


 Loading...
KODAK PIXPRO AZ401
DIGITAL CAMERA
User Manual

BEFORE YOU START
Declaration of Conformity
Responsible Party: |
JK Imaging Ltd. |
Address: |
JK Imaging Ltd., 17239 So. Main Street, Gardena, CA 90248 USA |
|
JK Imaging Europe, 71 Clarendon Road, Watford, WD17 1DS, UK |
Company Website: |
http://kodakpixpro.com |
For Customers in the U.S.A.
Tested to Comply with FCC Standards FOR HOME OR OFFICE USE
This device complies with part 15 of the FCC Rules. Operation is subject to the following two conditions: (1) This device may not cause harmful interference, and (2) this device must accept any interference received, including interference that may cause undesired operation.
For Customers in Europe
"CE" mark indicates that this product complies with the European requirements for safety, health, environment and customer protection. "CE" marked cameras are intended for sales in Europe.
This symbol [crossed-out wheel bin WEEE Annex IV] indicates separate collection of electrical waste and electronic equipment in the European countries. Please do not throw the equipment into domestic refuse. Please use the return and collection systems available in your country for proper, safe disposal of this product.
 Batteries: Please dispose of used batteries at designated collection centers.
Packaging: Please follow local regulations for the recycling of packaging.
1

About this Manual
Thank you for purchasing this KODAK PIXPRO Digital Camera. Please read this manual carefully and keep it in a safe place for future reference.
JK Imaging Ltd. reserves all rights of this document. No part of this published manual may be reproduced, transmitted, transcribed, stored in a retrieval system or translated into any language or computer language, in any form, by any means, without the prior written permission of JK
Imaging Ltd..
All trademarks mentioned in this manual are used for identification purposes only and are properties of their respective owners.
This manual provides you with instructions on how to use your new KODAK PIXPRO Digital
Camera. Every effort has been made to ensure that the contents of this manual are accurate, however JK Imaging Ltd. reserves the right to make changes without notice.
Throughout this manual, the following symbols are used to help you locate information quickly and easily:
Indicates useful information.
In the instructions below, the following symbols may be used throughout this manual on how to operate the camera. This is to facilitate better understanding.
Item properties The optional properties in the camera interface are indicated by the symbol .
2

SAFETY NOTES
Safety Notes for this Camera
Do not drop the camera or allow it to hit solid objects.
Do not attempt to disassemble or repair the camera.
Do not use or store the camera in dusty places or on a beach to prevent dust or sand from entering the camera, causing possible damage to it.
Do not use or store the camera in a hot environment or under direct sunlight.
Do not use or store the camera near a powerful magnetic field, for example near a magnet or transformer.
Avoid touching the lens of the camera.
Do not expose the camera to direct sunlight for a long period of time.
To prevent the camera from being damaged by moisture, do not use or store the camera in very humid environments, such as in rain or near bodies of water.
If water accidentally comes in contact with the camera, turn the camera off, remove the battery and the memory card, and dry it within 24 hours.
When you take the camera from a cold place to a warmer environment,
condensation may occur. Please wait for a reasonable period of time before you turn it on.
Before you remove the battery and memory card, the camera should be turned off.
When you clean the body of the camera, do not use abrasive, alcohol-based or organic cleaner.
Use a professional lens wiping cloth and dedicated cleaner to wipe and clean the lens.
Download your photos and remove the memory card when you are going to store the camera for a long period of time.
If this camera is not in use for a long time, please keep it in a dry and clean condition.
Our company will not pay compensation for any failure of playback of pictures or videos caused by improper operation.
3

Safety Notes for Battery
If battery fluid leaks inside the camera, contact our customer service department. If battery fluid leaks onto your skin, rinse your skin with clean water and seek immediate medical attention.
Disposal of used batteries should be carried out in accordance with the local (national or regional) regulations.
To prevent the battery from being damaged, do not drop the battery or allow it to hit solid objects or to be scratched by the objects.
Do not let the battery come in contact with metal objects (including coins) to avoid short circuiting, discharging, excessive heat, or possible leakage.
Do not attempt to disassemble the battery.
Do not expose the battery to water. Always keep the battery contacts dry.
Do not heat the battery or throw it into a fire to avoid a possible explosion.
Do not store the battery in a hot environment or in direct sunlight.
When the camera is stored for a long period of time, remove the battery and keep it in
a dry place that is not accessible to infants and children.
In a colder environment, the performance of the battery could be noticeably reduced.
When you install the battery, install it according to the positive and negative markings on the battery compartment.
Never force it into the battery compartment.
4

Safety Notes for Memory Card
We suggest buying only well-known, name brand memory cards to ensure peak performance.
Format the memory card using the camera before you use it or insert a new one.
Do not drop the memory card or allow it to hit solid objects to avoid damaging it.
Do not attempt to disassemble or repair the memory card.
Do not expose the memory card to water.
Always keep it dry.
Do not remove the memory card when the camera is turned on. Otherwise, the memory card could be damaged.
Do not directly edit the data on the memory card. Copy the data to your PC before you edit them.
When the camera is stored for a long period of time, be sure to download your photos and remove the memory card. Store it in a dry environment.
Do not modify the name of the files or folders of the memory card using your PC. Modifying the file names may cause the files to not be recognized on the camera or a possible error may occur.
A photo taken with the camera will be stored in the folder that is automatically generated on the memory card. Do not store photos that are not taken using this camera in these folders as the pictures cannot be recognized during the playback.
When you insert a memory card, make sure the notch of the card matches the markings on the top of the card slot.
5

Other Safety Notes
Do not disconnect the power or turn the product off during the update process. Doing so may cause incorrect data to be written and the product may not power on later.
Do not hang the neck strap of the camera around the neck of a child.
When using your product on an airplane, observe the relevant rules specified by the airline.
Due to the limitations of manufacturing technology, the LCD may have a few dead or bright pixels. These pixels do no effect the quality of the photos or video.
Do not expose the LCD to water. In a humid environment, only wipe it with a soft and dry cleaning cloth.
If the LCD is damaged, pay particular attention to the liquid crystal in the screen. If any of the following situations arise, take the recommended immediate action indicated below:
1.If liquid crystal comes in contact with your skin, please wipe with a dry cloth, wash thoroughly with soap, and rinse with plenty of clean water.
2.If liquid crystal gets into your eye, flush the eye immediately with plenty of clean water for at least 15 minutes and then seek for medical assistance.
3.If liquid crystal is swallowed, immediately flush your mouth thoroughly with clean water and induce vomiting. Seek for medical assistance.
6

CONTENTS
BEFORE YOU START............. |
1 |
SAFETY NOTES...................... |
3 |
CONTENTS............................. |
7 |
GETTING READY................... |
11 |
Accessories Included................................... |
11 |
Install lens cap and neck strap................... |
12 |
Part Names..................................................... |
13 |
Installing Battery and Memory Card......... |
15 |
Turn On / Off the Camera........................... |
17 |
How to take pictures.................................... |
17 |
Set your Language, Date/Time |
|
after the first power-on........................ |
18 |
Resetting your Language..................... |
18 |
Set your Language, Date/Time.................. |
18 |
Resetting Date/Time............................ |
19 |
MODE OVERVIEW................ |
20 |
|
Display Setting............................................... |
20 |
|
LCD Screen Display...................................... |
21 |
|
Overview of the screen icons in |
|
|
photo shooting mode........................... |
21 |
|
Overview of the screen icons in |
|
|
movie mode............................................ |
23 |
|
Overview of the screen icons in |
|
|
playback mode....................................... |
24 |
|
Using the Mode Dial..................................... |
25 |
|
Auto Mode..................................................... |
26 |
|
Program AE.................................................... |
27 |
|
Shutter Priority ............................................. |
27 |
|
Aperture Priority........................................... |
28 |
|
Manual Mode................................................ |
28 |
|
Face Beautifier............................................... |
29 |
|
Panorama Mode............................................ |
30 |
|
Scene Mode.................................................... |
31 |
|
Auto Scene Mode (ASCN) |
33 |
|
7 |
||
|
|
|

Custom Settings............................................ |
34 |
BASIC OPERATION.............. |
36 |
Using the Zoom Function............................ |
36 |
Focus Setting.................................................. |
37 |
Macro Mode.................................................. |
38 |
Self-timer Setting.......................................... |
39 |
Flash Mode .................................................... |
40 |
White Balance Setting................................. |
41 |
Continuous Shot............................................ |
42 |
EV Setting....................................................... |
43 |
Exposure Compensation...................... |
43 |
ISO............................................................ |
44 |
Shutter Adjustment.............................. |
44 |
Aperture Adjustment........................... |
45 |
Using Quick Recording................................ |
45 |
i Button Function Menu............................... |
46 |
8
PLAYBACK............................ |
47 |
Viewing Photos and Videos........................ |
47 |
Thumbnail View............................................ |
48 |
Using Zoom Playback (for still pictures |
|
only)................................................................. |
49 |
Photos and Video Deletion......................... |
50 |
Slideshow........................................................ |
51 |
USING THE MENUS.............. |
52 |
Photo Setup Menu........................................ |
52 |
Expo Metering (Exposure |
|
Metering)................................................ |
52 |
Image Size............................................... |
53 |
OIS............................................................ |
53 |
Cont. AF................................................... |
54 |
HDR.......................................................... |
54 |
Face Beautifier....................................... |
55 |
Scene........................................................ |
55 |
Photo Shooting Setting Menu.................... |
57 |

Quality..................................................... |
57 |
AF-Assist Beam..................................... |
58 |
Digital Zoom.......................................... |
58 |
Date Imprint........................................... |
59 |
Quick Review......................................... |
59 |
Custom Settings.................................... |
60 |
Face Detection....................................... |
60 |
Movie Menu................................................... |
61 |
Expo Metering (Exposure |
|
Metering)................................................ |
61 |
Video Quality......................................... |
62 |
OIS............................................................ |
62 |
Movie Setting Menu..................................... |
63 |
Custom Settings.................................... |
64 |
Digital Zoom.......................................... |
64 |
Playback Menu.............................................. |
65 |
Playback.................................................. |
66 |
HDR.......................................................... |
66 |
Touch-up................................................. |
67 |
Rotate...................................................... |
68 |
Resize....................................................... |
69 |
i button playback function.......................... |
70 |
Playback Setting Menu................................ |
71 |
Protect..................................................... |
72 |
Delete...................................................... |
73 |
DPOF (Digital Print Order Format)... |
74 |
Trim.......................................................... |
74 |
Setup Menu.................................................... |
75 |
Sound Settings....................................... |
75 |
Power Saver............................................ |
76 |
Power Saver............................................ |
76 |
Language................................................. |
76 |
World Time............................................. |
76 |
Date/Time.............................................. |
77 |
LCD Brightness...................................... |
77 |
Battery Type........................................... |
77 |
Format..................................................... |
78 9 |
|
|
|
|
....................................................File Settings |
78 |
Using the PictBridge Menu |
.........................88 |
Copy to Card.......................................... |
79 |
Print (without Date)............................. |
89 |
File Numbering...................................... |
79 |
Print Index............................................... |
90 |
Reset........................................................ |
80 |
Print DPOF Images................................ |
91 |
FW Version............................................. |
80 |
Exit............................................................ |
91 |
CONNECTIONS..................... |
81 |
APPENDICES........................ |
92 |
|
Connecting to a Computer.......................... |
81 |
|
Setting the USB Mode.......................... |
81 |
|
Transferring files to your computer... |
82 |
|
Video System................................................. |
83 |
|
Set Eye-Fi Card Connection Mode............. |
84 |
|
Supported HDMI Connections................... |
85 |
|
Connecting HDMI-Ready TV.............. |
85 |
|
Setting the USB Mode.......................... |
86 |
|
Connecting to a PictBridge Compatible |
|
|
Printer.............................................................. |
86 |
|
Connecting to your Printer.................. |
87 |
10 |
Print (with Date)................................... |
88 |
Specifications................................................. |
92 |
Prompts and Warning Messages............... |
96 |
Troubleshooting.......................................... |
100 |

GETTING READY
Accessories Included
Your camera box should contain the camera model you purchased along with the following accessories. If anything is missing or appears to be damaged, please contact your retailer.
AA alkaline battery ×4 |
Neck strap |
Lens cap with cord |
QuickStart Guid
e
STOP
Quick start guide |
Warranty card |
Service card |
11
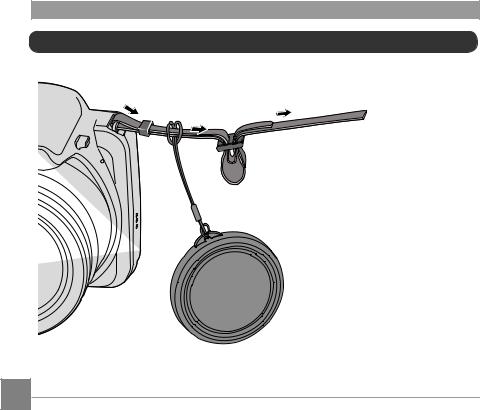
Install lens cap and neck strap


12
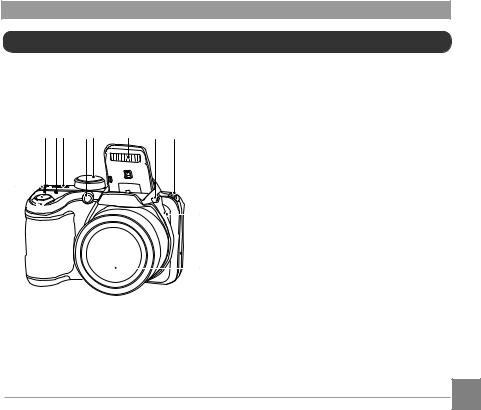
Part Names
4 |
5 6 |
7 8 |
9 |
10 |
3 |
3
2 


 1
1

11
 12 13
12 13
1 . Zoom Lever
2.Shutter Button
3.Strap Eyelet
4. Exposure Compensation Button
5.Continuous Shot Button
6.Power Switch
7.AF Assist Beam/Self-timer Lamp
8.Mode Dial
9.Flash Lamp
10. Flash Button
1 1 . Microphone
12. Speaker
13. Lens
13
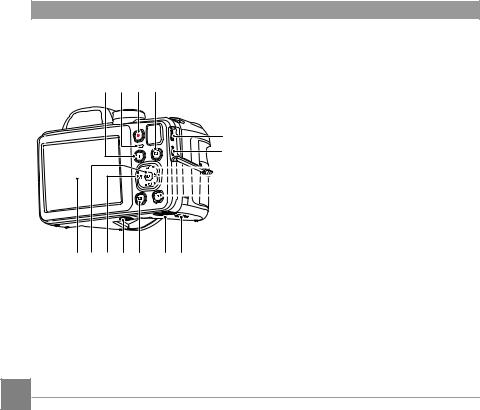
14 15 16 17
18
19
20
21
22
23
30 |
29 |
28 |
27 |
26 |
25 |
24 |
1 4. i Button
1 5. Indicator Lamp
1 6. Fast Video Recording Button
1 7. Menu Button
1 8. Micro USB Port
1 9. Micro HDMI Port
20. AF Button/Up Button
21 . Flash Button/Right Button
22. Delete Button/Self-timer Button/
Down Button
23. Display Button
24. Battery Cover Switch
25. Battery Cover
26. Playback Button
27. Tripod Socket
28. Macro Button/Left Button
29. SET Button
30. LCD
14
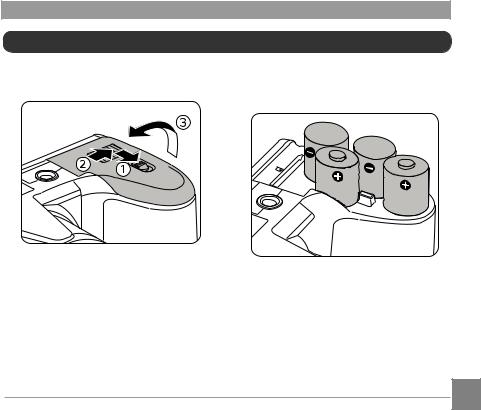
Installing Battery and Memory Card
1.Open the battery cover according to
, , .
2.Insert the batteries into the battery slot in the correct position as shown in the following diagram:
15
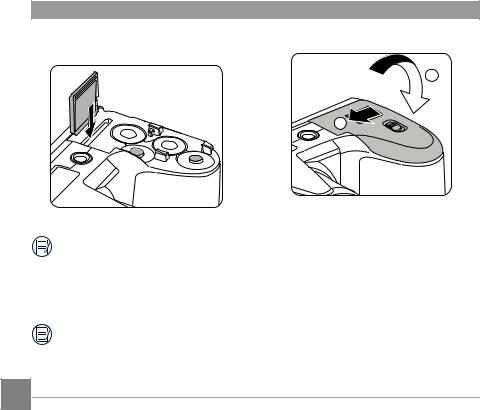
3.Insert the memory card into the memory card slot as shown in the diagram below:
4. Close the battery cover according to ,.
1
 Write Protection Buckle
2
The memory card (SD/SDHC) is optional and not included in all camera packaging.
It needs to be purchased separately. Please use an original memory card which is Class 4 or higher and has a capacity of 4GB to 32GB.
To remove your memory card, open the battery cover, gently press the memory card to eject it and remove it carefully.
16
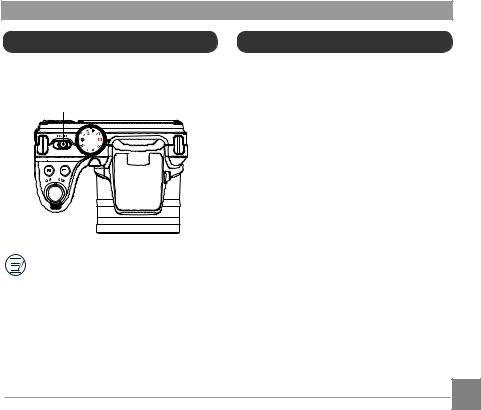
Turn On / Off the Camera
Slide the power switch to turn on/off the camera.
Power Switch
When the power is off, press and hold the  button to power on and enter playback mode.
How to Take Pictures
1.Hold the camera with both hands , not blocking the flash and lens by fingers.
2.Aim the camera at the object and then frame with the LCD.
3.Use the zoom lever to select Tele or Wide positions to zoom in or out on your subject.
4.Press the shutter button half way to focus on the subject. When the focus frame turns green, press the shutter button completely down to take the picture.
17
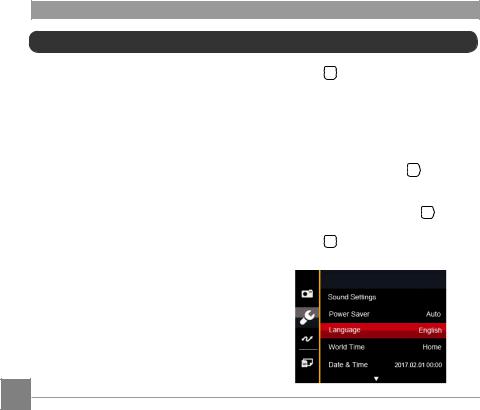
Set your Language, Date/Time
Set your Language, Date/Time after the first power-on
1.When you turn the camera on for the first time, the language selection screen appears.
2.Press the arrow buttons to select your desired language.
3.After you press the  button to confirm the selection, the Date/Time settings screen appears.
4.Press the left/right arrow buttons to select the Date/Time to be adjusted: Time is displayed in YYYY.MM.DD HH:MM.
5.Press the up/down arrow buttons to adjust the value for the selected Date/Time.
6.Press the  button to confirm the time settings and the snapshot screen appears.
Resetting your Language
After you set your language for the first time, follow the instructions below to reset your language.
1.Press the  button, press the up/down arrow buttons to select
  , and press the
  button to enter the menu.
2.Press the up/down arrow buttons to select
 , and press the
  button or right arrow button to enter the menu.
3.Press the up/down arrow buttons to select
Language and press the  button or right arrow button to enter the menu.
4.Press the arrow buttons to select your
desired language and press the  button to confirm.
5.Press the  button and the snapshot screen appears.
18
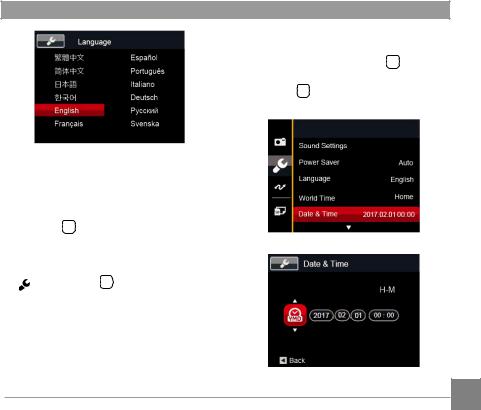
5. Press the up/down arrow buttons to press the value for your selected block. After you finish your settings, press the  button to confirm.
6. Press the  button and the following snapshot screen appears.
Resetting Date/Time
After you set your Date/Time for the first time, follow the instructions below to reset date and time.
1.Press the  button, press the up/down arrow buttons to select
  , and press the
 button to enter the menu.
2.Press the up/down arrow buttons to select
,and press the  button or right arrow button to enter the menu.
3.Press the up/down arrow buttons to select
Date & Time and press the  button or right arrow button to enter the menu.
4.Press the left/right arrow buttons to select the Date/Time to be adjusted: Time is displayed in YYYY.MM.DD HH:MM.
19

MODE OVERVIEW
Display Setting
Press the  button to display the settings: Classic, Full, Off.
Classic: Displays the camera parameters on screen
Off: Does not display any additional icons on screen
SD
1234 16M
|
|
00:56:00 |
|
F3.0 |
1/50 |
-0.3 EV |
400 ISO |
Full: Camera parameters with Grid and
Histogram
SD
|
|
|
1234 |
16M |
|
|
00:56:00 |
|
|
F3.0 |
1/50 |
-0.3 EV |
400 ISO |
|
20
LCD Screen Display
Overview of the Screen Icons in Photo
Shooting Mode
1 |
2 |
3 |
4 |
5 |
|
|
|
|
SD |
|
|
|
|
|
x1.0 |
|
|
6 |
|
|
|
|
|
|
7 |
18 |
|
|
|
|
|
8 |
|
|
|
1234 |
16M |
9 |
|
17 |
|
|
00:56:00 |
|
10 |
|
F3.0 |
|
1/50 |
-0.3 EV |
400 ISO |
|
|
16 |
15 |
14 |
13 |
12 |
11 |
|
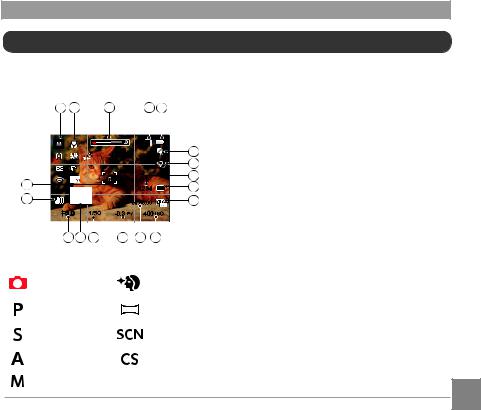
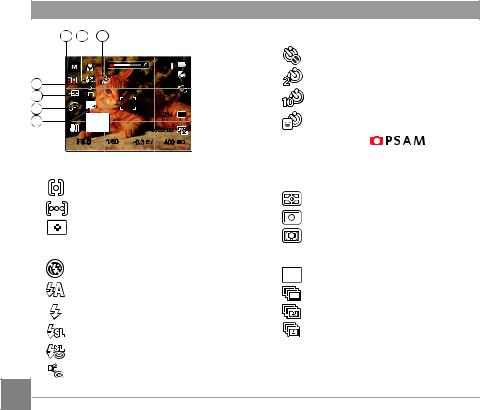
1 Shooting mode icons
Auto Mode |
Face Beautifier |
Program AE |
Panorama Mode |
Shutter priority |
Scene Mode |
Aperture priority |
Custom Settings |
Manual Mode |
|
2Macro mode
3Zoom Display (By turning the zoom lever)
4Memory card/Built-in memory
5Battery status
6White balance (Adjustable in 

 mode)
mode)
7Color Effect (Adjustable in 

 mode)
mode)
8Number of remaining shots
9Image size
10Video quality
11ISO value (Adjustable in 


 mode)
mode)
12Remaining recording time
13Exposure compensation (EV value) (Adjustable in 


 mode)
mode)
14Shutter speed (Adjustable in 
 mode)
mode)
15Histogram
16Aperture value (Adjustable in mode)
mode)
17Image stabilization
18 Focus frame |
21 |
|
19 |
20 |
21 |
|
|
|
21 Self-timer |
|
|
|
|
|
|
|
Self-timer Off |
|
|
|
|
|
SD |
|
|
|
|
|
|
x1.0 |
|
|
Self-timer 2 sec |
|
25 |
|
|
|
|
|
|
|
|
|
|
|
|
|
|
|
23 |
|
|
|
|
|
Self-timer 10 sec |
|
|
|
|
1234 |
16M |
Self-timer Smile |
|
|
22 |
|
|
|
|
|||
|
|
|
|
|
|
||
|
|
|
00:56:00 |
|
22 HDR (Adjustable in |
mode) |
|
|
F3.0 |
1/50 |
-0.3 EV |
400 ISO |
|||
19 AF mode |
|
|
|
|
23 Eye-Fi ON (with signal) |
|
|
|
|
|
|
|
|
||
|
Single-AF |
|
|
|
24 Expo metering |
|
|
|
|
|
|
AiAE |
|
||
|
Multi-AF |
|
|
|
|
||
|
|
|
|
Spot |
|
||
|
Object Tracking |
|
|
|
|||
|
|
|
Center |
|
|||
20 Flash mode |
|
|
|
|
|
||
|
|
|
|
25 Continuous Shot |
|
||
|
Force Off |
|
|
|
|
||
|
|
|
|
Single |
|
||
|
|
|
|
|
|
|
|
|
Flash Auto |
|
|
|
Continuous Shot |
|
|
|
|
|
|
|
|
|
|
|
Force Flash |
|
|
|
3 Shots |
|
|
|
Slow Sync. |
|
|
|
Time-Lapse (30sec/ 1min/ 5min/ |
||
|
Slow Sync. + Red-Eye |
|
10min) |
|
|||
|
|
|
|
||||
|
Red-Eye Reduction |
|
|
|
|||
22
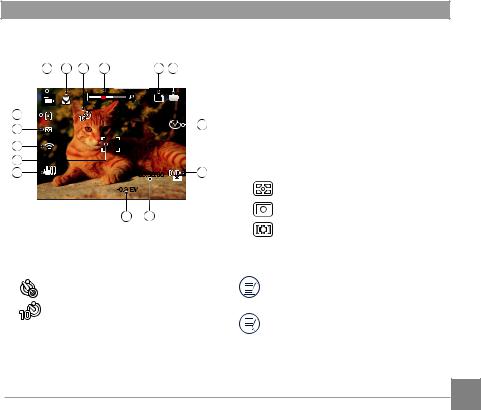
Overview of theScreen Icons in Movie
Mode
1 2 3 4 5 6
|
SD |
|
15 |
x3.4 |
|
7 |
||
14 |
||
|
13 |
|
|
12 |
|
|
11 |
00:56:00 |
8 |
|
-0.3 EV |
|
8Video quality
9Remaining recording time
10Exposure compensation (EV value)
11 Image stabilization
12 Focus frame
13 Eye-Fi ON (with signal)
14Expo Metering
AiAE
10 9
1Movie mode icons
2Macro mode
3Self-timer
Self-timer Off
Self-timer 10 sec
4Zoom display (by turning the zoom lever)
5Memory card/Built-in memory
6Battery status
7Color effect
Spot
Center
15 AF mode
Use an SD memory card with Class 4 or higher for the video recording.
Optical Zoom and Digital Zoom can be adjusted (160X in total). Digital Zoom can be adjusted to 4X .
23
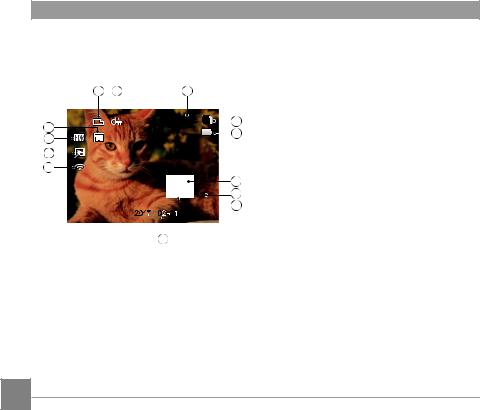
Overview of the Screen Icons in Playback Mode
1 |
2 |
|
3 |
|
|
|||
13 |
|
|
|
|
|
|
SD |
4 |
|
|
|
||||||
|
|
|
|
|
|
|
5 |
|
12 |
|
|
|
|
|
|
|
|
|
|
|
|
|
|
|
|
|
11 |
|
|
|
|
|
|
|
|
10 |
|
|
|
|
|
|
|
|
|
|
|
|
|
|
|
|
6 |
|
|
|
|
|
|
|
|
|
|
|
|
|
|
|
|
|
|
|
|
|
|
|
|
|
|
7 |
|
|
|
|
|
|
|
|
|
|
0 |
0 |
|
|
8 |
|||
|
|
|
|
|||||
|
9 |
|
|
|
|
|
||
1DPOF file
2File protection
3Memory space (indicating the current number of photos and total number of photos)
4Memory card/Built-in memory
5Battery status
6Zoom magnification area
7Image zoom ratios
8Image zone
9Shooting date
10Eye-Fi ON (with signal)
11Touch-up
12HDR
13Date folder
24
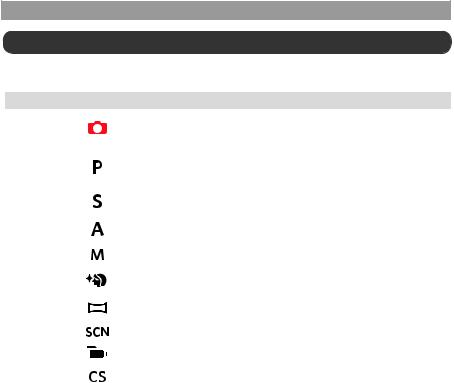
Using the Mode Dial
This camera provides a convenient mode dial that allows you to manually switch among different modes with ease. The available modes are listed below:
Mode Name |
Icon |
Description |
|
|
|
In this mode, the optimal conditions for taking pictures will be set based |
|
Auto Mode |
|
on the subject and environment. It is the most commonly used mode for |
|
|
|
taking pictures. |
|
|
|
Under different scenes, the user can switch the ISO and EV value |
|
Program AE |
|
according to personal preference, the camera can automatically set the |
|
|
|
shutter speed and aperture value. |
|
Shutter priority |
|
Setting allows you to choose a specific shutter speed so the camera will |
|
|
adjust the aperture automatically to ensure correct exposure. |
|
|
|
|
|
|
Aperture |
|
Allows you to choose a specific aperture and the camera will |
|
priority |
|
automatically adjust the shutter speed to match it. |
|
Manual Mode |
|
Many of the camera settings can be configured manually in this mode. |
|
|
|
|
|
Face Beautifier |
|
This mode automatically enhances facial features with skin softening |
|
|
touches and eye brightening capabilities. |
|
|
|
|
|
|
Panorama |
|
You can take a panoramic photo in this mode. |
|
Mode |
|
|
|
|
|
|
|
|
|
|
|
Scene Mode |
|
Choose from 12 different pre-set scene types and effects for your photos. |
|
|
|
|
|
Movie Mode |
|
Record videos. |
|
|
|
|
|
Custom |
|
The user can store the frequently used shooting modes and parameters |
|
Settings |
|
and switch to this mode for quick adjustment. |
|
|
25 |
||
|
|
|
|
|
|
|
|
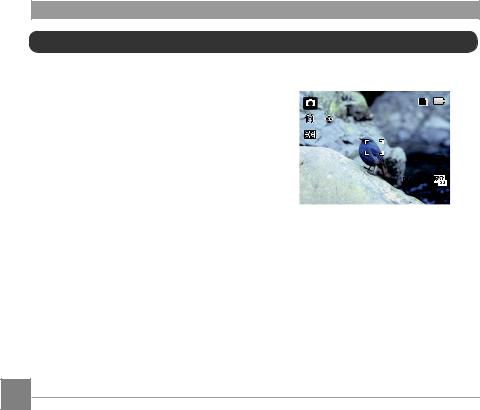
Auto Mode 
Auto mode is the easiest mode to take photos. While operating in this mode, the camera automatically optimizes numerous camera settings to adjust your photos and videos for the best possible results.
Follow these steps:
1.Turn the power switch to turn on the camera.
2.Turn the mode dial to  .
.
3.Compose your picture in the LCD and press the shutter button halfway down to focus on the subject.
4.The LCD will show a green focus frame when the subject is in focus.
5.Press the shutter button all the way down to take pictures.
SD
1234 
00:56:00
26

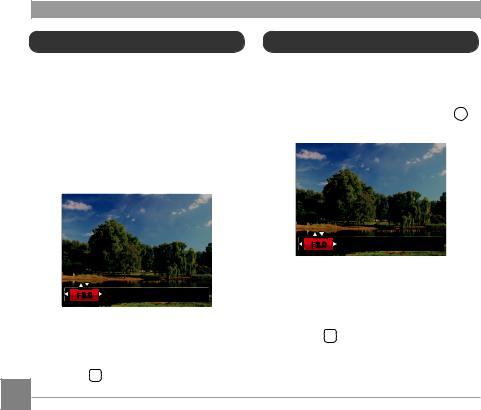
Program AE 
When  (Program AE) mode is selected, you can adjust the EV value and ISO value.
1.Turn the mode dial to  and press the
  button to configure settings.
F3.0 |
1/50 |
-2.0 EV |
100 ISO |
2.Press the left/right arrow buttons to select an adjustment item.
3.Press the up/down arrow buttons to adjust the parameters.
4.Press the  button to engage the settings and enter the shooting screen.
Shutter Priority 
When  (Shutter priority) is selected, you can adjust the shutter speed, ISO value and
EV value. The camera automatically sets the aperture value based on the shutter speed value and ISO value to get the most appropriate exposure value.
1.Turn the mode dial to  and press the
  button to configure settings.
F3.0 |
1/50 |
-1.3 EV |
100 ISO |
2.Press the left/right arrow buttons to select an adjustment item.
3.Press the up/down arrow buttons to adjust the parameters.
4 Press the |
button to confirm the settings |
|
and enter the shooting screen. |
27 |
|
|
|
|
|
|
|
Aperture Priority 
When selecting (Aperture priority) mode, you can adjust the aperture size / EV value and ISO value. Selecting a large aperture opening will emphasize the point of focus and show a blurry background and foreground.
A small aperture opening will keep both the background and main object in clear focus.
1.Turn the mode dial to and press the
  button to configure settings.
F3.0 |
1/50 |
-1.0 EV |
100 ISO |
2.Press the left/right arrow buttons to select an adjustment item.
3.Press the up/down arrow buttons to adjust the parameters.
4.Press the  button to confirm the settings
28 |
and enter the shooting screen. |
|
Manual Mode 
When selecting manual ( ) mode, you can set the aperture / shutter speed manually and ISO value.
1.Turn the mode dial to and press the
  button to configure settings.
F3.0 |
1/50 |
-1.0 EV |
100 ISO |
2.Press the left/right arrow buttons to select an adjustment setting.
3.Press the up/down arrow buttons to adjust the parameters.
4.Press the  button to confirm the settings and enter the shooting screen.

Face Beautifier 

In portrait mode, the camera is set to automatically adjust camera exposure for realistic portrayal of skin tones.
1.Turn the mode dial to select face beautifier mode ( 
 ).
).
2.Press the  button and press the up/down arrow buttons to select
 .
.
3.Press the left/right arrow buttons to select
face beautifier effects and press the  button to confirm and return to photo shooting mode.
 SD x3.6
1234 16M
00:56:00
-0.3 EV |
400 ISO |
Beautifier mode has 3 effects:
•
 Effect 1: Skin Soften
•
 Effect 2: Skin Soften + Eye Brightening
• 
 Effect 3: Skin Soften + Eye Brightening
+ Eye Enlargement
29
Loading...