


 Loading...
Kodak EasyShare C713/C813
zoom digital camera
User’s guide
www.kodak.com
For interactive tutorials, www.kodak.com/go/howto
For help with your camera, www.kodak.com/go/c713support,www.kodak.com/go/c813support

Eastman Kodak Company
Rochester, NY 14650
© Eastman Kodak Company, 2007
All screen images are simulated.
Kodak, EasyShare, and Perfect Touch are trademarks of Eastman Kodak Company.
P/N 2F6596_en
Product features
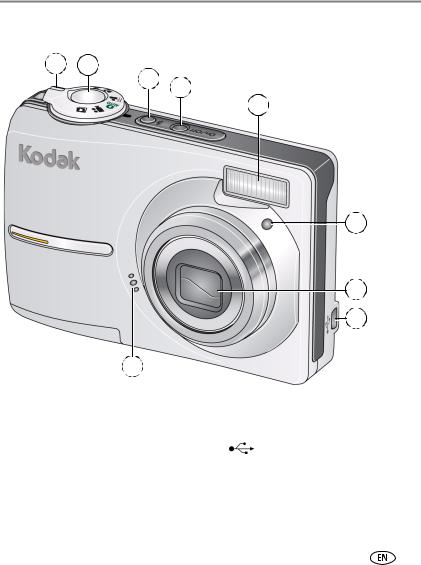
Front view
12
3 4
5
6
7
8
9
1 |
Mode dial |
6 |
Self-timer light |
2 |
Shutter button |
7 |
Lens |
3 |
Flash button |
8 |
USB |
4 |
On/Off button |
9 |
Microphone |
5Flash
www.kodak.com/go/support |
i |
Product features
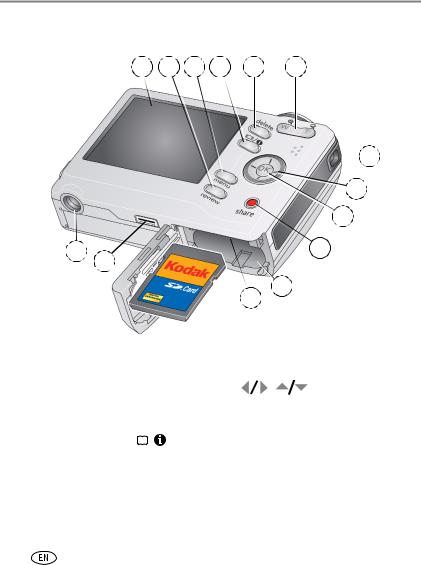
Back view
1 |
2 |
3 |
4 |
5 |
6 |
|
|
|
|
|
|
|
|
|
|
|
|
7 |
|
|
|
|
|
|
|
|
|
|
|
||
|
|
|
|
|
|
|
|
|
|
8 |
||
|
|
|
|
|
|
|
|
|
|
9 |
|
|
|
14 |
13 |
|
|
|
|
|
|
|
10 |
|
|
|
|
|
|
|
|
|
|
|
|
|
||
|
|
|
|
|
|
|
|
|
12 |
11 |
|
|
|
|
|
|
|
|
|
|
|
|
|
|
|
|
|
|
|
|
|
|
|
|
|
|
|
|
|
|
|
|
|
|
optional |
|
|
|
|
|
|
1 |
LCD |
|
|
|
|
|
|
8 |
|
|
|
|
2 |
Review button |
9 |
OK button |
|||||||||
3 |
Menu button |
10 |
Share button |
|||||||||
4 |
LCD/Info button |
|
|
|
|
11 |
Battery compartment |
|||||
|
|
|||||||||||
5 |
Delete button |
12 |
Slot for optional SD or MMC card |
|||||||||
6 |
Zoom button (Telephoto/Wide) |
13 |
Dock connector |
|||||||||
7 |
Strap post |
|
|
|
|
|
|
14 |
Tripod socket |
|||
ii |
|
|
|
|
|
|
|
|
www.kodak.com/go/support |
|||

Table of contents |
|
|
1 |
Setting up your camera ......................................................................... |
1 |
|
Attaching the strap ....................................................................................... |
1 |
|
Loading the battery ....................................................................................... |
1 |
|
Turning on the camera .................................................................................. |
2 |
|
Setting the language, date/time..................................................................... |
2 |
|
Storing pictures on an SD or MMC card ......................................................... |
3 |
2 |
Taking pictures/videos ........................................................................... |
4 |
|
Taking a picture ............................................................................................ |
4 |
|
Taking a video .............................................................................................. |
5 |
|
Using optical zoom ....................................................................................... |
6 |
|
Using the flash.............................................................................................. |
7 |
|
Using different picture-taking modes ............................................................. |
8 |
|
Using camera Help ...................................................................................... |
10 |
|
Understanding the picture-taking icons........................................................ |
11 |
3 |
Working with pictures/videos .............................................................. |
12 |
|
Reviewing pictures/videos ........................................................................... |
12 |
|
Deleting pictures/videos .............................................................................. |
14 |
|
Using Kodak Perfect Touch technology ........................................................ |
15 |
|
Cropping pictures........................................................................................ |
15 |
|
Editing videos ............................................................................................. |
16 |
|
Running a slide show .................................................................................. |
17 |
|
Copying pictures/videos............................................................................... |
19 |
|
Understanding the review icons................................................................... |
20 |
4 Doing more with your camera ............................................................. |
22 |
|
|
Changing picture-taking settings ................................................................. |
22 |
|
Customizing your camera ............................................................................ |
26 |
|
Using exposure compensation to adjust picture brightness ........................... |
28 |
|
Using the framing grid to compose a picture................................................ |
28 |
|
Sharing your pictures................................................................................... |
28 |
www.kodak.com/go/support |
iii |
|

Table of contents |
|
|
5 |
Transferring and printing pictures ....................................................... |
36 |
|
Installing the software................................................................................. |
36 |
|
Transferring pictures with the USB cable...................................................... |
37 |
|
Printing pictures.......................................................................................... |
38 |
|
Dock compatibility for your camera.............................................................. |
40 |
6 |
Troubleshooting .................................................................................. |
41 |
|
Camera problems........................................................................................ |
41 |
|
Camera/computer communications.............................................................. |
43 |
|
LCD screen messages .................................................................................. |
44 |
7 |
Getting help ........................................................................................ |
47 |
|
Helpful links................................................................................................ |
47 |
8 Appendix ............................................................................................. |
49 |
|
|
Camera specifications ................................................................................. |
49 |
|
Care and maintenance ................................................................................ |
51 |
|
Upgrading your software and firmware........................................................ |
52 |
|
Storage capacities ....................................................................................... |
52 |
|
Important safety instructions ....................................................................... |
52 |
|
Battery life .................................................................................................. |
53 |
|
Limited Warranty ........................................................................................ |
54 |
|
Regulatory compliance ................................................................................ |
56 |
iv |
www.kodak.com/go/support |
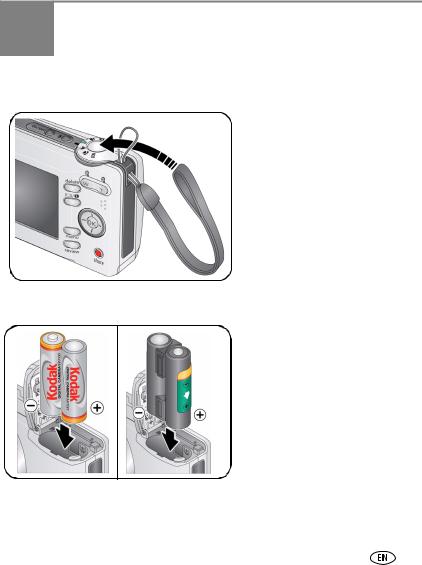
1 Setting up your camera
Attaching the strap
Loading the battery
• Kodak oxy-alkaline digital camera batteries AA
• Kodak Ni-MH rechargeable digital camera batteries AA
• Kodak Ni-MH rechargeable digital camera battery KAA2HR
• alkaline batteries AA
• lithium batteries AA
To replace batteries and extend battery life, see page 53.
www.kodak.com/go/support |
1 |
Setting up your camera
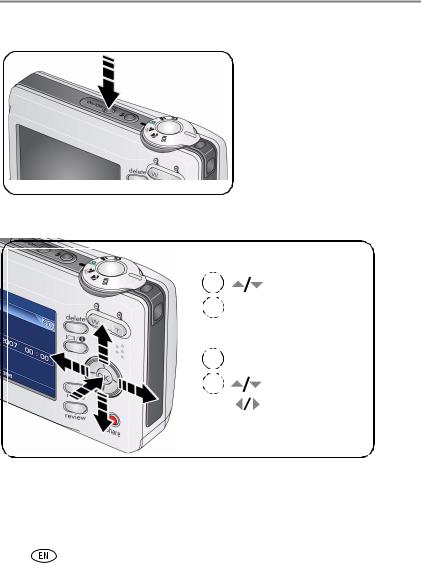
Turning on the camera
Setting the language, date/time
|
|
|
Language: |
|||
|
1 |
|||||
|
|
|
|
to change. |
||
|
|
|
|
|||
|
2 |
|
|
|
to accept. |
|
|
|
OK |
|
|||
|
1 |
Date/Time: |
||||
|
At the prompt, press OK. |
|||||
|
2 |
|
|
|
to change. |
|
|
|
|
|
|||
|
|
|
|
|
|
for previous/next field. |
|
|
|
|
|
|
|
|
|
|
|
OK |
|
to accept. |
|
|
|
|
|
|
|
NOTE: To change the date/time and language in the future, use the Menu button (see page 26).
2 |
www.kodak.com/go/support |

Setting up your camera
Storing pictures on an SD or MMC card
Your camera has internal memory. You can purchase an SD or MMC card to conveniently store more pictures and videos (www.kodak.com/go/c713accessories, www.kodak.com/go/c813accessories). We recommend Kodak SD or MMC cards.
NOTE: To choose a storage location for pictures and videos, see page 25.
1Turn off the camera.
2Insert or remove the optional card.
3Turn on the camera.
 CAUTION:
A card can only be inserted one way; forcing it may cause damage. If you insert or remove a card while the camera is accessing it, the card, pictures, or camera may be damaged.
See page 52 for storage capacities.
www.kodak.com/go/support |
3 |

2 Taking pictures/videos
Taking a picture
1 |
2 |
Press the Shutter button halfway to focus and set exposure.
When the framing brackets turn green, press the Shutter button completely down.
Framing brackets
Reviewing the picture just taken
After you take a picture or video, the LCD displays a quickview for approximately 10 seconds. (To exit the quickview sooner, press the Shutter button halfway.)
The picture is saved |
|
|
|
|
|
|
|
|
|
Delete |
|||
unless you press the |
|
|
|
|||
|
|
|
|
|
||
Delete button. |
|
|
|
Play a video. |
||
|
|
|
|
|
||
|
|
|
|
|
|
|
|
|
|
|
|
|
|
|
|
|
|
|
|
|
To review pictures/videos anytime, see page 12.
4 |
www.kodak.com/go/support |
Taking pictures/videos
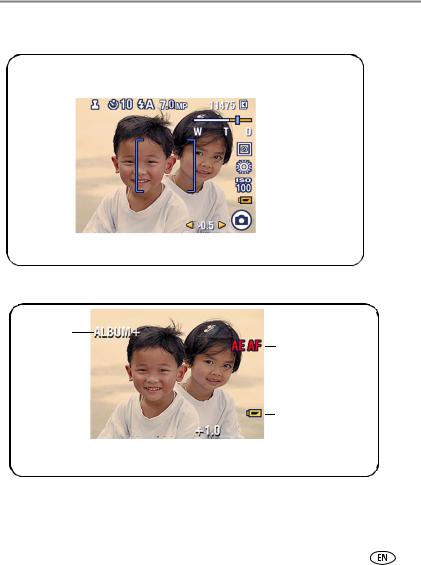
Using the framing marks to take pictures
Framing marks indicate the camera focus area. The camera attempts to focus on foreground subjects, even if the subjects are not centered in the scene.
Framing marks
1 Press the Shutter button halfway.
When the framing marks turn green, focus is accomplished.
2If the camera is not focusing on the desired subject (or if the framing marks disappear), release the Shutter button and recompose the scene.
3Press the Shutter button completely down to take the picture.
NOTE: Framing marks do not appear in all modes. When you use AF Zone and set Center Zone, the framing marks are fixed at Center Wide.
Taking a video
1 |
2 |
Press the Shutter button completely down and release.
To stop recording, press and release the Shutter button again.
To hear audio, transfer the video to your computer.
www.kodak.com/go/support |
5 |
Taking pictures/videos
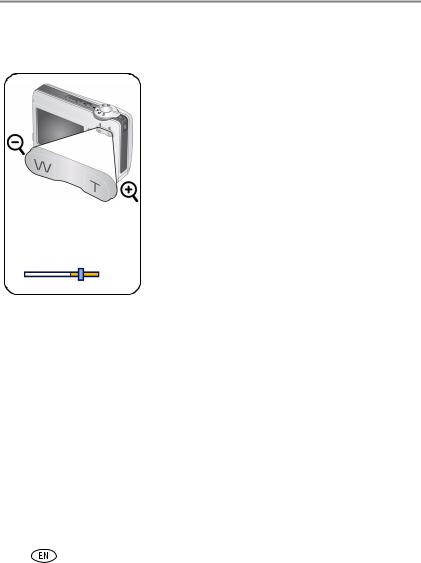
Using optical zoom
Use optical zoom to get up to 3X closer to your subject.
|
|
|
|
|
|
|
|
|
Optical |
|
|
Digital |
|||
|
zoom |
|
|
zoom |
|||
|
range |
|
|
range |
|||
|
|
|
|
|
|
|
|
|
|
|
|
|
|
|
|
|
|
|
|
|
|
|
|
|
W |
T |
|
D |
|||
1 Use the LCD to frame your subject.
2Press Telephoto (T) to zoom in. Press Wide Angle
(W) to zoom out.
The zoom indicator shows zoom status.
3 Take the picture or video.
NOTE: For focus distances, see Camera specifications, page 49.
■Always use the auto focus framing marks (see page 5).
■If you are using no zoom (1X, wide angle), you can be as close as 24 in. (60 cm) to your subject.
■As you zoom, you need to move further from your subject.
Using the digital zoom
Use digital zoom in any Still mode or during video recording to get up to 5X magnification beyond optical zoom.
1Press Telephoto (T) to the maximum optical zoom limit. Release the button, then press it again.
2 Take the picture.
NOTE: You may notice decreased image quality when using digital zoom. The slider on the zoom indicator turns red when the picture quality reaches the limit for an acceptable 4 x 6-in. (10 x 15 cm) print.
6 |
www.kodak.com/go/support |
Taking pictures/videos
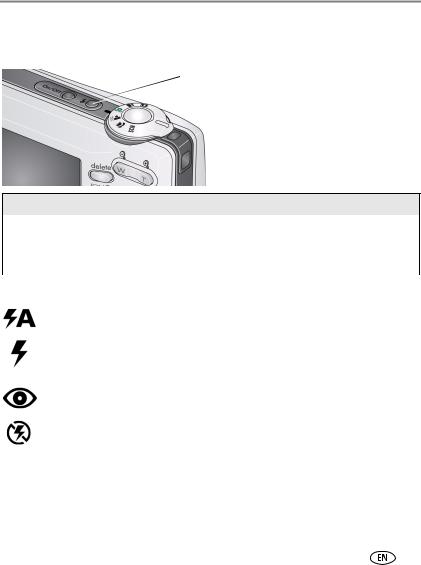
Using the flash
Use the flash when you take pictures at night, indoors, or outdoors in heavy shadows.
 Press the
  button repeatedly to scroll through flash modes (see Flash modes below).
The current flash mode appears in the LCD screen.
Flash-to-subject distance
|
Zoom position |
|
Flash distance |
|
Wide angle |
|
0.6–3.6 m (2–11.8 ft) @ ISO 200 |
|
|
|
|
|
Telephoto |
|
0.6–2.1 m (2–6.9 ft) @ ISO 200 |
|
|
|
|
|
|
|
|
|
Flash modes |
Flash fires |
|
|
Auto Flash |
When the lighting conditions require it. |
|
|
|
|
|
|
Fill |
Every time you take a picture, regardless of the lighting conditions. Use |
|
|
|
when the subject is in shadow or is “backlit” (when the light is behind |
|
|
|
the subject). In low light, hold the camera steady or use a tripod. |
|
|
|
|
|
|
Red-eye |
The flash fires twice—once, then again when the picture is taken. |
|
|
|
|
|
|
Off |
Never. |
|
|
|
|
|
www.kodak.com/go/support |
7 |
Taking pictures/videos
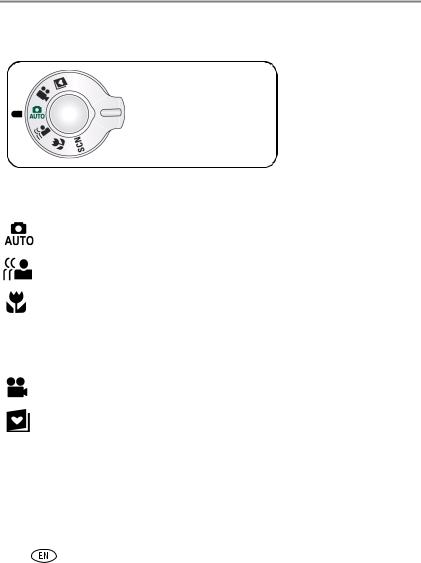
Using different picture-taking modes
Choose the mode that best suits your subjects and surroundings.
Use this mode |
For |
Auto |
General picture taking—offers an excellent balance of image quality |
|
and ease of use. |
|
|
Digital Image |
Minimizing the effects of camera shake and subject movement. |
Stabilization |
|
|
|
Close-up |
Close range. Use available light instead of flash if possible. The |
|
camera automatically sets the focus distance depending on the zoom |
|
position. |
|
|
SCN Scene |
Point-and-shoot simplicity when taking pictures under special |
|
conditions. (See page 9.) |
|
|
Video |
Capturing video with sound. (See page 5.) |
|
|
Favorites |
Reviewing favorite pictures. (See page 31.) |
|
|
8 |
www.kodak.com/go/support |

Taking pictures/videos
Scene modes
Choose a Scene mode—for great pictures in practically any situation!
1 Turn the Mode dial to Scene |
. |
||
2 Press |
to display Scene mode descriptions. |
||
|
If the mode description turns off before you finish reading it, press OK. |
||
3 Press OK to choose a Scene mode. |
|
||
|
|
|
|
|
Use this |
For |
|
|
SCN mode |
|
|
|
Portrait |
Full-frame portraits of people. |
|
|
|
|
|
|
Night |
Reducing red eye of people in night scenes or low-light conditions. Place the |
|
|
Portrait |
camera on a flat, steady surface or use a tripod. |
|
|
|
|
|
|
Landscape |
Far-away scenes. The camera uses infinity auto-focus. Auto-focus framing |
|
|
|
marks are not available in Landscape. |
|
|
|
|
|
|
Night |
Distant scenery at night. Flash does not fire. Place the camera on a flat, steady |
|
|
Landscape |
surface or use a tripod. |
|
|
|
|
|
|
Sports |
Subjects in motion. |
|
|
|
|
|
|
Snow |
Bright snow scenes. |
|
|
|
|
|
|
Beach |
Bright beach scenes. |
|
|
|
|
|
|
Text/ |
Documents. Focus is set to Auto Focus (see page 24). |
|
|
Document |
|
|
|
|
|
|
|
Backlight |
Subjects that are in shadow or “backlit” (when light is behind the subject). |
|
|
|
|
|
|
Manner/ |
Quiet occasions, like a wedding or lecture. Flash and sound are disabled. |
|
|
Museum |
|
|
|
|
|
|
|
Fireworks |
Bright, colorful light displays. Flash does not fire. Place the camera on a flat, |
|
|
|
steady surface or use a tripod. |
|
|
|
|
|
|
High ISO |
People indoors, in low-light scenes. Minimizes red eye. |
|
|
|
|
|
|
Children |
Action pictures of children in bright light. |
|
|
|
|
|
www.kodak.com/go/support |
9 |
||
Taking pictures/videos
Use this |
For |
SCN mode |
|
Flower |
Close-ups of flowers or other small subjects in bright light. Focus is set to Auto |
|
Focus (see page 24). |
|
|
Self- |
Close-ups of yourself. Assures proper focus and minimizes red eye. |
Portrait |
|
|
|
Sunset |
Capturing the deep hues seen at sunset. |
|
|
Using camera Help
To better understand each menu option, use camera Help. Highlight a menu choice, then press the 

 button.
Turn on/off Help
Scroll up/down
10 |
www.kodak.com/go/support |
Taking pictures/videos
Understanding the picture-taking icons
Flash |
|
|
|
|
|
|
|
Picture size |
|||||||
Self-timer |
|
|
|
|
|
|
|
|
|
|
|
|
Pictures/time remaining |
||
Date stamp |
|
|
|
|
|
|
|
|
|
|
|
|
|
Storage location |
|
|
|
|
|
|
|
|
|
|
|
|
|
|
|||
|
|
|
|
|
|
|
|||||||||
|
|
|
|
|
|
|
|
|
|
|
|
|
|
|
Zoom: Wide |
|
|
|
|
|
|
|
|
|
|
|
|
|
|
|
|
|
|
|
|
|
|
|
|
|
|
|
|
|
|
|
Telephoto |
|
|
|
|
|
|
|
|
|
|
|
|
|
|
|
Digital |
|
|
|
|
|
|
|
|
|
|
|
|
|
|
|
Exposure metering |
|
|
|
|
|
|
|
|
|
|
|
|
|
|
||
|
|
|
|
|
|
|
|
|
|
|
|
|
|
|
White balance |
|
|
|
|
|
|
|
|
|
|
|
|
|
|
||
|
|
|
|
|
|
|
|
|
|
|
|
|
|
|
ISO speed |
|
|
|
|
|
|
|
|
|
|
|
|
|
|
|
|
|
|
|
|
|
|
|
|
|
|
|
|
|
|
|
Low battery |
|
|
|
|
|
|
|
|
|
|
|
|
|
|
||
|
|
|
|
|
|
|
|
|
|
|
|
|
|
|
Camera mode |
|
|
|
|
|
|
|
|
|
|
|
|
|
|||
|
|
|
|
|
|
|
|
|
|
|
|
|
|
Exposure compensation |
|
|
|
|
|
|
|
|
|
|
|
|
|
|
|
||
|
|
|
|
|
|
|
|
|
|
|
|
|
|
||
In capture mode—shutter pressed halfway
Album
Auto Exposure/
Auto Focus warning
Low battery
 Exposure compensation
www.kodak.com/go/support |
11 |

3 Working with pictures/videos
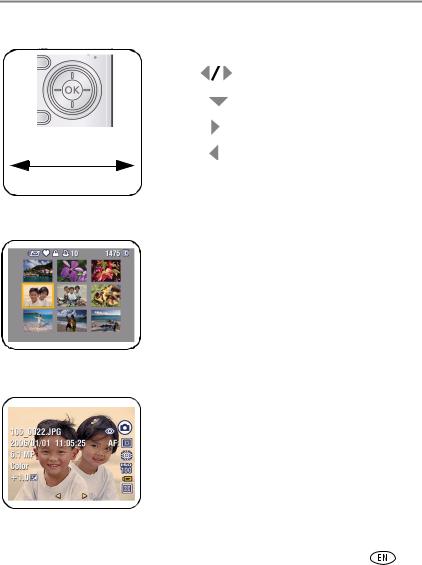
Reviewing pictures/videos
Press the Review button to view and work with your pictures/videos. Press Review again to exit.
Review
1 Press the Review button.
2Press  to view previous/next picture/video. To save battery power, use an optional Kodak EasyShare dock or Kodak 3-volt AC adapter. (Visit www.kodak.com/go/c713accessories, www.kodak.com/go/c813accessories).
NOTE: Pictures taken at a 3:2 picture size have a black bar at the top and bottom. Pictures taken at 16:9 picture size have a black bar at the sides. A video’s duration is displayed at the top of the LCD.
Magnifying pictures
1 Press the Review button.
2 Press W/T to magnify 2X–8X.
3Press 
 to view other parts of the picture.
4 Press OK to return to 1X.
NOTE: If you press |
while at 1X, the view changes from |
single-picture to multi-up thumbnails. (See page 13.) |
|
12 |
www.kodak.com/go/support |
Working with pictures/videos
Playing a video
|
Playback speed |
|
||
4X |
2X |
1X |
2X |
4X |
Reverse |
|
Forward |
||
1 |
Press the Review button. |
|
2 |
Press |
to find previous/next video. |
|
Press |
to play/pause. |
|
Press |
during playback to play at 2X, 4X. |
|
Press |
to reverse at 2X, 4X. |
NOTE: To hear audio, transfer the video to your computer.
Viewing thumbnails (multi-up)
1 Press the Review button.
2Press  to change from single-picture view to multi-up thumbnails.
3 Press OK to return to single-picture view.
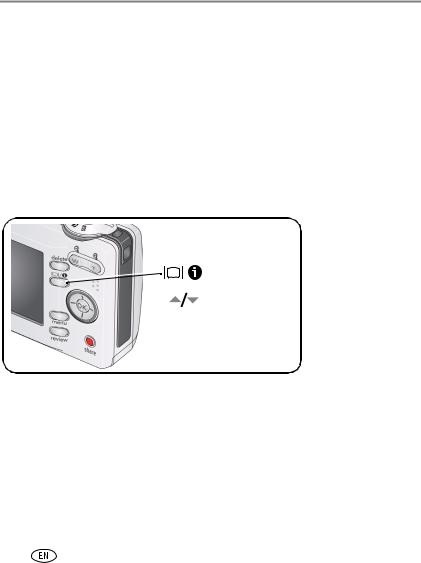
Viewing picture/video information
1 Press the Review button.
2 Repeatedly press the LCD/Info 

 button to turn on/off status icons and picture/video info.
www.kodak.com/go/support |
13 |
Working with pictures/videos
Deleting pictures/videos
1 Press the Review button.
2 Press  for previous/next picture/video.
3 Press the Delete button.
4 Follow the screen prompts.
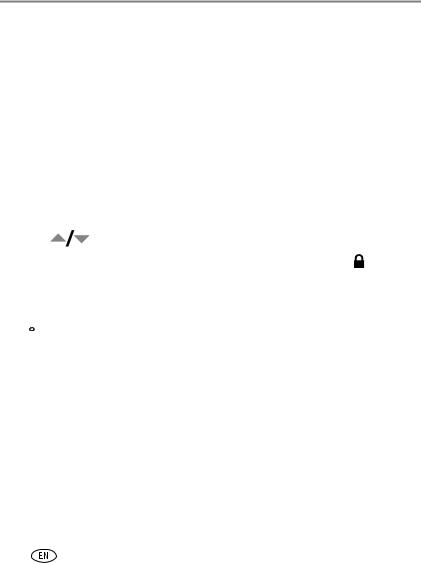
Protecting pictures/videos from deletion
1 Press the Review button.
2 Press  for previous/next picture/video.
3 Press the Menu button.
4 Press |
to highlight Protect, then press OK. |
|
The picture/video is protected and cannot be deleted. The Protect icon |
appears |
|
with the protected picture/video. |
|
|
■ Press the Menu button to exit the menu.
 CAUTION:
Formatting internal memory or an SD or MMC card deletes all (including protected) pictures/videos. (Formatting internal memory also deletes email addresses, album names, and favorites. To restore them, see EasyShare software Help.)
14 |
www.kodak.com/go/support |
Working with pictures/videos
Using Kodak Perfect Touch technology
Kodak Perfect Touch technology helps ensure better, brighter pictures.
1 Press the Review button, then  for previous/next picture.
2 Press the Menu button. Press |
to highlight Edit Picture, then press OK. |
3Press  to highlight Perfect Touch tech., then press OK.
The enhancement is previewed in a split screen. Press  to view other parts of the picture.
4Press OK. Follow the screen prompts to replace the original picture or to save the enhanced picture as a new one.
NOTE: You cannot enhance previously enhanced pictures.
■Press the Menu button to exit the menu.
Cropping pictures
You can crop a picture so that only the desired portion of the picture remains.
|
|
1 |
Press the Review button, then |
to find a |
|||
|
|
|
|
|
picture. |
|
|
|
|
|
|
|
|
|
|
|
|
|
|
|
Press the Menu button. Press |
to |
|
|
|
|
|
2 |
|||
|
Picture |
Cropped picture |
highlight Edit Picture, then press OK. |
|
|||
|
|
3 |
Press |
to highlight Crop, then press OK. |
|||
4 Press Telephoto (T) to zoom in, or |
to move the crop box. Press OK. |
||||||
5Follow the screen prompts.
The picture is cropped. The original is saved. (Cropped pictures cannot be cropped again.)
■Press the Menu button to exit the menu.
www.kodak.com/go/support |
15 |
Loading...