


 Loading...
KODAK DIGITAL SCIENCE™
8650/8650 PS Color Printer
Operator’s Guide
Part No. 1H9657
Radio Frequency Interference
This equipment generates, uses, and can radiate radio frequency energy. If it is not installed and used in accordance with the User’s Guide, this energy may cause interference to radio and television reception.
This equipment has been type tested and found to comply with the following:
This device meets FCC Class B emission limits for verification pursuant to Part 15 of the Federal Communications Commission Rule of the United States.
“The class B limits for radio noise emissions from digital apparatus as set out in the interference– causing equipment standard entitled “Digital Apparatus”, ICES-003 of the Department of Communications.”
“Cet appareil numérique respecte les limites de bruits radioléctriques applicables aux appareils numériques de Classe B prescrites dans la norme sur le matriél brouilleur : “Appareils Numériques”, NMB-003 édicté par le minstre des Communications.”
•47CFR Part 15 SubPart B (North American - USA) - Class B or “meets Class B limits for verification”
•ICES-003 (North American - Canada) - Class B
•VCCI-2 (Japan) - Class B
This equipment is in the 2nd class category (information equipment to be used in a residential area or an adjacent area thereto) and conforms to the standards set by the Voluntary Control Council For Interference by Data Processing Equipment and Electronic Office Machines aimed at preventing radio interference in such residential areas. When used near a radio or TV receiver, it may become the cause of radio interference. Read the instructions for correct handling.
Requirements of the EMC directive 89/336/EEC were met through compliance with the following:
•EN50081-1 (European - EU) consists of:EN55022 (class B)
•EN50082-1 (European - EU) consists of:IEC 801 - 2/91 (ESD) IEC 801 - 3/84
(rf immunity)
IEC 801 - 4/88 (EFT)
“Changes or modifications not expressly approved by the party responsible for compliance could void the user’s authority to operate the equipment.”
Regulatory Information
The foregoing limits are designed to provide reasonable protection against harmful interference when operated in a residential installation. However, there is no guarantee that interference will not occur in a particular location. If this equipment does cause interference to radio or television reception (determined by turning the equipment off and on), you are encouraged to try to correct the interference by one or more of the following measures:
•Reorient or relocate the receiving antenna
•Relocate the printer with respect to the receiver
•Move the printer away from the receiver
•Plug the printer into a different outlet so that the receiver and printer are on different branch circuits
If problems persist, consult an experienced radio/television technician for additional suggestions. You may also find the following booklet, prepared by the Federal Communications Commission, helpful: “How to Identify and Resolve Radio-TV Interference Problems.” This booklet can be purchased by contacting the Superintendent of Documents, U.S. Government Printing Office, Washington, DC 20402.
Important
This equipment was tested using shielded interface cables. The use of these cables is required to reduce the possibility of causing interference to radio and television reception.
Das Gerät ist gemäß Amtsblattberfügung 243/91 funkenstört und wurde der Deutschen Bundespost gemeldet. Kodak AG, Stuttgart.
DIESES GERÄT WURDE SOWOHL EINZELN ALS IN EINER ANLAGE, DIE EINEN NORMALEN ANWENDUNGSFALL NACHBILDET, AUF DIE EINHALTUNG DER FUNKENTSTÖRBESTIMMUNGEN GEPRÜFT. ES IST JEDOCH MÖGLICH, DASS DIE FUNKENSTÖRBESTIMMUNGEN UNTER UNGÜNSTIGEN UMSTÄNEN BEI ANDEREN GERÄTEKOMBINATIONEN NICHT EINGEHALTEN WERDEN. DER BETREIBER IST FÜR DIE EINHALTUNG DER FUNKENTSTÖRUNGS BESTIMMUNGEN SEINER GESAMTEN ANLAGE VERANTWORTLICH, IN DER DIESES GERÄT BETRIEBEN WIRD.
This equipment has been tested and found to comply with the following:
UL 1950
CSA 950
TUV EN60950

Safety Regulations
The following symbol has been placed on areas of the printer where electrical shock is possible. Take extra precautions in these areas.
Table of contents
About this guide ......................................................................................... |
i |
Using this guide ........................................................................................................ |
i |
About the other guides included with the printer ..................................................... |
ii |
Getting help or additional information ..................................................................... |
iii |
Introduction ............................................................................................. |
1-1 |
About printer memory ........................................................................................... |
1-1 |
Media and image size .......................................................................................... |
1-2 |
Interfaces ............................................................................................................. |
1-3 |
Printer drivers and export modules ...................................................................... |
1-4 |
Fonts .................................................................................................................... |
1-5 |
Resident fonts ......................................................................................... |
1-5 |
Setting up the printer ............................................................................. |
2-1 |
Finding a location for the printer ........................................................................... |
2-2 |
Unpacking the printer ........................................................................................... |
2-3 |
Cleaning the print head ........................................................................................ |
2-5 |
Loading the ribbon ............................................................................................... |
2-8 |
Handling the ribbon ................................................................................. |
2-8 |
Storing the ribbon .................................................................................... |
2-8 |
Loading ribbon in the printer ................................................................... |
2-9 |
Unpacking and adjusting the paper tray ............................................................. |
2-12 |
Working with media ............................................................................... |
2-12 |
Storing media ........................................................................................ |
2-12 |
Paper and humidity ............................................................................... |
2-12 |
Loading media .................................................................................................... |
2-14 |
Putting the dust cover on ...................................................................... |
2-17 |
Connecting the cables ........................................................................................ |
2-18 |
Connecting a parallel cable .................................................................. |
2-19 |
Connecting a LocalTalk cable ............................................................... |
2-19 |
Connecting a SCSI cable ...................................................................... |
2-20 |
Connecting the power cord ................................................................................ |
2-22 |
Checking and changing printer settings ............................................................. |
2-23 |
Changing the operating mode .............................................................. |
2-23 |
Changing the media settings ................................................................ |
2-24 |
About printer initialization ................................................................................... |
2-26 |
If the printer does not initialize itself ...................................................... |
2-26 |
Making a test print ............................................................................................. |
2-27 |
What’s next ........................................................................................................ |
2-27 |
Operating the printer ............................................................................. |
3-1 |
Looking at the display panel ................................................................................ |
3-2 |
Working with the printer settings .......................................................................... |
3-4 |
Working in Setup mode .......................................................................... |
3-6 |
About specifying port information ........................................................... |
3-6 |
Working with media ............................................................................................. |
3-8 |
Printing from computer applications .................................................................. |
3-15 |
Scheduling jobs ................................................................................................. |
3-16 |
Handling and storing prints and transparencies ................................................ |
3-17 |
Cleaning the printer ........................................................................................... |
3-18 |
Keeping the printer in good working order ......................................................... |
3-19 |
Working with the printer ..................................................................................... |
3-19 |
Troubleshooting the printer ................................................................... |
4-1 |
Error messages and how to resolve them ........................................................... |
4-2 |
When mismatches occur ..................................................................................... |
4-8 |
Ribbon type mismatch ............................................................................ |
4-8 |
Receiver type mismatch ......................................................................... |
4-8 |
Receiver size mismatch .......................................................................... |
4-8 |
If the printer is not operating correctly ................................................................. |
4-9 |
Clearing the paper path ...................................................................................... |
4-11 |
Cleaning the pick rollers ..................................................................................... |
4-14 |
Cleaning the sensors ......................................................................................... |
4-16 |
Repacking the printer ......................................................................................... |
4-17 |
Getting additional help ....................................................................................... |
4-19 |
Appendix A Printer specifications/site requirements ......................... |
A-1 |
Printer specifications .............................................................................. |
A-1 |
Space requirements ............................................................................... |
A-1 |
Operating environment ........................................................................... |
A-2 |
Power requirements ............................................................................... |
A-2 |
Appendix B Accessories and supplies ................................................ |
B-1 |
Accessories ............................................................................................ |
B-1 |
Supplies ................................................................................................. |
B-1 |
Ribbons .................................................................................................. |
B-2 |
Paper ...................................................................................................... |
B-3 |
Transparency material ........................................................................... |
B-4 |
Appendix C Customizing the printer .................................................... |
C-1 |
Adding an external hard drive ............................................................................. |
C-2 |
Installing the hard drive .......................................................................... |
C-2 |
Initializing the hard drive ........................................................................ |
C-3 |
Downloading additional fonts to the hard drive ...................................... |
C-5 |
Adding memory to the printer .............................................................................. |
C-8 |
Preparing to install a SIMM .................................................................... |
C-8 |
Installing the SIMM card ....................................................................... |
C-12 |
Finishing up .......................................................................................... |
C-13 |
Index
About this guide
The guide provides the information you need to set up, operate, maintain, and troubleshoot the KODAK DIGITAL SCIENCE™8650/8650 PS Color Printer.
This guide is intended for owners and operators of the KODAK DIGITAL SCIENCE 8650/8650 PS Printer.
Using this guide
This guide is organized as follows:
Chapter 1 Introduction—describes the printer and the different memory configurations of the printer. Talks about resident and non-resident fonts.
Chapter 2 Setting up the printer—explains how to unpack and set up the printer and how to get it ready to use. Also tells how to handle, store and load ribbon and media, and how to clean the printer (includes how to clean the thermal print head).
Chapter 3 Operating the printer—tells how to use the display panel, how to work with the printer settings, and how to handle and store finished prints and transparencies.
Chapter 4 Troubleshooting the printer—describes and tells how to handle error and print mismatch messages. Provides solutions to common operational problems and explains how to clear the paper path. Lists where to go for additional help.
October 1997 |
i |

About this guide
Appendix A Printer and site specifications —lists printer specifications and the site specifications
Appendix B Accessories and supplies—lists accessories and supplies for the printer, and tells how to order them.
Appendix C Customizing the printer—tells how to enhance the operation of the printer by connecting an external hard drive and by adding additional memory.
About the other guides included with the printer
The other guides included with the printer are—
•KODAK DIGITAL SCIENCE 8650 PS Color Printer Driver User’s Guide—provides information about setting up and using the ADOBE® PostScript™ Driver with PCs running Microsoft WINDOWS 3.1, PCs running WINDOWS 95, and Macintosh computers. Also provides color management information and application-related information.
•KODAK DIGITAL SCIENCE 8650 Color Printer Export Module for ADOBE PHOTOSHOP User’s Guide—provides information about installing and using the export modules for the 8650 Printer with PCs running Microsoft WINDOWS 3.1, PCs running WINDOWS 95, and Macintosh computers.
ii |
October 1997 |

Getting help or additional information
Your Kodak dealer is the best source for information about setting up, operating, and obtaining accessories and supplies for your printer. Please contact your dealer with any questions you have.
Dealer Name ________________________________________
Dealer Telephone Number _____________________________
In addition, for technical support see Kodak’s web site at www.kodak.com or call 1-800-23KODAK (1-800-235-6325) between 9:00 a.m. and 8:00 p.m. Eastern Standard Time on regular business days. Contact this number for
•help setting up or operating the printer
•where to obtain supplies
•where to obtain service
•information about software/printer interaction
•warranty information
•information about other Kodak products
The FAX back number for product literature is 1-800-508-1531. You may call this number 7 days a week, 24 hours a day.
October 1997 |
iii |
1 Introduction
Thank you for purchasing the KODAK Digital Science 8650/8650 PS
Color Printer.
The KODAK Digital Science 8650 Printer operates only in raster mode. The 8650 PS Printer is a PostScript language printer that also operates in raster mode. You can purchase an upgrade kit for the 8650 Printer that allows it to operate in both raster and PostScript modes.
The 8650/8650 PS Color Printer is a thermal dye diffusion device with superior printing speed. It contains a 33 MHz MIPS RISC processor, has a resolution of 300 dots per inch (DPI), and prints a three or fourcolor page in about 75 seconds. Printed images are high-contrast and long lasting. KODAK EKTATHERM XTRALIFE Ribbon (available with 3-color ribbon) can be used to protect images from fingerprints.
About printer memory
You can purchase the 8650/8650 PS Printer with 32 MB or 48 MB of memory. You can add memory to the printer to a maximum of 64 MB.
If your printer has 32 MB of memory, you can print all image sizes for three-color or black ribbons. You cannot, however, print CMYK images with 4-color ribbon. In addition, your ability to process one job while printing another is limited.
If your printer has 48 MB of memory, you can print all image sizes for all ribbons. With 48 MB of memory, you can process one job at the same time you are printing another while you are using 12-inch ribbon.
If your printer has 64 MB of memory, you can process and print jobs of all sizes at the same time.
October 1997 |
1-1 |

Introduction
Media and image size
The printer can print on the following sizes and types of KODAK EKTATHERM XLS Print Paper and on the following sizes of KODAK EKTATHERM XLS Transparency Material.
See Chapter 3 for illustrations of the maximum image size for each.
Paper/Transparency size |
Maximum image size |
|
|
8.5 x 11 (216 x 279 mm) - A |
8 x 8.93 |
paper (photographic grade) and trans- |
(204 x 228 mm) |
parency material |
|
|
|
8.27 x 11.69 (210 x 297 mm) - A4 |
8.0 x 9.6 |
paper (photographic grade) and |
(204 x 246 mm) |
transparency material |
|
|
|
8.5 x 12 (216 x 307 mm) - A (long) |
8 x 10 |
paper (photographic grade) and |
(204 x 256 mm) |
transparency material |
|
|
|
8.27 x 12 (210 x 307 mm) - A4 (long) |
8 x 10 |
paper (photographic grade) and |
(204 x 256 mm) |
transparency material |
|
|
|
8.5 x 14 (216 x 358 mm) - A (xlong) |
8 x 12 |
paper (photographic grade) and |
(204 x 307 mm) |
transparency material |
|
|
|
8.27 x 14 (210 x 358 mm) - A4 (xlong) |
8 x 12 (204 x 307 mm) |
paper (photographic grade) and |
|
transparency material |
|
|
|
9.5 x 14 (243 x 358 mm) - paper only |
Raster mode: |
—Photographic grade |
8.5 x 12 |
—Commercial grade |
(217 x 307 mm) |
—Publication grade |
PostScript mode: |
|
8.5 x 12 |
|
(217 x 307 mm) |
|
|
1-2 |
October 1997 |

Introduction
Interfaces
Standard communication ports are provided. In addition, the optional KODAK Network Interface Card lets you tie your printer into networks using Ethernet cabling.
The following interfaces are provided with the printer.
Interface Type |
Printer Mode |
|
|
Centronics Parallel |
Raster and PostScript |
|
|
LocalTalk |
PostScript only |
|
|
SCSI |
Raster only |
|
|
The following 16 MB Ethernet interfaces are provided by the Network
Interface Card.
Interface Type |
Version |
Printer Mode |
|
|
|
EtherTalk |
Phase 1 and Phase 2 |
Raster and PostScript |
|
|
|
Novell NetWare |
The following versions of |
Raster and PostScript |
|
Novell NetWare for Clients: |
|
|
NetX, VLM, and MSIPX. |
|
|
|
|
TCP/IP |
lpr |
Raster and PostScript |
|
|
|
October1997 |
1-3 |

Introduction
Printer drivers and export modules
The printer drivers and export modules developed for the 8650/8650 PS Printer are based on high-quality Kodak photographic printing methods. The color–rendering processes that evolved are highly sophisticated.
Using the drivers and export modules will allow you to access advanced printing options based on Kodak color science.
The following printer drivers are provided for printers operating in PostScript mode. For information about installing and using the drivers, refer to the Printer Driver User’s Guide.
•KODAK DIGITAL SCIENCE 8650 PS PostScript Driver for WINDOWS 3.1
•KODAK DIGITAL SCIENCE 8650 PS RGB PostScript Driver for WINDOWS 95
•KODAK DIGITAL SCIENCE 8650 PS CMYK PostScript Driver for WINDOWS 95
•KODAK DIGITAL SCIENCE 8650 PS Color Printer Driver for MACINTOSH Computers
The following export modules are provided for printers operating in raster mode. For information about installing and using the export modules, refer to the Export Module User’s Guide.
•KODAK DIGITAL SCIENCE 8650 Export Module for ADOBE PHOTOSHOP and WINDOWS 3.1
•KODAK DIGITAL SCIENCE 8650 Export Module for ADOBE PHOTOSHOP and WINDOWS 95
•KODAK DIGITAL SCIENCE 8650 Export Module for ADOBE PHOTOSHOP and MACINTOSH Computers
Additional printer drivers are available through third party developers. For third party products, refer to the KODAK Third Party Digital Imaging Solutions Catalog on the Kodak Web site at http://www.kodak.com. Search on solutions catalog.
1-4 |
October 1997 |

Introduction
Fonts
Thirty-five screen fonts are resident on PostScript versions of the printer. You can also connect an external hard drive to the printer for font storage. See Appendix C for more information.
Resident fonts
The following fonts are resident on PostScript versions of the printer.
•Courier, Courier Oblique, Bold, Bold Oblique
•Helvetica, Helvetica Oblique, Bold, Bold Oblique
•Times Roman, Times Italic, Bold, Bold Italic
•Helvetica Narrow, Narrow Oblique, Narrow Bold, Narrow Bold Oblique
•ITC Avant Garde Gothic Book, Book Oblique, Demi, Demi Oblique
•ITC Bookman Light, Light Italic, Demi, Demi Italic
•ITC Zapf Chancery Medium Italic
•ITC Zapf Dingbats
•New Century Schoolbook Roman, Italic, Bold, Bold Italic
•Palatino Roman, Italic, Bold, Bold Italic
•Symbol
October1997 |
1-5 |
2 Setting up the printer
This chapter explains how to set up the KODAK DIGITAL SCIENCE 8650/8650 PS Color Printer. These steps are:
•Finding an appropriate location for the printer
•Unpacking the printer
•Removing the shipping tape and shipping pins
•Cleaning the print head
•Loading ribbon
•Unpacking and adjusting the paper tray
•Connecting the interface cables
•Connecting the power cord and turning the printer on
•Checking and changing the printer settings
The printer drivers and export module that enable you to take full advantage of the printer’s capabilities are on the CD-ROM shipped with the printer. After you set up the printer and before you use it, you should install the printer drivers and the export module.
This chapter does not explain how to install the printer drivers or the export module. For this information, refer to the user’s guide for the export module or the printer driver.
October 1997 |
2-1 |
Setting up the printer
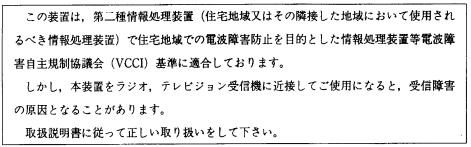
Finding a location for the printer
As you look for an appropriate location for the printer, keep the following guidelines in mind. Refer to Appendix A for site requirements.
•Allow two inches (about 5 cm) on all sides of the printer for easy access.
•Place the printer so that air flow is not blocked.
•Airborne dirt particles can cause image quality problems. Avoid placing the printer in areas where ventilation ducts, open doors, or frequent passers–by might expose the printer and media to high levels of debris.
The space requirements for the printer are shown below.
2-2 |
October 1997 |

Setting up the printer
Unpacking the printer
The following items are included with the printer. If any are missing, contact your place of purchase.
•Paper tray
•Power cords (3)
•Plastic dust cover
•Universal language kit with: —4 thermal head cleaning pads
—SCSI terminator
—Picker roller cleaning kit (includes 10 water pads)
—Protective overnight cover (blue)
—Set of user’s guides— Operator’s Guide, Printer Driver Guide, and Export Module Guide—printed in English.
—CD ROM containing user’s guides in Spanish, French, German, and English in ADOBE Acrobat (PDF) format. Contains ADOBE Acrobat software for accessing, viewing, and printing the guides. The CD ROM also contains the printer drivers and export module. The user interface for the printer drivers is in English only. The user interface for the export module is in English, Spanish, French, and German. In addition, the CD ROM has color management profiles and software from EFI and PANTONE and two International Color Consortium (ICC) profiles—one for 3-color ribbon and one for 4-color ribbon.
To unpack the printer:
1.Remove the printer from the shipping carton.
CAUTION: The printer is heavy. We recommend that two people lift and carry it.
2.Remove the printer from the plastic bag.
October 1997 |
2-3 |

Setting up the printer
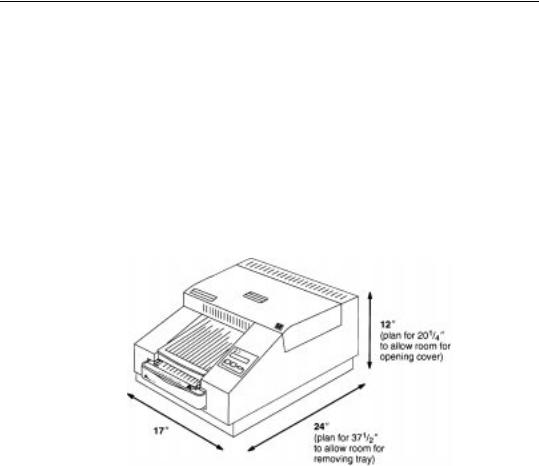
3. Remove the shipping tape from the printer cover.
shipping tape shipping pins
4. Carefully pull out the shipping pins.
CAUTION: Remove the shipping pins before you use the printer.
IMPORTANT: Save the packaging and the shipping pins in case you need to ship the printer.
2-4 |
October 1997 |
Setting up the printer
Cleaning the print head
To avoid lines or streaks in your prints, clean the print head before using it for the first time and whenever you replace the ribbon. If your site is particularly dusty, you may need to clean the head more often.
Cleaning pads come with each ribbon spool.
CAUTION: Always use the cleaning pad provided with the ribbon spool.
Never rub or wipe anything across the thermal head except when cleaning it.
To clean the print head:
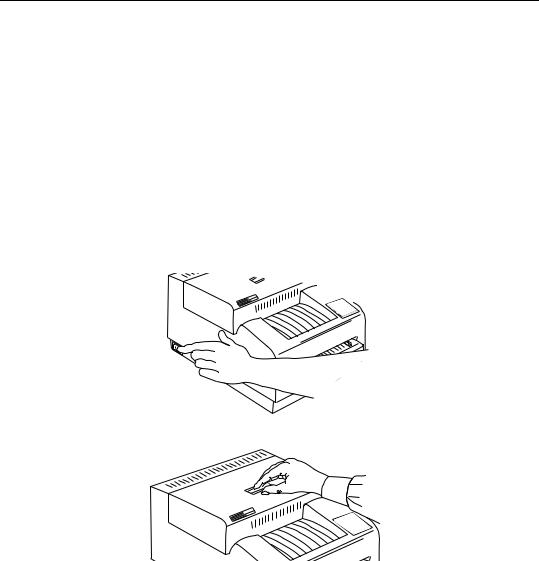
1. Make sure the printer is turned off and open the cover.
October 1997 |
2-5 |
Setting up the printer
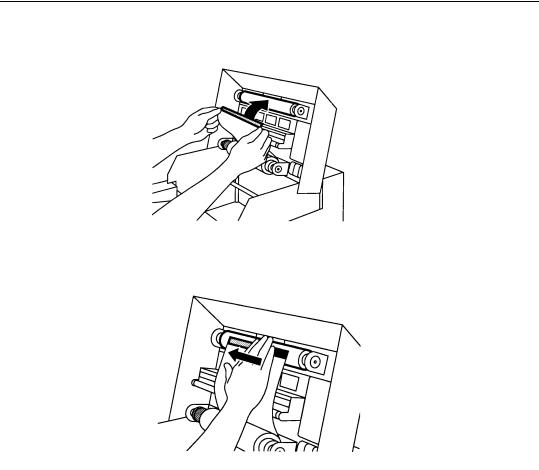
2.Remove the supply spool and wrap it tightly upward. Then remove the take-up spool. DO NOT touch the ribbon.
Takeup spool
Supply spool
3.Remove both spools and stand them upright on a freshly cleaned surface.
2-6 |
October 1997 |

Setting up the printer
4.To clean the print head, first use the water pad and then use the alcohol pad. With each pad, wipe along the heater line four times as follows:
—Wipe the full length of the glass area (always in one direction). —Use a clean part of the pad for each wipe.
—Apply firm, even pressure.
—Wipe the metal roller bar and rod as shown.
Metal roller bar
AVOID METAL
EDGE!
4x


Metal bar
Header line
Rod
5.Allow the glass area to dry for about two minutes.
6.Do one of the following:
If reloading the ribbon, load the supply spool first (with the bar code on the left. If the ribbon gets dirty or is damaged, wind the take-up spool ahead to the next clean magenta section.
If loading a new ribbon, refer to the instructions on the ribbon package.
7.Close the printer cover, and turn the printer On.
October 1997 |
2-7 |

Setting up the printer
Loading the ribbon
The ribbon provides dyes for printing images.
Three-color ribbon contains three dye patches: yellow, magenta, and cyan. Each three-color ribbon, except the three-color, oversize, extra-life ribbon, contains enough dye to make 100 prints. The three-color, oversize, extra-life ribbon contains enough dye to make 85 prints.
Four-color ribbon contains four dye patches: yellow, magenta, cyan, and black. Each four-color ribbon contains enough dye to make 85 prints.
Black ribbon contains only black dye patches. Each black ribbon contains enough dye to make 150 prints.
KODAK EKTATHERM XLS Three-Color Ribbon / XTRALIFE Media and KODAK EKTATHERM XLS Black Ribbon / XTRALIFE Media contain additional patches that protect images from fingerprints.
Handling the ribbon
Handle ribbon as follows.
•Hold the ribbon spools by the ends to avoid fingerprints. Fingerprints on the ribbon web severely reduce image quality.
•Wear lint free gloves when working with ribbon.
•Do not expose the ribbon to direct sunlight, extreme heat, dust, or liquids.
•Leave the printer cover closed except when you need to access the inside of the printer.
Storing the ribbon
For highest image quality, store ribbon as follows. See the instructions on the package for more storage information.
•Store unopened ribbon at temperatures below 77°F (25°C). Avoid exposure to temperatures higher than 100°F (38°C).
•Wrap partially used ribbons in their original wrappers to protect them from dust and dirt when they are not in the printer. Dust and dirt specs on the ribbon show up as much larger spots on prints.
2-8 |
October 1997 |
Setting up the printer
Loading ribbon in the printer
The ribbon fits easily in the printer. There is only one way to correctly place the spools.
Follow these steps to load a ribbon:
IMPORTANT: Hold the ribbon spools by the ends to avoid fingerprints. Also, wear lint-free gloves when handling ribbon spools.
1.Remove the old ribbon spools and dispose of them.
NOTE: Images remain on the ribbon after printing. If you are working with confidential documents, you may, to maintain security, need to consider alternate ways of disposing of the ribbon.
2.Clean the print head. See page 2-5 for instructions.
3.Remove the new ribbon spools from the box.
The supply spool is longer than the take–up spool. For new ribbons, the supply spool will be loaded with ribbon and the take-up spool will be empty.
4.Push the left side of the take–up spool into the left side of the top spool holder (the holders are spring–loaded).
5.Match the notches in the take–up spool with the notches on the right spool holder.
6.Insert the right side of the take–up spool into the holder on the right.
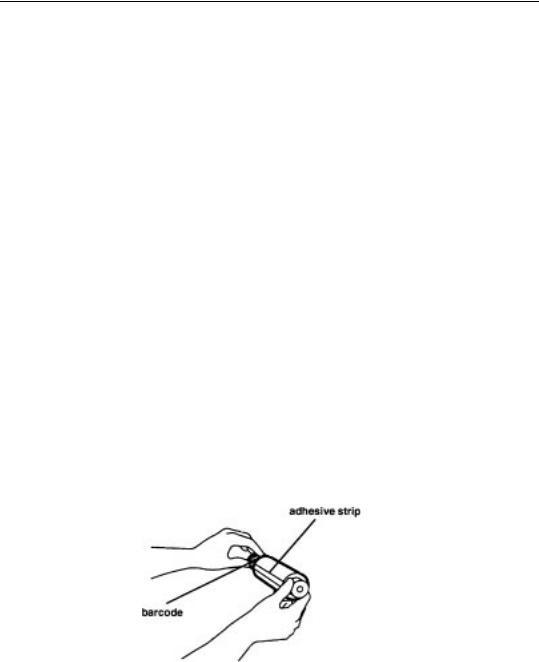
7.Hold the supply spool so that the adhesive strip on the ribbon is facing you and the barcode is on the left. Make sure, especially when you are reloading a partially used spool, that the spool notches are on the right.
October 1997 |
2-9 |

Setting up the printer
8.Push the left side of the supply spool into the left side of the bottom spool holder (the holders are spring loaded).
Take-up spool
Supply spool
9.Match the notches in the supply spool with the notches on the right spool holder.
10.Insert the right side of the supply spool into the holder on the right.
11.Remove the tape from the adhesive strip
12. Hold any excess ribbon behind the adhesive strip.
2-10 |
October 1997 |
Setting up the printer
13.Pull the ribbon up carefully and stick the adhesive onto the takeup spool.
NOTE: Keep the ribbon as straight as possible.
14. Smooth the ribbon over the adhesive strip.
15.Wind the take-up spool away from you several times. The first full set of dye patches is not used for printing.
16.Close the printer cover.
October 1997 |
2-11 |

Setting up the printer
Unpacking and adjusting the paper tray
Working with media
When working with paper and transparencies, follow these guidelines:
•Hold paper by the edges to avoid fingerprints, which reduce print quality.
•Handle the package of paper with the cardboard stiffener sheets in place.
•Keep the bottom stiffener board in place when handling stacks of paper to avoid fingerprints on the printing surface.
•Do not use wet or damaged stock.
•Keep the lid on the paper tray and the paper tray inserted in the printer to protect media from exposure to light, dust or dirt.
Storing media
For highest image quality, follow these storage instructions:
•Store opened paper and transparencies at temperatures below 77°F (25°C). Avoid exposure to temperatures higher than 100°F (38°C).
•Avoid storing loose stacks of media out of its wrapper.
Paper and humidity
Paper is adversely affected by extremes in relative humidity. High relative humidity tends to cause paper to curl toward the image side of the paper. Low relative humidity tends to cause paper to curl away from the image side of the paper. Low relative humidity also tends to increase static attraction of dust and dirt.
To avoid humidity-related problems, make sure the environment in which you use and store paper is between 40% and 60% relative humidity. Relative humidity lower than 20% or higher than 76% should be avoided even for short periods of time. Print paper can tolerate a relative humidity between 20% and 40%, and between 60% and 76%, for up to a few hours without causing the paper to curl.
2-12 |
October 1997 |

Setting up the printer
Handling humidity–related paper problems
If paper is exposed to humidity levels outside the recommended range, take extra care to help protect it as follows.
•Load small amounts of paper rather than a whole package. Paper stored in the wrapper lasts longer.
•Wrap partial stacks of paper in its original plastic wrap, squeeze out the air, and tape the wrap shut. This will protect the paper from humidity, as well as from dust and dirt. Specs of dust and dirt on paper show up as much larger spots on prints.
•Avoid leaving paper in the printer overnight or on weekends.
If the problems persist, consider installing a humidifier or dehumidifier to bring the humidity at your site to within the acceptable range.
October 1997 |
2-13 |
Setting up the printer
Loading media
Thermal media—paper and transparencies—comes in various sizes. See Chapter 3 in this guide for complete information about types and sizes of media
The paper tray adjusts to the size of the paper you want to load. Do not force media that is too long or wide into the tray.
IMPORTANT: Use only trays designed for the DIGITAL SCIENCE 8650/8650 PS Color Printer. Using other trays may cause paper jams, especially when you are printing images that do not take up the maximum image area of the receiver.
Contact your dealer for trays in a size other than the one supplied with the printer. See "Appendix B Accessories and supplies" for catalog numbers.
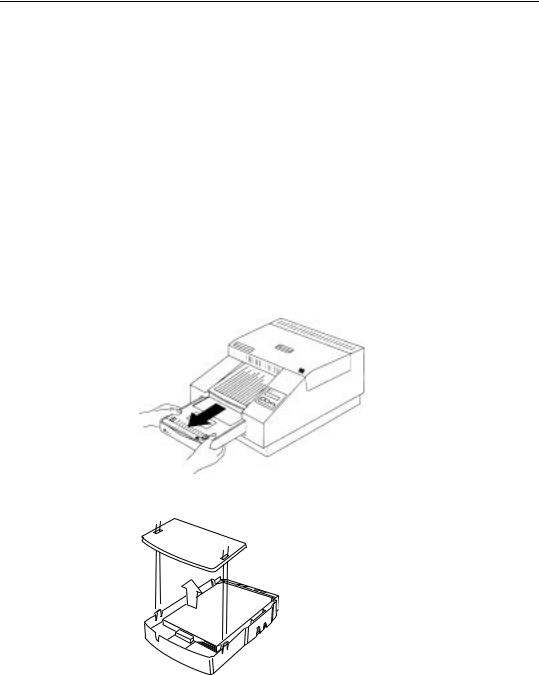
1. Remove the paper tray.
2.Press and hold the tabs that come through the top of the lid, then remove the lid.
2-14 |
October 1997 |
Setting up the printer
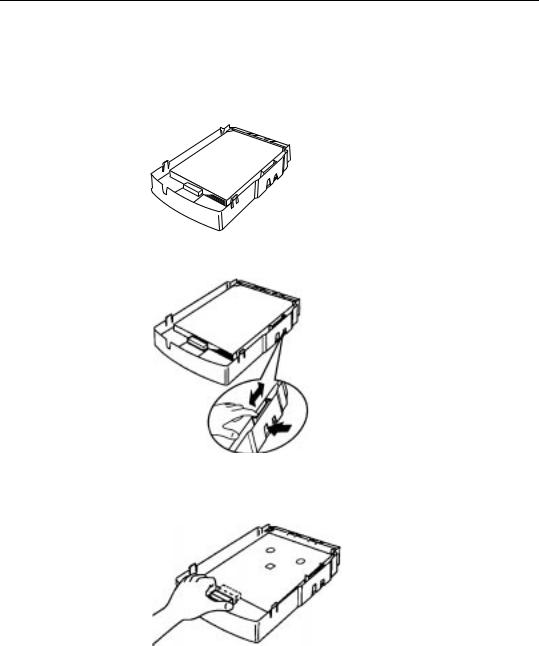
3.Make sure the paper size settings on the tray match, and that they are correct for the media you are going to load. If necessary, adjust the settings as follows:
—Look through the opening on the side of the tray at the sensor label. This label shows the current paper size setting.
—Move the media-length slider on the inside of the tray until the desired size appears in the opening.
—Make sure the tabs in the media-length stop (the piece that fits against the installed media) are inserted in the correct slots on the bottom of the tray. For example, if you set the sensor slider at 8.5 x 12, insert the tabs in the 8.5 x 12 slots.
4.Remove the media from the package. Leave the blue stiffener sheet on the bottom of the stack in place.
IMPORTANT: Handle paper by the edges to avoid fingerprints on the top sheet.
October 1997 |
2-15 |
Loading...