


 Loading...
KODAK OLED
Wireless Frame
Extended user guide
www.kodak.com
For help with your digital frame, www.kodak.com/go/digitalframesupport

Eastman Kodak Company
Rochester, New York 14650
© Eastman Kodak Company, 2008
All screen images are simulated.
Kodak, EasyShare, and Perfect Touch are trademarks of Eastman Kodak Company.
Flickr logo is a registered trademark used under license by Eastman Kodak Company. FrameChannel is a trademark of FrameMedia, Inc.
P/N 4H5030_en
Product features
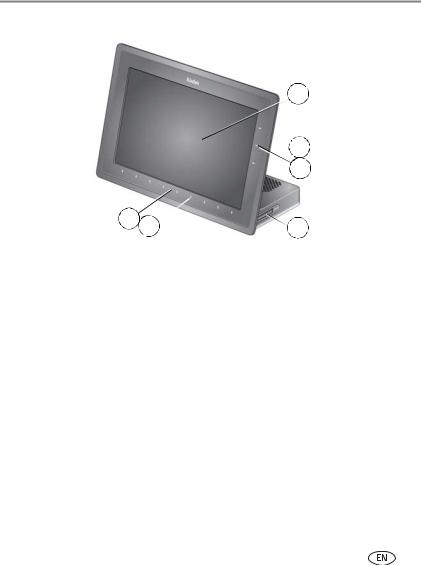
Front View
1
 2
2
4
3 |
4 |
5 |
1OLED screen
2Quick Touch Border (side, tap only)
3 Quick Touch Border (bottom, tap and slide)
4LED lights
5Memory card slot - SD, SDHC, MMC, MS, xD
NOTE: When you turn on the frame or tap the Quick Touch Borders, the screen icons appear and lights indicate where to touch the Borders.
To use the Quick Touch Borders, see page 3.
www.kodak.com/go/support |
i |
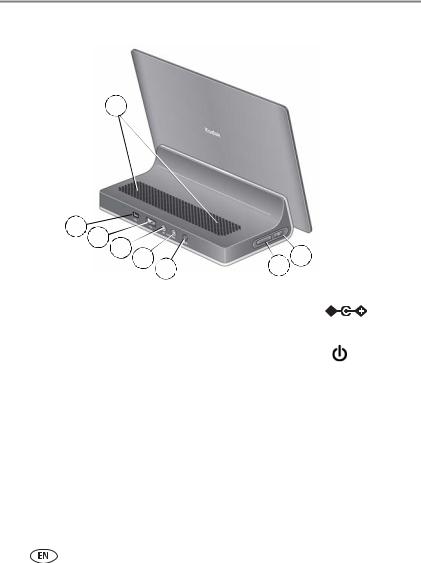
Back/Side View
8
|
1 |
2 |
3 |
4 |
5 |
|
6 |
7 |
|
1 |
USB connector (to computer) |
5 |
DC-In (12V) |
|
|||||
|
|||||||||
|
|||||||||
2 |
USB connector (to camera/USB device) |
6 |
Volume |
||||||
3 |
Audio In (external audio, i.e. MP3 player) |
7 |
Power button |
||||||
4 |
Audio Out (headphones or speakers) |
8 |
Speakers |
||||||
ii |
www.kodak.com/go/support |

Table of contents |
|
|
1 |
Getting started ...................................................................................... |
1 |
|
Setting up your frame.................................................................................... |
1 |
|
Using your frame’s Quick Touch Borders........................................................ |
3 |
|
Setting your language ................................................................................... |
4 |
|
Connecting to your wireless network ............................................................. |
4 |
2 |
Setting up for wireless operation .......................................................... |
5 |
|
Connecting to your wireless network—first time............................................ |
5 |
|
Connecting to your wireless network later ..................................................... |
7 |
|
If your wireless network is not found ............................................................. |
8 |
|
Installing the software: WINDOWS OS only.................................................... |
8 |
|
Verifying computer/device connections ........................................................ |
10 |
3 Setting up Web content ....................................................................... |
11 |
|
|
Opening the Device Settings Web page ....................................................... |
11 |
|
Connecting to your Gallery account ............................................................. |
14 |
|
Connecting to your FLICKR account ............................................................. |
15 |
|
Connecting to your FRAMECHANNEL account ............................................. |
16 |
|
Adding Web feeds....................................................................................... |
17 |
|
Creating shortcuts on your frame................................................................. |
23 |
|
Previewing, editing, and deleting feeds........................................................ |
24 |
4 |
Viewing locally on your frame ............................................................. |
25 |
|
Enjoying your pictures immediately! ............................................................ |
25 |
|
Inserting a memory card.............................................................................. |
26 |
|
Connecting a digital camera or other USB device ......................................... |
26 |
|
Viewing the Home screen............................................................................ |
27 |
|
Viewing your pictures and videos................................................................. |
28 |
|
Viewing thumbnails .................................................................................... |
29 |
|
Viewing a single picture .............................................................................. |
30 |
|
Playing a slide show.................................................................................... |
31 |
www.kodak.com/go/support |
iii |
|

Table of contents |
|
Creating a multimedia slide show................................................................ |
33 |
Arranging pictures to play by date or filename ............................................. |
35 |
5 Viewing in wireless mode .................................................................... |
36 |
What can I do in wireless mode? ................................................................. |
36 |
Viewing pictures from your computer........................................................... |
37 |
Viewing Gallery/Web media content on your frame...................................... |
38 |
Emailing pictures and videos from your frame .............................................. |
42 |
Copying wirelessly to/from your computer.................................................... |
44 |
6 Doing more with your frame ............................................................... |
48 |
Playing music.............................................................................................. |
48 |
Playing a video............................................................................................ |
49 |
Printing pictures.......................................................................................... |
50 |
Copying on your frame................................................................................ |
52 |
Deleting pictures ......................................................................................... |
53 |
Selecting multiple pictures........................................................................... |
54 |
7 Changing settings and more ............................................................... |
55 |
Changing frame settings ............................................................................. |
55 |
Settings menus ........................................................................................... |
55 |
Setting the clock and timer.......................................................................... |
58 |
Upgrading your firmware (recommended).................................................... |
59 |
Changing your frame orientation ................................................................. |
61 |
Maintaining your frame............................................................................... |
62 |
Learning more about your frame.................................................................. |
62 |
8 Troubleshooting and support .............................................................. |
63 |
Frequently asked questions ......................................................................... |
63 |
Picture frame problems ............................................................................... |
64 |
Picture frame/computer communications ..................................................... |
66 |
Screen messages......................................................................................... |
67 |
iv |
www.kodak.com/go/support |

9 Appendix ............................................................................................. |
70 |
Digital frame specifications.......................................................................... |
70 |
Important safety instructions ....................................................................... |
72 |
Upgrading your software and firmware........................................................ |
73 |
Additional care and maintenance ................................................................ |
73 |
Limited warranty ......................................................................................... |
73 |
FCC compliance and advisory ...................................................................... |
75 |
www.kodak.com/go/support |
v |
1 Getting started
Welcome to your KODAK OLED Wireless Frame. Viewing your pictures with spectacular clarity and brightness couldn’t be simpler!
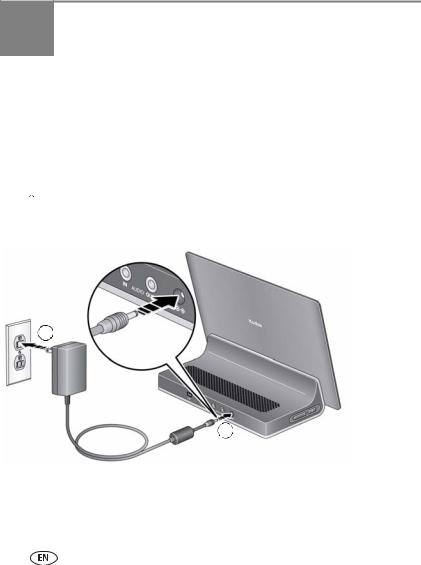
Setting up your frame
Attaching the power cable
 CAUTION:
Do not use this power cable with other devices, including digital cameras.
2
1
Your power cable may look different from the one pictured. Use the plug that accommodates your type of power outlet.
1 |
www.kodak.com/go/support |
Getting started
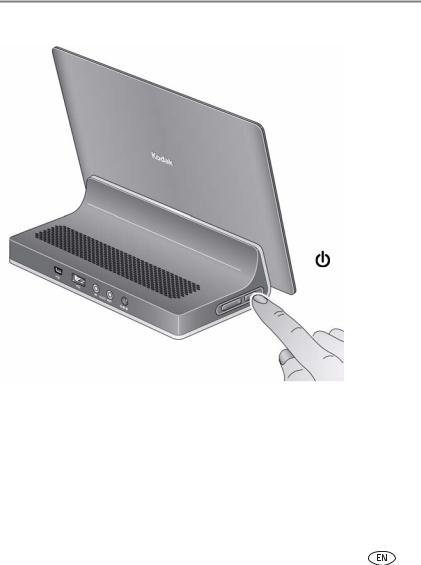
Turning your frame on and off
With the power cable still plugged in, your frame retains information (like the time) if you turn it off.
Power button - press and hold (for about 2 seconds), then release
www.kodak.com/go/support |
2 |

Getting started
Using your frame’s Quick Touch Borders
IMPORTANT: The display screen is not touch-sensitive. Do not touch it. Lights appear on the borders (upper right and bottom) to show you where to touch.
 CAUTION:
Only use your finger on the borders; borders do not react to sharp or metal objects—they may damage the border or screen.
Touch tips
Tap and slide on the Quick Touch Borders only.
 Tap a border to display the icons.
Tap Close to dismiss them.
 Tap the light closest to an icon* to select it.
 Slide to highlight menus, pictures, videos, options.** Tap OK to select them.
 Don’t hover, borders can be sensitive.
Tap lights below icons*
Slide on  bottom border only
 Tap lights next to icons*
(No sliding here)
 Home
Home
Play slide show 

 OK
OK
 Quick Touch
Borders
** Tap below arrows
Slide to scroll:
Scroll through images—Like turning the pages of a book, slide left ← to go forward, slide right → to go back. For faster scrolling through larger numbers of pictures, touch and hold (3 seconds), then slide to the end of the border.
 Scroll through menus—Slide right → to scroll down, slide left ← to scroll up.
* Icons change color when they are selected.
** Tap below arrows at the ends of the scroll bar to move the highlight one picture, menu, or item at a time.
3 |
www.kodak.com/go/support |
Getting started
Setting your language
The language screen appears the first time you turn on your frame.
■Slide (or tap below slider arrows) on the lights at the bottom border to highlight your language, then tap Save.
To change the language at a later time:
|
■ Tap |
(Home) → |
(Settings) → Language. |
|
The language screen appears. |
||
Slider arrows |
Highlight your language, then tap Save. |
||
|
|
|
|
|
Save |
|
|
To use the Quick Touch Borders, see page 3.
Connecting to your wireless network
After you set your language, your frame automatically scans for available wireless networks.
To continue with this initial network setup, see Connecting to your wireless network—first time, page 5.
If you want to connect to your wireless home network later and start enjoying your pictures now, insert a memory card or connect a camera or other USB device with pictures (see page 26). To bypass the initial network setup and connect later, see Connecting to your wireless network later, page 7.
www.kodak.com/go/support |
4 |
2Setting up for wireless operation
To allow your frame to access the contents of your computer wirelessly, connect your frame to your wireless home network.
NOTE: If you are not sure you have a wireless network, ask the person who set up your computer.
If you have problems with your wireless setup or connection, see Troubleshooting starting on page 63. Or open KODAK EASYSHARE Digital Display Software on your computer (see page 8) and click Tools → Wireless Troubleshooter. Follow the automated troubleshooting wizard.
Connecting to your wireless network—first time
The first time you turn on your frame, the wireless setup screens automatically appear after you set your language and tap Save (see page 4).
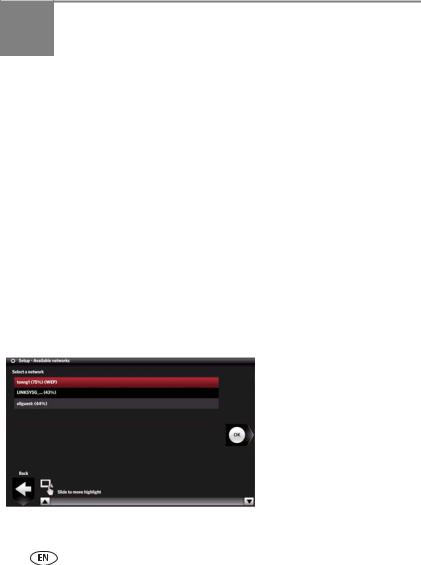
The frame scans for available networks and then your available networks are listed.
If your wireless network is not listed, follow the directions on page 8, then return to this page and resume this connection procedure.
NOTE:
If the scan finds multiple networks, your home network is usually listed first and highlighted.
Networks are listed by % of signal strength.
1 Slide or tap below the arrows to highlight your home network, then tap OK.
5 |
www.kodak.com/go/support |
Setting up for wireless operation
The Connecting screen (or the wireless network security screen, if enabled) appears.
Or, tap Exit to go to the Home screen without connecting. (See page 27.)
2If you do not have wireless network security enabled, go to step 3.
(However, we recommend that you enable your network security to prevent others from accessing your wireless home network.)
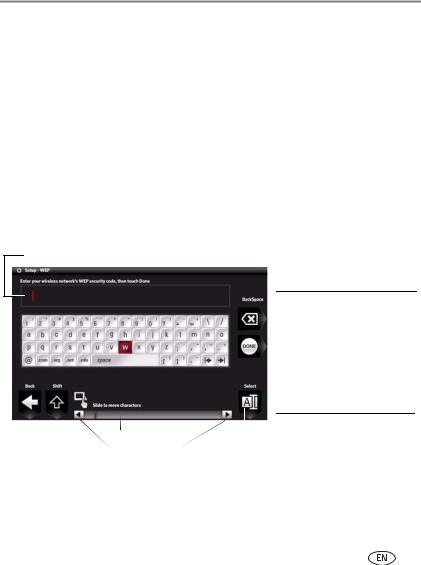
If you have wireless network security enabled, the on-screen keyboard appears. Enter your security key:
a Highlight a character, then tap  (Select) to enter it in the text box.
(To highlight a character, slide along the bottom of the touch border or tap below the slider arrows.)
b Repeat for each character of your security key, then tap Done.
On-screen keyboard:
Text box
Touch tips
 Backspace key
 erases text
 Right border - tap only
 Bottom border - keep sliding (or tapping slider arrows) left/right to go to the previous or next row.
Slider |
|
|
|
Select |
|||
Slider arrows |
|||
|
|
||
Congratulations! You have successfully connected your frame to your network!
www.kodak.com/go/support |
6 |

Setting up for wireless operation
NOTE: The screen identifies your security as either WEP or WPA. A WEP security key can be either:
5 or 13 characters (0-9, A-Z, some special characters, case sensitive) 10 or 26 characters (0-9, A-F, not case sensitive).
A WPA key is 8-63 characters, case sensitive.
The person who set up your network can provide you with this information.
IMPORTANT: Do not select Scan now (to verify connections, page 10) until you have installed the software.
3If you haven’t done so already, install the KODAK EASYSHARE Digital Display Software on your WINDOWS OS computer (see page 8) so you can set up and customize your frame right from your computer wirelessly. For MAC OS users, see page 12.
Connecting to your wireless network later
If you chose not to connect to your network when you first turned on your frame, you can do it at any time. Here’s how.
1 Tap Home  →Settings
  .
.
2 Slide to highlight Network, then tap Select.
3 Highlight Scan for wireless networks, then tap OK.
4 Follow the screen prompts and continue with step 1 on page 5.
7 |
www.kodak.com/go/support |

Setting up for wireless operation
If your wireless network is not found
If your wireless network is not found (from page 5), follow these suggestions:
1 Slide to highlight My network not shown, then select OK.
2Check that your router is on and your frame is close to the router, then select Scan again.
If your wireless network is still not found, your network does not broadcast SSIDs. You then need to enter the network SSID (sometimes called the network name) manually:
1Select Enter SSID, then tap OK.
The on-screen keyboard appears.
2Enter the SSID in the text box (see page 6). Tap Done when finished.
The person who set up your network can help you with this information. Or, tap Back then tap Help me connect for more information.
3 When your network is found and listed, return to step 1 on page 5.
Installing the software: WINDOWS OS only
IMPORTANT: For MAC OS users, do not install the software on your computer. See page 12 to start setting up access to Web content.
The CD that was packaged with your frame contains two applications that work well independently, but also work together for the best experience with your frame:
■KODAK EASYSHARE Digital Display Software  —manage your frame right from your computer, copy between your frame and computer (page 44), and set up your frame for access to KODAK Gallery and Web content (page 11).
■KODAK EASYSHARE Software  —organize, edit, and share your pictures.
IMPORTANT: We recommend that you install both. If you already have EASYSHARE Software on your computer, upgrade to this special version for additional features.
www.kodak.com/go/support |
8 |

Setting up for wireless operation
CD packaged with your frame.
1 Insert the CD into your computer.
2Follow the on-screen instructions to install the software.
■Click Typical to install EASYSHARE Digital Display Software and to update a previous version of EASYSHARE Software.
■If you do not have a previous version of EASYSHARE Software on your computer, you can click Custom and choose both applications for a new installation.
The software icons appear on your desktop when the installation is complete.
3Double-click  to open EASYSHARE Digital Display Software if it doesn’t open automatically.
The first time you open Digital Display Software, the wireless setup wizard automatically leads you through these next setup steps.
Follow the setup wizard screens to start your wireless setup:
1Select Next on the Welcome screen. Then select Yes, when asked if you are setting up for a wireless frame.
2Select Enable media sharing to allow your frame to access pictures on your computer. Then click Next.
3To set up your Web media content now, select Yes, set up Web media now. Then click Next and follow the directions in Chapter 3, Setting up Web content.
To complete your wireless setup, select No thanks, then Finish. To set up your Web media content later, see Chapter 3, Setting up Web content.
When prompted, take a few minutes to electronically register your frame and software for exclusive tips and offers. To register later, visit www.kodak.com/go/register.
9 |
www.kodak.com/go/support |
Setting up for wireless operation
Verifying computer/device connections
After installing the software (page 8), return to your frame, then:
1Tap OK.
The network connection setup screen appears.
2 Tap Scan now to verify your computer connection.
NOTE: Select Scan later if you want to finish your wireless setup at a later time. Your frame cannot access your wireless network until you have verified. To do so later, tap Home → Settings → Network → Verify computer connection.
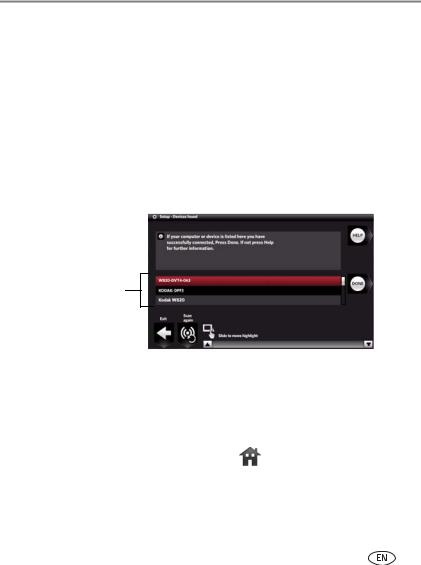
The Scanning screen appears as the frame scans your network and then lists available computers and other picture sources that your frame can access wirelessly.
Connected computers and devices
3If your computer is listed, your wireless connection is successful. Tap Done to close the window.
If your computer is not listed, tap Scan again or tap Help for options.
You have completed the frame setup. Your frame can now access the content on your host computer, wirelessly. Your computer appears as a picture source icon  on your frame’s Home screen (see page 28). Touch (Home) to start viewing your pictures.
NOTE: If you have more than one frame on your wireless network, give them unique names using the on-screen keyboard so you can tell them apart. Go to Home →Settings →Device configuration
menu. See page 57.
www.kodak.com/go/support |
10 |
3 Setting up Web content
Opening the Device Settings Web page
On your computer, open your frame’s Device Settings Web page in your browser. You’ll use it to set up access to the KODAK Gallery and RSS (Really Simple Syndication) feeds from services like FLICKR® and FRAMECHANNEL.
IMPORTANT: WINDOWS OS users—use KODAK EASYSHARE Digital Display Software to open the Device Settings Web page.
MAC OS users—enter the frame’s IP address in your browser to open the Device Settings page. See page 12.
WINDOWS OS users
WINDOWS OS users, here’s how to open your frame’s Device Settings Web page:
1Make sure the frame and computer are connected to your wireless network (page 5) and your computer is connected to the Internet.
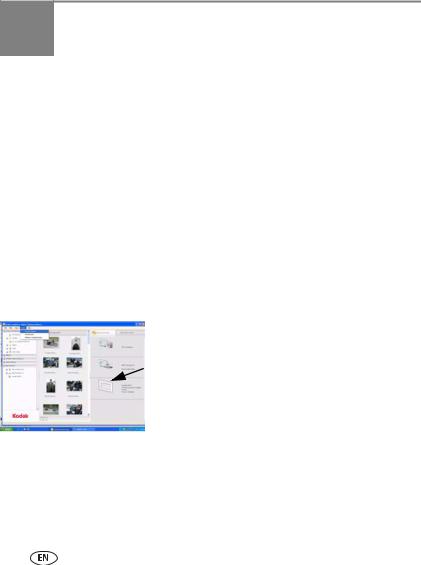
2On your computer, click  on your desktop to open EASYSHARE Digital Display Software.
3 Right-click the frame in the Drag and Drop Zone, then select Device Settings.
Your frame’s Device Settings Web page opens in your browser (see page 13).
KODAK EASYSHARE Digital
Display Software
11 |
www.kodak.com/go/support |
Setting up Web content
MAC OS users
MAC OS users, here’s how to open your frame’s Device Settings Web page:
1Make sure the frame is connected to your wireless network (page 5) and your computer is connected to the Internet.
2 Get your frame’s IP address:
a On the frame, tap Home  →Settings
  → Network, then tap Select.
bMake a note of the IP address (format: XXX.XXX.X.XXX) from the frame’s Network Settings screen.
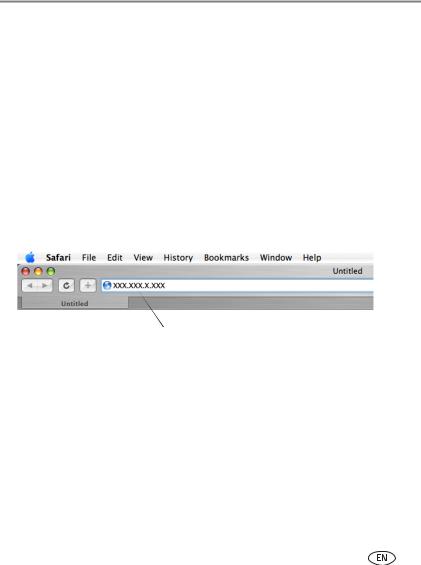
3Open a browser (for example, INTERNET EXPLORER, MOZILLA FIREFOX, SAFARI, etc.) on your computer.
4 Enter the IP address in the browser’s address window, then press Enter.
Enter the IP address here
The KODAK Displays and Devices Configuration page (Display Settings Web page) opens in your browser (see page 13).
www.kodak.com/go/support |
12 |
Setting up Web content
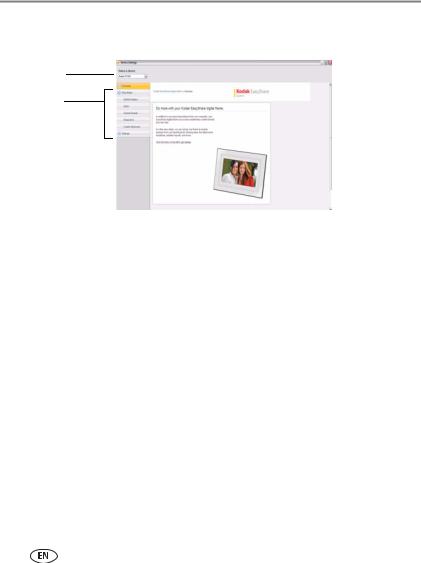
Your frame’s Device Settings Web page
1
2
Web Media tabs
1 From the drop-down menu, select your frame.
2Click the following Web Media tabs for on-screen setup instructions.
■KODAK Gallery—connect to your existing Gallery account or set up a new one to receive pictures from Gallery friends and family. See page 14.
■FLICKR service—sign in to your existing FLICKR account or set up a new one (see page 15) so you can receive and view FLICKR photos on your frame.
■FRAMECHANNEL service—connect to your existing FRAMECHANNEL account or set up a new one (see page 16) so you can customize content such as news, weather, traffic, sports scores, finance, and much more. Add to your list of RSS photo feeds from FRAMECHANNEL (see page 19) and receive photos from your favorite photo-sharing sites.
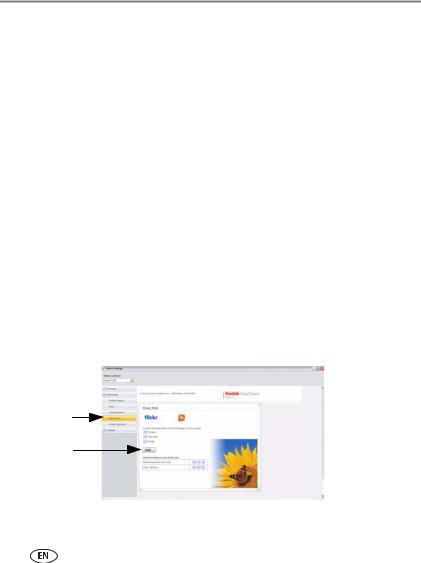
■Photo RSS—add to your list of RSS photo feeds from FLICKR and other favorite photo-sharing sites (see page 17).
■Create shortcuts—put shortcuts of your favorite photo feeds right on the frame’s Home screen (see page 23).
■Settings—customize your frame settings right from your computer. You can also change Settings from your frame (see page 55).
NOTE: Use the preview, edit, and delete features to manage your feeds (see page 24).
13 |
www.kodak.com/go/support |
Setting up Web content
Connecting to your Gallery account
Perform this one-time setup on your frame to connect it to your existing KODAK Gallery account.
1 Follow the steps on page 11 to access the Device Settings Web page.
2Click the KODAK Gallery tab.
The Gallery page appears.
2 
7
3
4
5
6
3If you don’t have a Gallery account, click Set one up now. Follow the on-screen instructions, or visit www.kodakgallery.com. Then continue with step 4.
4 Select your country/region from the drop-down menu.
5Enter the email address that is associated with your Gallery account, then enter your Gallery password.
6Select a Picture Mail automatic notification setting. For more about Picture Mail, see Automatically receiving My Friends Albums, page 40.
7 Click Save.
Congratulations, you have completed your Gallery setup! KODAK Gallery is added to the Web media list on your frame’s Home screen (see page 27). To create a KODAK Gallery shortcut on the Home screen, see page 23.
www.kodak.com/go/support |
14 |
Setting up Web content
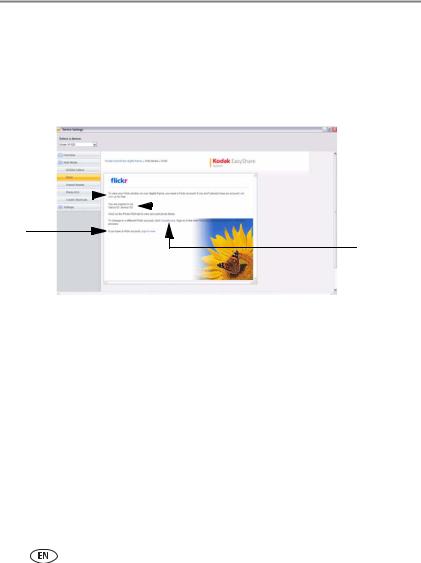
Connecting to your FLICKR account
To view your FLICKR photos on your digital frame, you need a FLICKR account.
1 Follow the steps on page 11 to access the Device Settings Web page.
2Click the FLICKR tab.
The FLICKR page appears.
2 
3 |
|
|
|
Sign in |
|
||||
|
|
|
|
confirmation |
4
5
3If you don’t have a FLICKR account, click Set one up. Follow the on-screen instructions to create an account.
4If you have an account, click Sign in now.
If you signed in to a valid account, the FLICKR authorization window appears.
If you want to change to a different FLICKR account, click Unauthorize and repeat this step.
5After setting up your FLICKR account, click OK, I’ll allow it. Your frame can now access FLICKR photo feeds wirelessly.
You return to the FLICKR page with your sign in confirmation. To add new FLICKR feeds, click the Photo RSS tab (see page 17).
15 |
www.kodak.com/go/support |
Setting up Web content
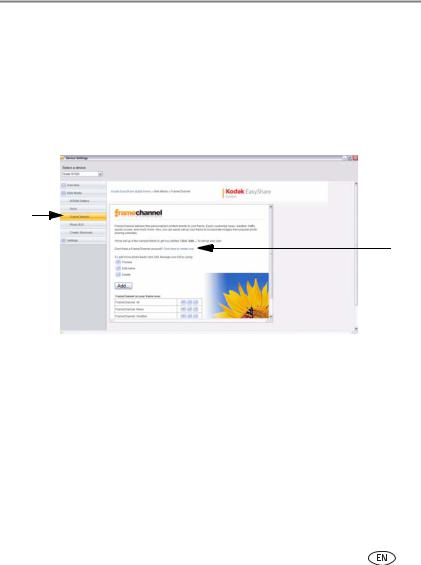
Connecting to your FRAMECHANNEL account
Connect your frame to your FRAMECHANNEL account so you can view, create, and manage additional customized feeds such as news, weather, sports scores, and finance.
1 Follow the steps on page 11 to access the Device Settings Web page.
2Click the FRAMECHANNEL tab.
The FRAMECHANNEL page appears.
2
3
3If you don’t have a FRAMECHANNEL account, click the link and follow the on-screen instructions to create one.
4When you are finished setting up your FRAMECHANNEL account, or if you already have one, sign in, then enjoy the benefits of having an account:
■access and customize free photo-sharing sites, and add them to your frame for viewing
■preview contents of your frame right on the FRAMECHANNEL page
■view and manage your favorite photos and photo-sharing sites
■add new FRAMECHANNEL feeds; click the Add button (see page 19)
www.kodak.com/go/support |
16 |
Setting up Web content
Adding Web feeds
Set up your frame to view RSS (Really Simple Syndication) photo feeds directly from FLICKR, FRAMECHANNEL, and other favorite sites.
IMPORTANT: Your frame can play only feeds that contain photos. An error message appears when you try to play feeds that are text only. Make sure you preview your feeds after they are added to the Device Settings page. You can edit or delete them there. See page 24.
NOTE: Preloaded and new feeds are added to the feeds list under the sites’ tabs on the Device Settings Web page, where you can preview, edit, or delete them, see page 24. They appear also in the Web media list on your frame’s Home screen where you can play them, see page 27.
How to add a FLICKR feed
1 Follow the steps on page 11 to access the Device Settings Web page.
2If you don’t have a FLICKR account, create one now (see page 15), then continue with step 3 below.
3Click the Photo RSS tab.
The Photo RSS/FLICKR page appears with a list of preloaded FLICKR feeds that are on your frame.
3
4
4 Click Add.
17 |
www.kodak.com/go/support |

Setting up Web content
The Photo RSS/FLICKR Add/Edit page appears.
5
8
6
7
NOTE: You can edit preloaded feeds here (such as FLICKR: Interesting photos) and feeds you add. (See page 24.)
5 In the Site drop-down menu, keep FLICKR as the default site.
6Enter a tag (keyword) for the types of photos you want to see. NOTE: FLICKR automatically sends pictures matching the tag directly to your frame.
7Click in the Photo feed name box to automatically assign the tag to the FLICKR feed name.
8 Click Save.
Congratulations, you have completed your FLICKR photo feed setup! The feed name is added to the list of feeds on the FLICKR page and to the Web media list on your frame’s Home screen. (See page 27.)
To create a shortcut of your feed on the Home screen, see page 23. NOTE: Preview your feed to make sure it will play on your frame. (See page 24.)
www.kodak.com/go/support |
18 |
Setting up Web content
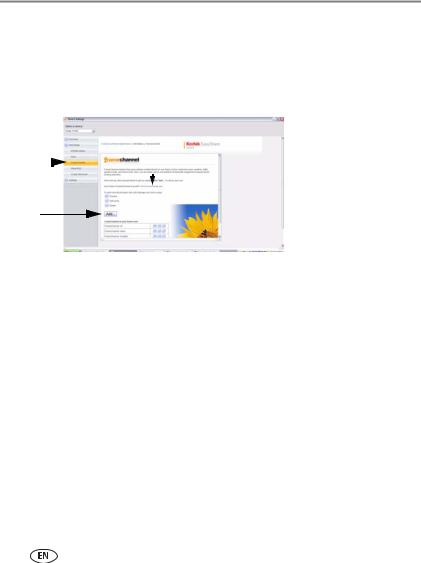
How to add a FRAMECHANNEL feed
1 Follow the steps on page 11 to access the Device Settings Web page.
2Click the FRAMECHANNEL tab.
The FRAMECHANNEL page appears with a list of preloaded FRAMECHANNEL feeds that are on your frame.
2 |
|
|
|
|
FRAMECHANNEL logo |
|
|
||||
|
|
|
|
||
3 |
|
|
|
|
|
|
|
|
|
|
4
3If you don’t have a FRAMECHANNEL account, click the link and follow the on-screen instructions to create one.
IMPORTANT: Creating an account links FRAMECHANNEL to your frame so you can view, create, and manage customized feeds such as news, weather, sports scores, traffic, and much more. You can click the FRAMECHANNEL logo to access these and other free photo-sharing sites for viewing right on your frame.
4 Click Add.
19 |
www.kodak.com/go/support |
Setting up Web content
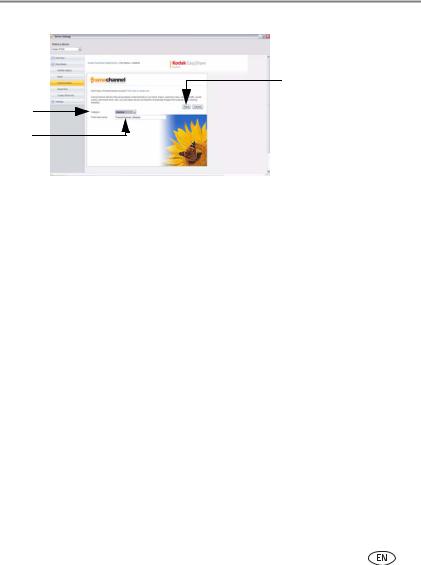
The FRAMECHANNEL Add/Edit page appears.
7
5
6
5From the Category drop-down menu, select the type of content you want to see from FRAMECHANNEL (news, weather, sports, finance, etc.)
6You can change the photo feed name (category included) that appears automatically.
7 Click Save.
Congratulations, you have completed your FRAMECHANNEL photo feed setup! The feed name is added to the list of feeds on the FRAMECHANNEL page and to the Web media list on your frame’s Home screen. See page 27.
To create a shortcut of your feed on the Home screen, see page 23. NOTE: Preview your feed to make sure it will play on your frame. See page 24.
www.kodak.com/go/support |
20 |
Loading...