


 Loading...
KODAK EASYSHARE D825 / D1025
Digital Frame / Decor Series
Extended user guide
www.kodak.com
For help with your digital frame, www.kodak.com/go/digitalframesupport

Eastman Kodak Company
Rochester, New York 14650
© Eastman Kodak Company, 2009
All screen images are simulated.
Kodak and EasyShare are trademarks of Eastman Kodak Company.
4H6823_en
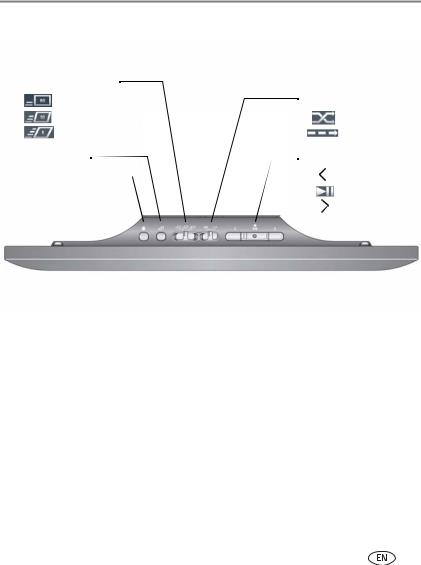
Product features
Top—buttons and controls
Play speed/transition |
|
|
|
|
|
|
|
|||||
|
|
|
Slow with Wipe |
Play order |
||||||||
|
|
|
||||||||||
|
|
|
Medium with Pan/Zoom |
|
|
|
|
|
|
Shuffle |
||
|
|
|
|
|
|
|
|
|||||
|
|
|
Fast with Fade |
|
|
|
|
|
|
By Date |
||
|
|
|
|
|
|
|
|
|
||||
|
|
|
|
|
|
|
|
|
||||
|
|
|
|
|
|
|||||||
|
|
|
|
|
|
|
|
|
|
|
||
Copy to frame |
Navigation |
|||||||||||
Delete from frame |
|
|
|
|
|
|
|
Previous picture |
||||
|
|
|
|
|
|
|||||||
|
|
|
|
|
|
|
|
|
|
|
OK/Play/Pause |
|
|
|
|
|
|
|
|
|
|
|
|
||
|
|
|
|
|
|
|
|
|
|
|
Next picture |
|
www.kodak.com/go/support |
i |
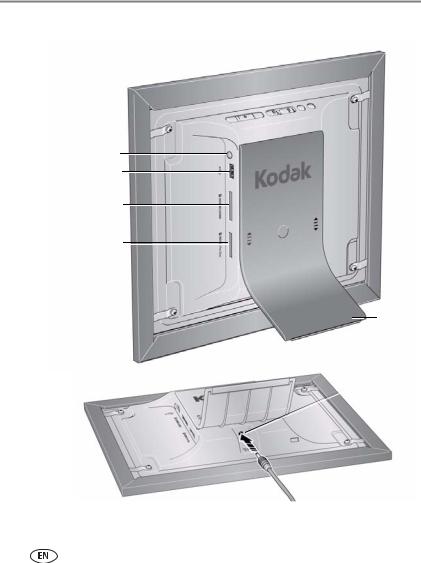
Side—power and connectors
 Power
Power
 USB connector
Memory card slot
SD/MMC/MS/XD
Memory card slot
MS/MS Pro Duo
Stand
DC-in* 

* See Attaching the power cable, page 3, Attaching the D825 stand and faceplate, page 1, and Attaching the D1025 stand and faceplate, page 2.
ii |
www.kodak.com/go/support |

Table of contents |
|
|
1 |
Getting started ...................................................................................... |
1 |
|
Attaching the D825 stand and faceplate........................................................ |
1 |
|
Attaching the D1025 stand and faceplate...................................................... |
2 |
|
Attaching the power cable ............................................................................ |
3 |
|
Turning your frame on and off ....................................................................... |
4 |
|
Inserting a memory card................................................................................ |
5 |
|
Connecting a USB device............................................................................... |
5 |
|
Adding a new standard picture frame ............................................................ |
6 |
2 |
Viewing and copying pictures ............................................................. |
11 |
|
Viewing pictures from internal memory........................................................ |
11 |
|
Viewing pictures from a memory card .......................................................... |
11 |
|
Navigating through your pictures................................................................. |
12 |
|
Changing play speed, transitions, and order ................................................ |
13 |
|
Copying pictures to internal memory............................................................ |
14 |
|
Deleting pictures from the frame ................................................................. |
16 |
3 |
Troubleshooting and support .............................................................. |
17 |
|
Learning more about your frame.................................................................. |
17 |
|
Maintaining your frame............................................................................... |
17 |
|
Picture frame problems ............................................................................... |
18 |
|
Identifying graphic messages....................................................................... |
19 |
|
Identifying error messages........................................................................... |
20 |
|
Upgrading your firmware............................................................................. |
21 |
|
Setting automatic shut-off time ................................................................... |
22 |
4 Appendix ............................................................................................. |
23 |
|
|
Digital frame specifications.......................................................................... |
23 |
|
Important safety instructions ....................................................................... |
24 |
|
Limited warranty ......................................................................................... |
25 |
www.kodak.com/go/support |
iii |
|
1 Getting started
Welcome to your KODAK EASYSHARE Digital Frame. Viewing your pictures couldn’t be simpler!
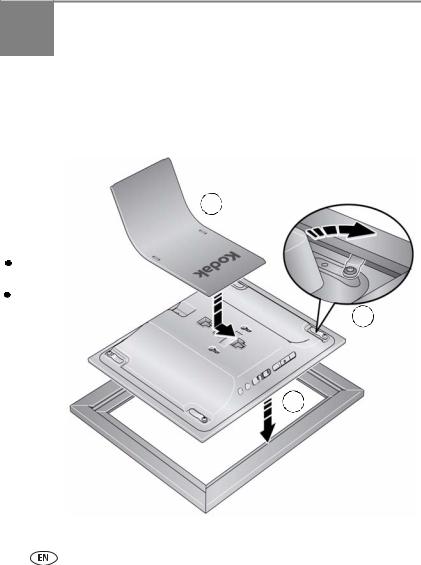
Attaching the D825 stand and faceplate
3
Fit the stand into the slot and slide to lock.
To adjust the display angle, move the stand to a different slot.
Faceplate and stand included in package.
1
2
1
www.kodak.com/go/support

Getting started
Attaching the D1025 stand and faceplate
3
2
1
Fit the stand into the slot and slide to lock.
To adjust the display |
4 |
angle, move the stand to a different slot.
Faceplate and stand included in package.
www.kodak.com/go/support |
2 |
Getting started
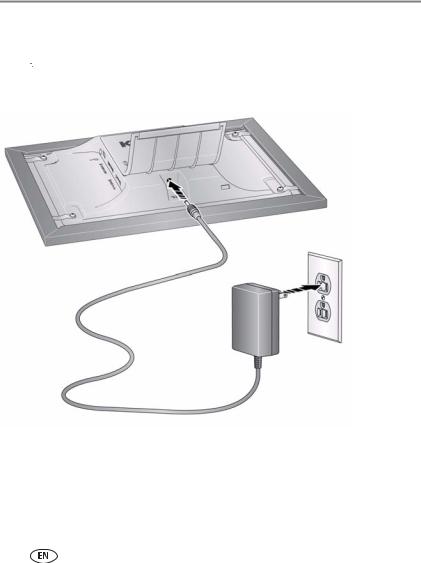
Attaching the power cable
 CAUTION:
Do not use this power cable with other devices, including digital cameras.
Your power cable may look different from the one pictured. Use the plug that accommodates your type of power outlet.
3 |
www.kodak.com/go/support |
Getting started
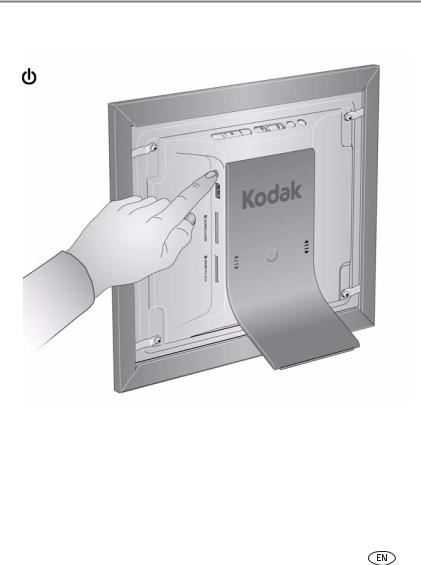
Turning your frame on and off
Press the power button
NOTES
■The frame automatically turns on when you plug it in for the first time.
■Your frame may contain pre-loaded sample pictures, which only play until you copy pictures to your frame or insert a memory card or USB device.
■The frame automatically shuts off after 16 hours. To change the automatic shut off time, see page 22.
www.kodak.com/go/support |
4 |
Getting started
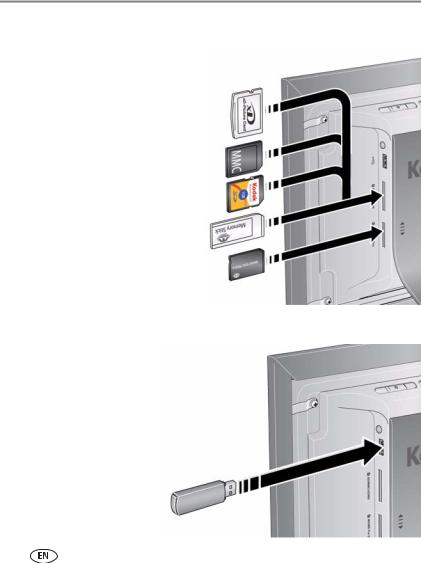
Inserting a memory card
 To insert a card, push it firmly into the slot.
 To remove a card, pull it out of the slot.
Top slot*:
SECURE DIGITAL/SECURE DIGITAL High Capacity (SD/SDHC)
MMC (MULTIMEDIA Card)
XD
MS (MEMORY STICK)
Bottom slot:
MS/MS Pro Duo (MEMORY STICK)
*IMPORTANT: Do not insert an MS Pro or MS Pro Duo card in the top slot. It may be difficult to remove.
Connecting a USB device
Supported USB devices include a flash drive, card reader, hard drive*, etc.
USB devices and cables are sold separately.
* External hard drives must be self-powered and formatted as FAT32.
5 |
www.kodak.com/go/support |
Getting started
Adding a new standard picture frame
You can personalize your KODAK EASYSHARE Digital Frame by putting a standard picture frame over the digital frame’s panel. Match your home décor and style by choosing from the hundreds of standard picture frames on the market, even a favorite you might already have.
Choosing a standard picture frame size
KODAK EASYSHARE Digital |
Use a standard picture frame that |
Frame model |
accommodates this photo size (without a matte) |
D825 |
8 x 10 in. (20.3 x 25.4 cm) |
D1025 |
8 x 10 in. (20.3 x 25.4 cm) |
|
|
Standard picture frames have different attachment styles. Your digital frame fits these most commonly available styles of standard frames:
■Slot—frames with a slot around the inside perimeter (see page 8)
■Clip—frames with a rotating clip around the perimeter of the frame (see page 9)
■Tab—frames with bendable metal tabs (see page 10)
Picture frame styles that don’t fit
Several standard picture frame styles are not compatible with your KODAK EASYHARE Digital Frame. A compatible standard picture frame must accept the dimensions of the digital frame’s attachment area. The dimensions of the attachment areas are:
KODAK EASYSHARE Digital |
Digital frame’s attachment area dimensions |
Frame model |
|
D825 |
8 x 10 x 0.165 in. deep (20.3 x 25.4 x 0.4 cm) |
D1025 |
8 x 10 x 0.165 in. deep (20.3 x 25.4 x 0.4 cm) |
|
|
www.kodak.com/go/support |
6 |
Loading...