


DCVR12

COMPVR ENCLOSURE
DCVR10
DCVR12
VCVR12
VCVR15
English Version
Versión Español
Caja de Subwoofer CompVR
Deutsche Version
CompVR Tieftöner Gehäuse
Version Francaise
Caisson de Graves CompVR
LIVIN’ LOUD
2010 CompVR Box Multilingual b01.indd 12010 CompVR Box Multilingual b01.indd 1 11/4/2009 4:51:20 PM11/4/2009 4:51:20 PM

2
COMPVR SUBWOOFER ENCLOSURE
CompVR Subwoofer Enclosure Owner’s Manual
The Kicker CompVR subwoofer enclosures were specially designed for “Livin’ Loud” out in the harsh
automotive environment. They are made of advanced materials and construction techniques to maintain
optimal performance for years to come.
CHECK THE LOAD
The CompVR subwoofer enclosures are internally wired for a 2 or 4 ohm load at the speaker-wire
connection terminal. Please refer to this terminal or the box packaging for your enclosure’s specifi c
impedance. Check to see if your amplifi er is optimized to drive this load.
DCVR/VCVR VENTED
The location and orientation of your enclosure will affect the quality and quantity of the bass. Designed
for use in SUV and sedan type vehicles, these enclosures offer you several mounting options. The vent
opening in these enclosures can not be obstructed. At some frequencies most of the bass will come out
of the vent. Therefore we recommend you leave at least four inches (10cm) of clear space around the
vent.
If the enclosure is to be mounted all the way in the back of the vehicle, it works best to point the woofer
toward the front of the vehicle. Conversely, if the enclosure is going to be mounted closer to the back
seat, pointing the woofer toward the rear of the vehicle will give you the best results.
If it is more convenient to mount the enclosure along a side wall, put the enclosure on the left side of the
vehicle. This orientation will make the vent point toward the rear of the vehicle and will produce the most
low bass output. Remember to leave at least four inches (10cm) of room between the enclosure and the
back of the vehicle.
After determining the best mounting position, carefully check the areas where the mounting brackets will
be placed. Make sure the mounting screws will not puncture the gas tank, brake lines, wiring, or interfere
with any mechanical parts on the underside of the mounting surface. Turn the enclosure upside-down,
pre-drill the holes using a 7/64” (2.5mm) bit and attach the four mounting brackets to the bottom of the
enclosure using the supplied smaller screws. Each bracket must be positioned so the rounded end
protrudes approximately 3/4” (2cm) from under the cabinet to allow a screw to easily pass through the
bracket, securing the enclosure to the vehicle.
Plug your subwoofer speaker wire into the terminals, using the red connector as positive and the black
connector as negative. Hook the other end of the wire to your subwoofer amplifi er in accordance with its
owner’s manual. With the enclosure right side up, securely attach the enclosure to the vehicle with the
supplied larger screws. If the supplied hardware is not applicable to your installation, some other means of
securely attaching the enclosure to the vehicle must be used.
Authorized KICKER Dealer:
Purchase Date:
Enclosure Model Number:
Enclosure Serial Number:
DCVR10 / DCVR12 / VCVR12 / VCVR15Models:
2010 CompVR Box Multilingual b01.indd 22010 CompVR Box Multilingual b01.indd 2 11/4/2009 4:51:36 PM11/4/2009 4:51:36 PM
3
IMPORTANT SAFETY WARNING
To avoid potential injury or possible death from forward movement of the enclousre during abrupt stops or accidents,
the enclosure must be properly installed and securely fastened to your vehicle. You are soley responsible for securely
fastening the enclosure in your vehicle.
stillwaterdesigns
P.O. Box 459 • Stillwater, Oklahoma 74076 • USA • (405) 624–8510
Note: The use of a subsonic fi lter will signifi cantly increase power handling. The power handling specifi cations in this chart are
calculated using a 25Hz, 24dB/octave subsonic fi lter. All specifi cations and performance fi gures are subject to change. Please
visit www.kicker.com for the most current information. To get the best performance from your new KICKER Subwoofer, we
recommend using genuine KICKER Accessories and Wiring. Please allow two weeks of break-in time for the subwoofer to reach
optimum performance.
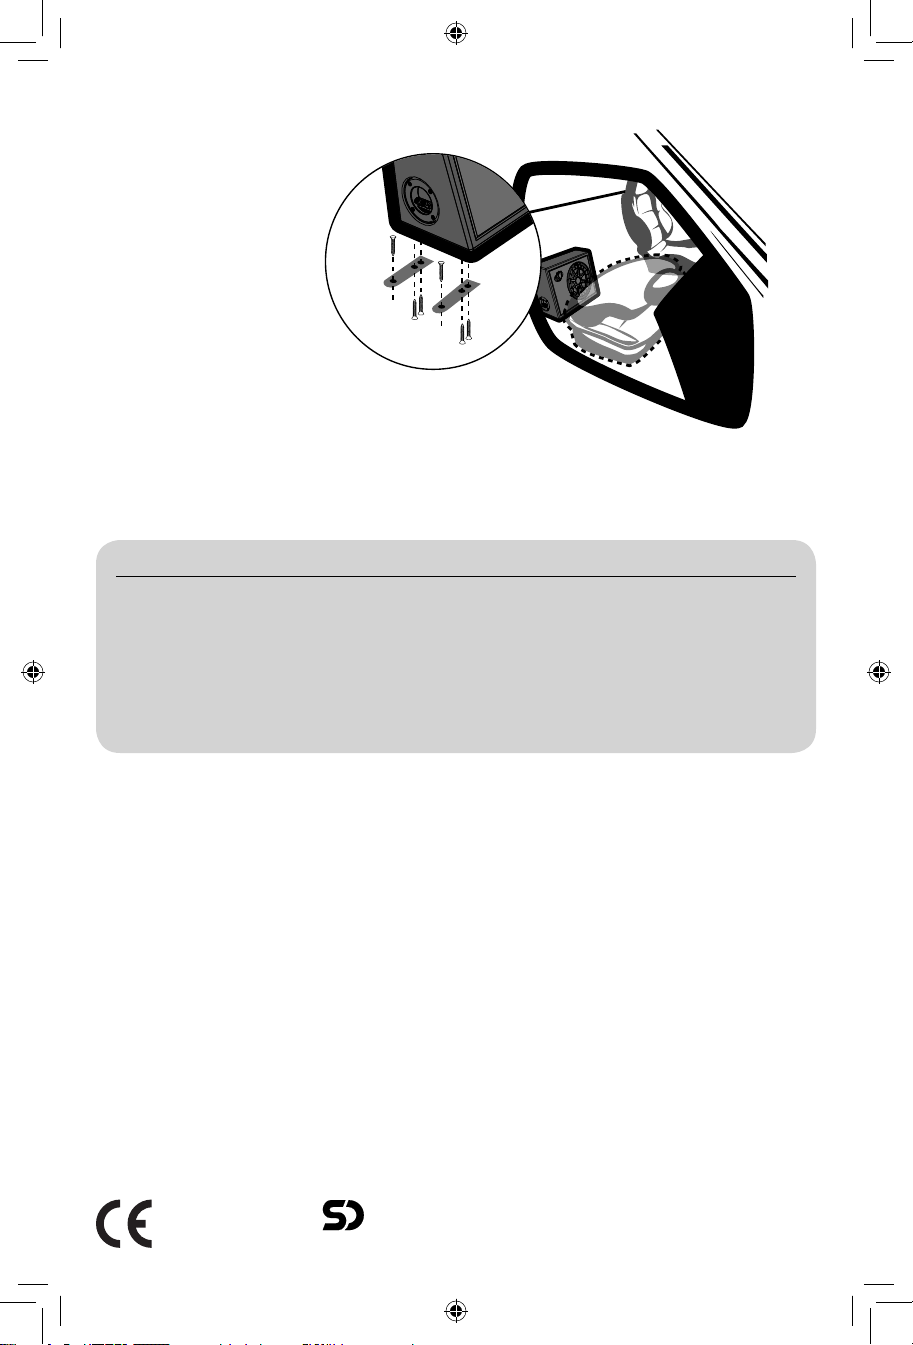
Behind-the-seat mounting:
subwoofer fi res into
the back of the
seat.
Sound Check: Poor bass response? Check the system phasing by reversing the positive and negative
speaker connections on the subwoofer. If the bass improves, then the subwoofer was out of phase in
reference to the rest of the audio system.
Pro Tip: You are one ZX
Mono-Amplifi er and a few
cables away from a complete,
high-quality system with
rock-solid bottom end, as
only available from KICKER!
The KICKER ZX line of mono-
amplifi ers make it easy to upgrade
the bassline of your stock or
aftermarket source unit. Please ask your
dealer about KICKER ZX amplifi er upgrades.
Model DCVR10 DCVR12 VCVR12 VCVR15
Nominal Impedance [Zn], ohm [per enclosure] 2 or 4 2 or 4 2 or 4 2 or 4
Sensitivity [SPLo], dB @ 1W, 1m 96.5 98 95 97.5
Power Handling Watts, Peak (RMS) 1600 (800) 1600 (800) 800 (400) 1000 (500)
Enclosure Top Surface Depth, in (cm) 13-1/2 (34.3) 14-1/8 (35.8) 11-3/8 (28.8) 13-3/16 (33.4)
Enclosure Bottom Surface Depth, in (cm) 16-1/2 (41.8) 17-3/8 (44) 14-5/8 (37) 16-13/16 (42.7)
Enclosure Height, in (cm) 14-1/8 (35.9) 16-1/16 (40.7) 16-1/16 (40.7) 19 (48.1)
Enclosure Width, in (cm) 28-3/4 (73) 32-11/16 (82.9) 17-13/16 (45.1) 20-11/16 (52.5)
Mount the brackets to the bottom of the
enclosure using the supplied smaller
screws. Securely attach the enclosure to
the vehicle with the supplied larger
screws.
SPECIFICATIONS
CompVR Subwoofer - Covered by one or more of the following patents:
U.S. Pat #’s 6,611,604, 6,731,773 D473,216, D456,386, D449,293, D355,193,
Taiwan Pat. #162,154; Other U.S. and foreign patents pending.
2010 CompVR Box Multilingual b01.indd 32010 CompVR Box Multilingual b01.indd 3 11/4/2009 4:51:36 PM11/4/2009 4:51:36 PM

4
CAJAS COMPVR SUBWOOFER
Caja De CompVR Manual Del Propietario
El Kicker CompVR Subwoofer Caja se diseñó para “Livin’ Loud” en el ambiente automotor duro. Utiliza las
técnicas avanzadas de materias y construcción para mantener el desempeño que óptimo para años para
venir
VERIFICA LOS OHMIOS
Esta CompVR caja tiene cableado interno para producir una carga de 2 ó 4 ohmios en las terminales
de conexión de cable de altavoz. Consulte la terminal o el empaque de la caja para saber la impedancia
específi ca de su caja. Asegúrese de que su amplifi cador puede manejar esta carga.
DCVR/VCVR CAJAS VENTILADAS
La ubicación y orientación de la caja afecta la calidad y la cantidad de los bajos. Las cajas han sido
diseñadas para vehículos tipo SUV y sedán y ofrecen varias opciones de montaje. La abertura de
ventilación de estas cajas no debe obstruirse. A ciertas frecuencias, la mayor parte de los bajos sale por
la abertura de ventilación. Por lo tanto, recomendamos que deje por lo menos 4 plg. (10 cm) de espacio
libre alrededor de la abertura de ventilación.
Si va a montar la caja al fondo del vehículo, es mejor apuntar el woofer hacia la parte de adelante del
vehículo. Por el contrario, si va a montarla cerca del asiento de atrás, apuntar el woofer hacia atrás
produce los mejores resultados.
Cuando sea más conveniente montar la caja en una pared lateral, la mejor opción es ponerla en el lado
izquierdo del vehículo. Esta orientación hará que la abertura de ventilación apunte hacia la parte de atrás
del vehículo y producirá el mayor rendimiento de bajos. Recuerde dejar por lo menos 4 plg. (10 cm) de
espacio entre la caja y la parte atrás del vehículo.
Después de determinar la mejor posición de montaje, verifi que cuidadosamente los lugares donde van
a ir los soportes de montaje. Asegúrese de que los tornillos de montaje no van a perforar el tanque de
gasolina, las líneas de freno, el cableado, etc., o a interferir con los componentes mecánicos debajo
de la superfi cie de montaje escogida. Invierta la caja, taladre agujeros piloto con una broca de 7/64 de
plg. (2.5 mm) y fíjele los 4 soportes de montaje en la parte de abajo con los tornillos pequeños que se
suministran.
Los soportes deben colocarse de tal manera que el extremo redondeado sobresalga aproximadamente
¾ de plg. (2 cm) del borde de la parte de abajo de la caja para permitir que el tornillo pase fácilmente a
través del soporte y fi je la caja al vehículo.
Enchufe el cable de altavoz del subwoofer en las terminales. Use el conector rojo como positivo y el
negro como negativo. Enchufe el otro extremo de este cable en el amplifi cador del subwoofer de acuerdo
con las instrucciones del manual del propietario. Con la caja hacia arriba, fíjela fi rmemente al vehículo con
los tornillos grandes que se suministran. Si los tornillos que se suministran no sirven para su instalación,
debe fi jar fi rmemente la caja al vehículo de alguna otra manera.
DCVR10 / DCVR12 / VCVR12 / VCVR15Modelo:
Distribuidor autorizado de KICKER:
Fecha de compra:
Número de modelo del Subwoofer:
Número de serie del Subwoofer:
2010 CompVR Box Multilingual b01.indd 42010 CompVR Box Multilingual b01.indd 4 11/4/2009 4:51:40 PM11/4/2009 4:51:40 PM
 Loading...