


KQ5
PREAMP EQUALIZER
Congratulations! You have just purchased the one of latest products in signal processing technology to carry the famous KICKER name. Your KICKER KQ5 is designed and built to give you years of troublefree performance. This installation manual contains valuable information on how to get the most out of your new KQ5 Preamp equalizer. Thanks for buying KICKER. Enjoy!
Features & Controls
Virtually any car stereo system will benefit from the addition of a Kicker KQ5 Preamp/Equalizer. The built-in preamplifier stage raises the signal level of your head unit before sending it on to the amplifier(s). This reduces the noise floor of your system and increases the dynamic range. The equalizer portion of the Kicker KQ5 has five bands carefully placed across the audible spectrum to allow you to boost or cut specific frequencies and fine-tune your system’s performance. Each band has a control which moves its center frequency up and down to precisely target the portion of the music you wish to control. Each band also has a control that allows you to boost or cut information at the chosen frequency up to 12dB.
Other features include illumination in a choice of amber or green, a remote bass level controller for the Kicker KX amplifiers, dual input capability, front to rear fader, and clipping indicator lights for input and output. All this housed in an attractive 1/2 DIN chassis with a fully isolated DC to DC power supply.
Back Panel Features
|
-On |
|
Turn |
Illumination |
|
+12VRemoteGround |
|
|
Selector |
Switch |
|
|
|
|
|
|
|
|
|
|
|
|
|
|
Right |
|
|
|
Level |
|||
|
Right |
|
Input |
Left |
|
Input |
Right |
|
Input |
Left |
Rear |
Right |
Rear |
Left |
Front |
Front |
Left |
Bass |
|||||
Line |
|
Input |
Line |
|
Line |
|
Line |
|
Output |
Output |
Output |
Output |
|
|
|||||||||
2 |
|
|
2 |
|
1 |
|
1 |
|
|
|
|
Remote |
|
|
|||||||||
A G
Front Panel Features |
|
|
|
|
Control |
|
|
|
|
Controls |
Controls |
|
||||
Control |
|
|
|
Level |
|
Controls |
|
|
Controls |
|||||||
|
|
|
|
|
|
|
Midrange |
|||||||||
Volume/Fader Input |
Selector |
Bypass Remote |
Bass |
|
Bass |
Controls |
Mid Bass |
Lower |
Upper |
Midrange |
High |
Frequency |
|
|||
|
EQ |
|
|
|
|
|
|
|
|
|||||||
Specifications
Variable Frequency Ranges |
|
|
Band 1 (40-90Hz) |
Cut/Boost - 12dB/12dB |
|
Band 2 |
(125-250Hz) |
Input Sensitivity - 950mV-6V |
Band 3 |
(300-750Hz) |
Output Voltage - 7.0Vrms |
Band 4 |
(1-4kHz) |
Signal-to-Noise Ratio - >95dB |
Band 5 (6-20kHz)
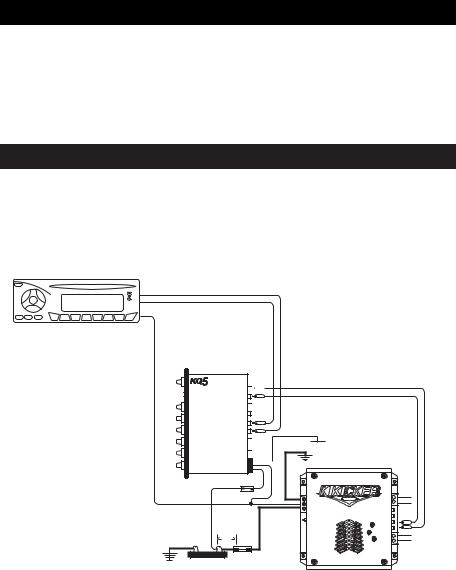
Wiring Configurations
The KICKER KQ5 goes in the signal chain between the head unit(s) and the system’s amplifiers. The most basic connection will be with one source unit and one amplifier:
RCA's OUT
fm
Stereo
DX 100.5KIKR
man.
REMOTE
L 

FRONT
OUTPUTR
L 

REAR
R
LINE 1L |
INPUTR |
L 

LINE 2R 

GROUND 
 REMOTE TURN-ON
+12V 
TURN-ON
REMOTE
18" or less
+12V |
FUSE |
BATTERY
 GROUND
GROUND |
 R- +
R- +
R+ +
|
INPUT |
L - + |
SPEAKERS |
L+ + |
When only one source unit is used it doesn’t matter which set of input jacks are used. Just make sure the input selector switch on the KQ5 front panel is in the correct position(in for Line 2 input, out for Line 1 input). Likewise, if only one set of RCA cables are run to your amplifier(s), make sure the Fader Control is turned to the direction that gives you output to the jacks being used (clockwise for rear, counter-clockwise for front).
2
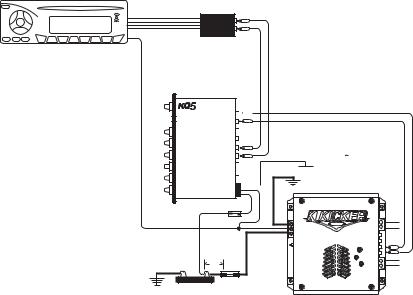
Additional Wiring Configurations:
If you are using a source unit that does not have RCA jacks, a Line Level Converter must be connected between the speaker output leads and the KQ5. This is to prevent damage to the source unit.
LINE LEVEL
CONVERTER
SPEAKER LEADS
fm
Stereo
DX 100.5KIKR
man.
REMOTE |
OUT |
L 

FRONT
OUTPUTR
L 

REAR
R IN
LINE 1L
INPUTR
L 

LINE 2R 

GROUND 
 REMOTE TURN-ON
+12V 
TURN-ON
REMOTE
18" or less
+12V |
FUSE |
BATTERY
 GROUND
GROUND |
 R- +
R- +
R+ +
|
INPUT |
L - + |
SPEAKERS |
L+ + |
3
 Loading...