


USE & CARE GUIDE
IMPORTANT SAFEGUARDS
When using electrical appliances, basic safety precautions should be followed, including the following:
1.Read all instructions before using.
2.Do not touch hot surfaces. Use handles and knobs when available.
3.This appliance must be properly installed and located in accordance with these instructions before
it is used.
4.The use of accessory attachments not recommended by the appliance manufacturer may result in fire, electrical shock, or injury to persons.
5.Do not place on or near a hot gas or electric burner, or in a heated oven.
6.Do not use outdoors.
7.To protect against fire, electric shock, and injury do not immerse cords, plugs, or the appliance in water or any other liquid.
8.Do not fill the Water Reservoir above the MAX FILL line.
9.Use only water in this appliance!
Do not put any other liquids or foods in the Water Reservoir except as instructed in the cleaning instructions in this guide.
10.Turn off and unplug the brewer
before cleaning or maintenance. Allow to cool before putting on or taking off parts and before cleaning the appliance.
11.For best operation, plug the appliance into its own electrical outlet on a dedicated circuit to prevent flickering of lights, blowing of fuses, or tripping a circuit breaker.
12.Do not operate any appliance with a damaged Power Cord or plug or after the appliance malfunctions or is damaged in any manner. Contact Keurig Customer Service to report any malfunction of or damage to the brewer.
13.Do not let the Power Cord hang over the edge of the table or counter, or touch hot surfaces.
14.To disconnect, press the Power Button on the brewer to “OFF” status and then remove the plug from the wall outlet.
15.Close supervision is necessary when any appliance is used by or near children.
16.Do not lift the brewer handle while brewing is in progress.
17.Always keep the Water Reservoir Lid on the Water Reservoir unless you are refilling it.
2

18.This appliance is equipped with a Power Cord having a grounding wire with a grounding plug.
The appliance must be grounded using a 3-hole properly grounded outlet. In the event of an electrical short circuit, grounding reduces the risk of electrical shock.
19.If the outlet is a standard 2-prong wall outlet, it is your personal responsibility and obligation to have it replaced with a properly grounded 3-prong wall outlet.
20. Do not, under any circumstances, cut or remove the third (ground) prong from the Power Cord or use an adapter.
21.Consult a qualified electrician if the grounding instructions are not completely understood, or
if doubt exists as to whether the appliance is properly grounded.
22.Do not use the appliance for other than its intended use.
23.Remove the shipping disk before brewing.
SAVE THESE INSTRUCTIONS.
WARNING TO USERS
AND PARENTS:
1.DO NOT permit children to use the brewer unless there is adult supervision. Brewer dispenses very hot water.
2.SPECIAL NOTICE FOR
HOT COCOA/OTHER USERS: IMMEDIATELY AFTER USING A HOT COCOA/OTHER POD, RUN A HOT WATER BREW CYCLE without a pod to avoid
the possibility of clogging the exit needle. DO NOT assume the next user will do this.
WARNING
RISK OF FIRE OR
ELECTRIC SHOCK !
DO NOT OPEN
WARNING: TO REDUCE THE RISK OF FIRE OR ELECTRIC SHOCK, DO NOT REMOVE THE BOTTOM COVER. NO USER SERVICEABLE PARTS ARE INSIDE. REPAIR SHOULD BE DONE BY AUTHORIZED SERVICE PERSONNEL ONLY.
3
CAUTION: There are three sharp needles that puncture pods, two above the Pod Holder and the other in the bottom of the Pod Holder. To avoid risk of injury, do not put your fingers in the Pod Holder Assembly.
CAUTION: There is extremely hot water in the Pod Holder during the brew process. To avoid risk of injury, do not lift the Handle or open the Pod Holder Assembly during the brewing process.
CAUTION: Do not fill above the MAX FILL line. If you fill the Water Reservoir above this point, you may occasionally get a larger brew than you selected for your first brew of the day. If you prefer to have your Water Reservoir filled to the top, we recommend you use a large mug for your first brew of the day to avoid any risk of overflow.
CAUTION: Please always keep the brewer in its upright position to avoid potential injury and/or damage to your brewer.
CAUTION: Very hot liquid. Adult supervision required.
SHORT CORD INSTRUCTIONS:
A short power-supply cord is provided to reduce the risk of becoming entangled in or tripping
over a longer cord. Longer detachable power-supply cords or extension cords are available and may be used if care is exercised in their use. If an extension cord is used,
(1)the marked electrical rating of the cord set or extension cord should be at least as great as the electrical rating of the appliance;
(2)the cord should be arranged
so that it will not drape over the countertop or tabletop where it
can be pulled on by children or tripped over unintentionally; and
(3) the extension cord must include a 3-prong grounding plug.
THIS PRODUCT IS FOR HOUSEHOLD USE ONLY.
WARNING
THIS PRODUCT CONTAINS
CHEMICALS, INCLUDING LEAD, WHICH IS KNOWN TO THE STATE OF CALIFORNIA TO CAUSE CANCER, BIRTH DEFECTS, OR OTHER REPRODUCTIVE HARM.
4

USER GUIDE TABLE OF CONTENTS
KEURIG® PLUS SERIES BREWER | K200
Features |
6 |
Touch Display Controls |
7 |
Quick Tips & To Dos |
8 |
SECTION 1
Setup & Cleansing Brew |
10 |
Brew Your First K-Cup® Pod |
12 |
Brew Your First K-Carafe® Pod |
13 |
Brew Your First K-MugTM Pod |
14 |
SECTION 2
Settings Menu |
16 |
Caring For Your Brewer |
18 |
Recycling K-Carafe® Pod Cups |
27 |
Stopping the Brew Process |
28 |
Adding Water |
28 |
Water FIlter Alert |
29 |
Brewer Alerts |
29 |
SECTION 3
Troubleshooting |
30 |
SECTION 4
Warranty |
32 |
5
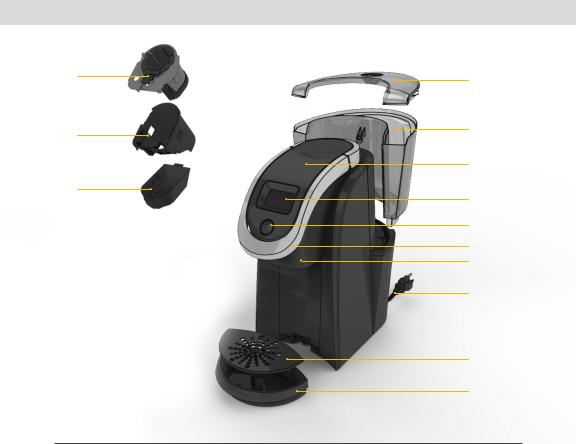
FEATURES
K
L
M
K200 SERIES BREWER
 A
A
 B
B
 C
C
 D
D
 E
E
 F
F
 G
G
 H
H
 I
I
 J
J
A. |
Water Reservoir Lid |
F. |
Handle |
K. Pod Holder |
B. |
Water Reservoir |
G. |
Brew Head |
L. Housing (K and L are the |
C. |
Top Housing |
H. |
Power Cord |
Pod Holder Assembly) |
D. |
Touch Display/Power Button |
I. |
Drip Tray Plate |
M. Base |
E. |
Brew Button |
J. |
Drip Tray |
|
6
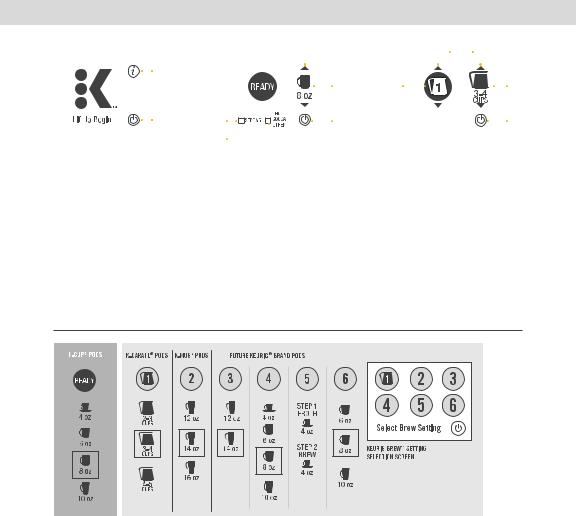
TOUCH DISPLAY CONTROLS
|
|
|
A |
|
|
|
|
|
|
|
|
|
|
|
|
|
|
|
|
|
|
|
|
scroll |
|
|
|
|
||||
|
|
|
|
|
|
|
|
|
|
|
|
|
|
|
|
|
C |
A |
|
|
|
|
|
|
|
|
|
|
|
|
B |
|
|
|
|
|
|
|
|
|
|
|
|
|
|
|
|
|
|
|
|
|
|
|
|
|
|
|
|
|
|
||||
|
|
|
|
|
|
|
|
|
|
|
|
|
|
|
|
|
|
|
|
|
|
|
|
|
|
|
|
|
||||
|
|
|
B |
|
|
|
|
|
|
|
|
|
|
|
|
|
|
|
|
|
|
|
|
|
|
|
|
|
|
|||
|
|
|
|
|
|
|
|
|
|
|
|
|
|
|
|
|
|
|
|
|
|
|
|
|
|
|
|
|
||||
|
|
|
A |
|
|
|
|
|
|
|
|
|
|
|
|
|
D |
|
|
|
|
|
|
|
|
|
|
|
|
|
C |
|
|
|
|
|
|
|
|
|
|
|
|
|
|
|
|
|
|
|
|
|
|
|
|
|
|
|
|
|
|||||
|
|
|
|
|
|
|
|
|
|
|
|
|
|
|
|
|
|
|
|
|
|
|
|
|
|
|
|
|||||
|
|
|
|
|
|
|
|
|
|
|
|
|
|
|
|
|
|
|
|
|
|
|
|
|
||||||||
|
|
|
|
B |
|
|
|
|
|
|
|
|
|
|
|
|
|
|
|
|
|
|
|
|
|
|
|
|
|
|
|
|
|
|
|
|
|
|
|
|
|
|
|
|
|
|
|
|
|
|
|
|
|
|
|
|
|
|
|
|
|
|
|
||
|
|
|
|
SCREEN FOR |
|
SCREEN FOR |
|
|
||||||||||||||||||||||||
HOME SCREEN |
K-CUP® PODS |
|
K-CARAFE® PODS |
|
|
|||||||||||||||||||||||||||
A. Settings Button |
A. STRONG |
|
A. KEURIG BREW™ |
|
|
|||||||||||||||||||||||||||
B. Power Button |
|
|
|
(only available for coffee) |
|
|
Setting 1 |
|
|
|||||||||||||||||||||||
|
|
|
|
B. HOT COCOA/OTHER |
B. Brew Size |
|
|
|||||||||||||||||||||||||
|
|
|
|
|
|
|
(for select non-coffee |
|
|
|
||||||||||||||||||||||
|
|
|
|
|
|
|
|
C. Power Button |
|
|
||||||||||||||||||||||
|
|
|
|
|
|
|
beverages) |
|
|
|
||||||||||||||||||||||
C.Brew Size
D.Power Button
BREW SETTINGS (OUTLINE INDICATES DEFAULT SIZE)
Select the KEURIG BREW™ Setting that matches the number on the pod lid.
7

QUICK TIPS & TO DOS
QUICK TIPS
With your Keurig® Plus Series brewer, you can brew a single cup or a full carafe.
TO DO
Register your brewer at Keurig.com. We’ll send you a special “thank you” when you do. Subject to availability and assortment/count will vary.
Join Club Keurig™ for special savings on Keurig® brand pods when purchased on Keurig.com
8

1 | LET’S GET BREWING!
9

SETUP
1.Place the brewer on a counter and plug into a grounded outlet.
2.Lift the Handle, remove and discard the shipping disk.
3.Remove the Water Reservoir and rinse. While removed, fill with bottled or filtered water, and return to the brewer. Be sure to fill below the MAX FILL line
and above the MIN FILL line.
NOTE: The reservoir only needs to be removed and filled for the initial set up. After the first fill, you can refill the Water Reservoir either while it is attached to the brewer or removed.
4.Press the Power Button and wait for preheating to complete, about three minutes.
10
CLEANSING BREW |
|
|
1 | LET’S GET BREWING! |
|
|
|
|
1. To begin a cleansing brew, place a |
2. Lift and lower the Handle. Do not place a |
||
12 ounce mug on the Drip Tray. |
Keurig® brand pod in the Pod Holder. |
||
3.Select a 8 ounce Brew Size and press the Brew Button.
4. You are now ready to use your brewer!
11
 Loading...