


INSTRUCTION MANUAL
INTERACTIVE VISUAL COMMUNICATOR
VC-H1
KENWOOD CORPORATION
© B62-0974-10 (K)
09 08 07 06 05 04 03 02 01

NOTICES TO THE USER
One or more of the following statements may be applicable:
FCC WARNING
This equipment generates or uses radio frequency energy. Changes or modifications to this equipment may cause harmful interference unless the modifications are expressly approved in the instruction manual. The user could lose the authority to operate this equipment if an unauthorized change or modification is made.
INFORMATION TO THE DIGITAL DEVICE USER REQUIRED BY THE FCC
This equipment has been tested and found to comply with the limits for a Class B digital device, pursuant to Part 15 of the FCC Rules. These limits are designed to provide reasonable protection against harmful interference in a residential installation.
This equipment generates, uses and can generate radio frequency energy and, if not installed and used in accordance with the instructions, may cause harmful interference to radio communications. However, there is no guarantee that the interference will not occur in a particular installation. If this equipment does cause harmful interference to radio or television reception, which can be determined by turning the equipment off and on, the user is encouraged to try to correct the interference by one or more of the following measures:
•Reorient or relocate the receiving antenna.
•Increase the separation between the equipment and receiver.
•Connect the equipment to an outlet on a circuit different from that to which the receiver is connected.
•Consult the dealer for technical assistance.

THANK YOU!
Thank you very much for purchasing this Interactive Visual Communicator. It was designed for plug-and-play color slow-scan television (SSTV). This portable unit includes a slow-scan converter, CCD camera, and LCD monitor. You can enjoy SSTV anywhere just by making a single connection with your amateur radio. KENWOOD believes that this product will provide more fun in your outdoor ham activities.
FEATURES
This Communicator has the following main features:
•Includes all equipment required for SSTV;
a slow-scan converter, CCD color camera, and LCD color monitor.
•Can store up to 10 images in memory. You may select the best image to send, from those images.
•Functions as a speaker microphone of a handy transceiver.
•Compatible with 8 popular SSTV modes besides the newly developed Fast FM mode.
•Equipped with a video input terminal to take in images from a digital camera or 8 mm VTR.
SUPPLIED ACCESSORIES
Check that everything listed below is included in your package.
Accessory |
Part Number |
Quantity |
|
|
|
Connection cable |
E30-3301-XX |
1 |
|
|
|
AC adapter |
W08-0559-XX |
1 |
|
|
|
Strap |
J69-0344-XX |
1 |
|
|
|
Cloth |
W01-0439-XX |
1 |
|
|
|
Warranty card |
— |
1 |
|
|
|
Instruction manual |
B62-0974-XX |
1 |
|
|
|
i

CONTENTS
PRECAUTIONS ......................................................... |
1 |
CONVENTIONS FOLLOWED IN THIS MANUAL ....... |
1 |
GETTING ACQUAINTED |
2 |
ORIENTATION........................................................... |
2 |
CONNECTOR DESCRIPTIONS ................................ |
2 |
PREPARATION |
3 |
INSTALLING ALKALINE BATTERIES ........................ |
3 |
ATTACHING THE STRAP .......................................... |
4 |
CONNECTING THE AC ADAPTER ........................... |
4 |
CONNECTION WITH A HANDY TRANSCEIVER ...... |
5 |
REMOVING/ REINSTALLING THE CAMERA UNIT ... |
5 |
QUICK USE |
6 |
OPERATING BASICS |
7 |
SWITCHING POWER ON/OFF ................................. |
7 |
SELECTING A SSTV MODE ...................................... |
7 |
CAPTURING IMAGES ............................................... |
8 |
TRANSMITTING IMAGES ......................................... |
9 |
RECEIVING IMAGES .............................................. |
10 |
AUXILIARY FUNCTIONS |
11 |
MEMORY PROTECTION ........................................ |
11 |
MEMORY RESET .................................................... |
11 |
ii
BATTERY SAVER .................................................... |
11 |
SUPERIMPOSING A CALL SIGN ............................ |
12 |
AUTO TRANSMIT ................................................... |
13 |
AF MUTING ............................................................. |
13 |
DISPLAY CONTRAST CHANGE ............................. |
13 |
MAINTENANCE |
14 |
GENERAL INFORMATION ...................................... |
14 |
SERVICE ................................................................. |
14 |
SERVICE NOTE ...................................................... |
14 |
CLEANING .............................................................. |
14 |
TROUBLESHOOTING ............................................. |
15 |
APPENDIX |
16 |
VC-H1 DATA PORT PIN FUNCTIONS .................... |
16 |
CONNECTION DIAGRAM WITH TS-570 |
|
OR TS-870 .............................................................. |
16 |
COMPUTER CONTROL .......................................... |
17 |
SPECIFICATIONS |
19 |

PRECAUTIONS
Please observe the following precautions to prevent fire, personal injury, or product damage:
•Never open this product. You will get an electric shock if you touch the circuit on which high voltage is applied.
•Do not install batteries in a hazardous environment where sparks could cause an explosion.
•Never discard old batteries in fire because extremely high temperatures can cause batteries to explode.
•Do not modify this product unless instructed by KENWOOD documentation.
•Do not apply excessive force to the monitor display.
•Do not expose this product to long periods of direct sunlight nor place it close to heating appliances.
•Do not place this product in excessively dusty areas, humid areas, wet areas, nor on unstable surfaces.
•If an abnormal odor or smoke is detected coming from this product, turn OFF the power immediately and remove the batteries from the product. When using AC power, also remove the AC adapter from an AC outlet. Contact your authorized KENWOOD dealer, customer service, or service station.
CONVENTIONS FOLLOWED IN THIS MANUAL
The writing conventions described below have been followed to simplify instructions and avoid unnecessary repetition.
Instruction |
What to Do |
|
|
|
|
Press [KEY]. |
Press and release KEY. |
|
|
|
|
Press [KEY1]+[KEY2]. |
Press and hold KEY1, then |
|
press KEY2. |
||
|
||
|
|
|
Press |
With VC-H1 power OFF, |
|
press and hold KEY, then |
||
[KEY]+ POWER ON. |
||
slide the PWR switch upward. |
||
|
||
|
|
|
|
With VC-H1 power OFF, |
|
Press [KEY1]+[KEY2]+ |
press and hold KEY1 and |
|
POWER ON. |
KEY2, then slide the PWR |
|
|
switch upward. |
|
|
|
Note: Pressing the same key again immediately after pressing [KEY]+ POWER ON causes the setting to be changed back.
1
GETTING ACQUAINTED
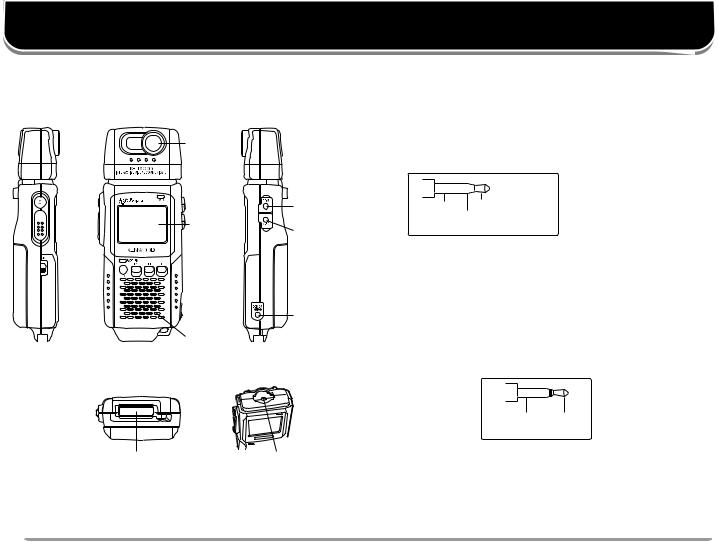
ORIENTATION
CCD camera
COM jack
LCD
monitor  Video output jack
DC IN jack
Speaker/ microphone
DATA port |
Video input jack |
CONNECTOR DESCRIPTIONS
qVideo input jack
This jack accepts a 3.5 mm (1/8") diameter, 3-conductor plug. You may connect a digital camera
or 8 mm VTR to take in images (acceptable video signals: 75 Ω, 1 VP-P (140 IRE) ±15%, NTSC).
|
|
|
|
1 When connecting a device |
|
|
|
|
other than the provided |
|
|
|
|
|
Ground |
|
|
No Connection 1 |
camera unit, using this |
|
Video |
conductor could cause the |
||
|
signal |
device to be damaged. |
||
wCOM jack
Connect a personal computer in which a dedicated program has been installed. For details, contact your authorized KENWOOD dealer, customer service, or service center.
eVideo output jack
Connect an external monitor, if you prefer. This jack accepts a 2.5 mm (1/10") diameter, 2-conductor plug.
Ground Video
signal
rDC IN jack
Connect the provided AC adapter to use power supplied from an AC outlet.
tDATA port
Connect your transceiver. See page 5.
2
PREPARATION
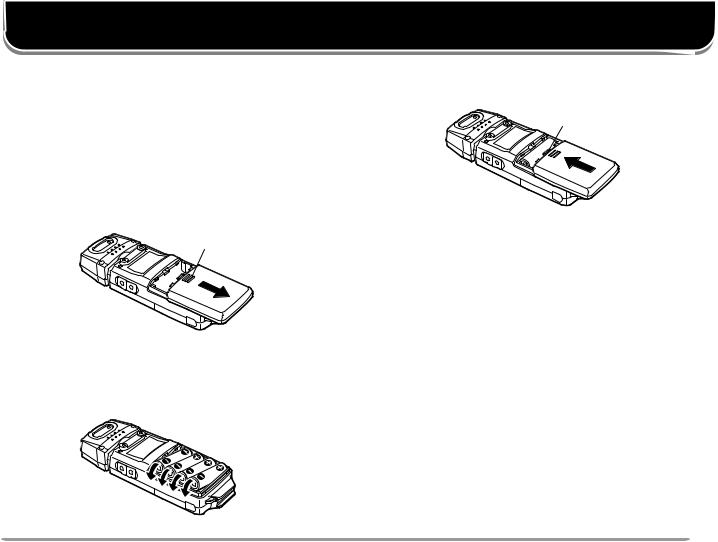
INSTALLING ALKALINE BATTERIES
WARNING!
DO NOT INSTALL THE BATTERIES IN A HAZARDOUS ENVIRONMENT WHERE SPARKS COULD CAUSE AN EXPLOSION.
NEVER DISCARD OLD BATTERIES IN FIRE BECAUSE EXTREMELY HIGH TEMPERATURES CAN CAUSE BATTERIES TO EXPLODE.
1To remove the battery cover, slide the cover outward while slightly pushing on the grooves on the cover.
Grooves
2Insert four AA (LR6) alkaline batteries.
•Be sure to match the battery polarities with those marked on the VC-H1.
3Align the three tabs on the battery cover, then slide the cover inward until the center tab clicks.
Note:
It is strongly recommended to use high quality alkaline batteries rather than manganese batteries, to enjoy longer periods of battery life. Do not use commercially available NiCd batteries.
If you will not use the VC-H1 for a long period, remove the batteries from the VC-H1.
Do not use different kinds of batteries together.
When the battery voltage is low, replace all four old batteries with new ones.
The approximate lives of alkaline batteries depending on the operation status are shown below:
Camera ON |
50 minutes |
|
|
Monitor ON (memory recalled) |
2 hours |
|
|
Monitor OFF |
6 hours |
|
|
When the batteries become almost empty while the TX/RX indicator is green, the indicator starts blinking. Replace the batteries at that time. This function, however, does not operate while Fast FM mode is currently selected.
3
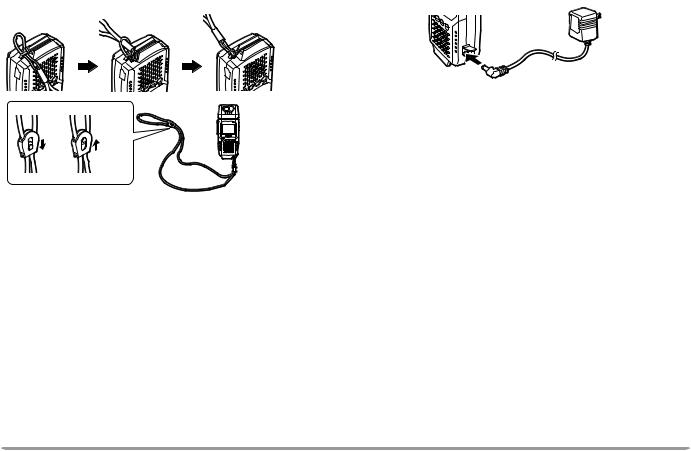
ATTACHING THE STRAP
If you want, attach the provided strap to the bottom of the VC-H1. The strap can be used to hang the VC-H1 around your neck.
CONNECTING THE AC ADAPTER
Use the provided AC adapter to connect the VC-H1 to an AC outlet if you want to use AC power.
|
|
WARNING! |
|
|
USING AN AC ADAPTER OTHER THAN THE PROVIDED |
|
|
ADAPTER CAN CAUSE FIRE OR PRODUCT DAMAGE. |
Lock |
Unlock |
DO NOT USE AN EXTENSION CABLE UNLESS ABSOLUTELY |
NECESSARY. IMPROPER EXTENSION CABLES CAN CAUSE |
||
|
|
FIRE OR ELECTRIC SHOCK. |
|
|
Note: The provided AC adapter does not function as a battery charger. |
4
 Loading...