


KDC-U549BT KDC-U4549SD KDC-U4549
CD-RECEIVER
INSTRUCTION MANUAL
© 2010 Kenwood Corporation All Rights Reserved. |
B64-4803-10/01 (MW/M0) |

CONTENTS
Safety |
3 |
Maintenance |
|
Preparation |
4 |
How to attach/detach the faceplate |
|
How to reset your unit |
|
How to prepare the remote controller |
|
(RC-405) |
|
Basic Operations |
6 |
Muting upon the reception of a phone call |
|
(KDC-U4549SD/KDC-U4549 only) |
|
Getting Started |
8 |
Canceling the display demonstration |
|
Setting the demonstration mode |
|
Adjusting the clock |
|
Initial settings before operations |
|
Listening to the Radio |
10 |
Changing the frequency steps |
|
Adjust [SETTINGS] mode settings |
|
Listening to the other external |
|
components |
11 |
Listening to a Disc/ USB/ SD/ iPod 12
Start playing a disc
Start playing a USB device or iPod Removing the USB device or iPod Start playing the disc changer Start playing an SD
Removing the SD card Selecting Repeat Play Selecting Random Play All Random Play
Selecting Magazine Random Play Selecting Scan Play
Selecting a folder/track/file Alphabet Search for iPod
Direct Music Search using the remote controller (RC-405)
Direct Disc Search using the remote controller (RC-405)
My Playlist for iPod
iPod control by Hand mode Adjust [SETTINGS] mode settings
Operation of Hands-Free Phoning 18
Getting Started
Making a Call
Receiving a Call
During a Call
Call Waiting
Downloading the Phone Book
Bluetooth Setup |
22 |
Easy Pairing function |
|
Registering Bluetooth Device (Pairing) |
|
Selecting the Bluetooth Device |
|
Setting a Voice Command |
|
Bluetooth Setup |
|
SMS (Short Message Service) |
26 |
Downloading the SMS |
|
Display the SMS |
|
Function settings |
28 |
Installation/connection |
30 |
Troubleshooting |
34 |
Specifications |
36 |
2 English

Safety
WARNING
Stop the car before operating the unit.
Important to know...
■To prevent a short circuit, never put or leave any metallic objects (such as coins or metal tools) inside the unit.
■Caution: Adjust the volume so that you can hear sounds outside the car. Driving with the volume too high may cause an accident.
■Condensation: When the car is airconditioned, moisture may collect on the laser lens. This may cause disc read errors. In this case, remove the disc and wait for the moisture to evaporate.
■The illustrations in this manual are examples used to explain more clearly how the controls are used. Therefore, what appears on the illustrations may differ from what appears on the actual equipment.
■If you experience problems during installation, consult your Kenwood dealer.
■When you purchase external components, check with your Kenwood dealer to make sure that they work with your model and in your area.
Maintenance
Cleaning the unit: Wipe off the dirt on the panel with a dry silicon or soft cloth. Failure to observe this precaution may result in damage to the monitor or unit.
Cleaning the connector: Wipe off dirt on the connector of the unit and faceplate. Use a cotton swab or cloth.
The marking of products using lasers
CLASS 1
LASER PRODUCT
The label is attached to the chassis/case and says that the component uses laser beams that have been classified as Class 1.
It means that the unit is utilizing laser beams that are of a weaker class. There is no danger of hazardous radiation outside the unit.
English 3
Preparation
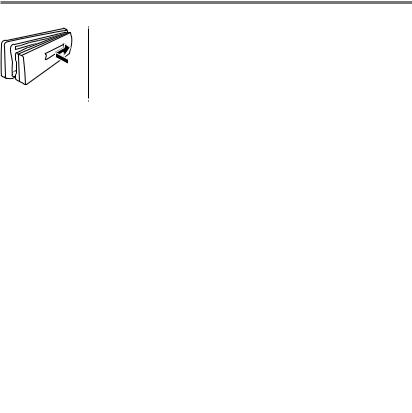
How to attach/detach the faceplate
1 |
1 |
2
2
■Do not expose the faceplate to direct sunlight, excessive heat, or humidity. Also avoid places with too much dust or the possibility of water splashing.
■Keep the faceplate in its casing while detached.
■The faceplate is a precision piece of equipment and can be damaged by shocks or jolts.
■To prevent deterioration, do not touch the terminals of the unit and faceplate with your fingers.
How to reset your unit
|
If this unit fails to operate |
|
1 |
properly, press the reset |
|
button. |
||
|
||
|
2 The unit returns to factory |
|
|
settings when the reset |
|
3 |
button is pressed. |
|
|
Reset button
How to prepare the remote controller (RC-405)
When you use the remote controller for the first time, pull out the insulation sheet.
Insulation sheet
If the effectiveness of the remote controller decreases, replace the battery.
2 |
4 |
|
|
|
3 |
1 |
|
¤Caution:
■Do not set the remote control in hot places such as on the dashboard.
■Lithium battery.
Danger of explosion if the battery is incorrectly replaced. Replace only with the same or equivalent type.
■The battery pack or batteries shall not be exposed to excessive heat such sunshine, fire or the like.
■Keep battery out of reach of children and in original package until ready to use. Dispose of used batteries promptly. If swallowed contact physician immediately.
4 English

■The Bluetooth word mark and logos are owned by the Bluetooth SIG, Inc. and any use of such marks by Kenwood Corporation is under license. Other
trademarks and trade names are those of their respective owners.
■SDHC Logo is a trademark of SD-3C, LLC.
■“Made for iPod” and “Made for iPhone” mean that an electronic accessory has been designed to connect specifically to iPod or iPhone, respectively, and has been certified by the developer to meet Apple performance standards. Apple is not responsible for the operation of this device or its compliance with safety and
regulatory standards. Please note that the use of this accessory with iPod or iPhone may affect wireless performance.
■iPhone, iPod, iPod classic, iPod nano, and iPod touch are trademarks of Apple Inc., registered in the U.S. and other countries.
This symbol mark indicates that Kenwood manufactured this product so as to decrease harmful influence on the environment.
English 5

Basic Operations
|
|
|
|
|
|
|
|
Loading slot |
||||||||
Remote sensor |
|
|
|
|
|
|
|
|
|
|
|
|||||
■ Do not expose to bright sunlight. |
|
|
|
|
|
|
|
Ejects the disc |
||||||||
|
|
|
|
|
|
|
|
|
|
|
|
|
|
|
|
|
|
|
|
|
|
|
|
|
|
|
|
|
|
|
|
|
|
|
|
|
|
|
|
|
|
|
|
|
|
|
|
|
|
|
|
|
|
|
|
|
|
|
|
|
|
|
|
|
|
|
|
|
|
|
|
|
|
|
|
|
|
|
|
|
|
|
|
|
|
|
|
|
|
|
|
|
|
|
|
|
|
|
|
|
|
|
|
|
|
|
|
|
|
|
|
|
|
|
|
|
|
|
|
|
|
|
|
|
|
|
|
|
|
|
|
|
|
|
|
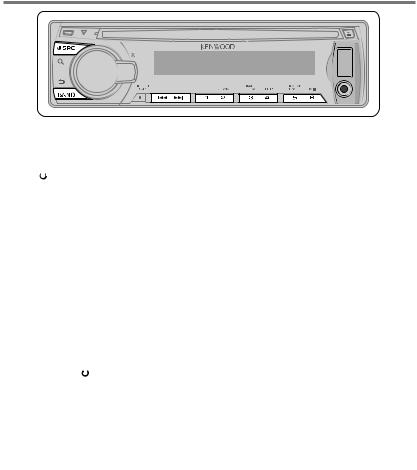
Volume knob
Detaches the faceplate
The following indicator lights up when...
ST: A stereo broadcast is received. IN: A disc is in the unit.
ATT: The sound attenuates.
EQ: [SYSTEM Q] is set to an EQ mode other than [NATURAL]. (page 28)
B.BOOST: [BASS BOOST] is set to [1] or [2]. (page 28)
 : Indicates that the Music Search mode is selected now.
BT: Bluetooth cell-phone connection status.
Display window
USB terminal 

Auxiliary input jack 


Slide open the cover
The illustration and button names used for explanation in this manual are of
KDC-U549BT (unless mentioned otherwise). Refer to the table below for the difference:
KDC-U549BT
KDC-U4549SD
KDC-U4549
6 English

When you press or hold the following button(s)...
Main unit |
Remote |
General operation |
||
controller |
||||
|
|
|
||
|
|
— |
■ Turns on. |
|
|
|
■ Turns off if pressed and held. |
||
|
|
|
||
|
SRC |
|
Selects the available sources (TUNER, USB or iPod, SD, CD, AUX, |
|
|
SRC |
STANDBY), if the power is turned on. |
||
|
||||
|
||||
|
|
• If the source is ready, playback also starts. “iPod”, “SD” and “CD” are |
||
|
|
|
selectable only when an iPod is connected, an SD card is inserted or a |
|
|
|
|
disc is loaded. |
|
Volume knob |
VOLud Adjusts the volume level. |
|||
(turn) |
5 / ∞ |
Selects items. |
||
Volume knob |
ENT 38 |
Confirms selection. |
||
(press) |
— |
Enters [FUNCTION] settings. |
||
|
|
*AM– / |
■ Selects the FM bands (FM1/ FM2/ FM3) or AM. |
|
BAND |
■ Selects the next folder. (Press *AM– on remote controller to select |
|||
#FM+ |
||||
|
|
the previous folder.) |
||
|
|
|
||
6 (38) |
ENT 38 |
Pauses/resumes playback of a disc/ USB device/ SD/ iPod. |
||
|
|
4/ |
■ Searches for radio station. |
|
4 / ¢ |
■ Selects track/file. |
|||
+¢ |
||||
|
|
■ Fast-forwards/reverses tracks/files if pressed and held. |
||
|
|
|
||
|
|
|
■ Changes the display information. |
|
SCRL DISP |
— |
■ Scrolls the display information if pressed and held. |
||
■ Enters clock adjustment mode directly (page 8) if pressed and held |
||||
|
|
|
||
|
|
|
while in clock display screen. |
|
|
|
|
KDC-U549BT only: |
|
|
|
|
■ Enters Bluetooth mode. (page 18) |
|
■ Press to answer an incoming call.
—■ Enters Bluetooth easy pairing mode if pressed and held. (page 22)
SD |
— |
KDC-U4549SD only: |
|
Selects “SD” source. |
|||
|
|
||
|
|
KDC-U4549 only: |
|
iPod |
— |
■ Selects “iPod” source. |
|
■ Switches the controlling terminal (HANDS ON/ HANDS OFF) for |
|||
|
|
||
|
|
iPod playback if pressed and held. (page 15) |
|
— |
AUD |
Enters [AUDIO CONTROL] settings directly. |
|
— |
ATT |
Attenuates the sound. |
|
• To return to the previous level, press the button again. |
|||
|
|
||
|
|
Returns to the previous item. |
|
|
|
Exit from setting mode. |
|
|
EXIT |
• Press and hold on the main unit will also exit from the setting |
|
|
|
mode. |
English 7

Muting upon the reception of a phone call (KDC-U4549SD/ KDC-U4549 only)
To use this feature, connect the MUTE lead to your telephone using a commercial telephone accessory. (See “Installation Manual” on a separate volume.)
When a call comes in, “CALL” appears.
■The audio system pauses.
■To continue listen to the audio system during a call, press  SRC. “CALL” disappear and the audio system resumes.
When a call ends, “CALL” disappear.
■ The audio system resumes.
Getting Started
Canceling the display |
Adjusting the clock |
||
demonstration |
1 |
Press the volume knob to enter |
|
The display demonstration is always turned |
|
[FUNCTION] mode. |
|
on unless you cancel it. |
2 |
Turn the volume knob to select |
|
|
|
|
[SETTINGS], then press to enter. |
When you turn on the power (or after you |
3 |
Turn the volume knob to select [CLOCK], |
|
reset the unit), the display shows: |
|
then press to enter. |
|
|
[CANCEL DEMO] \ [PRESS] \ [VOLUME |
4 |
Turn the volume knob to select [CLOCK |
|
KNOB] |
|
ADJUST], then press to enter. |
1 |
Press the volume knob. |
|
Clock hour flashes on the display. |
|
[YES] is selected as the initial setup. |
5 |
Turn the volume knob to adjust the hour, |
2 |
Press the volume knob again to confirm. |
|
then press to enter minute adjustment. |
|
[DEMO OFF] appears. |
|
Clock minutes flashes on the display. |
■ If no operation is done for about 15 seconds |
6 |
Turn the volume knob to adjust the |
|
|
or if you turn the volume knob to select |
|
minute, then press to confirm. |
|
[NO] in step 2, [DEMO MODE] appears and |
|
Press 4 / ¢ to move between the |
|
the display demonstration starts. |
|
hour and minute adjustment. |
Setting the demonstration mode |
7 |
Hold to finish the procedure. |
|
|
|
||
1 |
Press the volume knob to enter |
|
|
|
[FUNCTION]. |
|
|
2 |
Turn the volume knob to select [DEMO |
|
|
|
MODE], then press to enter. |
|
|
3 |
Turn the volume knob to select [ON] or |
|
|
|
[OFF]. |
|
|
|
If [ON] is selected, display demonstration |
|
|
|
starts if no operation is done for about 20 |
|
|
|
seconds. |
|
|
4 |
Hold to finish the procedure. |
|
|
8 English

Initial settings before operations
1Press  SRC to enter [STANDBY] mode.
2Press the volume knob to enter [FUNCTION] mode.
3Turn the volume knob to select [INITIAL SET], then press to enter.
4Turn the volume knob to make a selection, then press to confirm.
See table below for selection.
5Hold to finish the procedure.
Item |
Selectable setting (Preset: *) |
PRESET TYPE |
NORMAL *: Memorizes one station for each preset button in each band (FM1/ FM2/ FM3/ AM). ; |
|
MIX: Memorizes one station for each preset button regardless of the selected band (FM1/ FM2/ FM3/ AM). |
KEY BEEP |
ON */ OFF: Activates/deactivates the keypress tone. |
TDF ALARM |
ON: Activates the alarm if you forgot to detach the faceplate when ACC is set to OFF. ; OFF *: Cancels. |
BUILT-IN AUX |
ON1 *: Outputs sound of the connected external component through the car speakers when “AUX” is selected as the |
|
source. ; ON2: Outputs sound from the connected external component when “AUX” is selected as the source. When |
|
you turn on the power, the sound attenuates (to prevent noise when no external component is connected). Turn the |
|
volume knob clockwise to return to the previous volume level. ; OFF: Disables “AUX” in source selection. |
CD READ |
1*: Automatically distinguishes between audio file disc and music CD. ; 2: Forces to play as a music CD. No sound can |
|
be heard if an audio file disc is played. |
SWITCH |
KDC-U549BT only: |
PREOUT |
REAR */ SUB-W: Selects whether rear speakers or a subwoofer are connected to the line out terminals on the rear of |
|
the unit (through an external amplifier). |
SP SELECT |
OFF */ 5/4/ 6 × 9/6/ OEM: Selects the speaker size for optimum performance. |
F/W UP xx.xx |
YES: Starts upgrading the firmware. ; NO *: Cancels (upgrading is not activated). |
|
For details on how to update the firmware, see: www.kenwood.com/cs/ce/ |
English 9
Listening to the Radio
■Press and hold for about 2 seconds to memorize the current station.
■Press briefly to recall memorized station.
1Press  SRC to select “TUNER”.
2Press BAND repeatedly to select a band (FM1/ FM2/ FM3/ AM).
3Press 4 / ¢ to search for a station.
Using the remote controller (RC-405)
#FM+ / *AM– |
: Selects band. |
4 / +¢ |
: Selects station. |
1 – 6 |
: Selects preset station. |
Changing the frequency steps
You can change the frequency step of FM/ AM:
FM : 50 kHz to 200 kHz AM : 9 kHz to 10 kHz
1Press and hold  SRC to turn off the power.
2While pressing number buttons 1 and 5, press  SRC.
SRC.
Release your fingers from the buttons after the display appears.
■To restore the initial setting, repeat the same procedure.
■When the frequency step is changed, the frequencies in the memory are deleted.
Adjust [SETTINGS] mode settings
While listening to the radio...
1Press the volume knob to enter
[FUNCTION] mode.
2Turn the volume knob to select [SETTINGS], then press to enter.
3Turn the volume knob to make a selection, then press to confirm.
See table below for selection.
4Hold to finish the procedure.
Item |
Selectable setting (Preset: *) |
SEEK MODE |
Selects the tuning mode for 4 / ¢ buttons. |
|
AUTO1 *: Automatically search for a station. ; AUTO2: Search in the order of the stations in the preset memory. ; |
|
MANUAL: Manually search for a station. |
AUTO MEMORY |
YES: Automatically starts memorizing 6 stations with good reception. ; NO *: Cancels (automatic memorizing is |
|
not activated). (Selectable only if [NORMAL] is selected for [PRESET TYPE].) (page 9) |
MONO SET |
ON: Improves the FM reception (but the stereo effect may be lost). ; OFF *: Cancels (stereo effect resumes). |
10 English
Listening to the other external components
Preparation : Make sure [ON1] or [ON2] is selected for [BUILT-IN AUX]. (page 9)
1Press  SRC to select “AUX”.
2Turn on the external component and start playing.
3Turn the volume knob to adjust the volume.
Portable audio device (commercially available)
Auxiliary input jack 

3.5 mm stereo mini plug (commercially available)
English 11
 Loading...