


GPS NAVIGATION SYSTEM
DNX7340BT
DNX7340BTM
MONITOR WITH DVD RECEIVER
DDX7034BT
DDX7034BTM
DDX6034
DDX6034M
INSTRUCTION MANUAL
This instruction manual is used to describe models listed below.
Model availability and features (functions) may differ depending on the country and sales area.
•Region 2 (DVD Region Code 2 area)
•Region 3 (DVD Region Code 3 area)
•Region 4 (DVD Region Code 4 area)
•Region 6 (DVD Region Code 6 area)
© B64-4512-00/01 (MW/M2W/XW/VV)
Contents
How to read this manual |
4 |
Before Use |
6 |
Notes |
7 |
Functions of the buttons on the front |
|
panel |
10 |
Getting Started |
12 |
How to Display the Navigation Screen |
12 |
How to Select the Source |
12 |
How to Set a Medium / a Device |
13 |
Basic Operation |
14 |
How to Display the Source Control Screen |
14 |
How to Display Top Menu Screen |
15 |
Operation on the Playback Screen of Visual |
|
Sources |
16 |
How to Display the Easy Control Screen |
17 |
Watching DVD/Video CD |
18 |
Playback Screen |
18 |
Easy Control Screen |
18 |
Source Control Screen |
18 |
DVD-VIDEO Disc Menu |
20 |
DVD-VR Menu Control |
21 |
Video CD Zoom Control |
21 |
Music Disc/ Audio File Listening & Video |
|
File/ Picture File Watching |
22 |
Source Control Screen |
22 |
List Select |
23 |
USB device select |
24 |
Link search (Audio File in USB/SD) |
25 |
Playback Screen (Video file, Picture file) |
25 |
Easy Control Screen (Video file, Picture file) |
26 |
Picture Control |
26 |
Movie Menu Control |
27 |
iPod Control |
28 |
Playback Screen |
28 |
Easy Control Screen |
28 |
Source Control Screen |
29 |
iPod List |
29 |
Link search (Music file) |
30 |
Initial Setup |
85 |
Radio Listening |
31 |
Source Control Screen |
31 |
Preset Select |
32 |
Auto Memory |
32 |
Manual Memory |
33 |
Radio Text (Region 2/ 3 models) |
33 |
Set Station Name(Region 4/ 6 models) |
34 |
Traffic Information (Region 2/ 3 models) |
34 |
Search by Program Type |
|
(Region 2/ 3 models) |
35 |
Frequency Step Setting |
|
(Region 4/ 6 models) |
35 |
TV Watching |
36 |
Function During TV Screen |
36 |
Easy Control Screen |
36 |
Source Control Screen |
37 |
Auto Memory |
38 |
Manual Memory |
38 |
Preset Select |
39 |
Set Station Name |
39 |
Bluetooth Audio Control |
40 |
Before Use |
40 |
Source Control Screen |
40 |
Other Functions |
41 |
How To Use the Character Entry Screen |
41 |
External Device Power Supply Control |
|
(DNX/ DDX7 models) |
41 |
Muting Audio Volume upon Reception of |
|
Phone Call |
42 |
Screen Control |
43 |
Screen Control |
43 |
2  DNX7340BT/DNX7340BTM/DDX7034BT/DDX7034BTM/DDX6034/DDX6034M
Hands Free Unit Control |
44 |
Before Use |
44 |
Downloading the Phonebook |
44 |
Receiving a Call |
44 |
During a Call |
44 |
Call Waiting |
45 |
Making a Call |
45 |
Calling by Phonebook |
46 |
Calling by Entering a Phone Number |
46 |
Making a Call Using Call Records |
46 |
Calling by Voice Recognition |
47 |
Controlling Tone-based Services |
48 |
Setting Up the Hands-Free Phone |
48 |
Voice Registration |
49 |
Key Word Voice Registration |
50 |
Phone Number Preset |
51 |
SMS (Short Message Service) |
51 |
Audio Control |
53 |
Audio Control Menu |
53 |
Audio Control |
53 |
Equalizer Control |
54 |
Graphic Equalizer Setup |
|
(DNX/ DDX7 models) |
54 |
Tone Setup (DDX6 models) |
55 |
Zone Control |
55 |
Space Enhancer (DNX/ DDX7 models) |
56 |
Position (DNX/ DDX7 models) |
56 |
Remote Controller |
79 |
Battery installation |
79 |
Remote Controller mode switch |
79 |
Common operations (AUD mode) |
80 |
DVD/VCD (DVD mode) |
81 |
Music Disc/Audio file/Video file/ Picture file |
|
(AUD mode) |
82 |
Radio (AUD mode) |
83 |
NAVI (NAVI mode) |
83 |
TV (TV mode) |
84 |
Status bar Indicator items |
86 |
DVD Language Codes |
87 |
Help? Troubleshooting |
88 |
Help? Error |
89 |
Specifications |
90 |
Setup Menu |
58 |
How to Display SETUP Menu Screen |
58 |
[Information] |
|
DivX Setup |
59 |
Software Information |
59 |
[System] |
|
User Interface |
60 |
Language Setting |
60 |
Touch Panel Adjustment |
61 |
Clock Setup |
61 |
Security Setup |
62 |
Monitor Angle Control |
63 |
EXT SW Setup |
63 |
Setup Memory |
64 |
[Display] |
|
Entering Background |
65 |
Panel Color Coordinate |
66 |
Screen Adjustment |
67 |
[Bluetooth SETUP] |
|
Registering Bluetooth Unit |
67 |
Registering Bluetooth Unit PIN Code |
69 |
Bluetooth Unit Connection |
69 |
[AV-IN SETUP] |
|
AV Input Setup |
70 |
[AV Interface] |
|
AV Interface Setup |
70 |
[Navigation] |
|
Navigation Setup |
71 |
[Audio SETUP] |
|
DSP Bypass Control (DNX/DDX7 models) |
71 |
Speaker Setup |
72 |
Car Type (DTA) Setup (DNX/DDX7 models) |
73 |
[DVD SETUP] |
|
DVD Setup |
74 |
DVD Language Setup |
75 |
DVD Parental Level Setup |
75 |
Disc Setup |
76 |
[USB SETUP], [SD SETUP] |
|
USB/ SD Setup |
77 |
[iPod SETUP] |
|
iPod Setup |
77 |
[TUNER SETUP] |
|
Tuner Setup (Reagion 2/ 3 models) |
78 |
[TV SETUP] |
|
TV Setup |
78 |
English  3
3
How to read this manual
This manual uses illustrations to explain its operations.
The displays and panels shown in this manual are examples used to provide clear explanations of the operations.
For this reason, they may be different from the actual displays or panels used, or some display patterns may be different.
Selecting a screen item
Select and choose an item on the screen. Select the item by touching the button on the
screen.
Shhort Press
Pre
Change in the screen
With each operation, the screen changes in the order shown here.
∞: Continues to the next line.
¶: Ends here.
Continue to the next page
The instruction continues to the next page. Make sure to flip the page for the rest of the instruction.
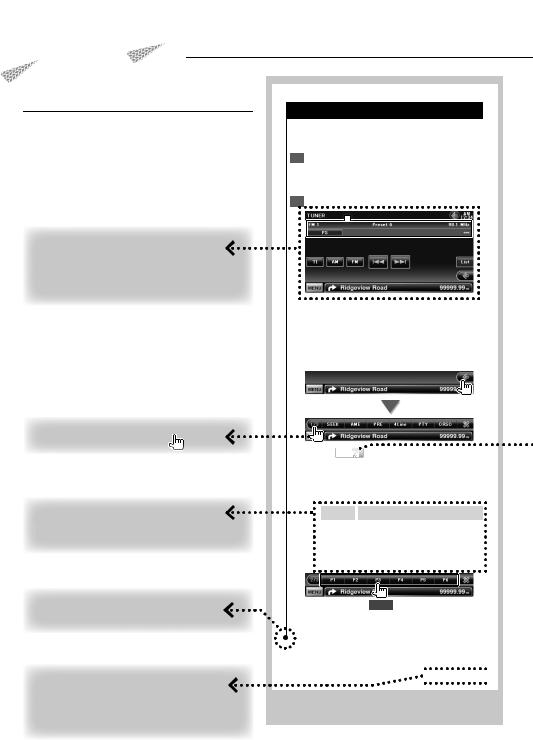
Source Control Screen
Switches to the source control screen to use various functions.
1Display the Source Control Screen
See <How to Display the Source Control Screen>.
2 Operation on the Source Control screen
[FM] Switches to the FM1/2/3 band.
[AM] Switches to the AM band. [ ], [D] Tunes in a station.
Use the [SEEK] to change the frequency switching.
Multi Function
[CRSC]  FM Turns the CRSC function On or Off.
[SEEK] Switches the Seek mode.
The mode is switched in the following order each time you touch the button.
Display |
|
Setting |
"AUTO1" |
|
Tunes in a station with good reception |
|
|
automatically. |
"AUTO2" |
|
Tunes in stations in memory one after another. |
"MANU" |
|
Switches to the next frequency manually. |
2 sec. 
Continue to touch until the memory number appears.
 Next page
The above operation example with the mark differs from the actual operation.
4  DNX7340BT/DNX7340BTM/DDX7034BT/DDX7034BTM/DDX6034/DDX6034M
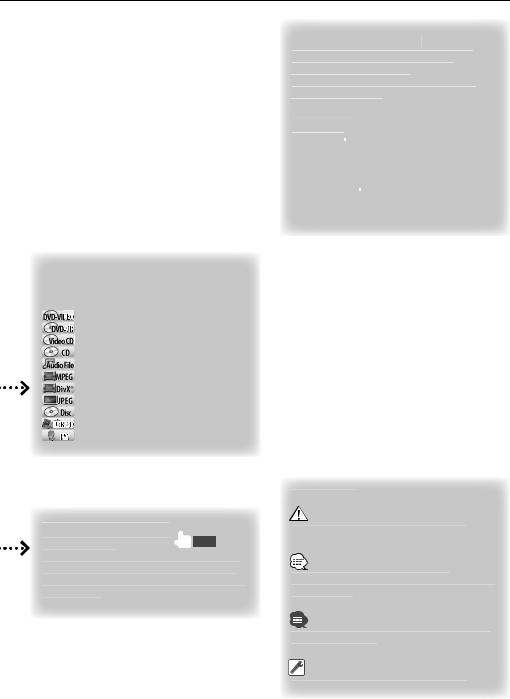
Function Icon
Icons representing available functions are shown below.
DEO: Function of DVD-VIDEO playback.
-VR : Function of DVD-VR playback.
 : Function of Video CD playback.
:Function of CD (CD-DA) playback.
:Function of Audio File playback.
:Function of MPEG file playback.
:Function of DivX file playback.
:Function of JPEG file playback.
:Function of Disc (DVD, CD) media. USB/SD : Function of USB device or SD card.
FM : Function of FM reception.
Press 2 seconds or more
Press the button, denoted by  2sec. , for 2 seconds or more
Indicates to press and hold down the button until operation starts or the screen changes. The left example indicates to press the button for 2 seconds.
About the model groups
If different functions are used in different model groups, the model groups are described as shown below.
Names of models included in each model group are as follows:
DNX models
DNX7340BT DNX7340BTM
DDX models
•DDX7 models
DDX7034BT DDX7034BTM
•DDX6 models
DDX6034 DDX6034M
Other marks
Important precautions are described to prevent injuries etc.
Special instructions, supplementary explanations, limitations, and reference pages are described.
General precautions and reference pages are shown on the item.
The initial value of each setup is shown.
English  5
5
Before Use
2WARNING
To prevent injury or fire, take the following precautions:
•To prevent a short circuit, never put or leave any metallic objects (such as coins or metal tools) inside the unit.
•Do not watch or fix your eyes on the unit’s display when you are driving for any extended period.
How to reset your unit
•If the unit or the connected unit fails to operate properly, press the Reset button. The unit returns to factory settings when the Reset button is pressed.
•Remove the USB device before pressing the Reset button. Pressing the Reset button with the USB device installed can damage the data contained in the USB device. For how to remove the USB device, see <How to Set a Medium / a Device> (page 13).
•When the unit is turned on after pressing the Reset button, the Initial SETUP screen is displayed. (page 85)
Reset button
Cleaning the Unit
If the faceplate of this unit is stained, wipe it with a dry soft cloth such as a silicon cloth.
If the faceplate is stained badly, wipe the stain off with a cloth moistened with neutral cleaner, then wipe it again with a clean soft dry cloth.
¤
•Applying spray cleaner directly to the unit may affect its mechanical parts. Wiping the faceplate with a hard cloth or using a volatile liquid such as thinner or alcohol may scratch the surface or erases characters.
Lens Fogging
When you turn on the car heater in cold weather, dew or condensation may form on the lens in the disc player of the unit. Called lens fogging, this condensation on the lens may not allow discs to play. In such a situation, remove the disc and wait for the condensation to evaporate. If the unit still does not operate normally after a while, consult your Kenwood dealer.
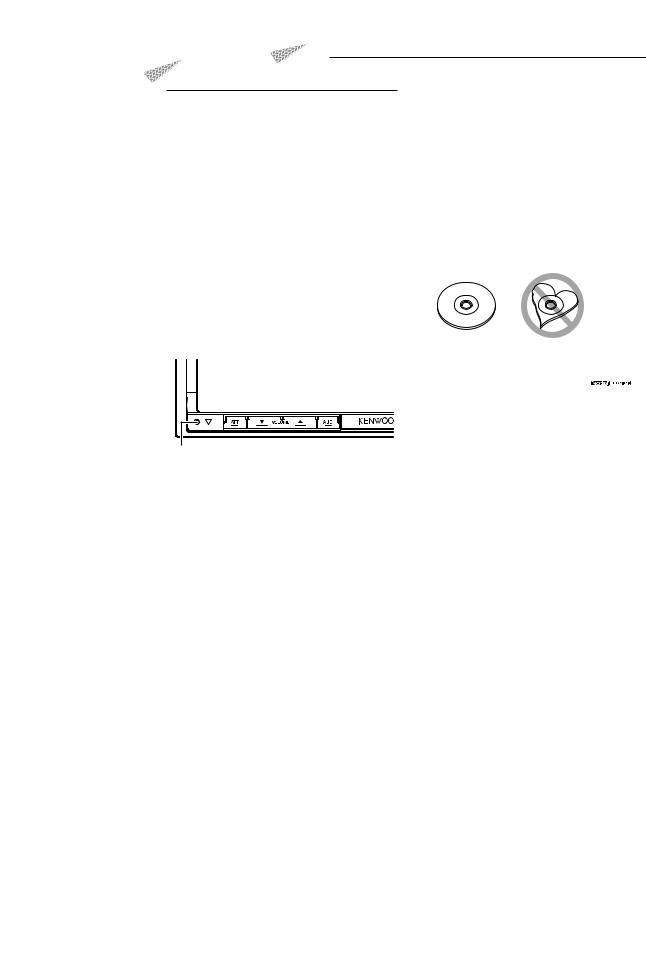
Handling discs
•Do not touch the recording surface of the disc.
•Do not stick tape etc. on the disc, or use a disc with tape stuck on it.
•Do not use disc type accessories.
•Clean from the center of the disc and move outward.
•When removing discs from this unit, pull them out horizontally.
•If the disc center hole or outside rim has burrs, use the disc only after removing the burrs with a ballpoint pen etc.
Discs that cannot be used
•Discs that are not round cannot be used.
•Discs with coloring on the recording surface or discs that are dirty cannot be used.
•This unit can only play the CDs with 
 . This unit may not correctly play discs which do not have the mark.
•You cannot play a disc that has not been finalized. (For the finalization process refer to your writing software, and your recorder instruction manual.)
•If you try to load a 3-inch-disc with its adapter into the unit, the adapter might separate from the disc and damage the unit.
Other notes
•If you experience problems during installation, consult your Kenwood dealer.
•When you purchase optional accessories, check with your Kenwood dealer to make sure that they work with your model and in your area.
•Characters that conform to ISO 8859-1 can be displayed.
•The RDS or RBDS feature won’t work where the service is not supported by any broadcasting station.
6  DNX7340BT/DNX7340BTM/DDX7034BT/DDX7034BTM/DDX6034/DDX6034M
Notes
List of playable discs
Disc |
Standard |
|
|
Support |
|
Remark |
||||||
types |
|
|
|
|
|
|
|
|
|
|||
DVD |
|
|
DVD Video |
|
|
|
‡ |
|
|
|
||
|
|
|
|
DVD Audio |
|
|
× |
|
|
|
||
|
|
|
|
DVD-VR |
|
|
‡ |
|
Not compatible with CPRM. |
|||
|
|
|
|
DVD-R |
|
|
‡ |
|
MP3/WMA/AAC/WAV/ |
|||
|
|
|
|
|
|
|
|
|||||
|
|
|
|
|
|
|
|
|
|
|
JPEG/MPEG/DivX Playback |
|
|
|
|
|
DVD-RW |
|
|
‡ |
|
||||
|
|
|
|
|
|
|
Multi-border/Multisession/ |
|||||
|
|
|
|
|
|
|
|
|
|
|
||
|
|
|
|
|
|
|
|
|
|
|
(Playback depends on |
|
|
|
|
|
DVD+R |
|
|
‡ |
|
||||
|
|
|
|
|
|
|
authoring conditions) |
|||||
|
|
|
|
|
|
|
|
|
|
|
||
|
|
|
|
|
|
|
|
|
|
|
Compatible with 8-cm (3 |
|
|
|
|
|
DVD+RW |
|
|
‡ |
|
||||
|
|
|
|
|
|
|
|
inch) discs |
||||
|
|
|
|
|
|
|
|
|
|
|
||
|
|
|
|
DVD-R DL (Dual layer) |
|
|
‡ |
|
Only video format |
|||
|
|
|
|
DVD+R DL (Double layer) |
|
|
‡ |
|
||||
|
|
|
|
|
|
|
|
|
||||
|
|
|
|
DVD-RAM |
|
|
× |
|
|
|
||
CD |
|
|
Music CD |
|
|
|
‡ |
|
CD-TEXT/8-cm (3 inch) |
|
||
|
|
|
|
|
|
|
|
|
|
|
discs supported. |
|
|
|
|
|
CD-ROM |
|
|
‡ |
|
MP3/WMA/AAC/WAV/ |
|||
|
|
|
|
|
|
|
|
|||||
|
|
|
|
|
|
|
|
|
|
|
JPEG/DivX playback |
|
|
|
|
|
CD-R |
|
|
‡ |
|
||||
|
|
|
|
|
|
|
|
|
|
|
Multisession supported |
|
|
|
|
|
CD-RW |
|
|
‡ |
|
||||
|
|
|
|
|
|
|
Packet write not supported. |
|||||
|
|
|
|
|
|
|
|
|
|
|
||
|
|
|
|
|
|
|
|
|
|
|
|
|
|
|
|
|
DTS-CD |
|
|
‡ |
|
|
|
||
|
|
|
|
Video CD (VCD) |
|
|
‡ |
|
|
|
||
|
|
|
|
Super video CD |
|
|
× |
|
|
|
||
|
|
|
|
Photo CD |
|
|
× |
|
|
|
||
|
|
|
|
CD-EXTRA |
% |
|
Only music CD session can |
|||||
|
|
|
|
|
|
|
|
|
|
|
be played. |
|
|
|
|
|
HDCD |
% |
|
Sound quality of normal |
|||||
|
|
|
|
|
|
|
|
|
|
|
CD music |
|
|
|
|
|
CCCD |
|
|
× |
|
|
|
||
Others |
|
|
Dualdisc |
|
|
|
× |
|
|
|
||
|
|
|
|
Super audio CD |
% |
|
Only CD layer can be |
|||||
|
|
|
|
|
|
|
|
|
|
|
played. |
|
‡ : Playback is possible.
% : Playback is partly possible. × : Playback is impossible.
⁄
•When buying DRM enabled contents, check the Registration Code in the <DivX Setup> (page 59). Registration Code changes each time a file with the displayed Registration Code is played to protect against copying.
Use of "DualDisc"
When playing a "DualDisc" on this unit, the surface of the disc that is not played may be scratched while the disc is inserted or ejected. Since the music CD surface does not conform to the CD standard, playback may be impossible.
(A "DualDisc" is a disc with one surface containing DVD standard signals and the other surface containing music CD signals.)
About Audio files
•Playable Audio file
AAC-LC (.m4a), MP3 (.mp3), WMA (.wma), Linear PCM (WAV) (.wav)
⁄
•If music of normal CD and other playback systems are recorded in the same disc, only the playback system recorded at the first setout is played.
•Acceptable media
CD-R/RW/ROM, DVD±R/RW, mass-storage-class USB device, SD/SDHC card, iPod with KCA-iP301V
•Playable disc file format
ISO 9660 Level 1/2, Joliet, Romeo, Long file name.
•Playable USB device or SD card file system
FAT16, FAT32
Although the audio files are complied with the standards listed above, the play maybe impossible depending on the types or conditions of media or device.
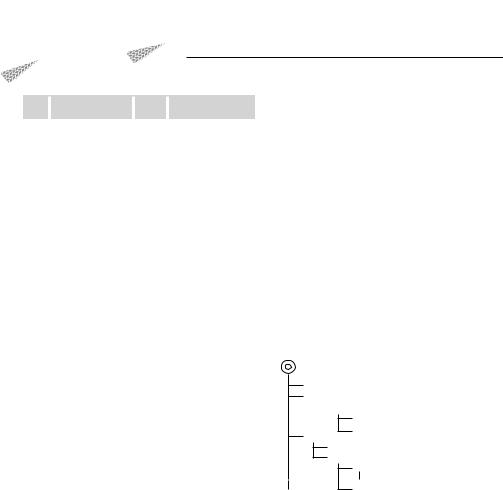
•Playing order of the Audio file
In the example of folder/file tree shown below, the files are played in the order from to .
CD ( ) <<: Folderer v vv: Audiofile
 v
v
v
v
v
v.
An online manual about audio files is put on the site, www.kenwood.com/audiofile/. On this online manual, detailed information and notes which are not written in this manual are provided. Make sure to read through the online manual as well.
About Video files
•Acceptable video files
MPEG1, MPEG2, DivX
•Extensions
mpg, mpeg, m1v, m2v, divx, div, avi
•Acceptable media
CD-R/RW/ROM, DVD±R/RW, mass-storage-class USB device, SD/SDHC card, iPod with KCA-iP301V Acceptable discs, disc formats, USB device or SD card file system, file and folder names and playing order
are the same as those for audio files. See <About Audio files>.
Next page 3
English  7
7
Notes
About Picture files
•Acceptable picture files
JPEG
•Extensions jpg, jpeg
•Acceptable media
CD-R/RW/ROM, DVD±R/RW, mass-storage-class USB device, SD/SDHC card
Acceptable discs, disc formats, USB device or SD card file system, file and folder names and playing order are the same as those for audio files. See <About Audio files>.
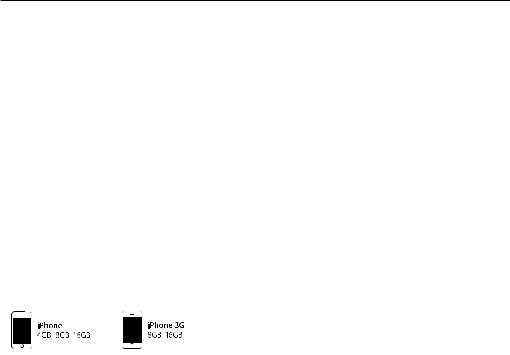
iPod/iPhone that can be connected to this unit
Made for
•iPod nano (1st generation)
•iPod nano (3rd generation)
•iPod with video
•iPod touch (1st generation) Works with
•iPhone
•iPod nano (2nd generation)
•iPod nano (4th generation)
•iPod classic
•iPod touch (2nd generation)
•iPhone 3G
•Update iPod/iPhone software to the latest version.
•You can control an iPod/iPhone from this unit by connecting an iPod/iPhone (commercial product) with Dock connector using an optional accessory iPod connection cable (KCA-iP301V). The word "iPod" appearing in this manual indicates the iPod/ iPhone connected with the KCA-iP301V (optional accessory).
•By connecting your iPod/iPhone to this unit with an optional accessory iPod connection cable (KCAiP301V), you can supply power to your iPod/iPhone as well as charge it while playing music. However, the power of this unit must be on.
⁄
•If you start playback after connecting the iPod, the music that has been played by the iPod is played first.
In this case, "RESUMING" is displayed without displaying a folder name, etc. Changing the browse item will display a correct title, etc.
•When the iPod is connected to this unit, "KENWOOD" or " " is displayed on the iPod to indicate that you cannot operate the iPod.
About USB device
•In this manual, the word "USB device" is used for flash memories and digital audio players which have USB terminals.
•When the USB device is connected to this unit, it can be charged up provided that this unit is powered.
•Install the USB device in the place where it will not prevent you from driving your vehicle properly.
•You cannot connect a USB device via a USB hub and Multi Card Reader.
•Take backups of the audio files used with this unit. The files can be erased depending on the operating conditions of the USB device.
We shall have no compensation for any damage arising out of erasure of the stored data.
•No USB device comes with this unit. You need to purchase a commercially available USB device.
•When connecting the USB device, usage of the CA-U1EX (option) is recommended.
Normal playback is not guaranteed when a cable other than the USB compatible cable is used. Connecting a cable whose total length is longer than 5 m can result in abnormal playback.
About SD card (DDX7 models only)
•This unit is capable of playback of SD/SDHC memory cards complying with the SD or SDHC standard.
•A special adapter is required to use a miniSD card, miniSDHC card, microSD card or microSDHC card.
•The MultiMedia Card (MMC) cannot be used.
Navigation units that can be connected to this unit (DDX models only)
• KNA-G430 |
• KNA-G431 |
•Update the navigation software to the latest version. For how to update the software, refer to the instruction manual of the navigation unit.
Bluetooth unit that can be connected to this unit (DDX6 models only)
• KCA-BT200
TV tuner that can be connected to this unit
• KTC-V300N |
• KTC-V300P |
8  DNX7340BT/DNX7340BTM/DDX7034BT/DDX7034BTM/DDX6034/DDX6034M

Region codes in the world
The DVD players are given a region code according to the country or area it is marketed, as shown in the following map.
1 |
5 |
|
|
2 |
|
1 |
6 |
2 |
|
|
|
|
3 |
|
4 |
|
1 |
|
|
|
|
5 |
|
|
2 |
|
|
|
4 |
DVD disc marks
Symbol |
|
Description |
ALL |
|
Indicates a region number. The discs with this mark can |
|
be played with any DVD player. |
|
|
|
|
|
|
Indicates the number of audio languages recorded. Up |
8to 8 languages can be recorded in a movie. You can select a favorite language.
32 |
|
Indicates the number of subtitled languages recorded. |
|
|
Up to 32 languages can be recorded. |
|
|
|
9 |
|
If a DVD disc has scenes shot from multiple angles, you |
|
can select a favorite angle. |
|
|
|
|
|
|
Indicates the type of screen for the image. The left mark |
16:9 LB |
|
indicates that a wide image picture (16:9) is displayed |
|
|
on a standard TV set screen (4:3) with a black band at |
|
|
both the top and bottom of the screen (letter box). |
Operation regulatory marks
With this DVD, some functions of this unit such as the play function may be restricted depending on the location where the DVD is playing. In this case, the following marks will appear on the screen. For more information, refer to the disc manual.
Prohibition Mark
Discs with limited period of use
Do not leave discs with a limited period of use in this unit. If you load an already expired disc, you may not be able to remove it from this unit.
English  9
9
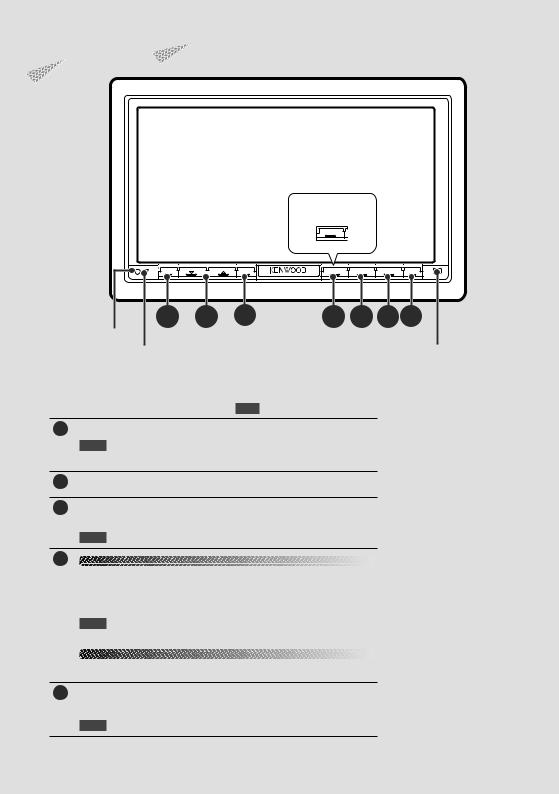
Functions of the buttons on the front panel
For DDX models
TOP
Reset button (page 6)
ATT |
VOLUME |
AUD |
NAV |
SRC |
TEL |
|
A B |
C |
D E F G |
SI indicator (page 62) |
|
Remote control |
|
|
sensor |
1 sec. : Press for more than 1 second
AAttenuation of the volume On/Off.
1sec. Switches the source that is output at the AV OUTPUT terminal.
BVolume adjustment.
CDisplays Graphic Equalizer/ Tone Control screen.*1
ET
1sec. Rear view display On/Off.*2
DDNX models
Displays the navigation screen.
When the navigation screen has already been displayed, it switches to the currently selected source screen.
1 sec. Picture in Picture function On/Off. !
⁄
*1 The display may not switch to Graphic Equalizer screen in some conditions
*2 The function of the [AUD] button can be changed to the display off function. See <User Interface> (page 60).
DDX models
Displays the Top Menu screen. %
ETurns the power On.
Displays the Source Select screen. @ 1 sec. Turns the power Off.
10  DNX7340BT/DNX7340BTM/DDX7034BT/DDX7034BTM/DDX6034/DDX6034M
Functions of the buttons on the front panel
F DNX models
Hands Free control screen On/Off.
1 sec. 7 While watching the navigation screen or playback screen of a visual source
Displays the Easy Control screen. &
7 While watching the screen other than the above Screen Switching function On/Off. !
DDX models
Hands Free control screen On/Off.
1 sec. While watching the navigation screen or playback screen of a visual source
Displays the Easy Control buttons. &
GOpens the panel and ejects the disc. Closes the panel.
1sec. Opens the panel fully for loading/ejecting an SD card.
DNX models
Picture in Picture function
Two screens, the navigation screen and source screen, are displayed. When Picture in Picture function is on, touching the source screen switches between the R-CAM image and source image.
NAV
1 sec.
Screen Switching function
Switching between the navigation screen and the source control screen with one touch operation.
English  11
11
Getting Started
How to Display the Navigation Screen
DNX models
NAV
The navigation screen appears.
DDX models
TOP
The navigation screen appears.
•For how to set up and use the navigation function, see the Navigation Instruction Manual.
⁄
•For DDX models, an optional navigation system needs to be connected. See <Navigation unit that can be connected to this unit> (page 8) for connectable navigation units.
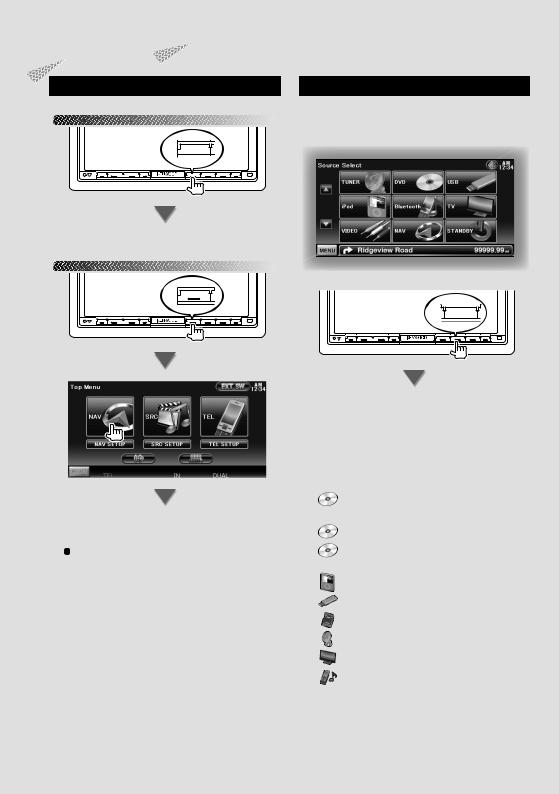
How to Select the Source
Sources can be selected from the Source Select screen.
Source Select screen (Example)
SRC |
The Source Select screen appears. Touch the icon of the source.
Use  or
or  to turn the page.
For how to operate each source, see the following pages.
DVD-VIDEO/ DVD-VR/ |
|
Video CD disc |
\ Page 18 |
CD |
\ Page 22 |
Audio file/ Video file/ |
|
Picture file disc |
\ Page 22 |
iPod |
\ Page 28 |
USB |
\ Page 22 |
SD |
\ Page 22 |
TUNER |
\ Page 31 |
TV |
\ Page 36 |
Bluetooth |
\ Page 40 |
⁄
•For Disc media, iPod, USB and SD, the input is switched to the source as the media or the device is set.
12  DNX7340BT/DNX7340BTM/DDX7034BT/DDX7034BTM/DDX6034/DDX6034M
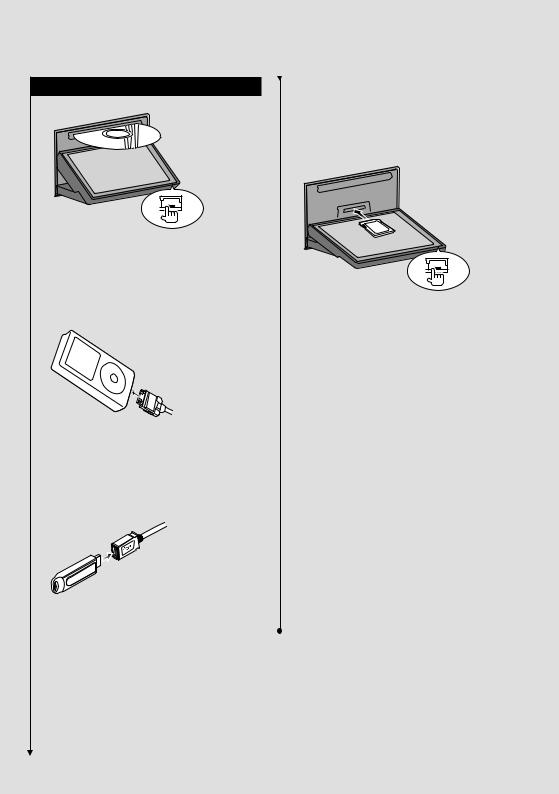
How to Set a Medium / a Device
7 Disc media
0
Press the [0] button to open/close the front panel.
If a disc is already inserted, it is ejected by pressing the [0] button.
7 iPod
To disconnect the iPod, stop the playback by touching the [38] button on the source control screen, and then disconnect the iPod. See <Source Control Screen> (page 29).
7 USB device
To disconnect the USB device, touch the [0] button on the source control screen, and then disconnect the USB device. See <Source Control Screen> (page 22).
Getting Started
7 SD card (DNX/ DDX7 models only)
For DNX models:
Update the navigation software.
For DDX7 models:
Audio File Listening & Video File/ Picture File Watching
Press the [0] button for more than 1 second to open the front panel.
Inserting the SD card
Hold the SD card with the label side up and the notched section on the right, and insert it into the slot until it clicks.
Removing the SD card
Push the SD card until it clicks and then remove your finger from the card. The card pops up so that you can pull it out with your fingers.
Press the [0] button to close the front panel.
⁄
•For DNX models:
For how to update the software, refer to the instruction manual of the navigation unit.
•For DDX7 models:
After inserting the SD card, select the SD source on the Source Select screen.
⁄
•The playback starts automatically after setting the media or the device.
English  13
13
Basic Operation
How to Display the Source Control Screen
On the Source Control screen you can find all the control buttons for the selected source.
Source Control Screen
•For how to use each button, see the operation pages of each source.
How to display the Source Control screen
DNX models
While watching the navigation screen
The Source Control Screen appears.
⁄
•The screen will return to the navigation screen by touching the same part of the Source Control screen.
DDX models
TOP
The Source Control Screen appears.
DNX/DDX models
While watching the Easy Control Screen
TEL |
1 sec.
The Source Control Screen appears.
14  DNX7340BT/DNX7340BTM/DDX7034BT/DDX7034BTM/DDX6034/DDX6034M
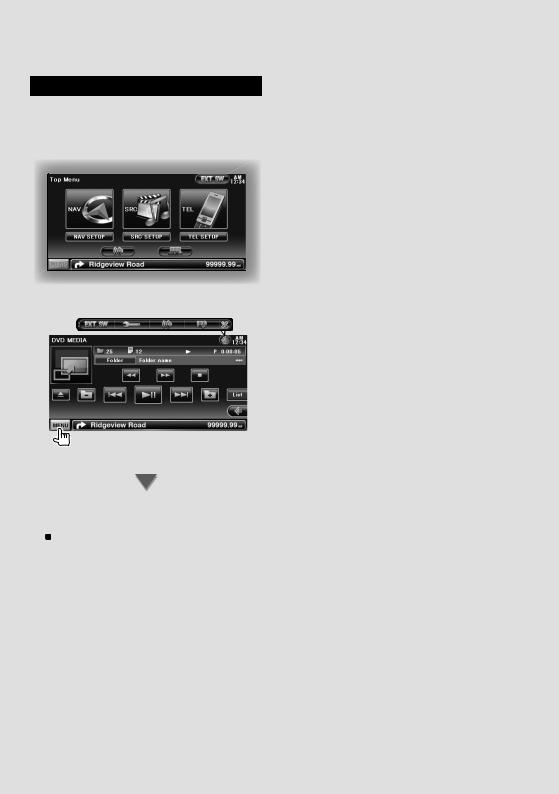
How to Display Top Menu Screen
Top Menu Screen is the entrance to all the functions. You can enter source operation screen as well as various setup menu from this screen.
Top Menu screen
How to display the Top Menu screen
Touch the [MENU] button on any screen.
The Top Menu Screen appears.
•For DDX models
Pressing the [TOP] button on the front panel also displays the Top Menu Screen.
Basic Operation
Buttons on the Top Menu screen
[NAV ] Switches to the navigation screen. [SRC
 ] Switches to the source control screen
of the selected source.
[TEL ] Switches to the Hands Free Main screen. (page 45)
[NAV SETUP] Displays Navigation SETUP screen. (Instruction manual of the Navigation part) (DNX models only)
[SRC SETUP] Displays SETUP Menu screen. (page 58)
[TEL SETUP] Displays the Hands Free Setup screen. (page 48)
[ ] Displays Audio Control Menu screen. (page 53)
[ |
] Displays Source Select screen. |
[ |
] Displays the EXT SW (External Switch) |
|
Control screen. (page 41) (DNX/ DDX7 models |
|
only) |
The buttons listed below are common for many screens.
[MENU] Displays Top Menu screen.
[ ] Opens the function bar. The buttons shown below appear.
[ ] Displays the currently selected source screen.
[ ] Displays Audio Control Menu screen. (page 53)
[ ] Displays SETUP Menu screen. (page 58)
[
[
 15
15
Basic Operation
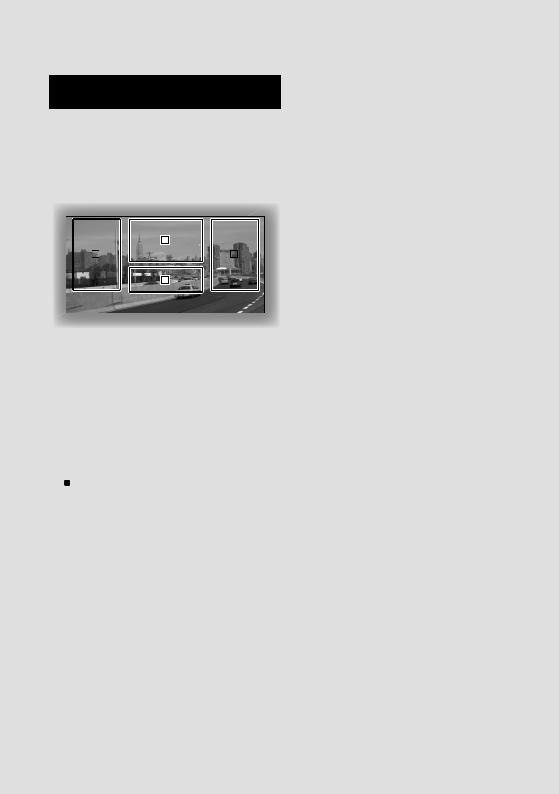
Operation on the Playback Screen of Visual Sources
While watching visual sources, basic operation is possible by touching the screen.
The screen has 4 function areas. The function of each area is different depending on the sources. (Some areas are unavailable for some sources.)
Playback screen of a visual source
2
1 |
|
3 |
4
Basic operation of each area
1Reverse search.
2Displays Menu control screen (DVD-VIDEO, DVD-VR source), Picture control buttons (sources with picture files), or Zoom control buttons (Video CD).
Switches TV band.
3Forward search.
4Displays/ Clears source information screen.*
•For the function of each touching area, see the pages of each source.
* Source information screen
2
1 |
|
3 |
4
⁄
•The information display is cleared automatically after approximately 5 seconds.
How to display the playback screen
SRC |
The Source Select screen appears. Touch the icon of the source.
The Playback screen of a visual source appears.
16  DNX7340BT/DNX7340BTM/DDX7034BT/DDX7034BTM/DDX6034/DDX6034M
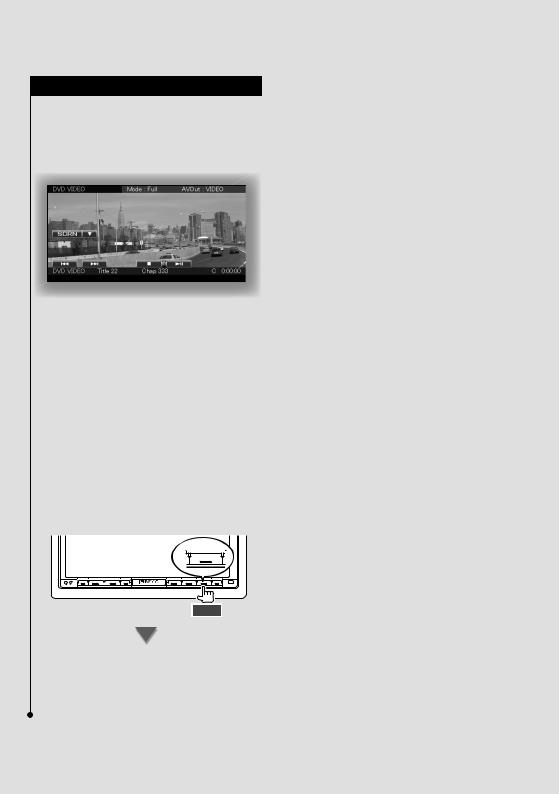
Basic Operation
How to Display the Easy Control Screen
Basic operation buttons of the selected source can be displayed on the playback screen of visual sources so that you can control the source without switching the screen.
Easy Control Screen
Buttons on the Easy Control Screen
[∞] Changes the function as follows by touching the [∞] button.
[SCRN] Displays Screen Control screen (page 43).
[TEL] Switches to the Hands Free Main screen (page 45).
[EXT SW] Switches to the EXT SW Control screen (page 41). (DNX/ DDX7 models only)
[4], [¢], [7], [£8]
Buttons for source control. The buttons are different depending on the source. See the operation pages of each source.
While watching the visual source
TEL |
1 sec.
The Easy control screen appears.
⁄
•Easy Control screen is hidden when you touch the central part of the monitor.
English  17
17
Watching DVD/Video CD
You can play DVD/Video CD using various functions.
•Set the remote controller mode switch to "DVD" mode before starting operation, see <Remote Controller mode switch> (page 79).
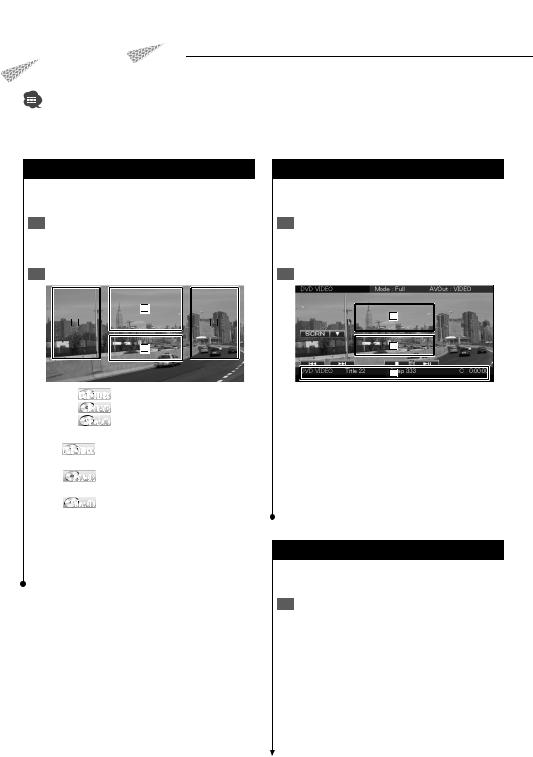
Playback Screen
Basic functions are available even when the playback screen is displayed.
1Display the Playback Screen
See <Operation on the Playback Screen of Visual Sources> (page 16).
2Operation on the Playback Screen
2
1 |
|
3 |
4
1, 3 DVD-VIDEO Searches for a chapter. DVD-VR Searches for a chapter. VideoCD Selects a scene (when PBC is
On) or a track (when PBC is Off ).
2 DVD-VIDEO Displays the Menu Control 1 Screen (page 20).
DVD-VR Displays the Menu Control Screen (page 21).
VideoCD Displays the Zoom Control Screen (page 21).
4 Displays/ Clears Source Information Screen.
⁄
•The information display is cleared automatically after approximately 5 seconds.
Easy Control Screen
Displays the basic operation buttons on the screen.
1Display the Easy Control Screen
See <How to Display the Easy Control buttons> (page 17).
2Operation on the Easy Control Screen
2
3
1, 2 Switches to the Playback Screen.
3 Displays the Source Control Screen. [4], [¢] Searches for a chapter/ scene/
track. [7] Stops playing.
When touched twice, the disc is played from its beginning when you play it in the next time.
[38] Plays or pauses.
Source Control Screen
Switches to the source control screen to use various playback functions.
1Display the Source Control Screen
See <How to Display the Source Control Screen> (page 14).
18  DNX7340BT/DNX7340BTM/DDX7034BT/DDX7034BTM/DDX6034/DDX6034M

 2 Operation on the Source Control Screen
DVD-VIDEO/DVD-VR
 VideoCD
[38] Plays or pauses. [7] Stops playing.
When touched twice, the disc is played from its beginning when you play it in the next time.
[0] Ejects a disc.
[1], [¡] Fast Forwards or Fast Backwards.
[4], [¢]
|
DVD-VIDEO Searches for a chapter. |
|
DVD-VR Searches for a chapter. |
|
VideoCD Selects a scene (when PBC is On) or a |
|
track (when PBC is Off ). |
[ |
], [ ] DVD-VIDEO, DVD-VR Slow Forwards or |
|
Backwards. |
[ |
] Switches to the playback screen. |
1Information display Title display.
"Title" Title Number Display "Chap" Chapter Number Display
"Scene" Scene/Track Number Display "3" Play Mode Display
"T"/ "C"/ "R"/ "P" Play Time Display Use the [TIME] to change play time display.
[ ] When
  is appeared, the text display is scrolled by touching it.
 Multi Function
[ ] Closes the multi function bar.
DVD-VIDEO
[REP] Switches the Repeat Play operations in the following sequence.
Title Repeat, Chapter Repeat, Repeat Off [TIME] Switches the play time display in the
following sequence.
Chapter ("C"), Title ("T"), remaining titles ("R")
DVD-VR
[REP] Switches the Repeat Play operations in the following sequence.
Title Repeat, Repeat Off
[TIME] Switches the play time display in the following sequence.
Title ("T"), remaining titles ("R")
[PLST] Switches between the original mode and Play list mode.
VideoCD
[REP] Switches the Repeat Play operations in the following sequence.
Track Repeat, Repeat Off (Available when the PBC is off )
[TIME] Switches the play time display in the following sequence.
Track ("P"), remaining discs ("R") (Effective only when the PBC function is off )
[PBC] Turns the PBC On or Off. (only when VCD Ver 2.0 is in use)
English  19
19
Watching DVD/Video CD
DVD-VIDEO Disc Menu
Selects an option from the DVD-VIDEO Disc Menu.
1Display the Playback Screen
See <Operation on the Playback Screen of Visual Sources> (page 16).
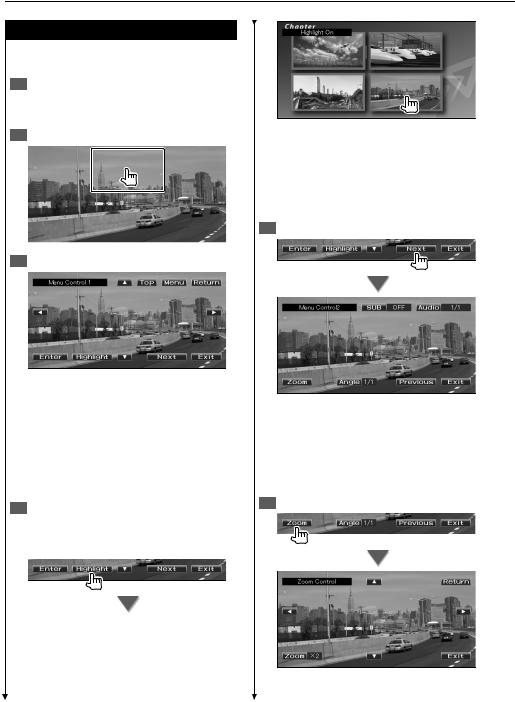
2Display the Menu Control 1 screen
3 Operation on the Menu Control 1 screen
[Menu] Calls the Menu.
[Next] Displays the Menu Control 2 screen. [2], [3], [5], [∞] Selects a menu option. [Enter] Enters your menu selection.
[Return] Returns to the previous menu screen. [Top] Displays the Top Menu.
[Highlight] Highlight Control.
[Exit] Exits the Menu Control 1 screen.
4Operation on the Highlight Control
Highlight control lets you control DVD Menu by touching the menu button directly on the screen.
⁄
•Touching the central part of the monitor also turns on the Highlight Control.
•To cancel Highlight Control, press the [TEL] button for more than 1 second.
•The Highlight Control is cleared automatically after approximately 10 seconds.
5 Operation on the Menu Control 2 screen
[Previous] Displays the Menu Control 1 screen. [Angle] Switches the picture angle.
[SUB] Switches the subtitle language. [Audio] Switches the voice language. [Zoom] Displays the Zoom Control screen. [Exit] Exits the Menu Control 2 screen.
6 Operation on the Zoom Control screen
20  DNX7340BT/DNX7340BTM/DDX7034BT/DDX7034BTM/DDX6034/DDX6034M
[Zoom] Changes the zoom ratio at 4 levels (2 times, 3 times, 4 times, or off ) each time you touch.
[2], [3], [5], [∞] Scrolls the screen in the direction you touch.
[Return] Returns to the previous screen. [Exit] Exits the Zoom Control screen.
DVD-VR Menu Control
Selects an option from the DVD-VR Disc Menu.
1Display the playback screen
See <Operation on the Playback Screen of Visual Sources> (page 16).
2Display the Menu Control screen
3 Operation on the Menu Control screen
[Zoom] Displays the Zoom Control screen.
[SUB] Switches the subtitle language. [Audio] Switches the voice language. [Exit] Exits the Menu Control screen.
4 Operation on the Zoom Control screen
[Zoom] Changes the zoom ratio at 4 levels (2 times, 3 times, 4 times, or off ) each time you touch.
[2], [3], [5], [∞] Scrolls the screen in the direction you touch.
[Return] Returns to the previous screen. [Exit] Exits the Zoom Control screen.
Video CD Zoom Control
Displays an enlarged VCD screen.
1Display the playback screen
See <Operation on the Playback Screen of Visual Sources> (page 16).
2Display the Zoom Control buttons
3 Operation on the Zoom Control screen
[Zoom] Changes the zoom ratio at 2 levels (2 times or off ) each time you touch.
[2], [3], [5], [∞] Scrolls the screen in the direction you touch.
[Exit] Exits the Zoom Control screen.
English  21
21

Music Disc/ Audio File Listening &
Video File/ Picture File Watching
You can recall various control screens during playback of CD, audio file, video file and picture file.
•See <List of playable discs> (page 7) for playable discs.
•See <About Audio file> (page 7), <About Video files> (page 7) or <About Picture files> (page 8) for playable files.
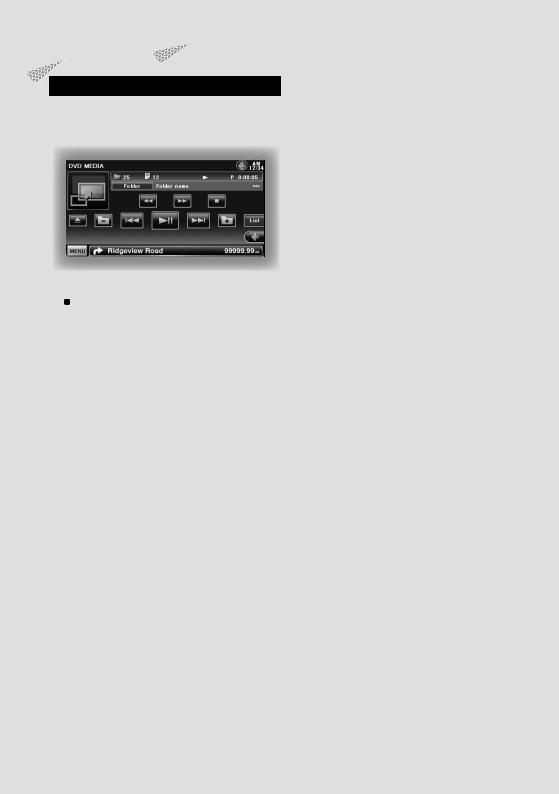
Source Control Screen
Switches to the source control screen to use various playback functions.
1Display the Source Control Screen
See <How to Display the Source Control Screen> (page 14).
2Operation on the Source Control screen
 C
C
 AudioFile MPEG/DivX® JPEG
|
|
|
|
|
|
|
|
|
|
|
[38] Plays or pauses. |
|
|
||||||||
[7] |
|
Disc |
Stops playing. |
|
|
|||||
When touched twice, the disc is played from |
||||||||||
its beginning when you play it in the next |
||||||||||
time. |
|
|
|
|
|
|
|
|
|
|
[0] |
|
Disc |
Ejects the disc. |
|
|
|||||
|
USB/SD Removes the USB device/ SD |
|||||||||
|
|
|
|
|
|
|
|
|
||
|
card. |
|
|
|
|
|
|
|||
|
When "No Device" is shown, the USB |
|||||||||
|
device/ SD card can be removed safely. |
|||||||||
|
If you wish to play it again while the |
|||||||||
|
USB device is connected, touch it |
|||||||||
|
again. |
|
|
|
|
|
|
|||
[1], [¡] |
|
|
CD , AudioFile, MPEG/DivX® |
|||||||
|
|
|
|
|
||||||
Fast Forwards or Fast Backwards. |
||||||||||
[4], [¢] Selects a track/ file. |
|
|
||||||||
[ ], [ |
] AudioFile, MPEG/DivX®, |
JPEG |
||||||||
|
|
|
|
|
|
|
|
|
|
|
Selects a folder.
[List]  AudioFile, MPEG/DivX®, JPEG
Displays the folder list or play list. (page 23) [ ] Switches to the playback screen.
1 Information display
CD |
Selects the Disc Text or Track Text. |
||
AudioFile, MPEG/DivX®, |
JPEG |
||
|
|
|
|
Selects Folder Name, File Name, Title, |
|||
Artist Name, or Album Name. |
|||
"Track" |
Track Number Display |
||
" " Folder Number Display
" " File Number Display
"#### / ####" Total number of file in the folder and the file number display
"3" Play Mode Display "P"/ "R" Play Time Display
Use the [TIME] to change play time display.
[ ] When
  is appeared, the text display is scrolled by touching it.
Multi Function
[1/2] Switches the multi function display. [ ] Closes the multi function bar.
 C
C
[REP] Repeats the present track.
[RDM] Starts or stops Random Play (to play music in random order).
[TIME] Switches the play time display between Track ("P"), and Disc Remaining Time ("R").
 AudioFile MPEG/DivX®
  JPEG
JPEG
[REP] Repeats the present file or data. [FREP] Repeats the music or data of the
present folder.
22  DNX7340BT/DNX7340BTM/DDX7034BT/DDX7034BTM/DDX6034/DDX6034M
[RDM] Starts or stops Random Play (to play files of the present folder in random order).
[4Line]/ [2Line] Switches the number of lines displayed in the Information Display.
[FOLD]/ [Flist] Displays the folder list.
[Plist]  AudioFile in
  USB/SD
Displays the play list.
[SLIDE] AudioFile, |
JPEG Displays images in |
the folder currently being played one after another.
If there is no image in the folder currently being played, initial background is displayed. For information on setting the image display time, see <Disc Setup> (page 76) or <USB/ SD Setup> (page 77).
[INFO]  AudioFile Displays music information (such as Tag and content property) of Audio file being played.
MPEG/DivX®, JPEG Displays information of file
being played.
[LINK]  AudioFile in
  USB/SD Searches for another song of the currently selected artist. See <Link Search> (page 25).
[DEVICE]  USB Selects the connected USB device (or a partition). (page 24)
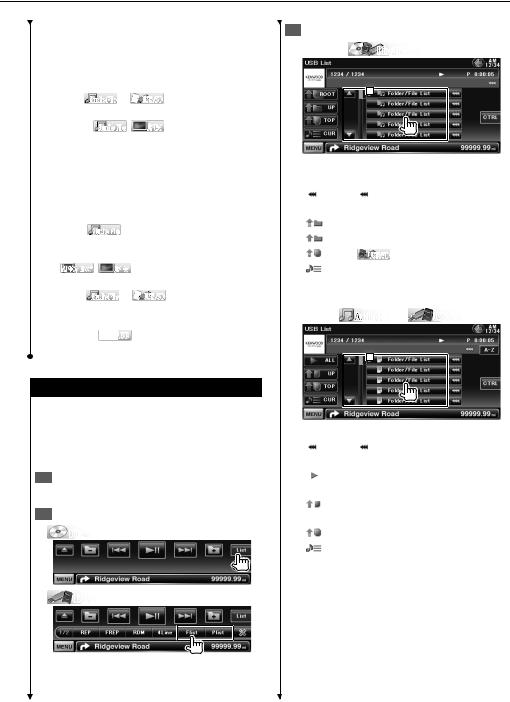
List Select
Folder list: Searches folders and Audio/ Video/ Picture files stored in media and devices according to hierarchy.
Play list: Lists and searches music contained in the USB device or SD card.
1Display the Source Control Screen
See <Source Control Screen> (page 22).
2Start List Select
 Disc
Disc
 USB/SD
⁄
• Touching [List] displays the previously used Folder list or Play list.
3 Select a song
Folder list  Disc/USB/SD
1
1 Folder opens when touched, and the Audio
|
file is played. |
|
|
|
[ |
] When |
is appeared, the text display is |
||
|
scrolled by touching it. |
|||
[ |
ROOT] Moves to the top hierarchy level. |
|||
[ |
UP] Moves up a hierarchy level. |
|||
[ |
TOP] |
|
USB/SD Moves to the top folder. |
|
[ |
|
|
|
|
CUR] Displays the currently playing folder. |
||||
[CTRL] Returns to the Source Control screen.
Play list AudioFile in
 USB/SD
1
1 Switches to the lower level of the category.
[ |
] When |
is appeared, the text display is |
|
scrolled by touching it. |
|
[ |
ALL] Lists all the music in the selected |
|
|
category. |
|
[ |
UP] Moves to the upper level of the |
|
|
category. |
|
[ |
TOP] Moves to the top category. |
|
[ |
CUR] Displays the currently playing |
|
|
category. |
|
[CTRL] Returns to the Source Control screen.
Next page 3
English  23
23
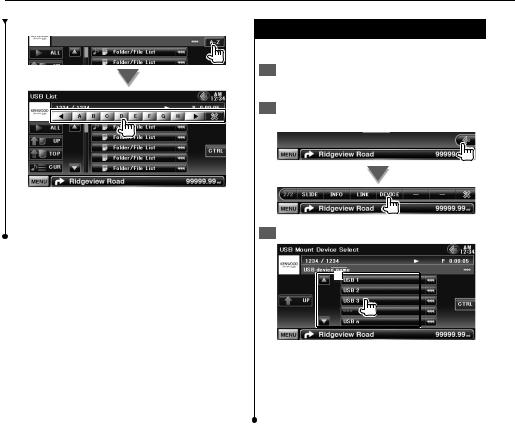
Music Disc/ Audio File Listening & Video File/ Picture File Watching
Scrolls to the position of the specified initial
Scrolls to the selected initial.
USB device select
Selects the connected USB device (or a partition).
1Display the Source Control Screen
See <Source Control Screen> (page 22).
2Display the USB Mount Device Select Screen
3 Select a USB device
1
1 Selects a device or partition.
[ UP] Returns to the Device Selection screen. [
 ] When
  is appeared, the text display is
scrolled by touching it.
[CTRL] Returns to the Source Control screen.
24  DNX7340BT/DNX7340BTM/DDX7034BT/DDX7034BTM/DDX6034/DDX6034M
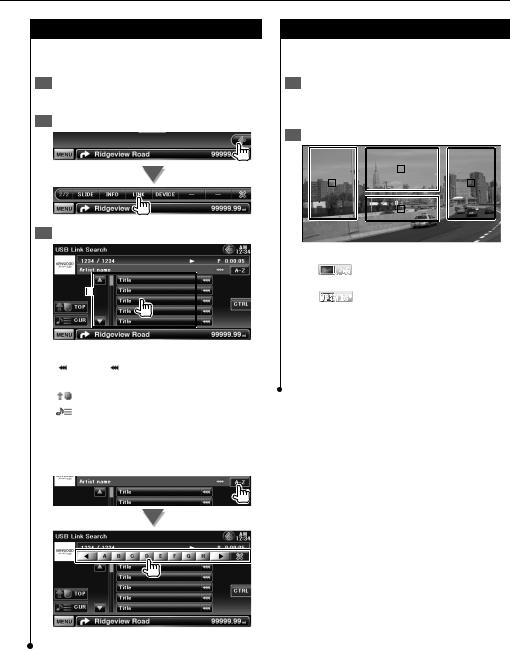
Link search (Audio File in USB/SD)
Searches for another song of the currently selected artist.
1Display the Source Control Screen
See <Source Control Screen> (page 22).
2Start Link search
3 Select a song
1
1 Plays the touched song.
[ |
] When |
is appeared, the text display is |
|
scrolled by touching it. |
|
[ |
TOP] Moves to the top category. |
|
[ |
CUR] Displays the currently playing |
|
|
category. |
|
[CTRL] Returns to the Source Control screen.
Scrolls to the position of the specified initial
Scrolls to the selected initial.
Playback Screen (Video file, Picture file)
Basic functions are available even when the playback screen is displayed.
1Display the Playback Screen
See <Operation on the Playback Screen of Visual Sources> (page 16).
2Operation on the Playback Screen
|
|
2 |
|
|
|
|
|
|
|
1 |
|
|
|
3 |
|
|
|
|
|
|
|
4 |
|
|
1, 3 Searches for a file.
2 |
JPEG Displays the Picture Control Screen |
|
(page 26). |
MPEG/DivX® Displays the Menu Control Screen (page 27).
4 Displays/ Clears Source Information Screen.
⁄
•The information display is cleared automatically after approximately 5 seconds. Also, the information can be displayed automatically when it is updated.
English  25
25
Music Disc/ Audio File Listening & Video File/ Picture File Watching
Easy Control Screen (Video file, Picture file)
Displays the basic operation buttons on the screen.
1Display the Easy Control Screen
See <How to Display the Easy Control Screen> (page 17).
2Operation on the Easy Control Screen
2
3
1, 2 Switches to the Playback Screen.
3 Displays the Source Control Screen. [4], [¢] Searches for a file.
[7]  Disc Stops playing.
When touched twice, the disc is played from its beginning when you play it in the next time.
[38] Plays or pauses.
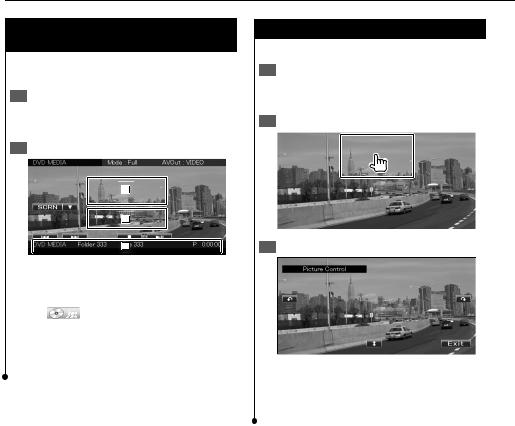
Picture Control
Adjusting the video display.
1Display the Playback Screen
See <Operation on the Playback Screen of Visual Sources> (page 16).
2Display the Picture Control Screen
3 Adjust the video display
[ ] Reverses the picture horizontally. [
 ] Rotates counter clockwise.
[ ] Rotates clockwise. [Exit] Ends Picture Control.
26  DNX7340BT/DNX7340BTM/DDX7034BT/DDX7034BTM/DDX6034/DDX6034M
Movie Menu Control
Selects an option from the Movie Menu.
1Display the playback screen
See <Operation on the Playback Screen of Visual Sources> (page 16).
2Display the Menu Control screen
3 Operation on the Menu Control screen
[SUB] Switches the subtitle language. [Audio] Switches the voice language. [Exit] Exits the Menu Control screen.
English  27
27
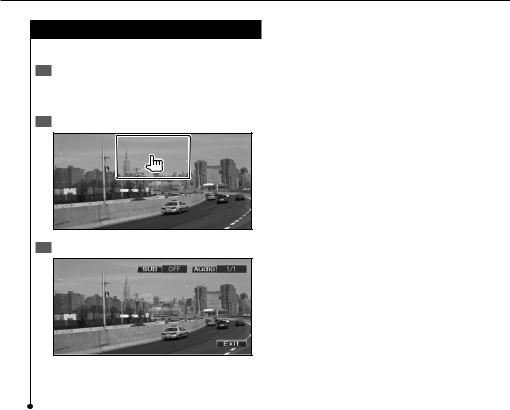
iPod Control
You can control and listen to songs in your iPod by connecting an iPod to this unit with KCA-iP301V (optional accessory). You can also display video contents on this unit when connecting an iPod with video.
Playback Screen
Basic functions are available even when the playback screen is displayed.
1Display the Playback Screen
See <Operation on the Playback Screen of Visual Sources> (page 16).
2Operation on the Playback Screen
2
1 |
|
3 |
4
1, 3 Selects the music/video.
2 Not effective
4 Displays/ Clears Source Information Screen.
⁄
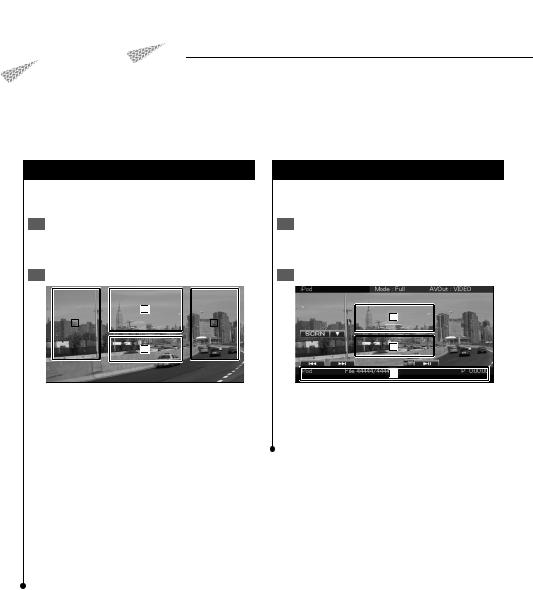
Easy Control Screen
Displays the basic operation buttons on the screen.
1Display the Easy Control Screen
See <How to Display the Easy Control Screen> (page 17).
2Operation on the Easy Control Screen
2
3
1, 2 Switches to the Playback Screen.
3 Displays the Source Control Screen. [4], [¢] Music/Video Search. [38] Plays or pauses.
•The information display is cleared automatically after approximately 5 seconds. Also, the information can be displayed automatically when it is updated.
•Remove all accessories such as headphone before connecting an iPod. You may not be able to control the iPod if you connect it with accessories attached.
•When you connect an iPod to this unit, playback starts from the song you were playing on the iPod itself (Resume Function).
•If the played song is not a video content, "No Video Signal" is displayed on the video screen.
28  DNX7340BT/DNX7340BTM/DDX7034BT/DDX7034BTM/DDX6034/DDX6034M
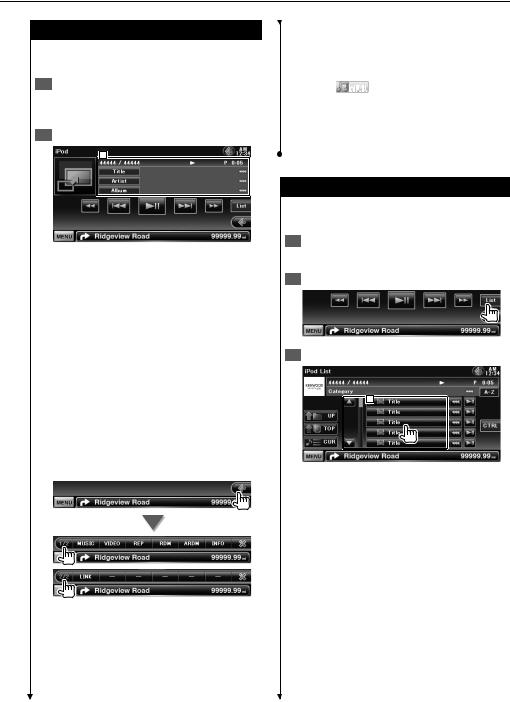
Source Control Screen
Switches to the source control screen to use various playback functions.
1Display the Source Control Screen
See <How to Display the Source Control Screen> (page 14).
2Operation on the Source Control Screen
1
[38] Plays or pauses.
[1], [¡] Fast Forwards or Fast Backwards.
[4], [¢] Selects Music/Video. [List] Displays the iPod list. (page 29)
[ ] Switches to the playback screen.
1Information display
Selects the Title, Artist Name, Album Name or iPod Name.
"##### / #####" Total number of music in the iPod and the music number display
"3" Play Mode Display
"P" Play Time Display
[ ] When
  is appeared, the text display is scrolled by touching it.
Multi Function
[1/2] Switches the multi function display.
[ ] Closes the multi function bar. [MUSIC] Displays the list of music category. [VIDEO] Displays the list of video category. [REP] Repeats the present file or data.
[RDM] Starts or stops Random play.*
[ARDM] Starts or stops Album Random Play (plays randomly from current album).*
[INFO] Displays information screen of music/ video being played.
[LINK]  MUSIC Searches for another song of the currently selected artist. See <Link Search> (page 30).*
⁄
* Disabled when VIDEO is being played.
iPod List
Lists and searches music/video contained in the iPod.
1Display the Source Control Screen
See <Source Control Screen> (page 29).
2Display the iPod List
3Select music/video
1
1 Categories and music are listed.
Touch a category name to move its lower level. If music title is displayed, the music is played by touching it.
When [38] is appeared, all the music in its category is played by touching the button.
[ ] When
  is appeared, the text display is scrolled by touching it.
[ UP] Returns to previous category. [
 TOP] Moves to the top category.
[ CUR] Displays the currently playing category.
[CTRL] Returns to the Source Control screen.
Next page 3
English  29
29
 Loading...