


Kenwood DDX593, DDX773BH, DDX793, DDX393, DDX416BT User Manual
...DDX793 |
DDX573BH |
DDX373BT |
||||||
DDX773BH |
DDX416BT |
DDX23BT |
||||||
DDX593 |
DDX393 |
|
||||||
MONITOR WITH DVD RECEIVER |
|
|
|
|
|
|
||
INSTRUCTION MANUAL |
|
|
|
|
|
|
||
|
|
|
|
|
|
|
|
|
|
|
|
|
|
|
|
|
|
|
|
|
|
|
|
|
|
|
|
|
|
|
|
|
|
|
|
|
|
|
|
|
|
|
|
|
|
|
|
|
|
|
|
|
|
|
|
|
|
|
|
|
|
|
|
|
|
|
|
|
|
|
|
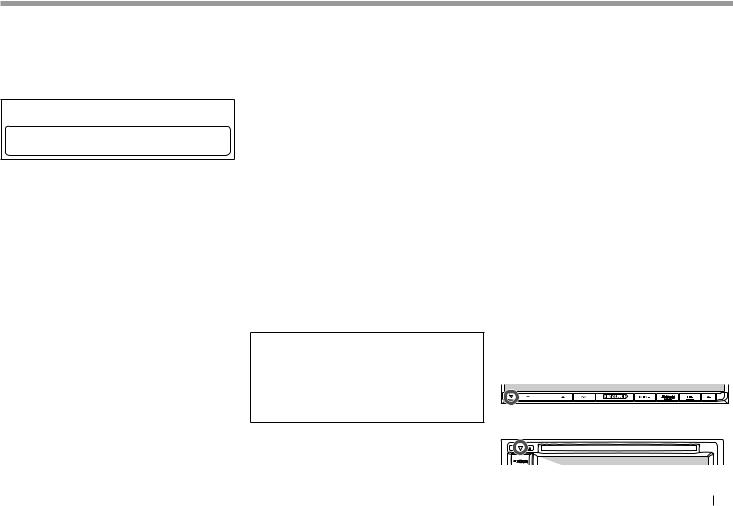
Take the time to read through this instruction manual.
Familiarity with installation and operation procedures will help you obtain the best performance from your new DVD-receiver.
For your records
Record the serial number, found on the back of the unit, in the spaces designated on the warranty card, and in the space provided below. Refer to the model and serial numbers whenever you call upon your Kenwood dealer for information or service on the product.
Model DDX793/DDX773BH/DDX593/DDX573BH/DDX416BT/DDX393/DDX373BT/DDX23BT Serial number
U S R e s i d e n t s O n l y
R e g i s t e r O n l i n e
Register your Kenwood product at www.Kenwoodusa.com
© 2015 JVC KENWOOD Corporation |
B5A-0858-00 (KN/RN) |

CONTENTS
BEFORE USE............................................................ |
2 |
How to reset your unit.................................................... |
3 |
INITIAL SETTINGS .................................................. |
4 |
Initial setup ......................................................................... |
4 |
Setting the security function ....................................... |
4 |
Clock settings .................................................................... |
5 |
BASICS .................................................................... |
6 |
Component names and functions ............................. |
6 |
Common operations ....................................................... |
8 |
Common screen operations......................................... |
9 |
Selecting the playback source................................... |
11 |
Using short-cut buttons............................................... |
12 |
DISCS .................................................................... |
13 |
USB........................................................................ |
18 |
Android ................................................................ |
20 |
iPod/iPhone ......................................................... |
22 |
APPs...................................................................... |
24 |
Pandora® .............................................................. |
25 |
HD Radio™ tuner.................................................. |
27 |
RADIO ................................................................... |
30 |
SiriusXM® Satellite Radio.................................... |
32 |
OTHER EXTERNAL COMPONENTS ...................... |
38 |
Using camera ................................................................... |
38 |
Using external audio/video players—AV-IN ........ |
41 |
Using an external component via ADS adapter— |
|
OEM Features................................................................... |
41 |
Using the external navigation unit .......................... |
42 |
BLUETOOTH ......................................................... |
43 |
SETTINGS.............................................................. |
51 |
Settings for using applications of iPod touch/ |
|
iPhone/Android/BlackBerry........................................ |
51 |
Sound adjustment ......................................................... |
52 |
Adjustment for video playback................................. |
55 |
Changing the display design ..................................... |
56 |
Customizing the Home screen .................................. |
57 |
Customizing the system settings ............................. |
58 |
Setting menu items ....................................................... |
60 |
REMOTE CONTROLLER ........................................ |
63 |
CONNECTION/INSTALLATION ............................ |
66 |
REFERENCES......................................................... |
72 |
Maintenance .................................................................... |
72 |
More information ........................................................... |
72 |
Error message list ........................................................... |
76 |
Troubleshooting ............................................................. |
77 |
Specifications................................................................... |
79 |
How to read this manual:
•Illustrations of DDX793 are mainly used for explanation. The displays and panels shown in this manual are examples used to provide clear explanations of the operations. For this reason, they may be different from the actual displays or panels.
•This manual mainly explains operations using the buttons on the monitor panel and touch panel. For operations using the remote controller (RC-DV340: supplied only for DDX416BT), see page 63.
•< > indicates the various screens/menus/operations/settings that appear on the touch panel.
•[ ] indicates the buttons on the touch panel.
•Indication language: English indications are used for the purpose of explanation. You can select the indication language from the <Setup> menu. (Page 62)
•Updated information (the latest Instruction Manual, system updates, new functions, etc.) is available from <http://www.kenwood.com/cs/ce/>.
BEFORE USE
IMPORTANT
To ensure proper use, please read through this manual before using this product. It is especially important that you read and observe WARNINGS and CAUTIONS in this manual. Please keep the manual in a safe and accessible place for future reference.
VWARNINGS: (To prevent accidents and damage)
•DO NOT install any unit or wire any cable in a location where;
–it may obstruct the steering wheel and gearshift lever operations.
–it may obstruct the operation of safety devices such as air bags.
–it may obstruct visibility.
•DO NOT operate the unit while driving.
If you need to operate the unit while driving, be sure to look around carefully.
•The driver must not watch the monitor while driving.
For DDX416BT:
The marking of products using lasers
The label is attached to the chassis/case and says that the component uses laser beams that have been classified as Class 1. It means that the unit is utilizing laser beams that are of a weaker class. There is no danger of hazardous radiation outside the unit.
2
BEFORE USE
For DDX793/DDX773BH/DDX593/DDX573BH/ DDX393/DDX373BT/DDX23BT:
VCAUTION
Use of controls or adjustments or performance of procedures other than those specified herein may result in hazardous radiation exposure. In compliance with Federal Regulations, the following are reproductions of labels on, or inside the product relating to laser product safety.
JVC KENWOOD Corporation
2967-3, ISHIKAWA-MACHI, HACHIOJI-SHI, TOKYO, JAPAN
THIS PRODUCT COMPLIES WITH DHHS RULES 21CFR SUBCHAPTER J IN EFFECT AT DATE OF MANUFACTURE.
Location : Top plate
FCC WARNING
This equipment may generate or use radio frequency energy. Changes or modifications to this equipment may cause harmful interference unless the modifications are expressly approved in the instruction manual. The user could lose the authority to operate this equipment if an unauthorized change or modification is made.
FCC NOTE
This equipment has been tested and found to comply with the limits for a Class B digital device, pursuant
to Part 15 of the FCC Rules. These limits are designed to provide reasonable protection against harmful interference in a residential installation.
This equipment may cause harmful interference to radio communications, if it is not installed and used in accordance with the instructions. However, there is no guarantee that interference will not occur in a particular installation. If this equipment does cause harmful interference to radio or television reception, which can be determined by turning the equipment off and on, the user is encouraged to try to correct the interference by one or more of the following measures:
•Reorient or relocate the receiving antenna.
•Increase the separation between the equipment and receiver.
•Connect the equipment into an outlet on a circuit different from that to which the receiver is connected.
•Consult the dealer or an experienced radio/TV technician for help.
For DDX793/DDX773BH/DDX593/DDX573BH/ DDX393/DDX373BT/DDX23BT:
IC (Industry Canada) Notice
This device complies with Industry Canada licenseexempt RSS standard(s).
Operation is subject to the following two conditions:
(1) This device may not cause interference, and (2) this device must accept any interference, including interference that may cause undesired operation of the device.
The term “IC: ” before the certification/registration number only signifies that the Industry Canada technical specification were met.
CAUTION
This equipment complies with FCC/IC radiation exposure limits set forth for an uncontrolled environment and meets the FCC radio frequency (RF) Exposure Guidelines in Supplement C to OET65 and RSS-102 of the IC radio frequency (RF) Exposure rules. This equipment has very low levels of RF energy that it deemed to comply without maximum permissive exposure evaluation (MPE). But it is desirable that it should be installed and operated keeping the radiator at least 20 cm or more away from person’s
body (excluding extremities: hands, wrists, feet and ankles). Under Industry Canada regulations, this radio transmitter may only operate using an antenna of a type and maximum (or lesser) gain approved for the transmitter by Industry Canada. To reduce potential radio interference to other users, the antenna type and its gain should be so chosen that the equivalent isotropically radiated power (e.i.r.p.) is not more than that necessary for successful communication.
•Contains Transmitter Module
FCC ID : ZWY8350X (for DDX793/DDX593)/ ZWY8811X (for DDX773BH/DDX573BH/DDX393/ DDX373BT/DDX23BT)
•Contains Transmitter Module
IC: 12033A-8350X (for DDX793/DDX593)/ 12033A-8811X (for DDX773BH/DDX573BH/ DDX393/DDX373BT/DDX23BT)
VCautions on the monitor:
•The monitor built into this unit has been produced with high precision, but it may have some ineffective dots. This is inevitable and is not considered defective.
•Do not expose the monitor to direct sunlight.
•Do not operate the touch panel using a ball-point pen or similar tool with a sharp tip.
Touch the buttons on the touch panel with your finger directly (if you are wearing a glove, take it off).
•When the temperature is very cold or very hot...
–Chemical changes occur inside, causing malfunction.
–Pictures may not appear clearly or may move slowly. Pictures may not be synchronized with the sound or picture quality may decline in such environments.
For safety...
•Do not raise the volume level too much, as this will make driving dangerous by blocking outside sounds, and may cause hearing loss.
•Stop the car before performing any complicated operations.
Temperature inside the car...
If you have parked the car for a long time in hot or cold weather, wait until the temperature in the car becomes normal before operating the unit.
How to reset your unit
If the unit fails to operate properly, press the reset
button.
DDX793/DDX773BH
DDX593/DDX573BH/DDX416BT/DDX393/
DDX373BT/DDX23BT
ENGLISH 3
INITIAL SETTINGS
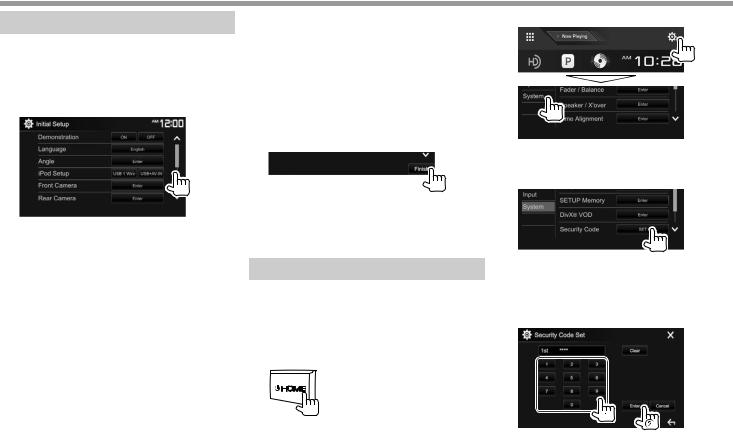
Initial setup
When you power on the unit for the first time or reset the unit, the initial setting screen appears.
•You can also change the settings on the <Setup> screen. (Page 60)
1Perform the initial settings.
• Press [  ] repeatedly to display more items.
*1
*2
<Demonstration> |
Activate or deactivate the |
(Page 61) |
display demonstration. |
<Language> |
Select the text language |
(Page 62) |
used for on-screen |
|
information. |
|
• Set <GUI Language> |
|
to display the operation |
|
buttons and menu items |
|
in the selected language |
|
([Local]) or English |
<Angle>*1 |
([English]). |
Adjust the panel angle. |
|
(Page 8) |
|
<iPod Setup> |
Select the connection |
(Page 22) |
method of iPod/iPhone. |
<Front Camera>*2 |
Configure the settings to |
(Page 38) |
display the picture from |
|
the connected front view |
|
camera. |
<Rear Camera> |
Configure the settings to |
(Page 38) |
display the picture from |
|
the connected rear view |
<User |
camera. |
Change the display design. |
|
Customize> |
|
(Page 56) |
|
2Finish the procedure.
•Press [  ] repeatedly to change the page on the <Initial Setup> screen.
The Home screen is displayed.
*1 Only for DDX793/DDX773BH.
*2 Only for DDX793/DDX773BH/DDX593/DDX573BH/DDX393.
Setting the security function
Registering a security code (only for
DDX416BT)
You can set a security code to protect your receiver system against theft.
1Display the Home screen.
On the monitor panel:
2 Display the <System> setting screen.
3Display the <Security Code Set> screen.
•Press [  ] repeatedly to change the page on the <System> menu screen.
•To clear the registered security code, perform steps 1 and 2, then press [CLR] in <Security Code>.
4Enter a four-digit number (1), then confirm the entry (2).
•Press [Clear] to delete the last entry.
•Press [Cancel] to cancel the setting.
•Press [  ] to return to the current source control screen.
4

INITIAL SETTINGS
5Repeat step 4 to confirm your security code.
Now, your security code is registered.
•When the unit has been reset or disconnected from the battery, you are required to enter the security code. Enter the correct security code, then press [Enter].
Activating the security function
You can activate the security function to protect your receiver system against theft.
1Display the <System> setting screen.
On the Home screen:
•Press [  ] repeatedly to change the page on the <System> menu screen.
2
To deactivate the security function: Select [OFF] |
3 |
for <SI>. |
|
Clock settings
1Display the Home screen.
On the monitor panel:
DDX793/DDX773BH
DDX593/DDX573BH/
DDX416BT/DDX393/
DDX373BT/DDX23BT
2 Display the <Clock> setting screen.
4
Set the clock time.
<NAV>* |
Synchronizes the clock time with |
<Radio Data |
the connected navigation unit. |
Synchronizes the clock time with |
|
System> |
FM RBDS. |
<OFF> |
Sets the clock manually. (See |
|
below.) |
When selecting <OFF>:
Adjust the hour (1), then adjust the minute (2).
• Press [Reset] to set the minute to “00”.
Finish the procedure.
The security indicator on the monitor panel flashes when the vehicle ignition is off.
•You can also display the <Clock> setting screen by touching the clock area on the Home screen.
*Only for DDX416BT: Appears only when a navigation unit is connected.
ENGLISH 5
BASICS
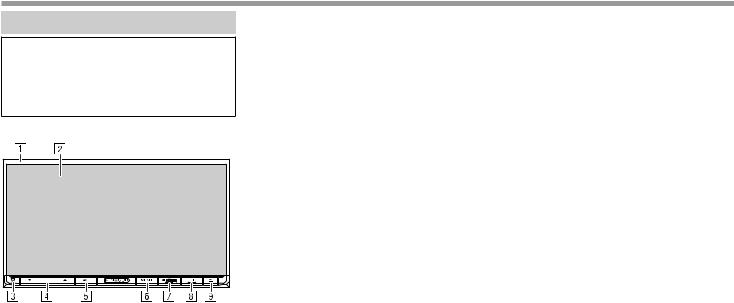
Component names and functions
VCaution on the volume setting:
Digital devices produce very little noise compared with other sources. Lower the volume before playing these digital sources to avoid damaging the speakers by sudden increase of the output level.
DDX793/DDX773BH
1Monitor panel*
2Screen (touch panel)
3Reset button/Power indicator/Security indicator
•Resets the unit. (Page 3)
•Lights up while the unit is turned on.
•Flashes when the security function is activated. (Page 5)
4VOLUME K/Jbuttons
Adjusts the audio volume. (Page 8)
5AV/DISP OFF button
•Displays the current source control screen. (Press)
•Turns off the screen. (Hold) (Page 9)
6MENU/CAMERA button
•Pops up the short-cut menu. (Press) (Page 12)
•Displays the picture from the connected camera. (Hold) (Page 39)
7BHOME button
•Displays the Home screen. (Press) (Page 10)
•Turns on the power. (Press) (Page 8)
•Turns off the power. (Hold) (Page 8)
8TEL/VOICE button
•Displays the phone control screen. (Press) (Page 47)
•Activates voice dialing. (Hold) (Page 48)
9M(Eject) button
•Ejects the disc. (Tilts the monitor panel fully.)
•Opens/closes the monitor panel.
*You can change the color of the buttons on the monitor panel. (Page 56)
6

BASICS
DDX593/DDX573BH/DDX393/DDX373BT/
DDX23BT
1Reset button/Power indicator/Security indicator
•Resets the unit. (Page 3)
•Lights up while the unit is turned on.
•Flashes when the security function is activated. (Page 5)
2M(Eject) button Ejects the disc.
3Loading slot
4BHOME button
•Displays the Home screen. (Press) (Page 10)
•Turns on the power. (Press) (Page 8)
•Turns off the power. (Hold) (Page 8)
5AV/DISP OFF button
•Displays the current source control screen. (Press)
•Turns off the screen. (Hold) (Page 9)
6TEL/VOICE button
•Displays the phone control screen. (Press) (Page 47)
•Activates voice dialing. (Hold) (Page 48)
7Volume/MENU/CAMERA knob
•Adjusts the audio volume. (Turn) (Page 8)
•Pops up the short-cut menu. (Press) (Page 12)
•Displays the picture from the connected camera. (Hold) (Page 39)
8Monitor panel*
9Screen (touch panel)
*You can change the color of the buttons on the monitor panel. (Page 56)
DDX416BT
1Reset button/Power indicator/Security indicator
•Resets the unit. (Page 3)
•Lights up while the unit is turned on.
•Flashes when the security function is activated. (Page 5)
2M(Eject) button Ejects the disc.
3Loading slot
4BHOME button
•Displays the Home screen. (Press) (Page 10)
•Turns on the power. (Press) (Page 8)
•Turns off the power. (Hold) (Page 8)
5MENU/CAMERA button
•Pops up the short-cut menu. (Press) (Page 12)
•Displays the picture from the connected camera. (Hold) (Page 39)
6TEL/VOICE button
•Displays the phone control screen. (Press) (Page 47)
•Activates voice dialing. (Hold) (Page 48)
7Volume K/Jbuttons
Adjusts the audio volume. (Page 8)
8Monitor panel*
9Screen (touch panel)
*You can change the color of the buttons on the monitor panel. (Page 56)
ENGLISH 7
BASICS
Common operations
Turning on the power
DDX793/DDX773BH
DDX593/DDX573BH/
DDX416BT/DDX393/
DDX373BT/DDX23BT
Turning off the power
DDX793/DDX773BH
(Hold)
DDX593/DDX573BH/ DDX416BT/DDX393/ DDX373BT/DDX23BT
(Hold)
Adjusting the volume
To adjust the volume (00 to 35) DDX793/DDX773BH
DDX416BT
Press Jto increase, and press Kto decrease.
•Holding the button increases/decreases the volume continuously.
DDX593/DDX573BH/
DDX393/DDX373BT/
DDX23BT
Turn to the right to increase, and turn to the left to decrease.
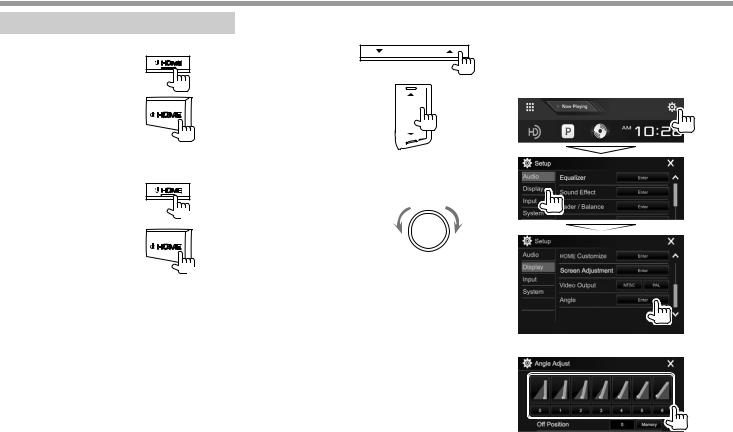
Adjusting the panel angle (only for DDX793/DDX773BH)
1Display the <Angle Adjust> screen.
On the Home screen:
•Press [  ] repeatedly to change the page on the <Display> menu screen.
2Select an angle (0 – 6).
•To set the current position as the power off position, select [Memory].
8
BASICS
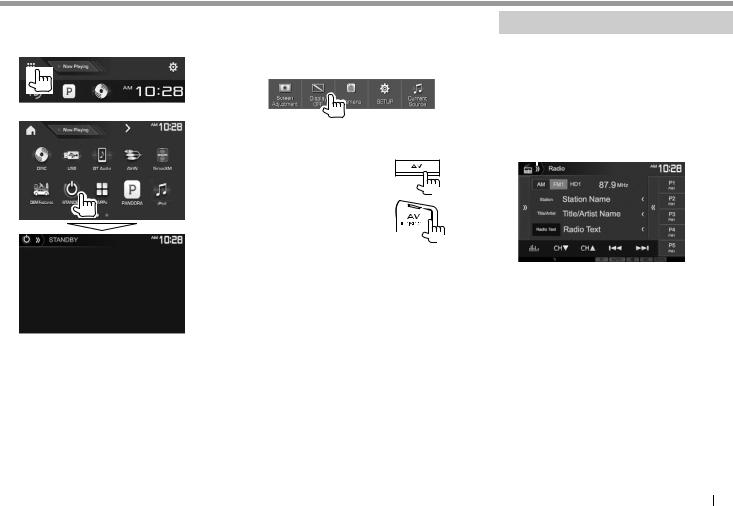
Putting the unit in standby
1Display all playback sources and items.
On the Home screen:
2
Turning off the screen
On the pop-up short-cut menu (Page 12): Display the pop-up short-cut menu by pressing
MENU on the monitor panel, then select [Display OFF].
On the monitor panel (only for DDX793/DDX773BH/ DDX593/DDX573BH/DDX393/DDX373BT/DDX23BT):
DDX793/DDX773BH
(Hold)
DDX593/DDX573BH/ DDX393/DDX373BT/ DDX23BT
(Hold)
To turn on the screen: Press and the hold the same button, or touch the display.
Common screen operations
Common screen descriptions
You can display other screens at any time to change the source, show the information, or change the settings, etc.
Source control screen
Performs source playback operations.
•The operation buttons and information displayed vary depending on the selected source.
1
2
Common operating buttons:
1Displays/hides short-cut source selection buttons. (Page 12)
2Displays the other operation button window.*
*Does not appear when there are no other operation buttons other than those currently shown on the source control screen.
Continued on the next page...
ENGLISH 9
BASICS
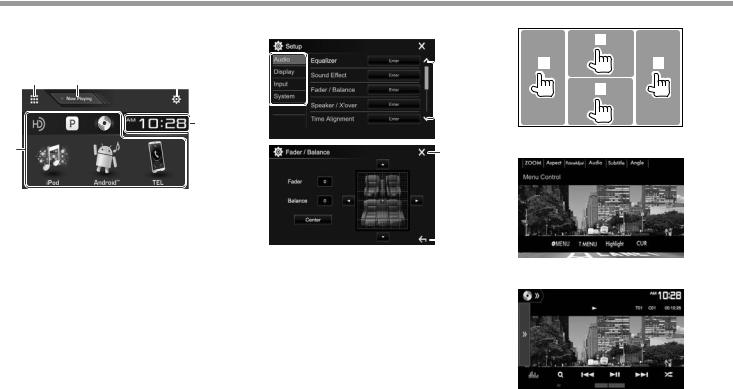
Home screen |
|
|
<Setup> screen |
Touch screen operations |
|
Displays the source control screen and settings |
Changes the detailed settings. (Page 60) |
1 |
|
||
screen. |
|
|
|
|
|
• You can arrange the items to display on the Home |
|
3 |
4 |
||
screen.(Page 57) |
|
|
|||
|
1 |
|
|
||
1 |
2 |
3 |
2 |
|
|
|
|
|
2 |
|
|
|
|
5 |
|
|
|
|
|
|
|
1 Displays the video control menu while playing a |
|
4 |
|
|
3 |
video. |
|
Common operating buttons:
1Displays all playback sources and items. (Page 11)
2Displays the source currently played back.
3Displays the <Setup> screen. (See the right column.)
4Changes the playback source. (Page 11)
5Displays the <Clock> setting screen. (Page 5)
|
|
4 |
Common operating buttons: |
2 Displays the source control screen while playing |
|
1 |
Selects the menu category. |
|
2 |
Changes the page. |
a video. |
3Closes the current setting screen and returns to the current source control screen.
4Returns to the previous screen.
• The operation buttons disappear when the screen is touched or when no operation is done for about 5 seconds.
3 Goes to the previous chapter/track.*
4 Goes to the next chapter/track.*
* Not available for video from an external component.
10
BASICS
Selecting the playback source
On the Home screen:
•You can change the page to display more items by pressing [  ]/[
]/[  ].
].
–The current page is indicated by the page indicator at the bottom of the screen.
[NAV]*1 |
Displays the navigation screen |
|
when a navigation unit is |
[DISC] |
connected. (Page 42) |
Plays a disc. (Page 13) |
|
[USB] |
Plays files on a USB device. |
[BT Audio] |
(Page 18) |
Plays a Bluetooth audio player. |
|
[AV-IN]*2 |
(Page 49) |
Switches to an external |
|
|
component connected to the |
|
iPod/AV-IN input terminal. |
[SiriusXM]*3 |
(Page 41) |
Switches to the SiriusXM® radio |
|
|
broadcast. (Page 32) |
[OEM Features]*4 Switches to the source connected
[STANDBY] |
via ADS adapter. (Page 41) |
Puts the unit in standby. |
|
[APPs] |
(Page 9) |
Switches to the App screen from |
|
|
the connected iPod touch/iPhone/ |
|
Android/BlackBerry device. |
[PANDORA]*5 |
(Page 24) |
Switches to the Pandora |
|
[iPod] |
broadcast. (Page 25) |
Plays an iPod/iPhone. (Page 22) |
|
[Android™] |
Plays an Android device. |
[TEL] |
(Page 20) |
Displays the phone control screen. |
|
[HD Radio]*6 |
(Page 47) |
Switches to the HD Radio |
|
[Radio]*7 |
broadcast. (Page 27) |
Switches to the conventional radio |
|
|
broadcast. (Page 30) |
To return to the Home screen
*1 Only for DDX416BT: When no navigation unit is connected, “No Navigation” appears.
*2 Selectable only when <iPod Setup> is set to [USB 1 Wire]. (Page 22)
*3 Only for DDX793/DDX773BH/DDX593/DDX573BH/DDX393/ DDX373BT.
*4 Only for DDX793/DDX773BH/DDX593/DDX573BH/DDX393. *5 Only for DDX793/DDX773BH/DDX593/DDX573BH/DDX393/
DDX373BT/DDX23BT.
*6 Only for DDX793/DDX773BH/DDX593/DDX573BH. *7 Only for DDX416BT/DDX393/DDX373BT/DDX23BT.
Selecting the playback source on the Home screen
•You can change the items to display on the Home screen. (Page 57)
ENGLISH 11
BASICS
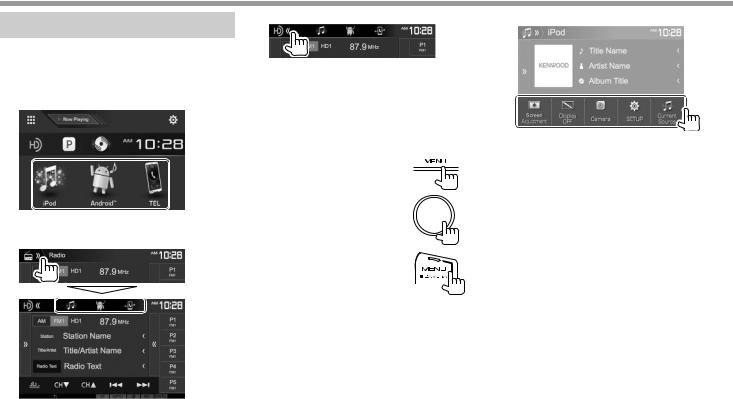
Using short-cut buttons
Using short-cut source selection buttons
While displaying the source control screen, you can use the short-cut buttons to go to the items on the Home screen indicated below.
To display the short-cut source selection buttons
On the source control screen:
To hide the short-cut buttons
Using the pop-up short-cut menu
While displaying the source control screen, you can jump to the other screen from the pop-up short-cut menu.
1Display the pop-up short-cut menu.
DDX793/DDX773BH 
DDX593/DDX573BH/
DDX393/DDX373BT/
DDX23BT
DDX416BT
2 Select an item to jump to.
[Screen |
Displays the picture adjustment |
Adjustment] |
screen. (Page 55) |
[Display OFF] |
Turns off the screen. |
[Camera] |
(Page 9) |
Displays the picture from the |
|
|
connected camera. (Page 39) |
[SETUP] |
Displays the <Setup> screen. |
[Current |
(Page 60) |
Displays the current source |
|
Source] |
control screen. |
To close the pop-up menu: Touch the screen anywhere other than the pop-up short-cut menu.
12
DISCS
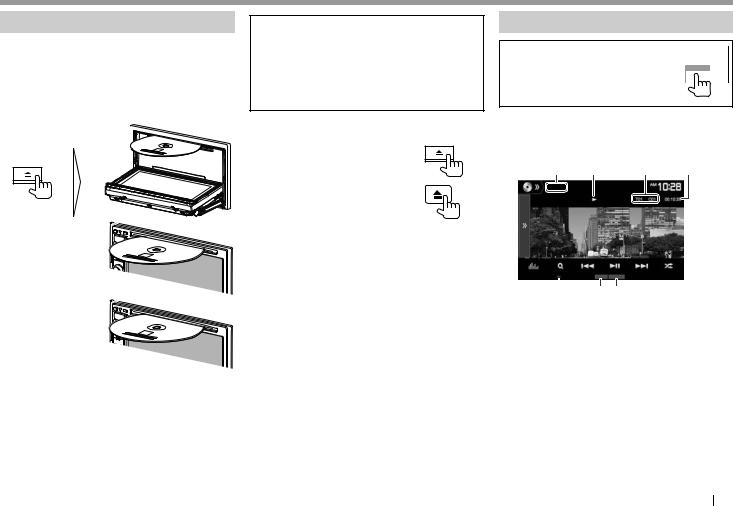
Playing a disc
•If a disc does not have a disc menu, all tracks on it will be played repeatedly until you change the source or eject the disc.
•For playable disc types/file types, see page 73.
Inserting a disc
Insert a disc with the label side facing up.
DDX793/DDX773BH
DDX593/DDX573BH/
DDX393/DDX373BT/
DDX23BT
DDX416BT
The source changes to “DISC” and playback starts.
• The IN indicator lights up while a disc is inserted.
•If “ ” appears on the screen, the unit cannot accept the operation you have tried to do.
–In some cases, without showing “ ,” operations will not be accepted.
•When playing back a multi-channel encoded disc, the multi-channel signals are downmixed to stereo.
Ejecting a disc
DDX793/DDX773BH
DDX593/DDX573BH/DDX416BT/
DDX393/DDX373BT/DDX23BT
•When removing a disc, pull it horizontally.
•You can eject a disc when playing another AV source.
•If the ejected disc is not removed within
15 seconds, the disc is automatically inserted again into the loading slot to protect it from dust.
Closing the monitor panel (only for DDX793/ DDX773BH)
After removing the disc, press Mon the monitor panel. The monitor panel closes.
Playback operations
When the operation buttons are not displayed on the screen, touch the area shown on the illustration.
•To change settings for video playback, see page 55.
Indications and buttons on the source control screen
For video playback
1 2 3 4
5 6 7
Playback information
•The information displayed on the screen differs depending on the type of disc/file being played back.
1Media type
2Playback status
3Current playback item information (title no./ chapter no./folder no./file no./track no.)
4Playing time
5IN indicator
6Playback mode (Page 16)
7File type
Continued on the next page...
ENGLISH 13

DISCS
Operation buttons
•Available buttons on the screen and operations differ depending on the type of disc/file being played back.
[ |
] |
Displays the other operation button |
|
|
window. |
|
|
• To hide the window, press [ ]. |
[ |
] |
Displays the <Equalizer> screen. |
|
|
(Page 52) |
[ |
] |
Displays the folder/track list. |
[S] [T] |
(Page 15) |
|
• Selects a chapter/track. (Press) |
||
|
|
• Reverse/forward search. (Hold) |
|
|
• Plays in slow-motion during pause. |
[IW] |
(Hold) |
|
Starts/pauses playback. |
||
[ |
] |
Selects Random playback mode. |
|
|
(Page 16) |
[ |
] [ ] |
Selects a folder. |
[ |
] |
Selects Repeat playback mode. |
[o] |
(Page 16) |
|
Stops playback. |
||
[MODE] |
Changes the settings for disc playback |
|
|
|
on the <DISC Mode> screen. |
|
|
(Page 17) |
•To display all available operation buttons, press
[  ] to display the other operation button window.
For audio playback
1 2
3 4 5 |
6 7 |
8 |
Playback information
•The information displayed on the screen differs depending on the type of disc/file being played back.
1Media type
2Track/file information
•Pressing [<] scrolls the text if not all of the text is shown.
3Playing time
4IN indicator
5Playback status
6Playback mode (Page 16)
7File type
8Current playback item information (folder no./file no./track no.)
Operation buttons
•Available buttons on the screen and operations differ depending on the type of disc/file being played back.
[ |
] |
Displays the other operation button |
|
|
window. |
|
|
• To hide the window, press [ ]. |
[ |
] |
Displays the <Equalizer> screen. |
|
|
(Page 52) |
[ |
] |
Displays the folder/track list. |
[S] [T] |
(Page 15) |
|
• Selects a track. (Press) |
||
[IW] |
• Reverse/forward search. (Hold) |
|
Starts/pauses playback. |
||
[o] |
Stops playback. |
|
[ |
] |
Selects Random playback mode. |
|
|
(Page 16) |
[ |
] [ ] |
Selects a folder. |
[ |
] |
Selects Repeat playback mode. |
[MODE] |
(Page 16) |
|
Changes the settings for disc playback |
||
|
|
on the <DISC Mode> screen. |
|
|
(Page 17) |
•To display all available operation buttons, press
[  ] to display the other operation button window.
14
DISCS
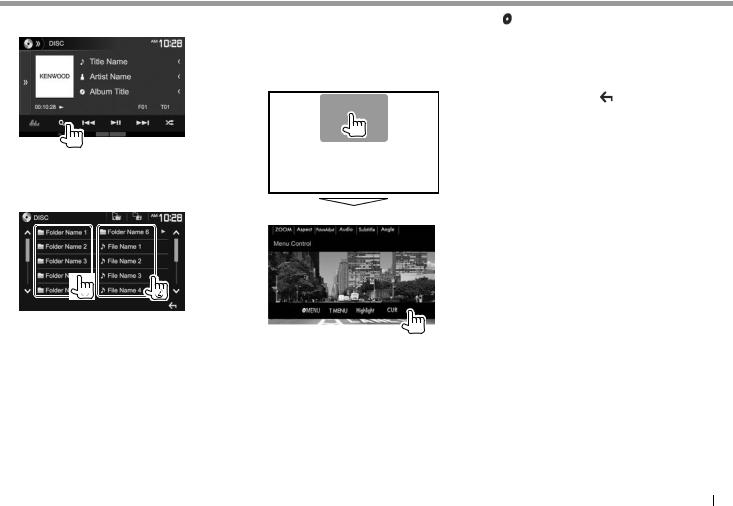
Selecting a folder/track on the list
1
2Select the folder (1), then the item in the selected folder (2).
•Repeat the procedure until you select the desired track.
•You can change the page to display more items by pressing [  ]/[
]/[  ].
].
•Press [  ] to return to the root folder.
•Press [  ] to return to the upper layer.
•If you want to play all tracks in the folder, press [I] on the right of the desired folder.
Video menu operations
You can display the video menu screen during video playback.
•The operation buttons disappear when the screen is touched or when no operation is done for about 5 seconds.
For video playback except VCD
[ MENU] |
Displays the disc menu (DVD). |
[T MENU] |
Displays the disc menu (DVD). |
[Highlight] |
Switches to the direct disc menu |
|
mode. Touch the target item to |
|
select. |
|
• To restore the screen, press |
[CUR] |
[ ]. |
Displays the menu/scene |
|
|
selection screen. |
|
• [J] [K] [H] [I]: Selects an |
|
item. |
|
• [Enter]: Confirms the |
|
selection. |
|
• [Return]: Returns to the |
[ZOOM] |
previous screen. |
Displays the picture size |
|
[Aspect] |
selection screen. (Page 56) |
Selects the aspect ratio. |
|
[PictureAdjust] |
(Page 55) |
Displays the picture adjustment |
|
[Audio] |
screen. (Page 55) |
Selects the audio type. |
|
[Subtitle] |
Selects the subtitle type. |
[Angle] |
Selects the view angle. |
•Available buttons on the screen and operations differ depending on the type of disc/file being played back.
Continued on the next page...
ENGLISH 15
DISCS
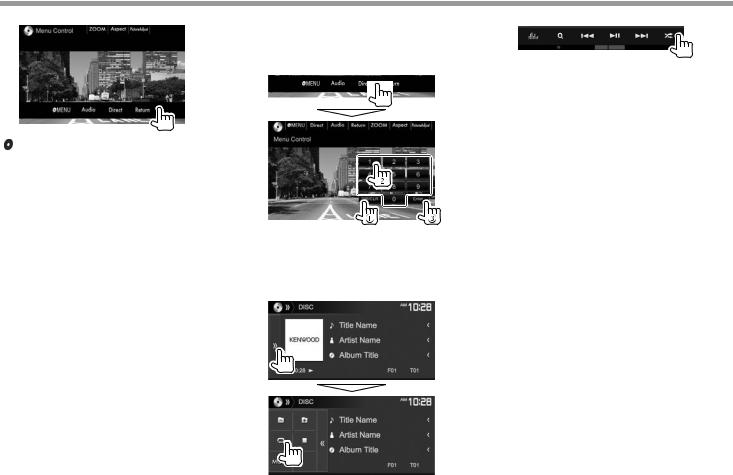
For VCD
[ MENU] |
Displays the disc menu. |
[Audio] |
Selects the audio channel (ST: |
[Direct] |
stereo, L: left, R: right). |
Displays/hides the direct |
|
|
selection buttons. (See the right |
[Return] |
column.) |
Displays the previous screen or |
|
[ZOOM] |
menu. |
Displays the picture size |
|
[Aspect] |
selection screen. (Page 56) |
Selects the aspect ratio. |
|
[PictureAdjust] |
(Page 55) |
Displays the picture adjustment |
|
|
screen. (Page 55) |
To select a track directly on a VCD
•When playing a VCD with PBC activated, stop playback to deactivate the PBC function, then use the direct selecting buttons to select a track number.
•When you enter a wrong number, press [DIR/CLR] to delete the last entry.
Selecting playback mode
To select Repeat playback mode
To select Random playback mode
•The location of the buttons differ depending on the type of disc/file being played back.
–When [  ] is not displayed, display the other operation button window by pressing [
 ].
].
•Available playback modes differ depending on the type of disc/file being played back.
•You cannot activate the repeat mode and the random mode at the same time.
•Each time you press the button, the playback mode changes. (The corresponding indicator lights up.)
–Available items differ depending on the type of disc/file being played back.
C-REP |
Repeats current chapter. |
T-REP |
Repeats current title/program. |
REP |
Repeats current track. |
FO-REP |
Repeats all tracks of the current |
FO-RDM |
folder. |
Randomly plays all tracks of the |
|
|
current folder, then tracks of the |
RDM |
next folders. |
Randomly plays all tracks. |
To cancel Repeat/Random playback: Press the button repeatedly until the indicator disappears.
16
DISCS
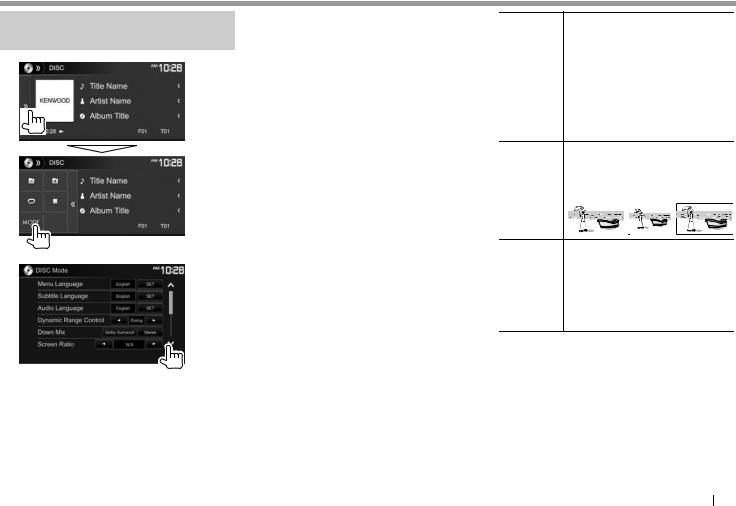
Settings for disc playback—<DISC Mode>
1
2
•Available items shown on the <DISC Mode> screen differ depending on the type of disc/file being played back.
Setting items
<Menu |
Select the initial disc menu language. |
Language> |
(Initial: English) (Page 75) |
<Subtitle |
Select the initial subtitle language |
Language> |
or turn subtitles off (Off). (Initial: |
|
English) (Page 75) |
<Audio |
Select the initial audio language. |
Language> |
(Initial: English) (Page 75) |
<Dynamic |
You can change the dynamic range |
Range |
while playing using Dolby Digital |
Control> |
software. |
|
• Wide: Select this to enjoy a |
|
powerful sound at a low volume |
|
level with its full dynamic range. |
|
• Normal: Select this to reduce the |
|
dynamic range a little. |
|
• Dialog (Initial): Select this to |
|
reproduce movie dialog more |
|
clearly. |
<Down Mix> When playing back a multi-channel disc, this setting affects the signals reproduced through the front and/or rear speakers.
•Dolby Surround: Select this to enjoy multi-channel surround sound by connecting an amplifier compatible with Dolby Surround.
•Stereo (initial): Normally select this.
<Screen Select the monitor type to watch a Ratio> wide screen picture on the external
monitor.
16:9 (Initial) 4:3 LB |
4:3 PS |
|||
|
|
|
|
|
|
|
|
|
|
<File Type>* Select the playback file type when a disc contains different types of files.
•Audio: Plays back audio files.
•Still Image: Plays back picture files.
•Video: Plays back video files.
•Audio&Video (initial): Plays back audio files and video files.
*For playable file types, see page 73.
If the disc contains no files of the selected type, the existing files are played in the following priority: audio, video, then still picture. You can change these settings only while playback is stopped.
ENGLISH 17

USB
Connecting a USB device
You can connect a USB mass storage class device such as a USB memory, Digital Audio Player etc. to the unit.
•For details about connecting USB devices, see page 69.
•You cannot connect a computer or portable HDD to the USB input terminal.
•For playable file types and notes on using USB devices, see page 74.
When a USB device is connected...
The source changes to “USB” and playback starts.
•All tracks in the USB device will be played repeatedly until you change the source.
To disconnect the USB device safely:
Press [M], then disconnect the USB device after “No Device” appears.
Playback operations
When the operation buttons are not displayed on the screen, touch the area shown on the illustration.
•To change settings for video playback, see page 55.
Indications and buttons on the source control screen
1 2
3 |
4 |
5 6 |
7 |
Playback information
•The information displayed on the screen differs depending on the type of file being played back.
1Jacket picture (Shown while playing if the file has tag data that includes the jacket picture)
2Track/file information
•Pressing [<] scrolls the text if not all of the text is shown.
3Playing time
4Playback status
5Playback mode (See the right column.)
6File type
7Current playback item information (folder no./file no.)
Operation buttons
•Available buttons on the screen and operations differ depending on the type of file being played back.
[ |
] |
Displays the other operation button |
|
|
window. |
|
|
• To hide the window, press [ ]. |
[ |
] |
Displays the <Equalizer> screen. |
|
|
(Page 52) |
[ |
] |
Displays the folder/track list. |
[S] [T] |
(Page 19) |
|
• Selects a track. (Press) |
||
[IW] |
• Reverse/forward search. (Hold) |
|
Starts/pauses playback. |
||
[ |
] |
Selects random playback |
|
|
mode.*1 *2 |
|
|
• FO-RDM: Randomly plays all tracks/ |
|
|
files in the folder. |
|
|
• RDM: Randomly plays all tracks/files. |
[ |
] [ ] |
Selects a folder. |
[ |
] |
Selects repeat playback mode.*1 *2 |
|
|
• REP: Repeats the current track/file. |
|
|
• FO-REP: Repeats all tracks/files in |
[M] |
the current folder. |
|
Disconnects the USB device safely. |
||
[MODE] |
Changes the settings for USB |
|
|
|
playback on the <USB Mode> screen. |
|
|
(Page 19) |
•To display all available operation buttons, press
[  ] to display the other operation button window.
*1 To cancel random or repeat mode, press the button repeatedly until the indicator disappears.
*2 You cannot activate the repeat mode and the random mode at the same time.
18
USB
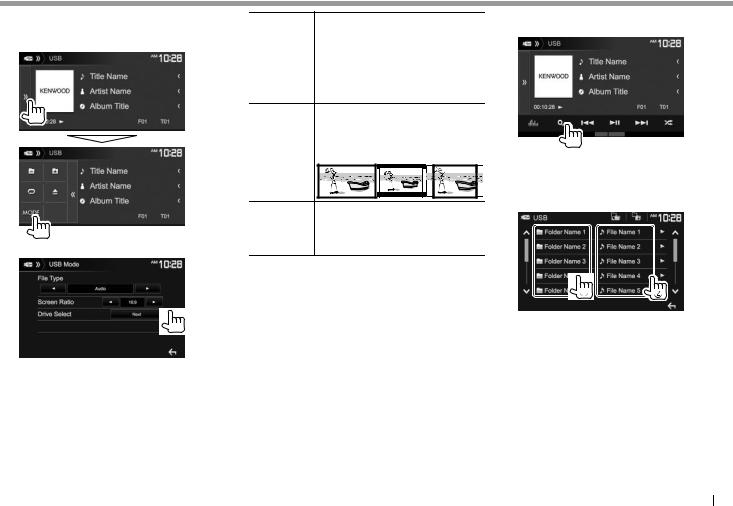
Settings for USB playback—<USB Mode>
1
2
<File Type>* Select the playback file type when a |
||
|
disc contains different types of files. |
|
|
• Audio: Plays back audio files. |
|
|
• Still Image: Plays back picture files. |
|
|
• Video: Plays back video files. |
|
|
• Audio&Video (initial): Plays back |
|
|
audio files and video files. |
|
<Screen |
Select the monitor type to watch a |
|
Ratio> |
wide screen picture on the external |
|
|
monitor. |
|
|
16:9 (Initial) 4:3 LB |
4:3 PS |
<Drive |
Switches between internal memory |
|
Select> |
and the memory source of the |
|
|
connected device (such as mobile |
|
|
phone). Press [Next]. |
|
*For playable files, see page 74. If the USB device contains no files of the selected type, the existing files are played in the following priority: audio, video, then still picture.
Selecting a folder/track on the list
1
2Select the folder (1), then the item in the selected folder (2).
•Repeat the procedure until you select the desired track.
•You can change the page to display more items by pressing [  ]/[
]/[  ].
].
•Press [  ] to return to the root folder.
•Press [  ] to return to the upper layer.
•If you want to play all tracks in the folder, press [I] on the right of the desired folder.
ENGLISH 19

Android
Preparation
Installing KENWOOD Music Play
Install the Android™ application KENWOOD Music Play on your Android device beforehand.
•When a compatible Android device is connected, “Press [VIEW] to install KENWOOD MUSIC PLAY APP” is shown on the Android device. Follow the instructions to install the application. You can also install the latest version of the KENWOOD Music Play application on your Android device before connecting.
About KENWOOD Music Play
•This unit supports the Android™ application KENWOOD Music Play.
•When you use KENWOOD Music Play, you can search for audio files by Genre, Artist, Album, Playlist, and Song.
•KENWOOD Music Play is available on the following web site: <www.kenwood.com/cs/ce/>
Connecting an Android device
Connect an Android device with a cable.
•For details about connecting Android devices, see page 69.
Compatible Android device
•This unit supports Android OS 4.1 and above.
•Some Android devices (with OS 4.1 and above) may not fully support Android Open Accessory (AOA) 2.0.
•If the Android device supports both mass storage class device and AOA 2.0, this unit always plays back via AOA 2.0 as priority.
•For more information and the latest compatible list, see: <www.kenwood.com/cs/ce/>
Starting playback
1Start KENWOOD Music Play on your Android device.
2Select “Android™ ” as the source. (Page 11)
Playback operations
Indications and buttons on the source control screen
1 2
3 4 5 6
Playback information
1Artwork (Shown if the song contains artwork)
2Track information
•Pressing [<] scrolls the text if not all of the text is shown.
3Playing time
4Playback status
5Playback mode (See the right column.)
6Track no./Total track number
Operation buttons
[ |
] |
Displays the other operation button |
|
|
|
window. |
|
|
|
• |
To hide the window, press [ ]. |
[ |
] |
Displays the <Equalizer> screen. |
|
|
|
(Page 52) |
|
[ |
] |
Displays the track list. (Page 21) |
|
[S] [T] |
• |
Selects a track. (Press) |
|
[IW] |
• |
Reverse/forward search. (Hold) |
|
Starts/pauses playback. |
|||
[ |
] |
Selects random playback mode.* |
|
|
|
• |
: Randomly plays all tracks. |
|
|
• |
Album: Randomly plays all |
|
|
|
tracks in the current album. |
[ |
] |
Selects repeat playback mode. |
|
|
|
• |
1: Repeats the current track. |
|
|
• |
All: Repeats all tracks. |
|
|
• |
: Cancels the repeat mode. |
[MODE] Changes the settings for Android playback on the <Android Mode> screen. (Page 21)
•To display all available operation buttons, press
[  ] to display the other operation button window.
*To cancel random mode, press the button repeatedly until the indicator disappears.
20
Android
Selecting a track from the menu
1
2Select a category (1), then a desired item (2).
•Select an item in each layer until you reach and select the desired file.
•You can change the page to display more items by pressing [  ]/[
]/[  ].
].
•Press [  ] to return to the top layer.
•Press [  ] to return to the upper layer.
Settings for playback on the Android device—<Android Mode>
1
2
<Artwork> Shows/hides artwork of the Android device.
<Android • BROWSE MODE: Controls from the
Setup> unit (using the KENWOOD Music Play application).
•HAND MODE: Controls other media player applications from the Android device (without using the KENWOOD Music Play application).
–You can play/pause or skip files from the unit.
ENGLISH 21

iPod/iPhone
Preparation
Connecting iPod/iPhone
•For details about connecting iPod/iPhone, see page 69.
•For playable iPod/iPhone types, see page
Connect your iPod/iPhone according to your purpose or the type of iPod/iPhone.
•To listen to music: Use USB Audio cable for iPod/ iPhone.
–For Lightning connector models: KCA-iP103 (optional accessory)
–For 30-pin connector models: KCA-iP102 (optional accessory)
•To watch video and listen to music (only for 30-pin connector models): Use USB Audio and Video cable for iPod/iPhone—KCA-iP202 (optional accessory).
–For Lightning connector models: You cannot 74. watch video with KCA-iP202.
Selecting the connection method of iPod/iPhone
1Putting the unit in standby. (page 9)
2Display the <System> setting screen.
On the Home screen:
3
[USB 1 Wire] Select this when the iPod/ iPhone is connected using KCA-iP102 or KCA-iP103 (optional accessory).
[USB+AV-IN] Select this when the iPod/ iPhone is connected using KCA-iP202 (optional accessory).
Selecting preference settings for iPod/ iPhone playback—<iPod Mode>
1
2
<Artwork> Shows/hides artwork of iPod.
22
iPod/iPhone
Playback operations
When the operation buttons are not displayed on the screen, touch the area shown on the illustration.
•To change settings for video playback, see page 55.
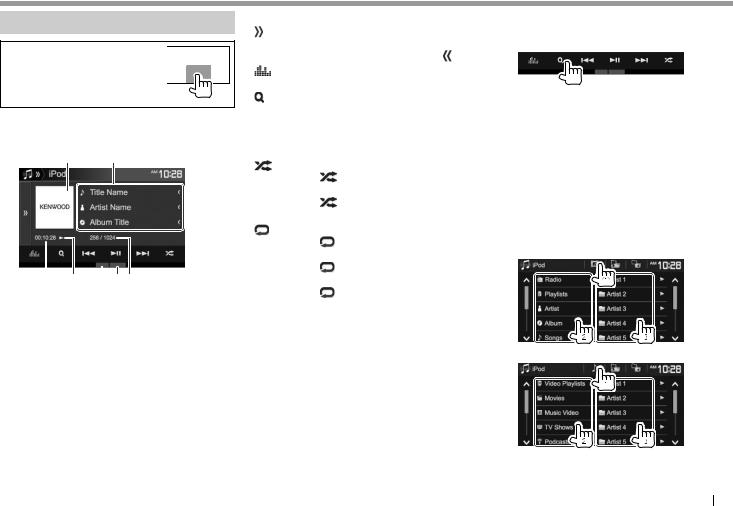
Indications and buttons on the source control screen
1 2
3 4 5 67
Playback information
1Artwork (Shown if the song contains artwork)
2Song/video information
•Pressing [<] scrolls the text if not all of the text is shown.
3Playing time
4Playback status
5Playback mode (See the right column.)
6File type
7Track no./Total track number
Operation buttons
[ |
] |
Displays the other operation button |
|
|
|
window. |
|
|
|
• |
To hide the window, press [ ]. |
[ |
] |
Displays the <Equalizer> screen. |
|
|
|
(Page 52) |
|
[ |
] |
Displays the audio/video file list. (See |
|
[S] [T] |
the right column.) |
||
• Selects a track. (Press) |
|||
[IW] |
• |
Reverse/forward search. (Hold) |
|
Starts/pauses playback. |
|||
[ |
] |
Selects random playback mode.* |
|
|
|
• |
: Functions the same as Shuffle |
|
|
|
Songs. |
|
|
• |
Album: Functions the same as |
|
|
|
Shuffle Albums. |
[ |
] |
Selects repeat playback mode. |
|
|
|
• |
1: Functions the same as Repeat |
|
|
|
One. |
|
|
• |
All: Functions the same as |
|
|
• |
Repeat All. |
[MODE] |
: Cancels the repeat mode. |
||
Changes the settings for iPod/iPhone |
|||
|
|
playback on the <iPod Mode> screen. |
|
|
|
(Page 22) |
|
•To display all available operation buttons, press
[  ] to display the other operation button window.
*To cancel random mode, press the button repeatedly until the indicator disappears.
Selecting an audio/video file from the menu
1
2Select the menu ( : audio or
  : video) (1), a category (2), then a desired item (3).
•Select an item in each layer until you reach and select the desired file.
•You can change the page to display more items by pressing [  ]/[
]/[  ].
].
•Press [  ] to return to the top layer.
•Press [  ] to return to the upper layer.
•If you want to play all tracks in the item, press [I] on the right of the desired item.
Audio menu:
Video menu:
•Available categories differ depending on the type of your iPod/iPhone.
ENGLISH 23
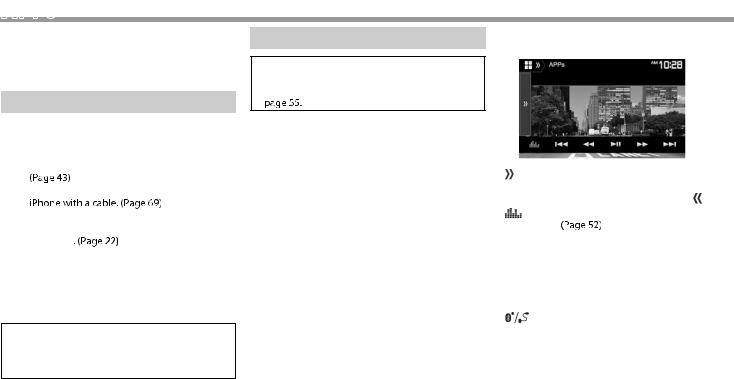
APPs
You can use an App of the connected iPod touch/ iPhone/Android/BlackBerry on this unit.
tFor Apps you can use on this unit, visit <http://www.kenwood.com/cs/ce/>.
Preparation
1Connect the iPod touch/iPhone/Android/ BlackBerry.
t For Android/BlackBerry: Connect the
Android/BlackBerry device via Bluetooth.
t For iPod touch/iPhone: Connect iPod touch/
–Be sure to select the appropriate connection method of iPod touch/iPhone on <iPod
Setup>
–You cannot watch video when connecting a Lightning connector model.
2Select the iPod touch/iPhone/Android/ BlackBerry device to use on the <APP
Setup> 
When connecting the device for the frst time, the setup screen (for connection, etc.) appears. Follow the procedure on the setup screen to confgure the settings.
Using an App
When the operation buttons are not displayed on the screen, touch the screen to show them.
t To change settings for video playback, see
Playback operations
1Start the App on your iPod touch/iPhone/ Android/BlackBerry.
2Select “Apps” 
Operation buttons on the source control screen
[ |
] |
Displays the other operation button |
|
|
window. |
|
|
t To hide the window, press [ ]. |
[ |
] |
Displays the <Equalizer> screen. |
[S] [T] Selects an audio/video fle. |
||
[O] [N] |
Reverse/forward search. |
|
[IW] |
Starts/pauses playback. |
|
[I] |
Starts playback. |
|
[W] |
Pauses playback. |
|
[ |
] |
Switches the device between iPod |
|
|
touch/iPhone connected with a |
|
|
cable and Android/BlackBerry device |
|
|
connected via Bluetooth. |
tTo display all available operation buttons, press
[  ] to display the other operation button window.
tYou can operate some functions of the App on the touch panel.
tYou can also play back the audio (for iPod touch/ iPhone/Android/Blackberry device) and video (for iPod touch/iPhone) on the stated devices itself, instead of the unit.
24
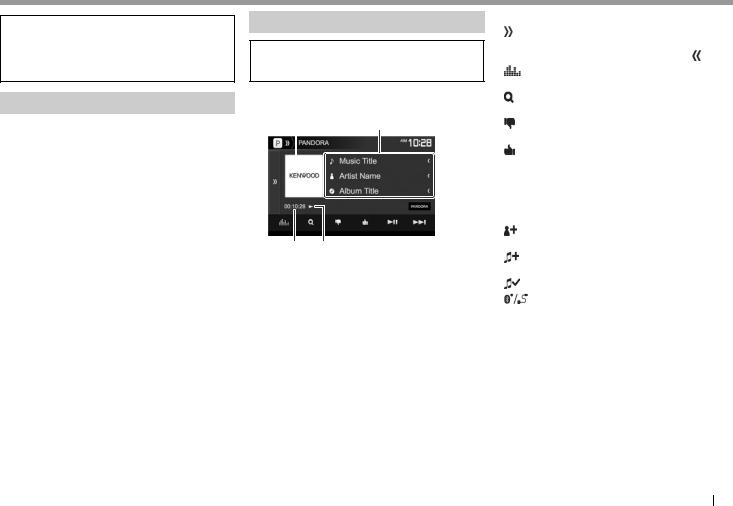
Pandora® (Only for DDX793/DDX773BH/DDX593/DDX573BH/DDX393/DDX373BT/DDX23BT)
You can stream Pandora from iPod touch/iPhone, Android or BlackBerry devices.
•Install the latest version of the Pandora application on your iPod touch/iPhone/Android/ BlackBerry.
Preparation
1Connect the device.
•For Android/BlackBerry: Connect the Android/BlackBerry device via Bluetooth. (Page 43)
•For iPod touch/iPhone: Connect iPod touch/ iPhone with a cable. (Page 69)
–Be sure to select the appropriate connection method of iPod touch/iPhone on <iPod Setup>. (Page 22)
2Select the device to use on the <APP Settings> screen. (Page 51)
3Select “PANDORA” as the source. (Page 11)
The Pandora application is started.
•If the device selection screen is displayed, select the device to use. (Page 51)
Playback operations
You can operate Pandora using the remote controller*. Only playing, pausing, and skipping are available.
Indications and buttons on the source control screen
1 2
3 4
Playback information
1Picture data
2Track information
•Pressing [<] scrolls the text if not all of the text is shown.
3Playing time
4Playback status
Operation buttons
[ |
] |
Displays the other operation button |
|
|
window. |
|
|
• To hide the window, press [ ]. |
[ |
] |
Displays the <Equalizer> screen. |
|
|
(Page 52) |
[ |
] |
Displays the list selection screen. |
|
|
(Page 26) |
[ |
] |
Thumbs down to the current track and |
|
|
skips to the next track. |
[ |
] |
Registers the current track as a |
[IW] |
favorite. |
|
Starts/pauses playback. |
||
[T] |
Skips the current track. |
|
|
|
• Not available when the Pandora skip |
|
|
reaches its limit. |
[ |
] |
Adds the current artist to the Station |
|
|
List. |
[ |
] |
Adds the current track to the Station |
|
|
List. |
[ |
] |
Bookmarks the current track. |
[ |
] |
Switches the device between iPod |
|
|
touch/iPhone connected with a |
|
|
cable and Android/BlackBerry device |
|
|
connected via Bluetooth. |
•To display all available operation buttons, press
[  ] to display the other operation button window.
* Purchase KNA-RCDV331 separately.
ENGLISH 25
Pandora®
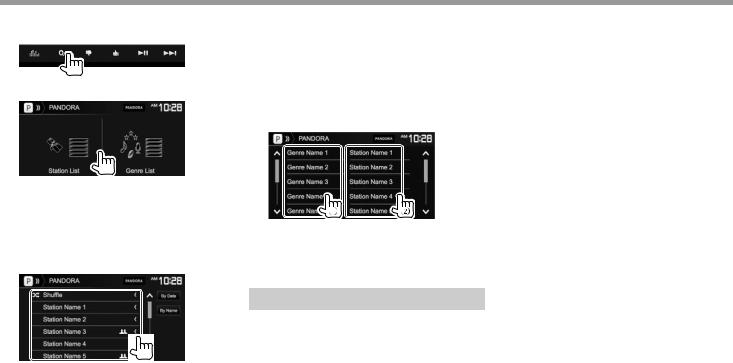
Selecting a station from the list
1Display the list selection screen.
2Select the list type.
<Station List> Selects from the station names (Station List).
<Genre List> Selects from the genre names (Genre List).
3Select a station from the list.
On the Station List
[Shuffle] Plays all the songs in the registered stations randomly.
[By Date] Sorts the list in reverse chronological order.
[By Name] Sorts the list in alphabetical order.
•You can change the page to display more items by pressing [  ]/[
]/[  ].
].
•The  indicator appears on the left of the item when Shuffle is activated. (All songs in the registered stations are played randomly.)
•The  indicator appears on the right of the item when the station is shared.
On the Genre List
Select a genre (1), then a station (2).
•You can change the page to display more items by pressing [  ]/[
]/[  ].
].
•The selected station is added to the Station List.
Requirements for Pandora®
iPhone or iPod touch
•Install the latest version of the Pandora application on your iPhone or iPod touch. (Search for “Pandora” in the Apple iTunes App Store to find and install the most recent version.)
•Connect iPod touch/iPhone to this unit with KCA-iP202, KCA-iP102 or KCA-iP103 (optional accessory).
Android™
•Visit Google play and search for “Pandora” to install.
•Bluetooth must be built in and the following profiles must be supported.
–SPP (Serial Port Profile)
–A2DP (Advanced Audio Distribution Profile)
BlackBerry®
•Visit www.pandora.com from the built in browser to download the Pandora application.
•Bluetooth must be built in and the following profiles must be supported.
–SPP (Serial Port Profile)
–A2DP (Advanced Audio Distribution Profile)
NOTE
•Ensure you are logged in to your smartphone application. If you do not have a Pandora account, you can create one for free from your smartphone or at www.pandora.com.
•Pandora is only available in certain countries. Please visit http://www.pandora.com/legal for more information.
•Because Pandora is a third-party service, the specifications are subject to change without prior notice. Accordingly, compatibility may be impaired or some or all of the services may become unavailable.
•Some functions of Pandora cannot be operated from this unit.
•For issues using the application, contact Pandora at pandora-support@pandora.com
•Establish an Internet connection using LTE, 3G, EDGE, or WiFi.
26
 Loading...