


Use & Care Guide
Manual de uso y cuidado
Models/Modelos: 722.1467*
Kenmore Elite®
Dishwasher
Lavavajillas
* = color number, número de color
MFL69706502
Sears Brands Management Corporation
Hoffman Estates, IL 60179 U.S.A.
www.kenmore.com

TABLE OF CONTENTS
WARRANTY...................................................................... |
3 |
DISHWASHER SAFETY...................................................... |
4 |
PARTS AND FEATURES...................................................... |
6 |
Exterior Parts............................................................................. |
6 |
Interior Parts.............................................................................. |
7 |
Product Specifications............................................................. |
7 |
START-UP/QUICK REFERENCE.......................................... |
8 |
CLEANING THE FILTERS................................................... |
9 |
DISHWASHER EFFICIENCY TIPS...................................... |
10 |
DETERGENT AND RINSE AID........................................... |
11 |
Detergent.................................................................................. |
11 |
Rinse Aid.................................................................................. |
12 |
LOADING........................................................................ |
13 |
Top Rack Loading................................................................... |
13 |
Bottom Rack Loading............................................................. |
14 |
Cutlery & Utensil Rack Loading............................................ |
16 |
DISHWASHER USE.......................................................... |
17 |
Cycles and Options Information........................................... |
17 |
Dishwasher Control Section................................................... |
19 |
Dishwasher Feedback Section.............................................. |
19 |
Canceling a Cycle................................................................... |
19 |
Changing a Cycle after Dishwasher Is Started................. |
20 |
Adding a Dish after Dishwasher Is Started........................ |
20 |
SMART FEATURES........................................................... |
21 |
Overview.................................................................................. |
21 |
Getting Connected................................................................. |
21 |
Connecting the Dishwasher................................................... |
21 |
My Cycle.................................................................................. |
21 |
FCC Notice............................................................................. |
22 |
WASHING SPECIAL ITEMS.............................................. |
23 |
DISHWASHER CARE....................................................... |
24 |
Cleaning.................................................................................. |
24 |
Dishwasher Maintenance Procedure................................... |
24 |
Drain Air Gap......................................................................... |
25 |
Vacation or Extended Time Without Use........................... |
25 |
DIAGNOSTICS................................................................ |
26 |
TROUBLESHOOTING...................................................... |
27 |
SERVICE............................................................ |
Back Cover |
2

KENMORE ELITE LIMITED WARRANTY
WITH PROOF OF SALE the following warranty coverage applies when this appliance is correctly installed, operated and maintained according to all supplied instructions. In all cases replacement units or parts are warranted only for the unexpired portion of the warranty period from the original date of sale.
FOR ONE YEAR from the date of sale this appliance is warranted against defects in material or workmanship. A defective appliance will receive free repair or replacement at option of seller.
FOR TWO YEARS from the date of sale all parts of this appliance are warranted against defects in material or workmanship. If a part is defective within the first year, a new part will be supplied and installed at no charge. If a part is defective after the first year, a new part will be supplied but not installed at no charge. You are
responsible for the labor cost of part installation after the first year from the date of sale.
FOR FIVE YEARS from the date of sale, all parts of the upper or lower dish rack are warranted against rust due to defects in material or workmanship. If a rack part rusts from defects within the first year, a new part will be supplied and installed at no charge. If a rack part rusts from defects after the first year, a new part will be supplied but not installed at no charge. You are
responsible for the labor cost of part installation after the first year from the date of sale.
FOR AS LONG AS IT IS USED from the date of sale, the stainless steel tub and inner door panel of this appliance are warranted against leaks due to rust-through. If a tub or panel rusts through within the first year, a new part will be supplied and installed at no charge. If a tub or panel rusts through after the first year, a new part will be supplied but not installed at no charge. You are responsible for the labor cost of part installation after the first year from the date of sale.
For warranty coverage details to obtain free repair or replacement, visit the web page: www.kenmore.com/ warranty
All warranty coverage applies for only 90 DAYS from the sale date if this appliance is ever used for other than private household purposes.
This warranty covers ONLY defects in material and workmanship, and will NOT pay for:
1.Expendable items that can wear out from normal use, including but not limited to filters, belts, bags or screwin base light bulbs.
2.A service technician to clean or maintain this appliance, or to instruct the user in correct appliance installation, operation and maintenance.
3.Service calls to correct appliance installation not performed by Sears authorized service agents, or to repair problems with house fuses, circuit breakers, house wiring, and plumbing or gas supply systems resulting from such installation.
4.Damage to or failure of this appliance resulting from installation not performed by Sears authorized service agents, including installation that was not in accord with electrical, gas or plumbing codes.
5.Damage to or failure of this appliance, including
discoloration or surface rust, if it is not correctly operated and maintained according to all supplied instructions.
6.Damage to or failure of this appliance, including discoloration or surface rust, resulting from accident, alteration, abuse, misuse or use for other than its intended purpose.
7.Damage to or failure of this appliance, including discoloration or surface rust, caused by the use of detergents, cleaners, chemicals or utensils other than those recommended in all instructions supplied with the product.
8.Damage to or failure of parts or systems resulting from unauthorized modifications made to this appliance.
9.Service to an appliance if the model and serial plate is missing, altered, or cannot easily be determined to have the appropriate certification logo.
Disclaimer of implied warranties; limitation of remedies
Customer’s sole and exclusive remedy under this limited warranty shall be product repair or replacement as provided herein. Implied warranties, including warranties of merchantability or fitness for a particular purpose, are limited to one year on the appliance, two years on appliance parts, five years on dish racks, and for as long as used on the tub and inner door panel, or the shortest period allowed by law. Seller shall not be liable for incidental or consequential damages. Some states and provinces do not allow the exclusion or limitation of incidental or consequential damages, or limitation on the duration of implied warranties of merchantability or
fitness, so these exclusions or limitations may not apply to you.
This warranty applies only while this appliance is used in the United States.
This warranty gives you specific legal rights, and you may also have other rights which vary from state to state.
Sears Brands Management Corporation
Hoffman Estates, IL 60179
3

DISHWASHER SAFETY
Your safety and the safety of others are very important.
We have provided many important safety messages in this manual and on your appliance. Always read and obey all safety messages.
This is the safety alert symbol.
This symbol alerts you to potential hazards that can kill or hurt you and others.
All safety messages will follow the safety alert symbol and either the word “WARNING” or “CAUTION.” These words mean:
CAUTION
You can be killed or seriously injured if you don’t follow instructions.
Failure to follow instructions may result in minor or moderate injury or product damage.
All safety messages will tell you what the potential hazard is, tell you how to reduce the chance of injury, and tell you what can happen if the instructions are not followed.
IMPORTANT SAFETY INSTRUCTIONS
WARNING: When using the dishwasher, follow basic precautions, including the following:
■Read all instructions before using the dishwasher.
■Use the dishwasher only for its intended function.
■Use only detergents or rinse agents recommended for use in a dishwasher, and keep them out of the reach of children.
■When loading items to be washed:
1)Locate sharp items so that they are not likely to damage the door seal; and
2)Load sharp knives with the handles up to reduce the risk of cuts.
■Do not wash plastic items unless they are marked “dishwasher safe” or the equivalent. For plastic items not so marked, check the manufacturer’s recommendations.
■Do not touch the heating element during or immediately after use.
■Do not operate the dishwasher unless all enclosure panels are properly in place.
■Do not tamper with controls.
■Do not abuse, sit on, or stand on the door, lid, or dish racks of the dishwasher.
■To reduce the risk of injury, do not allow children to play in or on the dishwasher.
■Under certain conditions, hydrogen gas may be produced in a hot water system that has not been used for two weeks or more. HYDROGEN GAS IS EXPLOSIVE. If the hot water system has not been used for such a period, before using the
dishwasher turn on all hot water faucets and let the water flow from each for several minutes. This will release any accumulated hydrogen gas. As the gas is flammable, do not smoke or use an open flame during this time.
■Remove the door or lid to the washing compartment when removing an old dishwasher from service or discarding it.
SAVE THESE INSTRUCTIONS
California Proposition 65
This product contains chemicals known to the State of California to cause cancer and birth defects or other reproductive harm. Wash hands after handling. (USA only)
4

Tip Over Hazard
Do not use dishwasher until completely installed. Do not push down on open door.
Doing so can result in serious injury or cuts.
Electrical Shock Hazard Electrically ground dishwasher.
Connect ground wire to green ground connector in terminal box.
Do not use an extension cord.
Failure to follow these instructions can result in death, fire, or electrical shock.
■Install where dishwasher is sheltered from the elements. Avoid possible rupture of fill valve from freezing. Such ruptures are not covered by the warranty. See the “Vacation or Extended Time Without Use” section.
■Install and level dishwasher on a floor that will hold the weight and in an area suitable for its size and use.
■Remove all shipping plugs from hoses and connectors (such as the cap on the drain outlet) before installing. See Installation Instructions for complete information.
GROUNDING INSTRUCTIONS
■For a grounded, cord-connected dishwasher:
The dishwasher must be grounded. In the event of a malfunction or breakdown, grounding will reduce the risk of electric shock by providing
a path of least resistance for electric current. If the dishwasher is equipped with a cord
having an equipment-grounding conductor and a grounding plug, the plug must be plugged into an appropriate outlet that is installed and grounded in accordance with all local codes and ordinances.
WARNING: Improper connection of the equipment-grounding conductor can result in a risk of electric shock. Check with a qualified electrician or service representative if you are in doubt whether the dishwasher is properly grounded. Do not modify the plug if it will not fit the outlet, have a proper outlet installed by a qualified electrician.
■For a permanently connected dishwasher:
The dishwasher must be connected to a grounded metal, permanent wiring system, or an equipment-grounding conductor must be run with the circuit conductors and connected to the equipment-grounding terminal or lead on the dishwasher.
SAVE THESE INSTRUCTIONS
5
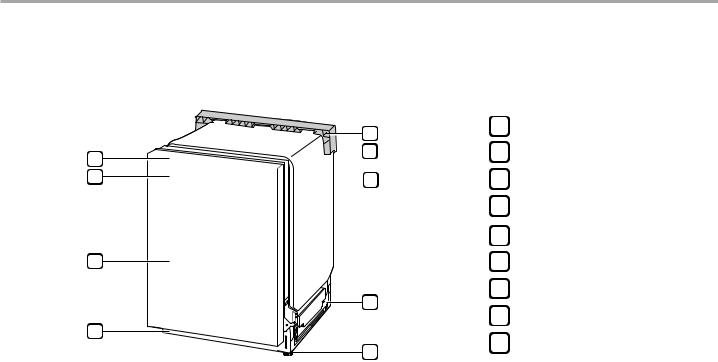
PARTS AND FEATURES
Exterior Parts
5
1


 6
6
2 7
7
3
8
4
9
NOTE: Do not remove the safety cover at any time.
Status LED
1 Control Panel
2Door Handle
3Front Cover
4 Lower Cover
5Shipping Brace
6Safety Cover
7Status LED (3)
8Base
9Leveling Feet
•Red : Error (See the Error Codes in Troubleshooting section.)
•White (steady): Normal operation
•White (blinking): Cycle has been paused. (After four minutes in pause mode, the machine turns off.)
•Green: Cycle finished normally.
The green light stays on for 90 seconds.
To keep the green light on until the door is opened, turn the power on, and then press and hold Hi Temp Wash on the control panel for three seconds until OFF or On appears in the display. The dishwasher remembers this setting until manually changed.
6
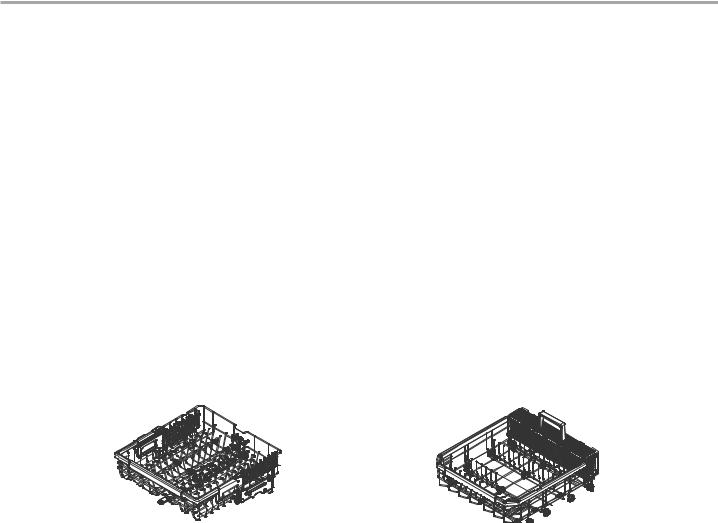
Interior Parts
1
2
3
4
5
6
7
8
9
10
TopTOP RACKRack
1 Top Spray Arm
2Upper Spray Arm
3Lower Spray Arm
4 Filtration System
5Detergent and Rinse Aid
Dispenser
6Drying Vent Cover
7Cutlery & Utensil Rack
8Top Rack
9Silverware Basket
10 Bottom Rack
BOTTOMBottomRACKRack
Included Accessories
Installation brackets |
Wood screws |
CUTLERY RACK |
Hose clamp |
Cutlery & Utensil Rack |
Product Specifications
The appearance and specifications listed in this manual may vary due to constant product improvements.
Electrical requirement |
120 V, 60 Hz AC only, minimum 15 A circuit breaker |
|
Water pressure |
20 - 80 psi (140 - 550 kPa) |
|
Dimensions |
23 3/4"(W) X 26 3/4"(D) X 33 5/8"(H) |
|
603 mm(W) X 679 mm(D) X 854 mm(H) |
||
|
||
Inlet water temperature |
120 °F (49 °C) minimum |
|
Net weight |
81.5 lbs. (39.6 kg) |
7
START-UP/QUICK REFERENCE
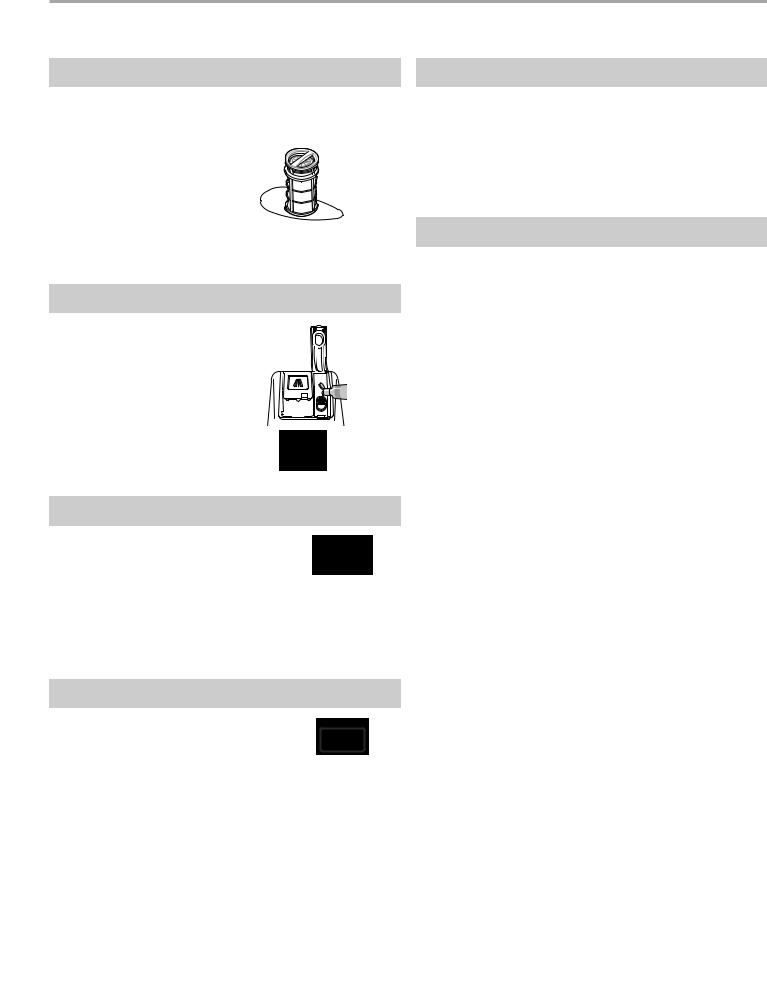
Filters Provide Peak Performance
Cleaning the filters periodically helps keep the dishwasher working at peak performance. The filters can be found at the bottom center of your dishwasher.
See Cleaning the Filters for information on removing and maintaining the filters.
Drying - Rinse Aid Is Essential
You must use a drying agent such as rinse aid for good drying performance (sample included). Rinse aid along with the Extra Dry option will provide best drying and avoid excessive moisture in the dishwasher interior.
Adding Dishes
The dishwasher will start automatically, after a slight delay, when the door is closed and latched. During the cycle, the display will indicate the estimated time remaining for the cycle and options selected. If the door is opened during the cycle, the dishwasher will stop. When the door is closed, the cycle will resume from the point where it was stopped.
Measuring Detergent
It is possible to use too much detergent in your dishwasher. This can lead to etching of your dishes. See “Detergent and Rinse Aid” to determine the amount of detergent needed based on your water hardness. High quality dishwasher detergent tablets or packs have been proven to be better than powdered, liquid, or gel detergents at reducing filming on dishes.
Express Wash - When You Need Fast Results
High Efficiency dishwashers run longer to save water and energy just as driving a car slower saves on gas. When you need fast results, the Express Wash cycle will clean your dishes using slightly more water and energy. For improved drying, select the Extra Dry option to add additional time to dry.
Smart Wash Cycle
Smart Wash provides improved results using only the amount of water and energy needed. The Smart Wash and Pots & Pans cycles are recommended for tough soil.
8
CLEANING THE FILTERS
This dishwasher has the latest technology in dishwasher filtration. This filtration system minimizes sound and optimizes water and energy consumption while providing superior cleaning performance. Maintain the filter regularly to ensure peak cleaning performance throughout the life of the dishwasher.
■The assembled inner filter keeps oversized items and foreign objects, along with very fine food particles, out of the pump.
■The stainless steel filter keeps food from being recirculated onto your dishware.
Assembled 
 inner filter
Stainless steel filter
Remove, inspect, and clean the filter system once a month for best performance. Filters may need to be cleaned more often depending on usage. See chart below for details.
The filters may need to be cleaned when:
■Visible objects or soils are on the filter assembly.
■There is degradation in cleaning performance (that is, soils still present on dishes).
■Dishes feel gritty to the touch.
Removing and maintaining the filters is very easy. The chart below shows the recommended cleaning frequency.
Recommended Filter Cleaning Schedule
Number of |
If you wash |
If you scrape and |
If you only scrape dishes |
|
Loads Per |
dishes before |
rinse dishes before |
||
before loading* |
||||
Week |
loading |
loading |
||
|
If you do not scrape or rinse dishes before loading
1-3 |
Every 6 months |
Once a year |
Four times a year |
Once a month |
|
|
|
|
|
|
|
4-7 |
Every 6 months |
Once a year |
Four times a year |
Twice a month |
|
(every 15 days) |
|||||
|
|
|
|
||
|
|
|
|
|
|
8-12 |
Every 6 months |
Every 6 months |
Every 1.5 months |
Every week |
|
|
|
|
|
|
|
13-14 |
Every 6 months |
Every 6 months |
Every 1.5 months |
Twice a week |
|
|
|
|
|
|
* Recommended: Only scraping dishes before loading them saves water, energy, and personal time and effort.
Very Hard Water
If you have hard water (above 15 grains), clean the filter at least once per month. Buildup of white residue on dishwasher surfaces indicates hard water. For tips on removing spots and stains, see Troubleshooting section.
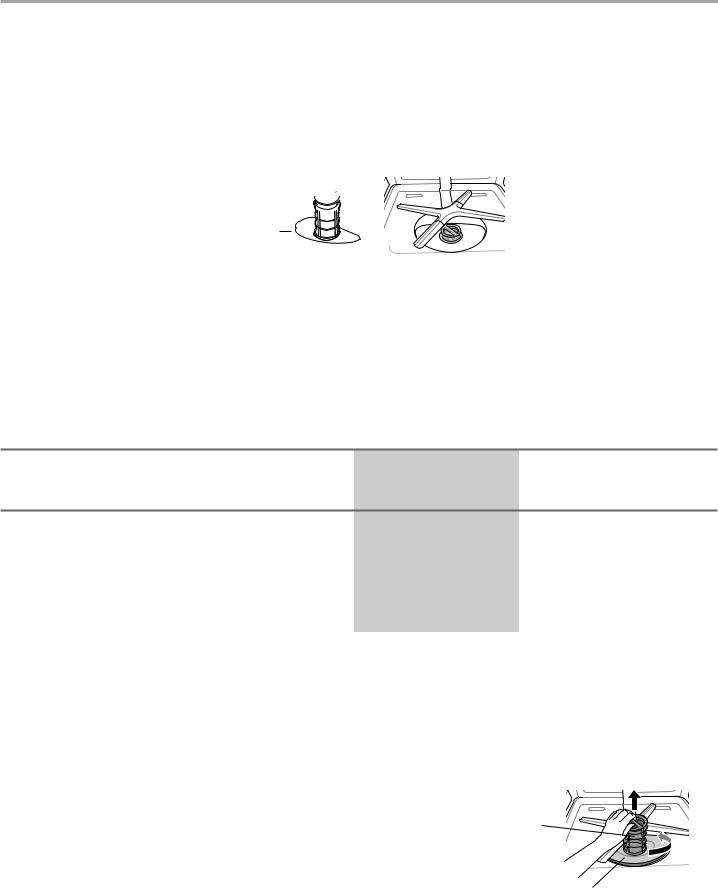
Filter Removal Instructions
1.Turn the filter assembly counterclockwise and lift out.
2.Grasp the stainless steel filter in the circular opening, lift slightly, and pull forward to remove.
3. Clean the filters as shown in the Cleaning Instructions.
Assembled inner filter
Stainless steel filter
9

Cleaning Instructions
IMPORTANT: Clean the filters with a soft brush under running water.
Rinse filter under running water until most soils are removed.
A soft brush may be required to get off hard to remove soil.
Filter Reinstallation Instructions
1. To replace the assembled filters, position the spray arm so the wider vee is toward the front. 2. Fit the filters back into the filter holder and secure them by turning the inner filter
clockwise until it clicks into place.
NOTE:
• For best wash performance, clean the filter after each load. If food debris remains in  the filter, it may cause an odor.
• In areas with hard water, clean the filter at least once a month with a soft brush.
•Clean the filters using non-abrasive materials and warm running water.
•Make sure the filter is assembled correctly before starting a cycle. When assembling, rotate it firmly until it clicks.
 WARNING: Be cautious of sharp edges when handling the stainless steel filter.
 CAUTION: Remove food residue caught in filters to prevent the build up of odor-causing bacteria and possible drainage problems.
DISHWASHER EFFICIENCY TIPS
Hot water dissolves and activates the dishwasher detergent. Hot water also dissolves grease on dishes and helps glasses dry spot-free. For best results, water should be 120°F (49°C) as it enters the dishwasher. Loads may not wash as well if the water temperature is too low.
■To save water, energy and time, only scrape dishes. Do not rinse dishes before putting them into the dishwasher.
■Use a delay feature to run the dishwasher during off-peak hours. Contact your local utility for information on peak usage times, and avoid running the dishwasher during those times.
■During the summer, run your dishwasher at night. This reduces daytime heat buildup in the kitchen.
■Use a rinse aid to improve drying.
10
 Loading...