


ARB1905CC0
Amana ARB1905CC0, ARB1905CW0, ARB190ZCC0, ARB190ZCS0, ARB190ZCW0 Owner’s Manual
...
@@IIWIF'II"WIIIIWIll IWII_% W@II"
Keep instructions for future reference.
Keep this manua! and your sales receipt together in a safe
31ace in case _ arranty sel-vice is required.
Ordering parts and accessories?
Questions about your features?
Ptease contact us with yore"model and serial numbe*:
Consumer A_il"s Depal"tment
Amana Appliances
2800 - 220th Tl"ail
Amana, Iowa 52204
Ph# 1(800)843o0304 in USA.
1(866)587-2002 au Canada
Intemet: http:ii www amana.com
Part No. 12642702
Printed in U.S.A. 01/02
maintenanceinformation.
Compmeteregistrationcardandpromptlyreturn.Ifregistrationcardismissing,
calltheConsumerAffairsDepartment.
WarrantyservicemustbeperformedbyanauthorizedservicerAmanaalso
recommendscontactinganauthorizedservicerifserviceisrequiredafterwarranty
expiresTolocateanauthorizedservicer,call1-800-NAT-LSVC(1-800-628-5782),
orcall1{319)622-5511ifoutsidetheUSA Youmayalsocontactusonthewebat
www.amana.com.
WhencontactingAmana,pleaseprovidethefollowinginformation.Product
informationisontheserialplate,locatedonceilingoffreshfoodsection.
ModelNumber
'P'Number
Serial Number
Purchase Date
Dealer Name
Amana offers long°term set_'ice
protection for this new refi-igerator.
Asure TM Extended Service Plan is
specially designed to supplement
Amaaa's smmg waranty. This plan
covers parts, labor, and travel charges_
Call 1(800)528-2682, or contact us at
_w'_oamana.com _br more in_brmation.
Before Calling Service :
][fsomething seems unusual, please
check "Trouble Shooting" section,
which is designed m help you solve
problems be_bre calling service.
Dealer Address
Dealer Phone
This book is intended to show the
variety of t}atures that are available in
the product line. If yore retiigerator
does not have all the options that arc
ShOWn, rnany of these options may be
purchased by contacting the Consumer
Affairs Department. See contact
in*brmation on the cover of your
nlanLtal_

Recognize Safety Symbols, Words, Labels
[ DANGER ]
DANGER--rmmediate hazards which WiLL resuff in severe personN injury or
death
[ WARNING ]
WARNmNG--Hazards or unsafe practices which COULD resuff in severe
personN injury or death
[ CAUTION ]
CAUTION--Hazards or unsafe practices which COULD resuff in minor personN
injury or product or property damage
about Safety Instructions
Warning and Important Sat'cry
Instractions appearing in this manual
are not meant to cover all possible
conditions and situations that may
occur. Common sense, caution, and care
mast be exercised when installing,
maintaining, or operating refl'igeraor.
Always contact your dealer, distributor,
service agent, or manufi_cmrer about
problems or conditions you do not
undersmn&
WARNING
To reduce risk of fire_ electric sheck_ serious injury_ or death when using yeur
refrigerator_ follow these basic precautions_ including the following;
1. Read aii instructions before using
refrigerator.
2 Observe all local codes and
ordinances
3 Be sure to follow grounding
instructions
4 Check with a qualified electrician
if you are not sure this appliance
is properly grounded.
5. DO NOT ground to a gas line.
6 DO NOT ground to cold water
pipe.
7. Refrigerator is designed to
operate on a separate 103 to 126
volt, 15 amp, 60 cycle line. DO
NOT modify plug on power cord If
plug does not fit electrical outlet,
have proper outlet installed by a
qualified electrician
8. DO NOT use a two-prong adapter,
extension cord or power strip.
9. DO NOT remove warning tag from
power cord.
10. DO NOT tamper with refrigerator
controls.
11. DO NOT service or replace any
part of refrigerator unless
specifically recommended in
owner's manual or published
user-repair instructions. DO NOT
attempt service if instructions are
not understood or if they are
beyond personal skill level.
12. Always disconnect refrigerator
from electrical supply before
attempting any service. Disconnect
power cord by grasping the plug,
not the cord.
13. Install refrigerator according to
Installation Instructions. Aii
connections for water, electrical
power, and grounding must compl
with local codes and be made by
licensed personnel
when required.
14 Keep your refrigerator in good
condition. Bumping or dropping
refrigerator can damage unit or
cause unit to malfunction or leak
If damage occurs, have
refrigerator checked by qualified
service technician.
15. Replace worn power cords and!or
loose plugs.
16. Always read and follow
manufacturer's storage and ideal
environment instructions for items
being stored in refrigerator.
I
DANGER
To reduce risk of injury or death_ follow basic precautions_
inc|uding the fol|owing:
Proper Disposal of Your Refrigerator
IMPORTANT: Child entrapment and suffocation are not problems of the past. Junked or
abandoned refrigerators are still dangerous-even if they sit out for "just a few days". If you are
getting rid of your old refrigerator, please follow the instructions below to help prevent accidents.
BEFORE YOU THROWAWAY YOUR OLD REFRIGERATOR OR FREEZER:
• Take off the doors.
• Leave the shelves in place so children may not easily climb inside.
Save These Instructions
3
I
i o
nstalhng Your Refrigerator
These instructions were provided to aid you in tile installation of your unit. Amana cannot be responsible fbr improper installation
How to Transport Your Unit
How do I measure an
opening to insure
proper fit?
A V," of air space should be provided
for the top and back of tile unit to allow
for proper air circulation. When
installing your unit, measure carefiAly.
Subflooring or floor coverings (i.e.
carpet, tile, wood floors, rugs) n'my
make your opening smaller than
anticipated.
Some clearance may be gained by using
the le\ cling procedure under How to
Leve[ }b_lr R@'igerator.
tMPORTAN_ If Unitis to be
installed into a recess where top Of
unit is completely covered, Use
dimensions from floor to top of
binge cap to Verify proper
clearance.
Follow these tips when moving the unit to final location:
NEVER transport unit on its side If an upright position is not possible, lay unit on its back.
Allow unit to sit upright for approximately 30 minutes prior to plugging unit in to assure oil
remm to the compressor, Plugging unit in immediately may cause damage to internal parts.
Use an appliance dolly when moving unit ALWAYS t_/ck unit from its side NEVER flora its
f?ont or back.
Protect outside finish of unit during transport by wrapping cabinet in blankets or inserting
padding between the unit and dolly.
Secure unit to dolly firn'dy widL straps Thread straps through handles when possible. DO NOT
overtighten. Overtightening restraints may
dent or damage outside finish.
Now to Se|eet the Best Location
Observe these points when choosing the final location [br your unit:
DO NOT install refrigerator near oven, radiator, or other heat source. If not possible, shield unit
with cabinet material.
DO NOT install where temperature falls below 55°F (13°C) Malflmction may occur at this
temperature
Make sure floor is level, If floor is not level, shim rear wheels of unit with a piece of plywood
or other shim material
To assure proper door closure, x erify that the unit is leveled with a %" tilt to the back.
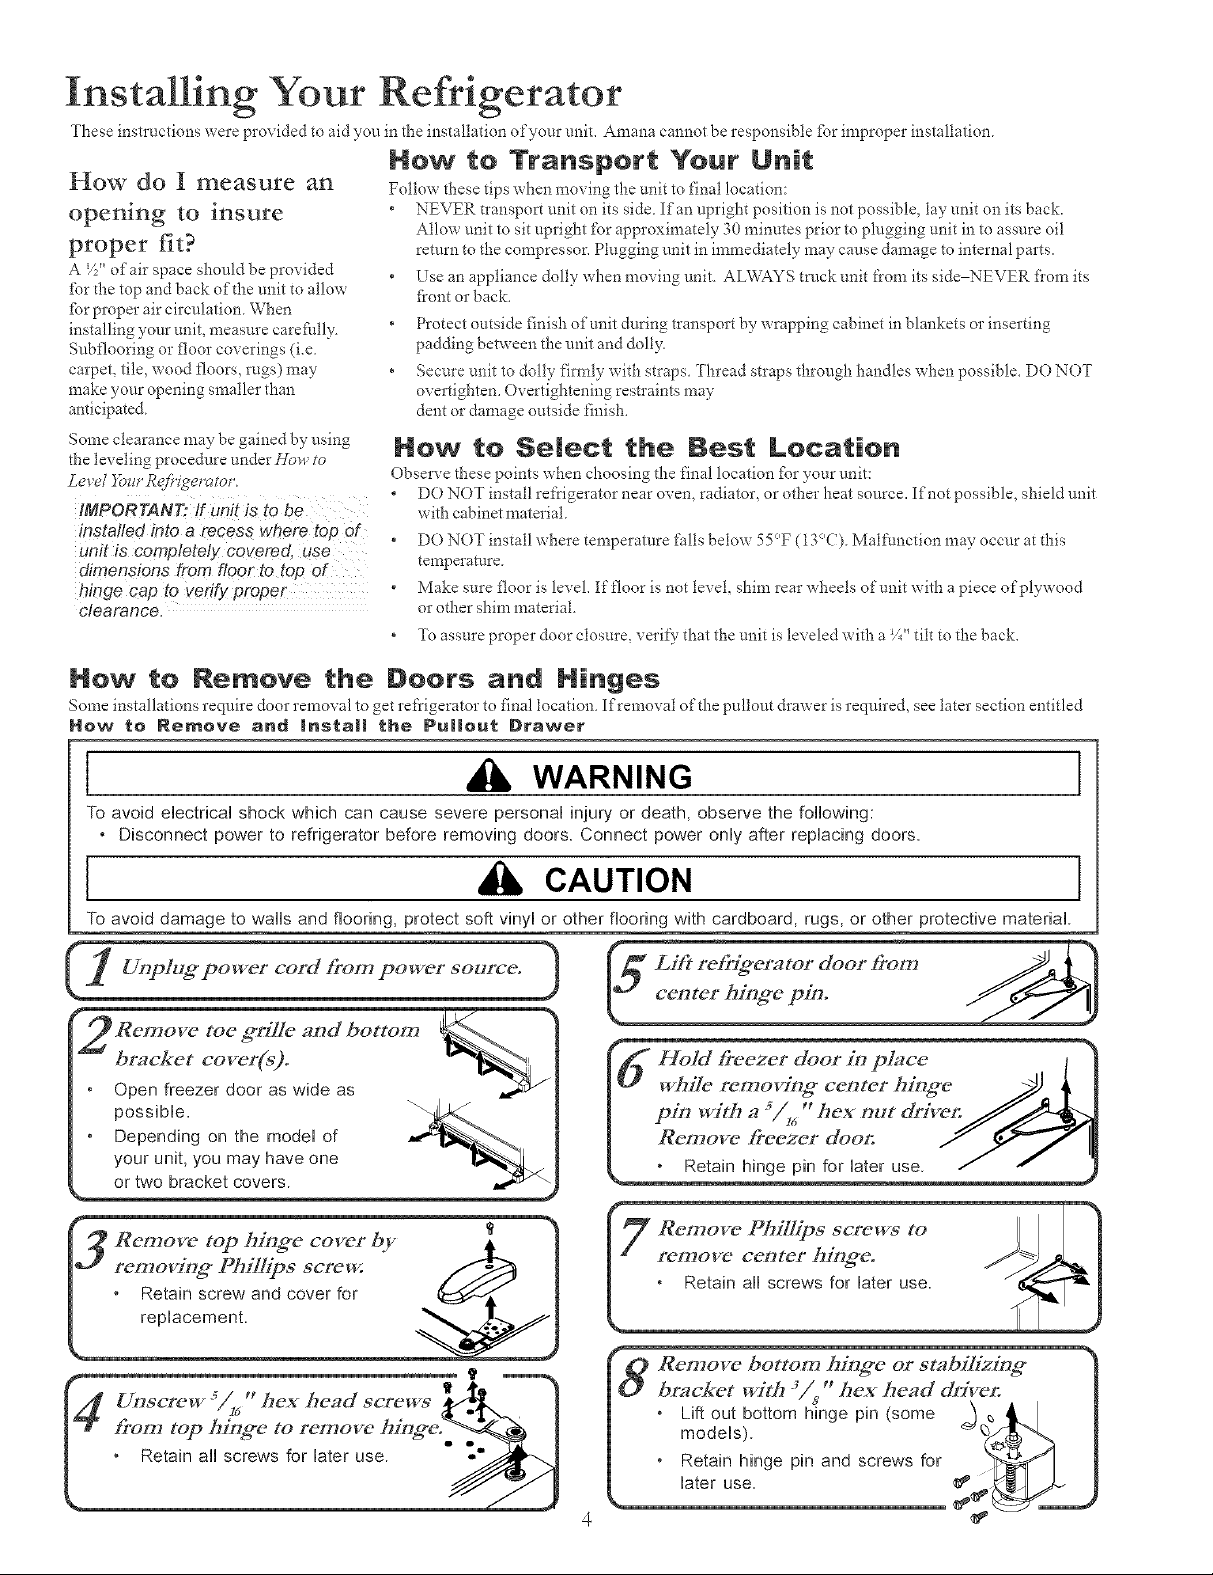
How to Remove the Doers and Ninges
Some installations reqniIe door removal to get refrigerator to final location Ifremo\ al of the pullout drawer is required, see later section entitled
Now te Remove and Inata|| the Pu||out Drawer
I WARNING I
To avoid electrical shock which can cause severe personal injury or death, observe the following:
• Disconnect power to refrigerator before removing doors. Connect power only after replacing doors.
I CAUTION I
To avoid damage to wals and flooring, protect soft vinyl or other flooring with cardboard, rugs, or other protective material.
==,,,,o, ,÷o], JA.
c,o,,,>io=cyo.
toe ffrilIe and botton_
bracket cover(s)°
Open freezer door as wide as
possible.
Depending on the model of
your unit, you may have one
or two bracket covers.
' Remove top hing*e cover by
removing_ Phillips screw.
Retain screw and cover for
replacement.
freezer door in place I h
rerr, cc=terhi. .e i !
witha54,"he==,tdri e,.
ow, ee=erdoo II
Remove bottom hinge or stabilizing*
bracket with 3in, _ hex head &'iven
* Lift out bottom hinge pin (some __
models). _ q
* Retain hinge pin and screws for
later use.
i o
nstallmg Your Refrigerator
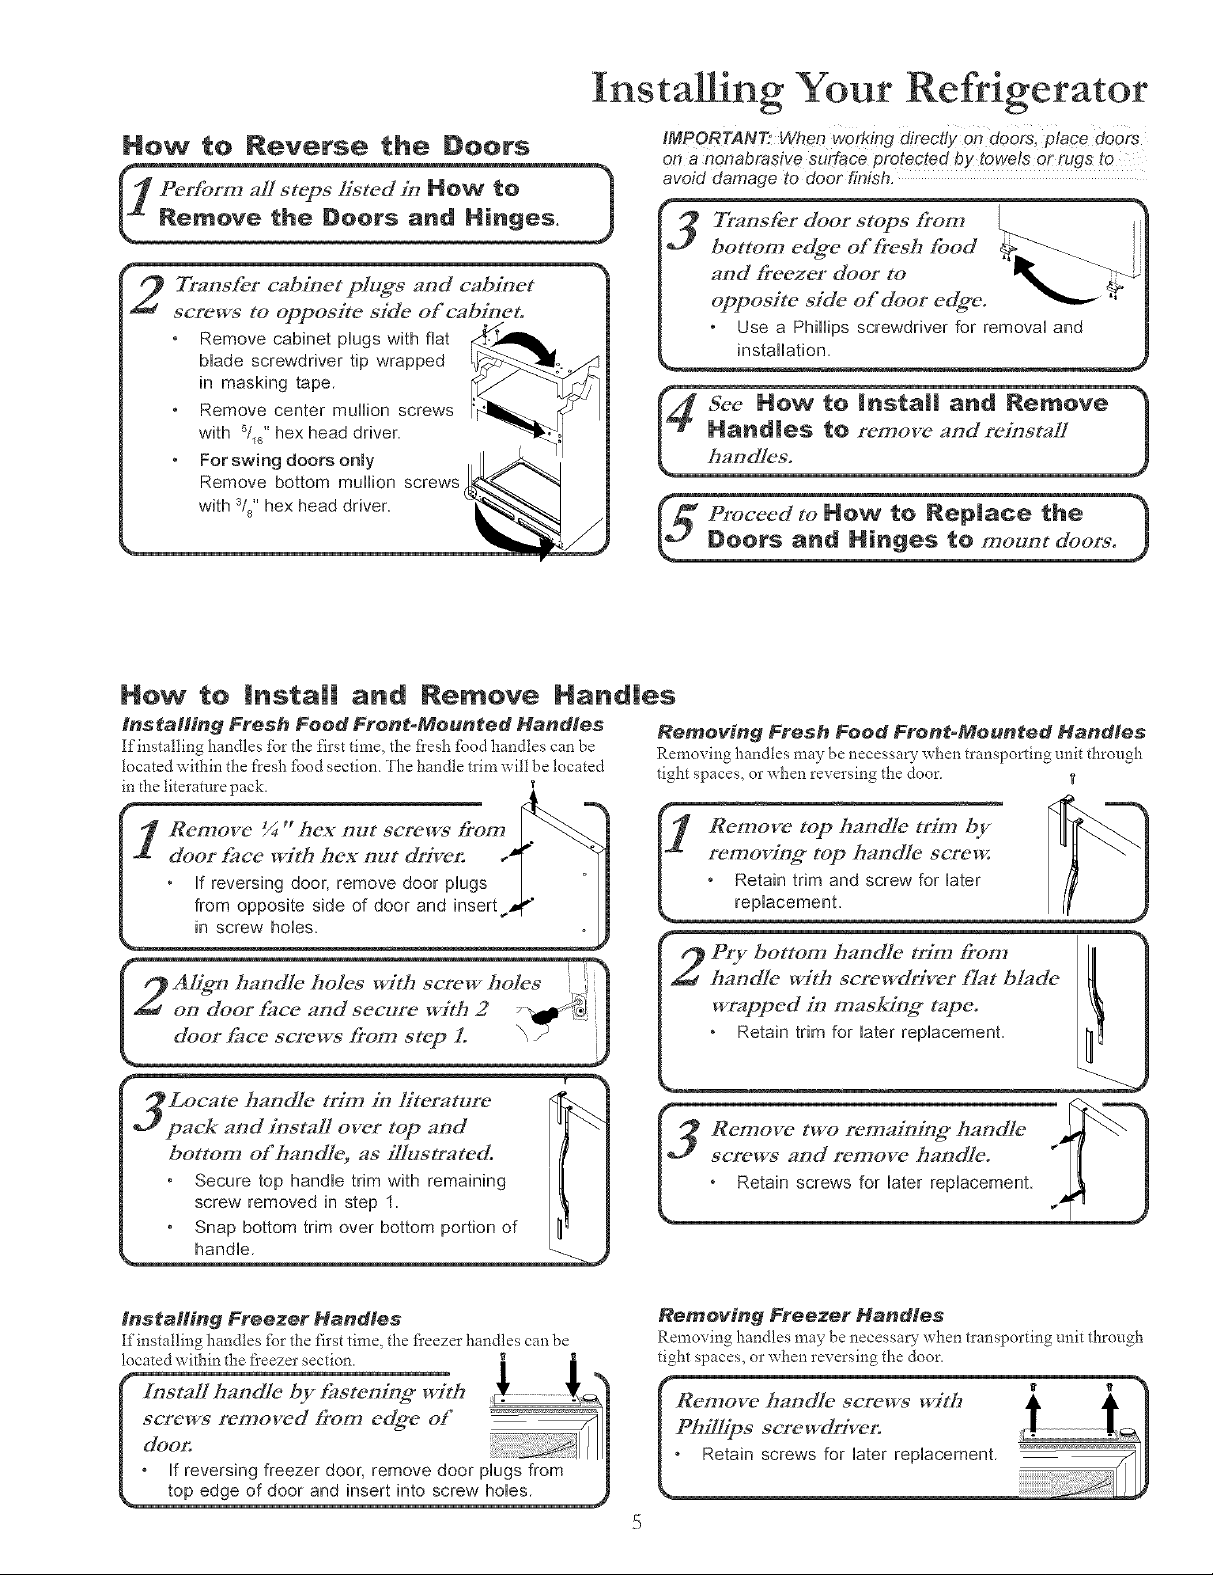
How to Reverse the Doors
rform aZ/steps listed in NOW to 1
move the Doors and Hinges. J
Transfer cabinet plugs anti cabinet
screws to opposite side of cabineto
Remove cabinet plugs with flat
Made screwdriver tip wrapped
in masking tape.
Remove center mullion screws
with Sl_" hex head driver.
For swing doors only
Remove bottom mullion screws
with si8"hex head driver.
Now to
tnstaH#_g Fresh Food Front-Mounted Handles
If installing handles tbr the first time, the flesh £)od handles can be
located within the t'resh fbod section. The handle trim will be located
in the literature pack.
Insta|| and Nemove Nand|es
IMPORTAN_ When working directly on doors, place doOrS
on a nonabrasive surface protected by towels or rugs to
avoid damage to door finish.
Transfer door stops from
bottom edffe of _'esh food
and _eezer door to
opposite side of door edffe.
Use a Phillips screwdriver for removal and
installation.
roceed to MOW to Rep|ace the )
oors and P|inge$ to mount doers. )
Removing Fresh Food Front-Mounted Handles
Remo\ ing handles may be necessary when transporting unit through
tight spaces, or when rex ersing the door _,
Refrlove 1//44_ hCX 17U[ screp/s _ron_
door _lce with hex out driver:
If reversing door, remove door plugs
in screw holes.
I2 Aligm haodle holes with screw holes
oo door _,ce a.d sec,,re with 2 _} ]
doo__"om step L \ /
Locate handle trim/17 Iitetvtmre
pack and install over top and
botton_ of haodlL5 as i[]ustrated
Secure top handle trim with remaining
screw removed in step 1
Snap bottom trim over bottom portion of t
handle
installing Freezer Handtee
[finstalling handles tbr the first time, the fl'eezer handles can be
located within the fl'eezer section.
and/c B_m by
].L removinff top boodle screw. "_ _"
] ,Retain trim and screw for later /l[
replacemenL /_'
- s<
(,_ Re,,,o_"tworemaio,%;*ha.d_'_-,_--"]
screwsaod removeha_d!e. " [ ]
" Retainscrewsforiaterrepiacement _ J
Removing Freezer Handles
Remo\'ing handles may be necessary _hen transporting t;nit through
tight spaces, or when reversing the door,
top edge of door and insert into screw hobs.
i o
nstallmg Your Refrigerator
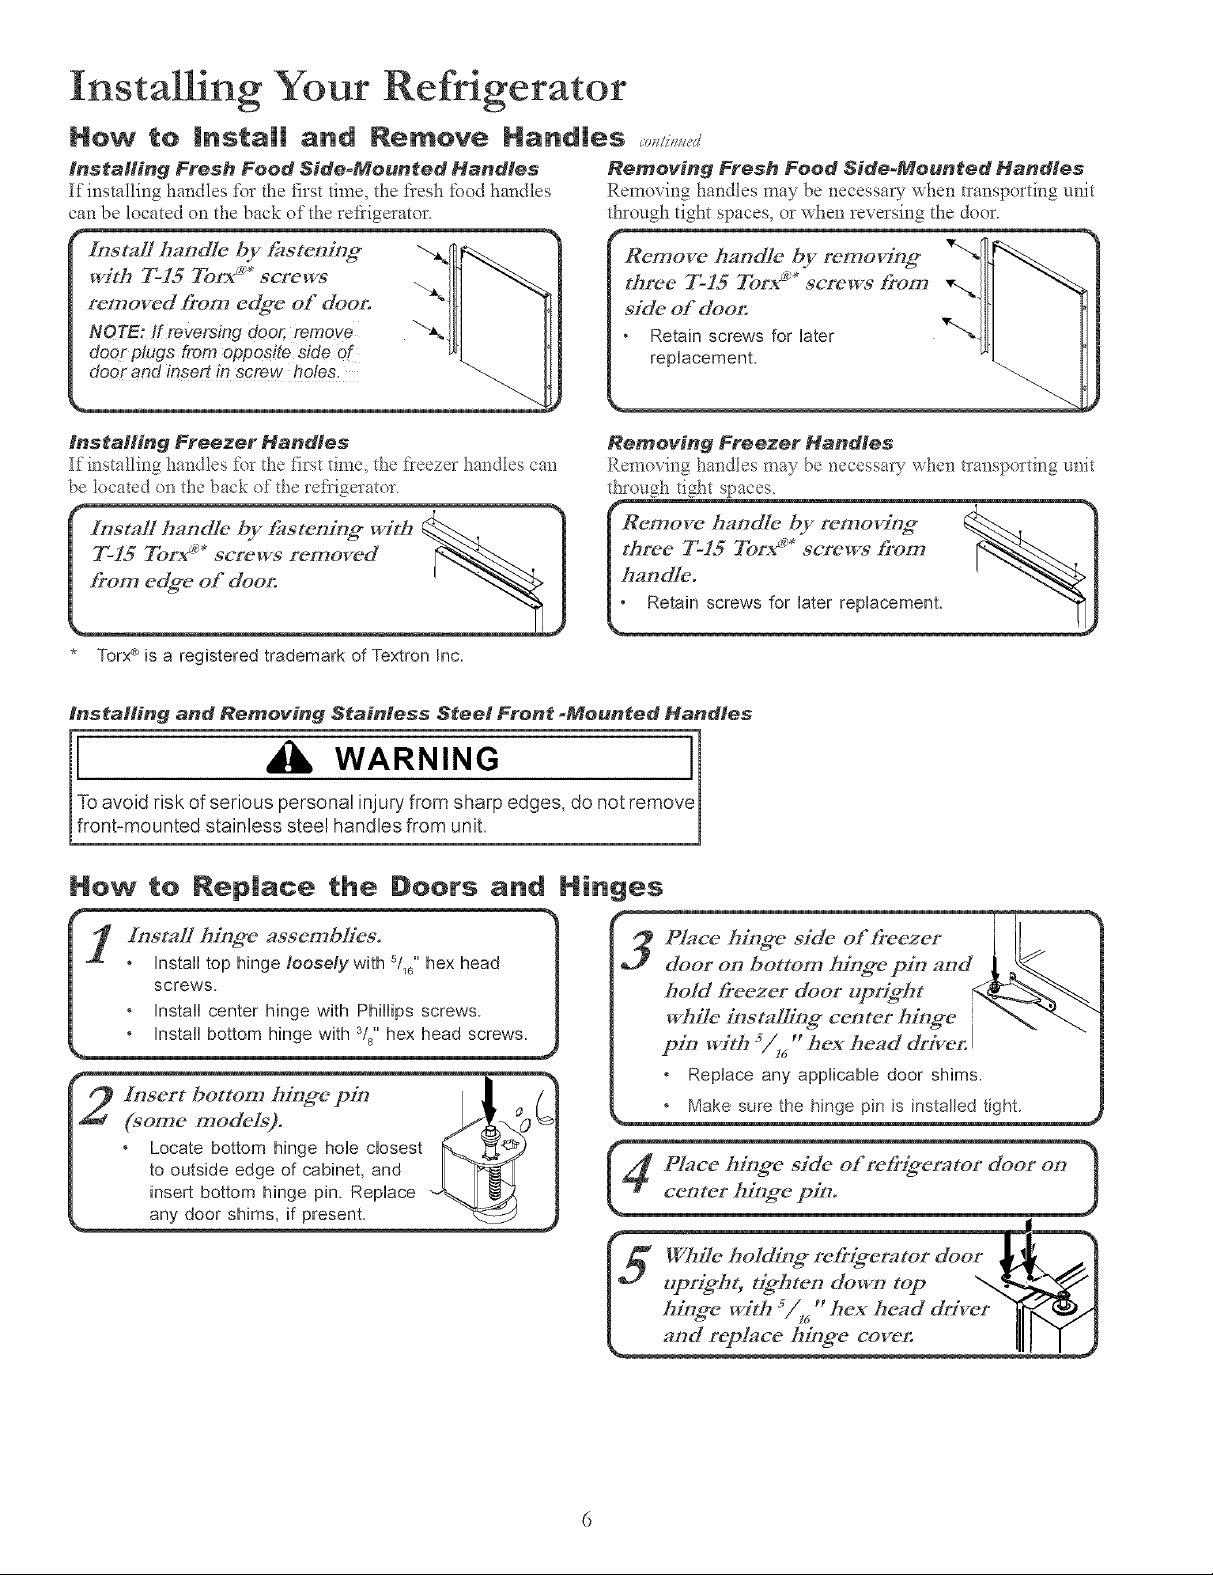
How to Insta|| and Remove Hand|es _,,,/,_,,_+
Installing Fresh Food Side_Meunted Handles Removing Fresh Food Side-Mounted Handles
If installing hal_dles for the first time, the flesh food handles Removi_g hanctles may be necessa7 when transporting unit
can be located on the back of the refrigerator, through tight spaces, or when reversing the door.
inataHing Freezer Handles
Ifi_stallii_g hai_dIes fi)_the fi_*stdin< the fleeze_ ha_dles car_
be Ideated (:mthe back of the ret_igerator.
T-15 Torx _'* screws removed
from edg*e of doon
I nsgaI1 handle by t2tstening with
* Torx®is a registered trademark of Textron Inc.
installing and Removing Stainless Steel Front _Moun_ed Handles
Toavoid risk of serious personal injury from sharp edges, do not remov
front-mounted stainless steel handles from unit.
Removing Freezer Handles
Remevi_g ha_dIes may be i_ecessary _ her_tm_sporti_-_grefit
th_ough tight spaces.
teer-isror,+"',crew,+o.',t%"._-'..I
H_w te Rep|aee the Doors a_d Hinges
@ Insert bottom hir_#e p_ I _ /
#o,.e.,ode+_. p{<ov
* Locate bottom hinge hole closest _%___._
to outside edge of cabinet, and _-.l
insert bottom hinge pin. Replace ""_----.1
any door sh_ms,_fpresent. '_
4P/ace M;ng*e skle of re&ig*erator door on
center hing_e pin.
I"1 '_m'%®ht"tg*hte_ do_ top "<._!
I ++_.e_+,h%,."he_headd,+er _...+/_
 Loading...