


 Loading...
NV10
Owner’s Manual
Introduction
Playing the Piano
Recorder
Music Screen
Favorite Screen
Settings
Appendix

Thank you for purchasing this Kawai NOVUS NV10 hybrid digital piano.
This owner’s manual contains important information regarding the instrument’s usage and operation. Please read all sections carefully, keeping this manual handy for future reference.
About this Owner’s Manual
Before attempting to play this instrument, please read the Introduction section (page 10) of this owner’s manual. This section explains the name and function of each part, how to connect the power cable, and how to turn on the power.
The Playing the Piano section (page 22) provides an overview of the instrument’s commonly used functions, allowing the NV10 hybrid digital piano to be enjoyed almost immediately after being connected, while the Recorder section (page 39) provides instructions on how to record pieces both to the instrument’s internal memory, and to a USB memory device.
The Music Screen section (page 52) includes information regarding the built-in demonstration songs, Piano Music pieces, Lesson and Finger Exercise features, and Concert Magic function. This section also explains how to playback songs recorded to internal memory, or stored on a USB memory device.
The Favorite Screen section (page 80) provides instructions on how to store, select, and manage favourite sounds, while the Settings section (page 88) details the various options and settings that can be used to adjust the sound and operation of the instrument.
Finally, the Appendix section (page 149) includes lists for all internal sounds, songs, and drum rhythms, assembly instructions for the NV10 model, MIDI reference information, and full specification details.
Important Safety Instructions
SAVE THESE INSTRUCTIONS
INSTRUCTIONS PERTAINING TO A RISK OF FIRE, ELECTRIC SHOCK, OR INJURY TO PERSONS
CAUTION |
RISK OF ELECTRIC SHOCK |
DO NOT OPEN |
WARNING
TO REDUCE THE RISK OF FIRE OR ELECTRIC SHOCK, DO NOT EXPOSE THIS PRODUCT TO RAIN OR MOISTURE.
AVIS : RISQUE DE CHOC ELECTRIQUE - NE PAS OUVRIR.
TO REDUCE THE RISK OF ELECTRIC SHOCK, DO NOT REMOVE COVER (OR BACK).
NO USER-SERVICEABLE PARTS INSIDE. REFER SERVICING TO QUALIFIED SERVICE PERSONNEL.
The lighting ash with arrowhead symbol, within an equilateral triangle, is intended to alert the user to the presence of uninsulated "dangerous voltage" within the product's enclosure that may be of su cient magnitude to constitute a risk of electric shock to persons.
The exclamation point within an equilateral triangle is intended to alert the user to the presence of important operating and maintenance (servicing) instructions in the leterature accompanying the product.
Examples of Picture Symbols
denotes that care should be taken.
The example instructs the user to take care not to allow ngers to be trapped.
denotes a prohibited operation.
The example instructs that disassembly of the product is prohibited.
denotes an operation that should be carried out.
The example instructs the user to remove the power cord plug from the AC outlet.
Read all the instructions before using the product.
1)Read these instructions.
2)Keep these instructions.
3)Heed all warnings.
4)Follow all instructions.
5)Do not use this apparatus near water.
6)Clean only with dry cloth.
7)Do not block any ventilation openings. Install in accordance with the manufacturer's instructions.
8)Do not install near any heat sources such as radiators, heat registers, stoves, or other apparatus (including ampli ers) that produce heat.
9)Do not defeat the safety purpose of the polarized or grounding-type plug. A polarized plug has two blades with one wider than the other. A grounding type plug has two blades and a third grounding prong. The wide blade or the third prong are provided for your safety. If the provided plug does not t into your outlet, consult an electrician for replacement of the obsolete outlet.
10)Protect the power cord from being walked on or pinched particularly at plugs, convenience receptacles, and the point where they exit from the apparatus.
11)Only use attachments/accessories speci ed by the manufacturer.
12)Use only with the cart, stand, tripod, bracket, or table
speci ed by the manufacturer, or
sold with the apparatus. When a cart is used, use caution when moving the cart/apparatus combination to avoid injury from tip-over.
13)Unplug this apparatus during lightning storms or when unused for long periods of time.
14)Refer all servicing to quali ed service personnel. Servicing is required when the apparatus has been damaged in any way, such as power-supply cord or plug is damaged, liquid has been spilled or object have fallen into the apparatus, the apparatus has been exposed to rain or moisture, does not operate normally, or has been dropped.
Règles de sécurité (Supplémentairespour le Canada)
CONSERVEZ CES INSTRUCTIONS
CAUTION |
RISK OF ELECTRIC SHOCK |
DO NOT OPEN |
AVERTISSEMENT
POUR REDUIRE LES RISQUES
D’INCENDIE OU D’ELECTROCUTION, PROTEGEZ CET APPAREIL DE LA PLUIE OU DE L’HUMIDITE.
AVIS : RISQUE DE CHOC ELECTRIQUE - NE PAS OUVRIR.
POUR REDUIRE LES RISQUES D’INCENDIE OU D’ELECTROCUTION, NE DEMONTEZ PAS LE COUVERCLE (OU L’ARRIERE). A L’INTERIEUR, AUCUNE PARTIE N’EST REPARABLE PAR L’UTILISATEUR.
POUR LA MAINTENANCE, ADRESSEZ-VOUS A DU PERSONNEL QUALIFIE.
Le symbole de l’éclair avec une pointe de flèche à l’intérieur d’un triangle équilatéral met en garde l’utilisateur contre la présence de tension dangereuse, non isolée, à l’intérieur de l’appareil, dont l’amplitude peut être suffisante pour induire un risque d’électrocution d’une personne.
Le point d’exclamation à l’intérieur d’un triangle équilatéral alerte l’utilisateur de la présence de règles d’utilisation et d’entretien importantes dans la notice qui accompagne l’appareil.
Exemples de symboles graphiques
Indique que des précautions doivent être prises.
L’exemple indique à l’utilisateur qu’il doit faire attention à ne pas se faire coincer les doigts.
Indique une manipulation interdite.
L’exemple indique que le démontage de l’appareil est interdit.
Indique qu’une manipulation doit être effectuée.
L’exemple indique à l’utilisateur qu’il doit débrancher le câble d’alimentation de la prise secteur.
 AVERTISSEMENT
Faite attention de ne pas introduire un produit étranger à l’intérieur
de l’appareil.
Ce produit n’est pas totalement déconnecté du circuit électrique lorsqu’il est mis hors tension par le bouton d’arrêt. Si l’appareil ne doit pas être utilisé pendant une longue période, débranchez le câble d’alimentation de la prise secteur.
Indique un risque potentiel qui peut entraîner la mort, ou de graves lésions, si l’appareil n’est pas manipulé correctement.
L’introduction d’eau, d’aiguilles ou d’épingles à cheveux, peut provoquer une panne ou un court-circuit. Ce produit doit être mis à l’abri des écoulements ou projections d’eau. Ne jamais placer sur le produit des objets contenant des liquides, tels que des vases ou autres récipients.
 Si vous ne le faisiez pas la foudre pourrait provoquer un incendie.
 Si vous ne le faisiez pas, la surchauffe de l’appareil pourrait provoquer un incendie.
Il est recommandé de placer l’instrument à proximité de la prise de courant et de positionner le câble d’alimentation secteur de sorte qu’il puisse être débranché rapidement en cas d’urgence, le courant électrique étant toujours présent tant que la prise est branchée même si le bouton de mise en marche est en position Arrêt.
[Seuls les produits avec 3P fiche]
INSTRUCTIONS DE MISE À LA TERRE
Ce produit doit être mis à la terre. En cas de défaillance matérielle ou de panne, la mise à la terre fournit un chemin de moindre résistance au courant électrique afin de réduire le risque d’électrocution. Ce produit est équipé d’un câble avec un conducteur de protection et une fiche de mise à la terre. La fiche doit être branchée dans une prise appropriée correctement installée et mise à la terre conformément à tous les codes et règlements locaux.
DANGER - La connexion incorrecte du conducteur de protection peut présenter un risque d’électrocution.
Consultez un électricien ou un réparateur qualifié si vous avez des doutes en ce qui concerne la mise à la terre du produit. Ne modifiez pas la fiche fournie avec le produit – si elle n’est pas adaptée à la prise, faites installer une prise correcte par un électricien qualifié.
Indique un risque potentiel qui peut entraîner la détérioration, PRECAUTION ou des dommages, pour l’appareil ou ses propriétés, si celui-ci
n’est pas manipulé correctement.
Description de la l'emplacement de la reference (Le cas échéant):
Anglais phrase: The nameplate label is located on the underside of the instruments, as indicated below.
Français phrase: La reference commerciale est inscrite sur une etiquette en dessous de votre instrument, conformement a l’indication ci-dessous.
Votre piano doit être placé à un endroit tel que sa position n’altère pas sa propre ventilation. Gardez une distance minimum de 5 cm autour de l’instrument pour une aération suffisante.
WARNING - When using electric products, basic precautions should always be followed, including the following.
WARNING |
Indicates a potential hazard that could result in death or |
|||
serious injury if the product is handled incorrectly. |
||||
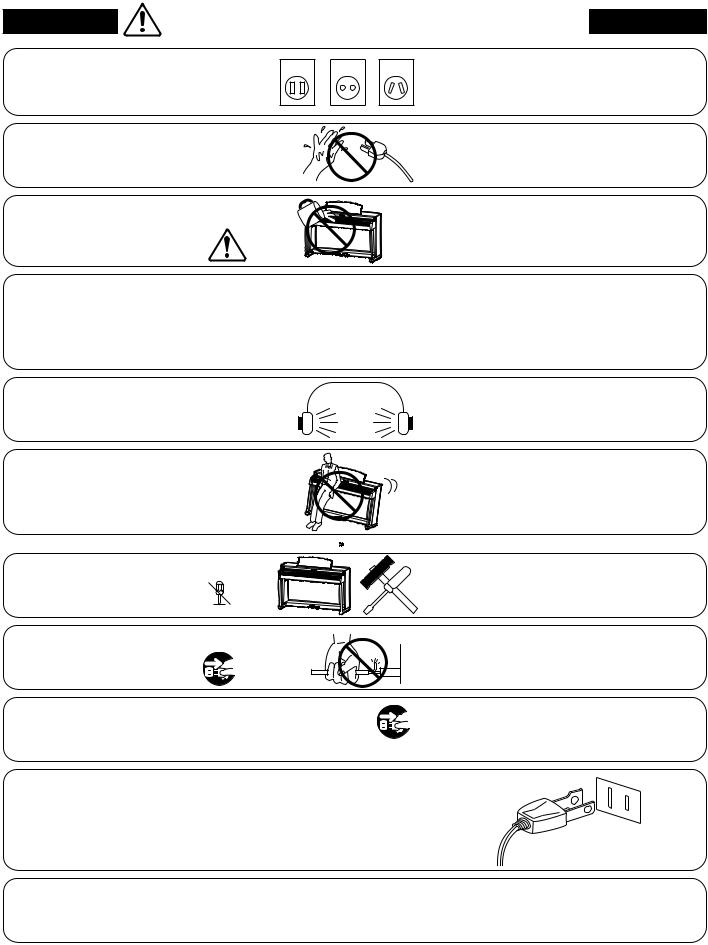
The product should be connected to |
120V |
230V |
240V |
● If you are going to use an AC power cord, |
an AC outlet of the speci ed voltage. |
|
|
|
make sure that its has the correct plug shape |
|
|
|
|
and conforms to the speci ed power voltage. |
|
|
|
|
● Failure to do so may result in re. |
Do not insert or disconnect the power |
|
|
|
Doing so may cause electric shock. |
cord plug with wet hands. |
|
|
|
|
Take care not to allow any foreign |
|
|
|
Entry of water, needles or hair pins may result |
matter to enter the product. |
|
|
|
in breakdown or short-circuit. |
|
|
|
|
The product shall not be exposed to dripping or |
|
|
|
|
splashing. No objects lled with liquids, such as |
|
|
|
|
vases, shall be placed on the product. |
The chair must be used properly (it must be used only when playing the product).
●Do not play with it or stand on it.
●Only one person is allowed to sit on it.
●Do not sit on it when opening the lid.
●Re-tighten the bolts occasionally.
When using the headphones, do not listen for long periods of
time at high volume levels.
Do not lean against the keyboard.
Do not disassemble, repair or modify the product. 
When disconnecting the AC power cord's plug, always hold the plug
and pull it to remove it.
The product is not completely disconnected from the power supply even when the power switch is turned o . If the product will not be used for a long time, unplug the AC power cord from the AC outlet.
Doing so may cause the chair to fall over or yourngers to be trapped, resulting in injury.
Doing so may result in hearing problems.
Doing so may cause the product to fall over, resulting in injury.
Doing so may result in product breakdown, electric shock or short-circuit.
●Pulling the AC power cord itself may damage the cord, causing a re, electric shock or short-circuit.
●Failure to do so may cause re in case of lightning.
●Failure to do so may over-heat the product, resulting in re.
This product may be equipped with a polarized line plug (one blade wider than the other). This is a safety feature.
If you are unable to insert the plug into the outlet, contact an electrician to replace your obsolete outlet.
Do not defeat the safety purpose of the plug.
This product shall be near the AC outlet and the power cord plug in a position so that it can readily be disconnected in an emergency because electricity is always charging while the plug is in the AC outlet even in a power switch o condition.

|
CAUTION |
Indicates a potential hazard that could result in injury or |
|
|
|
||
|
damage to the product or other property if the product |
|
|
|
|
is handled incorrectly. |
|
Do not use the product in the following areas.
●Areas, such as those near windows, where the product is exposed to direct sunlight
●Extremely hot areas, such as near a heater
●Extremely cold areas, such as outside
●Extremely humid areas
●Areas where a large amount of sand or dust is present
●Areas where the product is exposed to excessive vibrations
Using the product in such areas may result in product breakdown.
Use the product only in moderate climates (not in tropical climates).
When you close the keyboard cover, close it gently.
Before connecting cords, make sure that the power to this product
and other devices is turned OFF.
Do not drag the product on the oor. Take care not to drop the product.
Do not place the product near electrical appliances such as TVs and radios.
When connecting the AC power cord and other cords, take care
not to get them tangled.
Do not wipe the product with benzene or thinner.
Closing it roughly may trap your ngers, resulting in injury.
OFF |
Failure to do so may cause breakdown of this |
|
product and other devices. |
Please lift up the product when moving it. Please note that the product is heavy and must be carried by more than two persons. Dropping the product may result in breakdown.
● Doing so may cause the product to generate noise.
● If the product generates noise, move the product su ciently away from the electrical appliance or connect it to another AC outlet.
Failure to do so may damage them, resulting inre, electric shock or short-circuit.
● Doing so may result in discoloration or deformation of the product.
● When cleaning the product, put a soft cloth in lukewarm water, squeeze it well, then wipe the product.
Do not stand on the product or exert excessive force.
Do not place naked ame, such as lighted candles on the product.
Ensure that the ventilation is not impeded by covering the ventilation openings with items, such as newspaper, table-cloths, curtains, etc.
●Doing so may cause the product to become deformed or fall over, resulting in breakdown or injury.
Doing so may cause the illumination to fall over, resulting in re.
Failure to do so may over-heat the product, resulting in re.
The product should be located so that its location or position does not interfere with its proper ventilation. Ensure a minimum distance of 5cm around the product for su cient ventilation.
The product should be serviced by quali ed service personnel when:
●The power supply cord or the plug has been damaged.
●Objects have fallen, or liquid has been spilled into the product.
●The product has been exposed to rain.
●The product does not appear to operate normally or exhibits a marked change in performance. ●The product has been dropped, or the enclosure damaged.
Notes on Repair
Should an abnormality occur in the product, immediately turn the power OFF, disconnect the power cord plug, and then contact the shop from which the product was purchased.
CAUTION:
To prevent electric shock, match wide blade of plug to wide slot, fully insert.
ATTENTION:
Pour éviter les chocs électriques, introduire la lame la plus large de la che dans la borne correspondante de la prise et pousser jusqu'au fond.
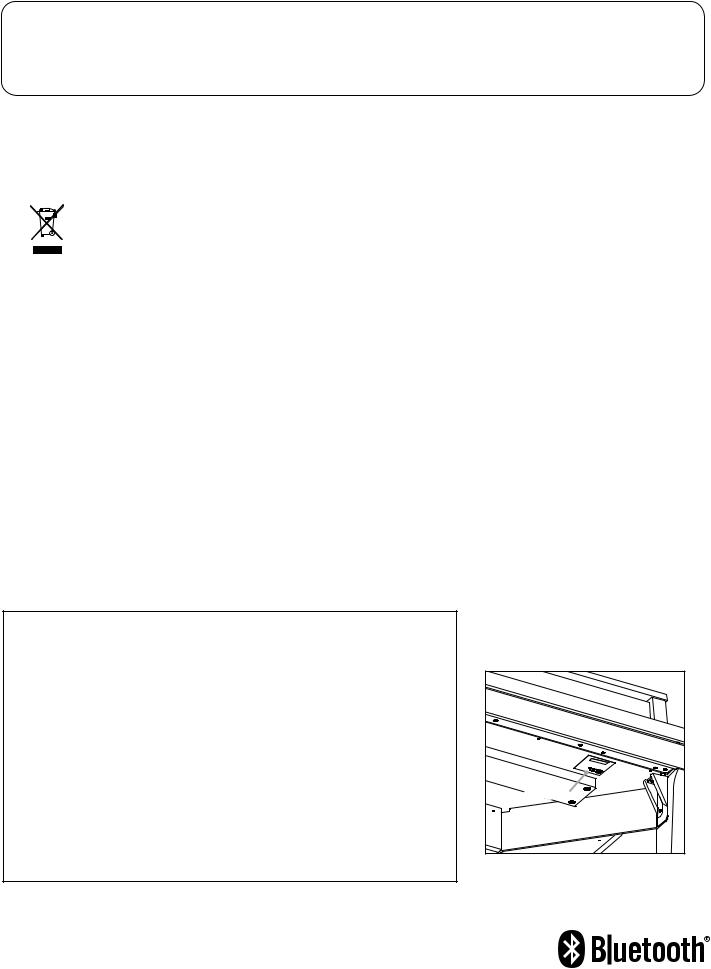
An information on Disposal for users
If your product is marked with this recycling symbol it means that, at the end of its life, you must dispose of it separately by taking it to an
appropriate collection point.
You should not mix it with general household waste. Disposing of this product correctly will prevent potential negative e ects on the environment and human health which could otherwise arise due to inappropriate waste handling.
For further details, please contact your local authority. (European Union only)
Instruction for AC power cord (U.K.)
IMPORTANT
THE WIRES IN THIS MAINS LEAD ARE COLOURED IN ACCORDANCE WITH THE FOLLOWING CODE.
BLUE : NEUTRAL BROWN : LIVE
As the colours of the wires in the mains lead of this apparatus may not correspond with the coloured markings identifying the terminals in your plug, proceed as follows:
The wire which is coloured BLUE must be connected to the terminal which is marked with the letter N or coloured BLACK. The wire which is coloured BROWN must be connected to the terminal which is marked with the letter L or coloured RED. Do not plug either terminal of the power cord to the the ground od AC outlet on the wall.
FCC Information (U.S.A)
CAUTION : Changes or modi cations not expressly approved by the party responsible for compliance could void the user’s authority to operate the equipment.
NOTE : This equipment has been tested and found to comply with the limits for a Class B digital device, pursuant to Part 15 of the FCC Rules. These limits are designed to provide reasonable protection against harmful interference in a residential installation. This equipment generates, uses and can radiate radio frequency energy and, if not installed and used in accordance with the instructions, may cause harmful interference to radio communications. However, there is no guarantee that interference will not occur in a particular installation. If this equipment does cause harmful interference to radio or television reception, which can be determined by turning the equipment o and on, the user is encouraged to try to correct the interference by one or more of the following measures:
•Reorient or relocate the receiving antenna.
•Increase the separation between the equipment and receiver.
•Connect the equipment into an outlet on a circuit di erent from that to which the receiver is connected.
•Consult the dealer or an experienced radio/TV technician for help.
Declaration of Conformity |
The nameplate label is located on |
||
the underside of the instrument, as |
|||
|
|
||
|
|
indicated below. |
|
Products : |
Electronic Piano |
|
|
Model Number : |
NV10 |
|
|
Responsible Party Name : |
Kawai America Corporation |
|
|
Address : |
2055 East University Drive Rancho |
|
|
|
Dominguez, CA 90220 |
|
|
Telephone |
310-631-1771 |
|
|
This device complies with Part 15 of the FCC Rules. |
Nameplate |
||
Operation is subject to the following two conditions: |
|
||
(1) this device may not cause harmful interference, and |
|
||
(2) this device must accept any interference received, |
|
||
including interference that may cause undesired operation. |
|
||
This applies only to products distributed by Kawai America Corporation.
About Bluetooth
•The Bluetooth® word mark and logos are registered trademarks owned by the Bluetooth SIG, Inc. and any use of such marks by Kawai Musical Instruments Mfg. Co., Ltd. is under license. Other trademarks and trade names are those of their respective owners.
•Frequency Band of Radio: 2400~2483.5 MHz Maximum Transmit Power: 2.5 mW (BLE), 4.5mW (A2DP)
•Availability of Bluetooth function dependent on market location.
Table of Contents
Important Safety Instructions.. . . . . . . . . . . . . . . . . . . . 3
Table of Contents. . . . . . . . . . . . . . . . . . . . . . . . . . . . . . . . . . . |
8 |
Introduction
Welcome to the NOVUS NV10 .. . . . . . . . . . . . . . . . . . . 10 Feature Highlights .. . . . . . . . . . . . . . . . . . . . . . . . . . . . . . 10
Part Names and Functions.. . . . . . . . . . . . . . . . . . . . . . . 12
Setting Up the Piano. . . . . . . . . . . . . . . . . . . . . . . . . . . . . . |
14 |
|
1. |
Power. . . . . . . . . . . . . . . . . . . . . . . . . . . . . . . . . . . . . . . . . . |
14 |
2. |
Key cover and music rest .. . . . . . . . . . . . . . . . . . . . |
15 |
3. |
Volume and headphones.. . . . . . . . . . . . . . . . . . . |
16 |
4. |
Pedals.. . . . . . . . . . . . . . . . . . . . . . . . . . . . . . . . . . . . . . . . . |
17 |
5. |
Touchscreen Operations.. . . . . . . . . . . . . . . . . . . . |
18 |
6. |
User Interface Overview.. . . . . . . . . . . . . . . . . . . . . |
19 |
Audio Recorder (USB memory).. . . . . . . . . . . . . . . . . . . . . . . |
49 |
1. Recording an audio file: Pianist and |
|
Sound mode. . . . . . . . . . . . . . . . . . . . . . . . . . . . . . . . . . |
49 |
Music Screen
About the Music Screen.. . . . . . . . . . . . . . . . . . . . . . . . . . 52
Demo Songs.. . . . . . . . . . . . . . . . . . . . . . . . . . . . . . . . . . . . . . . 53
Piano Music.. . . . . . . . . . . . . . . . . . . . . . . . . . . . . . . . . . . . . . . . 55
Lesson Songs.. . . . . . . . . . . . . . . . . . . . . . . . . . . . . . . . . . . . . . 57
Concert Magic.. . . . . . . . . . . . . . . . . . . . . . . . . . . . . . . . . . . . . 63
1. Concert Magic song playback. . . . . . . . . . . . . . . 65 2. Concert Magic song performance.. . . . . . . . . . 67
Recorder Playback.. . . . . . . . . . . . . . . . . . . . . . . . . . . . . . . . 69
USB Memory Player.. . . . . . . . . . . . . . . . . . . . . . . . . . . . . . . |
75 |
Playing the Piano
Pianist mode screen .. . . . . . . . . . . . . . . . . . . . . . . . . . . . . . 22
1. Rendering character and Resonance depth. . . 23
2. Pianist mode menu .. . . . . . . . . . . . . . . . . . . . . . . . . . 24
Sound mode screen. . . . . . . . . . . . . . . . . . . . . . . . . . . . . . . |
26 |
|
1. |
Single.. . . . . . . . . . . . . . . . . . . . . . . . . . . . . . . . . . . . . . . . . |
27 |
2. |
Dual .. . . . . . . . . . . . . . . . . . . . . . . . . . . . . . . . . . . . . . . . . . . |
27 |
3. |
Split. . . . . . . . . . . . . . . . . . . . . . . . . . . . . . . . . . . . . . . . . . . . |
29 |
4. |
4Hands.. . . . . . . . . . . . . . . . . . . . . . . . . . . . . . . . . . . . . . . . |
31 |
5. |
Reverb. . . . . . . . . . . . . . . . . . . . . . . . . . . . . . . . . . . . . . . . . |
33 |
6. |
Effects.. . . . . . . . . . . . . . . . . . . . . . . . . . . . . . . . . . . . . . . . . |
34 |
Metronome / Drum Patterns. . . . . . . . . . . . . . . . . . . . . |
36 |
|
Metronome settings.. . . . . . . . . . . . . . . . . . . . . . . . . . . . |
37 |
|
Drum rhythms. . . . . . . . . . . . . . . . . . . . . . . . . . . . . . . . . . . |
38 |
|
Recorder |
|
|
About the Recorder.. . . . . . . . . . . . . . . . . . . . . . . . . . . . . . . |
39 |
|
Song Recorder (Internal memory). . . . . . . . . . . . . . . . . . . . . |
40 |
|
1. |
Recording a song: Pianist mode.. .. .. .. .. .. .. .. .. .. .. .. .. |
40 |
2. |
Recording a song: Sound mode............. |
43 |
Favorite Screen |
|
|
About the Favorite Screen.. . . . . . . . . . . . . . . . . . . . . . . |
80 |
|
1. |
Storing and Selecting Favorite memories.. . . |
82 |
2. |
Editing Favorite memories. . . . . . . . . . . . . . . . . . . |
84 |
Settings
88 1. Pianist mode menu .. . . . . . . . . . . . . . . . . . . . . . . . . . 88 2. Sound mode menu .. . . . . . . . . . . . . . . . . . . . . . . . . . 92
Virtual Technician.. . . . . . . . . . . . . . . . . . . . . . . . . . . . . . . . |
. 98 |
|
1. |
Touch Curve .. . . . . . . . . . . . . . . . . . . . . . . . . . . . . . . . . |
102 |
|
User Touch Curve. . . . . . . . . . . . . . . . . . . . . . . . . . . . |
103 |
2. |
Voicing.. . . . . . . . . . . . . . . . . . . . . . . . . . . . . . . . . . . . . . . |
104 |
|
User Voicing.. .. .. .. .. .. .. .. .. .. .. .. .. .. .. .. .. .. .. .. .. .. .. .. .. .. .. .. .. .. .. .. .. .. |
105 |
3. |
Damper Resonance.. . . . . . . . . . . . . . . . . . . . . . . . . |
106 |
4. |
Damper Noise.. . . . . . . . . . . . . . . . . . . . . . . . . . . . . . . |
106 |
5. |
String Resonance. . . . . . . . . . . . . . . . . . . . . . . . . . . . |
107 |
6. |
Undamped String Resonance.. . . . . . . . . . . . . . |
108 |
7. |
Cabinet Resonance. . . . . . . . . . . . . . . . . . . . . . . . . . |
109 |
8. |
Key-off Effect .. . . . . . . . . . . . . . . . . . . . . . . . . . . . . . . . |
110 |
9. |
Fall-back Noise.. .. .. .. .. .. .. .. .. .. .. .. .. .. .. .. .. .. .. .. .. .. .. .. .. .. .. .. .. .. .. |
..111 |
8

10. |
Hammer Delay. . . . . . . . . . . . . . . . . . . . . . . . . . . . . . . |
112 |
11. |
Topboard Simulation........................ |
113 |
12. |
Decay Time.. . . . . . . . . . . . . . . . . . . . . . . . . . . . . . . . . . |
114 |
13. |
Minimum Touch.. . . . . . . . . . . . . . . . . . . . . . . . . . . . . |
114 |
14. |
Stretch Tuning.. . . . . . . . . . . . . . . . . . . . . . . . . . . . . . . |
115 |
|
User Tuning.. . . . . . . . . . . . . . . . . . . . . . . . . . . . . . . . . . |
116 |
15. |
Temperament................................ |
117 |
|
User Temperament.. . . . . . . . . . . . . . . . . . . . . . . . . |
118 |
16. |
Temperament Key.. . . . . . . . . . . . . . . . . . . . . . . . . . |
119 |
17. |
Key Volume.. . . . . . . . . . . . . . . . . . . . . . . . . . . . . . . . . . |
120 |
|
User Key Volume .. . . . . . . . . . . . . . . . . . . . . . . . . . . . |
121 |
18. |
Half-Pedal Adjust.. . . . . . . . . . . . . . . . . . . . . . . . . . . . |
122 |
19. |
Soft Pedal Depth.. . . . . . . . . . . . . . . . . . . . . . . . . . . . |
122 |
Sound Settings.. . . . . . . . . . . . . . . . . . . . . . . . . . . . . . . . . . . |
123 |
|
1. |
Tuning. . . . . . . . . . . . . . . . . . . . . . . . . . . . . . . . . . . . . . . . |
124 |
2. |
Damper Hold.. . . . . . . . . . . . . . . . . . . . . . . . . . . . . . . . |
124 |
3. |
Tone Control.. . . . . . . . . . . . . . . . . . . . . . . . . . . . . . . . . |
125 |
|
User Tone Control.. . . . . . . . . . . . . . . . . . . . . . . . . . . |
126 |
4. |
Speaker Volume.. . . . . . . . . . . . . . . . . . . . . . . . . . . . . |
127 |
5. |
Line In Level.................................. |
128 |
6. |
Wall EQ.. . . . . . . . . . . . . . . . . . . . . . . . . . . . . . . . . . . . . . . |
129 |
7. |
SHS Mode.. . . . . . . . . . . . . . . . . . . . . . . . . . . . . . . . . . . . |
130 |
8. |
Phones Type.. . . . . . . . . . . . . . . . . . . . . . . . . . . . . . . . . |
131 |
9. |
Phones Volume. . . . . . . . . . . . . . . . . . . . . . . . . . . . . . |
132 |
System Settings.. . . . . . . . . . . . . . . . . . . . . . . . . . . . . . . . . . |
133 |
|
1. |
Bluetooth® MIDI.. . . . . . . . . . . . . . . . . . . . . . . . . . . . . |
134 |
2. |
Bluetooth® Audio.. . . . . . . . . . . . . . . . . . . . . . . . . . . |
135 |
3. |
Bluetooth® Audio Level.. . . . . . . . . . . . . . . . . . . . . |
136 |
4. |
Rename File.. . . . . . . . . . . . . . . . . . . . . . . . . . . . . . . . . |
137 |
5. |
Delete File. . . . . . . . . . . . . . . . . . . . . . . . . . . . . . . . . . . . |
138 |
6. |
USB Format.. . . . . . . . . . . . . . . . . . . . . . . . . . . . . . . . . . |
139 |
MIDI Overview. . . . . . . . . . . . . . . . . . . . . . . . . . . . . . . . . . |
140 |
|
7. |
MIDI Channel.. . . . . . . . . . . . . . . . . . . . . . . . . . . . . . . . |
142 |
8. |
Send Program Change Number. . . . . . . . . . . . |
143 |
9. |
Local Control................................. |
143 |
10. |
Transmit Program Change Numbers .. . . . . . |
144 |
11. |
Multi-timbral Mode.. . . . . . . . . . . . . . . . . . . . . . . . . |
145 |
12. |
Channel Mute. . . . . . . . . . . . . . . . . . . . . . . . . . . . . . . . |
145 |
13. |
LCD Contrast. . . . . . . . . . . . . . . . . . . . . . . . . . . . . . . . . |
146 |
14. |
Auto Display Off.. . . . . . . . . . . . . . . . . . . . . . . . . . . . . |
146 |
15. |
Auto Power Off.. . . . . . . . . . . . . . . . . . . . . . . . . . . . . . |
147 |
16. |
Factory Reset.. . . . . . . . . . . . . . . . . . . . . . . . . . . . . . . . |
148 |
Appendix |
|
|
Assembly Instructions.. . . . . . . . . . . . . . . . . . . . . . . . . . . |
149 |
|
Connecting to Other Devices.. . . . . . . . . . . . . . . . . . . |
154 |
|
Jack Panel. . . . . . . . . . . . . . . . . . . . . . . . . . . . . . . . . . . . . . . |
155 |
|
Headphone Panel.. . . . . . . . . . . . . . . . . . . . . . . . . . . . . . |
155 |
|
USB MIDI (USB to Host connector) .. . . . . . . . . . . . . . . . . . . . . |
156 |
|
Troubleshooting. . . . . . . . . . . . . . . . . . . . . . . . . . . . . . . . . . |
157 |
|
Demo Song List. . . . . . . . . . . . . . . . . . . . . . . . . . . . . . . . . . . |
160 |
|
Sound List (Sound mode) .. . . . . . . . . . . . . . . . . . . . . . . |
161 |
|
Program Change Number List.. . . . . . . . . . . . . . . . . . |
162 |
|
Drum Rhythm List. . . . . . . . . . . . . . . . . . . . . . . . . . . . . . . . |
170 |
|
Specifications.. . . . . . . . . . . . . . . . . . . . . . . . . . . . . . . . . . . . . |
171 |
|
MIDI Exclusive Data Format. . . . . . . . . . . . . . . . . . . . . |
172 |
|
MIDI Implementation Chart..................... |
173 |
|
9
Introduction
Welcome to the NOVUS NV10
Feature Highlights
Millennium III Hybrid grand piano keyboard action, with optical hammer sensing system
The NOVUS NV10 is the first digital piano to incorporate Kawai’s leading acoustic grand piano keyboard action technology, renowned for its extended spruce key sticks, and innovative ABS Carbon components that are stronger, lighter, and more dimensionally stable than conventional wooden parts.
The specially adapted Millennium III Hybrid keyboard action utilised by the NV10 replaces traditional felt hammers with new ABS equivalents that are individual graded in weight from bass to treble, while high-precision optical sensors take the place of metal strings, accurately reading the subtle movements of each hammer as the corresponding keys are played.
Grand Piano Damper Mechanism for authentic pedal control
In addition to featuring a full acoustic grand piano keyboard action, the NOVUS NV10 is the first hybrid instrument to also incorporate a real grand piano damper mechanism. While there are no strings inside the NV10 to require physical damping, this unique feature replicates the true weighting of a grand piano damper pedal, while also mechanically easing the keyboard action’s touch weight as the pedal is pressed.
Shigeru Kawai SK-EX concert grand piano reproduced with latest SK-EX Rendering sound technology
The magnificent tone of Kawai’s flagship Shigeru Kawai SK-EX full concert grand piano is at the heart of the NOVUS NV10 hybrid digital piano. Widely regarded as the ‘premier pianos of Japan’, Shigeru Kawai instruments grace the stages of concert halls and musical institutions throughout the world, and are prized for their tonal clarity and exceptional dynamic range.
In order to faithfully reproduce the stunning sound of a Shigeru digitally, Kawai has developed SK-EX Rendering – a brand new piano sound engine that blends multi-channel, 88-key sampling with the latest resonance modelling technology. Multi-channel sampling captures the sound from different points of the Shigeru Kawai concert grand piano, allowing a broader range of tonal characteristics to be reproduced, and providing a more lively, authentic response to changes in dynamics. This naturally expressive sound is further enriched by newly developed resonance algorithms, which physically model the complex tonal interactions produced by the strings, pedals, and various other parts of an acoustic piano, giving players the impression that they’re sitting at a living, breathing instrument.
Alternative acoustic piano sounds and a strong selection of additional instrument voices
In addition to the latest SK-EX Rendering piano sound engine, the NOVUS NV10 hybrid digital piano also incorporates Kawai’s highly regarding Harmonic Imaging XL technology, showcasing a variety of alternative acoustic piano sounds and a strong selection of additional instrument voices. The Kawai EX full concert grand piano has frequently been selected by professional pianists in such prestigious events as the Chopin, Tchaikovsky, and Rubinstein international piano competitions, while the Shigeru Kawai SK-5 chamber grand and Kawai K-60 upright, allow performers to enjoy the contrasting tonal characteristics of various different piano sizes and voicing configurations.
Supplementing these realistic acoustic piano voices, the NOVUS NV10 hybrid digital piano also features an excellent selection of additional instrument sounds, ranging from electric pianos and drawbar and church organs, to strings, human choirs, and even atmospheric synth-style pads, inviting musicians to add greater variety to their performances. Furthermore, the Dual playing mode also allows two different sounds, such as grand piano and strings, to be layered together, while the Split and 4Hands playing modes divide the keyboard into two independent sections.
Virtual Technician adjustments to personalise the instrument’s character
The NOVUS NV10 hybrid digital piano’s Virtual Technician feature allows various characteristics of the selected acoustic piano, electric piano, or harpsichord sound to be shaped from the instruments’ touchscreen display, with settings to adjust voicing and regulation, string, damper, and cabinet resonances, and subtle hammer, damper, and key release noises. It is even possible to adjust the precise tuning and volume of individual notes, before storing one’s favorite instrument configuration to memory.
10
Integrated Bluetooth® MIDI and Audio connectivity
In addition to standard MIDI jacks for connecting to other instruments, the NOVUS NV10 hybrid digital piano also boasts integrated Bluetooth MIDI and Audio technology that allows the instrument to communicate with supported smart devices wirelessly. Once connected to a phone, tablet, or laptop, NV10 owners can enjoy a wide variety of exciting music-related apps that enhance their learning and playing experience, or stream audio from songs and videos through the instrument’s speakers without any additional cables.
* Availability of Bluetooth function dependent on market location.
USB to Device functionality, with MP3/WAV file recording and playback
The NOVUS NV10 hybrid digital piano is equipped with USB connectors that not only allow the instrument to be connected to a computer for MIDI use, but also to load and save data to USB memory devices directly. This ‘USB to Device’ feature allows recorded songs stored in internal memory to be saved to USB for posterity, or standard MIDI files (SMF) downloaded from the internet to be conveniently played back without additional hardware.
USB memory devices can also be used to play back MP3 or WAV audio files, allowing musicians to learn the chords or melody for a new piece, or to simply play along with their favorite songs. It is even possible to save performances as MP3 or WAV files for emailing to friends and family, listening to on the move, or for further editing using an audio workstation.
Premium audio hardware, powered by Onkyo
Developed in collaboration with Onkyo, one of Japan’s leading premium audio equipment manufacturers, the NOVUS NV10 hybrid digital piano is one of the first Kawai musical instruments to utilise specialist components designed for high-end audio reproduction.
With cutting-edge technologies such as 1-bit processing, dual DAC signal conversion, and Onkyo’s DIRDC filtering, the NV10’s optimised power amplifiers reproduce the Shigeru Kawai grand piano sound with stunning clarity, richness, and power, while the high-performance Discrete Spectra Module headphone amplifier ensures the finest quality listening experience, even when playing in privacy.
Full-colour touchscreen display for intuitive, button-less operation
The NOVUS NV10 is the first instrument of its kind to feature a full-colour 5” touchscreen display. Discreetly embedded within the left cheekblock, this high resolution touchscreen allows sounds and settings to be selected from an attractive user interface with the swipe of a finger. The display can also be set to turn off automatically while playing, thus preserving the NV10’s acoustic piano-like appearance, and minimising any visual distraction to the pianist.
Introduction
11

Part Names and Functions
Introduction
E
D C B A
LINE IN |
|
LINE OUT |
|
USB to HOST |
|
MIDI |
|
LEVEL |
STEREO |
L / MONO |
R |
|
IN |
OUT |
|
Max Min
F G H I
12

APOWER button
This button is used to turn the instrument on/off. Be sure to turn off the instrument after playing.
*The NV10 hybrid digital piano features a power saving mode that can turn off the instrument automatically after a specified period of inactivity. For more information, please refer to the ‘Auto Power Off’ setting on page 147.
BMASTER VOLUME knob
This knob controls the master volume level of the instrument’s built-in speakers or headphones, if connected.
*The MASTER VOLUME knob will also affect the volume level of the LINE OUT connectors.
CPHONES jacks
These jacks are used to connect stereo headphones to the NV10 hybrid digital piano. 1/4” and 1/8” connectors are provided for convenience, and both can be used simultaneously, allowing two pairs of headphones to be connected at the same time.
DUSB to DEVICE connector
This port is used to connect a FAT or FAT32 formatted USB memory device to the instrument in order to load/save recorded song data, and MP3/WAV/SMF files etc.
ETOUCHSCREEN display
The touchscreen display provides useful information such as the currently selected mode, sound name, settings values, and the status of various functions. The touchscreen is also used to interact with the instrument by gently tapping on buttons and icons that appear, or by swiping left and right, or up and down.
*A protective plastic film is attached to the display during production. Please remove this film before attempting to play the instrument.
*The display can be set to turn off automatically after a period of inactivity. For more information, please refer to the ‘Auto Display Off’ setting on page 146.
FLINE IN STEREO jack
This jack is used to connect the 1/8” stereo output from smart phones, tablets, computers, or other electronic audio equipment to the NV10 hybrid digital piano’s amplifier and speakers.
The input level can be adjusted by using the LEVEL knob.
GLINE OUT jacks
These jacks are used to connect the stereo output (Left/Right 1/4” phone plug) of the NV10 hybrid digital piano to external amplifiers, mixers, recording devices, and similar equipment.
HUSB to HOST port
This port is used to connect the NV10 hybrid digital piano to a computer using a USB ‘B to A’ type cable in order to send and receive MIDI data.
IMIDI IN / OUT jacks
These jacks are used to connect the NV10 hybrid digital piano to external MIDI devices such as other musical instruments or a computer in order to send and receive MIDI data.
*For more information about the instrument’s connectors and jacks, please refer to ‘Connecting to Other Devices’ on page 154.
Introduction
13
Introduction
Setting Up the Piano
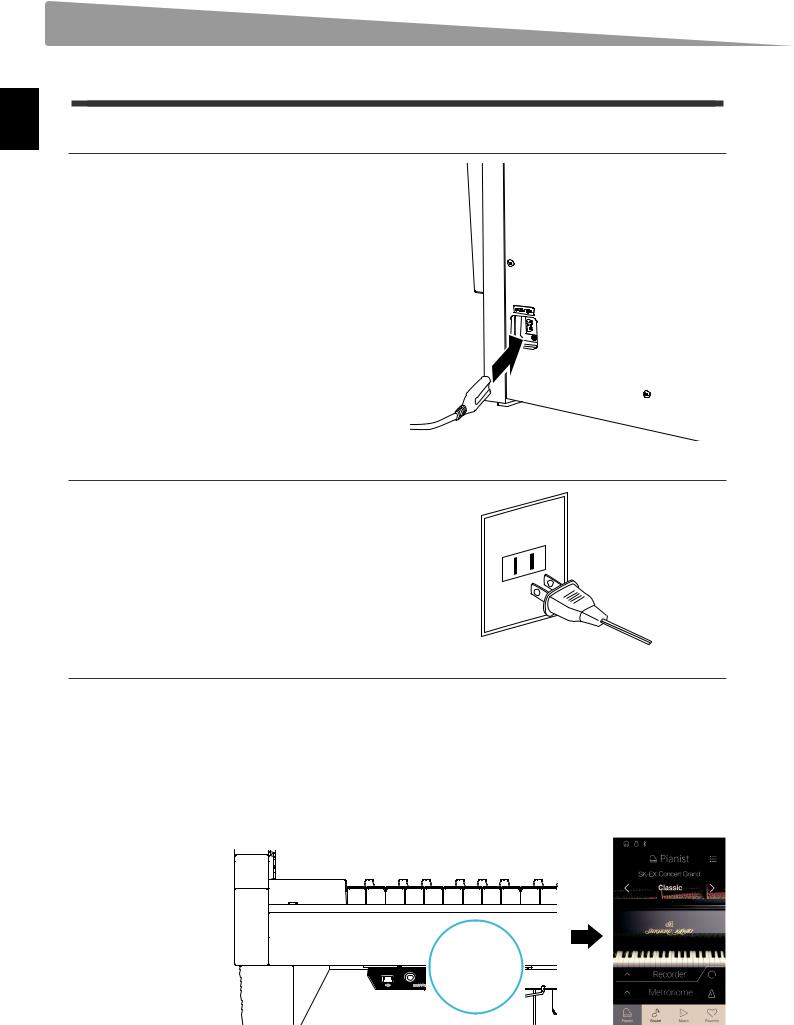
1 Power
1. Connecting the power cable to the instrument
Connect the included power cable to the AC IN terminal located on the back side of the pedal base, in the bottom left corner.
2. Connecting the power cable to an outlet
Connect the included power cable to the AC IN terminal located on the back side of the pedal base, in the bottom left corner.
3. Turning on the power
Press the POWER button located on the right hand side of the control box.
The instrument will turn on and the KAWAI logo will appear in the touchscreen display. After a short period, the Pianist mode screen will appear, indicating that the instrument is ready to be played. To turn off the power, press and hold the POWER button again for 1~2 seconds.
*Please do not turn off the instrument while the initial KAWAI logo is displayed.
*The NV10 hybrid digital piano features a power saving mode that can turn off the instrument automatically after a specified period of inactivity. For more information, please refer to the ‘Auto Power Off’ setting on page 147.
14
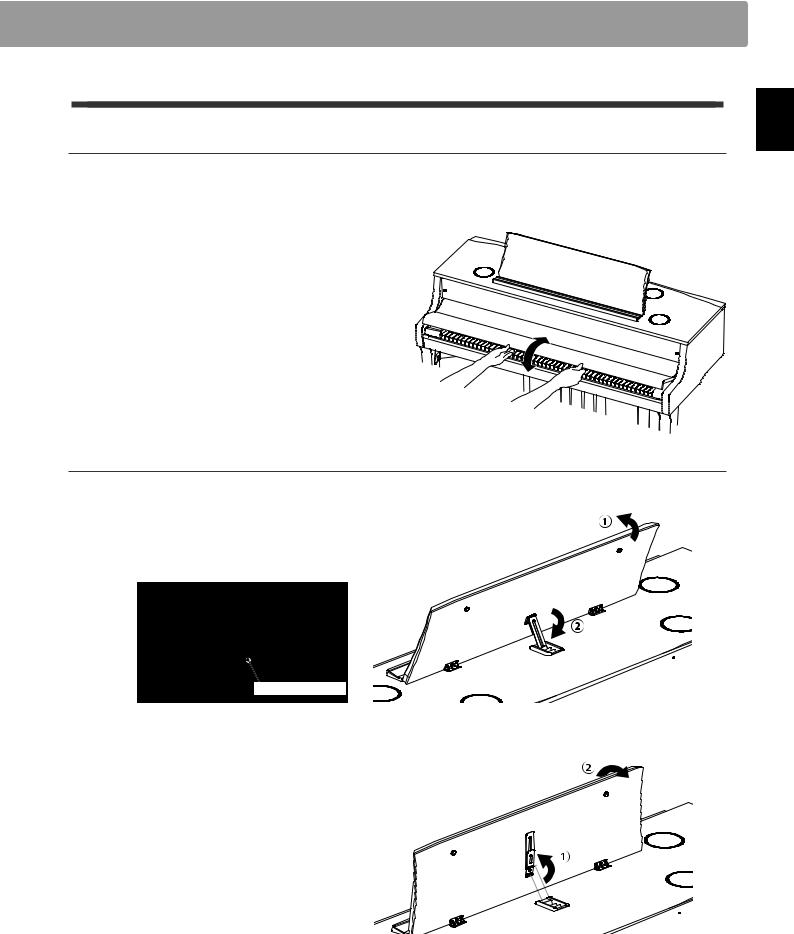
2 Key cover and music rest
Opening the key cover
Gently lift the key cover with both hands.
To close the key cover, slowly push or pull it forwards. The Soft Fall system will gently lower the key cover naturally.
* Please do not apply additional force on the key cover while it is closing.
Adjusting the music rest
Lift the music rest, then lower the metal prop (rear side) into the recessed holder to set the desired music rest angle.
* The music rest can be set to one of six different angle positions.
To lower the music rest, gently lift the prop from the recessed holder, then lower the music rest.
* Please lower the music rest slowly in order to avoid injury.
Introduction
15
Introduction
Setting Up the Piano
3 Volume and headphones
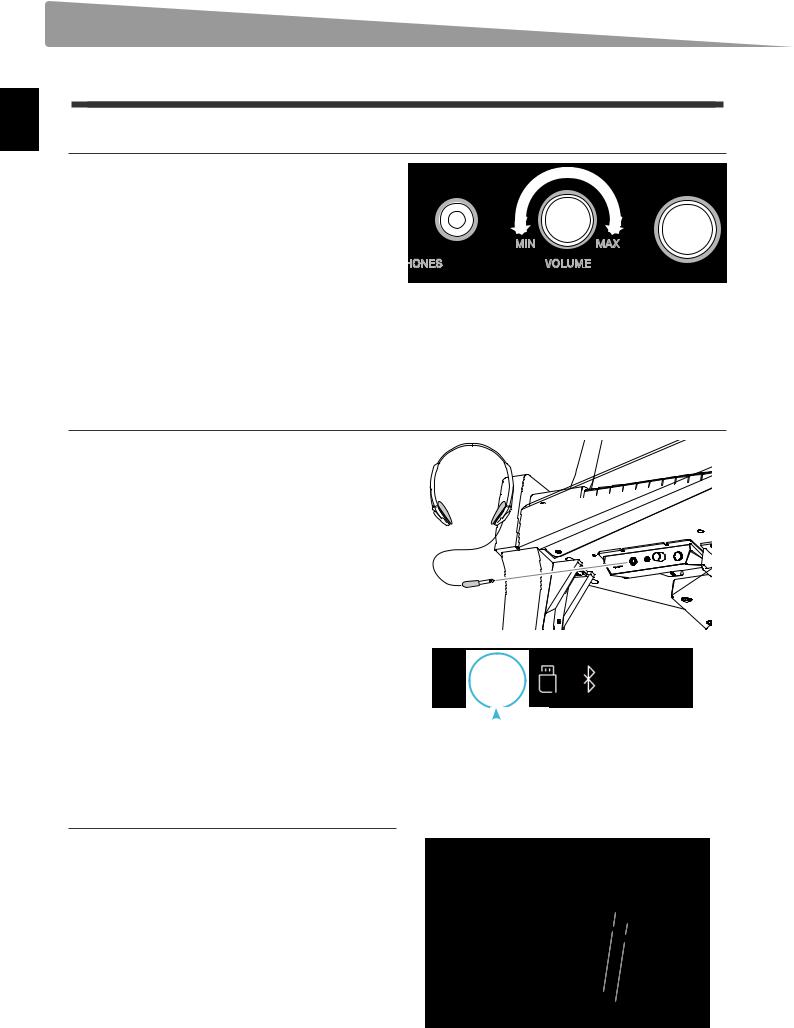
Adjusting the volume
The MASTER VOLUME knob controls the volume level of the |
|
|
instrument’s speakers, or headphones if connected. |
Decrease Volume |
Increase Volume |
Turn the knob clockwise to increase the volume, and anti- |
|
|
clockwise to decrease the volume. |
|
|
Use this knob to set the volume to a comfortable listening level - the middle is often a good starting point.
*The MASTER VOLUME knob will also affect the volume level of the LINE OUT connectors.
*The maximum volume level of the speakers can be reduced by using the ‘Speaker Volume’ setting. Please refer to page 127 for more information.
Using headphones
Use the jacks located beneath the keyboard on the left hand side to connect stereo headphones to the NV10 hybrid digital piano. 1/4” and 1/8” connectors are provided for convenience.
Two pairs of headphones can be connected and used simultaneously.
When a pair of headphones is connected, sound will not be produced by the speakers. In addition, the headphones icon will appear in the status bar of the touchscreen display.
* The maximum volume level of the headphones output and other |
|
|
|
|
|
|
|
|
|
Headphone icon |
|
|
|
||
headphone characteristics can be adjusted by using the settings in |
|
|
|
|
|
|
|
the ‘Sound Settings’ menu. Please refer to pages 130~132 for more |
|
|
|
information. |
|
|
|
Attaching the headphone hook (optional)
A headphone hook is included with the NV10 hybrid digital piano and can be used to hang headphones when not in use.
If desired, attach the headphone hook to the underside of the keyboard as shown in the illustration.
* For more information, please refer to the ‘Assembly Instructions’ on page 149.
16
4 Pedals
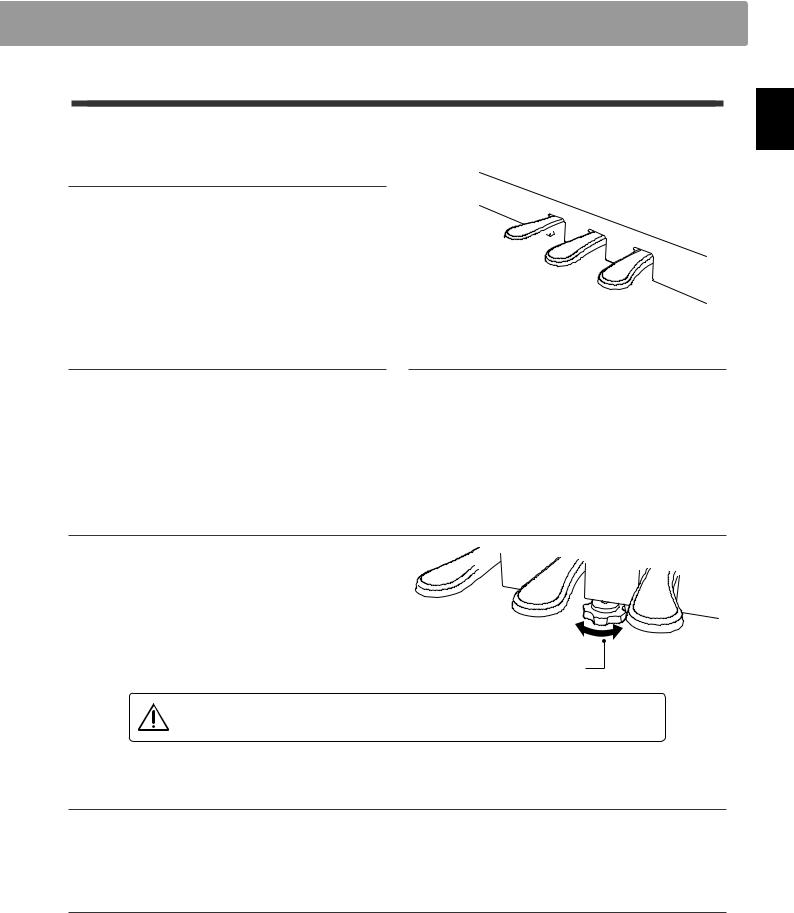
As with a grand piano, the NV10 hybrid digital piano features three pedals: damper, sostenuto, and soft.
Damper pedal (right pedal)
Depressing this pedal sustains the sound after one’s hands have been lifted from the keyboard – greatly enriching the piano sound, while also assisting smooth ‘legato’ passages.
The damper pedal is capable of responding to half pedaling.
Soft pedal
Sostenuto pedal
Damper pedal
Soft pedal (left pedal)
Depressing this pedal softens the sound, reducing its volume.
When the rotary speaker effect is selected, the soft pedal is also used to alternate the speed of the rotary simulation between ‘Slow’ and ‘Fast’ effect modes.
Sostenuto pedal (centre pedal)
Depressing this pedal after playing the keyboard and before releasing the keys, sustains the sound of only those notes that have been played. Any keys that are subsequently played after the sostenuto pedal is depressed will not be sustained.
Pedal support bolt
A pedal support bolt is attached to the base of the pedal board to aid stability when the pedals are pushed.
Turn the bolt anti-clockwise until it makes contact with the floor and supports the pedals firmly. If the pedal support bolt does not make proper contact with the floor, the pedal board may
become damaged.
Pedal support bolt
When moving the instrument, always adjust or remove the pedal support bolt, then readjust when the instrument is in its new position.
Caring for the pedals
If the surface of the pedals becomes dirty, clean the pedals using a dry dish-washing sponge.
Do not attempt to clean the pedals using rust-removing solvents, abrasives or files.
Grand Feel Pedal System
The NV10 hybrid digital piano features the Grand Feel Pedal System, which replicates the position and individual weighting of the damper, soft, and sostenuto pedals of a Shigeru Kawai SK Concert Grand piano. It is also possible to adjust the sensitivity of the damper pedal, and the effectiveness of the soft pedal using the ‘Half-Pedal Adjust’ and ‘Soft Pedal Depth’ settings.
* For more information, please refer to page 122.
Introduction
17
Introduction
Setting Up the Piano
5 Touchscreen Operations
The NV10 hybrid digital piano’s touchscreen display is used to provide useful information about the currently selected sound mode/name, function, and setting. The display is also used to control the instrument’s various features by tapping on buttons and icons, swiping in different directions, or tapping and holding onscreen elements.
The explanations below outline the different methods of interacting with the touchscreen, and how these operations are referenced in this owner’s manual.
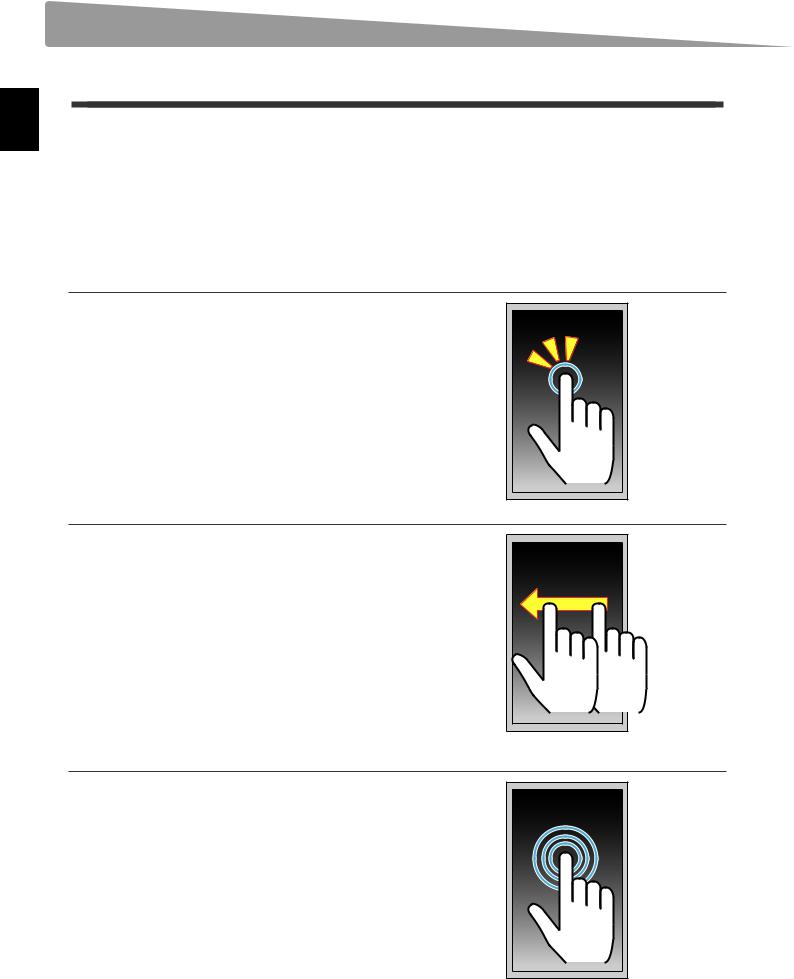
Tap
This operation is the most common method of selecting sounds and functions, and is performed by momentarily touching areas of the screen (typically buttons and icons) with a single finger.
In this owner’s manual, this operation will be referred to as “tap the xxxx button”.
Swipe
This operation is frequently used to cycle through lists of sounds, songs, and settings. The operation is performed by touching the screen with a single finger, then sliding up, down, left, or right while lifting the finger from the screen.
In this owner’s manual, this operation will be referred to as “swipe left” or “swipe up”, etc.
Long press
This operation is used when entering numeric values such as the metronome tempo, and is performed by touching and holding a button or icon with a single finger for more than two seconds.
In this owner’s manual, this operation will be referred to as “long press the xxxx button”.
18
6 User Interface Overview
The NV10 hybrid digital piano’s user interface is arranged into four different screens, which are selected by tapping the corresponding icons shown at the bottom of the touchscreen display.
Screen |
Explanation |
Pianist mode |
The instrument’s primary SK-EX Rendering sound engine, recommended for solo piano performance. |
|
This screen will appear automatically when the NV10 hybrid digital piano is turned on. |
Sound mode |
The instrument’s secondary sound engine, featuring a broad selection of high quality acoustic piano, electric |
|
piano, organ, strings and other sounds that can be layered, split, etc. |
Music |
The instrument’s built-in demonstration songs, piano music pieces, and classical and contemporary lesson |
|
songs. |
|
This screen is also used to playback internal recorder songs and audio files stored on USB memory devices. |
Favorite |
Favorite sounds and settings that can be recalled immediately with a single tap. |
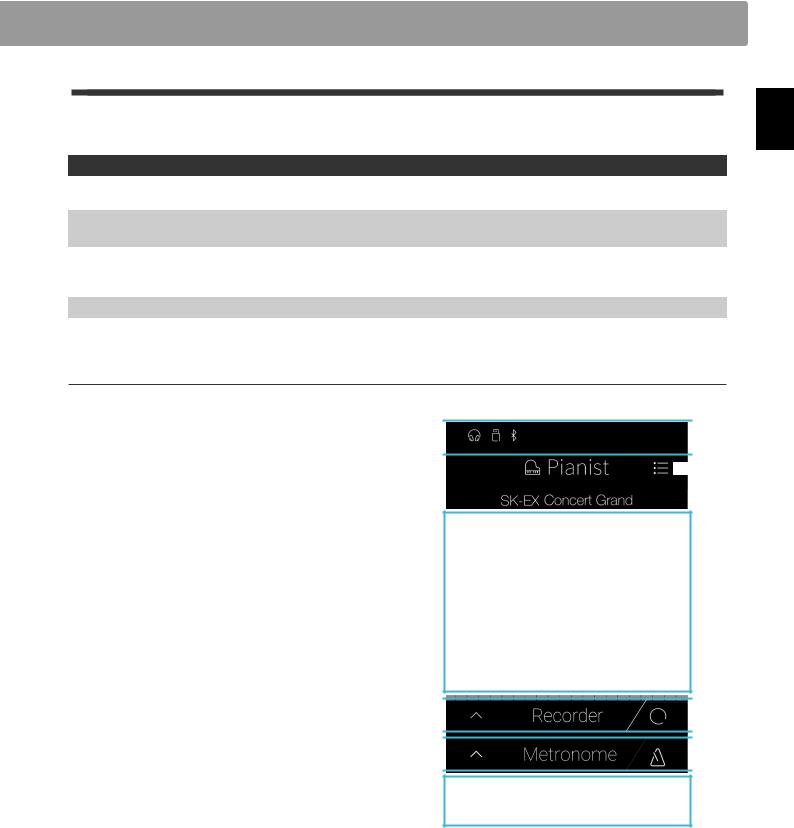
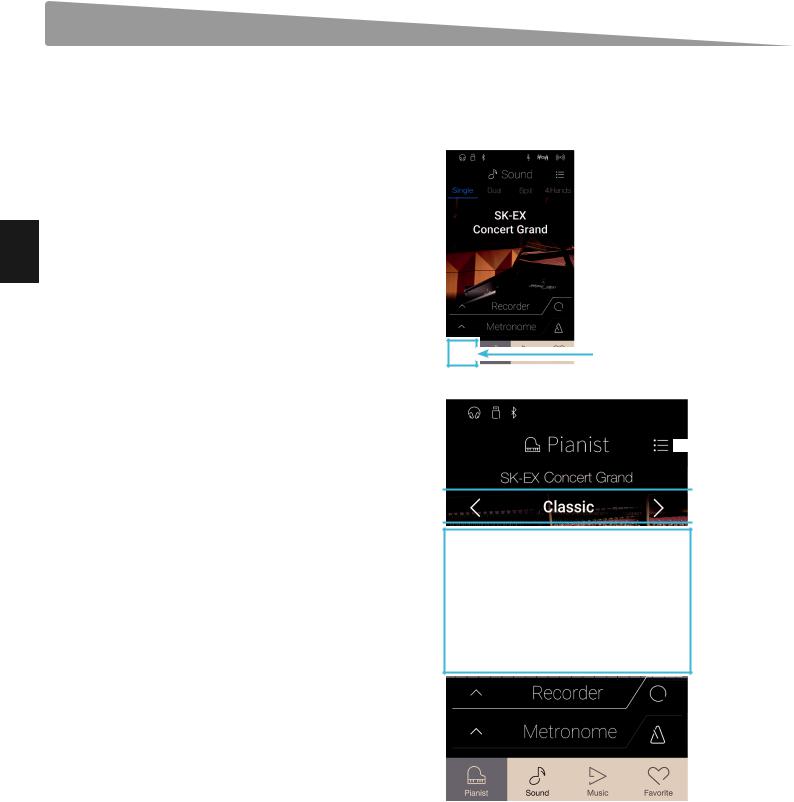
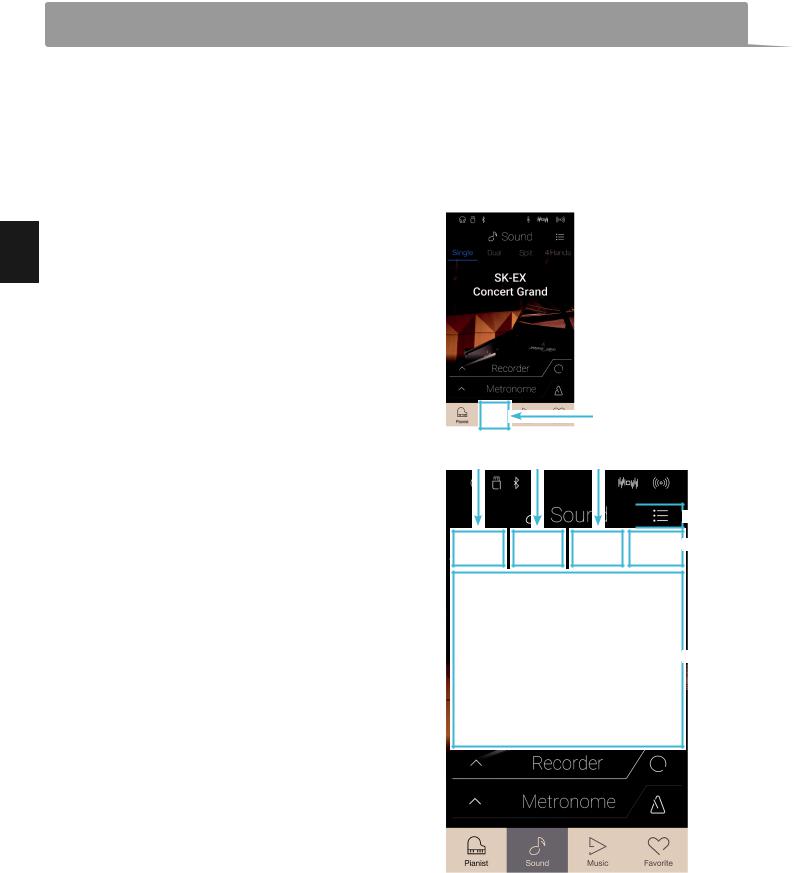
Typical screen layout
An example of a typical screen (in this case, Pianist mode) and its main components is shown and explained below.
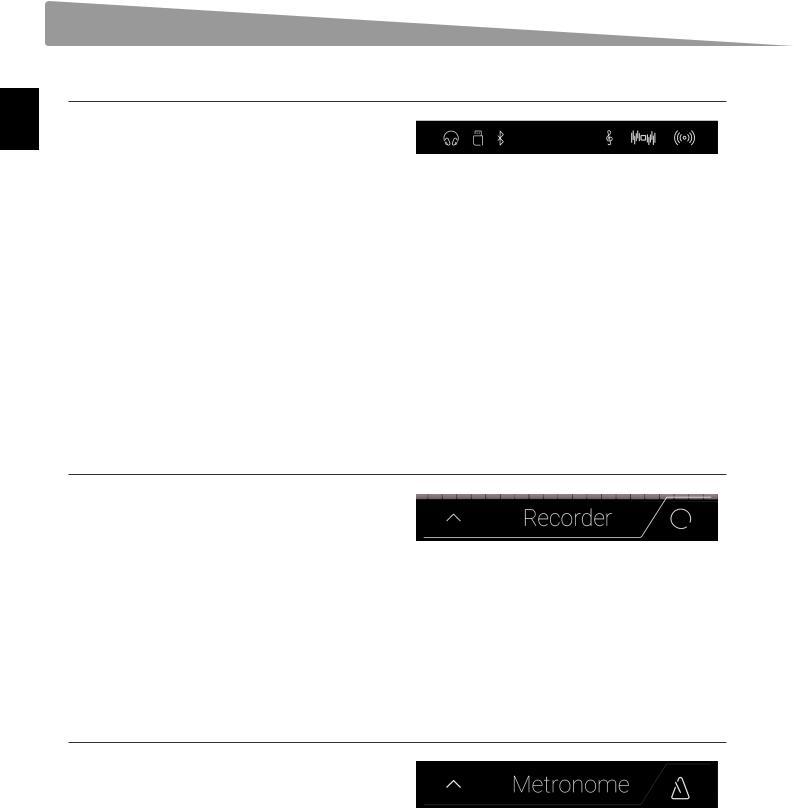
AStatus bar
Thisareaindicatesthestatusofconnecteddevices(headphones, USB, Bluetooth), and important functions (transpose, effects, reverb).
BMenu button
This button is used to display the function/settings menu for the current screen.
CSound adjustment/selection area
This area is used to change the rendering character and resonance depth of the SK-EX concert grand piano sound (Pianist mode screen), or to select the instrument sound for Single/Dual/Split/4Hands keyboard modes (Sound mode screen).
DRecorder bar
This area is used to start and stop the instrument’s recorder, and change recorder settings.
*For more information about the Recorder function, please refer to page 39.
EMetronome bar
This area is used to start and stop the instrument’s built-in metronome/drum rhythms, and change recorder settings.
*For more information about the Metronome function, please refer to page 36.
 A
A
 B
B
C
 D
D
 E
E
F
FScreen bar
This area is used to select the main Pianist mode, Sound mode,
Music, and Favorite screens.
The Status bar, Menu button, Recorder bar, Metronome bar, and Screen bar components are shown on most screens, however their functionality may vary slightly depending on the selected screen.
Introduction
19
Introduction
Setting Up the Piano
Status bar
AHeadphone icon
Appears headphones are connected to the instrument,
disabling the built-in speakers.
A BC D E F
BUSB Device icon
Appears when a USB memory device is connected to the instrument.
CBluetooth icon
Appears when Bluetooth MIDI or Bluetooth Audio is enabled.
DTranspose icon
Appears when the Key Transpose setting is changed.
EEffects icon
Appears when the Effects function is turned on (Sounds screen).
FReverb icon
Appears when the Reverb function is turned on (Sounds screen).
Recorder bar
AOpen Recorder button
Tap to expand the Recorder bar and show additional recorder settings.
BRecorder status |
A |
B |
C |
Indicates the current Recorder status. |
|
|
|
CRecord Start/Stop button |
|
|
|
Tap to place the Recorder in Standby, then tap again to Start/ |
|
|
|
Stop recording. |
|
|
|
* For more information about the Recorder function, please refer |
|
|
|
to page 39. |
|
|
|
Metronome bar
AOpen Metronome button
Tap to expand the Metronome bar and show additional metronome/rhythm settings.
BMetronome status |
A |
B |
C |
Indicates the current Metronome status. |
|
|
|
CMetronome Start/Stop button |
|
|
|
Tap to Start/Stop the Metronome. |
|
|
|
*For more information about the Metronome function, please refer to page 36.
20
Screen bar
APianist button
Show the Pianist mode screen, utilising the SK-EX Rendering piano sound engine.
BSound button |
A |
B |
C |
D |
|
Show the Sound mode screen, utilising the multi-instrument |
|||||
|
|
|
|
||
sound engine. |
|
|
|
|
|
CMusic button |
|
|
|
|
|
Show the Music screen, used for accessing the built-in |
|
|
|
|
|
demonstration songs, piano music pieces, lesson songs, |
|
|
|
|
|
recorder songs, and the USB audio player. |
|
|
|
|
|
DFavorite button |
|
|
|
|
|
Show the Favorite screen, used for recalling favorite sounds |
|
|
|
|
|
and settings. |
|
|
|
|
Introduction
21
Playing the Piano
Pianist mode screen
The Pianist mode screen utilises the NV10 hybrid digital piano’s new SK-EX Rendering piano sound engine. This mode delivers the most realistic acoustic piano playing experience possible, and is therefore recommended for solo piano performance.
Tap the [Pianist] button to show the Pianist mode screen.
Pianist button
AMenu button
Tap to display the function/settings menu for the Pianist mode screen.
BRendering character
Swipe left/right or tap the arrow buttons to change the rendering character used for the SK-EX Rendering piano sound engine.
CResonance depth
Long press and drag up/down to adjust the resonance depth of the SK-EX Rendering piano sound engine.
 A
A
 B
B
C
22
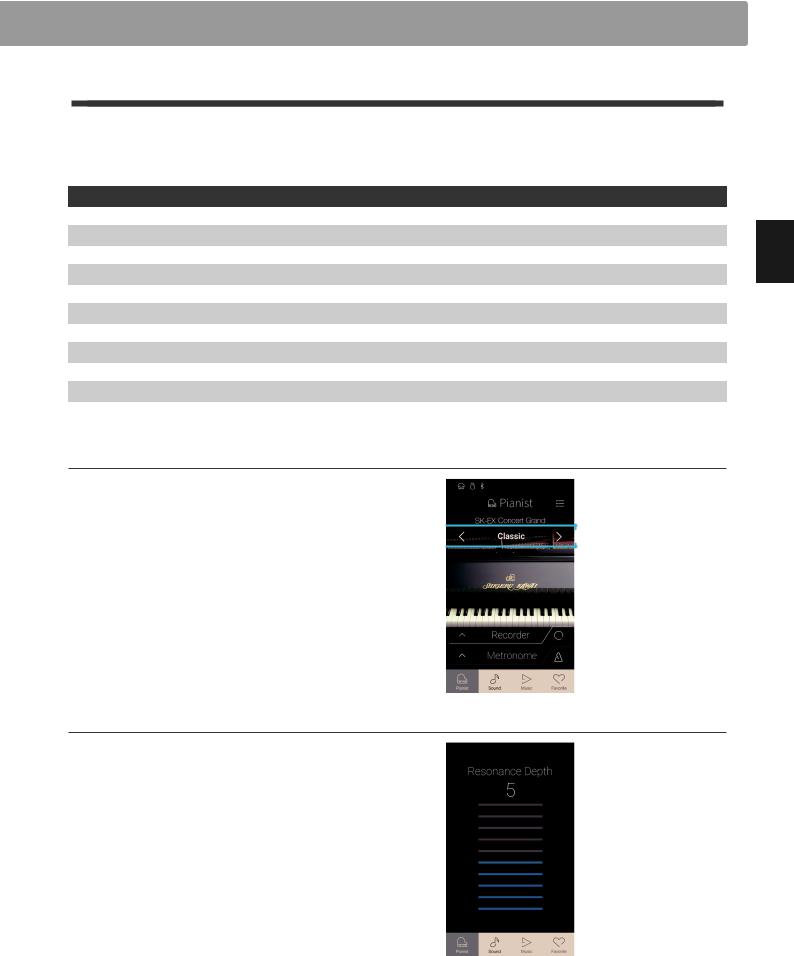
1 Rendering character and Resonance depth
The SK-EX Rendering piano sound engine combines high resolution multi-channel sampling with advanced modelling algorithms to reproduce 10 different acoustic piano rendering characters, suitable for a variety of musical genres.
Rendering character |
Description |
Classic |
A standard grand piano sound with a broad dynamic range. |
Romantic |
A mellow grand piano sound with soft hammers. |
Full |
A big grand piano sound with a strong bass and bright character. |
Jazz |
A clean grand piano sound that is suitable for jazz. |
Brilliant |
A bright grand piano sound with emphasised treble. |
Rich |
A rich grand piano sound with emphasised resonances. |
Ballad |
A clear, light grand piano sound that is suitable for ballads. |
Pop |
A strong grand piano sound with emphasised attack that is suitable for pop music. |
Vintage |
A soft grand piano sound with a vintage character. |
Boogie |
A small grand piano with a detuned character. |
Selecting the Rendering character
Swipe the Rendering character name left or right, or tap the arrow buttons to cycle through the available rendering characters used for the SK-EX Rendering piano sound engine.

 Rendering character
Adjusting the Resonance depth
Long press and drag up and down to adjust the Resonance depth of the SK-EX Rendering piano sound engine.
* The Resonance depth can be set to one of 10 levels.
Playing the Piano
23
Pianist mode screen
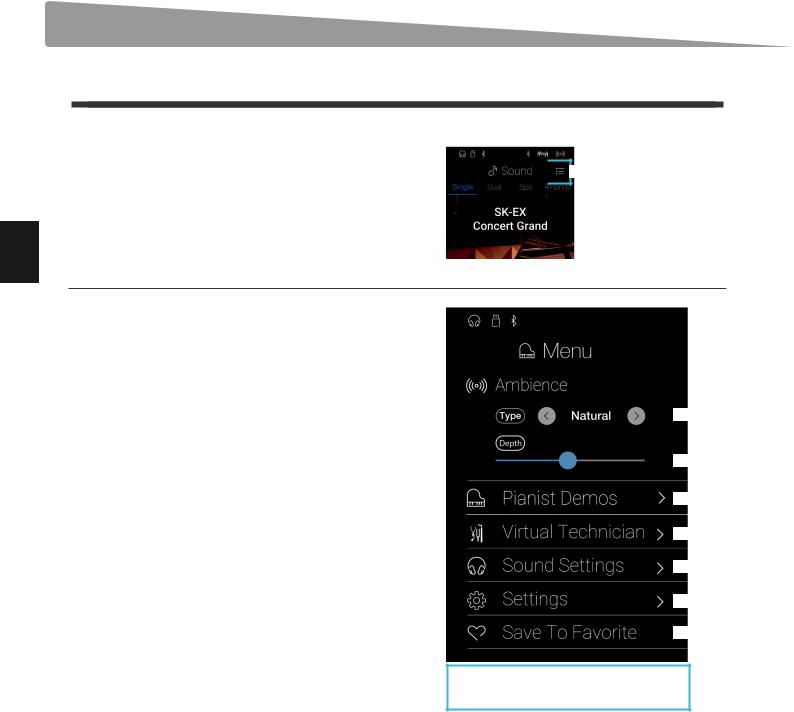
2 Pianist mode menu
The Pianist mode menu contains settings and functions related to the Pianist mode screen.
Tap the [Menu] button to show the Pianist mode menu.

 Menu button
Playing the Piano
Pianist mode menu
AAmbience type
Swipe left/right or tap the arrow buttons to change the ambience type used for the SK-EX Rendering piano sound engine.
Ambience refers to the sense of sound moving around in a virtual room.
* The Ambience type can be set to one of 10 types, listed below.
BAmbience depth
Long press and drag the slider to adjust the depth/strength of the ambience.
CPianist Demos
Tap to open the Pianist Demos screen, which performs pieces that demonstrate the SK-EX Rendering piano sound engine.
*Please refer to the table below for more information regarding the pieces of music played on this screen.
DVirtual Technician
Tap to open the Virtual Technician menu.
This menu is used to adjust various characteristics of the acoustic piano sound.
*For more information about the Virtual Technician menu, please refer to page 98.
ESound Settings
Tap to open the Sound Settings menu.
This menu is used to adjust various settings of the sound.
*For more information about the Sound Settings menu, please refer to page 123.
FSystem Settings
Tap to open the System Settings menu.
This menu is used to adjust various system settings.
*For more information about the System Settings menu, please refer to page 133.
GStore to Favorite
Tap to store the current piano sound and associated settings to a Favorite memory.
*For more information about the Favorite function, please refer to page 80.
HClose Menu
Tap to close the menu and return to the Pianist mode screen.
 A
A
 B
B
 C
C
 D
D
 E
E
 F
F
 G
G
H
24

Ambience types
Ambience Type |
Description |
Natural |
Simulates the ambience of a natural environment. |
Small Room |
Simulates the ambience of a small room. |
Medium Room |
Simulates the ambience of a medium-sized room. |
Large Room |
Simulates the ambience of a large room. |
Studio |
Simulates the ambience of a recording studio. |
Wood Studio |
Simulates the ambience of a wooden recording studio. |
Mellow Lounge |
Simulates the soft ambience of a lounge. |
Bright Lounge |
Simulates the bright ambience of a lounge. |
Live Stage |
Simulates the ambience of a live stage. |
Echo |
Simulates the ambience of an echo chamber. |
Pianist Demos pieces
|
Piece name |
Composer |
1 |
Polonaise in A-flat major, Op. 53 |
Frédéric Chopin |
2 |
Suite bergamasque - Prélude |
Claude Debussy |
3 |
Turkish March |
Wolfgang Amadeus Mozart |
|
|
|
Playing the Piano
25
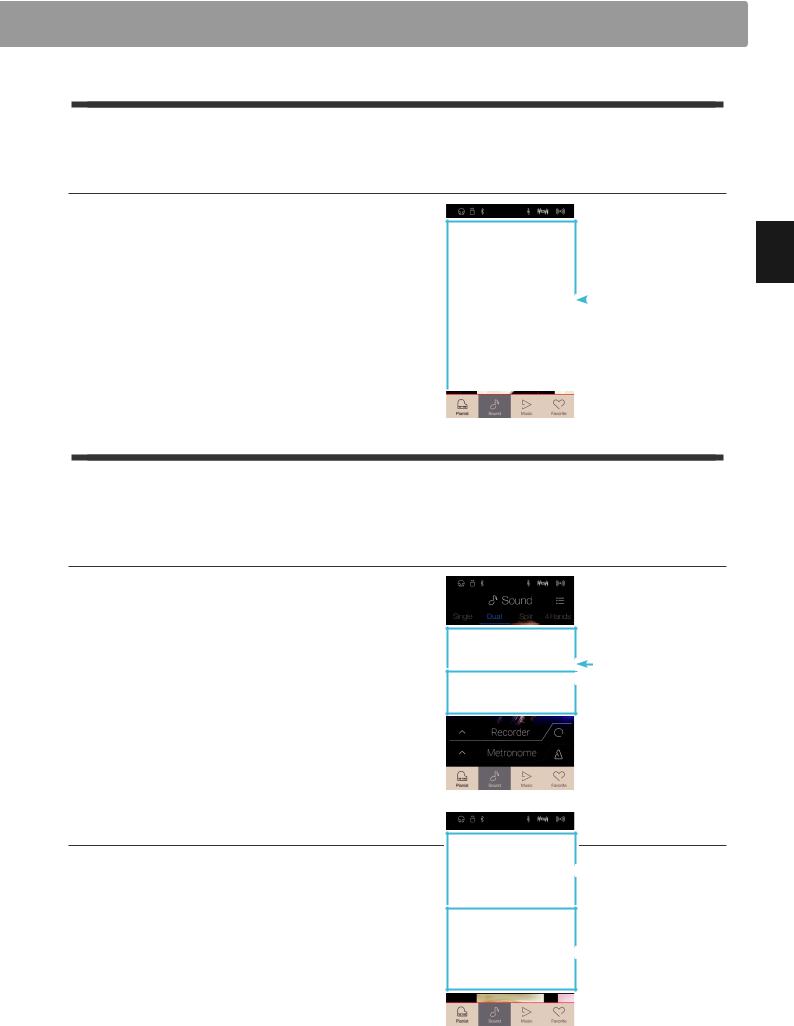
Playing the Piano
Soundmodemodescre nscreen
The Sound mode screen utilises the NV10 hybrid digital piano’s secondary sound engine. This mode features a wide selection of realistic instrument sounds suitable for various musical styles. These instrument sounds are arranged into eight categories, with several sounds assigned to each category. In additional to playing instrument sounds individually, it is also possible to play two sounds simultaneously, either by layering (Dual) or splitting the keyboard into two sections (Split/4Hands).
* For a complete listing of available instrument sounds, please refer to page 161 of this owner’s manual.
Tap the [Sound] button to show the Sound mode screen.
Sound button
AMenu button
Tap to display the function/settings menu for the Sound mode screen.
BSingle
Tap to select the Single keyboard mode.
This is the standard mode for playing one sound across the entire length of the keyboard.
CDual
Tap to select the Dual keyboard mode.
This mode allows two sounds to be layered together.
DSplit
Tap to select the Split keyboard mode.
This mode divides the keyboard into two sections, and allows different sounds to be played in each.
E4Hands
Tap to select the 4Hands keyboard mode.
This mode divides the keyboard into two 44-key sections with the same playing range.
FSound selection area
Tap to open the sound selection pop-up.
B C D

 A
A
 E
E
 F
F
26
1 Single
By default, the SK-EX Concert Grand piano sound will be selected in Single keyboard mode, meaning that one sound is used across the full width of the keyboard.
Selecting sounds
1.Tap the sound selection area to enter sound selection mode.
2.Swipe left or right to cycle through the different instrument sounds in the current category, or up and down to cycle through the different instrument categories.
* The sound selection mode will close automatically after |
|
|
|
|
|
|
Sound selection |
||
|
|
|||
approximately 5 seconds of inactivity. |
|
|
|
|
|
|
|
||
|
|
|
|
|
2 Dual
The Dual keyboard mode allows two sounds to be layered together, creating a more complex sound. For example, a piano sound layered with strings, or a church organ combined with a choir, etc.
Selecting Dual keyboard mode
Tap the [Dual] button to select Dual keyboard mode.
The sound selection area of the Sound mode screen will divide into two halves. The top half indicates the main sound, while the bottom half indicates the layered sound. By default, Slow Strings will be used for the layered sound.
Selecting sounds
Selecting sounds in Dual keyboard mode is identical to that of Single keyboard mode.
1.Tap the main or layered sound area to enter sound selection mode.
2.Swipe left/right to change the instrument sound, and up/ down to change the instrument category.
Main sound  Layered sound
 Main sound
 Layered sound
Playing the Piano
27
Playing the Piano
Sound mode screen
Dual keyboard mode settings
Dual setting |
Description |
Default Setting |
Balance |
Adjust the volume balance between the main and layered sounds. |
9 - 9 |
Layer Octave Shift |
Raise/lower the pitch of the layered sound in octave steps. |
0 |
Dynamics |
Adjust the dynamic sensitivity of the layered sound relative to the main sound. |
10 |
|
|
|
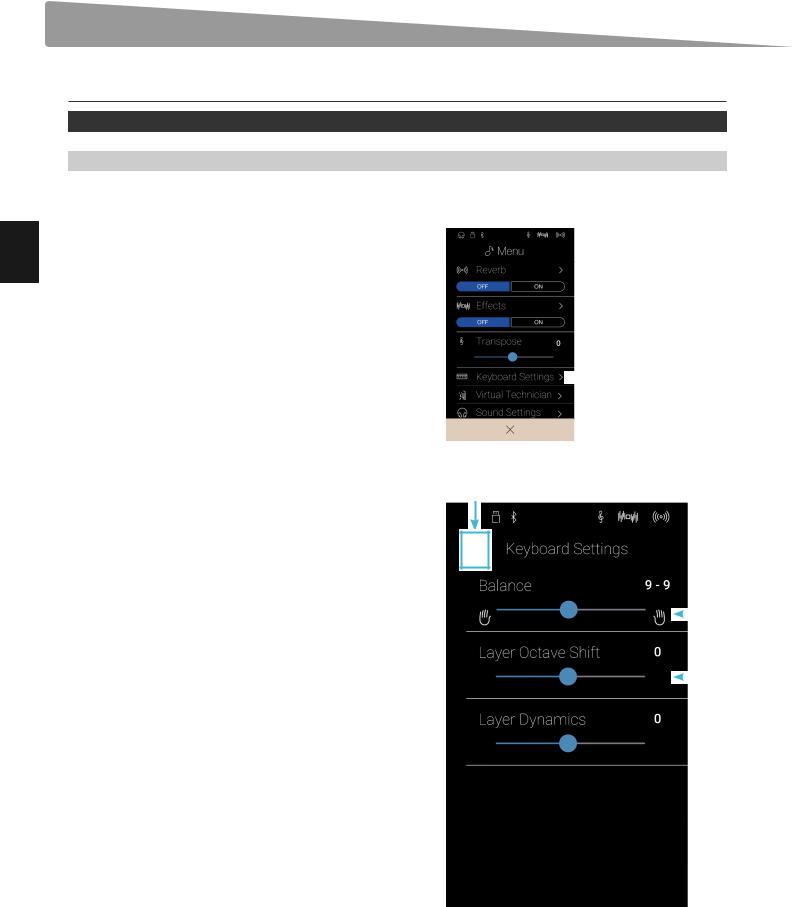
Tap the [Menu] button to show the Sound mode menu.
Next, tap [Keyboard Settings] to show the Dual keyboard mode settings.
 Keyboard Settings
ABack button |
A |
|
Tap to return to the Sound mode menu |
||
|
||
BBalance |
|
Long press and drag the slider to adjust the volume balance between the main and layered sounds.
CLayer Octave Shift
Long press and drag the slider to adjust the pitch of the layered |
|
|
|
|
|
B |
|
sound in octave steps. |
|
|
|
|
|
||
|
|
|
|
DDynamics |
|
|
|
|
|
|
|
Long press and drag the slider to adjust the dynamic sensitivity |
|
|
|
of the layered sound relative to the main sound. |
|
|
C |
|
|
||
|
|
|
|
 D
D
28
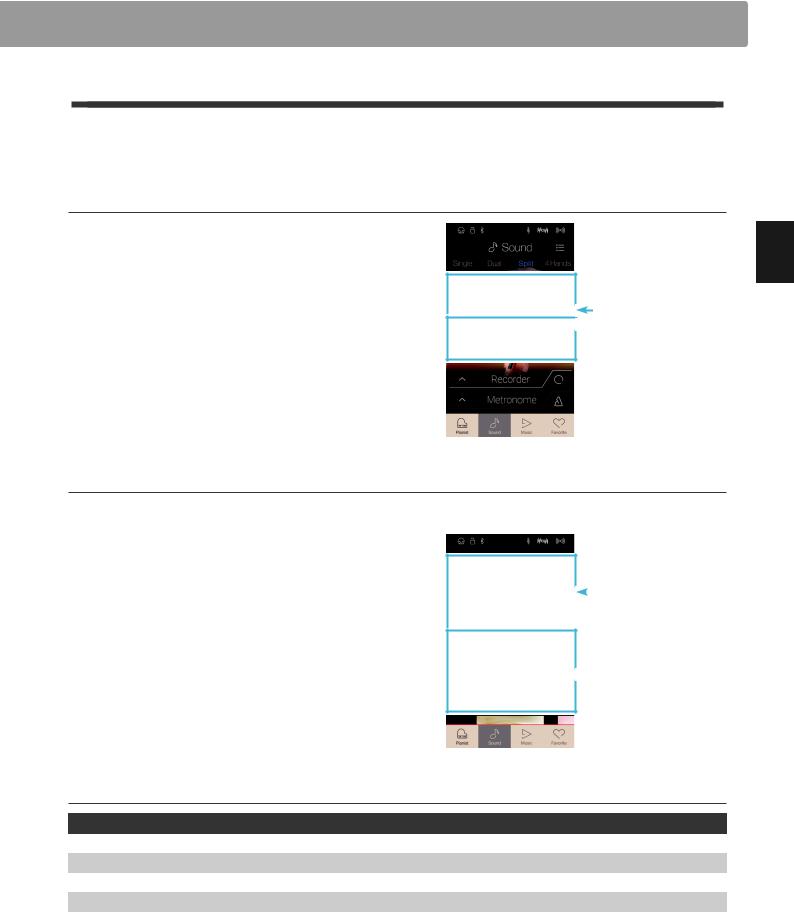
3 Split
The Split keyboard mode function divides the keyboard into two sections, allowing each section to be played with a different sound. For example, a bass sound in the lower section, and a piano sound in the upper section.
Selecting Split keyboard mode
Tap the [Split] button to select Split keyboard mode.
The keyboard will divide into upper and lower sections at key C4.
The sound selection area will divide into two halves. The top half indicates the upper section sound, while the bottom half indicates the lower section sound. By default, Wood Bass will be used for the lower section sound.
Upper sound  Lower sound
Selecting sounds
Selecting sounds in Split keyboard mode is identical to that of Single and Dual keyboard modes.
1.Tap the upper or lower section sound area to enter sound selection mode.
2. Swipe left/right to change the instrument sound, and up/ |
|
|
|
|
|
Upper sound |
|
down to change the instrument category. |
|
|
|
|
|
|
|
|
|
|
|
 Lower sound
Playing the Piano
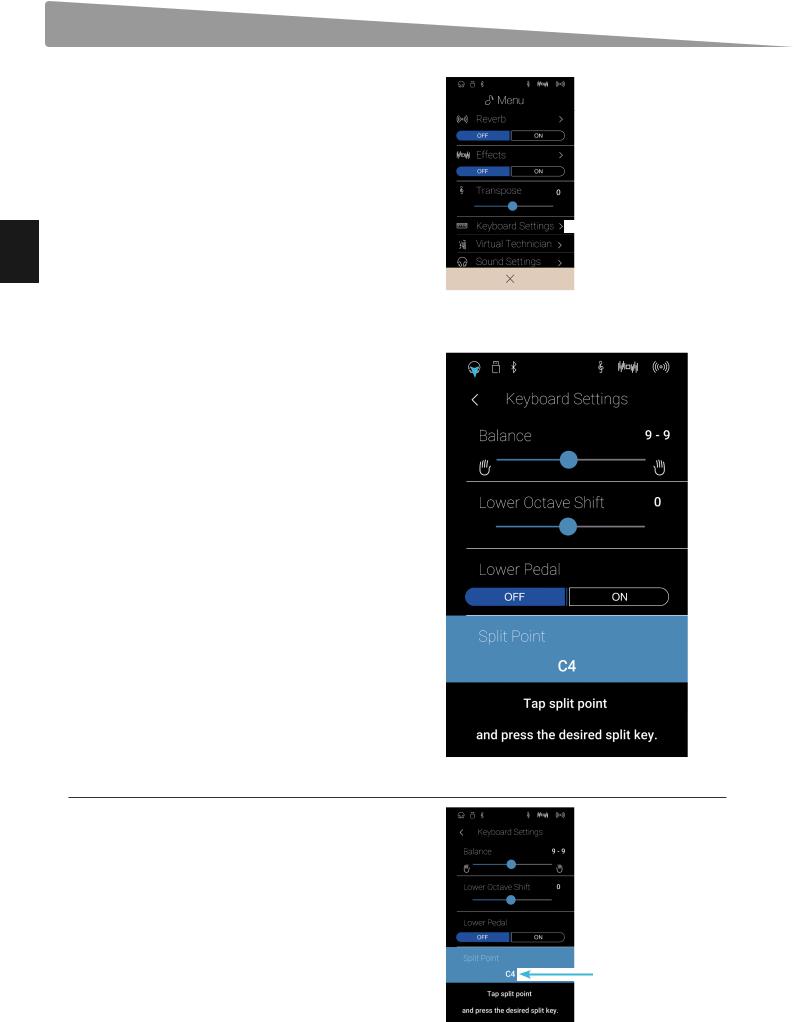
Split keyboard mode settings
Split setting |
Description |
Default Setting |
Balance |
Adjust the volume balance between the upper section and lower section sounds. |
9 - 9 |
Lower Octave Shift |
Raise/lower the pitch of the lower section sound in octave steps. |
0 |
Lower Pedal |
Enable/disable the damper pedal for the lower section sound. |
Off |
Split Point |
Set the point on the keyboard that divides the upper and lower sections. |
C4 |
29
Sound mode screen
Tap the [Menu] button to show the Sound mode menu.
Next, tap [Keyboard Settings] to show the Split keyboard mode settings.
 Keyboard Settings
Playing the Piano
ABack button |
|
|
|
|
|
|
|
A |
|
|
|||
Tap to return to the Sound mode menu |
|
|
|
|||
|
|
|
|
|
||
|
|
|
|
|
||
BBalance |
|
|
|
|
|
|
|
|
|
|
|
||
|
|
|
|
|
|
|
Long press and drag the slider to adjust the volume balance |
|
|
|
|
|
|
between the upper section and lower section sounds. |
|
|
|
|
|
|
|
|
|
|
|
|
|
CLower Octave Shift |
|
|
|
|
|
|
Long press and drag the slider to adjust the pitch of the lower |
|
|
|
|
|
|
section sound in octave steps. |
|
|
|
|
|
|
DLower Pedal |
|
|
|
|
|
|
Tab to enable/disable the damper pedal for the lower section |
|
|
|
|
|
|
sound. |
|
|
|
|
|
|
ESplit Point |
|
|
|
|
|
|
Tap to set the point on the keyboard that divides the upper and |
|
|
|
|
|
|
lower sections. |
|
|
|
|
|
|
Changing the Split point
 B
B
 C
C
 D
D
 E
E
Tap the [Split Point] setting. A message will appear prompting to press a key.
Press the desired split key on the keyboard.
The pressed key will become the new split point.
Split point
30
Loading...