


 Loading...
Operating Manual
- Englisch -
DVB combi receiver (SAT + DVB-T)
UFS 790si/sw

FOREWORD/IMPORTANT INFORMATION
Dear customer,
This operating manual is intended to help you make the fullest use of the extensive range of functions offered by your new satellite receiver.
We have tried to make the operating instructions as easy as possible to understand, and to keep them as concise as possible.
If you will not be using your receiver for a longer period, you should disconnect it from the mains to save energy. For shorter breaks, you can use the remote control to switch the receiver to standby, which uses only a minimal amount of energy.
We wish you good reception and much pleasure using your new DVB-Sat receiver.
Your
KATHREIN team
IMPORTANT INFORMATION
The programs available on the satellites and transponders as well as the DVB-T channels are subject to continual change. This means the channel settings have to be regularly updated, even though the factory presetting always represents the latest version when the receiver was shipped. The information for these settings can be found on the Internet or in relevant magazines.
Your receiver was equipped in the factory with the latest software version at that time. We are, however, constantly working on adapting the software to the wishes of our customers and to developments in technology. The “Software Update” section provides more information on this aspect.
The information in this operating manual was correct at the time of going to press. We reserve the right however to make changes at any time and without prior notice.
If new software is released for your receiver, and this affects the information in the operating manual (e.g. changes to the menus and/or functions), if we believe it necessary we will make available a new
operating manual for download under “www.kathrein.de”.
Please keep the original packaging in case you need to return the product at any time! If the product is not properly packed, the warranty claim is invalidated.
Make a note of the receiver's basic settings (these are set during the first installation), so you can restore them if necessary!
The term DiSEqC™ used in this operating manual is a registered trade mark of the European Telecommunication Satellite Organisation (EUTELSAT).
In order to disconnect the UFS 790 from the mains completely, the mains plug must be unplugged from the wall socket! Therefore place the UFS 790 near to a wall socket and make sure the socket is accessible, so that at any time (e.g. during a thunderstorm or during a long absence) you can disconnect the receiver from the mains.
2
IMPORTANT INFORMATION
INFORMATION ON AUDIO MPEG INC. AND S.I.SV.EL, S.P.A:
This unit makes use of legally protected technologies, which are protected by patents in the USA and also by other intellectual property rights in other countries.
KATHREIN-Werke KG has obtained licences from Audio MPEG Inc. and Societa‘ Italiana per lo sviluppo dell‘elettronica, S.I.SV.EL, S.P.A to use these technologies. These licences carry certain restrictions, which apply also to you as the customer.
Accordingly this unit may be used by the end customer only for private non-commercial purposes and for the licensed content. It may not be used for commercial purposes. The use of products or processes that are sold or used with this unit is not included in this statement.
The use of reverse engineering is not permitted in respect of the licensed technologies, nor is disassembly.
DISPOSAL INSTRUCTIONS
Electronic equipment is not domestic waste - in accordance with directive 2002/96/EC OF THE EUROPEAN PARLIAMENT AND THE COUNCIL dated 27th January 2003 concerning used electrical and electronic appliances, it must be disposed of properly.
At the end of its service life, take this unit for disposal at a designated public collection point.
Spent batteries are special waste!
Do not throw spent batteries into your domestic waste; take them to a collection point for spent batteries.
SERVICE
If, despite reading through this operating manual, you still have questions about getting started with the unit or using it correctly, or if unexpected problems occur, please contact your specialist dealer.
3

CONTENTS |
|
Foreword/important information ............................................................................................... |
2 |
Important Information............................................................................................................... |
3 |
Contents .................................................................................................................................. |
4 |
Receiver features and product package .................................................................................... |
6 |
Safety instructions ................................................................................................................... |
7 |
Connection and setup............................................................................................................... |
8 |
Controls, displays and connections........................................................................................ |
10 |
Remote control........................................................................................................................ |
11 |
First installation...................................................................................................................... |
12 |
Operation ............................................................................................................................... |
29 |
Using the remote control ......................................................................................................... |
29 |
Channel selection (TV and radio) .............................................................................................. |
29 |
Channel selection from the channel list ....................................................................................... |
30 |
Banner .................................................................................................................................. |
31 |
Audio/subtitle selection ........................................................................................................... |
31 |
Opening the options channel ................................................................................................... |
32 |
Picture scaling and audio output format .................................................................................... |
32 |
Teletext ................................................................................................................................. |
32 |
EPG (Electronic Program Guide)............................................................................................. |
33 |
Opening the EPG ................................................................................................................... |
33 |
“Current” view ........................................................................................................................ |
34 |
“Preview” view (program magazine) ......................................................................................... |
35 |
Categories overview ............................................................................................................... |
36 |
Search function ...................................................................................................................... |
37 |
Additional information (i button)................................................................................................ |
38 |
Recording (Timer)................................................................................................................... |
39 |
Recording once only .............................................................................................................. |
40 |
Recording daily..................................................................................................................... |
40 |
Recording weekly.................................................................................................................. |
41 |
Recording Monday to Friday .................................................................................................... |
41 |
Timer list view ........................................................................................................................ |
43 |
Common Interface .................................................................................................................. |
44 |
Important Information ............................................................................................................. |
44 |
Inserting the Smartcard and the CA Module .............................................................................. |
44 |
Inserting the CA module into the CI............................................................................................ |
44 |
Inserting the Smartcard into the Smartcard reader ......................................................................... |
44 |
Main menu.............................................................................................................................. |
45 |
Editing channel list................................................................................................................. |
46 |
Sorting channels in channel list (left column) ............................................................................. |
46 |
Deleting channels from channel list .......................................................................................... |
46 |
Favourite lists......................................................................................................................... |
46 |
Adding a channel to favourite list............................................................................................... |
47 |
4

|
CONTENTS |
Deleting a channel from favourite list.......................................................................................... |
48 |
Sorting channels in favourite list................................................................................................ |
48 |
Search for channels................................................................................................................ |
49 |
Automatic search (DVB-S) sat ................................................................................................. |
50 |
Manual search (DVB-S) sat ..................................................................................................... |
52 |
Automatic search (DVB-T) terrestrial ........................................................................................ |
53 |
Manual search (DVB-T) terrestrial ............................................................................................ |
55 |
Security.............................................................................................................................. |
.... 56 |
Box Settings........................................................................................................................... |
57 |
Video and audio settings ......................................................................................................... |
58 |
Menu Settings........................................................................................................................ |
59 |
General .............................................................................................................................. |
... 60 |
Conditional Access (Common Interface) ................................................................................... |
61 |
CONAX CA - Smartcard reader................................................................................................. |
61 |
Cryptoworks - CI (CA module) .................................................................................................. |
63 |
LNB settings .......................................................................................................................... |
64 |
Antenna settings (DVB-T)........................................................................................................ |
64 |
Service Menu.......................................................................................................................... |
65 |
Sat Finder.............................................................................................................................. |
66 |
Channel information................................................................................................................ |
66 |
System Information................................................................................................................. |
67 |
Updating software .................................................................................................................. |
67 |
Restoring factory settings ........................................................................................................ |
71 |
Language .............................................................................................................................. |
. 72 |
Technical appendix................................................................................................................. |
73 |
Technical features .................................................................................................................. |
73 |
Scart socket assignment ......................................................................................................... |
75 |
VHS/S-VHS switching............................................................................................................. |
75 |
Connection example ............................................................................................................... |
76 |
Examples of single-cable systems............................................................................................ |
77 |
5

RECEIVER FEATURES AND PRODUCT PACKAGE
RECEIVER FEATURES
The UFS 790si and UFS 790sw receivers enable digital satellite and digital terrestrial TV and radio channels to be received.
The decoding system for Conax is already integrated. In addition one Common Interface for a CA module is provided for decoding additional satellite Pay-TV channels.
The HDMI interface offers the optimum capability for connecting the receiver to a suitable flat-screen TV set.
The receivers have comprehensive features such as 16-character alphanumeric display for program names, electrical and optical audio outputs for Dolby Digital (AC 3) and Videotext with memory capacity for 800 pages.
These receivers are available in silver or black housings.
SWITCHING OFF THE RECEIVER AND UPDATING THE EPG
By pressing the button on the remote control you can switch the receiver out of TV mode to the standby mode, and back again.
The receiver has the facility to update the EPG overnight, i.e. at 03:00 the receiver automatically starts to update the EPG data. This procedure may take a few minutes, and is not shown in the receiver display. If the receiver is programmed to make a recording at this time, the updating is postponed until 03:00 the following night.
This update time cannot be changed.
This updates the EPG data for the first 25 channels of the overall channel list. However, this update is only performed if the receiver is in standby mode. If the receiver is completely switched off (at the mains) or if it is in operation, the update will be delayed. After updating the data, the receiver automatically switches back
to the standby mode. If during the update you press the button, the update is aborted and the receiver switches itself on.
PRODUCT PACKAGE
-UFS 790si (silver) or UFS 790sw (black)
-Infra-red remote control
-Scart cable
-2 batteries AAA 1.5 V
-Power supply cable
-Operating manual
6

SAFETY INSTRUCTIONS
7
CONNECTION AND SETUP
The following section is intended specifically for specialist dealers. You need not refer to this section unless you are carrying out the installation yourself. The “Connection Example” section provides a sample configuration.
Do not connect the receiver to the mains until all installation work has been properly carried out. Refer also to the information in the “Safety Instructions” section.
CONNECTING THE RECEIVER
SAT IF CONNECTION
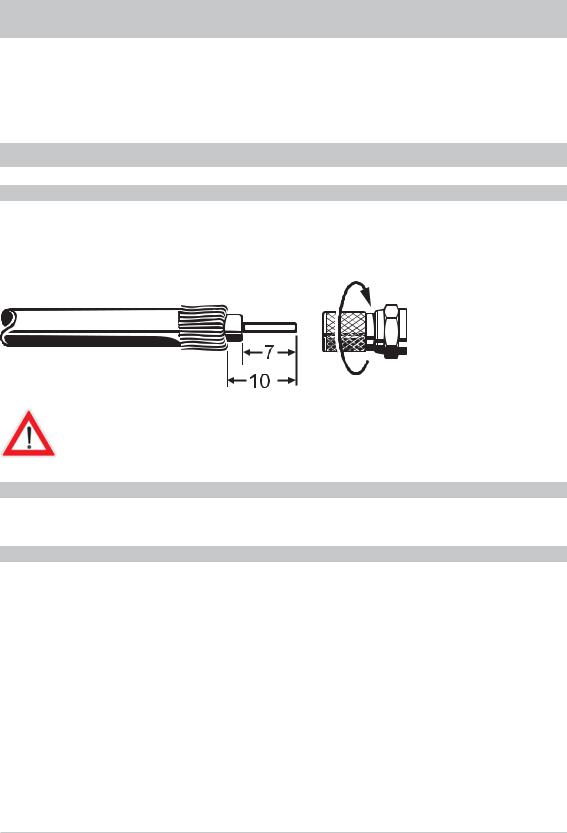
Connect the Sat IF input on the receiver to the satellite reception system. Use a coaxial cable with a standard F connector.
If the F connector is not yet fitted to the cable, strip the insulation from the cable as shown in the following illustration and carefully twist the F connector onto the end of the cable until it is securely fitted to the cable.
When fitting the connector, make sure that no strands from the braiding touch the inner conductor, otherwise a short circuit may occur.
The quality of the reception signal depends on this connection!
RECEPTION REQUIREMENTS
Ensure that your satellite antenna system is designed for digital reception.
RECEPTION SYSTEM PRESETS
The presets for the control signals have been made for standard reception systems, i.e. 14/18 V for polarity reversal and 22 kHz switching signal for low/high band changeover. Be sure to follow the operating instructions for the matrices used.
The parameters defined in the “Main Menu”, “Channel search” and “LNB settings” should only be changed by experienced installers.
8
CONNECTION AND SETUP
RF(HF) CONNECTION
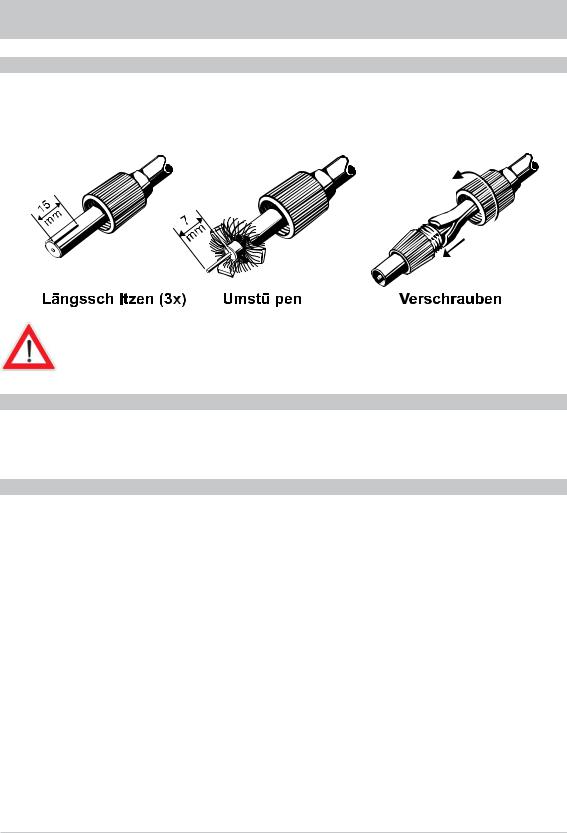
Connect the RF input on the receiver to the antenna socket or your DVB-T antenna.
Use the antenna cable supplied for this purpose, or a coaxial cable with an IEC standard connector. If the IEC connector is not yet fitted to this cable, strip the insulation from the cable as shown in the following illustration and carefully twist the connector onto the end of the cable until it is securely fitted to the cable.
|
|
|
|
|
|
Screw together |
|||||
Lengthwise slits (3x) |
|
Bend back |
When fitting the connector, make sure that no strands from the braiding touch the inner conductor, otherwise a short circuit may occur.
The quality of the reception signal depends on this connection!
TV CONNECTION
Connect the satellite receiver (TV Scart socket) to the TV set with a Scart cable. If your TV is stereo, you can receive the sound in stereo via the Scart connection. Connect the satellite receiver to the video/DVD recorder with a Scart cable.
INSERTING BATTERIES IN THE REMOTE CONTROL
Remove the cover on the rear of the remote control.
Insert the two batteries supplied into the remote control. Ensure correct polarity of the batteries; the + and - markings are indicated inside the battery compartment. Slide the cover back into the housing until it locks in place.
9

CONTROLS, DISPLAYS AND CONNECTIONS
This section provides a brief description of all the controls, displays and connections.
VIEW OF FRONT PANEL (FLAP FOLDED DOWN)
|
|
|
|
VIEW OF REAR PANEL
|
|
|
|
Front panel controls and displays
1.On/Off switch
2.Display (cover folded down)
3.Smartcard reader*) (Conax embedded)
4.Common Interface for fitting a CA module *)
5.Ejection button for the CA module
In addition there are three further buttons on
the front of the display:
-TV/R button for switching between TV and radio mode
-Channel select buttons (▼▲)
|
|
|
Rear panel controls and displays
1.DVB-T antenna input
2.LNB input
3.RJ 11 data interface
4.Optical data stream output (SPDIF/Sony Philips Digital Interface Format) for Dolby Digital AC 3 audio
5.Electrical data stream output (SPDIF/Sony Philips Digital Interface Format) for Dolby Digital AC 3 audio
6.Audio outputs (L/R) cinch sockets
7.Scart socket for TV connection
8.Scart socket for VCR/AUX connection
9.HDMI connection
10.Mains power cable
*) CA module and Pay-TV cards (Smartcards) are not included
10
REMOTE CONTROL
REMOTE CONTROL FUNCTION BUTTONS
The button symbols shown here are also used in the description of the operating steps.
|
|
|
|
|
Mute on/off |
|
Off mode |
|
|
|
(Stand-by) |
|
... |
|
|
|
|
|
|
|
|
!(Green) |
|
|
To enter channel |
|
|
|
numbers or menu |
|
Open video and audio |
|
parameters |
|
|
|
|
settings, select mono |
|
|
|
|
(left, right) and stereo |
|
|
|
|
|
|
|
|
|
|
||
|
Open main menu |
|
|
|
|
|
Open teletext |
|
(Red) |
||
|
|
|
|
|
|
"(Yellow) |
|
|
Open favourite list, open |
|
|
|
timer list in the EPG |
|
Open options menu |
|
|
|
|
|
% |
|
#(Blue) |
|
Volume |
|
Switch between |
|
|
|
radio and TV mode |
|
|
||
|
|
|
|
|
|
& |
|
|
(cursor buttons) |
|
|
|
Switch the channel and/or |
|
Channel selection |
|
navigate the menus |
|
|
|
|
|
|
|
|
|
|
|
|
||
|
|
Channel information |
|
|
(EXIT) |
|
on the current channel |
|
Close menus and |
|
|
|
sub-menus |
|
|
|
|
|
|
|
|
|
|
|
|
||
|
Confirm sub-menus |
||
|
Currently not used |
|
and menu options, |
|
|
open channel list |
|
|
|
|
|
|
|
|
|
|
|
||
|
Currently not used |
|
|
|
|
|
Open electronic |
|
|
program guide |
|
|
|
||
|
|
||
|
Currently not used |
|
|
|
|
|
|
|
|
Currently not used |
|
|
|
||
|
|
||
|
Open timer menu |
|
|
|
in the EPG |
|
Currently not used |
|
|
|
|
11
FIRST INSTALLATION
Before using your unit for the first time, read the “Safety Instructions” and “Connection and Setup” sections.
The “Connection Example” section provides a sample configuration.
Do not connect the receiver to the power supply until all installation work has been properly carried out.
The guidance given in the “First Installation” section assumes that the receiver has been properly connected as per the “Safety Instructions” and “Connection and Set-Up” sections.
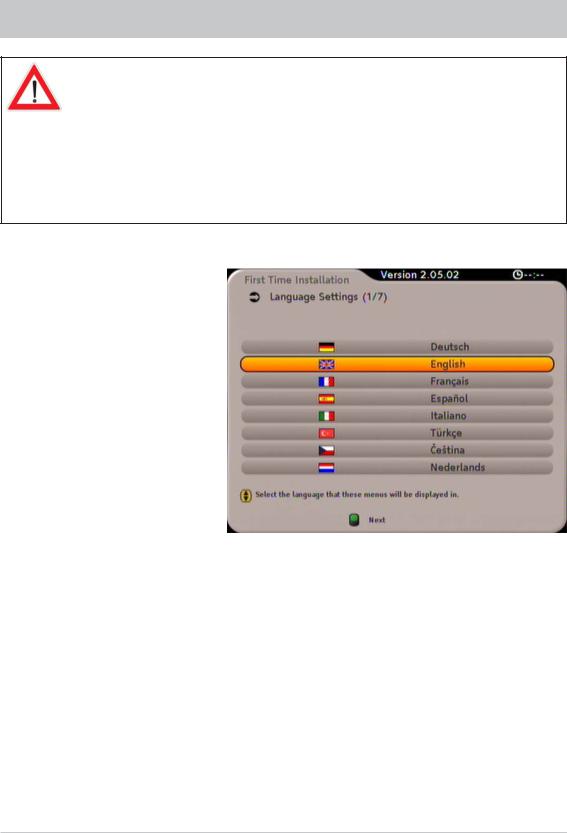
First switch your TV set on and select the AV channel slot. Connect your receiver to the power supply. The following display appears:
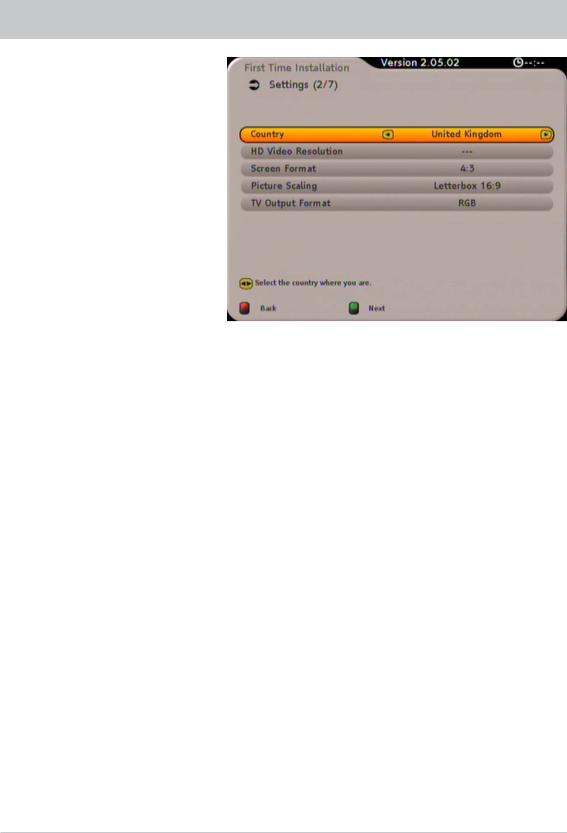
Use the buttons to select the desired menu language. Pressing the ! (green) button loads the desired menu language and opens the next menu:
12
FIRST INSTALLATION
Press the buttons to select the desired country. Press the buttons to switch to the “HD Video
Resolution” line. Set the video resolution of your TV set here using the buttons (only on connection of the receiver and the TV set using the HDMI interface). Refer to the user guide/operating instructions for your TV set.
Press the buttons to switch to the “Screen Format” line. Use the buttons to set the screen format for your TV set. Refer to the user guide/operating instructions for your TV set.
Press the buttons to switch to the “Picture Scaling” line. Use the buttons to perform the settings for the picture scaling. Refer to the user guide/operating instructions for your TV set.
Press the buttons to switch to the “TV Output Format” line. Select here the signal that your TV set can
process using the buttons (only on connection of the receiver and TV set using the Scart TV socket). Refer to the user guide/operating instructions for your TV set.
Press the !(green) button to open the next menu:
13
FIRST INSTALLATION
Note:
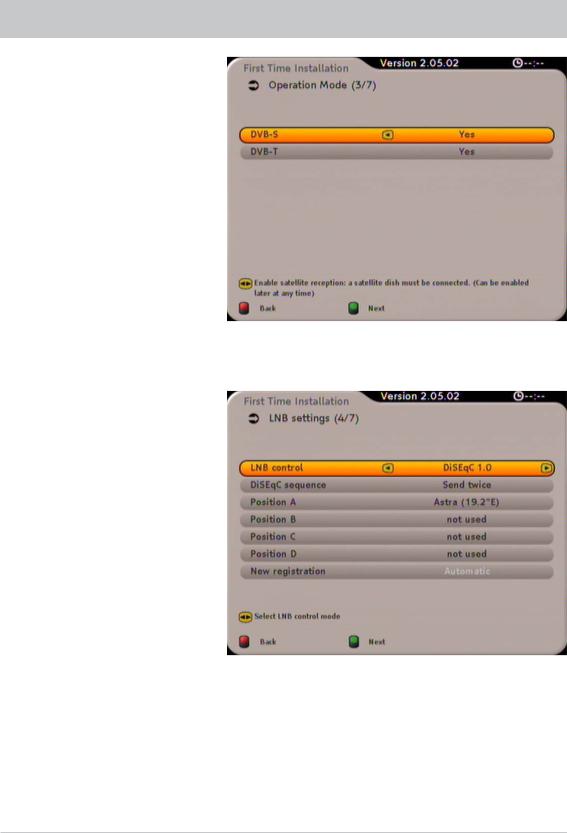
If the receiver is already connected to a satellite reception system and/or a DVB-T antenna, select “Yes” for the related operation mode or both operation modes to be able to start a search for the related operation mode at the end of the first installation.
You can change between the operation modes using the buttons. Make the “Yes” or “No” settings using the buttons. Press the !(green) button to open the next menu:
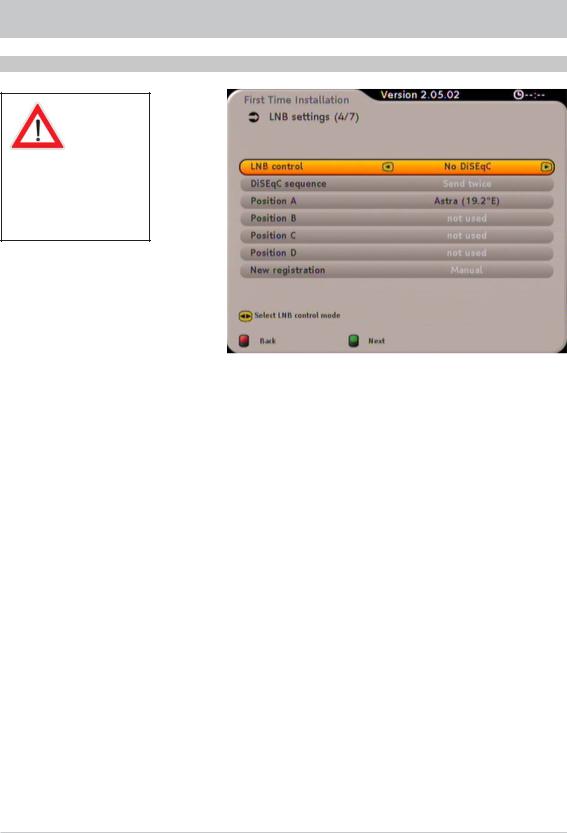
Select the required setting for your LNB control using the buttons (only on connection of the receiver to a satellite reception system). The following options are available:
-DiSEqC™1.0
-One cable (automatic or manual setting)
-No LNB power (if your LNB has a dedicated power supply)
-No DiSEqC™
-Toneburst
Continue the first installation with the related section.
14
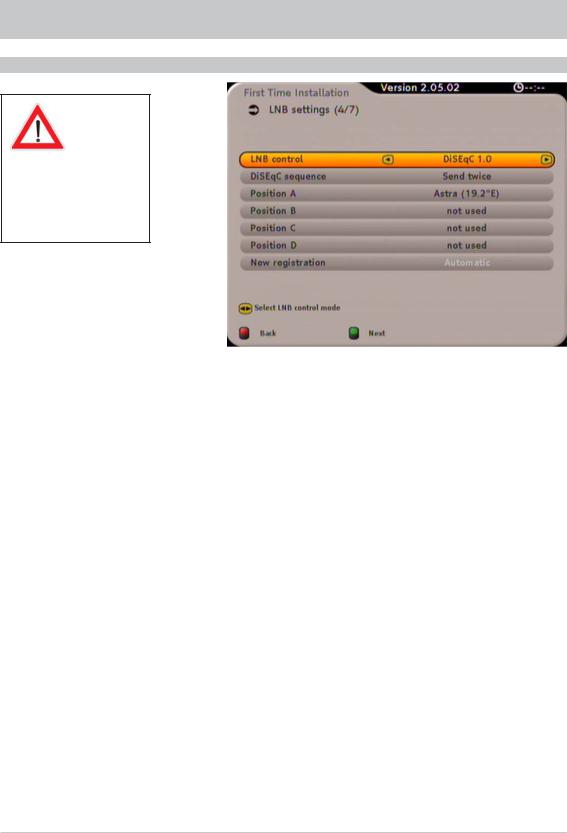
FIRST INSTALLATION (DISEQC™1.0)
DISEQC 1.0
If you do not know the settings or components used in your reception system, ask a specialist engineer!
Press the buttons to switch to “DiSEqC sequence”. Select how often the DiSEqCTM command is to be sent using the buttons.
Changes to the positions A - D:
Press the buttons to switch to “Position A”. Press the button to open the sub-menu. You
can select a satellite and make the related settings here. Press the ! (green) button. If you change the default setting (in this example “ASTRA 19.2°E”), a prompt “Save LNB settings?” will be displayed.
Select “Yes” or “No” using the buttons and confirm your selection using the button.
Repeat the process as necessary for the other positions (B, C, D),
Press the !(green) button to open the next menu:
Continue the first installation with the “Search” section.
15
FIRST INSTALLATION: Single-cable system (general)
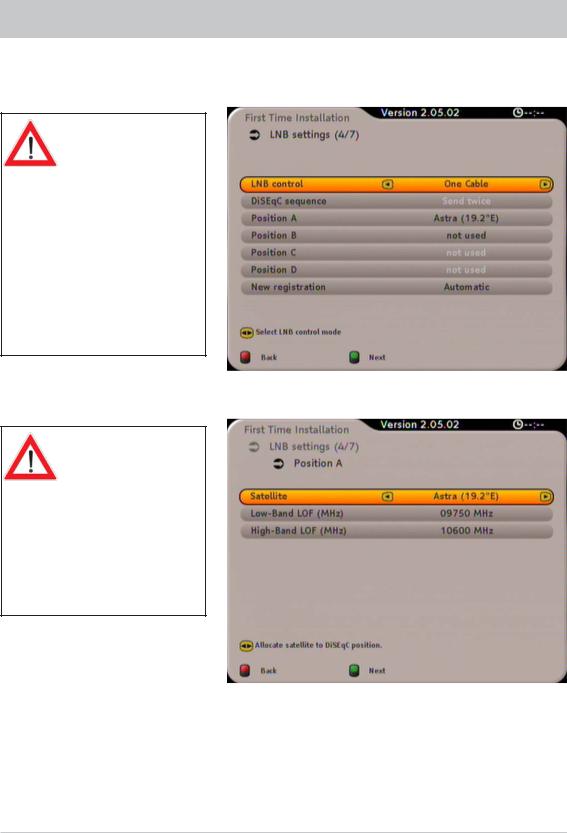
Use the buttons here to select “One Cable” as “LNB control”. Press the button to move to the next menu item:
The various options for a single-cable system with Kathrein components are summarised at
the end of this manual in the “Technical Appendix” section under “Examples of Single-Cable Systems”.
Dependingonthesystemtowhich they are connected, a maximum of four or eight receivers may be connected to a single-cable system (a twin receiver counts as two receivers)
Satellite selection
Press the button. The following display appears:
If the receiver is connected to an UAS 481 single-cable LNB, it is imperative the two frequencies
(low band/high band) are set to 10200 MHz here.
You can make the settings using either the number pad or the
buttons.
Use the buttons here to select the satellites you want to receive with your system. Press the
!(green) button to open the next menu:
Note: |
You can only receive the signals from two satellites in your single-cable system if |
|
a EXU 908 single cable matrix is used. In this case, repeat the “Satellite selection” |
|
process for the “Position B” line. |
16

FIRST INSTALLATION: Single-cable system (general)
Select the “New registration” line using the buttons. Using the buttons, select whether the
registration on the single-cable system is to be “Automatic” (receiver) or “Manual” (user). Press the !(green) button to open the next menu:
It is currently only possible to register on the EXU 908 single-cable matrix using the “Manual” mode.
For improved understanding, we have split the following explanation into two sections. Registration with the selection “Automatic” and registration with the selection “Manual”.
17
FIRST INSTALLATION: Single-cable system (Automatic)
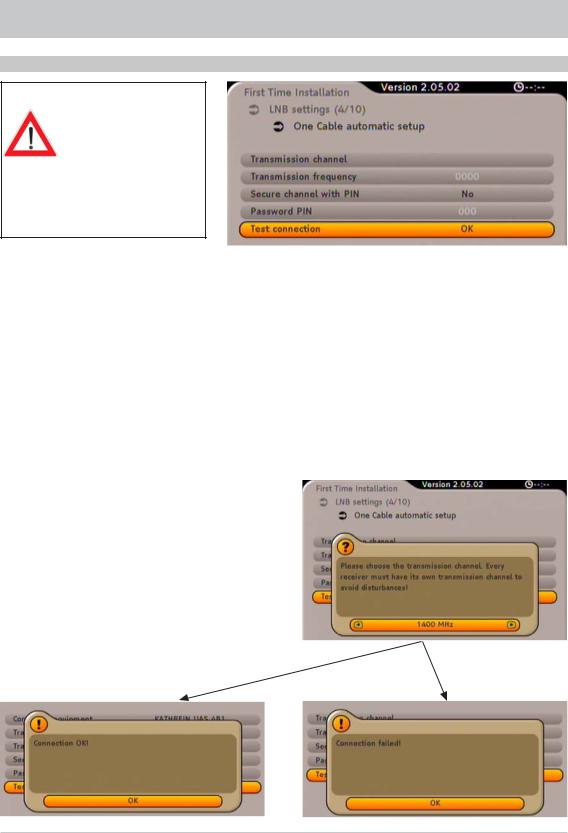
AUTOMATIC
You can only use the “Secure channel with PIN” function if this function is supported by the single-cable components used. In the case of Kathrein
single-cable components, this is currently only the case for the EXU 908.
Secure channel with PIN:
Press the button to switch to the “Secure channel with PIN” line. Here it is possible to protect the transmission frequency used by entering a PIN. No other receiver can then use that transmission frequency
unless the PIN is entered. Select the “Yes” setting using the buttons.
Password PIN (only for “Yes” setting in the “Secure channel with PIN” line):
Select the “Password PIN” line using the button. You can now use the number pad to enter |
|
a PIN (0-255). |
|
Testing connection: |
|
Use the button to switch to the “Test connection” line and press the |
button. The receiver now |
tests the settings you have made. The following message appears: |
|
Select a spare transmission frequency using the
buttons and then confirm your selection using the button. The following display appears:
18
FIRST INSTALLATION: Single-cable system (Manual)
Press the button to confirm.
Press (if necessary several times) the ! (green) button until you reach the “Channel list selection” point.
Continue the first installation with the “Search” section.
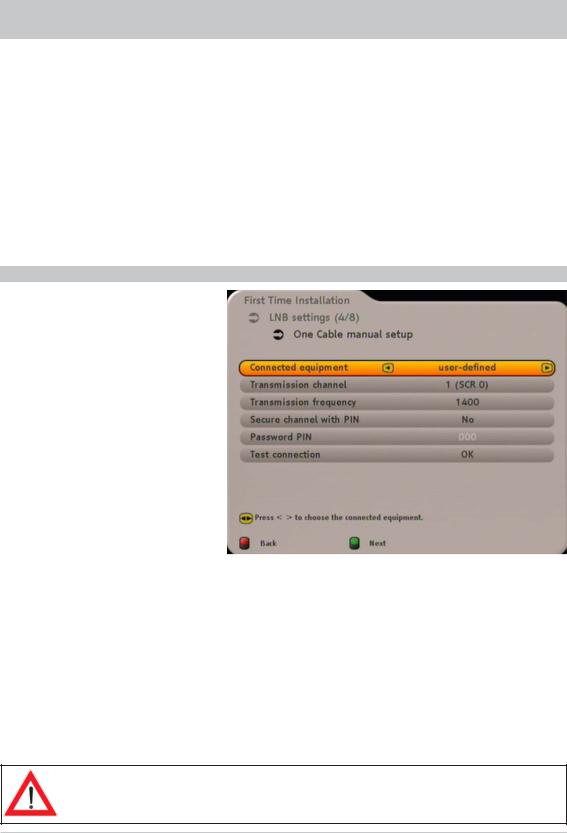
MANUAL
Press the button to confirm and check your settings. If necessary, seek assistance from a specialist engineer.
Use the button to switch to the “Test
connection” line again and press the button. As soon as the receiver outputs the “Connection OK” message, you can continue as described on the left.
Connected equipment:
Select the single-cable components used in your system using the buttons. Available options: Kathrein 2 subscribers (EXR 552), Kathrein 4 subscribers (EXR 501, EXR 551), Kathrein 8 subscribers (EXR 1581, EXR 2581, EXU 908) or User defined (UAS 481).
We have selected the UAS 481 single-cable LNB as an example for the remainder of this explanation. If there are differences to other components or to the setting “User defined”, we will note and explain these differences.
Transmission channel:
Press the button to switch to the “Transmission channel” line. Select the required transmission channel using the buttons.
If one or more receivers are already present on the system and an additional receiver is to be connected, you must assign a different frequency (transmission channel) to the new receiver (otherwise the receivers will interfere with each other).
19
FIRST INSTALLATION: Single-cable system (Manual)
Transmission frequency (only with the selection “User defined”):
Use the button to switch to the “Transmission frequency” line and enter the appropriate transmission frequency using the number pad. You can find the necessary information (transmission frequencies) in the documentation supplied with your system.
You can only use the “Secure channel with PIN” function if this function is supported by the single-cable components used. In the case of Kathrein single-cable components, this is currently only the case for the EXU 908.
Secure channel with PIN:
Press the button to switch to the “Secure channel with PIN” line. Here it is possible to protect the transmission frequency used by entering a PIN. No other receiver can then use that transmission
frequency unless the PIN is input. Select the setting “Yes” using the buttons.
Password PIN (only for “Yes” setting in the “Secure channel with PIN” line):
Select the “Password PIN” line using the |
button. You can now use the number pad to enter |
a PIN (0-255). |
|
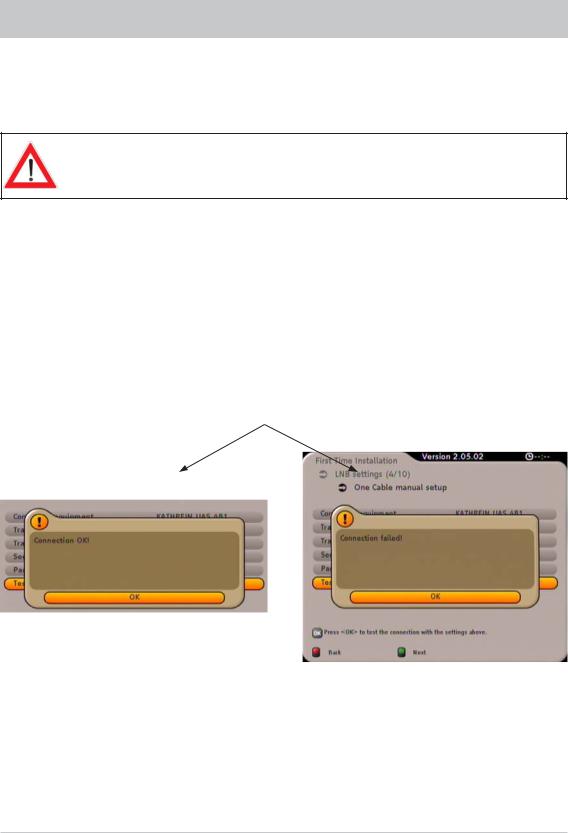
Testing connection:
Use the button to switch to the “Test connection” line and press the button. The receiver now tests the settings you have made. The following message appears:
Press the button to confirm.
Press (if necessary several times) the ! (green) button until you reach the “Channel list selection” point.
Continue the first installation with the “Search” section.
Press the button to confirm and check your settings. If necessary, seek assistance from a specialist engineer.
Use the button to switch to the “Test
connection” line again and press the button. As soon as the receiver outputs the “Connection OK” message, you can continue as described on the left.
20
FIRST INSTALLATION (NO LNB POWER)
NO LNB POWER
If you do not know the settings or components used in your reception system, ask a specialist engineer!
Press the buttons to switch to the “Position A”. Press the button to open the sub-menu. You
can select a satellite and make the related settings here. Press the ! (green) button. If you change the default setting (in this example “ASTRA 19.2°E”), a prompt “Save LNB settings?” will be displayed.
Select “Yes” or “No” using the buttons and accept your selection using the button.
Press the !(green) button to open the next menu:
Continue the first installation with the “Search” section.
21
FIRST INSTALLATION (NO DISEQC)
NO DISEQC
If you do not know the settings or components used in your reception system, ask a specialist engineer!
Press the buttons to switch to the “Position A”. Press the button to open the sub-menu. You
can select a satellite and make the related settings here. Press the ! (green) button. If you change the default setting (in this example “ASTRA 19.2°E”), a prompt “Save LNB settings?” will be displayed.
Select “Yes” or “No” using the buttons and accept your selection using the button.
Press the !(green) button to open the next menu:
Continue the first installation with the “Search” section.
22

FIRST INSTALLATION (TONEBURST)
TONEBURST
If you do not know the settings or components used in your reception system, ask a specialist engineer!
Press the buttons to switch to the “Position A”. Press the button to open the sub-menu. You
can select a satellite and make the related settings here. Press the ! (green) button. If you change the default setting (in this example “ASTRA 19.2°E”), a prompt “Save LNB settings?” will be displayed.
Select “Yes” or “No” using the buttons and accept your selection using the button. Repeat the process as necessary for the second position (B).
Press the !(green) button to open the next menu:
Continue the first installation with the “Search” section.
23
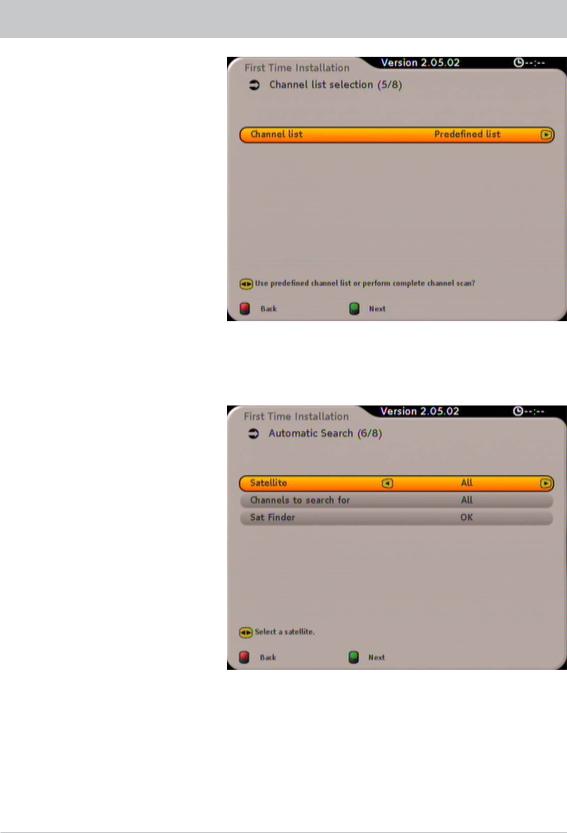
FIRST INSTALLATION (SEARCH)
Using the buttons, select whether you want to use the pre-defined satellite channel list or start a
search. Confirm your selection using the ! (green) button. On the selection of “Predefined List”, please continue with the “First Time Installation (DVB-T antenna)” section. If you select “Search Channels”, the following display appears:
Use the buttons to select whether you want the search to cover all satellites or only one specific satellite. Using the buttons switch to the “Channels to search for” line. Here, using
the buttons, you can select whether you want to search only for free-to-air channels, only for encrypted channels, or for all channels. The receiver also provides you with a feature for checking the
reception system settings in the “Sat Finder” line. Open using the button. The following display appears:
24
Loading...