


 Loading...
Operating manual
DVB Caravan Receiver
UFD 540
Order no.: 260 515
2

Preface
Dear Customer,
The following operating manual will help you obtain the best optimal use from the extensive features of your new satellite receiver.
We have written this operating manual as comprehensibly as possible and as concise as necessary. A brief lexicon containing specialised terms not easily translatable has been appended at the end of this manual. To further assist you in your search for a specific term, we have also added an index.
We have taken the environment into account with the mains switch. Therefore, during longer pauses separate your receiver from the mains, in order to save energy. During short pauses, you should switch the receiver to standby with the remote control, so the least amount of energy is consumed.
We wish you a great reception and much enjoyment with your new satellite receiver.
Your,
KATHREIN-Team
If you have any unexpected problems with your receiver, please contact your specialist supplier.
With regard to the programme allocation of the satellites and transponders, changes always occur. In such cases, it is necessary to carry out new programme settings, although factory pre-programming is always in accordance with the respective, newest developments. You can gather the details for the new setting from teletext on SAT 1, the internet, or respective magazines.
Your receiver has been equipped with the newest respective software at the factory. We are always trying to adjust the software to the desires of our customers and the state-of-the-art technology. Refer to section "Software and channel lists update" for more information.
UFO®micro and UFO®mini are registered trademarks of the KATHREIN Werke KG.
DiSEqC™ is a trademark of Eutelsat.
3

Contents
Preface............................................................................................................................................................... |
|
3 |
Contents ............................................................................................................................................................ |
|
4 |
Safety Instructions ........................................................................................................................................... |
|
7 |
Control Elements, Displays and Connections............................................................................................... |
8 |
|
View of front panel............................................................................................................................................. |
|
8 |
View of rear panel............................................................................................................................................. |
|
8 |
Front panel control elements and |
displays................................................................................................. |
8 |
Rear panel control elements and |
displays .............................................................................................. |
8 |
Remote control handset buttons........................................................................................................................ |
|
9 |
Command of Remote Control........................................................................................................................ |
|
10 |
Operating Instructions ................................................................................................................................... |
|
11 |
Menu concept .................................................................................................................................................. |
|
11 |
Button functions ............................................................................................................................................... |
|
11 |
Alphanumeric entries....................................................................................................................................... |
|
12 |
Alphanumeric assignments of number buttons on the remote control ............................................................ |
13 |
|
Language selectionOSD ............................................................................................................................... |
|
13 |
Connection and Start-up................................................................................................................................ |
|
14 |
Connecting receiver......................................................................................................................................... |
|
14 |
Sat-IF connection ..................................................................................................................................... |
|
14 |
Preconditions for receiving signals........................................................................................................... |
14 |
|
Presetting of receiving system ................................................................................................................. |
|
14 |
LNB supply voltage................................................................................................................................... |
|
15 |
TV and video recorder connection ........................................................................................................... |
15 |
|
Audio connection...................................................................................................................................... |
|
15 |
Dolby connection...................................................................................................................................... |
|
15 |
Inserting batteries in the remote control................................................................................................... |
15 |
|
First Time Installation..................................................................................................................................... |
|
16 |
The first steps .................................................................................................................................................. |
|
16 |
Factory setting of receiver ............................................................................................................................... |
|
16 |
On Screen Displays / OSD ............................................................................................................................. |
|
17 |
Important screen displays................................................................................................................................ |
|
17 |
Help function............................................................................................................................................. |
|
17 |
TV channel identifier................................................................................................................................. |
|
18 |
Radio channel identifier........................................................................................................................... |
|
18 |
Error message .......................................................................................................................................... |
|
18 |
Channel List – Radio/TV.................................................................................................................................. |
|
19 |
Videotext.......................................................................................................................................................... |
|
20 |
Programme Selection..................................................................................................................................... |
|
21 |
Selecting a TV programme.............................................................................................................................. |
|
21 |
Reception status....................................................................................................................................... |
|
21 |
Selecting a TV programme by number entry ........................................................................................... |
23 |
|
Switch-over to a radio programme .................................................................................................................. |
|
23 |
Reception status - radio ........................................................................................................................... |
|
23 |
Selecting a radio programme by number entry ........................................................................................ |
24 |
|
Common Interface .......................................................................................................................................... |
|
25 |
Timer Settings................................................................................................................................................. |
|
28 |
VPS signal ....................................................................................................................................................... |
|
29 |
Sound Settings ............................................................................................................................................... |
|
30 |
Volume setting ................................................................................................................................................. |
|
30 |
Stereo and two-channel sound reproduction................................................................................................... |
30 |
|
4

Contents
AC3.................................................................................................................................................................. |
31 |
Switching off sound .................................................................................................................................. |
31 |
Channel list ..................................................................................................................................................... |
32 |
Selecting programmes last received ............................................................................................................... |
32 |
Favourite programmes..................................................................................................................................... |
32 |
Search programmes alphabetically ................................................................................................................. |
37 |
Sorting programmes ........................................................................................................................................ |
38 |
Deleting programmes ...................................................................................................................................... |
39 |
Manually adding programmes ......................................................................................................................... |
40 |
Adding and Removing Satellites................................................................................................................... |
42 |
Setting up satellites.......................................................................................................................................... |
42 |
Entering satellite names .................................................................................................................................. |
43 |
Removing satellites.......................................................................................................................................... |
43 |
Programme Overview..................................................................................................................................... |
44 |
EPG ................................................................................................................................................................. |
44 |
EPG timer programming........................................................................................................................... |
45 |
Password......................................................................................................................................................... |
47 |
Factory setting .......................................................................................................................................... |
47 |
Entering a password................................................................................................................................. |
47 |
Parental lock............................................................................................................................................. |
49 |
Operation from Front Panel........................................................................................................................... |
51 |
Backup operation............................................................................................................................................. |
51 |
Setting System Parameters ........................................................................................................................... |
52 |
System parameters.......................................................................................................................................... |
53 |
Parental lock............................................................................................................................................. |
53 |
System information................................................................................................................................... |
53 |
Local time/Timer....................................................................................................................................... |
54 |
TV type ..................................................................................................................................................... |
54 |
Picture format ........................................................................................................................................... |
54 |
Screen ...................................................................................................................................................... |
54 |
A/V mode.................................................................................................................................................. |
54 |
Installation menu.............................................................................................................................................. |
55 |
LNB configuration..................................................................................................................................... |
55 |
Oscillator frequency L.O. ...................................................................................................................... |
55 |
Changing the oscillator frequency ........................................................................................................ |
56 |
Operation .............................................................................................................................................. |
56 |
Standby................................................................................................................................................. |
56 |
Reception of two satellites .................................................................................................................... |
56 |
DiSEqC setting...................................................................................................................................... |
57 |
Antenna settings .............................................................................................................................................. |
58 |
Antenna rotor / Positioner (DiSEqC 1.2) .................................................................................................. |
58 |
Satellite search ................................................................................................................................................ |
59 |
TP set-up/search ...................................................................................................................................... |
60 |
Transponder selection .......................................................................................................................... |
61 |
DiSEqC [UFO] Set-up .............................................................................................................................. |
63 |
22-kH signal.......................................................................................................................................... |
63 |
Tone burst and DiSEqC signal ............................................................................................................. |
63 |
Tone burst............................................................................................................................................. |
64 |
DiSEqC ................................................................................................................................................. |
64 |
DiSEqC Repeat..................................................................................................................................... |
64 |
UFO mini............................................................................................................................................... |
64 |
Remote frequency ................................................................................................................................ |
64 |
UFO micro............................................................................................................................................. |
64 |
Factory setting .......................................................................................................................................... |
65 |
Automatic Antenna Alignment with HDP 170 .............................................................................................. |
66 |
Software and Channel list Update ................................................................................................................ |
67 |
5

Contents
Data Transfer from Receiver to Receiver |
.....................................................................................................70 |
Preparation ...................................................................................................................................................... |
70 |
Transferring channel lists ......................................................................................................................... |
70 |
Transferring operating software ............................................................................................................... |
70 |
Technical Annex ............................................................................................................................................. |
71 |
Technical features ........................................................................................................................................... |
71 |
Technical data ................................................................................................................................................. |
72 |
Accessories ..................................................................................................................................................... |
73 |
Scart socket assignments................................................................................................................................ |
73 |
Switch-over VHS/S-VHS .......................................................................................................................... |
73 |
Connection example....................................................................................................................................... |
74 |
Short Technical Lexicon ............................................................................................................................... |
75 |
Glossary........................................................................................................................................................... |
77 |
6

Safety Instructions
7
Control Elements, Displays and Connections
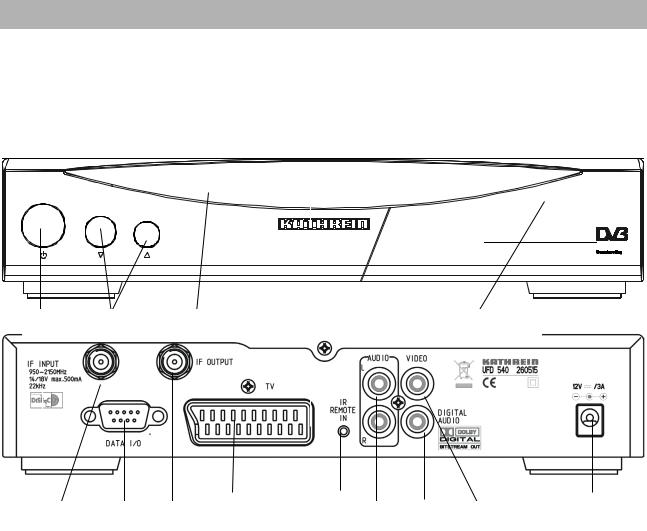
This section contains a brief description of all the control elements, displays and connections. The key symbols presented here are also used when describing operating sequences.
View of front panel
1 |
2 |
3 |
4 |
View of rear panel
1 |
2 |
3 |
4 |
5 |
6 |
7 |
8 |
9 |
Front panel control elements and displays
1On/Off switch
2Channel buttons (up/down)
3LED
4Common Interface for Pay-TV cards*) – behind front flap, open by lightly applying pressure on the upper right-hand corner
_________________________________________
*) CA module and Pay-TV cards are not included in delivery
Rear panel control elements and displays
1Satellite IF signal input
Output of the LNB supply voltage and control signals (22-kHz and DiSEqC 1.1)
2DATA socket interface for serial data transmission (Service)
3Satellite IF signal output looped-through Sat IF signal
4Scart socket TV connection
5Connection for separate IR receiver
6Audio outputs, 2 Cinch sockets, left and right channel
7Dolby Digital-output (AC3)
8Video output (FBAS)
9DC voltage input 12 V
8
Control Elements, Displays and Connections
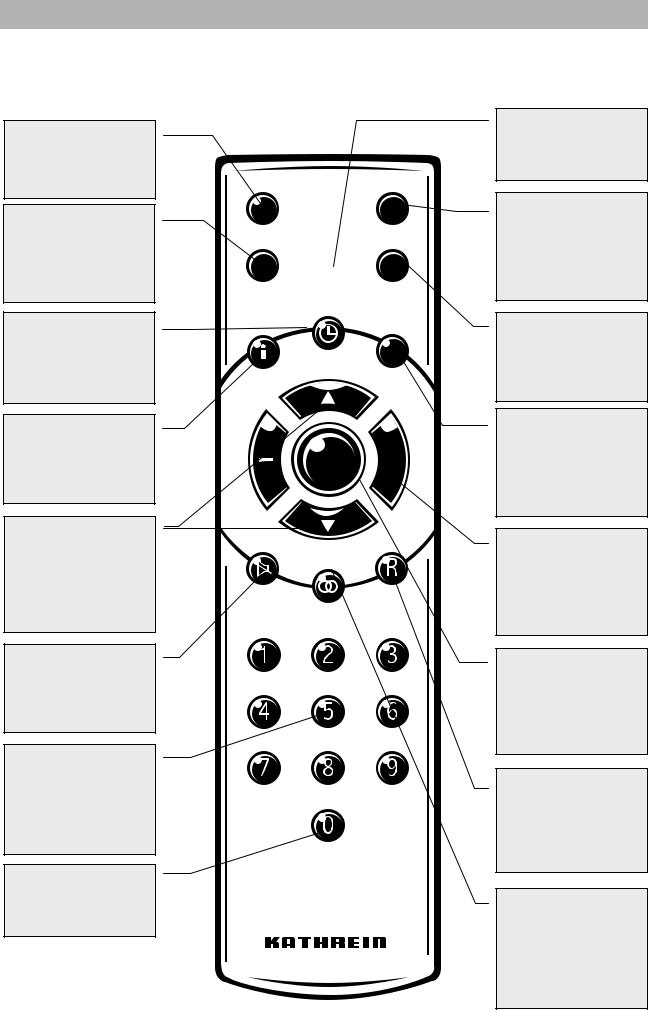
Remote control handset buttons
Switch over of the remote control
Calls up the last 4 programmes / favourite categories
Programme info
EPG programme guide
Locks channels
Channel lists Programme info Help
Programme selection / Selection of submenus and menu entries
Mute (On/Off)
...
Numerical input for programmes, parental lock, LO frequency etc.
Calls up teletext
A/B  M
M
 F
F 
 L
L
TV
OK 
Power On -
Standby
Calls up main menu/ Adds a new channel
Last programme and exit
Locks a channel
Setting Scart connection Radio Off Deletes a channel
Volume / Menu entries
Confirmation of the submenus and main entries
Radio On/Off Selects mode of channel lists
Sound selection menu /
Language selection
Moves channel to another position
9

Command of Remote Control
|
The remote control features 2 command sets, making it possible to |
|
operate 2 receivers independently of each other in one room (not in |
|
conjunction with a twin receiver). |
Note |
For this purpose, program one receiver on the command set 1 and the |
|
second receiver on the command set 2. |
|
Switch on receiver 1 and receiver 2 off with the mains switch |
|
Press and hold the button. |
|
Enter in "901" with the number buttons. |
|
To adopt the code, press the button to switch receiver 1 to |
|
standby and then switch off the device with the mains switch. |
|
Put receiver 2 into operation again. |
|
Press and hold the button. |
|
Enter in "902" with the number buttons. |
|
To adopt the code, press the button to switch receiver 2 to |
|
standby and then back into operation. Now switch on receiver 1 again. |
|
Press and hold the button. |
|
Enter in "903" with the number buttons. |
|
When carrying out the first two settings, the remote control must be di- |
|
rected at the respective receiver (when switched on). |
|
By pressing the button, you can now switch between the two |
|
command sets A and B (toggle function) and alternately operate both |
|
receivers. |
|
Command set 1 is always active as the on-delivery setting. |
|
If you are operating only one receiver and the active command set is |
|
switched over by mistake so that this receiver can no longer be oper- |
|
ated, the remote control can be easily switched back to command set |
|
1. The procedure is already described above. |
10
Operating Instructions
Menu concept
Note:
Observe the bar on the lower edge of the screen with functions for the respective menu item.
Button functions
The menu concept is set up in a logical operating sequence.
The current selected programme always appears in the upper righthand corner of the screen.
The called up menus, submenus and menu items as well as the parameters to be set are respectively highlighted with a coloured bar. The menus are mainly self-explanatory
Press button to select the main menu and press the buttons to select the submenus.
Press to access the submenus. The items in the submenus are
selected by pressing the buttons.
The settings allocated to specific menu items are executed either by pressing the buttons or the number buttons.
Press the or to exit the main menu, submenus and menu items.
is a changeover button (main channel list or help function) with menu function. Press to exit the setting.
is a changeover button. Identifier self-deleting. In function channel list: Deletes a channel.
is a switch-on button with menu functions.
Press to exit the setting. In function channel list: Moves the channel to another position
11

Operating Instructions
is a switch-on button with menu functions.
Press to exit setting. In function channel list: Locks the programme
is a switch-on button with menu functions. Press the button again to exit. In function channel list: Makes a channel a favourite channel.
is a function selection button for radio and TV. In the recording mode preparation of a recording. In the function channel list: Selection of mode of channel list.
is a function selection button. Press button once again to change function.
Alphanumeric entries
Use the number buttons to enter the programme and satellite names. These buttons produce numbers and letters in the name fields of the corresponding menus. Position the bar cursor on the name field. The first position automatically assumes a dark background. You can now also enter letters with the number buttons by pressing the corresponding button several times. For example, A, B and C — are additionally allocated to the "2" button (see table on next page).
12

Operating Instructions
Alphanumeric assignments of number buttons on the remote control
Button |
1 x |
2 x |
3 x |
4 x |
5x |
|
|
|
|
|
|
|
|
1 |
|
. |
|
, |
|
? |
|
1 |
|
|
|
|
|
|
|
|
|||||
|
|
|
|
|
|
|
|
|
|
|
|
|
2 |
|
A |
|
B |
|
C |
|
2 |
|
|
|
|
|
|
|
|
|
|||||
|
|
|
|
|
|
|
|
|
|
|
|
|
3 |
|
D |
|
E |
|
F |
|
3 |
|
|
|
|
|
|
|
|
|
|||||
|
|
|
|
|
|
|
|
|
|
|
|
|
4 |
|
G |
|
H |
|
I |
|
4 |
|
|
|
|
|
|
|
|
|
|||||
|
|
|
|
|
|
|
|
|
|
|
|
|
5 |
|
J |
|
K |
|
L |
|
5 |
|
|
|
|
|
|
|
|
|
|||||
|
|
|
|
|
|
|
|
|
|
|
|
|
6 |
|
M |
|
N |
|
O |
|
6 |
|
|
|
|
|
|
|
|
|
|||||
|
|
|
|
|
|
|
|
|
|
|
|
|
7 |
|
P |
|
R |
|
S |
|
7 |
|
|
|
|
|
|
|
|
|
|||||
|
|
|
|
|
|
|
|
|
|
|
|
|
8 |
|
T |
|
U |
|
V |
|
8 |
|
|
|
|
|
|
|
|
|
|||||
|
|
|
|
|
|
|
|
|
|
|
|
|
9 |
|
W |
|
X |
|
Y |
|
Z |
|
|
|
|
|
|
|
|
|
|||||
|
|
|
|
|
|
|
|
|
|
|
|
|
0 |
|
SPACE |
|
0 |
|
SPACE |
|
0 |
|
|
|
|
|
|
|
|
|
|||||
|
|
|
|
|
|
|
|
|
|
|
|
Language selectionOSD
To select the language for the on-screen menus press:
menu language English
The available languages are German, English, French, Italian, Spanish, Portuguese, Dutch, and Turkish.
13
Connection and Start-up
The following section is specifically intended for the specialist dealer. You only need to read this section, if you are carrying out the installation yourself.
You will find sample configurations in the section "Connection example".
First, carry out all installation work before connecting the receiver to the mains power supply.
Refer to the information provided in the section "Safety instructions“.
Connecting receiver
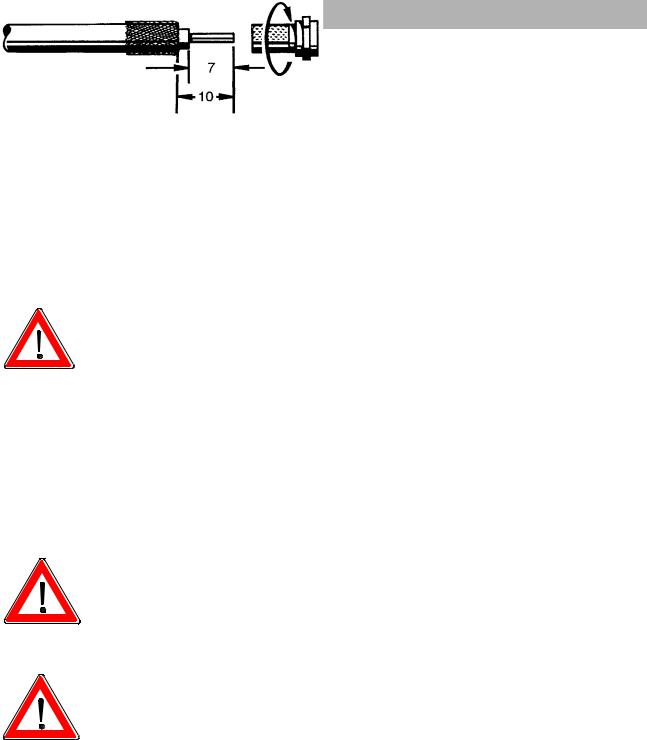
Sat-IF connection
Connect the Sat-IF input of the receiver to the satellite receiving system (satellite dish).
Use a coaxial cable with a standard F connector for this purpose.
If you need to fit the F-connector onto the cable, strip the cable insulation as shown in the diagram and slide the F-connector onto the cable, then carefully turn it clockwise until it locks.
When fitting the connector, make sure that no wires of the shield braid make contact with the inner conductor. This could otherwise cause a short-circuit.
The quality of the reception signal depends on a good connection!
Preconditions for receiving signals
Make sure that your satellite antenna system is equipped with at least one universal LNB to facilitate digital reception in the high band range.
Presetting of receiving system
The control signals for conventional receiving systems (satellite dishes) are preset, i.e. 14/18 V for polarisation changeover and 22 kHz switching signal for LOW/HIGH band changeover on multifeed reception systems.
The presetting will need to be changed in the installation menu, menu item "DiSEqC," if UFOmicro or tone burst switching matrices are used in the receiving system.
Refer to the section "Installation menu, DiSEqC menu“ for this purpose.
It is important, that you observe the operating manual for the used matrix.
14

Connection and Start-up
LNB supply voltage
If the feed system (LNB) is powered by an external supply voltage and the LNB supply voltage is not used for switching polarity, the LNB supply of the receiver must be set to "OFF" (see section "Installation menu, LNB configuration").
TV and video recorder connection
Use a SCART cable to connect the satellite receiver (TV SCART socket) and TV set.
If your TV set is equipped for stereo output, you can receive the sound in stereo via the SCART connection.
Audio connection
If you wish to reproduce the sound via a hi-fi system, connect a corresponding Cinch cable from the audio Cinch sockets on the receiver to the input sockets on your hi-fi system.
Dolby connection
The Dolby digital data stream output (AC3) is for the connection to a Dolby digital system.
Inserting batteries in the remote control
Remove the cover on the battery compartment on the underside of the remote control.
Insert the two supplied batteries in the remote control. Ensure correct polarity of the batteries, the + and – markings are indicated inside the battery compartment.
Slide the cover back into the casing and lock it into position.
Used batteries are special waste!
Therefore, do not throw batteries into the household waste, but rather deposit them at a collection depot for old batteries!
Electronic equipment is not household waste - in accordance with directive 2002/96/EC OF THE EUROPEAN PARLIAMENT AND THE COUNCIL of 27th January 2003 on used electrical and electronic equipment, it must be disposed of properly.
At the end of its service life, take this unit for disposal at a relevant official collection point.
15

First Time Installation
The first steps
Connect the receiver to the mains power supply.
Switch on the receiver by pressing the power button on the front of the unit.
The display, "- - - -,“ appears in the LED display.
When the LED for the operating display is red, the television is in standby.
Switch on the receiver by pressing the button on the remote control.
The orange LED on the front panel of the receiver flashes each time a button on the remote control is pressed.
You will see the factory set programme on your TV screen. An information bar indicating the programme provider, the time, the timer settings, the programme status and the programme title will be displayed in the bottom section of the screen, provided the corresponding data is transmitted. The number of the programme memory appears in the LED display.
The red standby indicator goes out.
You can now receive the factory set TV and radio programmes and call them up by pressing the buttons. Press the
and buttons to select radio programmes. Press the
or button once more to return to TV programmes.
Refer to the section " Channel list –Radio/TV" for information on how to set up and save other TV and radio programmes.
When the receiver is switched on, t he reception status, which was last set, always reappears.
Please check the time of day for summer or winter.
If the message "bad or no signal" appears on the screen in addition to an on-screen display indicating the programme last received, you will need to check the system installation and/or the receiver settings. If this problem only applies to individual programme slots, the problem may be due to an interruption in the transmission signal or a fault in the receiving system (cable or satellite system).
In this case, first check the connection configuration and then check whether the basic settings of you receiver are correct for your system. If necessary, have a specialist do this for you.
Factory setting of receiver
Your receiver is pre-programmed to receive the ASTRA and HotBird satellites as well as Eutelsat 10E and 16E, TurkSat 42E, Telecom 5W and 8W. You will normally not need to make further settings. If you are
not connected to a communal or party system, you need a multifeed arrangement with at least two LNBs in front of the satellite dish, in order to receive several satellite systems. Please ask your dealer.
Before you change the basic settings of your receiver, note down the settings in the form provided at the end of this operating manual. You will then be able to restore the original settings at any time.
16
On Screen Displays / OSD
Important screen displays
The receiver functions are controlled by a microprocessor and an extensive software. The following explanations are intended to improve your understanding of all procedures and to minimise the risk of mistakes.
Help function
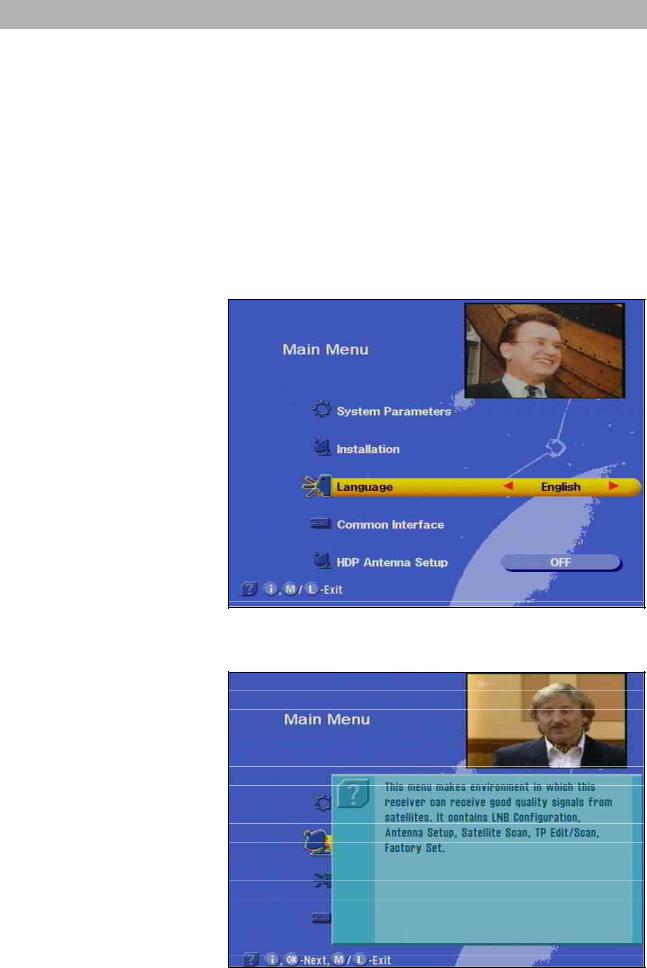
You can call up the help function for each menu and menu function. This help function gives you a short illustration of all the important functions of the selected menu item. For example, access the main
menu by pressing .
The help display for the menu item 'System parameters' appears when you press the button.
You will find a detailed description of the called up menu item in the respective capital of the operating manual.
17

On Screen Displays / OSD
With the or button, exit the help function and return to the
main menu. Press the button again and return to the originally received programme.
TV channel identifier
The channel identifier is displayed for several seconds every time the
channel is changed or by pressing the button. The  indicates that a channel is received even if no picture can be seen (e.g. radio). The film symbol indicates a TV channel and appears along with the time, and whether teletext is received. The + in the third line stands for the programme selection from the main channel list. If the favourite list is selected, the "apple" symbol appears. This is followed by the programme title, as well as start time and end time of the running programme, provided this data is transmitted.
Radio channel identifier
The identifier for the set radio channel has the same configuration. A radio appears in the upper left-hand corner indicating a radio channel. Programme times and text are displayed only if the corresponding data is transmitted with the signal.
Error message
"Bad or no signal" indicates that there is a fault in the receiving system or in the receiver settings. If the transponder is not transmitting any signals, the channel identifier shows a Sat antenna instead of  .
. 
Check the Sat IF connection and the LNB configuration. As an aid, refer to the list of service settings provided at the end of the operating manual.
18
On Screen Displays / OSD
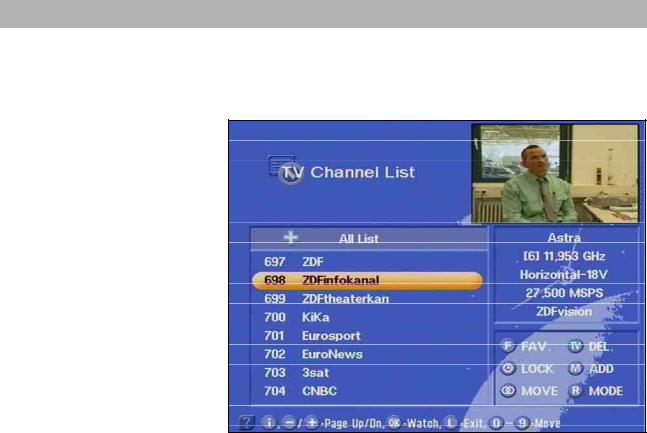
Channel List – Radio/TV
Press the button to access the channel list.
A + for the main channel list is indicated at the top left. Information about the channel, programme provider, and whether the programme is normally encrypted is found underneath. The upper-right column contains information about the received satellite, the transponder, and its frequency as well as the polarisation. The desired programme can be chosen by using the bar cursor or by numerical entry and con-
firmed by pressing .
The menu with programme/channel settings is found in the lower righthand corner. The programme/ channel settings, which were made in the factory, can be changed here. By pressing
(FAV.),you add the displayed channel to your favourite channels.
(LOCK) button, you lock the displayed channel.
(DEL.),delete the displayed channel.
-(ADD), add a new channel.
(MODE), you select the programme mode and channel list.
(Move), you move the channel to another position. Refer to chapter ‘Programme selection’ for more information
19
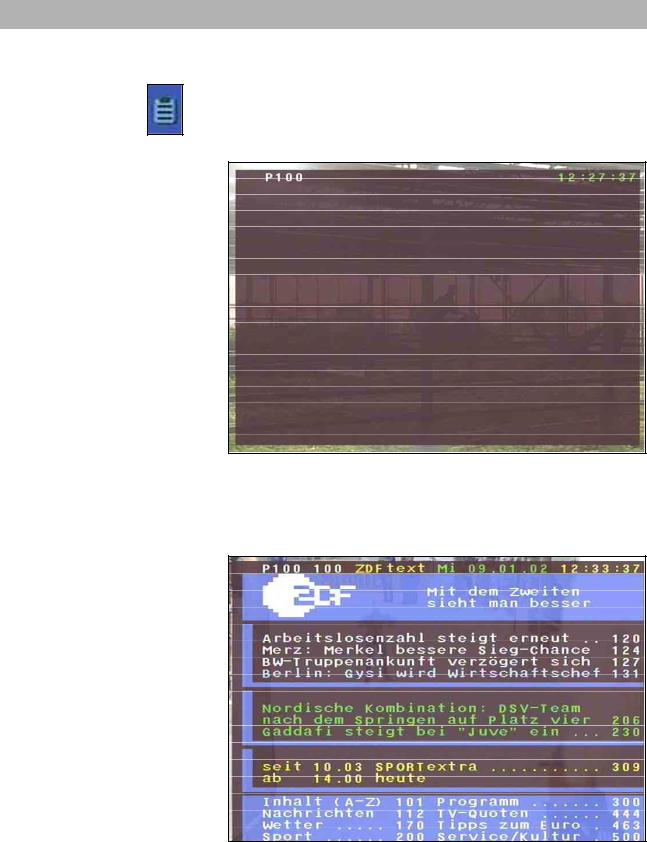
Videotext
This symbol in the programme display indicates, whether teletext is transmitted with the called up programme
By pressing the 0 button, the receiver prepares the teletext –also for scrambled signalsfor the television set.
The following display appears for a short time.
During the search, the programme page (here P100), which is being searched for, is displayed in the upper left-hand corner and the running time is displayed in the upper right-hand corner.
After search has ended, the teletext of the respective programme provider appears.
The single pages can only be called up with numerical buttons. During the search, a white star flashes in the upper right-hand corner of the screen.
With the 0 button or x, exit the teletext.
20
Programme Selection
This section describes how you select TV programmes with your receiver and how you can set the desired volume.
In this description of the functions, it is assumed that the receiver has been connected correctly.
If you wish to connect the receiver yourself, please read the section "Connection and start-up" beforehand.
Selecting a TV programme
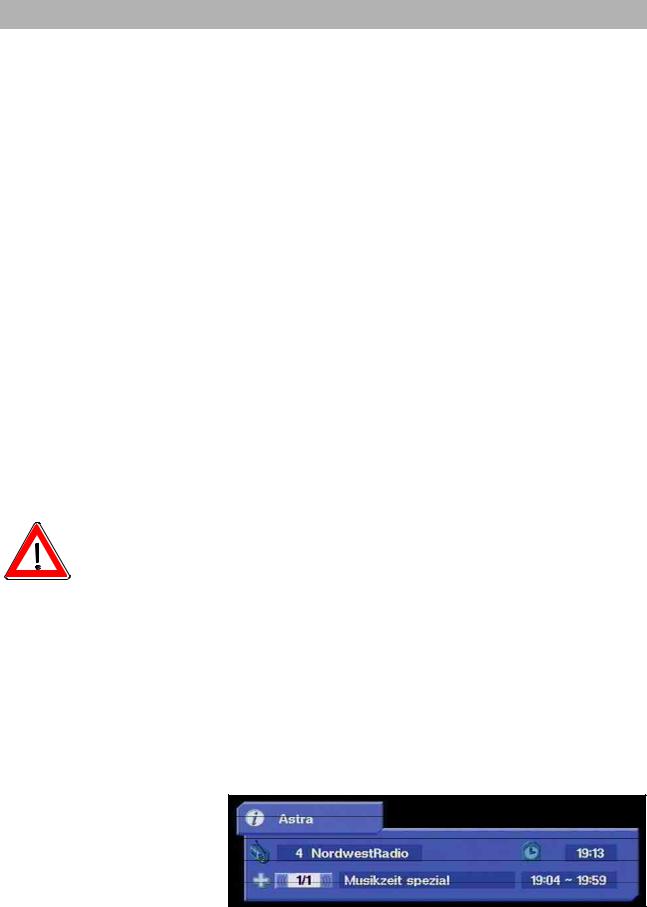
Reception status
The following information describes how to select other channels and shows what the on-screen displays look like. After switching on the
receiver, simply press the buttons in order to select other TV programmes in their ascending or descending order in the channel memory.
Every time you press the button, an on-screen display shows you the selected programme together with the time, the programme start and end times as well as the programme title in the information box, provided this data is transmitted together with the signal.
Press the button and this information box is permanently displayed. Press the button once more and the display disappears.
You will receive the "channel scrambled" message for scrambled channels.
You can receive these programmes with the UFD 540 only with CA module and card.
21
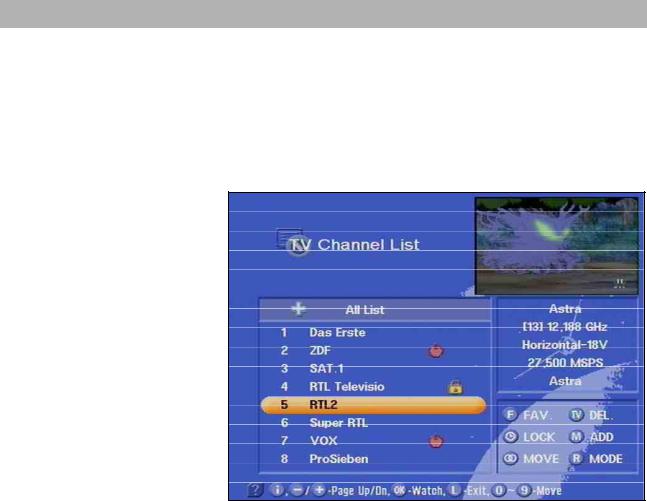
Programme Selection
A further option for selecting a different programme is to press the
button. The TV channel list is now displayed. The upper righthand column provides information relating to the received satellites, the transponder and its transmission frequency, polarisation, the symbol rate and the scrambling. The left column contains the programme position, the programme name, the type of receiving signals (free-to- air/scrambled) as well as the favourite and locked channels.
With the buttons, you jump to the next programme, and with the buttons, you jump to the neighbouring page. Confirm your selection by pressing the button.
You can also select a desired programme by using the numerical buttons.
Press the button to exit the channel list and remain in the already set programme.
22
Programme Selection
Selecting a TV programme by number entry
|
You can select a different TV programme during a running TV pro- |
|
gramme by entering the programme location number. Use the num- |
|
ber buttons to to enter in the programme positions. |
Example |
You wish to select the TV programme "DSF". This programme is |
|
stored under the programme position number 15. (The order of TV |
|
programmes is defined in the programme memory, and therefore this |
|
only serves as an example.) |
|
To select this programme, press the numbers and one |
|
after the other. The receiver waits for about 3 seconds for entry of the |
|
next number. |
|
Follow the same procedure for all other programmes – i.e. also pro- |
|
grammes with three-digit programme position numbers. You do not |
|
have to enter leading zeros. |
Switch-over to a radio programme
You can switch over from a TV programme to a radio programme.
Press the button on the remote control to switch to a radio programme.
The receiver switches over to the programme location of the last set radio programme. You can return to the TV programme by pressing
the same button or . The display corresponding to the received programme, as when selecting the TV programmes, appears on the screen. The LCD display shows a small "r" together with the programme position number.
The screen turns dark after a few seconds.
Reception status - radio
After switching over the receiver, simply press the buttons to select other radio programmes in their ascending or descending order in the programme memory.
Each time you press the button, an on-screen display appears and displays the selected programme together with the time, the programme start and end times as well as the programme title in the information box, provided this data is transmitted together with the signal.
By pressing the button, this information box is permanently displayed. Press the button once again and the information box disappears.
A further option for selecting a different programme is to press the
23

Programme Selection
button. The radio channel list is now displayed. The upper righthand column provides information relating to the received satellites, its transmission frequency, the polarisation, the symbol, rate, the bouquet and the scrambling. The programme position, the programme name, and type of reception signal (free-to-air/scrambled) are provided on the left. In the upper right-hand field you find the menu for the menu/
channel setting. Use the buttons to switch to the next programme, and with buttons to skip to the neighbouring page. The
programme selection is confirmed by pressing .
You can also select the desired programme with the numerical buttons.
Press the button to exit the channel list and remain in the already set programme.
Selecting a radio programme by number entry
|
You can select a different radio programme during a running radio |
|
programme by entering the programme location number. Use the |
|
number buttons to for the purpose of entering the programme |
|
location number. |
Example |
You wish to select the radio programme "DLR-Berlin". This pro- |
|
gramme is stored under the programme location number 15. (The or- |
|
der of radio programmes is defined in the programme memory, and |
|
therefore this only serves as an example.) |
|
To select this programme, press the numbers and one after |
|
the other. The receiver waits for about 3 seconds for entry of the next |
|
number. |
|
Follow the same procedure for all other programmes – i.e. also pro- |
|
grammes with three-digit programme location numbers. You do not |
|
have to enter leading zeros, unless for accessing teletext. |
24
Loading...