


B 40 C Ep
Register. |
|
www |
|
kaercher |
|
and |
|
. |
win! |
com |
|
59641630 (01/12)


 Please read and comply with


 these original instructions prior to the initial operation of your appliance
and store them for later use or subsequent owners.
Contents
Safety instructions . . . . . . . |
EN |
. . 1 |
|
Safety Devices . . . . . . . |
EN |
. . 1 |
|
Symbols in the operating in- |
EN |
. . 1 |
|
structions. . . . . . . . . . . . |
|||
Function . . . . . . . . . . . . . . . |
EN |
. . 1 |
|
Proper use . . . . . . . . . . . . . |
EN |
. . 1 |
|
Environmental protection . . |
EN |
. . 1 |
|
Warranty . . . . . . . . . . . . . . . |
EN |
. . 1 |
|
Operating and Functional Ele- |
EN |
. . 2 |
|
ments . . . . . . . . . . . . . . . . . |
|||
Illustration of scrubbing vac- |
EN |
. . 2 |
|
uum . . . . . . . . . . . . . . . . |
|||
Before Startup. . . . . . . . . . . |
EN |
. . 3 |
|
Installing the Brushes . . |
EN |
. . 3 |
|
Installing the Vacuum Bar |
EN |
. . 3 |
|
Unloading . . . . . . . . . . . |
EN |
. . 3 |
|
Operation . . . . . . . . . . . . . . |
EN |
. . 3 |
|
Electrical connection . . . |
EN |
. . 3 |
|
Filling in detergents . . . . |
EN |
. . 3 |
|
Setting the water quantity |
EN |
. . 3 |
|
Setting the Vacuum Bar |
EN |
. . 3 |
|
Setting the Advance Speed |
EN |
. . 3 |
|
(BD cleaning head only) |
|||
Cleaning . . . . . . . . . . . . |
EN |
. . |
3 |
Shutting Down the Appliance |
EN |
. . 4 |
|
Drain off dirt water. . . . . |
EN |
. . |
4 |
Drain off clean water . . . |
EN |
. . 4 |
|
Transport . . . . . . . . . . . . . . |
EN |
. . 4 |
|
Storage . . . . . . . . . . . . . . . . |
EN |
. . 4 |
|
Maintenance and care . . . . |
EN |
. . 4 |
|
Maintenance schedule . |
EN |
. . 4 |
|
Maintenance Works . . . |
EN |
. . 4 |
|
Maintenance contract . . |
EN |
. . 5 |
|
Frost protection. . . . . . . . . . |
EN |
. . 5 |
|
Faults . . . . . . . . . . . . . . . . . |
EN |
. . 6 |
|
Accessory B 40. . . . . . . . . . |
EN |
. . 7 |
|
BR appliance B 40 (brush |
EN |
. . |
7 |
roller accessories) . . . . . |
|||
BD appliances B 40 (disc |
EN |
. . |
7 |
roller accessories) . . . . . |
|||
BR/BD appliances B 40 |
EN |
. . 7 |
|
(vacuum bar accessories) |
|||
Technical specifications . . . |
EN |
. . 8 |
|
EC Declaration of Conformity |
EN |
. . 8 |
|
Spare parts . . . . . . . . . . . . . |
EN |
. . 8 |
|
Safety instructions
Before using the appliance for the first time, read and observe these operating instructions and the accompanying brochure:
Safety information for brush cleaning units and spray-extraction units, No. 5.956-251.
The appliance may only be operated when the hood and all lids are closed. In dangerous situations, release the safety switch.
The appliance must only be operated on surfaces that do not exceed the max. permitted incline (see "Technical Specifications").
Warning
Do not use the appliance on inclines.
Safety Devices
Safety devices serve to protect the user and must not be rendered inoperational or their functions bypassed.
Safety button
If the safety switch is released, the brush drive shuts off.
Symbols in the operating instructions
Danger
Immediate danger that can cause severe injury or even death.
Warning
Possible hazardous situation that could lead to severe injury or even death.
Caution
Possible hazardous situation that could lead to mild injury to persons or damage to property.
Function
The scrubber vacuum is used for wet cleaning or polishing of level floors.
–Rotating roller or disc brushes clean the floor while adding detergent. The contaminated cleaning liquid is suctioned into the wastewater reservoir.
–The appliance can be easily adjusted to the cleaning task by setting the water quantity.
–Depending on the selected cleaning head, the working width of the B 40 is between 430 mm and 550 mm.
–Power supply operation allows a high capacity without a restriction of the working time.
Note
The appliance can be equipped with various accessories depending on the cleaning task.
Please request our catalogue or visit us on the Internet at www.kaercher.com.
Proper use
Use this appliance only as directed in these operating instructions.
–The appliance may only be used for the cleaning of hard surfaces that are not sensitive to moisture and polishing operations.
–The appliance is not suited for the cleaning of frozen grounds (e.g. in cold stores).
–The appliance may only be equipped with original accessories and spare parts.
–The appliance is not suited for the use in potentially explosive environments.
–The machine should not be used to suck in inflammable gases, undiluted acids or solvents.
This includes petrol, thinning agents or hot oil that can form an explosive mixture when it comes in contact with sucked air. Do not use acetone, undiluted acids and solvents as they are aggressive towards the materials from which the appliance is made.
–The machine has been approved for use on surfaces with max. gradients as listed under "Technical Specifications".
Environmental protection
The packaging materials are recyclable. Please do not throw packaging in the domestic waste but pass it on for recycling.
Old units contain valuable recyclable materials. Batteries, oil and similar substances may not be released into the envi-
ronment. Therefore please dispose of old units through suitable collection systems.
Notes about the ingredients (REACH)
You will find current information about the ingredients at: www.kaercher.com/REACH
Warranty
The warranty terms published by our competent sales company are applicable in each country. We will repair potential failures of your accessory within the warranty period free of charge, provided that such failure is caused by faulty material or defects in fabrication. In the event of a warranty claim please contact your dealer or the nearest authorized Customer Service center. Please submit the proof of purchase.
2 |
EN - 1 |
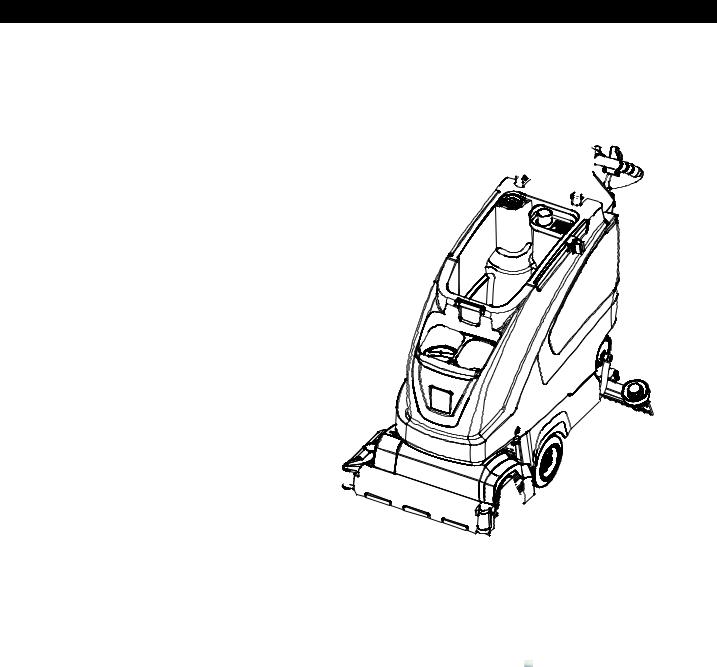
Operating and Functional Elements
Illustration of scrubbing vacuum
1 |
Vacuum bar lowering lever |
23 |
Rotary handle to incline the vacuum bar |
2 |
Cover dirt water reservoir |
24 |
Wing nuts for fastening the vacuum bar |
3 |
Holding rail for home base |
25 |
Suction hose |
4 |
Fluff filter |
26 |
Vacuum bar * |
5 |
Wastewater reservoir rinsing system |
27 |
Mains cable with mains plug |
|
(option) |
28 |
Automatic fill of fresh water reservoir |
6 |
Flexible lock of rinsing system (option) |
|
(option) |
7 |
Lock of wastewater reservoir |
29 |
Strain relief clamp |
8 |
Float |
30 |
Water quantity regulator |
9 |
Push handle |
31 |
Safety button |
10 |
Coarse dirt sieve |
32 |
Program selection switch |
11 |
Dirt water reservoir |
33 |
Fuse for brush drive |
12 |
Fresh water reservoir filler neck |
34 |
Storage surface for cleaning set "Home |
13 |
Detergent bottle holder |
|
base box“ |
14 |
Lock of the fresh water reservoir with fil- |
35 |
Cable hook |
|
ter |
36 |
Dirt water discharge hose |
15 |
Fresh water tank |
37 |
Dosing equipment for dirt water |
16 |
Locking the tank |
* not included in the delivery |
|
|
Secured with an additional plate and a |
||
|
screw |
Colour coding |
|
17 |
Cleaning head * |
– |
The operating elements for the cleaning |
18 |
Brush rollers (R-Cleaning head) |
|
process are yellow. |
|
Disk brush (D cleaning head) |
– |
The controls for the maintenance and |
19 |
Waste container (only BR) |
|
service are light gray. |
20Fresh water level display
21Pedal for raising/ lowering the cleaning head
22Lever to adjust the brush contact pressure
EN - 2
Program selection switch
1OFF
Device is switched off
2Normal mode
Wet clean the floor and vacuum up dirt water.
3Intense mode
Wet clean the floor and allow the detergent to react.
4Vacuum mode
Suck in the dirt fleet.
5Polishing mode
Polishing the floor without the application of liquid.
3

Before Startup |
Electrical connection |
Installing the Brushes
BD model
The disc brush must be installed before the initial operation (see "Maintenance work").
BR model
The brushes are mounted.
Installing the Vacuum Bar
Insert the vacuum bar into the vacuum bar suspension in such a manner that the profiled sheet is positioned above the suspension.
Tighten the wing nuts.
Insert the looped end of the extension cable in the strain relief hook.
Plug in the mains plug.
Filling in detergents
Fresh water
|
Open the lock of the fresh water reser- |
|||
|
voir. |
|
|
|
|
Fill fresh water (maximum 60 °C) until |
|||
|
the lower edge of the filling nozzle. |
|||
|
Close the lock of the fresh water reser- |
|||
|
voir. |
|
|
|
|
With automatic fill of fresh water reser- |
|||
|
voir (option) |
|
|
|
Insert the suction hose. |
Connect the hose to the automatic fill- |
|||
ing system and open the water supply |
||||
Unloading |
||||
(max. 60 °C, max. 5 bars). |
||||
Danger |
Monitor the appliance - the automatic |
|||
Risk of injury! Rotate the programme selec- |
filling system will interrupt the water |
|||
supply when the tank is full. |
||||
tor switch to "OFF" to immediately switch |
||||
Shut off the water supply and discon- |
||||
off all functions of the machine. |
||||
nect the hose from the appliance. |
||||
Place long lateral boards of the packag- |
||||
Detergent |
|
|
||
ing as a ramp next to the pallet. |
|
|
||
|
Warning |
|
|
|
|
Risk of damage. Only use the recommend- |
|||
|
ed detergents. With respect to different de- |
|||
|
tergents the operator bears the increased |
|||
|
risk regarding the operational safety and |
|||
|
danger of accident. |
|
|
|
|
Only use detergents that are free from sol- |
|||
|
vents, hydrochloric acid and hydrofluoric |
|||
|
acid. |
|
|
|
|
Follow the safety instructions for using de- |
|||
Fix the ramp on the pallet with nails. |
tergents. |
|
|
|
Note |
|
|
||
Place short boards as a support under- |
Do not use highly foaming detergents. |
|||
neath the ramp. |
||||
Recommended detergents: |
||||
Remove the wooden bars in front of the |
||||
wheels. |
Application |
|
Detergent |
|
Lift the cleaning head by pressing the |
Routine cleaning of all water RM 746 |
|||
pedal all the way down. |
resistant floors |
|
RM 780 |
|
Push down the appliance through the |
Routine cleaning of glossy |
RM 755 es |
||
ramp from the pallet. |
surfaces (e.g. granite) |
|
RM 69 ASF |
|
|
Routine cleaning and basic |
|||
Operation |
cleaning of industrial floors |
|
||
Routine cleaning and basic |
RM 753 |
|||
Danger |
cleaning of fine stoneware |
|
||
tiles |
|
|
||
Risk of injury. Push the pedal for raising/ |
|
|
||
Routine cleaning of tiles in |
RM 751 |
|||
lowering the cleaning head with one foot |
||||
sanitary areas |
|
|
||
only. The other foot must be placed firmly |
|
|
||
Cleaning and disinfection in RM 732 |
||||
on the ground. |
||||
sanitary areas |
|
|
||
In dangerous situations, release the safety |
|
|
||
Removal of coating from all RM 752 |
||||
switch. |
||||
alkali-resistant floors (e.g. |
|
|||
|
|
|||
|
PVC) |
|
|
|
4 |
EN |
- 3 |
|
|
Removal of coating from liRM 754 noleum floors
Add the detergent to the fresh water reservoir.
Setting the water quantity
Adjust the water quantity using the regulating button according to the dirt on the floor covering.
Note
Carry out the initial cleaning attempts with little quantities of water. Increase water quantity step-by-step until the desired cleaning result is achieved.
Setting the Vacuum Bar
Oblique position
To improve the vacuuming result on tiled floors the vacuum bar can be turned to an oblique position of up to 5°.
Loosen the wing nuts.
Turn the vacuum bar.
Tighten the wing screws.
Inclination
If the vacuum result is unsatisfactory the inclination of the straight vacuum bar can be modified.
Adjust the rotary handle to incline the suction bar.
Setting the Advance Speed (BD
cleaning head only)
Reducing the speed: Turn the button in "–" direction.
Increasing the speed: Turn the button in "+" direction.
Cleaning
Caution
Risk of damage to the floor covering. Do not operate the appliance on the spot.
Note
The machine is designed in such a way that the brush head protrudes on the right. This helps in working in a proper way even close to the edges.
Turn the program selection switch to the desired cleaning program.
 Loading...