


ULTRA MICRO COMPONENT SYSTEM
ULTRA-MIKRO-KOMPONENTEN-SYSTEM SYSTEME DE COMPOSANTS ULTRA MICRO ULTRA MIKRO KOMPONENTENSYSTEEM SISTEMAS DE COMPONENTES ULTRA MICRO SISTEMA AD ULTRA MICROCOMPONENTI
UX-5000
REMOTE CONTROL RM-RXU5000
DIMMER |
SLEEP |
|
DISPLAY |
FM MODE |
AUX |
AHB. |
AUTO |
CD |
SUPER PRO PRESET |
||
PROGRAM RANDOM |
REPEAT |
|
BASS |
TREBLE |
CANCEL |
|
UP |
|
|
SET |
|
|
DOWN |
VOLUME |
|
STANDBY |
|
MD |
TUNER |
CD |
/TAPE |
BAND |
|
VOLUME
ULTRA MICRO COMPONENT SYSTEM
UX-5000
PHONES
INSTRUCTIONS
BEDIENUNGSANLEITUNG MANUEL D’INSTRUCTIONS
GEBRUIKSAANWIJZING MANUAL DE INSTRUCCIONES
ISTRUZIONI
For Customer Use:
Enter below the Model No. and Serial No. which are located either on the rear, bottom or side of the cabinet. Retain this information for future reference.
Model No.
Serial No.
LVT0034-001A [E]
Warnings, Cautions and Others / Warnung, Achtung und sonstige Hinweise /Mises en garde, précautions et indications diverses /Waarschuwingen, voorzorgen en andere mededelingen/Avisos, precauciones y otras notas / Avvertenze e precauzioni da osservare
Caution –– |
switch! |
Disconnect the mains plug to shut the power off completely. The  switch in any position does not disconnect the mains line. The power can be remote controlled.
Achtung ––  Schalter!
Den Netzstecker aus der Steckdose ziehen, um die Stromversorgung vollkommen zu unterbrechen. Der Schalter  unterbrichet in keiner Stellung die Stromversorgung vollkommen. Die Stromversorgung kann mit der Fernbedienung einund ausgeschaltet werden.
Attention –– Commutateur  !
!
Déconnecter la fiche de secteur pour couper compltement le courant.
Le commutateur |
ne coupe jamais compltement la ligne de secteur, |
quelle que soit sa position. Le courant peut tre télécommandé. |
|
Voorzichtig –– |
schakelaar! |
Om de stroomtoevoer geheel uit te schakelen, trekt u de stekker uit het stopkontakt. Anders zal er altijd een geringe hoeveelheid stroom naar
het apparaat lopen, ongeacht de stand van de |
schakelaar. U kunt |
|
het apparaat ook met de afstandsbediening aanen uitschakelen. |
||
Precaución –– Interruptor |
! |
|
Desconectar el cable de alimentación para desactivar la alimentación
totalmente. Cualquier que sea la posición de ajuste del interruptor , la alimentación no es cortada completamente. La alimentación puede ser controlada remotamente.
Attenzione –– L’interruttore  !
!
Disinserire la spina del cavo di alimentazione dalla presa della rete elettrica per staccare completamente l’alimentazione. L’interruttore
in nessuna posizione stacca la linea di alimentazione elettrica principale. È possibile il controllo remoto dell’alimentazione.
Per l’Italia:
"Si dichiara che il questo prodotto di marca JVC è conforme alle prescrizioni del Decreto Ministeriale n.548 del 28/08/95 pubblicato sulla Gazzetta Ufficiale della Repubblica Italiana n.301 del 28/12/95."
CAUTION
To reduce the risk of electrical shocks, fire, etc.:
1.Do not remove screws, covers or cabinet.
2.Do not expose this appliance to rain or moisture.
ACHTUNG
Zur Verhinderung von elektrischen Schlägen, Brandgefahr, usw:
1.Keine Schrauben lösen oder Abdeckungen enlfernen und das Gehäuse nicht öffnen.
2.Dieses Gerät weder Regen noch Feuchtigkeit aussetzen.
ATTENTION
Afin d’éviter tout risque d’électrocution, d’incendie, etc.:
1.Ne pas enlever les vis ni les panneaux et ne pas ouvrir le coffret de l’appareil.
2.Ne pas exposer l’appareil à la pluie ni à l’humidité.
VOORZICHTIG
Ter vermindering van gevaar voor brand, elektrische schokken, enz.:
1.Verwijder geen schroeven, panelen of de behuizing.
2.Stel het toestel niet bloot aan regen of vocht.
PRECAUCIÓN
Para reducir riesgos de choques eléctricos, incendio, etc.:
1.No extraiga los tornillos, los cubiertas ni la caja.
2.No exponga este aparato a la lluvia o a la humedad.
ATTENZIONE
Per ridurre il rischio di shock elettrici, incendi, ecc...
1.Non togliete viti, coperchi o la scatola.
2.Non esponete l’apparecchio alla piogggia e all’umidità.
G-1
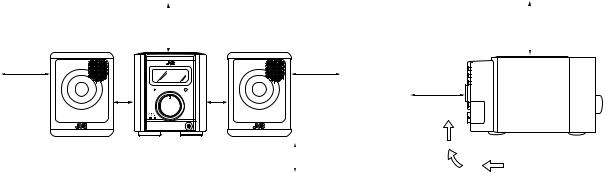
Caution: Proper Ventilation
To avoid risk of electric shock and fire, and to prevent damage, locate the apparatus as follows:
1 Front:
No obstructions and open spacing. 2 Sides/ Top/ Back:
No obstructions should be placed in the areas shown by the dimensions below.
3 Bottom:
Place on the level surface. Maintain an adequate air path for ventilation by placing on a stand with a height of 10 cm or more.
Vorsicht: Ausreichende Belüftung
Zur Vermeidung von elektrischen Schlägen, Feuer und sonstigen Schäden sollte das Gerät unter folgenden Bedingungen aufgestellt werden:
1 Vorderseite:
Hindernisfrei und gut zugänglich. 2 Seitenund Rückwände:
Hindernisfrei in allen gegebenen Abständen (s. Abbildung). 3 Unterseite:
Die Stellfläche muß absolut eben sein. Sorgen Sie für ausreichende Luftzufuhr durch Aufstellung auf einem Stand mit mindestens 10 cm Höhe.
Attention: Aération correcte
Pour prévenir tout risque de décharge électrique ou d’incendie et éviter toute détérioration, installez l’appareil de la manière suivante:
1 Avant:
Bien dégagé de tout objet. 2 Côtés/dessus/dessous:
Assurez-vous que rien ne bloque les espaces indiqués sur le schéma ci-dessous.
3 Dessous:
Posez l’appareil sur une surface plane et horizontale. Veillez à ce que sa ventilation correcte puisse se faire en le plaçant sur un support d’au moins dix centimètres de hauteur.
Voorzichtig: Goede ventilatie vereist
Om brand, elektrische schokken en beschadiging te voorkomen, moet u het toestel als volgt opstellen:
1 Voorkant:
Geen belemmeringen en voldoende ruimte. 2 Zijkanten/boven-/onderkant:
Geen belemmeringen plaatsen in de hieronder aangegeven zones.
3 Onderkant:
Op vlakke ondergrond plaatsen. Voldoende ventilatieruimte voorzien door het toestel op een onderstel met een hoogte van 10 cm of meer te plaatsen.
Precaucion: ventilación correcta
Para evitar el riesgo de descargas eléctricas e incendio y prevenir posibles daños, instale el equipo en un lugar que cumpla los siguientes requisitos:
1 Parte frontal:
Sin obstrucciones, espacio abierto. 2 Lados/parte superior/parte posterior:
No debe haber ninguna obstrucción en las áreas mostradas por las dimensiones de la siguiente figura.
3 Parte inferior:
Sitúe el equipo sobre una superficie nivelada. Mantenga un espacio adecuado para permitir el paso del aire y una correcta ventilación, situando el equipo sobre un soporte de 10 o más cm de allura.
Attenzione: Per una corretta ventilazione
Per prevenire il rischio di scosse elettriche e di incendio ed evitare possibili danni, collocare le apparecchiature nel modo seguente:
1 Parte anteriore:
Nessun ostacolo e spazio libero. 2 Lati/Parte superiore/Retro:
Lasciare libere le zone indicate dalle dimensioni di seguito. 3 Base:
Collocare su una superficie piana. Consentire un’adeguata ventilazione dell’impianto appoggiandolo su un tavolinetto alto almeno 10 cm.
Front view Vorderansicht Face Vooraanzicht Vista frontal Vista frontale
15 cm
|
Side view |
|
|
Seitenansicht |
|
|
Côt |
|
|
Zijaanzicht |
|
|
Vista lateral |
|
15 cm |
Vista laterale |
15 cm |
|
||
|
|
|
|
|
|
|
|
|
15 cm |
1cm |
VOLUME |
1cm |
15 cm |
|
UX-5000 |
||
|
ULTRA MICRO COMPONENT SYSTEM |
|
|
|
UX-5000 |
|
|
|
|
|
|
|
|
|
|
|
|
|
|
|
|
|
|
UX-5000 |
|
|
10 cm |
|
|
|
|
|
|
|
|
|
|
|
|
|
|
|
|
|
|
|
|
|
|
|
|
|
|
|
|
|
|
|
|
G-2
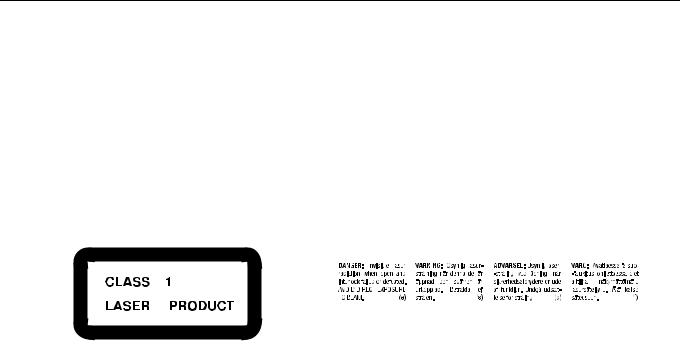
IMPORTANT FOR LASER PRODUCTS/ WICHTIGER HINWEIS FÜR LASER-PRODUKTE / IMPORTANT POUR LES PRODUITS LASER / BELANGRIJKE INFORMATIE VOOR LASERPRODUKTEN / IMPORTANTE PARA LOS PRODUCTOS LÁSER / IMPORTANTE PER I PRODOTTI LASER
REPRODUCTION OF LABELS/ANBRINGUNGSORTE FÜR LASER-PRODUKTE/REPRODUCTION DES ETIQUETTES/VERKLARING VAN DE LABELS/REPRODUCCIÓN DE ETIQUETAS/RIPRODUZIONE DELLE ETICHETTE
1 |
CLASSIFICATION LABEL, PLACED ON EXTERIOR SURFACE |
2 |
WARNING LABEL, PLACED INSIDE THE UNIT |
||||||||||||||||||||||||||||
1 |
KLASSIFIZIERUNGSHINWEIS BEFINDET SICH AUF DER AUS- |
2 |
WARNETIKETTE IM GERÄTEINNEREN |
||||||||||||||||||||||||||||
|
SENSIETE |
|
|
|
|
|
|
|
|
|
|
|
|
|
|
|
|
|
|
|
|
|
|
|
|
|
|
|
|
|
|
|
|
2 |
ETIQUETTE D’AVERTISSEMENT PLACÉE À L’INTERIEUR DE |
||||||||||||||||||||||||||||
1 |
ÉTIQUETTE DE CLASSIFICATION, PLACÉE SUR LA SURFACE |
|
|
L’APPAREIL |
|||||||||||||||||||||||||||
|
EXTÉRIEURE |
|
|
|
|
|
|
|
|
|
|
|
|
|
|
|
|
|
|
|
|
|
|
|
|
|
|
|
|
|
|
|
|
2 |
WAARSCHUWINGSLABEL, IN HET APPARAAT |
||||||||||||||||||||||||||||
1 |
CLASSIFICATIE-ETIKET AAN DE BUITENKANT VAN HET APPA- |
|
|
|
|
|
|
|
|
|
|
|
|
|
|
|
|
|
|
|
|
|
|
|
|
|
|
|
|
|
|
|
RAAT |
2 |
ETIQUETA DE ADVERTENCIA, PEGADA EN EL INTERIOR DE |
||||||||||||||||||||||||||||
|
|
|
|
LA UNIDAD |
|||||||||||||||||||||||||||
1 |
ETIQUETA DE CLASIFICACION, PROVISTA SOBRE LA SUPER- |
|
|
|
|
|
|
|
|
|
|
|
|
|
|
|
|
|
|
|
|
|
|
|
|
|
|
|
|
|
|
|
FICIE EXTERIOR |
2 |
ETICHETTA DI AVVERTENZA, SITUATA ALL’INTERNO |
||||||||||||||||||||||||||||
|
|
|
|
DELL’APPARECCHIO |
|||||||||||||||||||||||||||
1 |
ETICHETTA DI CLASSIFICAZIONE POSTA ALL’ESTERNO |
|
|
|
|
|
|
|
|
|
|
|
|
|
|
|
|
|
|
|
|
|
|
|
|
|
|
|
|
|
|
|
|
|
|
|
|
|
|
|
|
|
|
|
|
|
|
|
|
|
|
|
|
|
|
|
|
|
|
|
|
|
|
|
|
|
|
|
|
|
|
|
|
|
|
|
|
|
|
|
|
|
|
|
|
|
|
|
|
|
|
|
|
|
|
|
|
|
|
|
|
|
|
|
|
|
|
|
|
|
|
|
|
|
|
|
|
|
|
|
|
|
|
|
|
|
|
|
|
|
|
|
|
|
|
|
|
|
|
|
|
|
|
|
|
|
|
|
|
|
|
|
|
|
|
|
|
|
|
|
|
|
|
|
|
|
|
|
|
|
|
|
|
|
|
|
|
|
|
|
|
|
|
|
|
|
|
|
|
|
|
|
|
|
|
|
|
|
|
|
|
|
|
|
|
|
|
|
|
|
|
|
|
|
|
|
|
|
|
|
|
|
|
|
|
|
|
|
|
|
|
|
|
|
|
|
|
|
|
|
|
|
|
|
|
|
|
|
|
|
|
|
|
|
|
|
|
|
|
|
|
|
|
|
|
|
|
|
|
|
|
|
|
|
|
|
|
|
|
|
|
|
|
|
|
|
|
|
|
|
|
|
|
|
|
|
|
|
|
|
|
|
|
|
|
|
|
|
|
|
|
|
|
|
|
|
|
|
|
|
|
|
|
|
|
|
|
|
|
|
|
|
|
|
|
|
|
|
|
|
|
|
|
|
|
|
|
|
|
|
|
|
|
|
|
|
|
|
|
|
|
|
|
|
|
|
|
|
|
|
|
|
|
|
|
|
|
|
|
|
|
|
|
|
|
|
|
|
|
|
|
|
|
|
|
|
|
|
|
|
|
|
|
|
|
|
|
|
|
|
|
|
|
|
|
|
|
|
|
|
|
|
|
|
|
|
|
|
|
|
|
|
|
|
|
|
|
|
|
|
|
|
|
|
|
|
|
1.CLASS 1 LASER PRODUCT
2.DANGER: Invisible laser radiation when open and interlock failed or defeated. Avoid direct exposure to beam.
3.CAUTION: Do not open the top cover. There are no user serviceable parts inside the Unit; leave all servicing to qualified service personnel.
1.LASER-PRODUKT DER KLASSE 1
2.GEFAHR: Unsichtbare Laserstrahlung bei Öffnung und fehlerhafter oder beschädigter Spre. Direkten Kontakt mit dem Strahl vermeiden!
3.ACHTUNG: Das Gehäuse nicht öffnen. Das Gerät enthält keinerlei Teile, die vom Benutzer gewartet werden können. Überlassen
Sie Wartungsarbeiten bitte qualifizierten Kundendienst-Fachleu- ten.
1.PRODUIT LASER CLASSE 1
2.ATTENTION: Radiation laser invisible quand l’appareil est ouvert ou que le verrouillage est en panne ou désactivé. Eviter une exposition directe au rayon.
3.ATTENTION: Ne pas ouvrir le couvercle du dessus. Il n’y a aucune pièce utilisable à l’intérieur. Laisser à un personnel qualifié le soin de réparer votre appareil.
1.KLAS 1 LASERPRODUKT
2.GEVAARLIJK: Onzichtbare laserstraling wanneer open en de beveiliging faalt of uitgeschakeld is. Voorkom het direkt blootstaan aan de straal.
3.VOORZICHTIG: De bovenkap niet openen. Binnenin het toestel bevinden zich geen door de gebruiker te repareren onderdelen: laat onderhoud over aan bekwaam vakpersoneel.
1.PRODUCTO LASER CLASE 1
2.PELIGRO: En el interior hay radiación láser invisible. Evite el contacto directo con el haz.
3.PRECAUCIÓN: No abra la tapa superior. En el interior de la unidad no existen piezas reparables por el usuario; deje todo servicio técnico en manos de personal calificado.
1.PRODOTTO LASER CLASSE 1
2.PERICOLO: Radiazione laser invisibile quando l’apparecchio è aperto ed il dispositivo di sicurezza è guasto o disattivato. Evitare l’esposizione diretta ai raggi.
3.ATTENZIONE: Non aprire il coperchio superiore. Non vi sono parti adoperabili dall’utente all’interno di questo apparecchio; lasciare tutti i controlli a personale qualificato.
G-3
Thank you for purchasing the JVC Ultra Micro Component System. |
English |
If you have a query that is not answered by the manual, please contact your dealer. |
|
We hope it will be a valued addition to your home, giving you years of enjoyment. |
|
Be sure to read this instruction manual carefully before operating your new stereo system. |
|
In it you will find all the information you need to set up and use the system. |
|
Features |
|
Here are some of the things that make your System both powerful and simple to use.
■The controls and operations have been redesigned to make them very easy to use, freeing you to just enjoy the music.
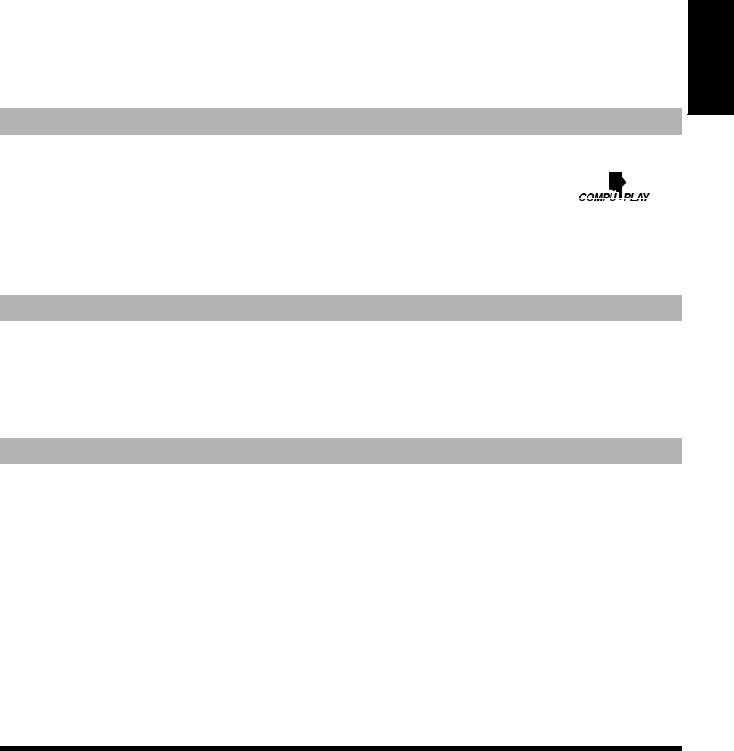
•With JVC’s COMPU PLAY you can turn on the System and automatically start the Radio or CD Player with a single touch.
■The System incorporates Active Hyper Bass Super PRO circuitry to faithfully reproduce low frequency sounds.
■A 45-station preset capability (30 FM and 15 AM (MW/LW)) in addition to auto-seek and manual tuning.
■Versatile CD options include repeat, random and program play.
■Timer functions; set the system to automatically come on, switch off.
■You can connect various external units, such as an MD recorder, tape deck, etc.
How This Manual Is Organized
•Basic information that is the same for many different functions - e.g. setting the volume - is given in the section ‘Common Op erations’, and not repeated under each function.
•The names of buttons/controls and display messages are written in all capital letters: e.g. TUNER BAND, “NO DISC”.
•System functions are written with an initial capital letter only: e.g. Normal Play.
Use the table of contents to look up specific information you require.
We’ve enjoyed making this manual for you, and hope it serves you in enjoying the many features built into your System.
IMPORTANT CAUTIONS
■1. Installation of the System
•Select a place which is level, dry and neither too hot nor too cold. (Between 5°C and 35°C or 41°F and 95°F.)
•Leave sufficient distance between the System and a TV.
•Do not use the System in a place subject to vibrations.
■2. Power cord
•Do not handle the power cord with wet hands!
•Some power (5W) is always consumed as long as the power cord is connected to the wall outlet.
•When unplugging the System from the wall outlet, always pull the plug, not the power cord.
■3. Malfunctions, etc.
•There are no user serviceable parts inside. In case of system failure, unplug the power cord and consult your dealer.
•Do not insert any metallic object into the System.
■Table of Contents
Features ............................................................................... |
1 |
How This Manual Is Organized .......................................... |
1 |
IMPORTANT CAUTIONS ................................................ |
1 |
Getting Started ......................................................... |
2 |
Common Operations ................................................ |
6 |
Using the Tuner ........................................................ |
8 |
Using the CD Player ............................................... |
10 |
Listening to External Equipments ......................... |
12 |
Using the Timers .................................................... |
13 |
Care And Maintenance .......................................... |
15 |
Troubleshooting .................................................... |
16 |
Specifications ........................................................ |
17 |
1
English |
■Getting Started |
|
|
|
Accessories |
Check that you have all of the following items, which are supplied with the System.
Power Cord (1)
AM Loop Antenna (1)
Remote Control (1)
Batteries (2)
FM Wire Antenna (1)
Speaker Cords (2)
If any of these items are missing, contact your dealer immediately.
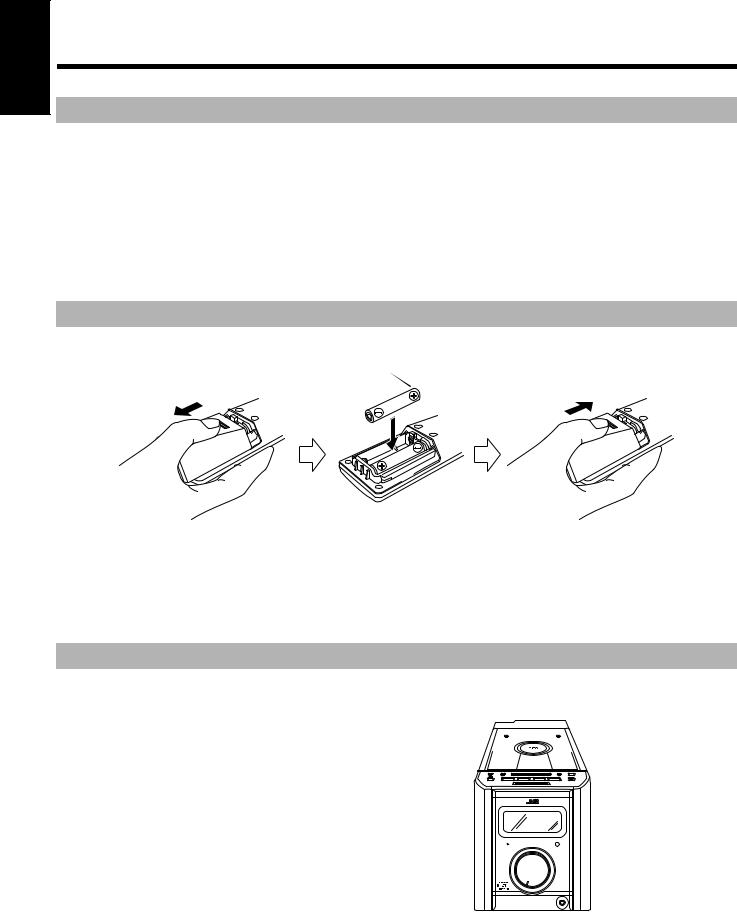
How To Put Batteries In the Remote Control
Match the polarity (+ and –) on the batteries with the + and – markings in the battery compartment.
R6P(SUM-3)/AA(15F)
CAUTION: Handle batteries properly.
To avoid battery leakage or explosion:
•Remove batteries when the Remote Control will not be used for a long time.
•When you need to replace the batteries, replace both batteries at the same time with new ones.
•Don’t use an old battery with a new one.
•Don’t use different types of batteries together.
Using the Remote Control
The Remote Control makes it easy to use many of the functions of the System from a distance of up to 7m (23 feet) away. You need to point the Remote Control at the remote sensor on the System’s front panel.
VOLUME
STANDBY
 Remote sensor
ULTRA MICRO COMPONENT SYSTEM
UX-5000
PHONES
2
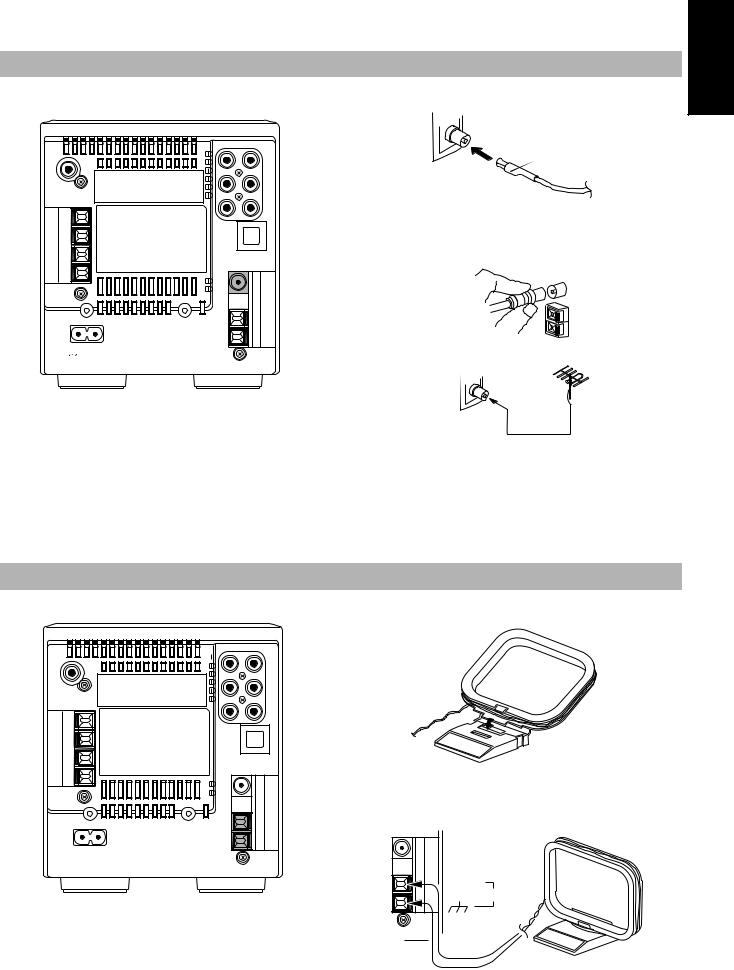
CAUTION: Make all connections before plugging the System into an AC power outlet. |
||
Connecting the FM Antenna |
English |
|
|
||
|
|
Using the Supplied Wire Antenna |
R |
L |
FM wire antenna (supplied) |
Using the Coaxial Type Connector (Not Supplied)
$эжирRKPэDQWHQQDэZLWKэFRD[LDOэW\SHэFRQQHFWRUэх',1йиэкклфэVKRXOG EHэFRQQHFWHGэWRэWKHэ)0эжирRKPэ&2$;,$/эWHUPLQDOп
AC IN |
,IýUHFHSWLRQýLVýSRRUñýFRQQHFWýWKHýRXWVLGHýDQWHQQDïý |
|
FM outdoor antenna (option)
Coaxial cable
Note: Before attaching a 75 ohm coaxial lead (the kind with a round wire going to an outside antenna), disconnect the supplied FM Wire Antenna.
CAUTION: To avoid noise, keep antennas away from the System, the connecting cord and the AC power cord.
Connecting the AM (MW/LW) Antenna
AM loop antenna (Supplied)
 R L
R L
Attach the AM loop to its base by snapping the tabs on the loop into the slot in the base.
 AC IN
AC IN
AM EXT
AM LOOP
Turn the loop until you have the best reception.
3
 Loading...