


COMPACT COMPONENT SYSTEM
MX-KC50
Consists of CA-MXKC50 and SP-MXKC50
|
|
|
|
|
|
|
|
|
|
|
|
|
|
|
|
|
|
|
|
|
|
|
|
|
|
|
|
|
|
|
|
|
|
|
|
|
|
|
|
|
|
|
|
|
|
|
|
|
|
|
|
|
|
|
|
|
|
|
|
|
|
|
|
|
|
|
|
|
|
|
|
|
|
|
|
|
|
|
|
|
|
|
|
|
|
|
|
|
|
|
|
|
|
|
|
|
|
|
|
|
|
|
|
|
|
|
|
|
|
|
|
|
|
|
|
|
|
|
|
|
|
|
|
|
|
|
|
|
|
|
|
|
|
|
|
|
|
|
|
|
|
|
|
|
|
|
|
|
|
|
|
|
|
|
|
|
|
|
|
|
|
|
|
|
|
|
|
|
|
|
|
|
|
|
|
|
|
|
|
|
|
|
|
|
|
|
|
|
|
|
|
|
|
|
|
|
|
|
|
|
|
|
|
|
|
|
|
|
|
|
|
|
|
|
|
|
|
|
|
|
|
|
|
|
|
|
|
|
|
|
|
|
|
|
|
|
|
|
|
|
|
|
|
|
|
|
|
|
|
|
|
|
|
|
|
|
|
|
|
|
|
|
|
|
|
|
|
|
|
|
|
|
|
|
|
|
|
|
|
|
|
|
|
|
|
|
|
|
|
|
|
|
|
|
|
|
|
|
|
|
|
|
|
|
|
|
|
|
|
|
|
|
|
|
|
|
|
|
|
|
|
|
|
|
|
|
|
|
|
|
|
|
|
|
|
|
|
|
|
|
|
|
|
|
|
|
|
|
|
|
|
|
|
|
|
|
|
|
|
|
|
|
|
|
|
|
|
|
|
|
|
|
|
|
|
|
|
|
|
|
|
|
|
|
|
|
|
|
|
|
|
|
|
|
|
|
|
|
|
|
|
|
|
|
|
|
|
|
|
|
|
|
|
|
|
|
|
|
|
|
|
|
|
|
|
|
|
|
|
|
|
|
|
|
|
|
|
|
|
|
|
|
|
|
|
|
|
|
|
|
|
|
|
|
|
|
|
|
|
|
|
|
|
|
|
|
|
|
|
|
|
|
|
|
|
|
|
|
|
|
|
|
|
|
|
|
|
|
|
|
|
|
|
|
|
|
SP-MXKC50 |
|
|
CA-MXKC50 |
|
|
SP-MXKC50 |
|||||||||
|
|
|
|
|
|
|
|
|
|
|
|
|
|
|
||||||||||||
|
|
|
|
|
|
|
|
|
|
|
|
|
|
|
||||||||||||
|
|
|
|
|
|
|
|
|
|
|
|
|
|
|
|
|
|
|
|
|
|
|
|
|
|
|
|
|
|
|
|
|
|
|
|
|
|
|
|
|
|
|
|
|
|
|
|
|
|
|
|
|
|
|
|
|
|
|
|
|
|
|
|
|
|
|
|
|
|
|
|
|
|
|
|
|
|
|
|
|
INSTRUCTIONS
For Customer Use:
Enter below the Model No. and Serial No. which are located either on the rear, bottom or side of the cabinet. Retain this information for future reference.
Model No.
Serial No.
LVT1728-001A [J]
Warnings, Cautions and Others /
Mises en garde, précautions et indications diverses
(For U.S.A)
|
|
|
|
|
|
|
|
|
|
|
|
|
|
|
|
|
|
|
|
|
|
|
|
|
|
|
|
|
|
|
|
|
|
|
|
|
|
|
|
|
|
|
|
|
|
|
|
|
|
|
|
|
|
|
|
|
|
|
|
|
|
|
|
|
|
|
|
|
|
|
|
|
|
|
|
|
|
|
|
|
|
|
|
|
|
|
|
|
|
|
|
|
|
|
|
|
|
|
|
|
|
|
|
|
|
|
|
|
|
|
|
|
|
|
|
|
|
|
|
|
|
|
|
|
|
|
|
|
|
|
|
|
|
|
|
|
|
|
|
|
|
|
|
|
|
|
|
|
|
|
|
|
|
|
|
|
|
|
|
|
|
|
|
|
|
|
|
|
|
|
|
|
|
|
|
|
|
|
|
|
|
|
|
|
|
|
|
|
|
|
|
|
|
|
|
|
|
|
|
|
|
|
|
|
|
|
|
|
|
|
|
|
|
|
|
|
|
|
|
|
|
|
|
|
|
|
|
|
|
|
|
|
|
|
|
|
|
|
|
|
|
|
|
|
|
|
|
|
|
|
|
|
|
|
|
|
|
|
|
|
|
|
|
|
|
|
|
|
|
|
|
|
|
|
|
|
|
|
|
|
|
|
|
|
|
|
|
|
|
|
|
|
|
|
|
|
|
|
|
|
|
|
|
|
|
|
|
|
|
|
|
|
|
|
|
|
|
|
|
|
|
|
|
|
|
|
|
|
|
|
|
|
|
|
|
|
|
|
|
|
|
|
|
|
|
|
|
|
|
|
|
|
|
|
|
|
|
|
|
|
|
|
|
|
|
|
|
|
|
|
|
|
|
|
|
|
|
|
|
|
|
|
|
|
|
|
|
|
|
|
|
|
|
|
|
|
|
|
|
|
|
|
|
|
|
|
|
|
|
|
|
|
|
|
|
|
|
|
|
|
|
|
|
|
|
|
|
|
|
|
|
|
|
|
|
|
|
|
|
|
|
|
|
|
|
|
|
|
|
|
|
|
|
|
|
|
|
|
|
|
|
|
|
|
|
|
|
|
|
|
|
|
|
|
|
|
|
|
|
|
|
|
|
|
|
|
|
|
|
|
|
|
|
|
|
|
|
|
|
|
|
|
|
|
|
|
|
|
|
|
|
|
|
|
|
|
|
|
|
|
|
|
|
|
|
|
|
|
|
|
|
|
|
|
|
|
|
|
|
|
|
|
|
|
|
|
|
|
|
|
|
|
|
|
|
|
|
|
|
|
|
|
|
|
|
|
|
|
|
|
|
|
|
|
|
|
|
|
|
|
|
|
|
|
|
|
|
|
|
|
|
|
|
|
|
|
|
|
|
|
|
|
|
|
|
|
|
|
|
|
|
|
|
|
|
|
|
|
|
|
|
|
|
|
|
|
|
|
|
|
|
|
|
|
|
|
|
|
|
|
|
|
|
|
|
|
|
|
|
|
|
|
|
|
|
|
|
|
|
|
|
|
|
|
|
|
|
|
|
|
|
|
|
|
|
|
|
|
|
|
|
|
|
|
|
|
|
|
|
|
|
|
|
|
|
|
|
|
|
|
|
|
|
|
|
|
|
|
|
|
|
|
|
|
|
|
|
|
|
|
|
|
|
|
|
|
|
|
|
|
|
|
|
|
|
|
|
|
|
|
|
|
|
|
|
|
|
|
|
|
|
|
|
|
|
|
|
|
|
|
|
|
|
|
|
|
|
|
|
|
|
|
|
|
|
|
|
|
|
|
|
|
|
|
|
|
|
|
|
|
|
|
|
|
|
|
|
|
|
|
|
|
|
|
|
|
|
|
|
|
|
|
|
|
|
|
|
|
|
|
|
|
|
|
|
|
|
|
|
|
|
|
|
|
|
|
|
|
|
|
|
|
|
|
|
|
|
|
|
|
|
|
|
|
|
|
|
|
|
|
|
|
|
|
|
|
|
|
|
|
|
|
|
|
|
|
|
|
|
|
|
|
|
|
|
|
|
|
|
|
|
|
|
|
|
|
|
|
|
|
|
|
|
|
|
|
|
|
|
|
|
|
|
|
|
|
|
|
|
|
|
|
|
|
|
|
|
|
|
|
|
|
|
|
|
|
|
|
|
|
|
|
|
|
|
|
|
|
|
|
|
|
|
|
|
|
|
|
|
|
|
|
|
|
|
|
|
|
|
|
|
|
|
|
|
|
|
|
|
|
|
|
|
|
|
|
|
|
|
|
|
|
|
|
|
|
|
|
|
|
|
|
|
|
|
|
|
|
|
|
|
|
|
|
|
|
|
|
|
|
|
|
|
|
|
|
|
|
|
|
|
|
|
|
|
|
|
|
|
|
|
|
|
|
|
|
|
|
|
|
|
|
|
|
|
|
|
|
|
|
|
|
|
|
|
|
|
|
|
|
|
|
|
|
|
|
|
|
|
|
|
|
|
|
|
|
|
|
|
|
|
|
|
|
|
|
|
|
|
|
|
|
|
|
|
|
|
|
|
|
|
|
|
|
|
|
|
|
|
|
|
|
|
|
|
|
|
|
|
|
|
|
|
|
|
|
|
|
|
|
|
|
|
|
|
|
|
|
|
|
|
|
|
|
|
|
|
|
|
|
|
|
|
|
|
|
|
|
|
|
|
|
|
|
|
|
|
|
|
|
|
|
|
|
|
|
|
|
|
|
|
|
|
|
|
|
|
|
|
|
|
|
|
|
|
|
|
|
|
|
|
|
|
|
|
|
|
|
|
|
|
|
|
|
|
|
|
|
|
|
|
|
|
|
|
|
|
|
|
|
|
|
|
|
|
|
|
|
|
|
|
|
|
|
|
|
|
|
|
|
|
|
|
|
|
|
|
|
|
|
|
|
|
|
|
|
|
|
|
|
|
|
|
|
|
|
|
|
|
|
|
|
|
|
|
|
|
|
|
|
|
|
|
|
|
|
|
|
|
|
|
|
|
|
|
|
|
|
|
|
|
|
|
|
|
|
|
|
|
|
|
|
|
|
|
|
|
|
|
|
|
|
|
|
|
|
|
|
|
|
|
|
|
|
|
|
|
|
|
|
|
|
|
|
|
|
|
|
|
|
|
|
|
|
|
|
|
|
|
|
|
|
|
|
|
|
|
|
|
|
|
|
|
|
|
|
|
|
|
|
|
|
|
|
|
|
|
|
|
|
|
|
|
|
|
|
|
|
|
|
|
|
|
|
|
|
|
|
|
|
|
|
|
|
|
|
|
|
|
|
|
|
|
|
|
|
|
|
|
|
|
|
|
|
|
|
|
|
|
|
|
|
|
|
|
|
|
|
|
|
|
|
|
|
|
|
|
|
|
|
|
|
|
|
|
|
|
|
|
|
|
|
|
|
|
|
|
|
|
|
|
|
|
|
|
|
|
|
|
|
|
|
|
|
|
|
|
|
|
|
|
|
|
|
|
|
|
|
|
|
|
|
|
|
|
|
|
|
|
|
|
|
|
|
|
|
|
|
|
|
|
|
|
|
|
|
|
|
|
|
|
|
|
|
|
|
|
|
|
|
|
|
|
|
|
|
|
|
|
|
|
|
|
|
|
|
|
|
|
|
|
|
|
|
|
|
|
|
|
|
|
|
|
|
|
|
|
|
|
|
|
|
|
|
|
|
|
|
|
|
|
|
|
|
|
|
|
|
|
|
|
|
|
|
|
|
|
|
|
|
|
|
|
|
|
|
|
|
|
|
|
|
|
|
|
|
|
|
|
|
|
|
|
|
|
|
|
|
|
|
|
|
|
|
|
|
|
|
|
|
|
|
|
|
|
|
|
|
|
|
|
|
|
|
|
|
|
|
|
|
|
|
|
|
|
|
|
|
|
|
|
|
|
|
|
|
|
|
|
|
|
|
|
|
|
|
|
|
|
|
|
|
|
|
|
|
|
|
|
|
|
|
|
|
|
|
|
|
|
|
|
|
|
|
|
|
|
|
|
|
|
|
|
|
|
|
|
|
|
|
|
|
|
|
|
|
|
|
|
|
|
|
|
|
|
|
|
|
|
|
|
|
|
|
|
|
|
|
|
|
|
|
|
|
|
|
|
|
|
|
|
|
|
|
|
|
|
|
|
|
|
|
|
|
|
|
|
|
|
|
|
|
|
|
|
|
|
|
|
|
|
|
|
|
|
|
|
|
|
|
|
|
|
|
|
|
|
|
|
|
|
|
|
|
|
|
|
|
|
|
|
|
|
|
|
|
|
|
|
|
|
|
|
|
|
|
|
|
|
|
|
|
|
|
|
|
|
|
|
|
|
|
|
|
|
|
|
|
|
|
|
|
|
|
|
|
|
|
|
|
|
|
|
|
|
|
|
|
|
|
|
|
|
|
|
|
|
|
|
|
|
|
|
|
|
|
|
|
|
|
|
|
|
|
|
|
|
|
|
|
|
|
|
|
|
|
|
|
|
|
|
|
|
|
|
|
|
|
|
|
|
|
|
|
|
|
|
|
|
|
|
|
|
|
|
|
|
|
|
|
|
|
|
|
|
|
|
|
|
|
|
|
|
|
|
|
|
|
|
|
|
|
|
|
|
|
|
|
|
|
|
|
|
|
|
|
|
|
|
|
|
|
|
|
|
|
|
|
|
|
|
|
|
|
|
|
|
|
|
|
|
|
|
|
|
|
|
|
|
|
|
|
|
|
|
|
|
|
|
|
|
|
|
|
|
|
|
|
|
|
|
|
|
|
|
|
|
|
|
|
|
|
|
|
|
|
|
|
|
|
|
|
|
|
|
|
|
|
|
|
|
|
|
|
|
|
|
|
|
|
|
|
|
|
|
|
|
|
|
|
|
|
|
|
|
|
|
|
|
|
|
|
|
|
|
|
|
|
|
|
|
|
|
|
|
|
|
|
|
|
|
|
|
|
|
|
|
|
|
|
|
|
|
|
|
|
|
|
|
|
|
|
|
|
|
|
|
|
|
|
|
|
|
|
|
|
|
|
|
|
|
|
|
|
|
|
|
|
|
|
|
|
|
|
|
|
|
|
|
|
|
|
|
|
|
|
|
|
This equipment has been tested and found to comply |
|
|
||||||||||||||||||||||||||
WARNING: TO REDUCE THE RISK OF FIRE |
|
|
|
|
|
||||||||||||||||||||||||||||||||||||||||||||||||
|
|
|
with the limits for a Class B digital device, pursuant to |
|
|
||||||||||||||||||||||||||||||||||||||||||||||||
OR ELECTRIC SHOCK, DO NOT EXPOSE |
|
|
|
Part 15 of the FCC Rules. These limits are designed |
|
|
|||||||||||||||||||||||||||||||||||||||||||||||
THIS APPLIANCE TO RAIN OR MOISTURE. |
|
|
|
to provide reasonable protection against harmful inter- |
|
|
|||||||||||||||||||||||||||||||||||||||||||||||
|
|
|
|
|
|
|
|
|
|
|
|
|
|
|
|
|
|
|
|
|
|
|
|
|
ference in a residential installation. This equipment |
|
|
||||||||||||||||||||||||||
|
|
|
|
|
|
|
|
|
|
|
|
|
|
|
|
|
|
|
|
|
|
|
|
|
generates, uses, and can radiate radio frequency |
|
|
||||||||||||||||||||||||||
|
|
|
|
|
|
|
|
|
|
|
|
|
|
|
|
|
|
|
|
|
|
|
|
|
energy and, if not installed and used in accordance |
|
|
||||||||||||||||||||||||||
CAUTION |
|
|
|
|
|||||||||||||||||||||||||||||||||||||||||||||||||
|
|
|
with the instructions, may cause harmful interference |
|
|
||||||||||||||||||||||||||||||||||||||||||||||||
Changes or modifications not approved by JVC could |
|
|
|
to radio communications. However, there is no guar- |
|
|
|||||||||||||||||||||||||||||||||||||||||||||||
void the user’s authority to operate the equipment. |
|
|
|
antee that interference will not occur in a particular |
|
|
|||||||||||||||||||||||||||||||||||||||||||||||
|
|
|
installation. If this equipment does cause harmful |
|
|
||||||||||||||||||||||||||||||||||||||||||||||||
|
|
|
|
|
|
|
|
|
|
|
|
|
|
|
|
|
|
|
|
|
|
|
|
|
|
|
|||||||||||||||||||||||||||
|
|
|
|
|
|
|
|
|
|
|
|
|
|
|
|
|
|
|
|
|
|
|
|
|
interference to radio or television reception, which can |
|
|
||||||||||||||||||||||||||
|
|
|
|
|
|
|
|
|
|
|
|
|
|
|
|
|
|
|
|
|
|
|
|
|
be determined by turning the equipment off and on, |
|
|
||||||||||||||||||||||||||
Note to CATV system installer: |
|
|
|
|
|||||||||||||||||||||||||||||||||||||||||||||||||
|
|
|
the user is encouraged to try to correct the interfer- |
|
|
||||||||||||||||||||||||||||||||||||||||||||||||
This reminder is provided to call the CATV system |
|
|
|
ence by one or more of the following measures: |
|
|
|||||||||||||||||||||||||||||||||||||||||||||||
installer’s attention to section 820-40 of the NEC which |
|
|
|
– Reorient or relocate the receiving antenna. |
|
|
|||||||||||||||||||||||||||||||||||||||||||||||
provides guidelines for proper grounding and, in particular, |
|
|
|
– Increase the separation between the equipment |
|
|
|||||||||||||||||||||||||||||||||||||||||||||||
specifies that the cable ground shall be connected to the |
|
|
|
|
and receiver. |
|
|
||||||||||||||||||||||||||||||||||||||||||||||
grounding system of the building, as close to the point of |
|
|
|
– Connect the equipment into an outlet on a circuit |
|
|
|||||||||||||||||||||||||||||||||||||||||||||||
cable entry as practical. |
|
|
|
|
different from that to which the receiver is con- |
|
|
||||||||||||||||||||||||||||||||||||||||||||||
|
|
|
|
|
|
|
|
|
|
|
|
|
|
|
|
|
|
|
|
|
|
|
|
|
|
nected. |
|
|
|||||||||||||||||||||||||
|
|
|
|
|
|
|
|
|
|
|
|
|
|
|
|
|
|
|
|
|
|
|
|
|
– Consult the dealer or an experienced radio/TV |
|
|
||||||||||||||||||||||||||
|
|
|
|
|
|
|
|
|
|
|
|
|
|
|
|
|
|
|
|
|
|
|
|
|
|
technician for help. |
|
|
|||||||||||||||||||||||||
|
|
|
|
|
|
|
|
|
|
|
|
|
|
|
|
|
|
|
|
|
|
|
|
|
|
|
|
|
|
|
|
|
|
|
|
|
|
|
|
|
|
|
|
|
|
|
|
|
|
|
|
|
|
For Canada/pour le Canada
THIS DIGITAL APPARATUS DOES NOT EXCEED THE CLASS B LIMITS FOR RADIO NOISE EMISSIONS FROM DIGITAL APPARATUS AS SET OUT IN THE INTERFERENCE-CAUSING EQUIPMENT STANDARD ENTITLED “DIGITAL APPARATUS,” ICES-003 OF THE DEPARTMENT OF COMMUNICATIONS.
CET APPAREIL NUMERIQUE RESPECTE LES LIMITES DE BRUITS RADIOELECTRIQUES APPLICABLES AUX APPAREILS NUMERIQUES DE CLASSE B PRESCRITES DANS LA NORME SUR LE MATERIEL BROUILLEUR: “APPAREILS NUMERIQUES”, NMB-003 EDICTEE PAR LE MINISTRE DES COMMUNICATIONS.
CAUTION –– %STANDBY/ON button ! |
ATTENTION –– Touche %STANDBY/ON |
Disconnect the mains plug to shut the power off completely |
Déconnectez la fiche de secteur pour mettre l’appareil |
(all lamps and indications go off). When installing the |
complètement hors tension (tous les témoins et toutes les |
product, ensure that the plug is easily accessible. The % |
indications s’éteignent). Lors de l’installation de l’appareil, |
STANDBY/ON button in any position does not disconnect |
assurez-vous que la fiche soit facilement accessible. La |
the mains line. |
touche % STANDBY/ON dans n’importe quelle position ne |
• When the unit is on standby, the STANDBY lamp lights red. |
déconnec-te pas l’appareil du secteur. |
• When the unit is turned on, the STANDBY lamp goes off. |
• Quand l’appareil est en mode d’attente, le témoin |
The power can be remote controlled. |
STANDBY est al-lumé en rouge. |
|
• Quand l’appareil est sous tension, le témoin STANDBY |
|
s’éteint. |
|
L’alimentation ne peut pas être commandée à distance. |
|
|
G-1
IMPORTANT FOR LASER PRODUCTS / IMPORTANT POUR PRODUITS LASER
1.CLASS 1 LASER PRODUCT
2.CAUTION: Do not open the top cover or the cabinet. There are no user serviceable parts inside the unit; leave all servicing to qualified service personnel.
3.CAUTION: (For U.S.A.) Visible and/or invisible class II laser radiation when open. Do not stare into beam. (For Canada) Visible and/or invisible class 1M laser radiation when open. Do not view directly with optical instruments.
4.REPRODUCTION OF LABEL: CAUTION LABEL, PLACED INSIDE THE UNIT.
1.PRODUIT LASER CLASSE 1
2.ATTENTION: N'ouvrez pas le couvercle supérieur ni le boîtier. Il n’y a aucune pièce réparable par l’utilisateur à l’intérieur de l’appareil; confiez toute réparation à un personnel qualifié.
3.ATTENTION: (Pour les Etats-Unis) Radiation laser de classe II visibles et/ou invisible si l’appareil est ouvert. Ne regardez pas le rayon. (Pour le Canada) Rayonnement laser visible et/ ou invisible de classe 1M une fois ouvert. Ne pas regarder directement avec des instruments optiques.
4.REPRODUCTION DE L’ÉTIQUETTE: ÉTIQUETTE DE PRÉCAUTION PLACÉE À L’INTERIEUR DE L’APPAREIL.
CAUTION
To reduce the risk of electrical shocks, fire, etc.:
1.Do not remove screws, covers or cabinet.
2.Do not expose this appliance to rain or moisture.
ATTENTION
Afin d’èviter tout risque d’électrocution, d’lncendie. etc.:
1.Ne pas enlever les vis ni les panneaux et ne pas ouvrir le coffret de l’appareil.
2.Ne pas exposer l’appareil à la pluie ni à l’humidité.
CAUTION
1.Do not block the ventilation openings or holes.
(If the ventilation openings or holes are blocked by a newspaper or cloth, etc., the heat may not be able to get out.)
2.Do not place any naked flame sources, such as lighted candles, on the apparatus.
3.When discarding batteries, environmental problems must be considered and local rules or laws governing the disposal of these batteries must be followed strictly.
4.Do not expose this apparatus to rain, moisture, dripping or splashing and that no objects filled with liquids, such as vases, shall be placed on the apparatus.
ATTENTION
1.Ne bloquez pas les orifices ou les trous de ventilation. (Si les orifices ou les trous de ventilation sont bloqués par un journal un tissu, etc., la chaleur pent ne pas être évacuée correctement de l’appareil.)
2.Ne placez aucune source de flamme nue, telle qu’une bougie, sur l’appareil.
3.Lors de la mise au rebut des piles, veuillez prendre en considération les problèmes de l’environnement et suivre strictement les règles et, les lois locales sur la mise au rebut des piles.
4.N’exposez pas cet appareil à la pluie, à l’humidité, à un égouttement ou à des éclaboussures et ne placez pas des objets remplis de liquide, tels qu’un vase, sur l’appareil.
CAUTION:
Excessive sound pressure from earphones or headphones can cause hearing loss.
ATTENTION:
Une pression acoustique excessive des écouteurs ou du casque d’écoute peut entraîner une perte auditive.
Caution: Proper Ventilation
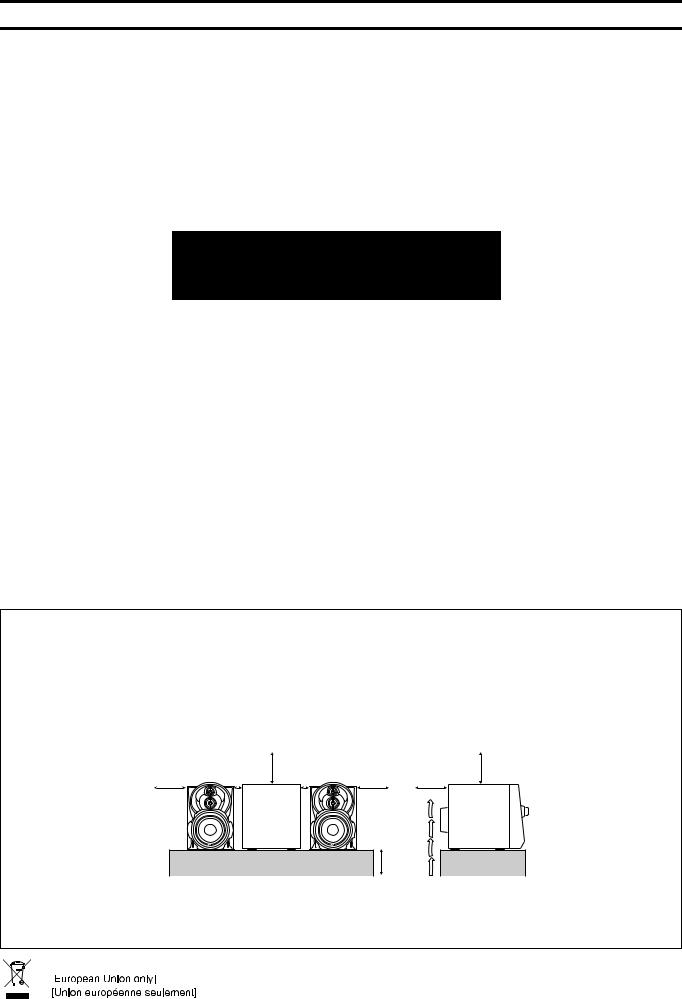
To avoid risk of electric shock and fire, and to prevent damage, locate the apparatus as follows:
1. Front:
No obstructions and open spacing. 2. Sides/ Top/ Back:
No obstructions should be placed in the areas shown by the dimensions below. 3. Bottom:
Place on the level surface. Maintain an adequate air path for ventilation by placing on a stand with a height of 10cm (315/16 in.) or more.
Attention: Aération correcte
Pour prévenir tout risque de décharge électrique ou d’incendie et éviter toute détérioration, installez l’appareil de la manière suivante:
1. Avant:
Bien dégagé de tout objet. 2. Côtés/dessus/dessous:
Assurez-vous que rien ne bloque les espaces indiqués sur le schéma ci-dessous. 3. Dessous:
Posez l’appareil sur une surface plane et horizontale. Veillez à ce que sa ventilation correcte puisse se faire en le plaçant sur un support d’au moins dix centimètres de hauteur.
Front view |
|
15cm |
|
Side view |
15cm |
Face |
|
|
Côt |
||
|
(515/16 in) |
|
(515/16 in) |
||
15cm |
1cm |
1cm |
15cm |
15cm |
|
(515/16 in) |
(7 /16 in) |
(7 /16 in) |
(515/16 in) |
(515/16 in) |
|
|
|
|
10cm |
|
|
|
|
|
(315/16 in) |
|
|
About the cooling fan
Cooling fan is built into the main unit. The internal cooling fan automatically rotates for emitting generated heat. To ensure sufficient cooling, leave a space of more than 1 cm between the main unit and the speakers or other objects.
À propos du ventilateur de refroidissement
Un ventilateur de refroidissement est incorporé dans l’unité principale. Ce ventilateur de refroidissement interne tourne automatiquement pour libérer la chaleur générée. Afin de garantir un refroidissement suffisant, laissez un espace de plus d’1 cm entre l’unité principale et les enceintes ou d’autres objets.
G-2
Introduction
Thank you for purchasing the JVC Compact Component System.
We hope it will be a valued addition to your home, giving you years of enjoyment.
Be sure to read this instruction manual carefully before operating your new stereo system.
In it you will find all the information you need to set up and use the system.
If you have a query that is not answered by the manual, please contact your dealer.
Features
Here are some of the things that make your System both powerful and simple to use.
The controls and operations have been redesigned to make them very easy to use, freeing you to just enjoy the music.
•With JVC’s COMPU PLAY you can turn on the System and automatically start the Radio, Cassette Deck, or CD Player with a single touch.
The great SEA (Sound Effect Amplifier) effects Rock, Pop and Classics are provided.
The Sound Turbo function provides emphasized rich sound.
A 45-station preset capability (30 FM and 15 AM) in addition to auto-seek and manual tuning.
CD changer function can operate 3 discs.
•Discs can be changed during play using the Carrousel tray (rotational tray).
Two Decks enabling tape dubbing.
Timer functions; Daily Timer, REC (Recording) Timer, and Sleep Timer.
You can connect various external units, such as an MD recorder.
The CD Player can play back a CD-R and CD-RW.
How This Manual Is Organized
•Basic information that is the same for many different functions - e.g. setting the volume - is given in the section “Basic Operations”, and not repeated under each function.
•The names of buttons/controls and display messages are written in all capital letters: e.g. FM/AM, “NO DISC”.
•If the button names on the Unit and the Remote Control are the same, the description on where the button is used will be omitted.
•System functions are written with an initial capital letter only: e.g. Normal Play.
Use the table of contents to look up specific information you require.
We have enjoyed making this manual for you, and hope it serves you in enjoying the many features built into your System.
IMPORTANT CAUTIONS
1 Installation of the System
•Select a place which is level, dry and neither too hot nor too cold. (Between 5°C and 35°C or 41°F and 95°F.)
•Leave sufficient distance between the System and a TV.
•Do not use the System in a place subject to vibrations.
2 Power cord
•Do not handle the power cord with wet hands!
•Some power is always consumed as long as the power cord is connected to the wall outlet.
•When unplugging the System from the wall outlet, always pull the plug, not the power cord.
3 Malfunctions, etc.
•There are no user serviceable parts inside. In case of system failure, unplug the power cord and consult your dealer.
•Do not insert any metallic object into the System.
1

Table of Contents
Introduction ................................................................................................................... |
1 |
Features.................................................................................................................................................... |
1 |
How This Manual Is Organized............................................................................................................... |
1 |
IMPORTANT CAUTIONS..................................................................................................................... |
1 |
Table of Contents .......................................................................................................... |
2 |
Getting Started .............................................................................................................. |
3 |
Accessories .............................................................................................................................................. |
3 |
How To Put Batteries In the Remote Control.......................................................................................... |
3 |
Using the Remote Control ....................................................................................................................... |
3 |
Connecting the FM Antenna.................................................................................................................... |
4 |
Connecting the AM Antenna................................................................................................................... |
5 |
Connecting the Speakers ......................................................................................................................... |
5 |
Connecting External Equipment.............................................................................................................. |
6 |
Connecting to the Wall Outlet ................................................................................................................. |
6 |
DEMO Mode ........................................................................................................................................... |
6 |
COMPU Play........................................................................................................................................... |
6 |
Basic Operations........................................................................................................... |
7 |
Turning the Power On and Off ................................................................................................................ |
7 |
ECO Mode (ECO) ................................................................................................................................... |
7 |
Adjusting the Volume.............................................................................................................................. |
8 |
Fade-out Muting (FADE MUTING) ....................................................................................................... |
8 |
Emphasizing the sound (SOUND TURBO)............................................................................................ |
8 |
Selecting the Sound Mode (SOUND MODE)......................................................................................... |
8 |
Entering the Number with the Remote Control (Numeric Keys)............................................................ |
8 |
Changing the Display .............................................................................................................................. |
8 |
Using the Tuner ............................................................................................................. |
9 |
Tuning In a Station .................................................................................................................................. |
9 |
Presetting Stations ................................................................................................................................. |
10 |
To Change the FM Reception Mode ..................................................................................................... |
10 |
Using the CD Player .................................................................................................... |
11 |
To Load CDs ......................................................................................................................................... |
12 |
To Unload CDs...................................................................................................................................... |
12 |
Changing the MP3/WMA Playback Mode............................................................................................ |
12 |
Basics of Using the CD Player-Normal Play......................................................................................... |
13 |
Resume Play for Audio CD and MP3/WMA Disc................................................................................ |
14 |
Programming the Playing Order of the Tracks...................................................................................... |
14 |
Random Play.......................................................................................................................................... |
15 |
Repeating Tracks ................................................................................................................................... |
15 |
Tray Lock Function ............................................................................................................................... |
15 |
Using the Cassette Deck (Listening to a Tape) ........................................................ |
16 |
Playing a Tape ....................................................................................................................................... |
16 |
Using the Cassette Deck (Recording) ...................................................................... |
17 |
Standard Recording ............................................................................................................................... |
18 |
CD Synchro Recording.......................................................................................................................... |
18 |
Tape to Tape Recording (DUBBING)................................................................................................... |
18 |
Using an External Equipment .................................................................................... |
19 |
Listening to the External Equipment ..................................................................................................... |
19 |
Using the Timers ......................................................................................................... |
20 |
Setting the Clock ................................................................................................................................... |
20 |
Fixing the Clock .................................................................................................................................... |
20 |
Setting the Daily Timer ......................................................................................................................... |
21 |
Setting the REC (Recording) Timer ...................................................................................................... |
22 |
Setting the SLEEP Timer ...................................................................................................................... |
24 |
Timer Priority ........................................................................................................................................ |
24 |
Care And Maintenance................................................................................................ |
25 |
Troubleshooting .......................................................................................................... |
26 |
Specifications ............................................................................................... |
Back cover |
2
Getting Started
Accessories
Make sure that you have all of the following items, which are supplied with the System.
AM Loop Antenna (1)
FM Wire Antenna (1)
Remote Control (1)
Batteries (2)
Stereo Mini Plug Cable (1)
If any of these items are missing, contact your dealer immediately.
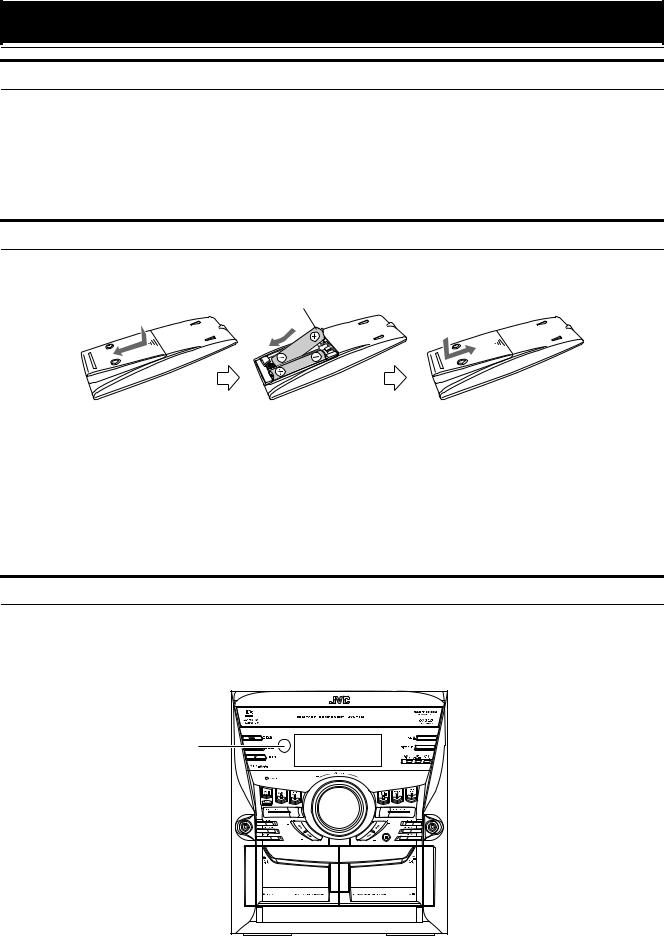
How To Put Batteries In the Remote Control
Match the polarity (+ and –) on the batteries with the + and – markings in the battery compartment.
R6P(SUM-3)/AA(15F)
 CAUTION:
• Battery shall not be exposed to excessive heat such as sunshine, fire or the like.
To avoid battery leakage or explosion:
•Remove batteries when the Remote Control will not be used for a long time.
•When you need to replace the batteries, replace both batteries at the same time with new ones.
•Do not use an old battery with a new one.
•Do not use different types of batteries together.
Using the Remote Control
The Remote Control makes it easy to use many of the functions of the System from a distance of up to 7m (23 feet) away. You need to point the Remote Control at the remote sensor on the System’s front panel.
Remote sensor
 CAUTION:
• Make all connections before plugging the System into an AC power outlet.
3
Getting Started
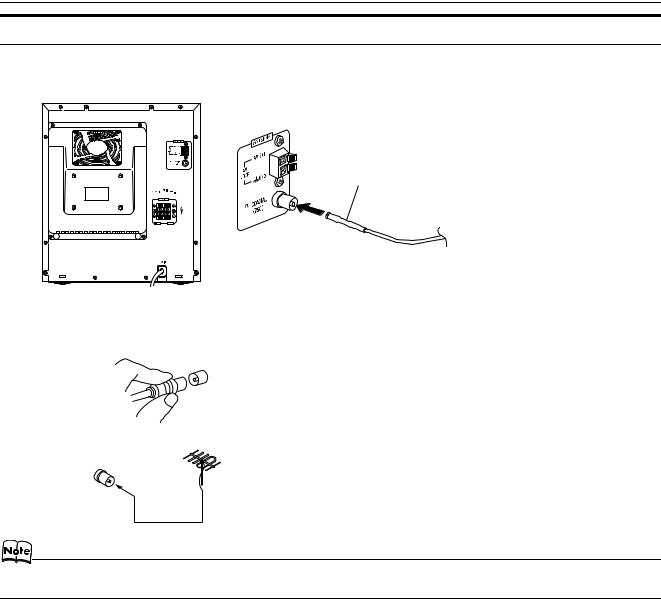
Connecting the FM Antenna
Using the Supplied Wire Antenna
FM wire antenna
Using the Coaxial Type Connector (Not supplied)
A 75Ω antenna with coaxial type connector (IEC or DIN45 325) should be connected to the FM 75Ω COAXIAL terminal.
If reception is poor, connect the outdoor antenna.
FM outdoor antenna (Not supplied)
Coaxial cable
•Before attaching a 75 ohm coaxial lead (the kind with a round wire going to an outdoor antenna), disconnect the supplied FM Wire Antenna.
4
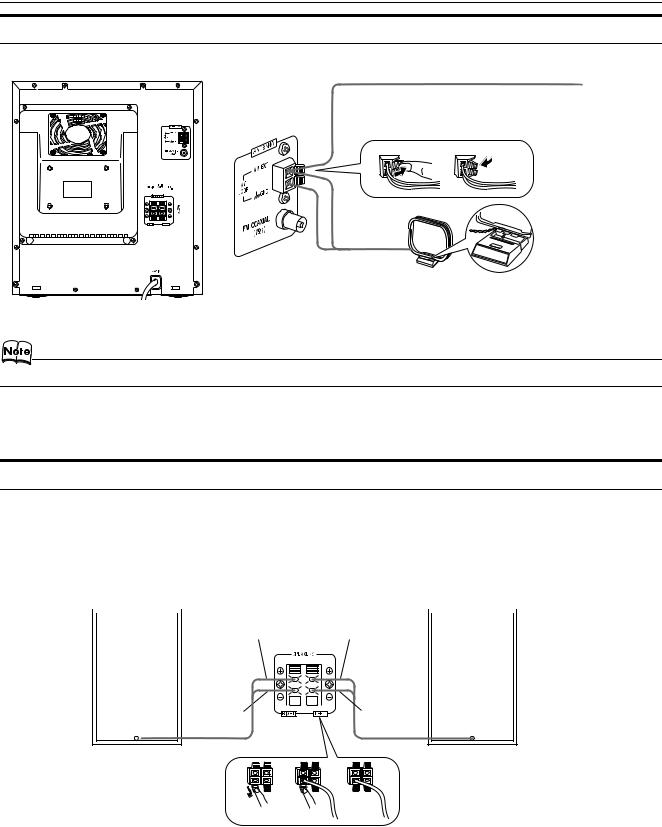
Getting Started
Connecting the AM Antenna
Rear Panel of the Unit
AM antenna wire (not supplied)
If reception is poor, connect the outside antenna.
Turn the loop until you have the best reception.
AM loop antenna (Supplied)
Attach the AM loop to its base by snapping the tabs on the loop into the slot in the base.
• Even when connecting an outside AM antenna, keep the indoor AM loop connected.
 CAUTION:
• To avoid noise, keep antennas away from the System, the connecting cord and the AC power cord.
Connecting the Speakers
1.Open each of the terminals to connect the speaker wire leads.
2.Connect the speaker cords to the Speaker terminals of the Unit.
Connect the gray (+) and gray with black stripe (–) cords of the right side speaker to the red (+) and black (–) terminals marked RIGHT on the System.
Connect the gray (+) and gray with black stripe (–) cords of the left side speaker to the red (+) and black (–) terminals marked LEFT on the System.
3.Close each of the terminals.
Right side (rear view) |
|
|
|
|
|
|
|
|
|
Left side (rear view) |
||||||
|
|
|
|
|
|
|
|
|
|
|
|
|
|
|
|
|
|
|
|
|
Gray |
|
|
|
|
|
|
Gray |
|||||
|
|
|
|
|
|
|
|
|
|
|
|
|
|
|
||
|
|
|
|
|
|
|
|
|
|
|
|
|
|
|
|
|
|
|
|
|
|
|
|
|
|
|
|
|
|
|
|
|
|
|
|
|
|
|
|
|
|
|
|
|
|
|
|
|
|
|
|
|
|
|
|
|
|
|
|
|
|
|
|
|
|
|
|
|
|
|
|
|
|
|
|
|
|
|
|
|
|
|
|
|
|
|
|
|
|
|
|
|
|
|
|
|
|
|
|
|
|
Gray with |
Gray with |
black stripe |
black stripe |
 CAUTIONS:
•A TV may display irregular colors if located near the speakers. If this happens, set the speakers away from the TV.
•Use speakers with the correct impedance only. The correct impedance is indicated on the rear panel.
5
Getting Started
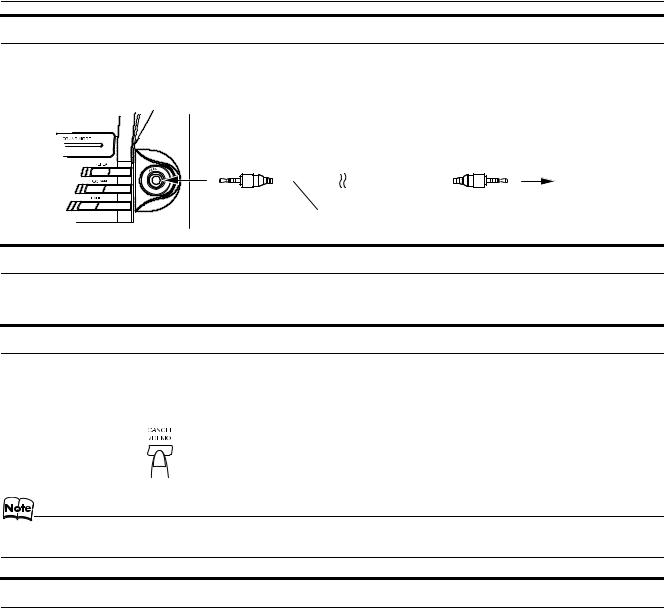
Connecting External Equipment
Connect a signal cord with stereo mini plugs (not supplied) between the System’s AUX jack on the front panel and the audio output jack or output terminals of the external portable CD, MD player, STB, etc.
You can then listen to the external source through the System.
To audio output of external equipment.
Stereo mini plug cable (supplied)
Connecting to the Wall Outlet
Plug the AC power cord into the wall outlet.
Now, your System is at your command!
DEMO Mode
When the System is connected to the wall outlet, a DEMO mode displaying some of the system’s features automatically starts.
To turn the DEMO display off, press any of the operation buttons. The DEMO display automatically stops. To turn the DEMO display on, press the DEMO button on the Unit for more than 2 seconds.
(For 2 seconds)
•While the System is turned on, the DEMO display will automatically starts if no operation is made for 2 minutes. To cancel this auto DEMO display function, press the CANCEL button on the Unit during DEMO display.
COMPU Play
JVC’s COMPU PLAY feature lets you control the most frequently used System functions with a single touch.
With One Touch Operation you can play a CD, a tape, turn on the radio, or listen to an external equipment with a single press of the play button for that function. One Touch Operation turns the power on for you, then starts the function you have specified. If the System is not ready (no CD or tape in place), the System still powers on so you can insert a CD or tape.
How One Touch Operation works in each case is explained in the section dealing with that function. The COMPU PLAY buttons are:
On the Unit
CD 6button
FM/AM button
TAPE A 3, TAPE B 3buttons
AUX button
CD1, CD2 and CD 3 buttons
CD Open/Close 0button
On the Remote Control
CD 6button
FM/AM button
TAPE A, TAPE B buttons
AUX button
CD1, CD2 and CD 3 buttons
6

Basic Operations |
|
||
) |
|
|
|
|
STANDBY/ON |
Display |
|
|
|
||
Numeric |
|
|
|
keys |
STANDBY indicator |
|
|
|
(STANDBY/ON) |
|
|
DISPLAY |
ECO |
SOUND MODE |
|
SOUND TURBO |
VOLUME |
||
|
|||
|
PHONES |
||
|
|
||
SOUND |
VOLUME +, – |
|
|
TURBO |
|
|
|
SOUND |
FADE MUTING |
Various information |
|
||
MODE |
|
|
|
Sound Turbo indicator |
Sound Mode indicator |
|
|
Level bar |
|
|
Status bar (Indicates various statuses.) |
*When the System is in use, the display shows other items as well. For simplicity, we show here only the items described in this section.
Turning the Power On and Off
Turning the System On
1 Press the  STANDBY/ON button.
or
The display comes on and “POWER ON” is displayed once. The STANDBY indicator goes out.
The System comes on ready to continue in the mode it was in when the power was last turned off.
Turning the System Off
1 Press the  STANDBY/ON button again.
or
ECO Mode (ECO)
The System has three energy modes; power on, power off (Standby) and ECO. In ECO mode, the display goes off and the least power is consumed.
To enter ECO mode, press the ECO button on the Unit in Standby mode (while the STANDBY indicator lights up). “ECO MODE” appears on the display, then the display goes off. The STANDBY indicator remains lit.
To cancel ECO mode and turn on the power, press the  STANDBY/ON button on the Unit.
To cancel ECO mode and enter Standby mode, press the ECO button again.
“GOOD BYE” is displayed and the display goes out, except for the clock display. The STANDBY indicator lights up. (The display is dimmed.)
•Some power is always consumed even though power is turned off (called Standby mode).
•To switch off the System completely, unplug the AC power cord from the wall outlet. When you unplug the AC power cord, the clock will be reset to AM 12:00 immediately.
7
 Loading...