


 Loading...
COMPACT COMPONENT SYSTEM
MX-K35V
Consists of CA-MXK35V and SP-MXK35V
 CA-MXK35V
 SP-MXK35V
RM-SMXK35V REMOTE CONTROL
1 |
2 |
3 |
STANDBY/ON |
|
4 |
5 |
6 |
|
SLEEP |
7 |
8 |
9 |
|
AUX |
10 |
+10 |
FM MODE |
FM /AM |
|
CD1 |
CD2 |
CD3 |
CD SELECT |
|
PROGRAM |
REPEAT |
TAPE A/B |
TAPE |
|
/RANDOM |
||||
PREV. |
NEXT |
V.INTRO |
HIGHLIGHT |
|
|
RETURN |
STILL |
|
ON SCREEN |
KARAOKE |
KEY CONTROL |
|
MPX |
|
SOUND |
|
|
|
|
MODE |
|
|
|
ECHO |
ACTIVE |
VOLUME |
|
FADE |
|
BASS EX. |
|
|
|
MUTING |

 3-CD
3-CD
COMPACT COMPONENT SYSTEM MX-K35V
1 BIT DUAL D/A CONVERTER
E
M
LU
VO
AUX |
|
M /A |
M |
C |
D |
|
|
P |
E |
F |
|
|
T |
A |
|
|
CD-R/RW PLAYBACK
ACTIVE
BASS EX.
|
|
C |
P |
R |
O |
OP |
|
SOUND |
|||
|
|
MODE |
|
|
|
CLA |
SSIC |
DISC SKIP
CD CONTROL
C |
D |
1 |
D |
2 |
C |
D |
3 |
C |
|
|
EJECT EJECT
A PLAY FULL - LOGIC CONTROL CD SYNCHRO RECORDING REC/PLAY B
SP-MXK35V CA-MXK35V SP-MXK35V
INSTRUCTIONS
For Customer Use:
Enter below the Model No. and Serial No. which are located either on the rear, bottom or side of the cabinet. Retain this information for future reference.
Model No.
Serial No.
LVT0799-001A [US]
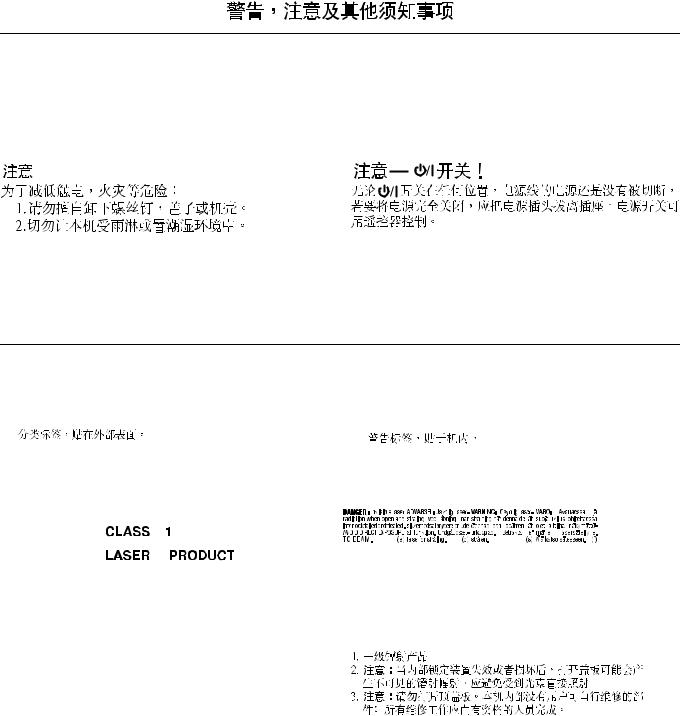
Warnings, Cautions and Others
CAUTION
To reduce the risk of electrical shocks, fire, etc.:
1.Do not remove screws, covers or cabinet.
2.Do not expose this appliance to rain or moisture.
Caution ––  switch!
Disconnect the mains plug to shut the power off completely. The  switch in any position does not disconnect the mains line. The power can be remote controlled.
IMPORTANT FOR LASER PRODUCTS / 


REPRODUCTION OF LABELS / 


1 CLASSIFICATION LABEL, PLACED ON EXTERIOR SURFACE |
|
2 WARNING LABEL, PLACED INSIDE THE UNIT |
|||||||||||||||||||||||||||
1 |
|
|
2 |
|
|
|
|
|
|
|
|
|
|
|
|
|
|
|
|
|
|
|
|
|
|
|
|
||
|
|
|
|
|
|
|
|
|
|
|
|
|
|
|
|
|
|
|
|
|
|
|
|
|
|
|
|||
|
|
|
|
|
|
|
|
|
|
|
|
|
|
|
|
|
|
|
|
|
|
|
|
|
|
|
|
|
|
|
|
|
|
|
|
|
|
|
|
|
|
|
|
|
|
|
|
|
|
|
|
|
|
|
|
|
|
|
|
|
|
|
|
|
|
|
|
|
|
|
|
|
|
|
|
|
|
|
|
|
|
|
|
|
|
|
|
|
|
|
|
|
|
|
|
|
|
|
|
|
|
|
|
|
|
|
|
|
|
|
|
|
|
|
|
|
|
|
|
|
|
|
|
|
|
|
|
|
|
|
|
|
|
|
|
|
|
|
|
|
|
|
|
|
|
|
|
|
|
|
|
|
|
|
|
|
|
|
|
|
|
|
|
|
|
|
|
|
|
|
|
|
|
|
|
|
|
|
|
|
|
|
|
|
|
|
|
|
|
|
|
|
|
|
|
|
|
|
|
|
|
|
|
|
|
|
|
|
|
|
|
|
|
|
|
|
|
|
|
|
|
|
|
|
|
|
|
|
|
|
|
|
|
|
|
|
|
|
|
|
|
|
|
|
|
|
|
|
|
|
|
|
|
|
|
|
|
|
|
|
|
|
|
|
|
|
|
|
|
|
|
|
|
|
|
|
|
|
|
|
|
|
|
|
|
|
|
|
|
|
|
|
|
|
|
|
|
|
|
|
|
|
|
|
|
|
|
|
|
|
|
|
|
|
|
|
|
|
|
|
|
|
|
|
|
|
|
|
|
|
|
|
|
|
|
|
|
|
|
|
|
|
|
|
|
|
|
|
|
|
|
|
|
|
|
|
|
|
|
|
|
|
|
|
|
|
|
|
|
|
|
|
|
|
|
|
|
|
|
|
|
|
|
|
|
|
|
|
|
|
|
|
|
|
|
|
|
|
|
|
|
|
|
|
|
|
|
|
|
|
|
|
|
|
|
|
|
|
|
1. CLASS 1 LASER PRODUCT
2. CAUTION: Invisible laser radiation when open and interlock failed or defeated. Avoid direct exposure to beam.
3. CAUTION: Do not open the top cover. There are no user serviceable parts inside the Unit; leave all servicing to qualified service personnel.
G-1
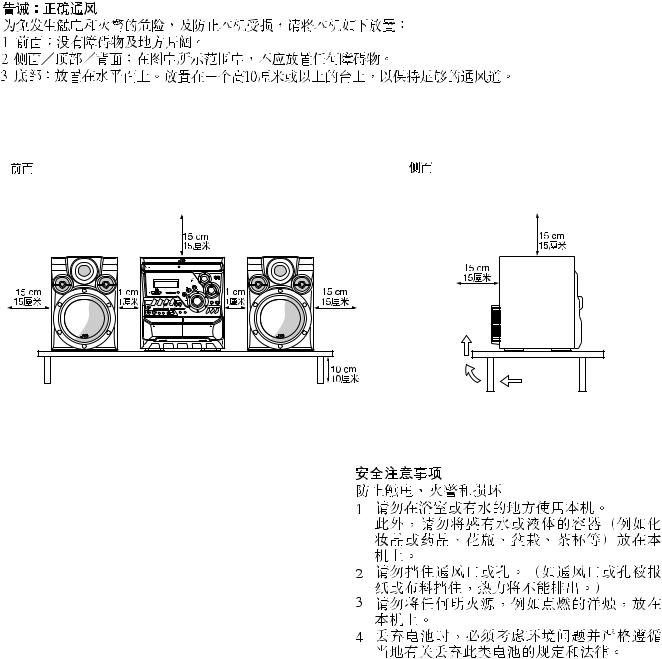
Caution: Proper Ventilation
To avoid risk of electric shock and fire, and to prevent damage, locate the apparatus as follows:
1 |
Front: |
No obstructions and open spacing. |
2 |
Sides/ Top/ Back: No obstructions should be placed in the areas shown by the dimensions below. |
|
3 |
Bottom: |
Place on the level surface. Maintain an adequate air path for ventilation by placing on a stand with a height of 10 cm or more. |
Front view |
Side view |
 3-CD
3-CD
MX-K35V
P
O
P
|
U |
X |
FM/A |
M |
A |
|
|
|
A
C |
D |
|
A |
P |
E |
|
T |
|
|
CD CONTROL
1 2 |
3 |
FULL - LOGIC CONTROL CD SYNCHRO RECORDING |
B |
SAFETY PRECAUTIONS
Prevention of Electric Shocks, Fire Hazards and Damage
1.Do not use this apparatus in a bathroom or places with water. Also do not place any containers filled with water or liquids (such as cosmetics or medicines, flower vases, potted plants, cups, etc.) on top of this apparatus.
2.Do not block the ventilation openings or holes.
(If the ventilation openings or holes are blocked by a newspaper or cloth, etc., the heat may not be able to get out.)
3.Do not place any naked flame sources, such as lighted candles, on the apparatus.
4.When discarding batteries, environmental problems must be considered and local rules or laws governing the disposal of these batteries must be followed strictly.
G-2
English
Introduction
Thank you for purchasing the JVC Compact Component System.
We hope it will be a valued addition to your home, giving you years of enjoyment.
Be sure to read this instruction manual carefully before operating your new stereo system.
In it you will find all the information you need to set up and use the system.
If you have a query that is not answered by the manual, please contact your dealer.
Features
Here are some of the things that make your System both powerful and simple to use.
Types of CD you can play
Many types of compact discs are sold for a variety of uses. The Video CD Player can play the following compact discs.
•Video CD without Playback Control function: for audio and video (moving picture) reproduction.
•Video CD with Playback Control function: featuring user interrupting operation and super-fine still pictures for audio and video (moving picture) reproduction.
•MP3 disc
•Digital Audio CD, including 8-cm CDs: for audio reproduction.
•CDs you cannot play: Do not play SVCDs, DVDs and CD-ROMs on this System. Playing CD-ROMs may generate a noise which can damage your speakers.
The controls and operations have been redesigned to make them very easy to use, freeing you to just enjoy the music.
•With JVC’s COMPU PLAY you can turn on the System and automatically start the Radio, Cassette Deck, or CD Player with a single touch.
The great SEA (Sound Effect Amplifier) effects Rock, Pop and Classics are provided.
The Active Bass EX. (Extension) circuitry faithfully reproduces low frequency sounds.
A 45-station preset capability (30 FM and 15 AM ) in addition to auto-seek and manual tuning.
CD changer function can operate 3 discs.
•Discs can be changed during play using the Carrousel tray (rotational tray).
•Continuous, random or program play of 3 discs. (Audio CD only)
Two Decks enabling tape dubbing.
You can use conventional tapes and CDs for Karaoke with the voice masking system. With an optional microphone, you can replace the lead singer’s voice on your favorite songs with your own.
•Digital Echo applied to your voice through the microphone gives you a professional sound.
Timer functions; Daily Timer, REC (Recording) Timer, and Sleep Timer.
You can connect various external units, such as an MD recorder.
The CD player can play back a CD-R and CD-RW.
How This Manual Is Organized
•Basic information that is the same for many different functions - e.g. setting the volume - is given in the section “Basic Operations”, and not repeated under each function.
•The names of buttons/controls and display messages are written in all capital letters: e.g. FM/AM, “NO DISC”.
•If the button names on the Unit and the Remote Control are the same, the description on where the button is used will be omitted.
•System functions are written with an initial capital letter only: e.g. Normal Play.
Use the table of contents to look up specific information you require.
We have enjoyed making this manual for you, and hope it serves you in enjoying the many features built into your System.
IMPORTANT CAUTIONS
1 Installation of the System
•Select a place which is level, dry and neither too hot nor too cold. (Between 5°C and 35°C or 41°F and 95°F.)
•Leave sufficient distance between the System and a TV.
•Do not use the System in a place subject to vibrations.
2 Power cord
•Do not handle the power cord with wet hands!
•Some power is always consumed as long as the power cord is connected to the wall outlet.
•When unplugging the System from the wall outlet, always pull the plug, not the power cord.
3 Malfunctions, etc.
•There are no user serviceable parts inside. In case of system failure, unplug the power cord and consult your dealer.
•Do not insert any metallic object into the System.
1

Table of Contents |
|
Introduction ................................................................................................................... |
1 |
Features.................................................................................................................................................... |
1 |
How This Manual Is Organized............................................................................................................... |
1 |
IMPORTANT CAUTIONS..................................................................................................................... |
1 |
Table of Contents .......................................................................................................... |
2 |
Getting Started .............................................................................................................. |
3 |
Accessories .............................................................................................................................................. |
3 |
Set the VOLTAGE SELECTOR Switch ................................................................................................. |
3 |
How To Put Batteries In the Remote Control.......................................................................................... |
3 |
Using the Remote Control ....................................................................................................................... |
4 |
Connecting the FM Antenna.................................................................................................................... |
4 |
Connecting the AM Antenna ................................................................................................................... |
5 |
Connecting the Speakers ......................................................................................................................... |
5 |
Connecting a TV...................................................................................................................................... |
6 |
Connecting External Equipment.............................................................................................................. |
6 |
Connecting to the Wall Outlet ................................................................................................................. |
6 |
COMPU Play........................................................................................................................................... |
6 |
Basic Operations........................................................................................................... |
7 |
Turning the Power On and Off ................................................................................................................ |
7 |
Adjusting the Volume.............................................................................................................................. |
7 |
Fade-out Muting (FADE MUTING) ....................................................................................................... |
8 |
Reinforcing the Bass Sound (ACTIVE BASS EX.)................................................................................ |
8 |
Selecting the Sound Mode (SOUND MODE)......................................................................................... |
8 |
Entering the Number with the Remote Control (Numeric Keys) ............................................................ |
8 |
Using the Tuner ............................................................................................................. |
9 |
Tuning In a Station .................................................................................................................................. |
9 |
Presetting Stations ................................................................................................................................. |
10 |
To Change the FM Reception Mode ..................................................................................................... |
10 |
Using the CD Player (Digital Audio CDs, MP3 Discs) .............................................. |
11 |
To Load CDs ......................................................................................................................................... |
12 |
To Unload CDs...................................................................................................................................... |
12 |
Basics of Using the CD Player-Normal Play......................................................................................... |
12 |
Programming the Playing Order of the Tracks...................................................................................... |
13 |
Random Play.......................................................................................................................................... |
14 |
Repeating Tracks ................................................................................................................................... |
14 |
Tray Lock Function ............................................................................................................................... |
15 |
MP3 Discs Playback .............................................................................................................................. |
15 |
Using the Video CD Player (Video CDs).................................................................... |
16 |
Setting the TV System ........................................................................................................................... |
16 |
Selecting the Audio Channel ................................................................................................................. |
16 |
Playing Video CDs with PBC Function (VCD 2.0) .............................................................................. |
17 |
Playing Video CDs with PBC Functions without Using the PBC Function (PBC OFF)...................... |
18 |
Playing video CDs without the PBC Function ...................................................................................... |
18 |
Various Functions to Enhance Your Enjoyment ................................................................................... |
18 |
Using the Cassette Deck (Listening to a Tape) ........................................................ |
20 |
Playing a Tape ....................................................................................................................................... |
20 |
Using the Cassette Deck (Recording) ...................................................................... |
21 |
Standard Recording ............................................................................................................................... |
22 |
CD Synchro Recording.......................................................................................................................... |
22 |
Tape to Tape Recording (DUBBING)................................................................................................... |
22 |
Using an External Equipment .................................................................................... |
23 |
Listening to the External Equipment ..................................................................................................... |
23 |
Recording the System's source to External Equipment ......................................................................... |
23 |
Dubbing the Video CD into the VCR.................................................................................................... |
23 |
Using the Timers ......................................................................................................... |
24 |
Setting the Clock ................................................................................................................................... |
24 |
Setting the Daily Timer ......................................................................................................................... |
25 |
Setting the REC (Recording) Timer ...................................................................................................... |
26 |
Setting the SLEEP Timer ...................................................................................................................... |
28 |
Timer Priority ........................................................................................................................................ |
28 |
Using the Microphone................................................................................................. |
29 |
Singing Along with Karaoke ................................................................................................................. |
29 |
Microphone Mixing ............................................................................................................................... |
30 |
Playing the Microphone Sound through the Speakers........................................................................... |
30 |
Care And Maintenance................................................................................................ |
31 |
Troubleshooting .......................................................................................................... |
32 |
Specifications .............................................................................................................. |
32 |
English
2
English
Getting Started
Accessories
Make sure that you have all of the following items, which are supplied with the System.
AM Loop Antenna (1)
Remote Control (1)
Batteries (2)
FM Wire Antenna (1)
Video Cord (1)
AC Plug Adaptor (1)
If any of these items are missing, contact your dealer immediately.
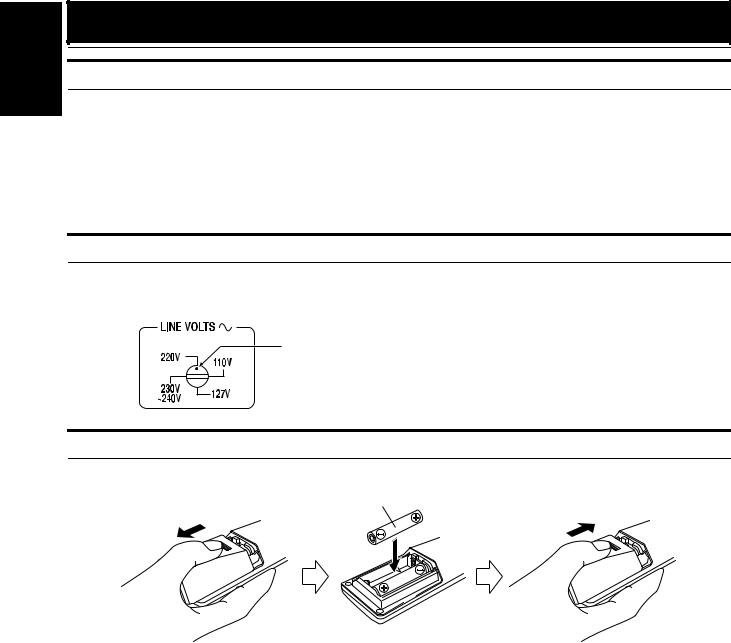
Set the VOLTAGE SELECTOR Switch
To avoid damaging the System, set the voltage before plugging in the System.
Set the correct voltage for your area with the VOLTAGE SELECTOR switch on the back of the Unit. Use a screwdriver to rotate the selector so the number the voltage mark is pointed at is the same as the voltage.
Voltage mark
How To Put Batteries In the Remote Control
Match the polarity (+ and –) on the batteries with the + and – markings in the battery compartment.
R6P(SUM-3)/AA(15F)
 CAUTION:
• Handle batteries properly.
To avoid battery leakage or explosion:
•Remove batteries when the Remote Control will not be used for a long time.
•When you need to replace the batteries, replace both batteries at the same time with new ones.
•Do not use an old battery with a new one.
•Do not use different types of batteries together.
3
Getting Started
Using the Remote Control
The Remote Control makes it easy to use many of the functions of the System from a distance of up to 7m away. You need to point the Remote Control at the remote sensor on the System’s front panel.
|
NTSC/PAL |
|
|
3-CD |
|
|
|
|
|
|
||||
|
COMPATIBILITY |
|
|
|
|
|
|
|
|
CD-R/RW PLAYBACK |
||||
COMPACT COMPONENT SYSTEM |
MX-K35V |
1 BIT DUAL D/A |
|
|
|
|
|
|
||||||
|
|
|
|
|
|
|
|
CONVERTER |
ACTIVE |
|
|
|
|
|
|
|
|
|
|
|
|
|
|
|
|
|
|
|
|
|
|
|
|
|
|
|
|
|
BASS EX. |
|
|
|
|
|
|
|
|
|
|
|
|
|
NEXT |
|
|
|
|
|
|
|
|
|
|
|
|
|
|
PRESET |
|
|
|
|
|
|
|
|
|
|
|
|
|
|
PREV |
R O |
C |
K |
|
|
PO |
|
|
|
|
|
|
|
|
|
|
|
|
P |
||
|
|
|
STANDBY/ON |
|
|
|
ME |
|
|
|
|
SOUND |
|
|
|
|
|
|
|
CANCEL |
SET |
|
|
|
|
|
MODE |
|
|
|
|
|
|
|
|
|
|
LU |
|
|
|
|
|
|
Remote sensor |
|
|
|
|
|
|
|
VO |
|
|
|
|
|
|
|
|
|
|
|
|
|
|
|
|
|
|
S |
|
|
|
|
|
|
|
|
|
|
|
|
|
|
CLA SIC |
|
|
|
|
|
X |
FM/AM |
CD |
TAPE |
VCD NUMBER |
|
|
|
|
|
DISC SKIP |
|
PHONES |
A |
U |
TUNING |
|
|
|
|
|
|
|
||||
|
|
|
|
SELECT |
|
REC START |
CD |
|
|
|
|
|
CD CONTROL |
|
|
|
|
|
REPEAT PROGRAM |
RANDOM |
/STOP |
REC START DUBBING |
|
|
|
|
|
|
|
MIC |
|
|
|
MIC LEVEL |
KEY CONTROL |
CLOCK |
TAPE |
|
|
|
1 |
2 |
3 |
|
|
|
|
|
PBC RETURN |
|
/TIMER |
A/B |
|
|
C D |
||||
|
|
|
|
|
|
|
|
|
|
|
|
C D |
C D |
|
MIN |
|
|
|
MAX |
|
|
|
|
|
|
|
|
|
|
|
|
|
|
EJECT |
|
|
|
|
EJECT |
|
||||
|
|
|
A PLAY |
FULL - LOGIC CONTROL |
CD SYNCHRO RECORDING |
REC/PLAY B |
|
|||||||
 CAUTION:
• Make all connections before plugging the System into an AC power outlet.
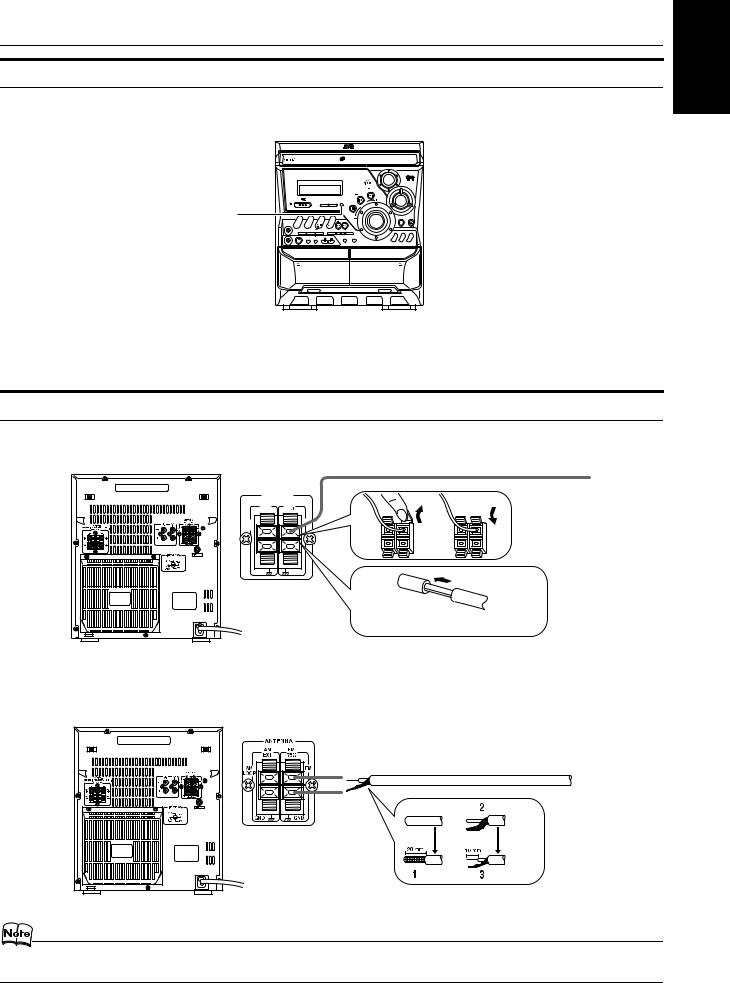
Connecting the FM Antenna
Using the Supplied Wire Antenna
ANTENNA
AM |
FM |
EXT |
75 |
AM |
FM |
LOOP |
|
GND |
GND |
FM wire antenna (supplied)
Extend the supplied FM
Wire Antenna horizontally.
Strip vinyl shield from cut line,twist wire core.
Using an FM 75-Ohm Antenna Cable (not Supplied)
If reception is poor, connect the outside antenna.
Outdoor FM antenna cable (not supplied)
English
•Before attaching a 75 ohm coaxial lead (the kind with a round wire going to an outdoor antenna), disconnect the supplied FM Wire Antenna.
4
English
Getting Started
Connecting the AM Antenna
Rear Panel of the Unit
Turn the loop until you have the best reception.
AM loop antenna (Supplied)
ANTENNA
AM |
FM |
EXT |
75 |
AM |
FM |
LOOP |
|
GND |
GND |
Attach the AM loop to its base by snapping the tabs on the loop into the slot in the base.
AM antenna wire (not supplied)
If reception is poor, connect the outside antenna.
• Even when connecting an outside AM antenna, keep the indoor AM loop connected.
 CAUTION:
• To avoid noise, keep antennas away from the System, the connecting cord and the AC power cord.
Connecting the Speakers
1.Open each of the terminals to connect the speaker wire leads.
2.Connect the speaker cords to the Speaker terminals of the Unit.
Connect the red (+) and black (–) wires of the right side speaker to the red (+) and black (–) terminals marked RIGHT on the System. Connect the red (+) and black (–) wires of the left side speaker to the red (+) and black (–) terminals marked LEFT on the System.
3.Close each of the terminals to securely connect the cords.
Right side (rear view)
CAUTION:
SPEAKER IMPEDANCE 6 16 OHMS.
Red |
SPEAKERS |
|
RIGHT |
LEFT |
Black
Left side (rear view)
Red
Black
 CAUTIONS:
•A TV may display irregular colors if located near the speakers. If this happens, set the speakers away from the TV.
•Use speakers with the correct impedance only. The correct impedance is indicated on the rear panel.
5
Getting Started
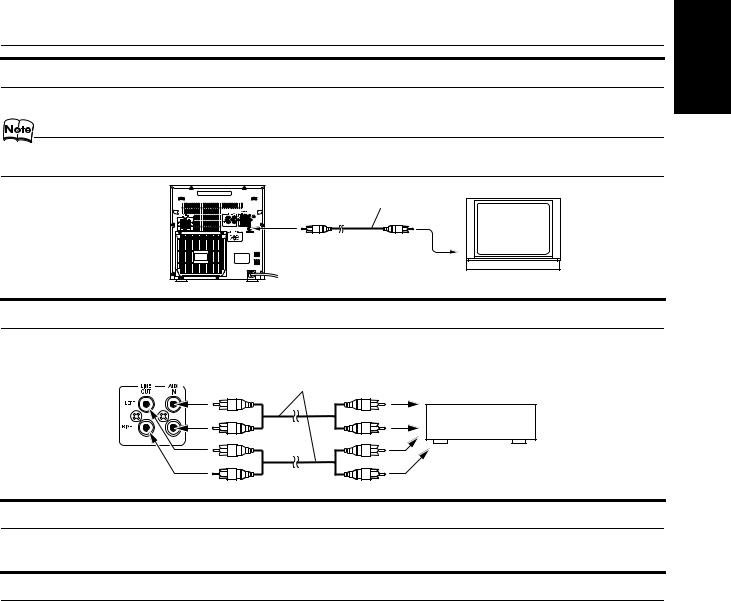
Connecting a TV
Connect a video cord (supplied) between the System’s VIDEO OUT terminal and the video input jack of your TV.
•Do not connect a cable between the LINE-OUT terminals and the audio input terminals of an external TV. If it is connected, noise may be generated depending on the TV to be used.
Video cord
TV (not supplied)
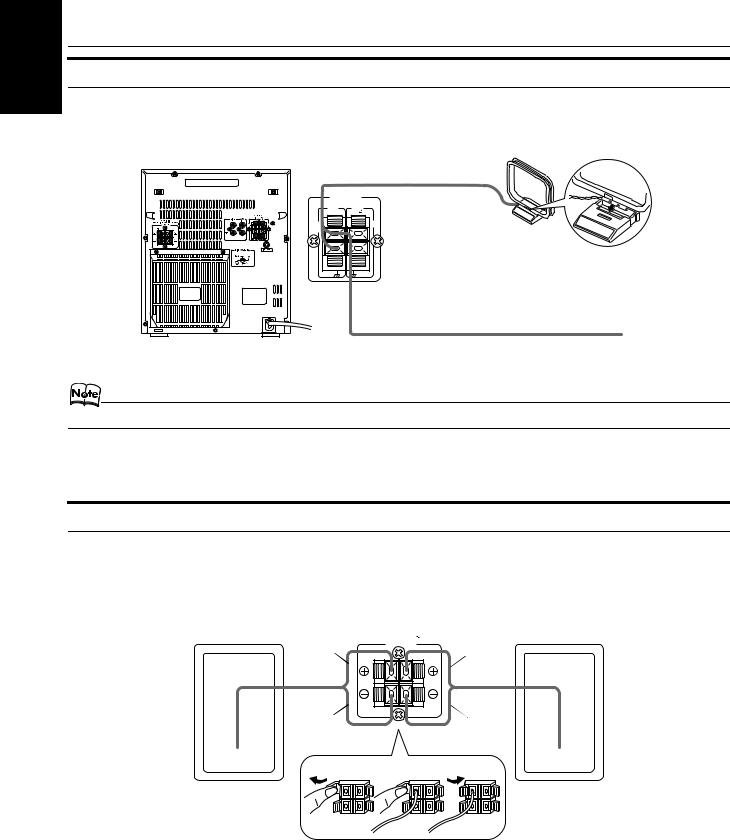
Connecting External Equipment
Connect signal cords (not supplied) between the System’s AUX-IN/LINE OUT terminals and the output/input terminals of the external MD recorder, tape deck, etc.
Then you can listen to or record from the external source through the System.
Signal cord (not supplied) |
MD recorder, tape deck, etc. (not supplied) |
|
Pin-plug x 2 |
Pin-plug x 2 |
|
Pin-plug x 2 |
Pin-plug x 2 |
|
Connecting to the Wall Outlet
Plug the AC power cord into the wall outlet.
Now, your System is at your command!
COMPU Play
JVC’s COMPU PLAY feature lets you control the most frequently used System functions with a single touch.
With One Touch Operation you can play a CD, a tape, turn on the radio, or listen to an external equipment with a single press of the play button for that function. One Touch Operation turns the power on for you, then starts the function you have specified. If the System is not ready (no CD or tape in place), the System still powers on so you can insert a CD or tape.
How One Touch Operation works in each case is explained in the section dealing with that function. The COMPU PLAY buttons are:
On the Unit |
On the Remote Control |
CD 6 button |
CD 6 button |
FM/AM button |
FM/AM button |
TAPE 3 button |
TAPE 3 button |
AUX button |
AUX button |
CD1, CD2 and CD 3 buttons |
CD1, CD2 and CD 3 buttons |
CD Open/Close 0 button |
|
English
6
English
Basic Operations
)
RM-SMXK35V REMOTE CONTROL
|
1 |
2 |
3 |
STANDBY/ON |
% |
|
|
|
|
|
|
||
Numeric |
4 |
5 |
6 |
SLEEP |
|
|
|
|
|
|
Display |
||
keys |
7 |
8 |
9 |
AUX |
||
|
||||||
|
10 |
+10 |
FM MODE FM /AM |
STANDBY indicator |
||
|
CD1 |
CD2 |
CD3 |
CD SELECT |
% |
|
|
PROGRAM |
REPEAT TAPE A/B TAPE |
|
|||
|
/RANDOM |
PHONES |
||||
|
PREV. |
NEXT V.INTRO HIGHLIGHT |
||||
|
|
|||||
|
|
RETURN STILL ON SCREEN |
|
|||
|
KARAOKE |
KEY CONTROL |
MPX |
VOLUME +,– |
||
SOUND |
MODE |
|
|
ECHO |
||
|
SOUND |
|
|
|
|
|
MODE |
|
|
|
|
|
|
ACTIVE |
ACTIVE |
VOLUME |
FADE |
|
||
BASS EX. |
|
|
MUTING |
FADE MUTING |
||
|
|
|
|
|||
BASS EX. |
|
|
|
|
|
|
|
NTSC/PAL |
|
|
|
|
3-CD |
|
|
|
|
|
|
|
|
|
||
|
COMPATIBILITY |
|
|
|
|
PLAY & EXCHANGE |
|
|
|
|
|
|
CD-R/RW PLAYBACK |
||||
|
|
|
|
|
|
|
|
|
|
|
|
|
|
|
|||
COMPACT COMPONENT SYSTEM |
MX-K35V |
1 BIT DUAL D/A |
|
|
|
|
|
|
|
|
|||||||
|
|
|
|
|
|
|
|
|
|
|
|
|
|
|
|
||
|
|
|
|
|
|
|
|
CONVERTER |
ACTIVE |
|
|
|
|
|
|
|
|
|
|
|
|
|
|
|
|
|
|
|
|
|
|
|
|
|
|
|
|
|
|
|
|
|
|
|
|
BASS EX. |
|
|
|
|
|
|
|
|
|
|
|
|
|
|
|
|
NEXT |
|
|
|
|
|
|
|
|
|
|
|
|
|
|
|
|
PRESET |
|
|
|
|
|
|
|
|
|
|
|
|
|
|
|
|
|
|
|
|
|
|
K |
|
|
|
O |
|
|
|
|
|
|
|
|
|
|
|
|
C |
|
|
|
|
P |
|
|
|
|
|
|
|
|
PREV |
|
R |
O |
|
|
|
|
P |
|
|
|
|
|
|
|
|
|
|
|
|
|
|
|
|
|||
|
|
|
|
|
|
|
|
|
|
|
|
|
|
SOUND |
|
||
|
STANDBY/ON |
|
|
|
|
|
|
|
|
|
|
|
|
|
|||
STANDBY |
|
|
CANCEL |
|
SET |
|
|
ME |
|
|
|
|
|
MODE |
|
||
|
|
|
|
|
|
|
|
|
LU |
|
|
|
|
|
|
|
|
|
|
|
|
|
|
|
|
V |
O |
|
|
|
|
|
|
|
|
|
|
|
|
|
|
|
|
|
|
|
|
|
|
|
CLA SSIC |
|
|
|
AUX |
FM/AM |
CD |
|
|
E |
VCD NUMBER |
|
|
|
|
|
|
|
DISC SKIP |
|
|
PHONES |
|
T A |
P |
|
TUNING |
|
|
|
|
|
|
|
|
|
|
||
|
|
SELECT |
|
REC START |
CD |
|
|
|
|
|
|
|
CD CONTROL |
||||
|
|
REPEAT PROGRAM |
RANDOM |
/STOP |
REC START DUBBING |
|
|
|
|
|
|
|
|
|
|||
MIC |
|
MIC LEVEL |
KEY CONTROL |
CLOCK |
TAPE |
|
|
|
|
|
1 |
|
2 |
3 |
|||
|
|
|
/TIMER |
A/B |
|
|
|
|
D |
D |
|||||||
|
|
PBC RETURN |
|
|
|
|
|
|
|
|
|
|
|
D |
|||
|
|
|
|
|
|
|
|
|
|
|
|
|
C |
|
C |
|
C |
MIN |
|
MAX |
|
|
|
|
|
|
|
|
|
|
|
|
|
|
|
|
|
EJECT |
|
|
|
|
|
|
|
EJECT |
|
|
|||||
|
A PLAY |
FULL - LOGIC CONTROL |
CD SYNCHRO RECORDING |
REC/PLAY B |
|
|
|||||||||||
ACTIVE
BASS EX.
SOUND MODE
VOLUME
Various information
BASS  BASS indicator
S.MODE  Sound Mode indicator
Level bar Status bar (Indicates various statuses.)
*When the System is in use, the display shows other items as well. For simplicity, we show here only the items described in this section.
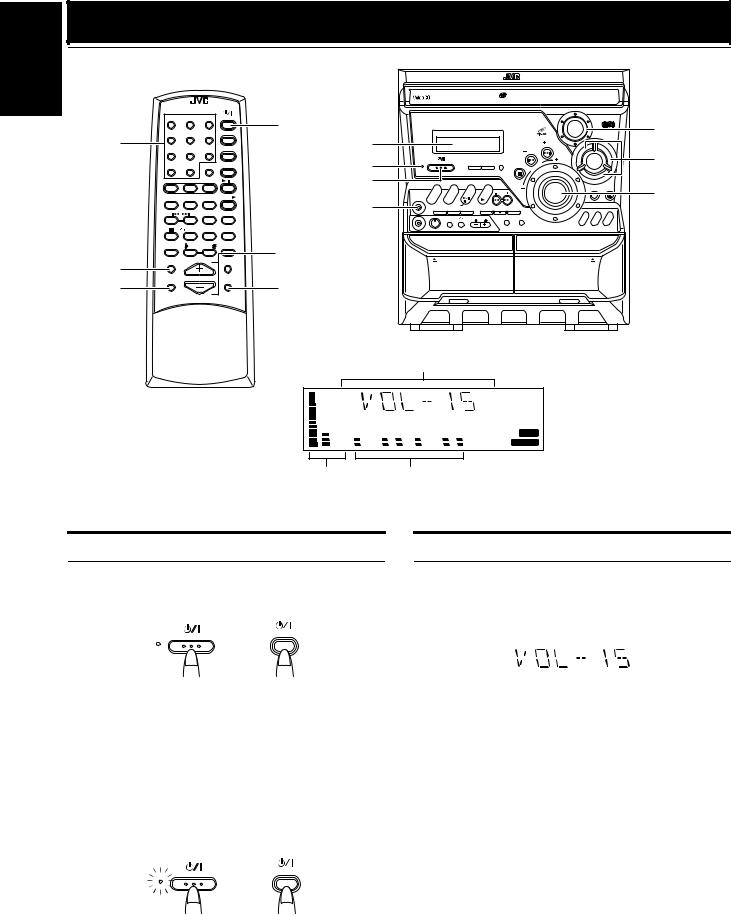
Turning the Power On and Off
Turning the System On
1 Press the % button.
STANDBY/ON
STANDBY STANDBY/ON
or
The display comes on and “WELCOME” is displayed once. The STANDBY indicator goes out.
The System comes on ready to continue in the mode it was in when the power was last turned off.
•For example, if the last thing you were doing was listening to a CD, you are now ready to listen to a CD again. If you wish, you can change to another source.
•If you were listening to the Tuner last, the Tuner comes on playing the station it was last set to.
Turning the System Off
1 Press the %button again.
STANDBY/ON
STANDBY STANDBY/ON
or
“GOOD BYE” is displayed and the display goes out, except for the clock display. The STANDBY indicator lights up. (The display is dimmed.)
•Some power is always consumed even though power is turned off (called Standby mode).
•To switch off the System completely, unplug the AC power cord from the wall outlet. When you unplug the AC power cord, the clock will be reset to 0:00 immediately.
Adjusting the Volume
Turn the VOLUME control on the Unit clockwise to increase the volume or turn it counterclockwise to decrease the volume.
Press the VOLUME + button on the Remote Control to increase the volume or press the VOLUME – button to decrease the volume.
You can set the volume level to MIN, 1-31, or MAX.
 CAUTION:
•DO NOT turn on the System and/or start playing any source without first setting the VOLUME control to minimum, as a sudden blast of sound could damage your hearing, speakers and/or headphones.
For private listening
Connect a pair of headphones to the PHONES jack. No sound comes out of the speakers.
Be sure to turn down the volume before connecting or putting on headphones.
7
Basic Operations
Fade-out Muting (FADE MUTING)
You can mute the output with one touch operation.
To mute the output, press the FADE MUTING button on the Remote Control. The output is faded out.
To release muting, press the FADE MUTING button once again. The output is faded in to the previous level.
•After Fade-out Muting, turning the VOLUME control on the unit or pressing the VOLUME button on the Remote Control will increase the volume from MIN. setting.
Reinforcing the Bass Sound
(ACTIVE BASS EX.)
The richness and fullness of the bass sound is maintained regardless of how low you set the volume.
You can use this effect only for playback.
To get the effect, press the ACTIVE BASS EX. (Extension) button.
The “BASS” indicator lights up and “ACTIVE BASS EXTENSION” appears on the display.
To cancel the effect, press the button again.
The “BASS” indicator goes out and “OFF” appears on the display.
Selecting the Sound Mode
(SOUND MODE)
You can select one of 3 SEA (Sound Effect Amplifier) modes. You can use this effect only for playback.
On the Unit
To get the effect, press one of the Sound Mode buttons, ROCK, POP, or CLASSIC.
The selected Sound Mode name “ROCK”, “POP”, or “CLASSIC” appears on the display. The “S.MODE” indicator also lights up on the display.
To cancel the effect, press the currently selected mode button again.
When the effect is canceled, the “S.MODE” indicator goes out. For example, if the current Sound Mode is ROCK, press the ROCK button again. “FLAT” appears on the display, showing that no sound effect is applied.
ROCK |
Boosts low and high frequencies. Good for |
POP |
acoustic music. |
Good for vocal music. |
|
CLASSIC |
Set for wide and dynamic sound stereo |
FLAT |
systems. |
No sound effect applies. |
Entering the Number with the Remote Control (Numeric Keys)
You will use the number keys on the Remote Control to enter numbers for presetting stations, recalling the preset stations, or programming the playing tracks on CDs.
How to enter the number with the number keys is explained here.
Examples:
•To enter number 5, press 5.
•To enter number 15, press +10, then 5.
•To enter number 20, press +10, then 10.
•To enter number 25, press +10, +10, then 5.
On the Remote Control
Press the SOUND MODE button until Sound Mode you want appears on the display.
The “S.MODE” indicator lights up on the display.
Each time you press the button, the Sound Mode changes as follows:
ROCK =POP =CLASSIC =FLAT =(back to the beginning)
To cancel the effect, press the SOUND MODE button until “FLAT” appears on the display.
The “S.MODE” indicator goes out.
English
8
Loading...