


CD RECEIVER
RECEPTOR CON CD
RÉCEPTEUR CD
KD-AHD39/KD-HDR30
Only for KD-AHD39
For canceling the display demonstration, see page 7.
Para cancelar la demostración en pantalla, consulte la página 7.
Pour annuler la démonstration des affichages, référez-vous à la page 7.
For installation and connections, refer to the separate manual. Para la instalación y las conexiones, refiérase al manual separado.
Pour l’installation et les raccordements, se référer au manuel séparé.
INSTRUCTIONS
MANUAL DE INSTRUCCIONES
MANUEL D’INSTRUCTIONS
For customer Use:
Enter below the Model No. and Serial No. which are located on the top or bottom of the cabinet. Retain this information for future reference.
Model No.
Serial No.
FRANÇAIS ESPAÑOL ENGLISH
LVT1775-001A [J]
ENGLISH
Thank you for purchasing a JVC product.
Please read all instructions carefully before operation, to ensure your complete understanding and to obtain the best possible performance from the unit.
INFORMATION (For U.S.A.)
This equipment has been tested and found to comply with the limits for a Class B digital device, pursuant to Part 15 of the FCC Rules. These limits are designed to provide reasonable protection against harmful interference in a residential installation. This equipment generates, uses, and can radiate radio frequency energy and, if not installed and used
in accordance with the instructions, may cause harmful interference to radio communications. However, there is no guarantee that interference will not occur in a particular installation. If this equipment does cause harmful interference to radio or television reception, which can be determined by turning the equipment off and on, the user is encouraged to try to correct the interference by one or more of the following measures:
–Reorient or relocate the receiving antenna.
–Increase the separation between the equipment and receiver.
–Connect the equipment into an outlet on a circuit different from that to which the receiver is connected.
–Consult the dealer or an experienced radio/TV technician for help.
Caution:
Changes or modifications not approved by JVC could void the user’s authority to operate the equipment.
IMPORTANT FOR LASER PRODUCTS
1.CLASS 1 LASER PRODUCT
2.CAUTION: Do not open the top cover. There are no user serviceable parts inside the unit; leave all servicing to qualified service personnel.
3.CAUTION: (For U.S.A.) Visible and/or invisible class II laser radiation when open. Do not stare into beam.
(For Canada) Visible and/or invisible class 1M laser radiation when open. Do not view directly with optical instruments.
4.REPRODUCTION OF LABEL: CAUTION LABEL, PLACED OUTSIDE THE UNIT.
[European Union only]
|
|
|
|
|
|
|
|
|
|
|
|
|
|
|
|
|
|
|
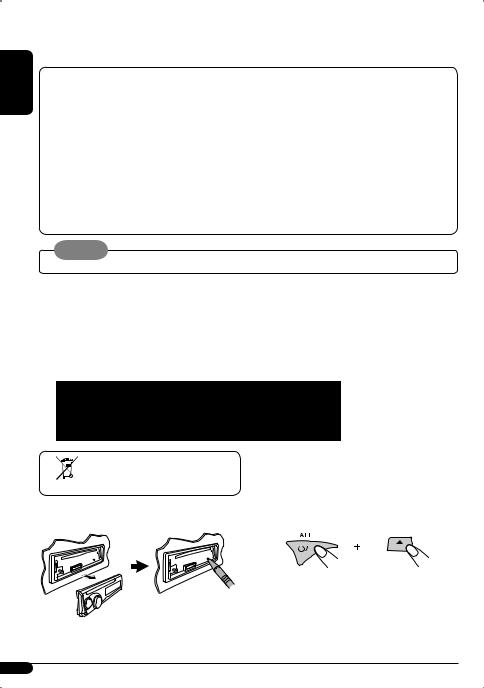
How to reset your unit |
|
|
How to forcibly eject a disc |
|||||||||
|
|
|
|
|
|||||||||||
|
|
|
|
||||||||||||
|
|
|
|
|
|
|
|
|
|
|
|
|
|
|
|
|
|
|
|
|
|
|
|
|
|
|
|
|
|
|
|
|
|
|
|
|
|
|
|
|
|
|
|
|
|
|
|
• If this does not work, reset your unit.
• Be careful not to drop the disc when it ejects.
•Your preset adjustments will also be erased (except the registered Bluetooth device, see pages 19 and 20).
2
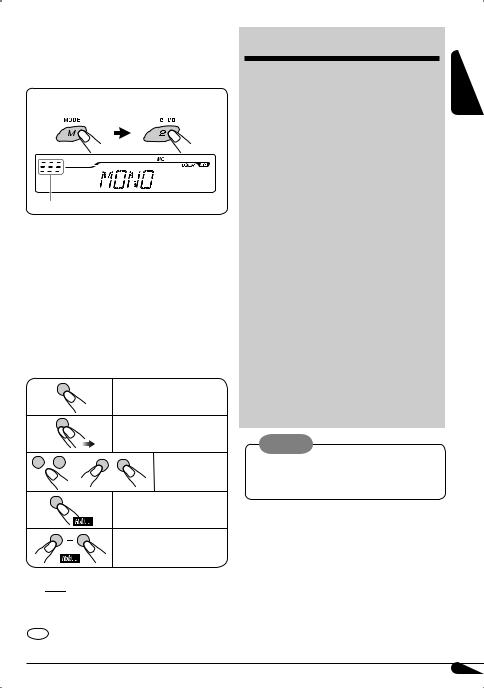
 How to use the M MODE button
If you press the M MODE button, the unit goes into functions mode, then the number buttons and 5/∞ buttons work as different function buttons.
Ex.: When number button 2 works as the
MO (monaural) button...
Time countdown indicator
To use these buttons for their original functions again after pressing the M MODE button, wait for 5 seconds without pressing any of these buttons until the functions mode is cleared or press the M MODE button again.
 How to read this manual
•Button operations are mainly explained using the illustrations in the table below.
•Illustrations of KD-HDR30 are mainly used for explanation.
•Some related tips and notes are explained in “More about this unit” (see pages 31 – 33).
Press briefly.
Press repeatedly.
Press either one.
Press and hold until your desired response begins.
Press and hold both buttons at the same time.
The following marks are used to indicate...
 : Built-in CD player operations.
 : External CD changer operations.
: Indicator displayed for the corresponding operation.
CONTENTS |
|
Control panel ................................... |
4 |
Remote controller — RM-RK50 .............. |
5 |
Getting started................................. |
7 |
Basic operations.................................................... |
7 |
Radio operations .............................. |
8 |
Disc operations................................. |
11 |
Playing a disc in the unit ...................................... |
11 |
Playing discs in the CD changer ............................ |
11 |
Sound adjustments........................... |
14 |
General settings — PSM ................... |
17 |
Bluetooth® operations ...................... |
19 |
Connecting a Bluetooth device for the first time ... |
19 |
Using the Bluetooth cellular phone....................... |
21 |
Using the Bluetooth audio player.......................... |
23 |
Bluetooth settings ................................................ |
24 |
Satellite radio operations.................. |
25 |
iPod operations ................................ |
28 |
Other external component |
|
operations .................................... |
30 |
More about this unit ......................... |
31 |
Maintenance .................................... |
34 |
Troubleshooting............................... |
35 |
Specifications................................... |
39 |
Warning:
If you need to operate the unit while driving, be sure to look around carefully or you may be involved in a traffic accident.
For safety...
•Do not raise the volume level too much, as this will block outside sounds, making driving dangerous.
•Stop the car before performing any complicated operations.
Temperature inside the car...
If you have parked the car for a long time in hot or cold weather, wait until the temperature in the car becomes normal before operating the unit.
ENGLISH
3

ENGLISH
Control panel
Display window
Parts identification
|
|
|
|
|
|
|
|
|
|
|
|
|
|
|
|
|
|
|
|
|
|
|
|
|
|
|
|
|
|
|
|
|
|
|
|
|
|
|
|
|
|
|
|
|
|
|
|
|
|
|
|
|
|
|
|
|
|
|
|
|
|
|
|
|
|
|
|
|
|
|
|
|
|
|
|
|
|
|
|
|
|
|
|
|
|
|
|
|
|
|
|
|
|
|
|
|
|
|
|
|
|
|
|
|
|
|
|
|
|
|
|
|
|
|
|
|
|
|
|
|
|
|
|
|
|
|
|
|
|
|
|
|
|
|
|
|
|
|
|
|
|
|
|
|
|
|
|
|
|
|
|
|
|
|
|
|
|
|
|
|
|
|
|
|
|
|
|
|
|
|
|
|
|
|
|
|
|
|
|
|
|
|
|
|
|
|
|
|
|
|
|
|
|
|
|
|
|
|
|
|
|
|
|
|
|
|
|
|
|
|
|
|
|
|
|
|
|
|
|
|
|
|
|
|
|
|
|
|
|
|
|
|
|
|
|
|
|
|
|
|
|
|
|
|
|
|
|
|
|
|
|
|
|
|
|
|
|
|
|
|
|
|
|
|
|
|
|
|
|
|
|
|
|
|
|
|
|
|
|
|
|
|
|
|
|
|
|
|
|
|
|
|
|
|
|
|
|
|
|
|
|
|
|
|
|
|
|
|
|
|
|
|
|
|
|
|
|
|
|
|
|
|
|
|
|
|
|
|
|
|
|
|
|
|
|
|
|
|
|
|
|
|
|
|
|
|
|
|
|
|
|
|
|
|
|
|
|
|
|
|
|
|
|
|
|
|
|
|
|
|
|
|
|
|
|
|
|
|
|
|
|
|
|
|
|
|
|
|
|
|
|
|
|
|
|
|
|
|
|
|
|
|
|
|
|
|
|
|
|
|
|
|
|
|
|
|
|
|
|
|
|
|
|
|
|
|
|
|
|
|
|
|
|
|
|
|
|
|
|
|
|
|
|
|
|
|
|
|
|
|
|
|
|
|
|
|
|
|
|
|
|
|
|
|
|
|
|
|
|
|
|
|
|
|
|
|
|
|
|
|
|
|
|
|
|
|
|
|
|
|
|
|
1 |
5 (up) / ∞ (down) buttons |
w SRC (source) button |
||||||||||||||||||||||||||
2 |
0 (eject) button |
e 4 /¢ buttons |
||||||||||||||||||||||||||
3 |
|
|
|
|
(standby/on attenuator) button |
r AUX (auxiliary) button |
||||||||||||||||||||||
|
|
|
||||||||||||||||||||||||||
|
|
|
||||||||||||||||||||||||||
4 |
Control dial |
t SEL (select) button |
||||||||||||||||||||||||||
5 |
Remote sensor |
y M MODE button |
||||||||||||||||||||||||||
|
DO NOT expose the remote sensor to strong light |
u Number buttons |
||||||||||||||||||||||||||
|
(direct sunlight or artificial lighting). |
i KD-AHD39: EQ (equalizer) button |
||||||||||||||||||||||||||
6 |
BAND button |
o MO (monaural) button |
||||||||||||||||||||||||||
7 |
Loading slot |
; SSM (Strong-station Sequential Memory) button |
||||||||||||||||||||||||||
8 |
Display window |
a HOLD button |
||||||||||||||||||||||||||
9 |
KD-AHD39: CS-A (SRS Circle Surround Auto™) button |
s RPT (repeat) button |
||||||||||||||||||||||||||
|
KD-HDR30: EQ (equalizer) button |
d RND (random) button |
||||||||||||||||||||||||||
p DISP (display) button |
f AUX (auxiliary) input jack |
|||||||||||||||||||||||||||
q |
|
(control panel release) button |
|
|
|
|
|
|
|
|
|
|
|
|
||||||||||||||
4

Display window
gStatus of Bluetooth device
(Device number, [1 – 5]; signal strength, [0 – 3]*1; battery reminder, [0 – 3]*1)
h Tr (track) indicator j Sub-display
kBluetooth indicator
Lights up when a Bluetooth device is connected.
l Playback source indicators—
CH: Lights up only when CD-CH is selected as the playback source.
DISC: Lights up only when CD is selected as the playback source.
/Playback mode / item indicators— RND (random), (disc),
 (folder), RPT (repeat)
zTuner reception indicators—ST (stereo), MO (monaural), HOLD (reception hold), HD (HD Radio™ broadcasting)
xSound mode (preset equalizer) indicators—CLASSIC, HIP HOP, JAZZ, ROCK, POPS, USER
c EQ (equalizer) indicator
vInformation indicators—TAG,  (folder),
 (track/ file, CS II encoded HD Radio signal*2)
b Main display
*1 As the signal/battery becomes stronger, the number increases.
*2 KD-AHD39 only
ENGLISH
Remote controller — RM-RK50
Installing the lithium coin battery (CR2025)
If the range of effectiveness of the remote controller decreases, replace the battery.
For USA-California Only
This product contains a CR Coin Cell Lithium Battery which contains Perchlorate Material—special handling may apply.
See www.dtsc.ca.gov/hazardouswaste/perchlorate
Aim the remote controller directly at the remote sensor on the unit. Make sure there is no obstacle in between.
Warning:
•Do not install any battery other than CR2025 or its equivalent; otherwise, it may explode.
•Store the battery in a place where children cannot reach to avoid risk of accident.
•To prevent the battery from over-heating, cracking, or starting a fire:
–Do not recharge, short, disassemble, heat the battery, or dispose of it in a fire.
–Do not leave the battery with other metallic materials.
–Do not poke the battery with tweezers or similar tools.
–Wrap the battery with tape and insulate when throwing away or saving it.
Caution:
Continued on the next page
5

Main elements and features
ENGLISH
1


 (standby/on/attenuator) button
•Turns the power on if pressed briefly or attenuates the sound when the power is on.
•Turns the power off if pressed and held.
25 U (up) / D (down) ∞ buttons
•Changes the FM/AM bands with 5 U.
•Changes the preset stations with D ∞.
•Changes the HD Radio multicast channel numbers if pressed and held.
•Changes the folder of the MP3/WMA discs.
•While playing an MP3 disc on an MP3-compatible CD changer:
–Changes the disc if pressed briefly.
–Changes the folder if pressed and held.
•While listening to the satellite (SIRIUS or XM) radio:
–Changes the categories.
•While listening to an Apple iPod:
–Pauses/stops or resumes playback with D ∞.
–Enters the main menu with 5 U. (Now 5 U/ D ∞/2 R/F 3 work as the menu selection buttons.)*
3VOL – / VOL + buttons
• Adjusts the volume level.
4SOUND button
•Selects the sound mode (EQ mode.) 5 SOURCE button
•Selects the source.
62 R (reverse) / F (forward) 3 buttons
•Searches for stations if pressed briefly.
•Searches for HD Radio stations if pressed and held.
•Fast-forwards or reverses the track if pressed and held.
•Changes the tracks if pressed briefly.
•While listening to the satellite radio:
–Changes the channels if pressed briefly.
–Changes the channels rapidly if pressed and held.
•While listening to an iPod (in menu selecting mode):
–Selects an item if pressed briefly. (Then, press D ∞ to confirm the selection.)
–Skips 10 items at a time if pressed and held.
•While listening to a Bluetooth audio player
–Reverse skip/forward skip
* 5 U : Returns to the previous menu. D ∞ : Confi rms the selection.
Only for KD-AHD39:
The unit is equipped with the OE remote control (steering wheel remote control) function.
•See the Installation/Connection Manual (separate volume) for connection.
6
Getting started
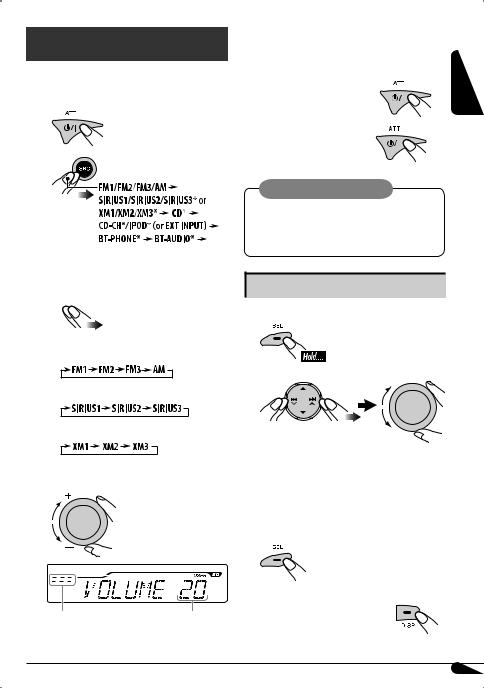
Basic operations 
~ Turn on the power.
Ÿ


 (Back to the beginning)
*You cannot select these sources if they are not ready or not connected.
!
•For conventional FM/AM stations and HD Radio stations
@ Adjust the sound as you want. (See pages |
|
|||||
14 – 16.) |
ENGLISH |
|||||
|
|
|
|
|
|
|
To drop the volume in a moment |
|
|
|
|
|
|
|
|
|
|
|
|
|
(ATT) |
|
|
|
|
|
|
|
|
|
|
|
|
|
To restore the sound, press it again. |
|
|
|
|
|
|
To turn off the power |
|
|
|
|
|
|
|
|
|
|
|
|
|
|
|
|
|
|
|
|
|
|
|
|
|
|
|
|
|
|
|
|
|
|
|
|
|
|
|
|
|
Caution on volume setting:
Discs produce very little noise compared with other sources. Lower the volume before playing a disc to avoid damaging the speakers by the sudden increase of the output level.
Basic settings
• See also “General settings — PSM” on pages 17 and 18.
1
• |
For SIRIUS radio |
2 |
|
||
• |
For XM radio |
|
|
|
1 Canceling the display demonstration |
⁄ Adjust the volume. |
Select “DEMO,” then “DEMO OFF.” |
|
2 Setting the clock |
||
Select “CLOCK HOUR,” then adjust the hour. Select “CLOCK MIN” (minute), then adjust the minute.
3 Finish the procedure.
Volume level indicator |
Volume level appears. |
To check the current clock time |
|
|
|
during power off with “CLOCK DISP” |
|
|
|
||
|
|
deactivated |
|
|
|
7
ENGLISH
Radio operations
You can tune in to both conventional and HD Radio broadcasts.
•If you want to search for HD Radio stations only, see “To search for HD Radio stations only—HD Search” on page 9.
What is HD Radio™ broadcasting?
HD Radio stations can deliver high-quality digital sound—AM digital will have FM-like sound quality (in stereo) and FM digital will have CD-like sound quality— with static-free and clear reception. Furthermore, stations can offer text and data, such as artist names and song titles.
•HD Radio tuners can also tune in to conventional analog broadcasts.
•Many HD Radio stations offer more than one channel of programming. This service is called multicasting.
•To find HD Radio stations in your area, visit <http:// www.hdradio.com/>.
~
Ÿ 
The selected band appears on the sub-display.
!Start searching for a station.
When a station is tuned in, searching stops.
•The ST indicator lights up when the unit receives a stereo signal.
•Only for KD-AHD39:
The indicator lights up when the unit receives an HD Radio signal encoded with CS II (SRS Circle Surround II™).
When an HD Radio broadcast is tuned in...
Analog signals are received first for a few seconds before digital signals.
EX.: When a conventional FM broadcast is tuned in
ST indicator
Selected band |
Selected frequency |
EX.: When an HD Radio broadcast is tuned in
Flashes first then lights up when a digital audio broadcast is tuned in.
Call Sign
To stop searching, press the same button again.
7 Only for HD Radio multicast channels
⁄ Select your desired channel.
First four letters of the Call Sign |
Channel number |
To tune in to broadcasts manually—
Manual Search
Before starting Manual Search, select “MANUAL” for “SEARCH MODE” (see page 18).
In step ! on the left...
1
8
2 Select the desired station frequency.
•When you press the M MODE button in step ! on page 8, you can use HD Search (see below) temporarily by pressing the 4  /¢
/¢ buttons even though “MANUAL” is selected for “SEARCH MODE.”
To search for HD Radio stations only—HD Search
Before starting HD Search, select “HD SEEK” for “SEARCH MODE” (see page 18).
In step ! on page 8...
When an HD Radio station is tuned in, searching stops.
•When you press the M MODE button in step ! on page 8, you can use Manual Search (see page 8) temporarily by pressing the 4  /¢
/¢ buttons even though “HD SEARCH” is selected for “SEARCH MODE.”
When an FM stereo broadcast is hard to receive
Lights up when the monaural mode is activated.
Reception improves, but the stereo effect will be lost.
To restore the stereo effect, repeat the same procedure. “MONO OFF” appears and the MO indicator goes off.
To change the HD Radio reception mode
While tuning in to an HD Radio broadcast, the received signals may alternate between digital and analog due to the receiving conditions.
If you want to cancel this function, follow the procedure below.
While listening to an HD Radio station...
1
2
HOLD indicator
AUTO: For automatic switching between digital and analog audio.
DIGITAL: For playing digital audio only. HOLD indicator lights up.
ANALOG: For playing analog audio only. HOLD indicator lights up.
•If no sound comes out with current setting, change the setting to “ANALOG” or “DIGITAL.”
•The setting automatically returns to “AUTO” in the following cases:
–When you tune in to another broadcast.
–When you change to another source.
–When you turn off the power.
•This setting does not affect the conventional FM/AM stations.
•If the radio station forces the reception mode to digital, the HOLD indicator flashes.
ENGLISH
9
|
|
Storing stations in memory |
ENGLISH |
You can preset six stations for each band. |
|
• The HD Radio multicast channels can also be preset. |
||
|
Station automatic presetting—SSM |
|
|
|
(Strong-station Sequential Memory) |
|
1 |
Select the band you want to store in. |
|
2 |
|
|
3 |
|
“SSM” flashes, then disappears when automatic presetting is over.
Local stations with the strongest signals are searched for and stored automatically in the selected band.
• HD Radio stations are preferentially stored.
Manual presetting
1Tune in to the station or channel you want to preset (see pages 8 and 9).
2Press and hold a number button (1 – 6) to select a preset number.
Ex.: Storing channel number 2 of an HD Radio broadcast into preset number 4 of the FM1 band.
The preset number flashes for a while.
Listening to a preset station
1 
2 Select the preset station (1 – 6) you want.
•“LINKING” appears while linking to an HD Radio multicast channel.
Changing the display information
Clock: Shows the clock.
Call Sign*1: Shows the Call Sign of the HD Radio broadcast tuned in.
Frequency: Shows the station frequency.
PTY*2: Shows the genre of the HD Radio program tuned in (Program Type).
Text*3: Shows the Title/Artist/Album name of the current segment.
•Station frequency appears for a while...
–When you change the frequency.
–When you change the band.
*1 No information appears when a Call Sign is not received. *2 When no program type (PTY) is received, “HD RADIO”
appears for HD Radio broadcasting, and “ANALOG” appears for analog broadcasting.
*3 “NO TEXT” appears when no text is received.
10
Disc operations
Playing a disc in the unit 
All tracks will be played repeatedly until you change the source or eject the disc.
To stop playback and eject the disc
About MP3 and WMA discs
MP3 and WMA “tracks” (the words “file” and “track” are used interchangeably) are recorded in “folders.”
About the CD changer
It is recommended to use a JVC MP3-compatible CD changer with your unit.
•You can also connect other CH-X series CD changers (except CH-X99 and CH-X100). These units are not compatible with MP3 discs.
•You cannot play any WMA discs in the CD changer.
•You cannot use the KD-MK series CD changers with this unit.
•Disc text information recorded on a CD Text can be displayed when a JVC CD Text compatible CD changer is connected.
•For connection, see Installation/Connection Manual (separate volume).
ENGLISH
Playing discs in the CD changer 
All discs in the magazine will be played repeatedly until you change the source.
• Ejecting the magazine will also stop playback.
~
*If you have changed the external input setting to “EXT INPUT” (see page 18), you cannot select the CD changer.
ŸSelect a disc.
For disc numbers 01 – 06:
For disc numbers 07 – 12:
To fast-forward or reverse the track
To go to the next or previous tracks
11
ENGLISH
To go to the next or previous folders (only for MP3 or WMA discs)
For MP3 discs:

For WMA discs:
To locate a particular track (for CD) or folder (for MP3 or WMA discs) directly 
To select a number from 01 – 06:
To select a number from 07 – 12:
To select a particular track in a folder (for MP3 or WMA discs):
Other main functions
Skipping tracks quickly during playback
Only possible on JVC MP3-compatible
CD changer
•For MP3 or WMA discs, you can skip tracks within the same folder.
Ex.: To select track 32 while playing a track whose number is a single digit (1 to 9).
1
2
Each time you press the button, you can skip 10 tracks.
•After the last track, the first track will be selected and vice versa.
3
Prohibiting disc ejection
You can lock a disc in the loading slot.
To cancel the prohibition, repeat the same procedure.
12

Changing the display information
While playing an audio CD or a CD Text
 Disc title / performer*1
 Track title*1
While playing an MP3 or a WMA*2 disc
•When “TAG DISPLAY” is set to “TAG ON” (see page 18)
 Album name / performer (folder name*3)
 Track title (file name*3)
• When “TAG DISPLAY” is set to “TAG OFF”
 Folder name
 File name

 : Clock with the current track number
: Elapsed playing time with the current track number
*1 If the current disc is an audio CD, “NO NAME” appears. *2 Only for the built-in CD player.
*3 If an MP3/WMA fi le does not have Tag information, the folder name and fi le name appear. In this case, the TAG indicator will not light up.
Selecting a playback mode
You can use only one of the following playback modes at |
ENGLISH |
|
|
a time. |
|
1 |
|
2Select your desired playback mode.
7 Repeat play
Mode |
Plays repeatedly |
TRACK RPT: |
The current track. |
FOLDER RPT*1: All tracks of the current folder.
DISC RPT*2: All tracks of the current disc.
RPT OFF: |
Cancels. |
7 Random play |
|
Mode |
Plays at random |
FOLDER RND*1: All tracks of the current folder, then the tracks of the next folder and so on. 
DISC RND: All tracks of the current disc.
ALL RND*2: All tracks of the inserted discs.
RND OFF: |
Cancels. |
*1 Only while playing an MP3 or a WMA disc. *2 Only while playing discs in the CD changer.
13

Sound adjustments
ENGLISH |
|
|
|
|
|
|
|
|
|
|
|
|
|
|
|
|
|
|
|
|
|
|
|
|
|
|
|
Using EQ mode |
|||||||||||||||||||||
|
|
|
|
|||||||||||||||||||||
|
You can select and customize a preset sound mode suitable |
|||||||||||||||||||||||
|
to the music source using the 7-band equalizer. |
|||||||||||||||||||||||
|
To select a preset EQ mode |
|||||||||||||||||||||||
|
1 |
|
|
|
|
|
|
|
|
|
|
|
|
|
|
|
|
|
|
|
|
|
|
|
|
|
Only for KD-AHD39 |
||||||||||||||||||||||
|
2 |
|
|
|
|
|
|
|
|
|
|
|
|
|
|
|
|
|
|
|
|
|
|
|
|
|
|
|
|
|
|
|
|
|
|
|
|
|
|
|
|
|
|
|
|
|
|
|
|
|
|
|
|
|
|
|
|
|
|
|
|
|
|
|
|
|
|
|
|
|
|
|
|
|
|
|
|
|
|
|
|
|
|
|
|
|
|
|
|
|
|
|
|
|
|
|
|
|
|
|
|
|
|
|
|
|
|
|
|
|
|
|
|
|
|
|
|
|
|
|
|
|
|
|
USER: Flat sound
ROCK: For rock or discotheque music
CLASSIC: For classical music
POPS: For light music
HIP HOP: For funk or rap music
JAZZ: For jazz music
To adjust a preset EQ mode
You can adjust the sound modes and store your own adjustments in memory.
1Select your desired preset mode to customize, referring to “To select a preset EQ mode” on the left, then...
The adjustable frequency level appears.
EX.: When “FREQ 60” of “JAZZ” is selected
2 Select your desired frequency.
(Back to the beginning)
3
The adjusted frequency level (-05 to +05) will be stored.
4Repeat the procedure from steps 2 and 3 to adjust other frequencies.
Initial settings of preset EQ modes
|
|
|
Initial level of each frequency |
|
|
||
Mode |
FREQ 60 |
FREQ 150 |
FREQ 400 |
FREQ 1K |
FREQ 2.4K |
FREQ 6K |
FREQ 15K |
USER |
00 |
00 |
00 |
00 |
00 |
00 |
00 |
ROCK |
+03 |
+02 |
00 |
00 |
+01 |
+02 |
+01 |
CLASSIC |
+01 |
+03 |
+01 |
00 |
00 |
+02 |
00 |
POPS |
00 |
+02 |
00 |
00 |
00 |
+01 |
+02 |
HIP HOP |
+04 |
+01 |
-01 |
-02 |
00 |
+01 |
00 |
JAZZ |
+03 |
+02 |
+01 |
+01 |
+01 |
+03 |
+01 |
14
Adjusting the sound balance
1
2
Indication [Range]
FADER*1 *2
Adjust the front and rear speaker balance. [F12 to R12]
BALANCE*2
Adjust the left and right speaker balance. [L12 to R12]
SUB.W*3 (subwoofer)
Adjust the subwoofer output level. [00 to 08]
VOL ADJ (volume adjust)
Adjust the input level of each source (except “FM,” “BT-PHONE,” and “BT-AUDIO”*4). [–10 to +10] Adjust to match to the input level of the FM sound level.
•Before making an adjustment, select the source you want to adjust.
VOLUME
Adjust the volume. [00 to 30 or 50*5]
•The volume levels for “BT-PHONE,” “BT-AUDIO,” and the other sources are stored separately.
*1 If you are using a two-speaker system, set the fader level to “00.”
*2 This adjustment does not affect the subwoofer output. *3 This takes effect only when a subwoofer is connected. *4 When “FM,” “BT-PHONE,” or “BT-AUDIO” is selected as
the source, “VOL ADJ FIX” appears on the display and you cannot adjust the setting.
*5 Depending on the amplifi er gain control setting (see page 18).
Using SRS Circle Surround Auto™ |
|
|
(CS-A mode) |
ENGLISH |
|
This function is only for KD-AHD39. |
||
|
SRS Circle Surround Auto™ is a surround technology specially designed for car audio, and it can reproduce 5.1-channel sound through a standard 4-speaker car stereo system (with or without a subwoofer.)
SRS Circle Surround AutoTM is made up of...
SRS Circle Surround II™ decoder:
Converts the sound of CD, AM/FM radio broadcast and other various sources into multi-channel sounds.
SRS FOCUS®:
Elevates the sound field to a more optimal listening level.
SRSTruBass®:
Creates an ultra rich bass using the standard speakers with no subwoofer connected.
To select a preset mode of SRS Circle
Surround Auto™
TYPE A: For the system of large front speaker with tweeter and rear tray speaker
TYPE B: For the system of large front speaker with tweeter and door-mounted rear speaker
TYPE C: For the system of small front speaker and door-mounted rear speaker
USER: For your preference
OFF: Cancels CS-A mode.
Continued on the next page
15
ENGLISH
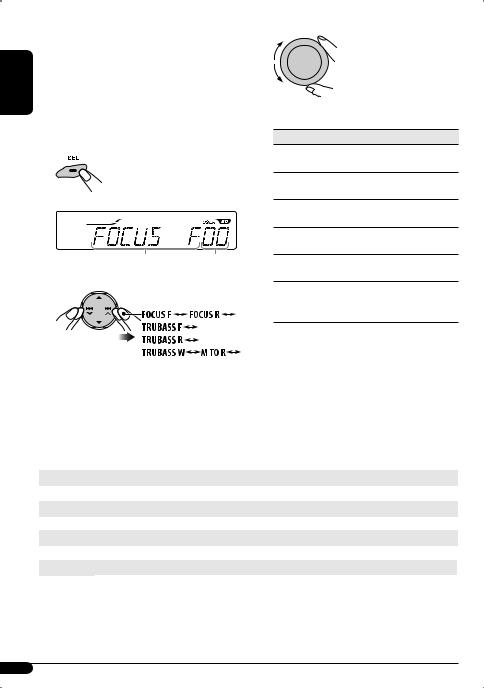
To adjust a preset mode of SRS Circle Surround Auto™
You can adjust the SRS FOCUS® and the SRS TruBass® of each preset CS-A mode and store your own adjustments in memory.
1Select your desired CS-A mode to adjust, referring to “To select a preset mode of SRS Circle Surround Auto™” on page 15, then...
The adjustable item appears.
Selected item name appears. Level number (0-9.)
2 Select an item to adjust.
(Back to the beginning)
Initial settings of preset CS-A mode
3
Adjusted settings will be stored.
Indication [Range]
FOCUS F (SRS FOCUS® Front)
Adjust the SRS FOCUS® of the front speaker. [0 to 9]
FOCUS R (SRS FOCUS® Rear)
Adjust the SRS FOCUS® of the rear speaker. [0 to 9]
TRUBASS F (SRS TruBass® Front)
Adjust the SRS TruBass® of the front speaker. [0 to 9]
TRUBASS R (SRS TruBass® Rear)
Adjust the SRS TruBass® of the rear speaker. [0 to 9]
TRUBASS W (SRS TruBass® Subwoofer)
Adjust the SRS TruBass® of the subwoofer. [0 to 9]
M TO R (Mix to Rear)
Adjust the level of the front channel signals mixed to the rear for richer sound in the rear seat. [0 to 9]
4Repeat the procedure from steps 2 and 3 to adjust other items.
|
|
|
Initial level of each item |
|
|
|
Mode |
FOCUS F |
FOCUS R |
TRUBASS F |
TRUBASS R |
TRUBASS W |
M TO R |
USER |
0 |
0 |
0 |
0 |
0 |
2 |
TYPE A |
3 |
4 |
3 |
4 |
3 |
2 |
TYPE B |
4 |
8 |
5 |
6 |
5 |
2 |
TYPE C |
7 |
9 |
7 |
8 |
7 |
2 |
OFF |
|
|
No effect applied. |
|
|
|
16
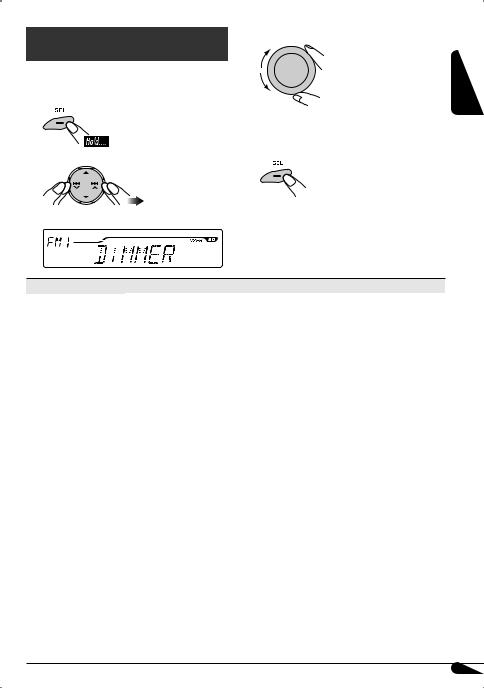
General settings — PSM
You can change PSM (Preferred Setting Mode) items (except “SID”) listed in the table that follows.
1
2Select a PSM item.
Ex.: When “DIMMER” is selected
3 Adjust the PSM item selected.
4Repeat steps 2 and 3 to adjust other PSM items if necessary.
5 Finish the procedure.
ENGLISH
Indications |
Selectable settings, [reference page] |
||
DEMO |
DEMO ON: |
[Initial]; Display demonstration will be activated automatically, [7]. |
|
|
Display demonstration |
DEMO OFF: |
Cancels. |
CLOCK DISP |
CLOCK ON: |
Clock time is always shown on the display when the power is turned off. |
|
|
Display clock |
CLOCK OFF: [Initial]; Cancels. Pressing DISP will show the clock time for about 5 seconds when |
|
|
|
|
the power is turned off, [7]. |
CLOCK HOUR |
1 – 12, [7] |
|
|
|
Hour adjustment |
[Initial: 1 (1:00)] |
|
CLOCK MIN |
00 – 59, [7] |
|
|
|
Minute adjustment |
[Initial: 00 (1:00)] |
|
CLOCK ADJ |
AUTO: |
The built-in clock is automatically adjusted using the clock data provided via the |
|
|
Clock adjustment |
OFF: |
HD Radio broadcast.*3 |
|
|
[Initial]; Cancels. |
|
TIME ZONE*1 |
Select your residential area from one of the following time zones for clock adjustment. |
||
|
Time zone |
EASTERN [Initial] “ ATLANTIC “ NEWFOUND “ ALASKA “ PACIFIC “ |
|
|
|
MOUNTAIN “ CENTRAL “ (back to the beginning) |
|
DST*1 |
Activate this if your residential area is subject to DST. |
||
|
Daylight savings time |
DST ON: |
Activates daylight savings time. |
|
|
DST OFF: |
[Initial]; Cancels. |
SID*2 |
The 12-digit SIRIUS identification number scrolls on the display 5 seconds, [25]. |
||
|
SIRIUS ID |
|
|
DIMMER |
AUTO: |
[Initial]; Dims the display when you turn on the headlights. |
|
|
Dimmer mode |
ON: |
Dims the display illumination of this unit. |
|
|
OFF: |
Cancels. |
*1 |
Displayed only when “CLOCK ADJ” is set to “AUTO.” |
||
*2 |
Displayed only when SIRIUS Satellite radio is connected. |
||
*3 |
When the SIRIUS Satellite Radio or XM Satellite Radio is connected, the clock data is provided via the Satellite radio channel. |
||
Continued on the next page
17

ENGLISH
Indications |
Selectable settings, [reference page] |
||
TEL MUTING*1 |
MUTING 1/ |
Select either one which mutes the sounds while using a cellular phone system. |
|
Telephone muting |
MUTING 2: |
||
|
|||
|
MUTING OFF: [Initial]; Cancels. |
||
|
• When “CD” or “CD-CH/IPOD” has been selected as the source, playback pauses during |
||
|
telephone muting. |
||
SCROLL*2 |
ONCE: |
[Initial]; Scrolls the information once. |
|
Scroll mode |
AUTO: |
Repeats scrolling (5-second intervals). |
|
|
OFF: |
Cancels. |
|
|
• Pressing DISP for more than one second can scroll the display regardless of the setting. |
||
SUB.W FREQ |
LOW: |
Frequencies lower than 90 Hz are sent to the subwoofer. |
|
Subwoofer cutoff |
MID: |
[Initial]; Frequencies lower than 135 Hz are sent to the subwoofer. |
|
frequency |
HIGH: |
Frequencies lower than 180 Hz are sent to the subwoofer. |
|
EXT INPUT*3 |
CHANGER: |
[Initial]; To use a JVC CD changer, [11] or an Apple iPod, [28]. |
|
External input |
EXT INPUT: |
To use any other external component than the above, [30]. |
|
|
• For connecting KS-BTA200, [19]/KS-SRA100, [25]/XMDJVC100 [25], this setting is not |
||
|
required. It is automatically detected. |
||
TAG DISPLAY*2 |
TAG ON: |
[Initial]; Shows the Tag information while playing MP3/WMA tracks, [13]. |
|
Tag display |
TAG OFF: |
Cancels. |
|
AMP GAIN |
You can change the maximum volume level of this unit. |
||
Amplifier gain control |
HIGH POWER: [Initial]; VOL 00 – VOL 50 |
||
|
LOW POWER: VOL 00 – VOL 30 (Select this if the maximum power of the speaker is less than |
||
|
OFF: |
50 W to prevent them from being damaged.) |
|
|
Deactivates the built-in amplifier. |
||
IF BAND |
AUTO: |
[Initial]; Increases the tuner selectivity to reduce interference noises between |
|
Intermediate frequency |
WIDE: |
the stations. (The stereo effect will be lost.) |
|
band |
Subject to the interference noises from adjacent stations, but sound quality will |
||
|
|
not be degraded. (The stereo effect will not be lost.) |
|
AREA |
AREA US: |
[Initial]; When using the unit in North/Central/South America. The AM/FM |
|
Tuner channel interval |
AREA EU: |
intervals are set to 10 kHz/200 kHz. |
|
|
When using the unit in any other areas. The AM/FM intervals are set to |
||
|
AREA SA: |
9 kHz/50 kHz (100 kHz during auto search). |
|
|
When using the unit in South American countries where the FM interval is |
||
|
|
100 kHz. The AM interval is set to 10 kHz. |
|
SEARCH MODE |
You can change radio station search mode operation using the 4 /¢ buttons. |
||
Radio station search |
MANUAL: |
[Initial]; To search for stations manually—for Manual search, [8]. |
|
mode |
HD SEEK: |
To search for HD Radio stations only—for HD search, [9]. |
|
CS ON HD*1 |
AUTO: |
When the unit tunes in to a radio broadcast encoded with CS II, the CS-A mode |
|
CS-A mode standby on |
|
(see page 15) is automatically set to “USER” even though you have set the mode |
|
HD Radio broadcasting |
OFF: |
to “OFF.” |
|
|
[Initial]; Cancels. |
||
*1 KD-AHD39 only
*2 Some characters or symbols will not be shown correctly (or will be blanked out) on the display. *3 Not displayed when the component connected to the CD changer jack is selected as the source.
18
Bluetooth® operations
For Bluetooth operations, it is required to connect the Bluetooth Adapter (KS-BTA200) to the CD changer jack on the rear.
•Refer also to the instructions supplied with the Bluetooth adapter and the Bluetooth device.
•Refer to the list (included in the box) to see the countries where you may use the Bluetooth® function.
Preparation: Operate the device to turn on its Bluetooth function.
To use a Bluetooth device through the unit (“BT-PHONE” and “BT-AUDIO”) for the first time, you need to establish a Bluetooth wireless connection between the unit and the device.
•Once the connection is established, it is registered on the unit even if you reset your unit. Up to five devices can be registered in total.
•Only one device can be connected at a time for each source (“BT-PHONE” and “BT-AUDIO”).
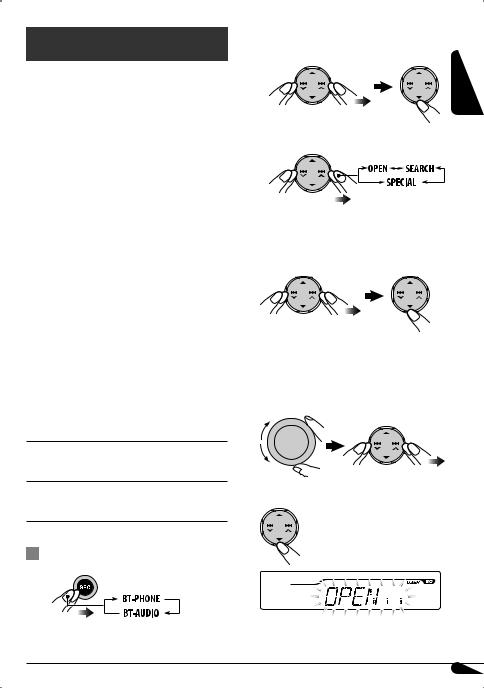
Connecting a Bluetooth device for the first time 
Registration (Pairing) methods
Use either of the following items in the Bluetooth menu to register and establish the connection with a device.
•Select “BT-PHONE” or “BT-AUDIO” as the source to operate the Bluetooth menu.
OPEN: Make the unit ready to establish a new Bluetooth connection. The connection is established by operating the Bluetooth device.
SEARCH: Make the unit ready to establish a new Bluetooth connection. The connection is established by operating the unit.
ŸSelect “NEW DEVICE” then enter the Bluetooth menu.
! Select a desired item.
Registering using “OPEN”
In step ! above...
1 Select “OPEN.”
2 Enter a PIN (Personal Identification Number)* code into the unit.
•You can enter any number you like (1-digit to 16digit number).
*Some devices have their own PIN code. Enter the specified PIN code into the unit.
3 Confirm the entry.
ENGLISH
Basic operations
~
Continued on the next page
19
ENGLISH
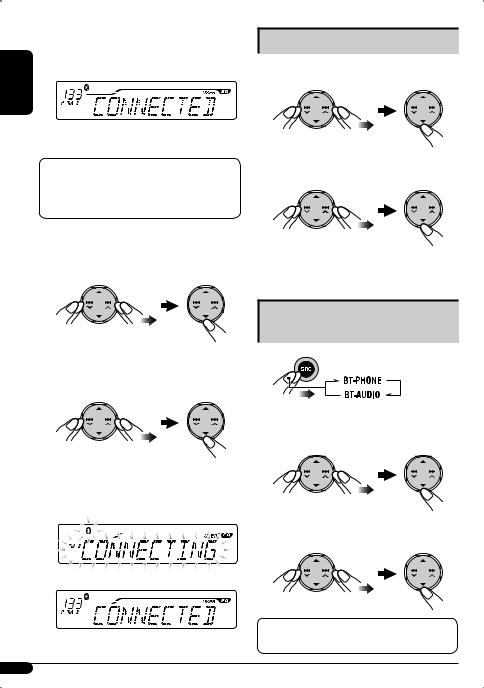
4Operate the target Bluetooth device while “OPEN..” is flashing on the screen.
Enter the same PIN code (as entered in step 2) into the device to be connected.
Now the connection is established and you can use the device through the unit.
The device remains registered even after you disconnect it. Use “CONNECT” (or activate
“AUTO CNNCT”) to connect the same device from next time on (see right and page 24).
Connecting a special device
In step ! on page 19...
1 Select “SPECIAL.”
The unit displays device names.
2 Select the device you want to connect.
Registering using “SEARCH”
In step ! on page 19... |
3 Use “OPEN” (see page 19) or “SEARCH” (see |
1 Select “SEARCH.” |
left) to connect. |
The unit searches for available devices and displays them. (If no available device is detected, “UNFOUND” appears.)
2 Select the device you want to connect.
3Enter the specific PIN code of the device into the unit.
•Refer to the instructions supplied with the device to check the PIN code.
4Use the Bluetooth device to connect.
Now the connection is established and you can use the device through the unit.
Connecting/disconnecting a
registered device
1
2Select the registered device you want to connect/disconnect then enter the Bluetooth menu.
3Select “CONNECT” or “DISCONNECT” to connect/disconnect the selected device.
You can set the unit to connect a Bluetooth device automatically when the unit is turned on (see page 24).
20
Deleting a registered device
1
2Select the registered device you want to delete then enter the Bluetooth menu.
3 Select “DELETE” then “YES.”
! Enter the Bluetooth menu.
ENGLISH
⁄Make a call or settings using the Bluetooth menu.
See pages 22 and 24.
•You can adjust the microphone volume level (see page 24).
•You can adjust the volume level for “BT-PHONE” without affecting the volume level for the other sources.
When the sound is stopped or interrupted while using a Bluetooth device, turn off, then turn on the unit.
•If the sound is not yet restored, connect the device again (see page 20).
To check the clock time
Clock Ô BT-PHONE/BT-AUDIO
Using the Bluetooth cellular phone 
~
ŸEstablish a connection with a device (see page 20).
When a call comes in...
The source is automatically changed to “BT-PHONE.” When “AUTO ANSWER” is set to “ON” (see page 24), the unit answers the incoming calls automatically.
•When “AUTO ANSWER” is set to “OFF,” press any button (except the 


 button) to answer the incoming call.
To end the call or reject an incoming call, hold any button (except the 


 button).
When a Text Message comes in...
If the cellular phone is compatible with Text Message and “MSG INFO” is set to “AUTO” (see page 24), the unit rings and “RCV MSG” appears on the display to inform you of the arrival of the message.
• You cannot edit or send a message through the unit.
21
ENGLISH
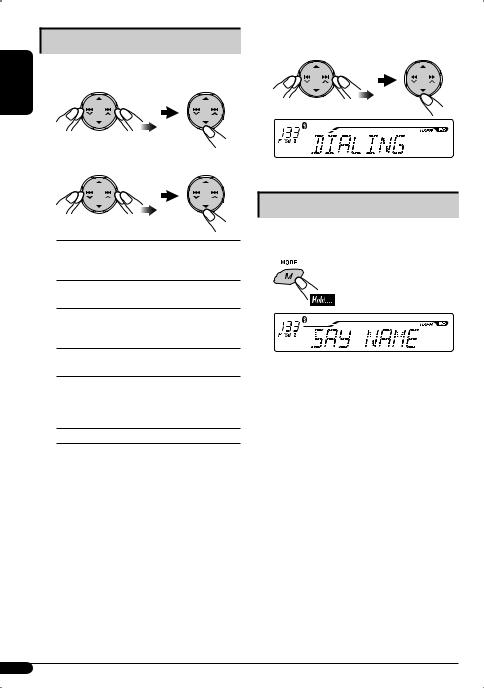
Making a call
In step ⁄ on page 21...
1 Select “DIAL” to enter the Dial menu.
2 Select a calling method.
3Select a name/phone number you want to call.
REDIAL: Shows the phone numbers you have dialed.
Go to the following step. RECEIVED: Shows the received calls.
Go to the following step. PHONE BOOK: Shows the phone book of the
connected cellular phone. Go to the following step.
MISSED: Shows the missed calls. Go to the following step.
NUMBER: Shows the phone number entry display. Enter the phone number in the same way as entering a PIN code (see step 2 on page 19).
VOICE*: Speak the name you want to call.
*Only when the connected cellular phone has the voice recognition system.
Voice Dialing
After the connection is established, you can make a call by your voice regardless of the current source.
1
2Speak the name you want to call.
•You can also use this function from the Dial menu. Select “VOICE” from the menu.
•If your cellular phone does not support the voice recognition system, “ERROR” appears on the display.
22
Presetting phone numbers
You can preset up to six phone numbers.
In step 2 of “Making a call” on page 22...
1Select “RECEIVED,” “PHONE BOOK,” or “MISSED.”
2Select the phone number you want to preset.
3 Select a number.
To call a preset phone number
1
2 Select the preset number.
Using the Bluetooth audio |
|
|
player |
ENGLISH |
|
~ |
||
|
If playback does not start automatically, operate the Bluetooth audio player to start playback.
•See pages 19 and 20 for connecting a new device.
•See page 20 for connecting/disconnecting a registered device.
•See page 21 for deleting a registered device.
When the sound is stopped or interrupted while using a Bluetooth device, turn off, then turn on the unit.
•If the sound is not yet restored, connect the device again (see page 20).
Playback operations
Button |
Operation |
5 (up) button: |
Play/pause |
4  /¢
/¢ buttons: Reverse skip/forward skip
To select other registered devices
1Go to the device selection menu then select a device.
2 Confirm the selection.
23
ENGLISH
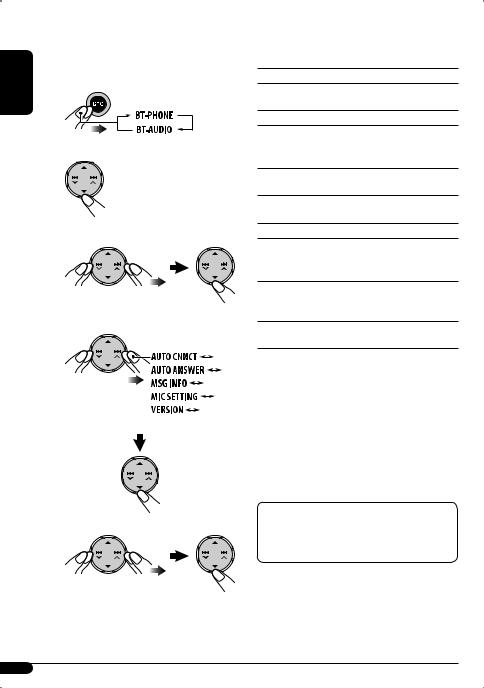
Bluetooth settings 
You can change the settings listed in the right column according to your preference.
~
Ÿ Enter the Bluetooth menu.
! Select “SETTINGS.”
⁄ Select a desired setting item.
(Back to the beginning)
@ Change the setting.
7 AUTO CNNCT (connect)
When the unit is turned on, the connection is established automatically with...
LAST*: The last connected Bluetooth device
ORDER: The available registered Bluetooth device found at first
OFF: No Bluetooth device
7 AUTO ANSWER
Only for the device being connected for “BT-PHONE.”
ON: The unit answers the incoming calls automatically.
OFF*: The unit does not answer the calls automatically. Answer the calls manually.
REJECT: The unit rejects all incoming calls.
7 MSG INFO (message info)
Only for the device being connected for “BT-PHONE.”
AUTO*: The unit informs you of the arrival of a message by ringing and displaying “RCV MSG” (receiving message).
MANUAL: The unit does not inform you of the arrival of a message.
7 MIC SETTING (microphone setting)
Only for the device being connected for “BT-PHONE.” Adjust the volume of the microphone connected to the Bluetooth Adapter, [LEVEL 01/02*/03].
7 VERSION
The Bluetooth software and hardware versions are shown.
* Initial setting
Bluetooth Information:
If you wish to receive more information about Bluetooth, visit the following JVC web site: <http://www.jvc-victor.co.jp/english/car/>
24

Satellite radio operations
This unit is satellite (SAT) Radio Ready—compatible with both SIRIUS Satellite radio and XM Satellite radio.
Before operating your satellite radio:
•For connection, see Installation/Connection Manual (separate volume).
•Refer also to the Instructions supplied with your SIRIUS Satellite radio or XM Satellite radio.
•“SIRIUS” and the SIRIUS dog logo are registered trademarks of SIRIUS Satellite Radio Inc.
•XM and its corresponding logos are registered trademarks of XM Satellite Radio Inc.
•“SAT Radio,” the SAT Radio logo and all related marks are trademarks of SIRIUS Satellite Radio Inc., and XM Satellite Radio, Inc.
Listening to the satellite radio
Connect either one of the following (separately purchased) to the CD changer jack on the rear of this unit.
•SIRIUS satellite radio interface—KS-SRA100, for listening to the SIRIUS Satellite radio through any SIRIUS Satellite radio tuner.
•JVC Smart Digital Adapter—XMDJVC100, for listening to the XM Satellite radio through XMDirect™ Universal Tuner Box.
GCI (Global Control Information) update:
•If channels are updated after subscription, updating starts automatically.
“UPDATING” flashes and no sound can be heard.
•Update takes a few minutes to complete.
•During update, you cannot operate your satellite radio.
Activate your SIRIUS subscription after connection
1 |
ENGLISH |
2 |
|
The SIRIUS satellite radio starts updating all the SIRIUS channels.
Once completed, SIRIUS Satellite radio tunes in to the preset channel, CH184.
3 Check your SIRIUS ID, see page 17.
4Contact SIRIUS on the internet at <http://activate. siriusradio.com/> to activate your subscription, or you can call SIRIUS toll-free at 1-888-539-SIRIUS (7474).
“SUB UPDT PRESS ANY KEY” scrolls on the display once subscription has been completed.
Activate your XM subscription after connection
•Only Channel 0, 1, and 247 are available before activation.
1
2
The XMDirect™ Universal Tuner Box starts updating all the XM channels. “Channel 1” is tuned in automatically.
3Check your XM Satellite radio ID labeled on the casing of the XMDirect™ Universal Tuner Box, or tune in to “Channel 0” (see page 27).
Continued on the next page
25
|
4 Contact XM Satellite radio on the internet at |
|
|
<http://xmradio.com/activation/> to activate |
|
ENGLISH |
your subscription, or you can call 1-800-XM- |
|
RADIO (1-800-967-2346). |
||
|
||
|
Once completed, the XMDirect™ Universal Tuner Box |
|
|
tunes in to one of the available channels (Channel 2 |
|
|
or higher). |
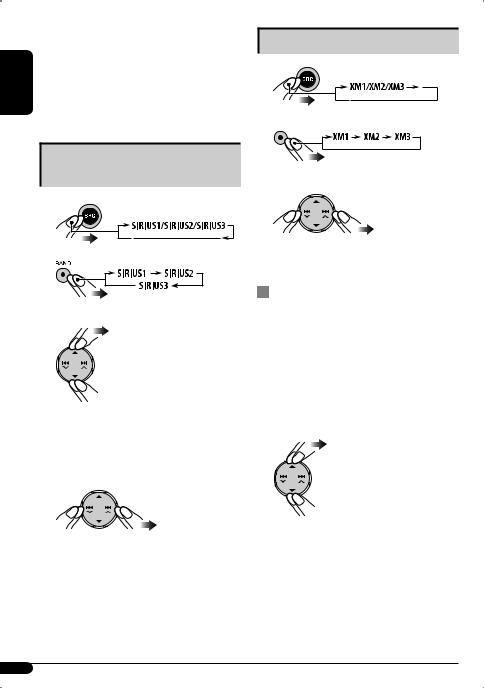
Listening to the SIRIUS Satellite radio
1
2
3 Select a category.
You can tune in to all the channels of every category by selecting “ALL.”
Selecting a particular category (SPORTS, ENTERTAINMENT, etc.) allows you to enjoy only the channels from the selected category.
4 Select a channel to listen to.
Holding the button changes the channels rapidly.
•When changing the category or channel, invalid and unsubscribed channels are skipped.
Listening to the XM Satellite radio
1
2 

3 Select a channel to listen to.
Holding the button changes the channels rapidly.
Searching for a category/channel
You can search for programs by category (Category Search) or channel number (Channel Search).
•In Category Search, you can tune in to the channels of the selected category. Category Search begins from the currently selected channel. The selected channel number flashes on the display.
•In Channel Search, you can tune in to all channels (including non-categorized channels).
1 Select a category (Category Search).
• For Channel Search, skip this step.
26

2Select a channel to listen to.
Ex.: When you select “COUNTRY” for Category Search
Current channel number
If no operation is done for about 15 seconds, Category Search is canceled.
In Channel Search, the channel name and channel number appear on the display while searching.
•While searching, invalid and unsubscribed channels are skipped.
|
Storing channels in memory |
|
||
You can preset six channels for each band. |
ENGLISH |
|||
|
||||
Ex.: Storing a channel into preset number 4 |
|
|||
1 |
Tune in to the channel you want. |
|
||
2 |
|
|
|
|
|
|
|
|
|
|
|
|
|
|
The preset number flashes for a while.
Listening to a preset channel
1Select either SIRIUS Satellite radio or XM Satellite radio.
Checking the XM Satellite radio ID
While selecting “XM1,” “XM2,” or “XM3,” select “Channel 0.”
The display shows “RADIO ID” and the 8-digit (alphanumeric) ID number alternately.
To cancel the ID number display, select any channel other than “Channel 0.”
2 

3 Select the preset channel (1 – 6) you want.
To change the display information
Clock = Category name = Channel name = Artist name = Composer name* = Song/ program name/title = (back to the beginning)
* Only for SIRIUS Satellite radio.
27

ENGLISH
iPod operations
This unit is ready for operating an Apple iPod from the control panel.
Before operating your iPod:
Connect Interface adapter for iPod—KS-PD100 (separately purchased) to the CD changer jack on the rear of this unit for controlling.
•For connection, see Installation/Connection Manual (separate volume).
•For details, refer also to the manual supplied with the interface adapter.
Caution:
Make sure to turn off this unit or turn off the vehicle’s ignition switch before connecting or disconnecting the iPod.
Preparations
Make sure “CHANGER” is selected for the external input setting (see page 18).
~
Ÿ
! Adjust the volume.
⁄Adjust the sound as you want (see pages 14 – 16).
•Make sure the equalizer on the iPod is deactivated.
To pause playback
To resume playback, press it again.
To fast-forward or reverse the track
To go to the next or previous tracks
Playback starts automatically from where it has been paused previously.
28
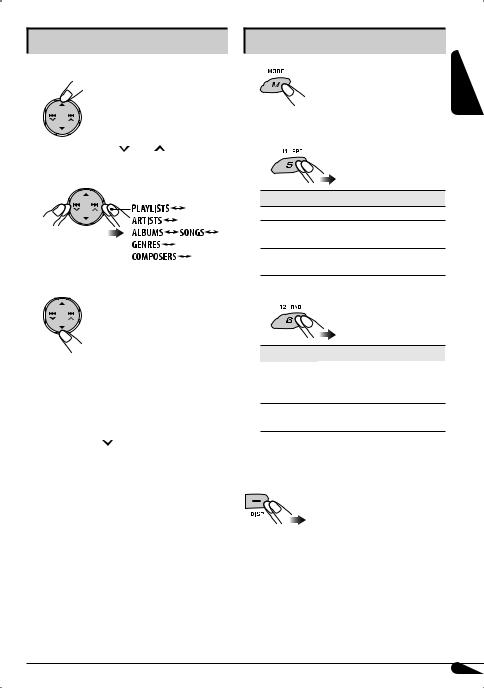
Selecting a track from the menu |
|
Selecting a playback mode |
1 Enter the main menu. |
1 |
|
|
2 |
Select your desired playback mode. |
Now the 5/∞/4 /¢ buttons work as |
|
7 Repeat play |
|
|
the menu selection buttons*1.
2
3
Select the desired menu.
(Back to the beginning)
Confirm the selection.
Mode Plays repeatedly
RPT OFF: Cancels.
ONE RPT: Functions the same as “Repeat One” of the iPod. 
ALL RPT: Functions the same as “Repeat All” of the iPod. 


7 Random play
ENGLISH
To move back to the previous menu, press 5.
•If a track is selected, playback starts automatically.
•If the selected item has another layer, you will enter the layer. Repeat steps 2 and 3 until the desired track is confirmed.
•Holding 4 /¢ can skip 10 items at a time.
*1 The menu selection mode will be canceled:
–If no operations are done for about 5 seconds.
–When you confi rm the selection of a track.
Mode |
Plays at random |
RND OFF: |
Cancels. |
ALBUM RND*2: Functions the same as “Shuffle Album” of the iPod. 
SONG RND: Functions the same as “Shuffle Songs” of the iPod. 
*2 Only when you select “ALL” in “ALBUMS” of the “Music” menu.
To check other information
29

ENGLISH
Other external component operations
Connecting to the AUX input jack
You can connect an external component to the AUX (auxiliary) input jack on the control panel.
Portable audio player
Stereo mini plug
~ 
or
ŸTurn on the connected component and start playing the source.
! Adjust the volume.
⁄Adjust the sound as you want (see pages 14 – 16).
To check the clock time
Clock Ô AUX IN
Connecting to the CD changer jack
You can connect an external component to the CD changer jack on the rear using the Line Input Adapter—KS-U57 (not supplied) or AUX Input Adapter—KS-U58 (not supplied).
•For connection, see Installation/Connection Manual (separate volume).
~
If “EXT INPUT” does not appear, see page 18 and select the external input (“EXT INPUT”).
ŸTurn on the connected component and start playing the source.
! Adjust the volume.
⁄Adjust the sound as you want (see pages 14 – 16).
To check the clock time
Clock Ô EXT INPUT
30
 Loading...