


VIDEO CASSETTE RECORDER
VIDEO PŘEHRÁVAČ
MAGNETOWID KASET VIDEO
HR-E639EE (Hi-Fi)
(Vysoká věrnost reprodukce - Hi-Fi) (Hi-Fi)
HR-E539EE(Monaural) (Monofonní)
(Monofoniczny)
ENGLISH
ČESKY
|
|
OPERATE |
|
|
PROG. |
A B |
|
CLOCK |
1 |
2 |
3 |
START |
STOP |
DATE |
4 |
5 |
6 |
7 |
8 |
9 |
C.RESET |
AUX |
|
CANCEL |
0 |
TIMER |
TV |
TV |
|
VOL. |
PROG. |
|
|
TV/VIDEO |
TV VCR |
PLAY |
|
|
FF |
|
|
|
|
|
|
|
|
|
|
|
|
|
|
REW |
|
|
|
|
|
|
|
|
|
|
|
|
|
|
|
|
|
STOP |
|
PAUSE |
|
|
|
|
|
|
|
REW |
|
|
|
FF |
|||
REC |
|
|
|
|
|
|
|
|
|
|
|
|
|
|
|
||
CENE FINDER |
|
DISPL |
|
|
SCENE FINDER |
|
|
|
|
|
|
|
|
|
|
|
|
S |
|
|
AY |
|
|
|
|
|
|
|
|
|
|
|
0 |
0 |
|
|
|
|
|
|
|
|
|
|
|
|
|
|
|
|
0 |
|
|
|
|
|
|
|
|
|
|
|
|
|
|
|
|
|
0 |
0 |
|
|
|
|
|
|
|
|
|
|
|
|
|
|
|
0 |
|
0 |
|
|
|
|
|
|
|
WIDE |
AUTO SP/LP |
|
|
|
0 |
0 |
0 |
|
0 |
|
|
O |
K/C.M |
|
|
|
|
QUALITY |
TIMER |
|
|
|
0 |
|
|
|
|
0 |
|
O |
|
EM |
ORY |
OPERATE |
TIMER |
|
|
|
|
|
0 |
|
|
|
|
0 |
TV PROG./ |
TV V L. |
|
|
|
|
|
|
|
|
|
00 |
|
|
|
|
00 |
JOG |
|
|
|
|
|
|
|
|
|
|
|
|
00 |
|
|
|
0 |
|
|
|
|
|
|
|
|
|
|
|
|
|
0 |
|
|
|
|
0 |
|
|
|
|
|
|
|
|
|
|
|
|
0 |
|
|
0 |
|
||
|
|
|
|
|
|
|
|
|
|
|
0 |
|
0 |
|
|||
|
|
|
|
|
|
|
|
|
|
|
0 |
|
|
|
0 |
|
|
|
|
|
|
|
|
|
|
|
|
|
0 |
|
|
||||
|
|
|
|
|
|
|
|
|
|
|
0 |
0 |
SHUTTLE |
||||
PUSH JOG |
|
|
|
|
|
|
|
|
|
|
0 |
00 |
|||||
|
|
|
|
|
|
|
|
|
|
|
|
|
|
|
|
|
|
|
|
|
|
|
|
|
|
|
|
|
RENTAL |
|
|
|
|
|
|
|
|
|
|
|
|
|
|
+8 |
|
|
RETURN |
|
|
|
|
|
|
|
|
|
|
|
|
|
|
4 |
|
|
SP LP |
|
|
|
|
|
|
|
|
|
|
|
|
|
|
0 |
|
R E C |
|
|
|
|
|
|
|
|
|
|
|
|
|
|
|
6 |
|
PLAY NTSC |
CH SET |
|
|
|
|
|
|
|
|
|
|
|
|
|
|
–20dB |
|
|
|
|
|
|
|
||
|
|
|
|
|
|
|
|
10 |
|
|
|
|
|
|
|
|
|
|
|
|
|
|
|
|
L |
NORM |
R |
M TIMER |
|
|
|
|
STORE |
OK |
|
MULTI BRAND |
|
|
|
|
|
|
|
|
|
|
|
|
|
|
|
|
|
REMOTE CONTROL UNIT |
|
|
|
|
|
|
|
|
|
|
|
|
|
|
|
||
PAL NTSC
The recorder illustrations appearing in this instruction manual are of the
HR-E639EE.
Na ilustracích v tomto návodu je zobrazen videorekordér HR-E639EE.
Ilustracje odtwarzacza przedstawione w niniejszej instrukcji dotyczą
HR-E639EE.
INSTRUCTIONS
POKYNY
INSTRUKCJA
POLSKI
PU30425-1824
2

 EN
EN


 SAFETY
 FIRST
FIRST

Safety Precautions
The rating plate and the safety caution are on the rear of the unit.
WARNING: DANGEROUS VOLTAGE INSIDE
WARNING: TO PREVENT FIRE OR SHOCK HAZARD, DO NOT EXPOSE THIS UNIT TO RAIN OR MOISTURE.
CAUTION
nWhen you are not using the recorder for a long period of time, it is recommended that you disconnect the power cord from the mains outlet.
nDangerous voltage inside. Refer internal servicing to qualified service personnel. To prevent electric shock or fire hazard, remove the power cord from the mains outlet prior to connecting or disconnecting any signal lead or aerial.
ATTENTION
1.This recorder can also receive SECAM colour television signals for recording and playback.
2.Recordings made of SECAM television signals produce monochrome pictures if played back on another video recorder of SECAM standard, or do not produce normal colour pictures if played back on another video recorder of PAL standard.
3.SECAM prerecorded cassettes or recordings made with a SECAM video recorder produce monochrome pictures when played back with this recorder.
POWER SYSTEM
This set operates on voltage of AC110 – 240 V`(Rating), AC90 – 260 V` (Operating), 50/60 Hz with automatic switching.
IMPORTANT
nPlease read the various precautions on this page and page 33 before installing or operating the recorder.
nIt should be noted that it may be unlawful to re-record pre-recorded tapes, records, or discs without the consent of the owner of copyright in the sound or video recording, broadcast or cable programme and in any literary, dramatic, musical, or artistic work embodied therein.
The OPERATE button does not completely shut off mains power from the unit, but switches operating current on and off.
Video tapes recorded with this video recorder in the LP (Long Play) or EP (Extended Play) mode cannot be played back on a single-speed video recorder.
n Only cassettes marked "VHS" can be used with this videorecorder. n HQ VHS is compatible with existing VHS equipment.
PAL NTSC
Contents |
|
SAFETY FIRST |
2 |
Safety Precautions .................................................................... |
2 |
INSTALLING YOUR NEW RECORDER |
3 |
Basic Connections ................................................................... |
3 |
Tune The TV To Your Video Recorder ...................................... |
4 |
Select Television System .......................................................... |
4 |
INITIAL SETTINGS |
5 |
On-Screen Displays ................................................................. |
5 |
Tuner Set .................................................................................. |
6 |
Clock Set ................................................................................. |
9 |
PLAYBACK |
10 |
Basic Playback ....................................................................... |
10 |
Playback Features .................................................................. |
11 |
RECORDING |
16 |
Basic Recording ..................................................................... |
16 |
Recording Features ................................................................ |
17 |
B.E.S.T. Picture System ........................................................... |
18 |
TIMER RECORDING |
20 |
Timer Programming ............................................................... |
20 |
Check And Cancel Programmes ......................................... |
21 |
Auto SP/LP Timer ............................................................... |
21 |
EDITING |
22 |
Edit To Or From Another Video Recorder .............................. |
22 |
Edit From A Camcorder ......................................................... |
23 |
INFORMATION ON MULTI-SYSTEM COMPATIBILITY |
24 |
REMOTE CONTROL |
26 |
Multi-Brand Remote Control .................................................. |
26 |
TROUBLESHOOTING |
27 |
QUESTIONS AND ANSWERS |
29 |
INDEX |
30 |
SPECIFICATIONS |
33 |
 INSTALLING
 YOUR
YOUR NEW
NEW
 RECORDER


 EN
EN
 3
3
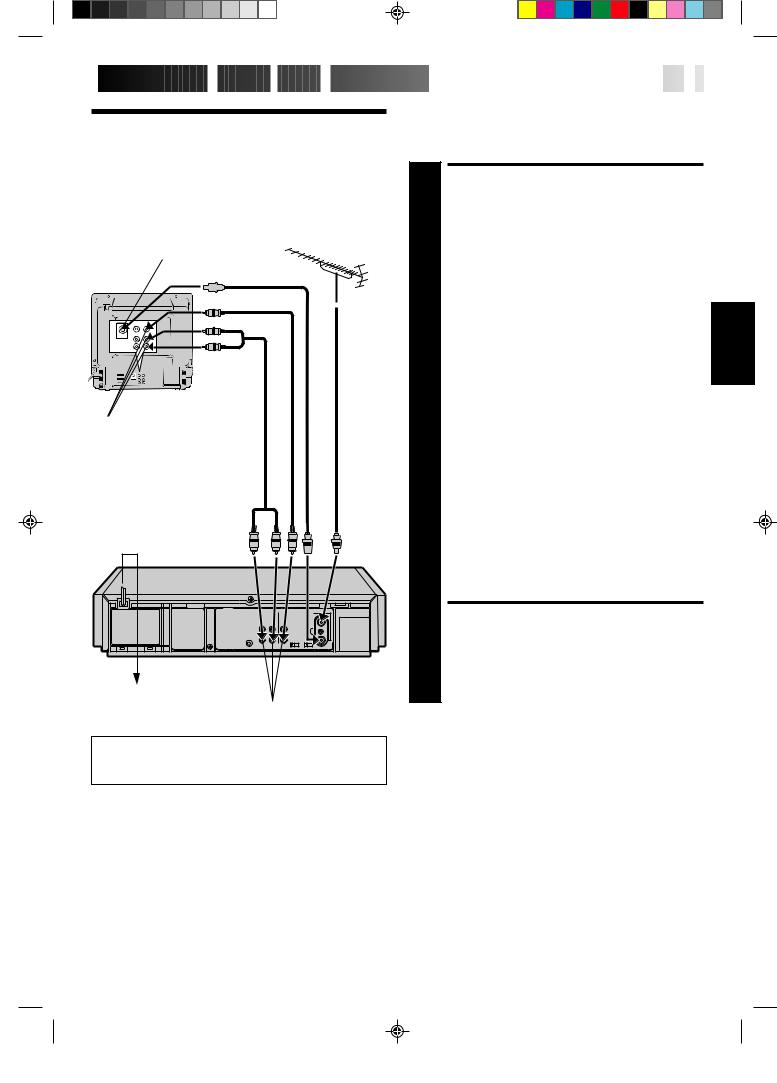
Basic
Connections
Aerial terminal |
|
|
RF Cable |
|
|
|
|
|
|
Back of TV |
|
|
(provided) |
|
|
|
|
|
|
TV Aerial
Cable
AV-IN terminals
AV Cable (not provided)
Mains Power Cord
Rear View
Mains outlet
AUDIO OUT/VIDEO OUT
It's essential that your video recorder be properly connected. Follow these steps carefully. THESE STEPS MUST BE COMPLETED BEFORE ANY VIDEO OPERATION CAN BE PERFORMED.
|
CHECK CONTENTS |
|
Make sure the package contains all of the accessories |
1 listed in “Specifications” (Z pg. 33). |
|
|
SITUATE RECORDER |
2 Place the recorder on a stable, horizontal surface. |
|
|
CONNECT RECORDER TO |
3 |
TV |
The connection method you use depends on the type of |
|
TV you have. |
|
|
|
RF CONNECTION |
|
|
c To Connect To A TV With NO AV Input Terminals . . . |
|
a– Disconnect the TV aerial cable from the TV. |
|
b– Connect the TV aerial cable to the ANT. IN jack |
|
on the rear panel of the recorder. |
|
c– Connect the provided RF cable between the RF |
|
OUT jack on the rear panel of the recorder and the |
|
TV’s aerial terminal. |
AV CONNECTION
cTo Connect To A TV With AV Input Terminals . . .
a– Connect the aerial, recorder and TV as per “RF CONNECTION”.
b– Connect an optional AV cable between the AUDIO OUT and VIDEO OUT connectors on the rear panel of the recorder and the TV’s AV-IN terminals .
CONNECT RECORDER TO MAINS
4 Plug the end of the mains power cord into a mains outlet.
ENGLISH
For HR-E539EE Owners:
If your TV has AUDIO IN L and R connectors, connect the recorder to the L connector.
4

 EN
EN


 INSTALLING

 YOUR
YOUR NEW
NEW
 RECORDER
 (cont.)

|
|
|
|
SET SYSTEM SWITCH |
|
Select Televi- |
1 |
||||
|
|
system. (Refer to the chart on the left.) |
|||
|
|
|
|
Set to the appropriate position depending on your TV |
|
sion System |
|
|
|
|
|
|
|
|
|
Major countries |
Colour TV broadcast |
Switch |
|
system |
position |
|
|
|
China, Mongolia, |
PAL D/K |
|
Rumania |
|
|
|
|
|
Bulgaria, Czech Rep., |
|
K |
|
|
|
Slovakia, Hungary, |
SECAM D/K |
|
Poland, Russia |
|
|
|
|
|
Austria, Denmark, |
|
|
Finland,Holland, Italy, |
|
|
Norway, Spain, |
PAL B/G |
G |
Switzerland, Sweden, |
|
|
Germany |
|
|
|
|
|
Egypt |
SECAM B/G |
|
|
|
|
Tune The TV
To Your Video
Recorder
|
000 |
0 |
000 |
0 |
000 |
000 |
|
0000 |
000 |
|
0 |
00 |
|
00 |
00 |
00 |
|
00 |
00 |
|
00 |
00 |
|
OPERATE
NOTES:
cIf no colours appear on the screen when using a multi-system television with its system select switch set to AUTO, change the switch position to correspond to the recorder's RF system select switch (G or K).
cFor more information on multi-system compatibility. Z p.24
Back of recorder
OFF – ON |
K – G |
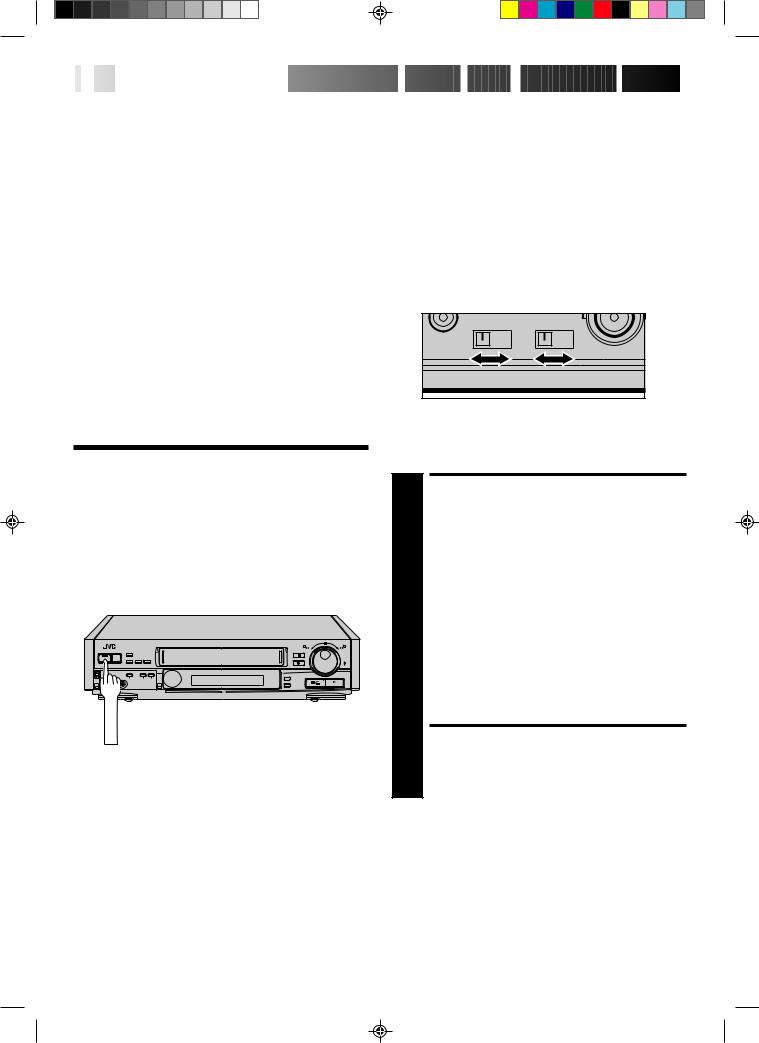
The video recorder sends picture and sound signals via the RF connecting cable to your TV on UHF channel 36.
TURN ON THE RECORDER
1 |
Press OPERATE. |
2 |
SELECT OUTPUT MODE |
Set the TEST switch on the back of the recorder to ON. |
|
3 |
SET TV CHANNEL |
Set your TV to the video channel (UHF channel 36). |
|
Two white bars appear on screen vertically. |
|
|
cTune the TV until the bars are as clear as they can be.
cYour TV should be set to the channel designated for use with a video recorder, or to a spare channel if there is not a specified video channel on your TV.
RESET OUTPUT MODE
4 Return the TEST switch to OFF.
NOTES:
cIf CH36 is occupied by a local station, adjust the RF output channel adjustment screw to use another channel between CH32 and CH40 instead.
cIf some interference noise is continually seen on the screen, consult your JVC dealer.
 INITIAL
 SETTINGS


 EN
EN
 5
5
On-Screen
Displays
Turn on the TV and select the VIDEO channel (or AV mode).
|
000 |
0 |
000 |
0000 |
|
0 |
000 |
|
000 |
|
0000 |
000 |
|
0 |
00 |
|
00 |
00 |
00 |
|
00 |
00 |
|
00 |
00 |
|
OPERATE
OPERATE
1 2 3
4 |
5 |
6 |
7 8 9
0
TV PROG.5
OK
OSD ( )
)
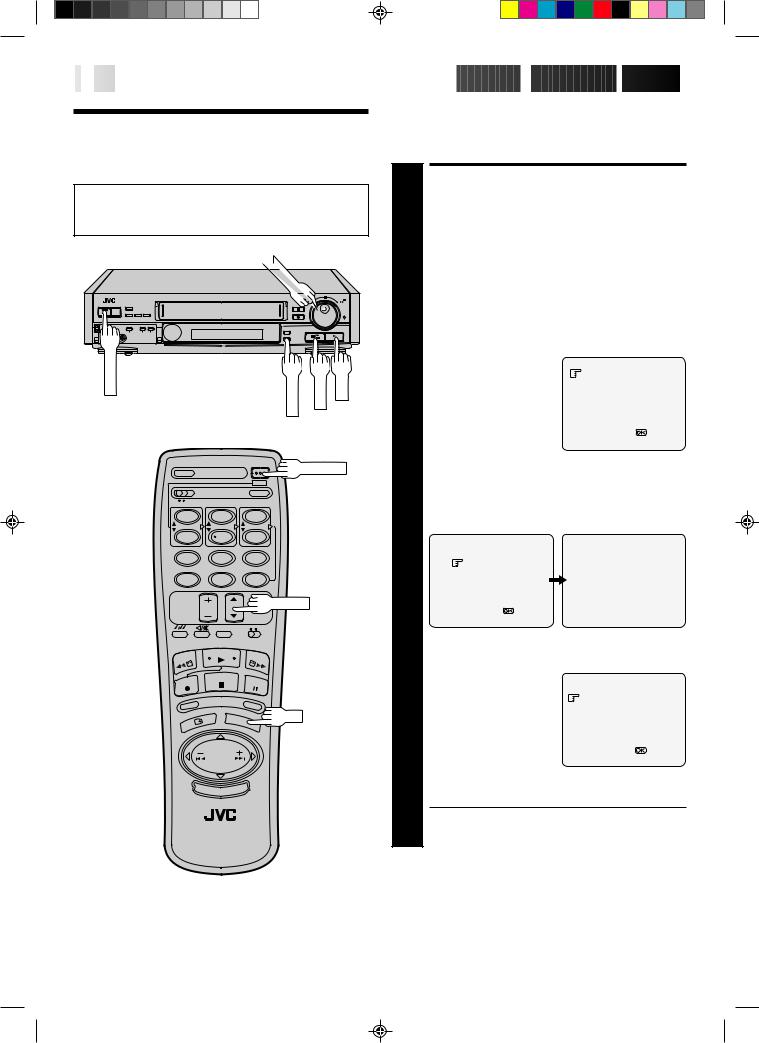
You can choose whether or not to have various operational indicators appear on screen, by setting this function ON or OFF. Messages appear in the language you select.
Use the buttons on the remote control for this procedure.
TURN ON THE RECORDER
1 Press OPERATE. |
|
|
||
|
SELECT LANGUAGE |
|
||
|
Press OSD( ). The |
ENGLISH |
|
|
|
Language screen appears. |
|
||
2 Place the pointer next to |
|
|
||
|
the language of your |
|
|
|
|
choice by pressing TV |
|
|
|
|
PROG.5/ , then press OK |
[TV PROG5 ] = |
|
|
|
to enter your selection. |
|
||
|
|
[OSD] : EXIT |
|
|
|
|
|
|
|
|
SELECT MODE |
|
|
|
|
The pointer should already |
|
|
|
|
be next to “O.S.D.”. If not, |
O.S.D. |
: ON |
|
3 press TV PROG.5/ to |
||||
B.E.S.T. |
: ON |
|||
|
place it there. |
|
|
|
|
|
[TV PROG5 ] = |
:ON/OFF |
|
|
|
[OSD] :EXIT |
|
|
|
|
|
||
|
ENABLE/DISABLE |
|
||
|
ON-SCREEN DISPLAY |
|
||
|
The default setting is “ON”, so if you want on-screen |
|||
|
displays, leave the setting as is and go to step 5. If you |
|||
4 don’t want the displays to appear, press OK to set |
||||
|
“O.S.D.” to “OFF”. |
|
|
|
|
CLOSE MODE SELECT |
|
||
|
SCREEN |
|
|
|
5 Press OSD ( ). |
|
|
||
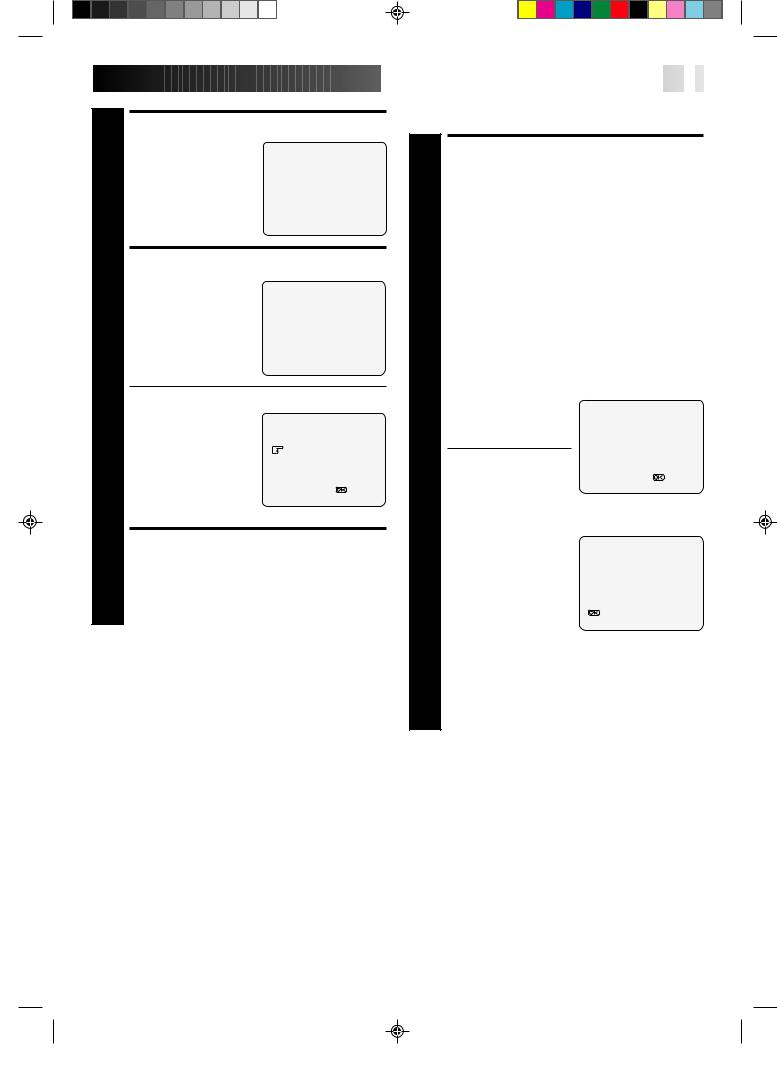
The superimposed indication on the TV screen tells you what the recorder is doing.
|
|
|
|
|
|
|
|
12 |
|
1 |
|
|
|
|
|
|
|
2 |
|
|
|
|
|
|
|
|
|
|
q6 |
4 |
|||||
|
|
PR. |
12 |
|
|
] SP |
|
||||||||||
6 |
|
23 : 59 |
|
|
|
PAL |
|
|
|
5 |
|||||||
|
|
|
|
|
|
|
|||||||||||
7 |
31. |
12. 96 |
|
|
|
|
|
|
|
3 |
|||||||
|
|
|
|
|
|
|
|
|
|
|
|
|
|
||||
|
|
|
|
|
|
|
|
|
|
|
|
|
|
||||
|
|
|
|
|
|
|
|
|
|
|
|
|
|
|
|
|
|
|
|
|
|
|
|
|
|
B.E.S.T. |
|
|
|
|
|
8 |
|||
|
|
|
|
|
|
|
|
|
|
|
|
|
|
|
|||
9 |
|
|
0 |
|
+ |
+ |
+ |
+ |
|
|
|
||||||
|
|
|
|
|
|
10 |
|||||||||||
|
|
|
|
|
|
||||||||||||
11 |
|
|
HI FI |
|
|
M –9 : 59 : 59 |
|
|
|
|
|||||||
|
|
|
|
|
|
|
|||||||||||
|
|
L |
|
|
R |
|
|
|
|
|
|
|
|
|
|
||
|
|
|
|
|
|
|
|
|
|
|
|
||||||
|
|
|
|
|
|
|
|
|
|
|
|
|
|||||
1– Operation mode indicators
2– Channel position number/Aux. indicator (AUX) 3– Cassette loaded mark
4– Tape speed SP/LP/EP
5– Colour System indicator (Z pg. 24) 6– Clock display
7– Current day/month/year 8– Tape direction
9– Tape position indicator (Z pg. 14)
10– Counter display (including Counter Memory indicator) 11– Audio mode display [E639EE only]
12– B.E.S.T. Picture System indicator
6

 EN
EN


 INITIAL
 SETTINGS
 (cont.)

Tuner Set
cTurn on the TV and select the VIDEO channel (or AV mode).
cBe sure to select the AUTO mode by pressing the COLOUR SYSTEM button. (Z pg. 24)
TV |
PROG |
. |
0 |
000 |
00 |
00 |
000 |
0 |
00 |
00 |
00 |
00 |
OPERATE |
CH SET |
STORE |
OK |
OPERATE
1 2 3
4 |
5 |
6 |
7 8 9
0
TV PROG.
OK
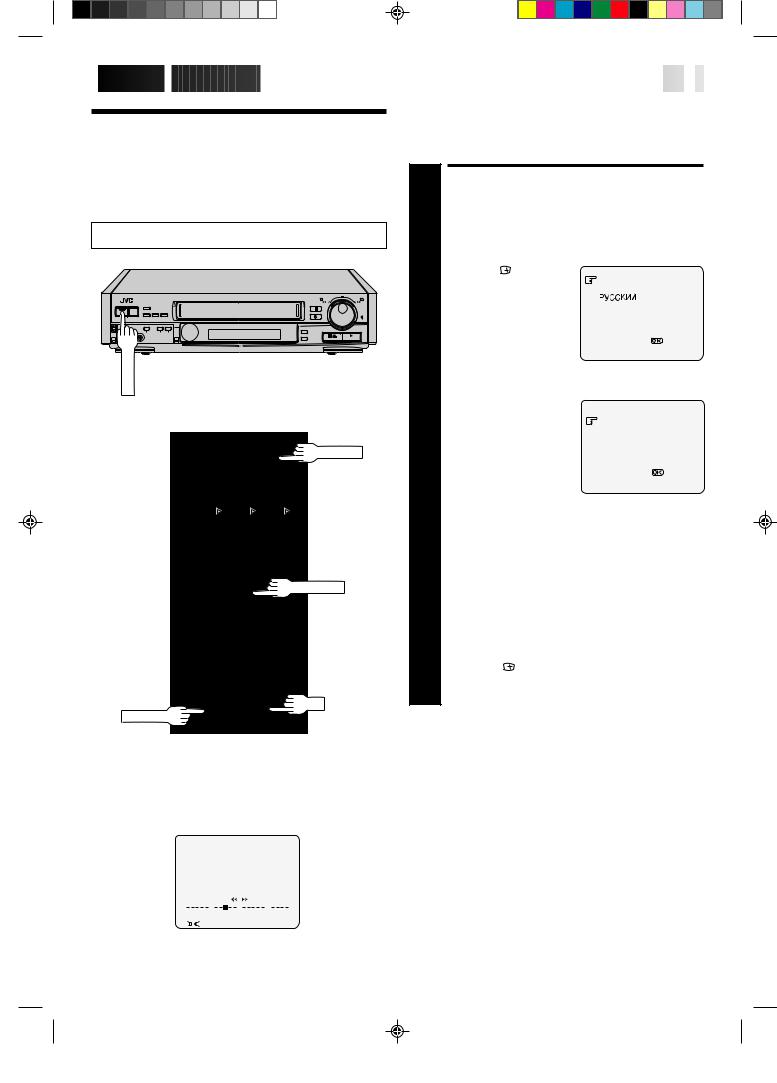
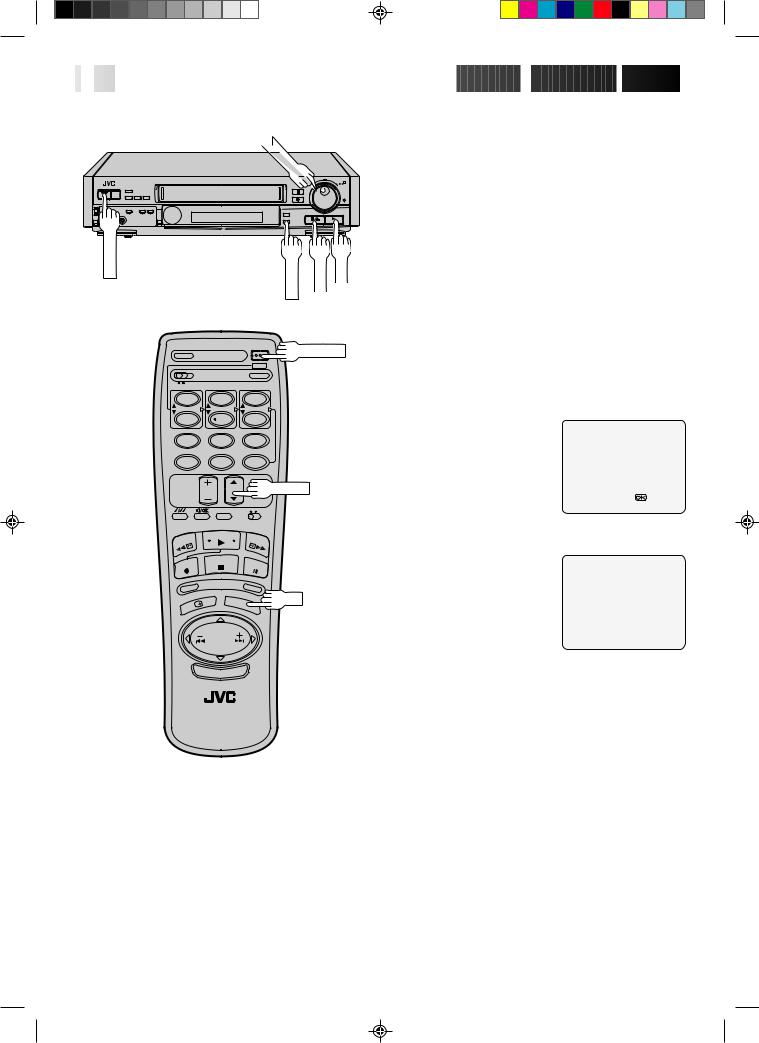
Your recorder needs to memorise all necessary stations in channel positions in order to record TV programmes. Once stored, you can call them up with the TV PROG. buttons without going through any vacant channels.
TURN ON THE RECORDER
1 Press OPERATE. |
|
|
|
ACCESS CHANNEL SET |
|
2 |
MODE SELECT SCREEN |
|
Press and hold CH SET for more than 2 seconds. The |
||
Channel Set Mode Select screen appears. |
||
3 |
SELECT MODE |
|
Turn the TV PROG. dial to |
|
|
place the pointer next to |
SEARCH/STORE |
|
"SEARCH/STORE", then |
DELETE |
|
|
press OK. The Band Select |
FINE TUNING |
|
screen appears. |
|
|
|
[TV PROG5 ] = |
|
|
[CANCEL] :EXIT |
|
|
|
4 |
SELECT BAND |
|
Turn the TV PROG. dial to place the pointer next to the |
||
band of your choice, then press OK to initiate Auto |
||
Channel Search. |
|
|
|
BAND SELECT |
AUTO SEARCH PROCEEDING |
|
VHF L |
PLEASE WAIT |
|
VHF H |
|
|
UHF |
VHF L 00 |
|
|
|
|
[TV PROG5 ] = |
[CH SET] :EXIT |
|
[CH SET] :EXIT |
|
|
|
|
|
SET DESIRED CHANNEL |
|
|
The following screen |
|
|
appears when a station is |
|
5 detected. To store the |
STORE |
|
|
||
|
detected station, place the |
CONTINUE |
|
pointer next to "STORE" by |
|
|
turning the TV PROG. dial, |
|
|
then press OK. |
[TV PROG5 ] = |
|
If you don't want to store |
[CH SET] :EXIT |
|
the station, turn the TV |
|
|
PROG. dial to place the pointer next to "CONTINUE", |
|
|
then press OK. Auto Channel Search will start resume. |
|
cThe blueback screen and the TV picture currently being broadcast appear alternately for 8 seconds each.
NOTES:
cYou can also use the TV PROG. 5/ button on the remote control instead of the TV PROG. dial.
cYou can also use the SHUTTLE ring on the recorder instead of the OK button.
6
7
8
SELECT POSITION
Turn the TV PROG. dial until an open position in which you want to store a channel appears, then press OK.
SELECT NUMBER
TV PROG. 1
[TV PROG5 ] = 
[CH SET] :EXIT
STORE CHANNEL
If fine tuning is not necessary, simply press STORE. For fine tuning adjustment, turn the TV PROG. dial until the picture becomes clearer, then press STORE.
TV PROG. 1
[STORE] :STORE
[TV PROG5] :FINE TUNING + [TV PROG ] :FINE TUNING –
[CH SET] :EXIT
cTo continue Auto Channel Search, turn the TV PROG. dial to select "CON-
TINUE", then press OK.
Repeat steps 5 – 7 as necessary.
c To set channels for other bands, turn the TV PROG. dial to select "BAND SELECT", then press OK to go back to
the Band Select screen. Repeat steps 4 – 7.
RETURN TO NORMAL SCREEN
Press CH SET.


 EN
EN
 7
7
Delete A Stored Channel
1 |
TURN ON THE RECORDER |
|
Press OPERATE. |
|
|
|
ACCESS CHANNEL SET |
|
2 |
MODE SELECT SCREEN |
|
Press and hold CH SET for more than 2 seconds. The |
||
Channel Set Mode Select screen appears. |
||
3 |
SELECT MODE |
|
Turn the TV PROG. dial to place the pointer next to |
||
"DELETE", then press OK. |
|
|
|
SELECT CHANNEL |
|
|
Turn the TV PROG. dial |
|
|
until the position number |
SELECT NUMBER |
4 of the channel you wish to |
TV PROG. 1 |
|
|
delete appears. |
|
cIf the on-screen display is hard to read, refer to
[TV PROG5 ] = the recorder's display [CH SET] :EXIT
panel.
|
DELETE CHANNEL |
|
|
Press OK twice. |
|
|
The screen shows the |
|
5 selected channel has been |
TV PROG. 1 DELETED |
|
|
||
|
deleted. |
|
|
|
|
|
c To delete another |
|
|
channel, press OK again, |
:CONTINUE |
|
then repeat steps 4 – 5. |
[CH SET] :EXIT |
|
|
|
|
RETURN TO NORMAL |
|
|
SCREEN |
|
6 Press CH SET. |
|
|
NOTE:
If you skipped a channel by mistake, perform steps 1 – 8 on pages 6 and 7 to re-store it.
8

 EN
EN


 INITIAL
 SETTINGS
 (cont.)

TV |
|
PROG |
|
. |
|
|
00 |
|
000 |
|
00 |
|
00 |
|
000 |
|
0 |
|
00 |
|
00 |
|
00 |
0 |
00 |
OPERATE |
|
CH SET |
STORE |
OK |
|
|
|
OPERATE |
|
1 |
2 |
3 |
|
|
4 |
5 |
6 |
|
|
7 8 9
0
TV PROG.
OK
Fine-Tuning Channels
Already Stored
1 |
|
TURN ON THE RECORDER |
||
|
Press OPERATE. |
|
||
|
|
ACCESS CHANNEL SET |
||
2 |
|
MODE SELECT SCREEN |
||
|
Press and hold CH SET for more than 2 seconds. The |
|||
|
Channel Set Mode Select screen appears. |
|||
3 |
|
SELECT MODE |
|
|
|
Turn the TV PROG. dial to place the pointer next to |
|||
|
"FINE TUNING", then press OK. |
|||
4 |
|
SELECT CHANNEL |
||
|
Turn the TV PROG. dial so |
|
||
|
that the position number of |
SELECT NUMBER |
||
|
the channel you want to |
TV PROG. 1 |
||
|
|
fine-tune appears, then |
|
|
|
|
press OK. |
|
|
|
|
|
|
[TV PROG5] = |
|
|
|
|
[CH SET] :EXIT |
|
|
|
|
|
5 |
|
PERFORM TUNING |
||
|
Turn the TV PROG. dial |
|
||
|
until the picture becomes |
TV PROG. 1 |
||
|
clearer, then press STORE. |
|
||
|
|
|||
|
|
c To fine-tune another |
[STORE] :STORE |
|
|
|
channel, press OK and |
[TV PROG ] :FINE TUNING – |
|
|
|
|
|
[TV PROG5] :FINE TUNING + |
|
|
repeat steps 4 – 5. |
|
|
|
|
[CH SET] :EXIT |
||
|
|
|
|
|
|
|
|
||
|
|
RETURN TO NORMAL |
||
6 |
|
SCREEN |
|
|
|
Press CH SET. |
|
||
Clock Set
Turn on the TV and select the VIDEO channel (or AV mode).
|
000 |
0 |
000 |
0 |
000 |
000 |
|
0000 |
000 |
|
0 |
00 |
|
00 |
00 |
00 |
|
00 |
00 |
|
00 |
00 |
|
OPERATE
OPERATE
NUMBER5 |
1 |
2 |
3 |
CLOCK |
|
|
|||
|
4 |
5 |
6 |
|
|
7 |
8 |
9 |
|
|
|
0 |
|
|
TV PROG.
OK


 EN
EN
 9
9
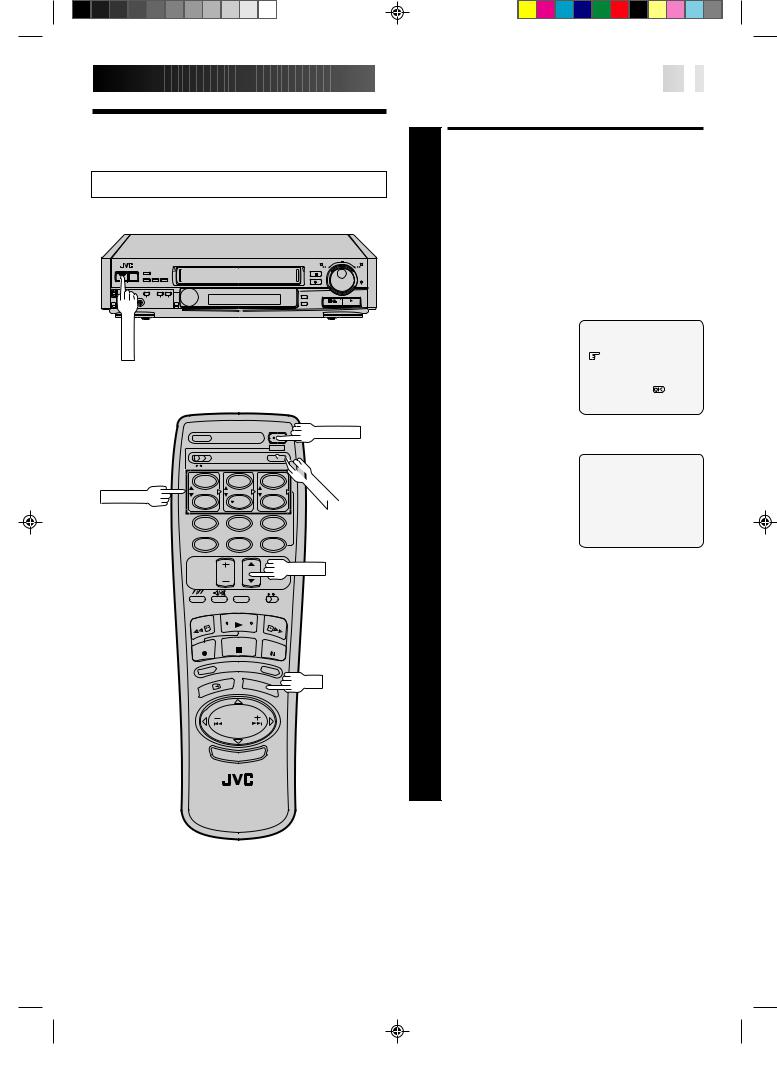
Use the buttons on the remote control for this procedure.
TURN ON THE RECORDER
1 Press OPERATE. |
|
|
|
||
|
ACCESS MODE SELECT |
|
|||
|
SCREEN |
|
|
|
|
2 Press CLOCK. |
|
|
|
||
3 |
SELECT MODE |
|
|
|
|
Press TV PROG.5/ to |
|
|
|
||
place the pointer next to |
TIMER PROGRAMMING |
||||
"CLOCK SET", then press |
CLOCK SET |
|
|||
|
OK. The Clock Set screen |
|
|
|
|
|
appears. |
|
|
|
|
|
|
|
[TV PROG5] = |
|
|
|
|
|
[CANCEL] :EXIT |
|
|
|
|
|
|
|
|
4 |
SET TIME |
|
|
|
|
Use NUMBER key "1(5)" |
|
|
|
||
or "4( )" to set the time. |
|
CLOCK SET |
|
||
|
|
TIME |
DATE |
YEAR |
|
c Press and hold either |
|||||
|
button to delay or |
0:00 |
01:01 |
00 |
|
|
|
|
|
||
|
advance the time by 30 |
[1 – 6] |
|
|
|
|
minutes. |
|
|
||
|
|
|
[PROG./CLOCK] :EXIT |
|
|
|
|
|
|
|
|
5 |
SET DATE |
|
|
|
|
Use NUMBER key "2(5)" or "5( )" to set the date. |
|||||
|
|||||
c Press and hold either button to change the date by 15 |
|||||
days. |
|
|
|
||
|
|
|
|
|
|
|
SET YEAR |
|
|
|
|
6 Use NUMBER key "3(5)" or "6( )" to set the year. |
|||||
|
RETURN TO NORMAL |
|
|||
|
SCREEN |
|
|
|
|
7 Press CLOCK. |
|
|
|
||
To Make Corrections
Perform steps 1 – 3 to call up the Clock Set screen, use NUMBER keys "1" – "6" to make the correction, then press
CLOCK.
NOTE:
If, in step 7, the year digits are automatically cleared, it is possible that you have input 29th February for a non-leap year. Input the correct data.

10

 EN
EN


 PLAYBACK

Basic
Playback
Turn on the TV and select the VIDEO channel (or AV mode).
SHUTTLE
|
000 |
0 |
000 |
0000 |
|
0 |
000 |
|
000 |
|
0000 |
000 |
|
0 |
00 |
|
00 |
00 |
00 |
|
00 |
00 |
|
00 |
00 |
|
COLOUR SYSTEM |
STOP/EJECT |
PLAY |
1 |
2 |
3 |
4 |
5 |
6 |
7 |
8 |
9 |
|
0 |
|
The easiest, most basic operation possible with your video recorder is tape playback. Already-recorded signals on a video tape are read by your video recorder and displayed on your TV just like a TV programme.
1 |
|
LOAD A CASSETTE |
|
Make sure the window side is up, the rear label side is |
|
|
facing you and the arrow on the front of the cassette is |
|
|
point toward the recorder. Don’t apply too much |
|
|
|
pressure when inserting. |
|
|
|
|
|
c The recorder power comes on automatically and the |
|
|
counter is reset to 0:00:00. |
|
|
c Select the appropriate colour system by pressing the |
|
|
COLOUR SYSTEM button. (Z pg. 24) |
|
|
c If the record safety tab has been removed, playback |
|
|
begins automatically. |
|
|
|
|
|
FIND PROGRAMME START |
2 |
|
POINT |
|
If the tape is advanced past the start point, press REW or |
|
|
turn the SHUTTLE ring to the left and release it. |
|
|
To go forward, press FF or turn the SHUTTLE ring to the |
|
|
|
right and release it. |
|
|
|
3 |
|
START PLAYBACK |
|
Press PLAY. "B.E.S.T." appears on screen. (Z pg. 18) |
|
4 |
|
STOP PLAYBACK |
|
Press STOP on the remote or STOP/EJECT on the |
|
|
recorder’s front panel. Then press STOP/EJECT to |
|
|
remove the cassette. |
Usable cassettes
PLAY 


FF
REW
STOP
c Compact VHS camcorder recordings can be played on this video recorder. Simply place the recorded cassette into a VHS Cassette Adapter and it can be used just like any full-sized VHS cassette.
c This video recorder can record on regular VHS and Super VHS cassettes. However, it will record and play back regular VHS signals only. It is not possible to play back a recorded Super VHS tape.
Playback
Features
Take advantage of special functions possible with the recorder’s controls or the remote control.
NOTE:
Refer to the SHUTTLE ring illustration below as you read the following procedures.
Still
|
|
|
|
|
|
|
|
|
|
|
|
se |
Sl |
o |
|
|
|
||
|
|
|
|
|
|
|
|
|
|
|
er |
|
|
|
|
|
|||
|
|
|
|
|
|
|
v |
|
|
|
|
w |
|
|
|
||||
|
|
|
|
|
|
e |
|
w |
m |
oti |
|
|
|
|
|||||
|
|
|
|
|
|
R |
|
|
|
|
|
o |
|
|
|
||||
|
|
|
|
|
e |
|
|
|
|
|
lo |
|
|
|
P |
|
|
||
|
|
|
|
|
|
s |
|
|
|
|
n |
|
|
||||||
|
|
|
|
s |
|
|
|
|
|
|
|
|
|
|
|
l |
|
|
|
|
|
|
|
|
|
|
|
|
|
|
|
|
|
|
a |
|
|
||
|
|
|
r |
|
|
|
|
|
|
|
|
|
|
|
|
|
|
||
|
|
|
e |
|
y |
|
|
|
|
|
|
|
|
|
|
|
y |
|
|
|
|
e |
v |
a |
|
|
|
|
|
|
|
|
|
|
|
|
|
|
|
|
R |
|
p |
|
|
|
|
|
|
|
|
|
|
|
|
|
|
|
|
|
|
|
|
|
|
|
|
|
|
|
|
|
|
|
|
|
F |
||
e |
h |
|
|
|
|
|
|
|
|
|
|
|
|
|
|
|
so |
||
|
|
|
|
|
|
|
|
|
|
|
|
|
|
|
e |
r |
|||
s |
|
|
|
|
|
|
|
|
|
|
|
|
|
|
|
aw |
|||
r c |
|
|
|
|
|
|
|
|
|
|
|
|
|
|
0 |
||||
|
|
|
|
|
|
|
|
0 |
|
|
|
|
0 |
r |
|
||||
e |
r |
|
|
|
|
|
|
0 |
0 |
0 |
|
|
|
|
|
0 |
|
|
a |
|
|
|
|
|
|
|
|
|
|
|
|
|
0 |
|
|
||||
v a |
|
|
|
|
|
0 |
|
|
|
|
|
|
|
0 |
c |
r |
|||
|
|
|
|
|
|
|
|
|
|
|
|
|
0 |
|
|||||
e |
e |
|
|
|
|
|
00 |
|
|
|
|
|
|
|
|
0 |
h |
d |
|
|
|
|
|
|
00 |
|
|
|
|
|
|
|
|
0 |
|||||
R |
s |
|
|
|
|
|
0 |
|
|
|
|
|
|
|
|
0 |
|
|
|
|
|
|
|
|
0 |
|
|
|
|
|
|
|
|
0 |
|
|
|
||
|
|
|
|
|
0 |
|
|
|
|
|
|
|
|
|
|
|
|||
|
|
|
|
|
|
0 |
|
|
|
|
|
|
|
|
0 |
|
|
|
|
|
|
|
|
|
|
0 |
|
|
|
|
|
|
|
|
0 |
|
|
|
|
|
|
|
|
|
|
|
0 |
|
|
|
|
|
|
|
|
0 |
|
|
|
|
|
|
|
|
|
|
0 |
|
|
|
|
|
|
|
0 |
|
|
|
|
|
|
|
|
|
|
|
0 |
|
|
|
|
|
|
0 |
|
|
|
||
|
|
|
|
|
|
|
0 |
|
|
|
|
|
|
0 |
|
|
|
||
|
|
|
|
|
|
|
0 |
|
|
|
|
|
0 |
|
|
|
|||
|
|
|
|
|
|
|
0 |
|
|
|
|
|
0 |
|
|
|
|||
Still Picture/Frame-By-Frame
Playback
PAUSE DURING PLAYBACK
1 Press PAUSE. If there is vertical jitter, use the TV PROG. buttons to correct the picture.
ACTIVATE FRAME-BY-FRAME PLAYBACK
2 Turn the JOG dial to the right for forward frame-by- frame playback, or to the left for reverse frame-by-frame playback.
OR
Press PAUSE.
OR
Press PUSH JOG fior fi.
To resume normal playback, press PLAY.
NOTE:
In the search, still or frame-by-frame playback mode, the picture will be distorted, and there may be a loss of colour.


 EN
EN
 11
11
Slow Motion
ACTIVATE SLOW-MOTION PLAYBACK
1 During playback or still, turn the SHUTTLE ring to the right for forward slow motion, or to the left for reverse slow motion (refer to the illustration to the left).
OR
During still picture, press and hold PAUSE for 2 seconds, then release. Press and release again to return to still picture.
OR
During still picture, press and hold PUSH JOG fior fi.
Release to return to still picture.
To resume normal playback, press PLAY.
Variable-Speed Search
ACTIVATE VARIABLE-SPEED SEARCH
1 During playback or still, turn the SHUTTLE ring to the right for forward variable-speed search, or to the left for reverse variable-speed search (refer to the illustration to the left).
OR
During playback, press PUSH JOG fior fi.
cThe more times you press, the faster the playback picture moves.
cTo decrease speed, press the button for the opposite direction.
To resume normal playback, press PLAY.
High-Speed Search
ACTIVATE HIGH-SPEED SEARCH
1 During playback or still, turn the SHUTTLE ring all the way to the right for forward high-speed search, or to the left for reverse high-speed search.
cFor forward search with a visible picture, turn the SHUTTLE ring all the way to the right and release it within 1 second.
cFor reverse search with a visible picture, turn the SHUTTLE ring all the way to the left and release it within 1 second.
OR
Press FF for forward high-speed search, or REW for reverse high-speed search.
cFor short searches, press and hold FF or REW for over 2 seconds. When released, normal playback resumes.
To resume normal playback, press PLAY.
 Loading...