


 Loading...
COMPACT COMPONENT SYSTEM
SYSTEME DE COMPOSANTS COMPACT
FS-V100— Consists of CA-FSV100 and SP-UXV100.
AUTO REVERSE
|
|
COMPACT |
|
|
DIGITAL AUDIO |
|
|
VERTICAL DISC |
|
|
LOADING MECHANISM |
POWER |
|
|
SLEEP |
DISPLAY |
COMPACT COMPONENT SYSTEM FS-V100 |
AUX |
TAPE FM/AM |
CD |
CD |
|
|
REPEAT |
|
UP |
PROGRAM |
|
SET |
RANDOM |
|
DOWN |
AHB |
|
|
PRO |
BASS |
TREBLE CANCEL |
VOLUME
REMOTE CONTROL RM-SFSV10J
STANDBY |
|
|
|
|
AHB |
AUX |
|
PRO |
POWER |
|
VOLUME |
REC |
|
TIMER |
REV. |
|
|
MODE |
|
CLOCK |
|
|
CD |
|
|
OPEN/CLOSE |
TAPE |
FM/AM |
CD |
PHONES |
|
|
DOWN |
MULTI CONTROL |
UP |
INSTRUCTIONS
MANUEL D’INSTRUCTIONS
For Customer Use:
Enter below the Model No. and Serial No. which are located either on the rear, bottom or side of the cabinet. Retain this information for future reference.
Model No.
Serial No.
GVT0056-001A
[J]
COVER.FS-V100[J]f |
3 |
12/12/00, 10:34 AM |
Warnings, Cautions and Others
Mises en garde, précautions et indications diverses
|
|
CAUTION |
|
|
|
RISK OF ELECTRIC SHOCK |
|
|
|
DO NOT OPEN |
|
|
|
|
|
|
|
|
|
CAUTION: |
TO REDUCE THE RISK OF ELECTRIC SHOCK, |
||
|
DO NOT REMOVE COVER (OR BACK). |
||
|
NO USER SERVICEABLE PARTS INSIDE. |
||
REFER SERVICING TO QUALIFIED SERVICE PERSONNEL.
The lightning flash with arrowhead symbol, within an equilateral triangle is intended to alert the user to the presence of uninsulated "dangerous voltage" within the product's enclosure that may be of sufficient magnitude to constitute a risk of electric shock to persons.
The exclamation point within an equilateral triangle is intended to alert the user to the presence of important operating and maintenance (servicing) instructions in the literature accompanying the appliance.
For U.S.A.
This equipment has been tested and found to comply with the limits for a Class B digital device, pursuant to part 15 of the FCC Rules. These limits are designed to provide reasonable protection against harmful interference in a residential installation.
This equipment generates, uses and can radiate radio frequency energy and, if not installed and used in accordance with the instructions, may cause harmful interference to radio communications. However, there is no guarantee that interference will not occur in a particular installation. If this equipment does cause harmful interference to radio or television reception, which can be determined by turning the equipment off and on, the user is encouraged to try to correct the interference by one or more of the following measures:
Reorient or relocate the receiving antenna.
Increase the separation between the equipment and receiver. Connect the equipment into an outlet on a circuit different from that to which the receiver is connected.
Consult the dealer or an experienced radio/TV technician for help.
WARNING: TO REDUCE THE RISK OF FIRE OR ELECTRIC SHOCK, DO NOT EXPOSE THIS APPLIANCE TO RAIN OR MOISTURE.
CAUTION
To reduce the risk of electrical shocks, fire, etc.:
1.Do not remove screws, covers or cabinet.
2.Do not expose this appliance to rain or moisture.
ATTENTION
Afin d’éviter tout risque d’électrocution, d’incendie, etc.:
1.Ne pas enlever les vis ni les panneaux et ne pas ouvrir le coffret de l’appareil.
2.Ne pas exposer l’appareil à la pluie ni à l’humidité.
Caution –– POWER switch!
Disconnect the mains plug to shut the power off completely. The POWER switch in any position does not disconnect the mains line. The power can be remote controlled.
Attention –– Commutateur POWER!
Déconnecter la fiche de secteur pour couper complètement le courant. Le commutateur POWER ne coupe jamais complètement la ligne de secteur, quelle que soit sa position. Le courant peut être télécommandé.
1.CLASS 1 LASER PRODUCT
2.DANGER: Invisible laser radiation when open and interlock failed or defeated. Avoid direct exposure to beam.
3.CAUTION: Do not open the top cover. There are no user serviceable parts inside the Unit; leave all servicing to qualified service personnel.
1.PRODUIT LASER CLASSE 1
2.ATTENTION: Radiation laser invisible quand l’appareil est ouvert ou que le verrouillage est en panne ou désactivé. Eviter une exposition directe au rayon.
3.ATTENTION: Ne pas ouvrir le couvercle du dessus. Il n’y a aucune pièce utilisable à l’intérieur. Laisser à un personnel qualifié le soin de réparer votre appareil.
G-1
G1-G3.FS-V100[J]f |
2 |
12/12/00, 10:32 AM |
For Canada/pour le Canada
CAUTION: TO PREVENT ELECTRIC SHOCK, MATCH WIDE BLADE OF PLUG TO WIDE SLOT, FULLY INSERT.
ATTENTION: POUR EVITER LES CHOCS ELECTRIQUES,
INTRODUIRE LA LAME LA PLUS LARGE DE LA FICHE DANS LA BORNE CORRESPONDANTE DE LA PRISE ET POUSSER
JUSQUAU FOND.
For Canada/pour le Canada
THIS DIGITAL APPARATUS DOES NOT EXCEED THE CLASS B LIMITS FOR RADIO NOISE EMISSIONS FROM DIGITAL APPARATUS AS SET OUT IN THE INTERFERENCE-CAUSING EQUIPMENT STANDARD ENTITLED “DIGITAL APPARATUS,” ICES-003 OF THE DEPARTMENT OF COMMUNICATIONS.
CET APPAREIL NUMERIQUE RESPECTE LES LIMITES DE BRUITS RADIOELECTRIQUES APPLICABLES AUX APPAREILS NUMIRIQUES DE CLASSE B PRESCRITES DANS LA NORME SUR LE MATERIEL BROUILLEUR: “APPAREILS NUMERIQUES”, NMB-003 EDICTEE PAR LE MINISTRE DES COMMUNICATIONS.
G-2
G1-G3.FS-V100[J]f |
3 |
12/12/00, 10:32 AM |

Instructions for safe use
(Statement in accordance with the UL standards)
1)Read Instructions — Read carefully this instructions for your safe use before this appliance is installed, wireconnected, and operated.
2)Retain Instructions — For your future reference, retain this instruction.
3)Follow Instructions — Follow and obey all warnings, cautions and instructions marked on this appliance and this instruction.
4)Water and Moisture — Do not expose this appliance to rain, water and moisture, or operate it near water — for example near a bathtub, wash bowl, kitchen sink, laundry tub, in a wet basement or near a swimming pool, and the like.
5)Ventilation and Heat — This appliance should be situated so that its location does not interfere with its proper ventilation. For example, this appliance should not be situated on a bed, sofa, rug, or similar surface that may block the ventilation openings; or, placed in a built-in installation, such as a bookcase or cabinet that may impede the flow of air through the ventilation openings. This appliance should be situated away from heat sources such as radiators, heat registers, stoves, or other appliances (including amplifiers) that produce heat.
6)Power sources — This appliance should be connected to a power supply only of the type as marked on this appliance.
7)Polarization — The precautions that should be taken so that the polarization means of this appliance is not defeated.
8)Power Cord Protection — Power supply cords should be routed so that they are not likely to be walked on or pinched by items placed upon or against them, paying particular attention to cords at plugs, convenience receptacles, and the point where they exit from the appliance.
9)Cleaning — The appliance should be cleaned only as recommended by the manufacturer.
10)Power Lines — An outdoor antenna should be located away from power lines.
11)Outdoor Antenna Grounding — If this appliance is provided with means to connect the outdoor antenna and outside antenna is connected to this appliance, be sure the antenna system is grounded so as to provide some protection against voltage surges and built-up static charges. Article 810 of the National Electrical Code, ANSI/ NFPA 70, provides information with regard to proper grounding of the mast and supporting structure, grounding of the lead-in wire to an antenna-discharge unit, size of grounding conductors, location of antenna-discharge unit, connection to grounding electrodes, and requirements for the grounding electrode. Example of antenna grounding is illustrated in here.
EXAMPLE OF ANTENNA GROUNDING AS PER
NATIONAL ELECTRICAL CODE
ANTENNA
LEAD IN
WIRE
GROUND
CLAMP
ANTENNA DISCHARGE UNIT (NEC SECTION 810–20)
ELECTRIC
SERVICE
EQUIPMENT
GROUNDING CONDUCTORS (NEC SECTION 810–21)
 GROUND CLAMPS
POWER SERVICE GROUNDING ELECTRODE SYSTEM
(NEC ART 250. PART H)
NEC — NATIONAL ELECTRICAL CODE
12)Nonuse Periods — The power cord of the appliance should be unplugged from the outlet when left unused for a long period of time.
13)Object and Liquid Entry — Care should be taken so that objects do not fall and liquids are not spilled into the enclosure through openings.
14)Damage Requiring Service — The appliance should be serviced by qualified service personnel when : (a) The power-supply cord or the plug has been damaged; or (b) Objects have fallen, or liquid has been spilled into the appliance; or (c) The appliance has been exposed to rain; or (d) The appliance does not appear to operate normally or exhibits a marked change in performance; or (e) The appliance has been dropped, or the enclosure damaged.
15)Servicing — The user should not attempt to service the appliance beyond that described in the operating instructions. All other servicing should be referred to qualified service personnel.
G-3
G1-G3.FS-V100[J]f |
4 |
12/12/00, 10:32 AM |
Thank you for purchasing the JVC Compact Component System.
We hope it will be a valued addition to your home, giving you years of enjoyment.
Be sure to read this instruction manual carefully before operating your new stereo system.
In it you will find all the information you need to set up and use the system.
If you have any query that is not answered by the manual, please contact your dealer.
Features
Here are some of the things that make your System both powerful and simple to use.
■The controls and operations have been designed to make them very easy to use, freeing you to just enjoy the music.
• With JVC’s COMPU PLAY you can turn on the System and automatically start the Radio, Cassette deck or CD
Player with a single touch.
■The System incorporates Active Hyper Bass PRO circuitry to faithfully reproduce low frequency sounds.
■Forty-five-station preset capability (30 FM and 15 AM) in addition to auto-seek and manual tuning.
■Versatile CD options include repeat, random and program play.
■Timer functions; Daily Timer, Recording Timer and Sleep Timer.
■Auto-reverse tape function.
■You can connect an audio equipment — used only as a playback device.
How This Manual Is Organized
•Basic information that is the same for many different functions – e.g. setting the volume – is given in the section “Common Operations,” and not repeated under each function.
•The names of buttons/controls and display messages are written in all capital letters: e.g. TAPE, “NO DISC.”
IMPORTANT PRECAUTIONS
1Installation of the System
•Select a place which is level, dry and neither too hot nor too cold. (Between 5°C (41°F) and 35°C (95°F).)
•Leave sufficient distance between the System and a TV.
•Do not use the System in a place subject to vibrations.
2Power cord
•Do not handle the power cord with wet hands!
•Some power is always consumed as long as the power cord is connected to the wall outlet.
•When unplugging the System from the wall outlet, always pull the plug, not the power cord.
3Malfunctions, etc.
•There are no user serviceable parts inside. In case of a system failure, unplug the power cord and consult your dealer.
•Do not insert any metallic object into the System.

 Table of Contents
Features .................................................................................. |
1 |
How This Manual Is Organized ............................................. |
1 |
IMPORTANT PRECAUTIONS ............................................ |
1 |
Getting Started ........................................................... |
2 |
Common Operations .................................................. |
6 |
Using the Tuner .......................................................... |
8 |
Using the CD Player ................................................. |
10 |
Using the Cassette Deck (Listening to a Tape) ..... |
13 |
Using the Cassette Deck (Recording) ................... |
14 |
Using External Equipment ....................................... |
16 |
Using the Timers ...................................................... |
17 |
Care and Maintenance ............................................. |
20 |
Troubleshooting ....................................................... |
21 |
Specifications ........................................................... |
21 |
1
EN01-09.FS-V100[J]f |
1 |
12/12/00, 10:33 AM |

 Getting Started
Accessories
Make sure that you have all of the following items, which are supplied with the System.
AC Power Cord (1)
AM Loop Antenna (1)
Remote Control (1)
Batteries (2)
FM Wire Antenna (1)
If any of these items are missing, contact your dealer immediately.
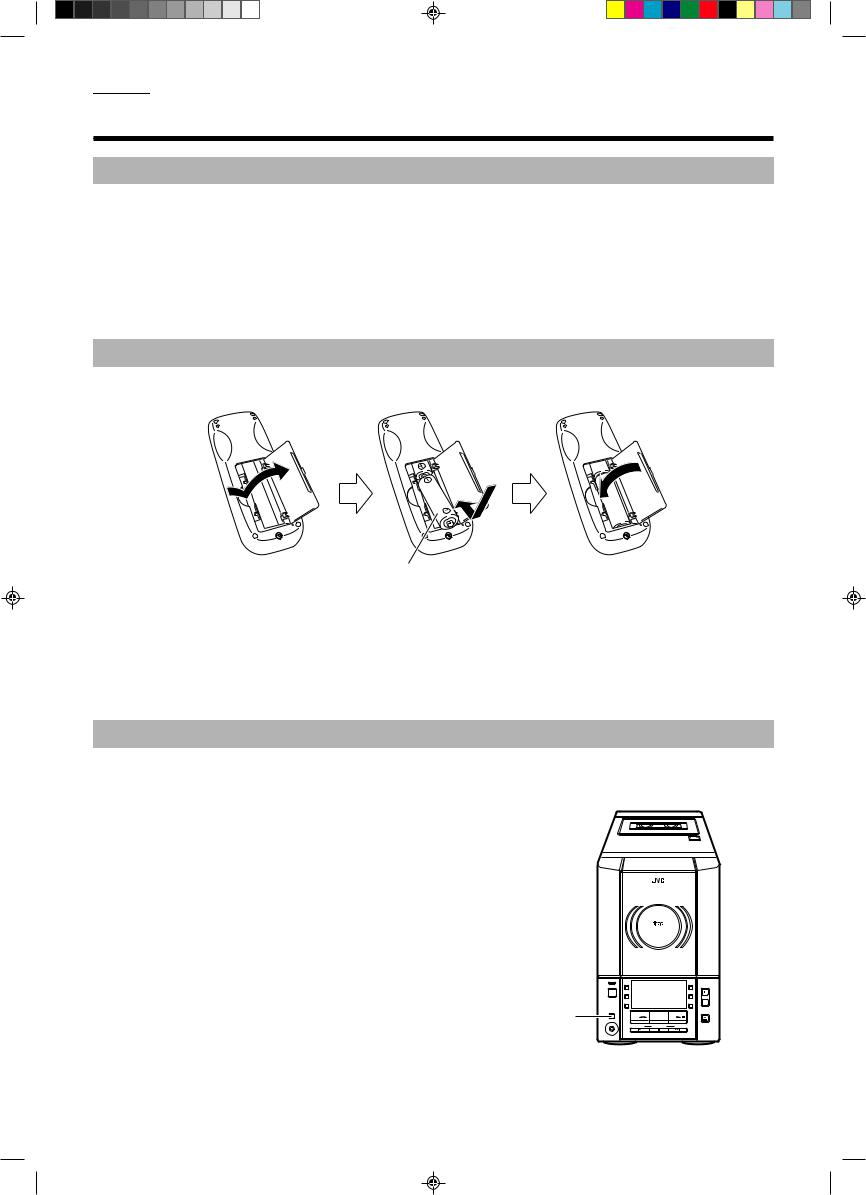
How to Put Batteries in the Remote Control
Match the polarity (+ and –) on the batteries with the + and – markings in the battery compartment.
R6(SUM-3)/AA(15F)
CAUTION: Handle batteries properly.
To avoid battery leakage or explosion:
•Remove batteries when the Remote Control will not be used for a long time.
•When you need to replace the batteries, replace both batteries at the same time with new ones.
•Do not use an old battery with a new one.
•Do not use different types of batteries together.
Using the Remote Control
The Remote Control makes it easy to use many of the functions of the System from a distance of up to 7 m (23 ft.) away. You need to point the Remote Control at the remote sensor on the System’s front panel.
Remote sensor
|
COMPACT |
|
|
DIGITAL AUDIO |
|
|
VERTICAL DISC |
|
|
LOADING MECHANISM |
|
COMPACT COMPONENT SYSTEM |
FS-V100 |
|
STANDBY |
|
|
|
|
AHB |
AUX |
|
PRO |
POWER |
|
VOLUME |
REC |
|
TIMER |
REV. |
|
|
MODE |
|
CLOCK |
|
|
CD |
|
|
OPEN/CLOSE |
TAPE |
FM/AM |
CD |
PHONES |
|
|
DOWN |
MULTI CONTROL |
UP |
2
EN01-09.FS-V100[J]f |
2 |
12/12/00, 10:33 AM |
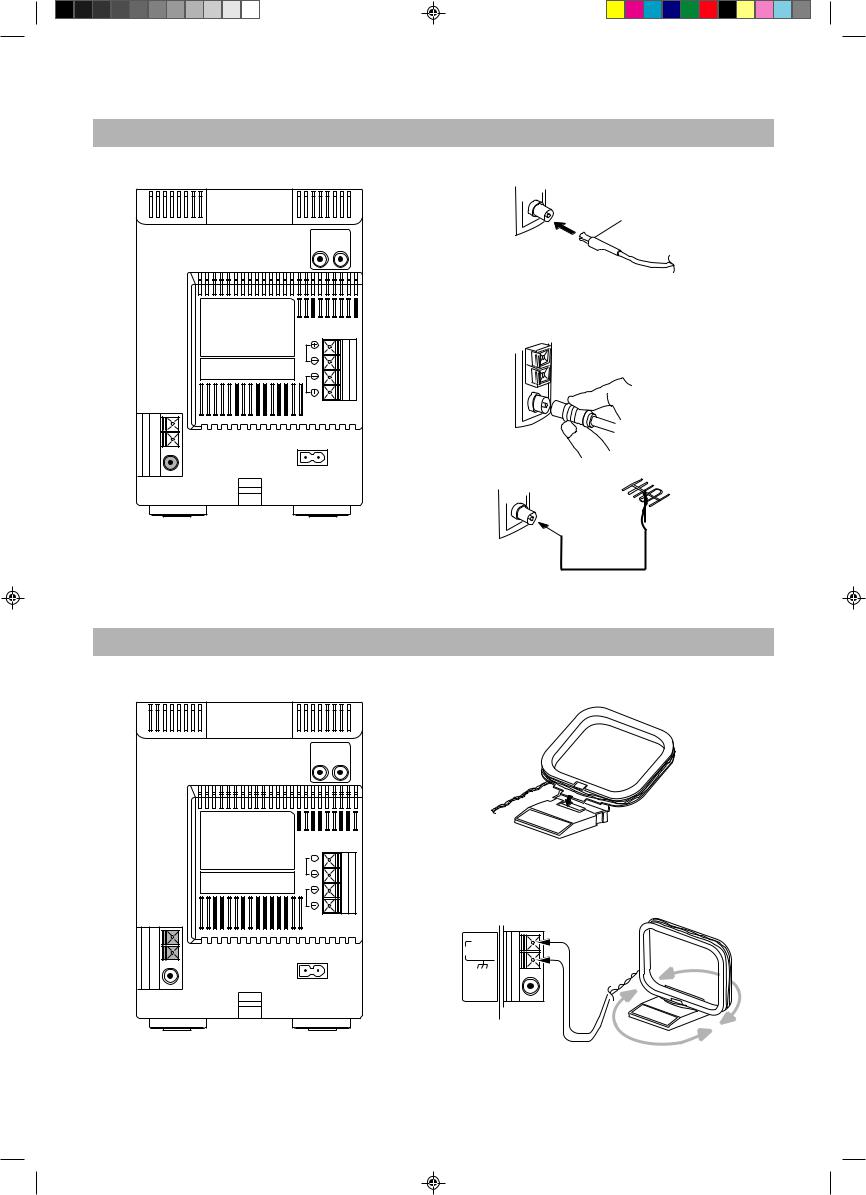
CAUTION: Make all connections before plugging the System into an AC power outlet.
Connecting the FM Antenna
Using the supplied Wire Antenna
Rear Panel of the Unit
FM Wire Antenna
(supplied)
R L
L
R
SPEAKERS
IMPEDANCE
MIN 4Ω
 AC IN
AC IN
Using the coaxial type connector (not supplied)
A 75 Ω antenna with coaxial type connector (IEC or DIN 45325) should be connected to the FM (75 Ω) COAXIAL terminal.
If reception is poor, connect the outdoor antenna.
FM outdoor antenna (not supplied)
Coaxial cable
Note: Before attaching a 75 Ω coaxial lead (the kind with a round wire going to an outdoor antenna), disconnect the supplied FM Wire Antenna.
Connecting the AM Antenna
AM Loop Antenna (supplied)
Rear Panel of the Unit
R L
L
R
SPEAKERS
IMPEDANCE
MIN 4Ω
 AC IN
AC IN
CAUTION:
To avoid noise, keep antennas away from the System, the connecting cord and the AC power cord.
Attach the AM loop to its base by snapping the tabs on the loop into the slot in the base.
ANTENNA
AM EXT
AM LOOP
FM (75Ω)
COAXIAL
Turn the loop until you have the best reception.
3
EN01-09.FS-V100[J]f |
3 |
12/12/00, 10:33 AM |

CAUTION: Make all connections before plugging the System into an AC power outlet.
Connecting the Speakers
For each speaker, connect one end of the speaker wire to the speaker terminals on the back of the System.
1.Open each of the terminals and insert the speaker wires firmly, then close the terminals.
2.Connect the red (+) and black (–) wires of the right side speaker to the red (+) and black (–) terminals marked R on the System. Connect the red (+) and black (–) wires of the left side speaker to the red (+) and black (–) terminals marked L on the System.
Right speaker (rear side) |
Black |
Left speaker (rear side) |
L
R
SPEAKERS
IMPEDANCE
MIN 4Ω
CAUTION:
If a TV is installed near the speakers, the picture on the TV may be distorted. If this happens, set the speakers away from the TV.
Connecting External Equipment
You can connect an audio equipment — used only as a playback device.
Connect the audio output terminals on the other equipment and the LINE IN (AUX) terminals on the rear, using an audio cord (not supplied).
|
Pin-plug x 2 |
Pin-plug x 2 |
|
|
To audio output |
|
Signal cord (not supplied) |
MD recorder or |
R |
L |
cassette deck (not supplied) |
|
LINE IN |
|
|
|
|
|
(AUX) |
|
4
EN01-09.FS-V100[J]f |
4 |
12/12/00, 10:33 AM |
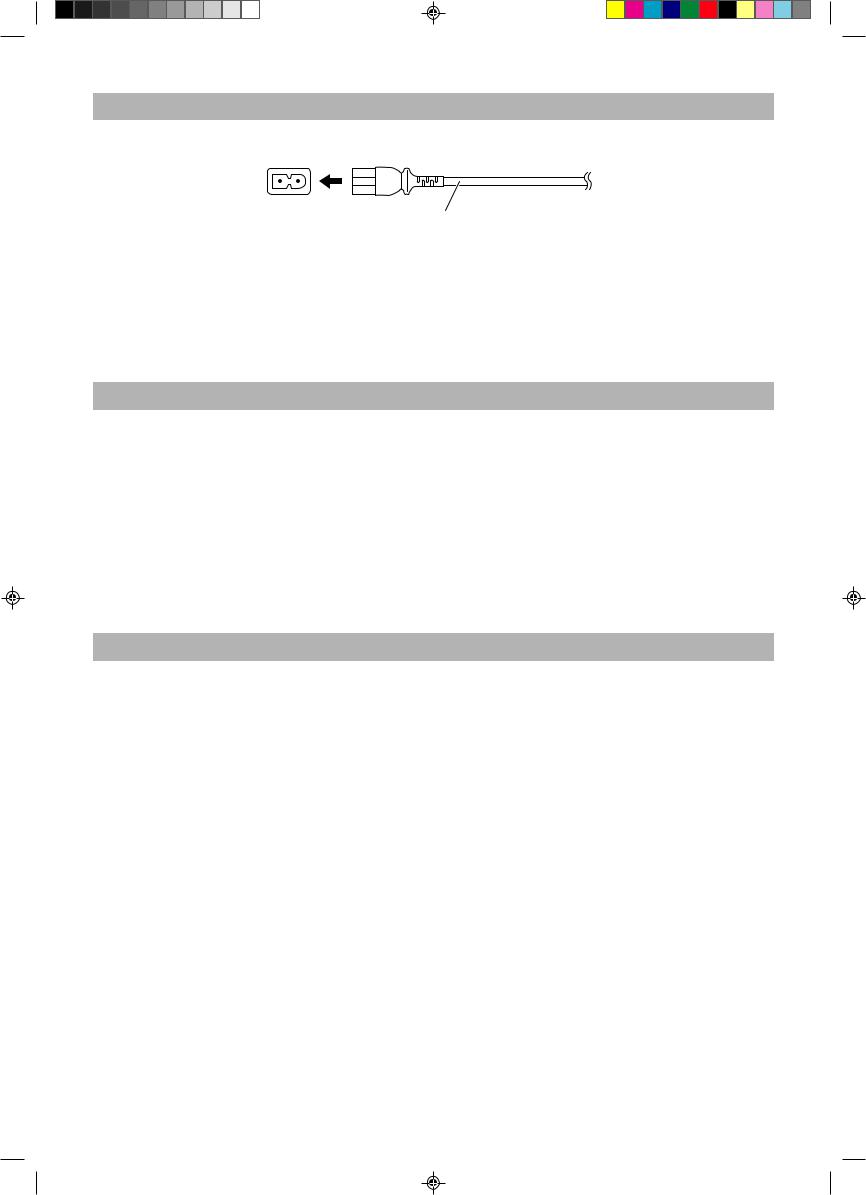
Connecting the AC Power Cord
Firmly insert the supplied AC power cord into the AC inlet on the back of the Unit.
 AC IN
AC IN
AC power cord
CAUTIONS:
•ONLY USE JVC POWER CORD PROVIDED WITH THIS SYSTEM TO AVOID MALFUNCTION OR DAMAGE TO THE SYSTEM.
•BE SURE TO UNPLUG THE POWER CORD FROM THE OUTLET WHEN YOU ARE GOING OUT OR WHEN THE SYSTEM IS NOT IN USE FOR AN EXTENDED PERIOD OF TIME.
Now you can plug the AC power cord into the wall outlet, and your System is at your command!
COMPU PLAY
The JVC’s COMPU PLAY feature lets you control the most frequently used System functions with a single touch.
With One Touch Operation you can play a CD, a tape, turn on the radio, or listen to an external equipment at a single press of the play button for that function. One Touch Operation turns the power on for you, then starts the function you have specified.
How One Touch Operation works in each case is explained in the section dealing with that function. The COMPU PLAY buttons are:
On the Unit |
On the Remote Control |
|
CD #/8button |
CD / |
button |
FM/AM button |
#8 |
|
FM/AM button |
||
TAPE @#button |
TAPE @#button |
|
AUX button |
AUX button |
|
AUTOMATIC POWER ON
The System automatically turns on with the following operation.
• When you press the CD OPEN/CLOSE 0button on the Unit (or CD 0button on the Remote Control), the System automatically turns on and the CD cover opens to allow CD insertion. However, this operation does not change the source to CD.
When you press the POWER button to turn on or off the System, the CD cover will automatically close if it is open.
5
EN01-09.FS-V100[J]f |
5 |
12/12/00, 10:33 AM |
Loading...