


 Loading...
Jvc GZ-MS215 SEK, GZ-MS250 BEK, GZ-MS215 PEK, GZ-MS215 AEK, GZ-MS210 SEK User Manual
...CAMCORDER
GZ-MS250 BEK |
Detailed User Guide |
GZ-MS230 BEK |
|
GZ-MS215 BEK/AEK/PEK/SEK GZ-MS210 BEK/AEK/PEK/SEK
LYT2116-006A

Contents |
|
Beginner's Guide ............................................................ |
4 |
Charging .................................................................................. |
4 |
Recording ................................................................................ |
5 |
Playback .................................................................................. |
5 |
Shooting Tips .......................................................................... |
6 |
Useful Shooting Techniques |
|
Holiday Season/Christmas ...................................................... |
7 |
Wedding .................................................................................. |
8 |
Travel ...................................................................................... |
9 |
Amusement Park ................................................................... |
11 |
Getting Started |
|
Verifying the Accessories ...................................................... |
12 |
Attaching the Core Filter to the DC cord ............................ |
12 |
Charging the Battery Pack .................................................... |
14 |
Grip Adjustment .................................................................... |
15 |
Hand Strap ........................................................................ |
15 |
Inserting an SD Card (GZ-MS250/GZ-MS230) ..................... |
16 |
Types of Usable SD Card .................................................. |
16 |
Inserting an SD Card (GZ-MS215/GZ-MS210) ..................... |
17 |
Types of Usable SD Card .................................................. |
17 |
Clock Setting ......................................................................... |
18 |
Resetting the Clock ........................................................... |
18 |
Changing the Display Language ........................................... |
19 |
Using the Operation Buttons ................................................. |
19 |
Using the Slider ..................................................................... |
19 |
Holding this Unit .................................................................... |
20 |
Tripod Mounting .................................................................... |
20 |
Using this Unit Overseas ....................................................... |
21 |
Charging the Battery Pack Overseas ................................ |
21 |
Setting the Clock to Local Time when Traveling ............... |
21 |
Setting Daylight Saving Time ............................................ |
22 |
Optional Accessories ............................................................ |
22 |
Recording |
|
Taking Videos in Auto Mode ................................................. |
23 |
Zooming ............................................................................. |
24 |
Capturing Still Images During Video Recording ................ |
24 |
Reducing Camera Shake .................................................. |
25 |
Checking the Captured Image Immediately ...................... |
25 |
Taking Still Images in Auto Mode .......................................... |
25 |
Zooming ............................................................................. |
27 |
Checking the Captured Image Immediately ...................... |
28 |
Manual Recording ................................................................. |
28 |
Scene Selection ................................................................. |
29 |
Adjusting Focus Manually .................................................. |
30 |
Adjusting Brightness .......................................................... |
31 |
Setting Shutter Speed ....................................................... |
31 |
Setting White Balance ....................................................... |
32 |
Setting Backlight Compensation ........................................ |
32 |
Setting Metering Area ........................................................ |
33 |
Recording with Effects (GZ-MS250/GZ-MS230) ............... |
33 |
Taking Close-up Shots ...................................................... |
34 |
Registering Files to Events Before Recording ...................... |
34 |
Taking Videos in YouTube Format ........................................ |
35 |
Taking Videos in iTunes Format ........................................... |
36 |
Recording at Intervals (TIME-LAPSE RECORDING) ........... |
36 |
Recording Automatically by Sensing Movements (AUTO REC) |
|
............................................................................................ |
38 |
Remaining Recording Time/Battery Power ........................... |
39 |
Playback |
|
Playing Back Videos ............................................................. |
41 |
Checking the Content of Videos Quickly ........................... |
42 |
Playing a Video with Defective Management Information |
|
........................................................................................ |
42 |
Playing Back Still Images ...................................................... |
43 |
Slideshow Playback ........................................................... |
43 |
Searching for a Specific Video/Still Image ............................ |
44 |
Group Search .................................................................... |
44 |
Date Search ....................................................................... |
44 |
Event and Date Search ..................................................... |
45 |
Connecting to and Viewing on TV ......................................... |
45 |
Playing Back Playlists ........................................................... |
46 |
Editing |
|
Deleting Unwanted Files ....................................................... |
47 |
Deleting the Currently Displayed File ................................ |
47 |
Deleting Selected Files ...................................................... |
48 |
Deleting All Files ................................................................ |
49 |
Protecting Files ..................................................................... |
49 |
Protecting the Currently Displayed File ............................. |
49 |
Protecting Selected Files ................................................... |
50 |
Protecting All Files ............................................................. |
51 |
Releasing Protection of All Files ........................................ |
51 |
Changing Event Registration of Videos ................................ |
52 |
Changing the Event of the Currently Displayed File .......... |
52 |
Changing the Event of the Selected Files ......................... |
53 |
Capturing a Still Image in the Video during Playback ........... |
54 |
Capturing a Required Part in the Video ................................ |
54 |
Capturing Videos for Uploading to YouTube ......................... |
55 |
Preparing Videos to Transfer to iTunes ................................ |
56 |
Creating Playlists from the Recorded Videos ........................ |
57 |
Creating Playlists with Selected Files ................................ |
57 |
Creating Playlists by Group ............................................... |
58 |
Creating Playlists by Date ................................................. |
59 |
Creating Playlists by Event ................................................ |
60 |
Editing Playlists ................................................................. |
61 |
Deleting Playlists ............................................................... |
62 |
Copying |
|
Copying Files to Card (GZ-MS250/GZ-MS230) .................... |
63 |
Copying All Files ................................................................ |
63 |
Copying Selected Files ...................................................... |
64 |
Moving Files (GZ-MS250/GZ-MS230) .................................. |
65 |
Moving All Files ................................................................. |
65 |
Moving Selected Files ....................................................... |
66 |
Dubbing Files to a DVD Recorder or VCR ............................ |
67 |
Copying to Windows PC ....................................................... |
68 |
Verifying System Requirements (Guideline) ...................... |
68 |
Installing the Provided Software ........................................ |
68 |
Backing Up All Files ........................................................... |
69 |
Organizing Files ................................................................. |
70 |
Recording Videos to Discs ................................................ |
71 |
JVC Software Licence Agreement ..................................... |
72 |
Backing Up Files Without Using Provided Software .......... |
72 |
List of Files and Folders .................................................... |
73 |
Copying to Mac Computer .................................................... |
74 |
Menu Settings |
|
Operating the Menu .............................................................. |
75 |
Recording Menu (Video) ....................................................... |
76 |
LIGHT (GZ-MS250/GZ-MS230/GZ-MS215) ...................... |
77 |
REGISTER EVENT ........................................................... |
77 |
VIDEO QUALITY ............................................................... |
77 |
ZOOM ................................................................................ |
78 |
GAIN UP ............................................................................ |
78 |
TIME-LAPSE RECORDING .............................................. |
78 |
AUTO REC ........................................................................ |
78 |
AUTO SWITCH REC MEDIA ............................................ |
79 |
SELECT ASPECT RATIO ................................................. |
79 |
WIND CUT ......................................................................... |
80 |
Recording Menu (Still Image) ................................................ |
81 |
LIGHT (GZ-MS250/GZ-MS230/GZ-MS215) ...................... |
82 |
3

Beginner's Guide
SELF-TIMER ..................................................................... |
82 |
SHUTTER MODE .............................................................. |
83 |
IMAGE QUALITY ............................................................... |
83 |
GAIN UP ............................................................................ |
84 |
AUTO REC ........................................................................ |
84 |
Manual Settings Menu .......................................................... |
85 |
SCENE SELECT ............................................................... |
85 |
FOCUS .............................................................................. |
85 |
BRIGHTNESS ADJUST .................................................... |
85 |
SHUTTER SPEED ............................................................ |
85 |
WHITE BALANCE ............................................................. |
85 |
BACKLIGHT COMP. ......................................................... |
85 |
METERING AREA/TYPE .................................................. |
85 |
EFFECT (GZ-MS250/GZ-MS230) ..................................... |
85 |
TELE MACRO ................................................................... |
85 |
Playback Menu (Video) ......................................................... |
86 |
DELETE ............................................................................. |
87 |
SEARCH ............................................................................ |
87 |
PLAYBACK PLAYLIST ...................................................... |
87 |
EDIT PLAYLIST ................................................................. |
87 |
PLAYBACK MPG FILE ...................................................... |
87 |
EDIT .................................................................................. |
87 |
ON-SCREEN DISPLAY ..................................................... |
88 |
Playback Menu (Still Image) ................................................. |
89 |
DELETE ............................................................................. |
89 |
SEARCH DATE ................................................................. |
89 |
EDIT .................................................................................. |
89 |
SLIDE SHOW EFFECTS ................................................... |
90 |
ON-SCREEN DISPLAY ..................................................... |
91 |
Display Settings Menu .......................................................... |
92 |
LANGUAGE ....................................................................... |
92 |
DATE DISPLAY STYLE .................................................... |
92 |
MONITOR BRIGHTNESS ................................................. |
92 |
LCD BACKLIGHT .............................................................. |
93 |
CLOCK ADJUST ................................................................... |
93 |
Basic Settings Menu ............................................................. |
94 |
DEMO MODE .................................................................... |
95 |
AUTO POWER OFF .......................................................... |
95 |
OPERATION SOUND ....................................................... |
96 |
RECORD BUTTON ........................................................... |
96 |
QUICK RESTART ............................................................. |
97 |
UPDATE ............................................................................ |
97 |
FACTORY PRESET .......................................................... |
97 |
Connection Settings Menu .................................................... |
98 |
DISPLAY ON TV ............................................................... |
98 |
VIDEO OUTPUT ................................................................ |
98 |
Media Settings Menu ............................................................ |
99 |
REC MEDIA FOR VIDEO (GZ-MS250/GZ-MS230) .......... |
99 |
VIDEO SLOT SELECTION (GZ-MS215/GZ-MS210) ........ |
99 |
REC MEDIA FOR IMAGE (GZ-MS250/GZ-MS230) ........ |
100 |
IMAGE SLOT SELECTION (GZ-MS215/GZ-MS210) ...... |
100 |
FORMAT BUILT-IN MEM. (GZ-MS250/GZ-MS230) ....... |
101 |
FORMAT SD CARD ........................................................ |
101 |
ERASE ALL DATA (GZ-MS250/GZ-MS230) ................... |
102 |
Names of Parts |
|
Front .................................................................................... |
103 |
Rear .................................................................................... |
103 |
Bottom ................................................................................. |
104 |
Interior ................................................................................. |
104 |
LCD Monitor ........................................................................ |
105 |
Indications on the LCD monitor |
|
Common Recording Indications .......................................... |
106 |
Video Recording .................................................................. |
106 |
Still Image Recording .......................................................... |
107 |
Video Playback ................................................................... |
107 |
Still Image Playback ............................................................ |
108 |
Troubleshooting |
|
Battery Pack ........................................................................ |
109 |
Recording ............................................................................ |
109 |
Card .................................................................................... |
109 |
Playback .............................................................................. |
109 |
Editing/Copying ................................................................... |
110 |
PC ....................................................................................... |
110 |
Screen/Image ...................................................................... |
110 |
Other Problems ................................................................... |
110 |
Error Message? ................................................................... |
110 |
Maintenance ................................................................ |
112 |
Specifications ............................................................. |
113 |
Charging
●Refer to the operating instructions found in the animation on the Detailed User Guide.
4

Beginner's Guide
Recording
●Refer to the operating instructions found in the animation on the Detailed User Guide.
Playback
●Refer to the operating instructions found in the animation on the Detailed User Guide.
5
Beginner's Guide
Shooting Tips
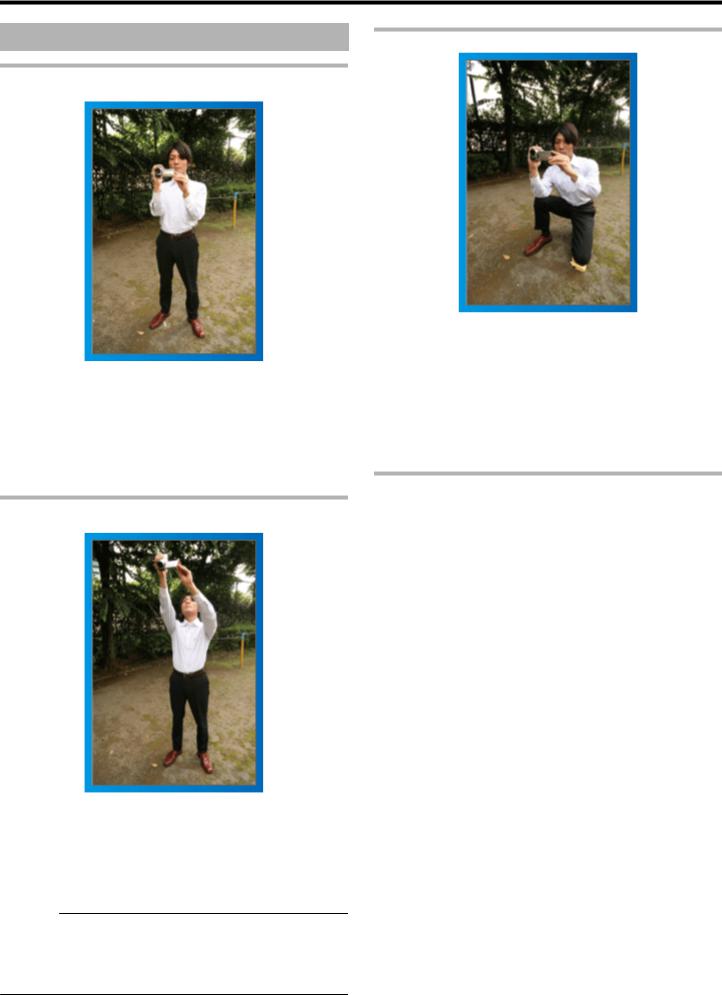
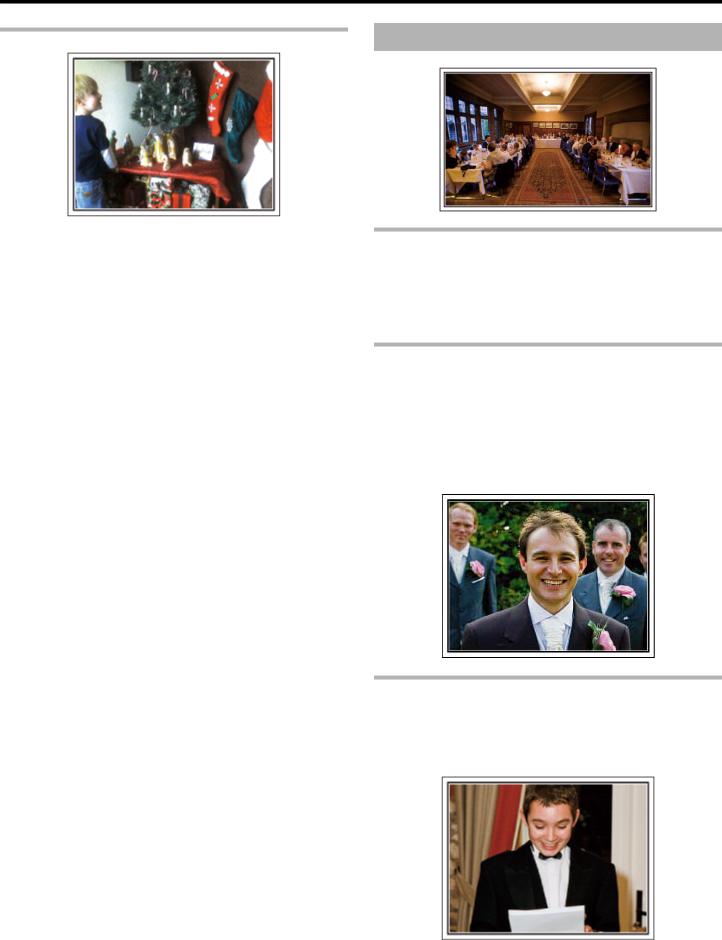
Squatting and Shooting at Eye Level
Basic Way to Hold a Camcorder ~ Recording Stable Images ~
This is the standard way of shooting while standing up.
Be sure to master this basic technique in order to achieve stable images.
■[Getting Ready]
Open your feet to the width of your shoulders.
Keep the elbow of your right arm, which is holding the camcorder, close to your side.
Hold the LCD monitor with your left hand and adjust the angle accordingly.
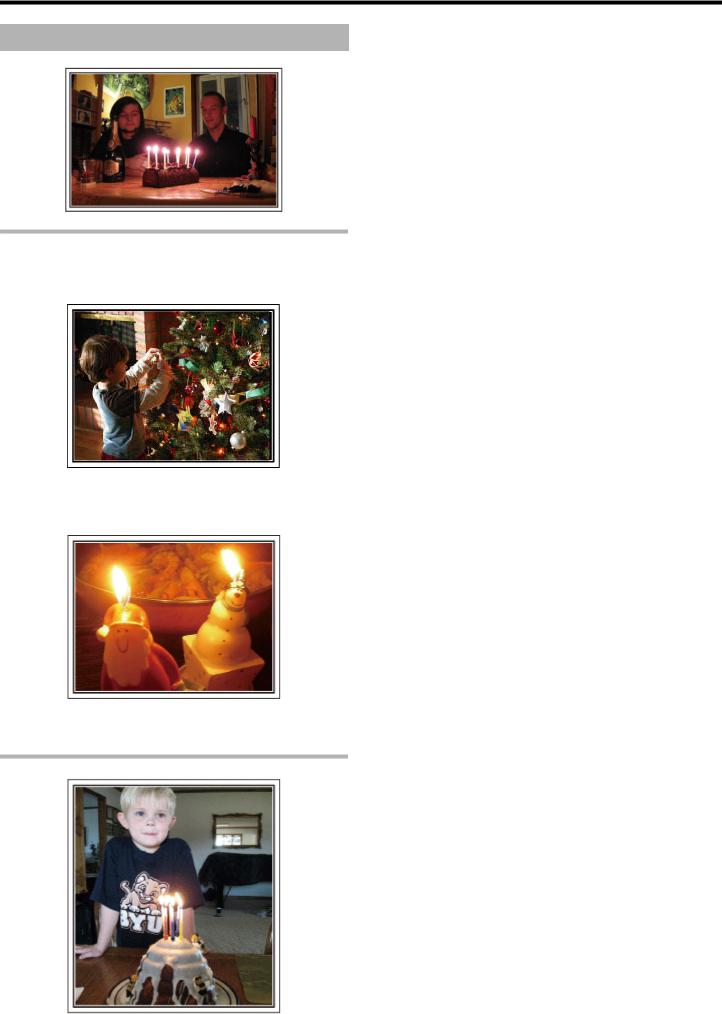
Extending Your Hands to Shoot ~ High-Angle Shooting ~
Extend your hand when your subject is being hidden behind a crowd of people.
■[Getting Ready]
Open your feet to the width of your shoulders.
Extend your right hand and hold the camcorder over your head.
Hold the LCD monitor with your left hand and adjust the angle accordingly.
CAUTION:
●Use this way of shooting only as a last resort as it is difficult to achieve stable images.
●Set to the wide angle as much as possible as the image will be prone to camera shake.
●Be considerate. Do not inconvenience the people around you.
Staying low is a common position to take when shooting small children. By recording from the eye level of the child, you can capture all his cute expressions clearly.
■[Getting Ready]
Kneel down with your left knee while keeping your right foot on the ground.
Place the elbow of your right arm, which is holding the camcorder, on your right knee.
Hold the LCD monitor with your left hand and adjust the angle accordingly.
Panning
●Refer to the operating instructions found in the animation on the Detailed User Guide.
Use this method to shoot a wide angle of view.
■ [Getting Ready]
Shoot by rotating your body instead of moving your arms while keeping the basic way of holding a camcorder as stated above.
Stand facing the direction where the rotation will stop.
Twist your upper body to the direction where recording will start.
Press the start button and record for 2 seconds, then slowly twist back your body to face the front.
Record for another 2 seconds while facing the front, then press the stop button.
(The 90 degrees rotation should take about 5 seconds, giving the feeling of a slow motion.)
6
Useful Shooting Techniques
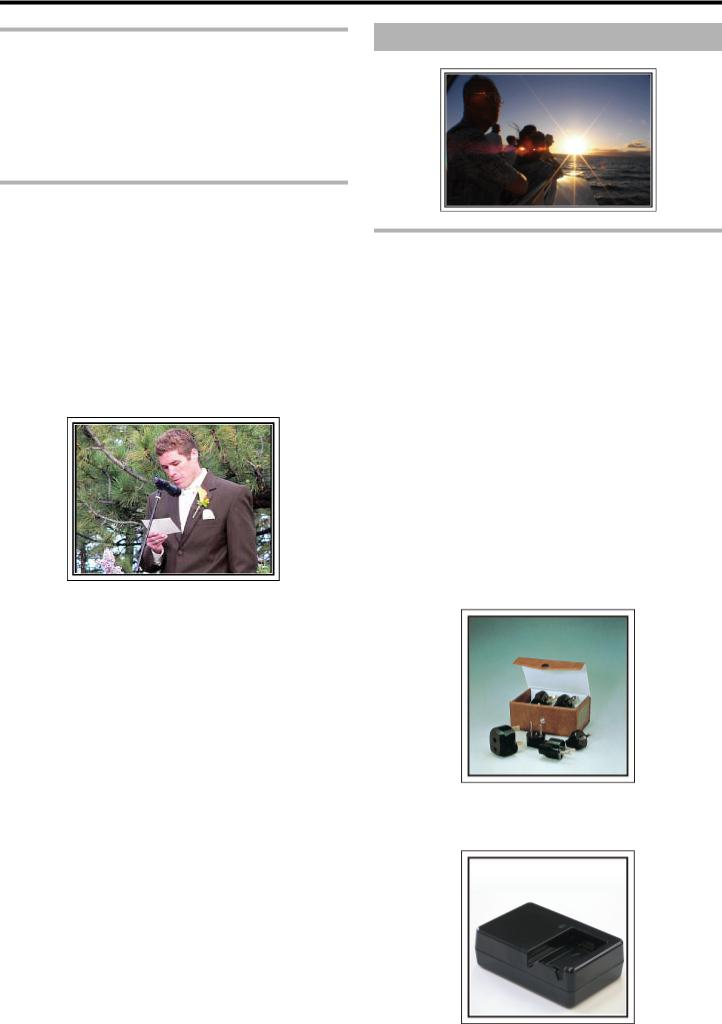
Not only should you record the candle-blowing scene, but also the smiles
Holiday Season/Christmas of the family while being surrounded by good food, or even the father who is slightly drunk from champagne!
Record the happy Christmas celebration with your family!
Decorating the Tree and Preparing the Dinner
The decoration of tree and preparation of dinner are part of the joy of Christmas. Be sure to record these happy family times!
■ Decorating the tree
.
A tree is the most important thing to bring out the mood of Christmas. Simply the scene of all family members engaging in the decorating of a fir tree with various colorful ornaments is full of the feeling of happiness.
■ Preparing the Dinner
Record the scenes as everyone helps to prepare the feast of the night.
You can film the mother who is cooking, the children who are helping, and of course, the process of making a cake!
Recording the Christmas Party
After all preparations, it is finally the Christmas party itself.
7
Useful Shooting Techniques
Finding the Presents
For children, the greatest joy of Christmas is receiving presents the next morning.
Their expression of delight when finding a present next to their pillow is a recording opportunity not to be missed. Get ready to shoot before the children wake up!
Wedding
Create an awesome wedding video for the bride and groom!
Discussing and Planning Before the Event
Before the day of the wedding reception, it is important to discuss with the bride and groom about various details such as the order of the ceremony and whether there are any entertainment programs or change of clothes.
By understanding the preferences of the bride and groom, you will be able to shoot more appropriately.
Finding the Right Angle to Capture Both Bride and Groom
The main characters of a wedding are of course the bride and groom. Record their expressions clearly during the toast, speech, entertainment programs, and other scenes.
Another recommendation is to capture the face shots of the guests, then pan towards the groom. Picture composition containing the crowd of guests only lacks fun, so be sure to pay attention to the shooting angle and size.
■Composing the picture with the guests in front and the bride and groom at the back
.
Recording the Expressions and Comments of Guests
You can record comments from the guest by going around asking, "Please say a few words for the bride and groom".
This can be done at the guests' waiting room, when the bride and groom are changing, or during the entertainment programs.
■ Setting the shot from eye level to chest level
8
Useful Shooting Techniques
Closing Up on the Bride's Face During the Thank You Speech
The climax of the event finally comes during the bride and groom's thank you speech and presentation of flowers. The touching words of appreciation from the bride and tears of joy from the parents are scenes that must not be missed.
Start by closing up on the bride's face using zoom. As the tears start to form in the bride's eyes, continue shooting for a little longer. Then, slowly zoom out to the wide angle to show the parents who are moved by the speech.
Advanced Operation with Two Camcorders
If video-editing is to be done, record using two camcorders so that a video with varying scenes can be created. You can try asking a close friend who has a camcorder at home.
Set the borrowed camcorder on a tripod to focus on taking close-up shots of the bride and groom. In this way, the other camcorder can be moved around to record other scenes, enabling an interesting video with changing scenes to be created through editing and compilation.
As most people own at least a digital camera nowadays, even if you are really unable to find an extra camcorder, inserting still pictures to the video at various points is also a good way to add variety. Do give it a try!
■<Camcorder 1>
Closing up on the bride and groom all the time
■<Camcorder 2>
Recording the congratulatory messages from friends at the same time
.
Travel
Capture all the good times of your domestic or overseas trips!
Bringing the Necessary Equipment
The necessary things to bring on a trip depends on your traveling purpose and the destination.
For overseas trips in particular, you have to think about what to bring in accordance to the local conditions.
Here are some suggestions for your consideration.
■ Camcorder
Think about how many hours of shooting you will usually perform in a day. Be sure to prepare enough recording medium especially for long overseas trips.
If you are recording in SD cards, get ready the sufficient number of cards, including some for backup.
■ Battery Pack
Prepare a battery pack that is ready for double the expected recording time in a day. For example, if you plan to record for 2 hours a day, prepare a battery pack that is ready for 4 hours (actual recording time).
For a day trip, you can prepare a battery with low capacity but for a long trip, do prepare a few batteries with high capacities.
■ AC Adapter
The JVC AC adapter supports voltages from 100 V to 240 V, and hence can be used anywhere in the world.
Bring along the adapter if you are traveling for a long time. Charge the battery pack while sleeping so that you can record with full battery power the next day.
■ Power Plug AdapterA P.21
The shape of the power plug varies according to countries. Be sure to check the shape of the power plug beforehand, and bring the appropriate power plug adapter.
■ Battery Charger
9
Useful Shooting Techniques
Recording cannot be performed when an AC adapter is connected to the camcorder for battery charging.
You can bring an additional battery charger to charge battery packs if you plan to use the camcorder for recording at night. You can also charge multiple battery packs by using both the battery charger and this camcorder at the same time.
■ Tripod
A tripod is an essential item to take stable images. Select an appropriate tripod in accordance to your purpose and style of traveling, such as a compact one to be used on a table or one that is at least 1 m tall.
Recording the Excitement Before Departure
It may be a little abrupt to start your travel video at the destination suddenly.
Record also the preparations prior to departure if it is a family trip, or the time when everyone is gathered at the meeting place if you are traveling with your friends.
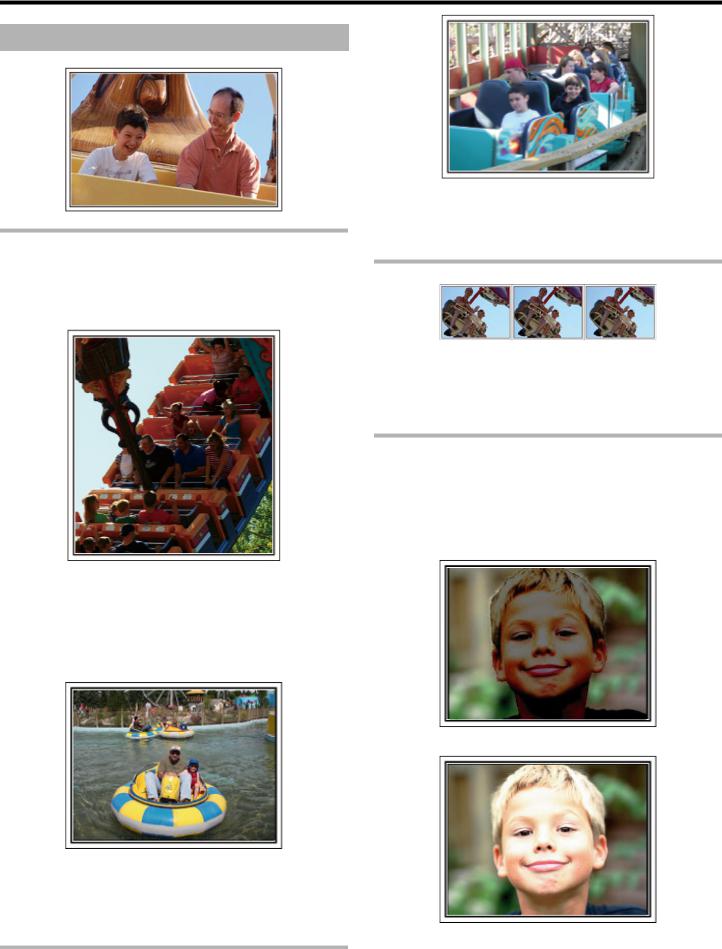
For overseas trips, taking a shot of the signs and displays at the airport of the flight you are taking may be useful for future reference.
■
■
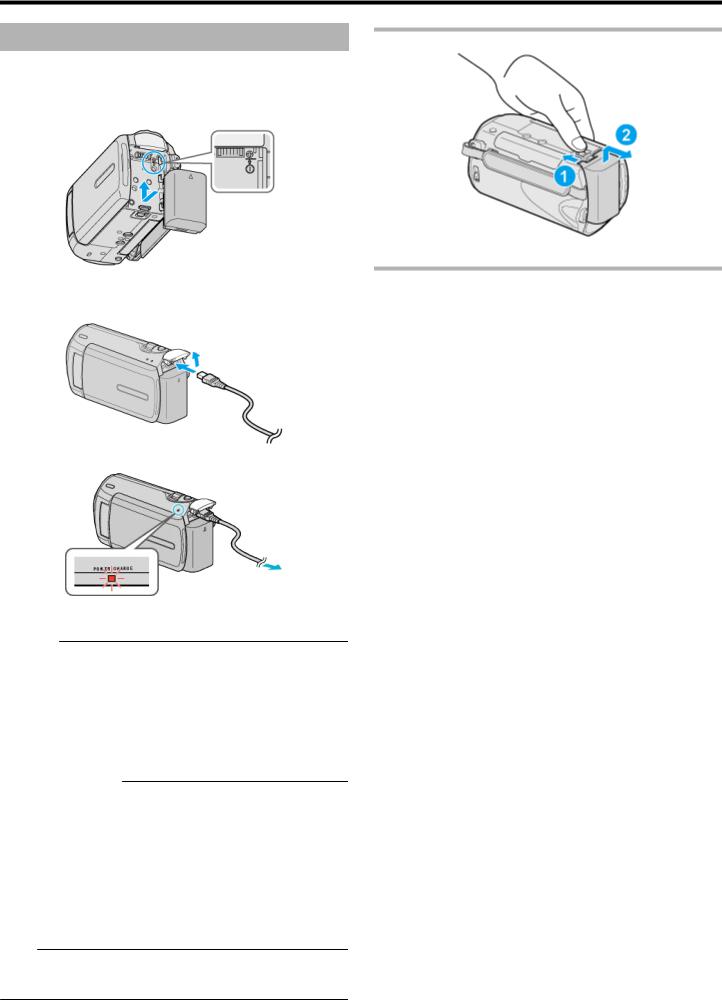
Using Pan at the Places of Interest
Tourists spots with beautiful scenery or historical sites are places that you would certainly want to record.
To capture the magnificence of a scene which cannot be fitted into a single frame, try the panning technique.
Refer to the "Shooting Tips" found in this website on how to use panning effectively.
In addition, you may also like to take a shot of the signs or monuments that can often be found at the tourist spots.
Showing Everyone Having a Good Time
When taking a video, it is rather dull to shoot only the scenery or historical sites.
Talk about your feelings while recording the breath-taking scenery of an attraction so that it will be an interesting scene to view later.
10
Useful Shooting Techniques
Amusement Park
Take more shots of the smiling faces of everyone in the family!
Taking Videos or Still Images According to the Attraction
You may choose to take videos all the time. However, you may want to take some still images too.
The following section explains the scenarios suitable for taking videos or still images.
■ Scenarios suitable for taking videos
Scenarios with changes in body movement are suitable for taking videos. This includes situations where there are rapid changes in facial expressions or voices of surprise and delight.
*Some amusement parks do not allow passengers to perform any recording. Be sure to check beforehand.
[Examples]
● Merry-go-round, go kart, coffee cup, etc.
■ Scenarios suitable for taking still images (photos)
Scenarios with little movement of the subject are suitable for taking still images.
Try to take the still images from an angle such that the surroundings can be seen clearly.
[Examples]
● Carousal, ferris wheel, fun bicycle rides, etc.
Inducing Responses by Calling Out
Videos with no waving of hands nor laughter are not only dull when you view them later, but also put the capability of the audio-recording function of the camcorder to a waste.
When recording, induce more reactions by enthusiastically waving your hands or shouting out "Is it fun?" and the like.
Capturing the Best Moment in a Video as a Still Image
Shots with the eyes closed are often taken by accident. To reduce such mistakes, make use of the function to capture still images from videos. As videos are actually continuous recording of 60 still images within 1 minute, using this function allows you to select the best moment and save it as a still image.
"Capturing a Still Image in the Video during Playback" A P.54
Advanced Operation with Backlight Compensation
It is useful to make use of backlight compensation when the subject's face is in backlight or when the expression cannot be seen clearly.
Increase the brightness of the whole image by setting “BACKLIGHT COMP.” if the faces appear too dark. Even the expressions of faces under shadows can be captured brightly and clearly.
"Setting Details" A P.32
■ <Without backlight compensation>
■ <With backlight compensation>
11
Getting Started
Verifying the Accessories
If any of the items are missing or defective, consult your JVC dealer or the nearest JVC service center.
Illustration |
Description |
|
|
|
AC Adapter |
|
AP-V30M |
|
● Connects to this unit to charge the battery pack. |
|
It can also be used when recording or playing back videos indoors. |
|
|
|
Power Cord |
|
|
|
Battery Pack |
|
BN-VG107E |
|
● Attaches to this unit to supply power. |
. |
|
|
|
|
AV Cable |
|
● Connects this unit to a TV to play back recorded images on the TV. |
. |
|
|
|
|
USB Cable |
|
(Type A - Mini Type B) |
|
● Connects this unit to a PC. |
. |
|
|
|
|
CD-ROM |
|
● For installing the provided software "Everio MediaBrowser" on a PC. |
|
|
|
Core Filter (GZ-MS250/GZ-MS230) |
|
|
|
Basic User Guide |
|
● Read well and keep in a safe place where it can be accessed easily when necessary. |
|
|
NOTE:
SD cards are sold separately.
"Types of Usable SD Card" A P.16
When using the AC adapter overseas, please prepare a commercially available converter plug for the country or region of visit.
"Charging the Battery Pack Overseas" A P.21
|
The core filter reduces interference. Connect the end of the cable with the |
|
|
core filter to the camera. |
|
Attaching the Core Filter to the DC cord |
||
|
||
The core filter reduces interference. Connect the end of the cable with the |
|
|
core filter to this unit. |
|
12

Getting Started
.
13
Getting Started
Charging the Battery Pack
Charge the battery pack immediately after purchase and when the remaining battery power is low.
The battery pack is not charged at the time of purchase.
1 Attach the battery pack.
●Align the top of the battery with this unit, and slide in until the battery clicks into place.
2 Connect the AC adapter to the DC terminal.
3 Plug in the power.
.
●The charging lamp blinks when charging is in progress. It goes out when charging is finished.
CAUTION:
Be sure to use JVC battery packs.
●If you use any other battery packs besides JVC battery packs, safety and performance can not be guaranteed.
●Charging time: Approx. 1 h 50 m (using supplied battery pack)
The charging time is when the unit is used at 25°C.
If the battery pack is charged outside the room temperature range of 10°C - 35°C, charging may take a longer time or it may not start. The recordable and playable time may also be shortened under some usage conditions such as at low temperature.
Rechargeable Batteries
●When using the battery in a low temperature environment (10°C or below), the operating time may be shortened, or it may not function properly. When using this unit outdoors in the winter weather, warm the battery, such as by placing it in the pocket, before attaching it.
(Keep away from direct contact with a warm pack.)
●Do not expose the battery to excessive heat, such as direct sunlight or fire.
●After removing the battery, store it in a dry place between 15°C to 25°C.
●If the battery pack is not to be used for a long time, use up the charge completely and detach it from this unit to prevent deterioration.
NOTE:
●You can connect this unit to the AC adapter to record for long hours indoors.
(Battery charging begins when the LCD monitor is closed.)
Detaching the Battery Pack
Slide the battery release lever to detach the battery from this unit.
Approximate Battery Charging Time
Battery Pack |
Charging Time |
|
|
BN-VG107E |
1 h 50 m |
(Supplied) |
|
|
|
BN-VG114E |
2 h 30 m |
|
|
BN-VG121E |
3 h 30 m |
|
|
●When the battery life is reached, the recording time becomes shorter even if the battery pack is fully charged.
(Replace the battery pack with a new one.)
*The charging time is when the unit is used at 25°C.
If the battery pack is charged outside the room temperature range of 10°C - 35°C, charging may take a longer time or it may not start. The recordable and playable time may also be shortened under some usage conditions such as at low temperature.
14
Getting Started
Grip Adjustment
Flip the grip belt over.
Adjust the length of the belt.
Fasten the grip belt.
CAUTION:
●Be sure to fasten the grip belt properly.
If the belt is loose, this unit may drop and result in injuries or damages.
Hand Strap
When using the hand strap, loop it around your wrist.
.
Removing the Strap
.
● While pressing A, pull B and remove the strap.
Attaching the Strap
Push in firmly until it clicks into place.
15
Getting Started
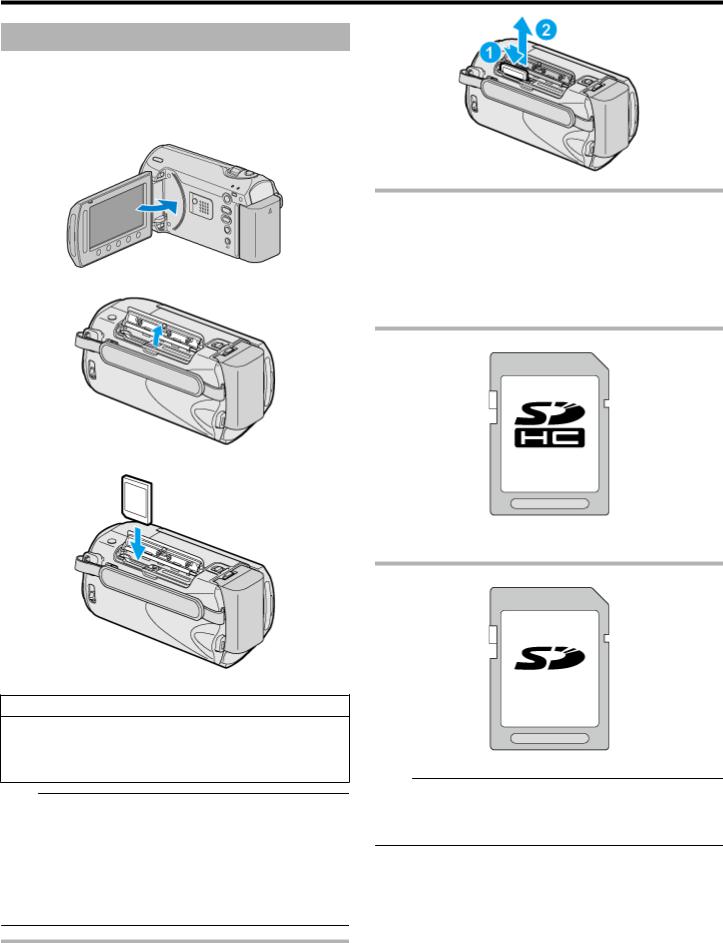
Inserting an SD Card (GZ-MS250/GZ-MS230)
When a commercially available SD card is inserted, recordings can still be made to the card without stopping when the remaining recording time on the built-in memory runs out.
"Types of Usable SD Card" A P.16
"Approximate Video Recording Time" A P.40
1 Close the LCD monitor.
2 Open the slot cover.
3 Insert an SD card.
Types of Usable SD Card
The following SD cards can be used on this unit.
Operations are confirmed on the SD cards from the following manufacturers.
●Panasonic
●TOSHIBA
●SanDisk
●ATP
SDHC Card
● Insert with the label facing outward.
Warning
●Make sure not to insert the card in the wrong direction.
It may cause damage to the unit and card.
●Turn off the power of this unit before inserting or removing a card.
●Do not touch the metal contact area when inserting the card.
NOTE:
●To record to the card, it is necessary to perform media settings. When no card is available, set media settings to “BUILT-IN MEMORY” for recording.
"REC MEDIA FOR VIDEO (GZ-MS250/GZ-MS230)" A P.99
"REC MEDIA FOR IMAGE (GZ-MS250/GZ-MS230)" A P.100
●To use cards that have been used on other devices, it is necessary to format (initialize) the card using “FORMAT SD CARD” from media settings.
"FORMAT SD CARD" A P.101
Removing the Card
Push the SD card inward once, then pull it out straight.
●Use a Class 4 or higher compatible SDHC card (4 GB to 32 GB) for video recording.
SD Card
●This unit supports 256 MB to 2 GB SD cards.
NOTE:
●Using SD cards (including SDHC cards) other than those specified above may result in recording failure or data loss.
●Class 4 and Class 6 are guaranteed to have a minimum transfer rate of
4 MB/s and 6 MB/s respectively during reading or writing of data.
16

Getting Started
Inserting an SD Card (GZ-MS215/GZ-MS210)
Insert a commercially available SD card before recording. This unit comes with two SD card slots.
When two SD cards are inserted, recordings can be continued on the other card even if one card is full.
"Types of Usable SD Card" A P.17
"Approximate Video Recording Time" A P.40
1 Close the LCD monitor.
2 Open the slot cover.
3 Insert an SD card into slot A.
● Insert with the label facing outward.
Warning
●Make sure not to insert the card in the wrong direction. It may cause damage to the unit and card.
●Turn off the power of this unit before inserting or removing a card.
●Make sure that a card is inserted in at least one slot.
Recordings cannot be performed without any SD card inserted.
"Media Settings Menu" A P.99
● Do not touch the metal contact area when inserting the SD card.
NOTE:
●To use cards that have been used on other devices, it is necessary to format (initialize) the card using “FORMAT SD CARD” from media settings.
"FORMAT SD CARD" A P.101
Removing the Card
Push the SD card inward once, then pull it out straight.
Types of Usable SD Card
The following SD cards can be used on this unit.
Operations are confirmed on the SD cards from the following manufacturers.
●Panasonic
●TOSHIBA
●SanDisk
●ATP
SDHC Card
●Use a Class 4 or higher compatible SDHC card (4 GB to 32 GB) for video recording.
SD Card
●This unit supports 256 MB to 2 GB SD cards.
NOTE:
●Using SD cards (including SDHC cards) other than those specified above may result in recording failure or data loss.
●Class 4 and Class 6 are guaranteed to have a minimum transfer rate of
4 MB/s and 6 MB/s respectively during reading or writing of data.
17
Getting Started
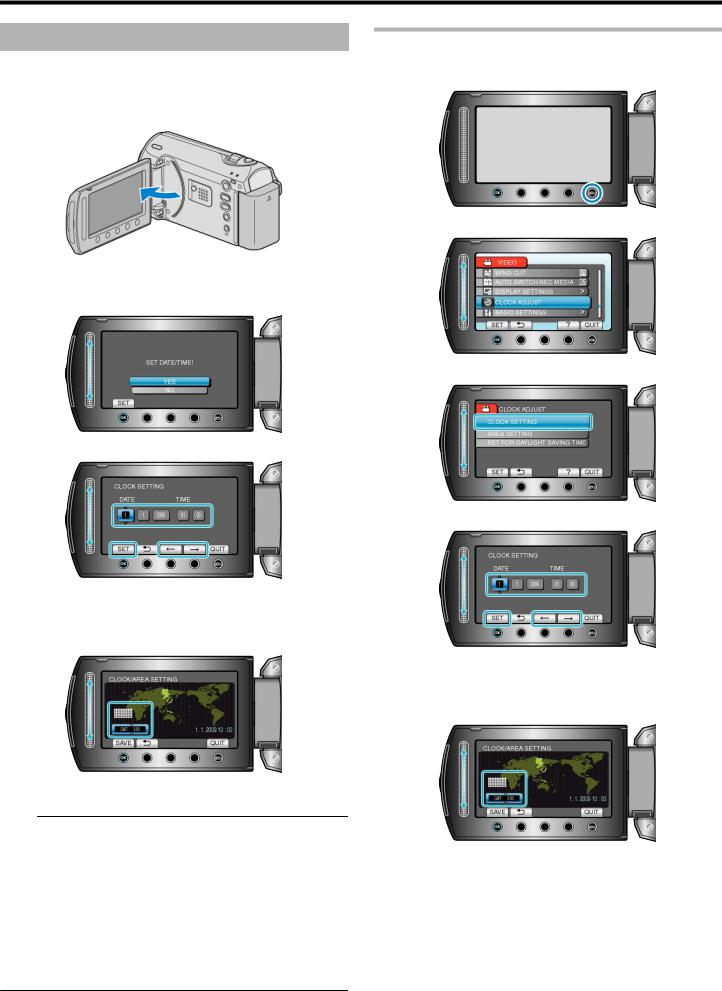
Clock Setting
The “SET DATE/TIME!” screen appears when you turn on this unit for the first time after purchase, when it has not been used for a long time, or when the clock is not set yet.
Set the clock before recording.
1 Open the LCD monitor.
●This unit turns on.
●When the LCD monitor is closed, this unit turns off.
2 Select “YES” and touch C.
.
3 Set the date and time.
.
●Use the slider to adjust the year, month, day, hour, and minute in order.
●Touch the operation buttons "E" / "F" to move the cursor.
●After setting the date and time, touch C.
4 Select the region where you live and touch C.
.
●The city name and time difference are displayed.
●Touch C after the color of the selected region changes.
NOTE:
●The clock can be reset again later.
"Resetting the Clock" A P.18
●When using this unit overseas, you can set it to the local time for recording.
"Setting the Clock to Local Time when Traveling" A P.21
●You can turn on or off the clock display during playback mode. "ON-SCREEN DISPLAY" A P.88
●Touch the slider and buttons around the screen with your fingers.
●The slider and buttons do not function if you touch them with your fingernails or with gloves on.
●The displays on the screen do not work even if you touch them.
Resetting the Clock
Set the clock with “CLOCK ADJUST” from the menu.
1 Touch D to display the menu.
.
2 Select “CLOCK ADJUST” and touch C.
.
3 Select “CLOCK SETTING” and touch C.
.
4 Set the date and time.
.
●Use the slider to adjust the year, month, day, hour, and minute in order.
●Touch the operation buttons "E" / "F" to move the cursor.
●After setting the date and time, touch C.
5 Select the region where you live and touch C.
.
●The city name and time difference are displayed.
●Touch C after the color of the selected region changes.
18

Getting Started
Changing the Display Language
The language on the display can be changed.
1 Touch D to display the menu.
.
2 Select “DISPLAY SETTINGS” and touch C.
.
3 Select “LANGUAGE” and touch C.
.
4 Select the desired language and touch C.
Using the Operation Buttons
Functions of the operation buttons may be displayed on the screen according to the feature in use.
.
●To operate, touch the slider and buttons around the screen lightly with your fingers.
NOTE:
●"Touch" denotes the touching of the operation buttons lightly.
●The slider and buttons do not function if you touch them with your fingernails or with gloves on.
●The displays on the screen do not work even if you touch them.
Using the Slider
Slide the ball of your finger along the slider for smooth operations. While the slider is being pressed, the cursor moves automatically.
Fine operations such as moving the cursor one by one can be performed by touching the slider.
●Refer to the operating instructions found in the animation on the Detailed User Guide.
NOTE:
●The slider and buttons do not function if you touch them with your fingernails or with gloves on.
●The displays on the screen do not work even if you touch them.
19
Getting Started
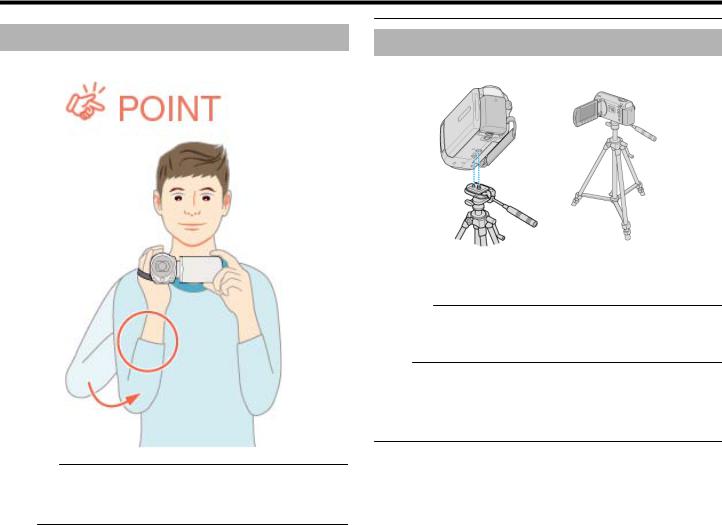
Holding this Unit
When holding this unit, keep your elbows close to your sides to prevent camera shake.
.
CAUTION:
●Be careful not to drop this unit during transportation.
●Guardians should pay close attention when this unit is being used by children.
NOTE:
● If camera shake is excessive, use the digital image stabilizer. "Reducing Camera Shake" A P.25
Tripod Mounting
This unit can be mounted on a tripod. This is useful for preventing camera shake and recording from the same position.
●To prevent this unit from falling off, check the tripod mounting screw holes and positioning holes on the unit carefully before mounting, and turn the screws until they are fastened firmly.
CAUTION:
●To prevent injuries or damages which may result if this unit falls off, read the instruction manual of the tripod to be used and make sure that it is securely attached.
NOTE:
●It is recommended to use the tripod when recording in conditions prone to camera shake (such as in dark places or when zoomed to the telephoto end).
●Set "DIS" to Z (OFF) when using a tripod for recording.
"Reducing Camera Shake" A P.25
20
Getting Started
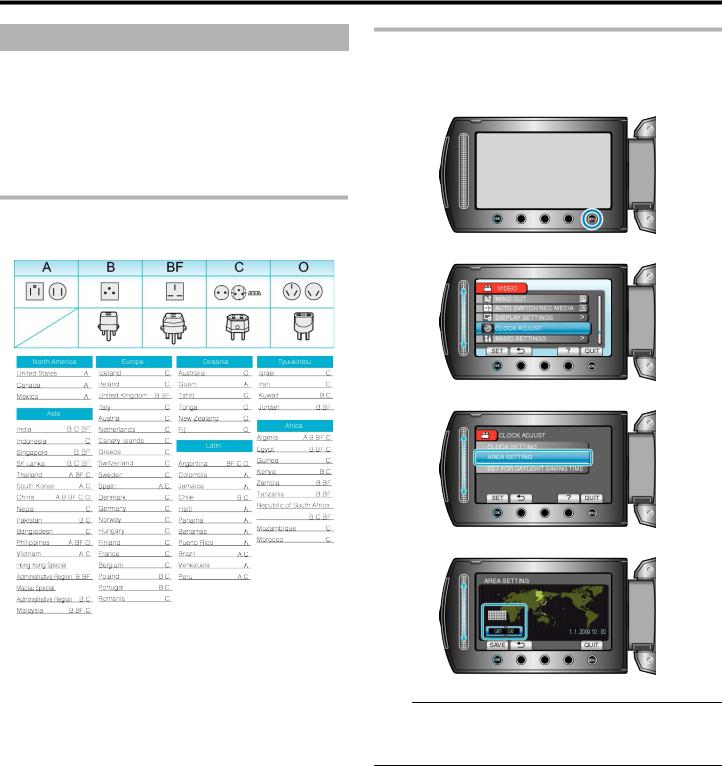
Using this Unit Overseas
The shape of the power outlet varies according to countries and regions. To charge the battery pack, you need a converter plug that matches the shape of the outlet.
"Charging the Battery Pack Overseas" A P.21
Change the date and time display to the local time by selecting your travel destination in “AREA SETTING” of “CLOCK ADJUST”.
"Setting the Clock to Local Time when Traveling" A P.21 When “ON” is selected in “SET FOR DAYLIGHT SAVING TIME” of “CLOCK ADJUST”, the time is set 1 hour ahead.
"Setting Daylight Saving Time" A P.22
Charging the Battery Pack Overseas
The shape of the power outlet varies according to countries and regions. To charge the battery pack, you need a converter plug that matches the shape of the outlet.
.
Setting the Clock to Local Time when Traveling
Change the date and time display to the local time by selecting your travel destination in “AREA SETTING” of “CLOCK ADJUST”.
Restore the region settings after you returned from the trip.
1 Touch D to display the menu.
.
2 Select “CLOCK ADJUST” and touch C.
.
3 Select “AREA SETTING” and touch C.
.
4 Select the area you are traveling to and touch C.
.
●The city name and time difference are displayed.
NOTE:
●Setting “AREA SETTING” changes the clock time such that time difference is accounted for.
After returning to your country, re-select the region that was set initially to restore the original clock settings.
21
Getting Started
Setting Daylight Saving Time
When “ON” is selected in “SET FOR DAYLIGHT SAVING TIME” of “CLOCK ADJUST”, the time is set 1 hour ahead.
1 Touch D to display the menu.
.
2 Select “CLOCK ADJUST” and touch C.
.
3 Select “SET FOR DAYLIGHT SAVING TIME” and touch C.
Optional Accessories
You can record for a longer time by using the optional battery pack.
Product Name |
Description |
|
|
Battery Pack |
● Provides a longer recording time than the battery |
● BN-VG107E |
pack that comes with this unit. It can also be used |
● BN-VG114E |
as a spare battery pack. |
● BN-VG121E |
|
|
|
Battery Charger |
● Enables the battery pack to be charged without |
● AA-VG1 |
using this unit. |
|
|
NOTE:
●For more information, refer to the catalog.
●BN-VG107E is the same battery pack that comes with this unit.
●File copying by connecting this unit to a DVD writer is not supported.
Approximate Recording Time (Using Battery)
Battery Pack |
Actual Recording |
Continuous Recording |
|
Time |
Time |
|
|
|
BN-VG107E |
50 m |
1 h 30 m |
(Supplied) |
|
|
|
|
|
BN-VG114E |
1 h 40 m |
3 h 5 m |
|
|
|
BN-VG121E |
2 h 35 m |
4 h 40 m |
|
|
|
●The above are values when “LIGHT” is set to “OFF” and “LCD BACKLIGHT” is set to “STANDARD”.
●The actual recording time may be shorter if zooming is used or if recording is stopped repeatedly.
(It is recommended to prepare battery packs ready for three times the expected recording time.)
.
● When the battery life is reached, the recording time becomes shorter
4 Set daylight saving time and touch C. even if the battery pack is fully charged. (Replace the battery pack with a new one.)
.
NOTE:
●What is daylight saving time?
Daylight saving time is the system of setting the clock 1 hour ahead for a fixed period in summer.
It is used mainly in the Western countries.
●Restore the daylight saving time settings after you returned from the trip.
22
Recording
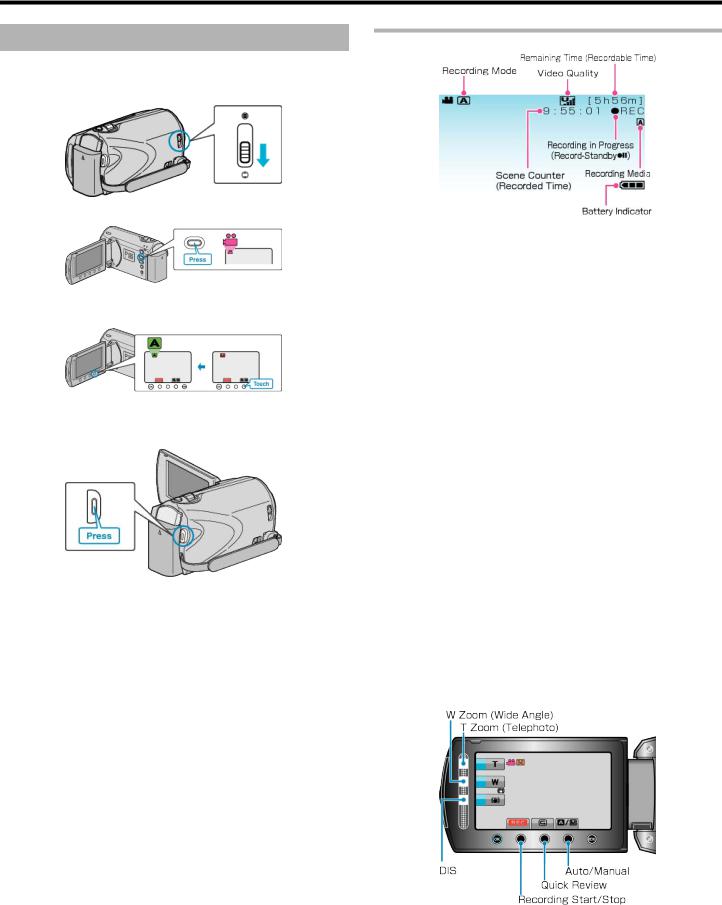
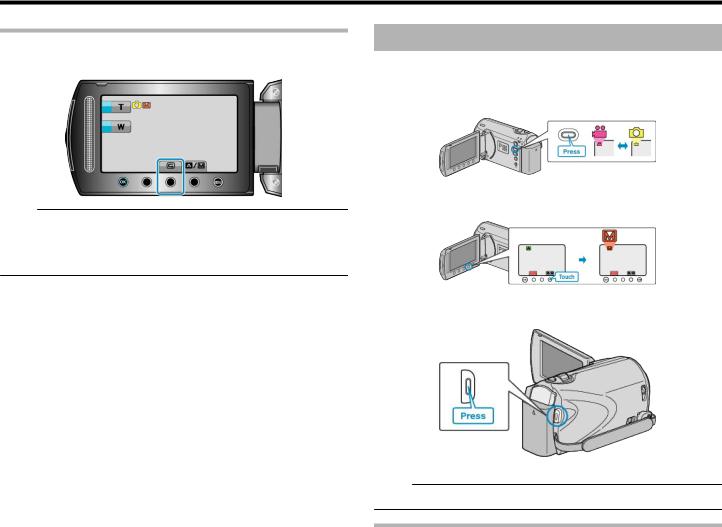
Taking Videos in Auto Mode
You can record without worrying about the setting details by using the auto mode.
1 Open the lens cover.
.
2 Open the LCD monitor and select the video mode.
.
● The video mode icon appears.
3 Check if the recording mode is Auto.
.
●If the mode is Manual, touch the G/H button.
The mode changes between Auto and Manual with every touch.
4 Start recording.
.
● Press again to stop.
Indications During Video Recording
.
Display Icon |
Description |
|
|
Recording |
Press the G/H button to switch the recording |
Mode |
mode between G (Auto) and H (Manual). |
|
|
Video Quality |
Displays the icon of the “VIDEO QUALITY” setting |
|
selected in the recording menu. |
|
"VIDEO QUALITY" A P.77 |
|
|
Remaining |
Displays the remaining time for video recording. |
Time |
|
(Recordable |
|
Time) |
|
|
|
Recording in |
Appears when video recording is in progress. |
Progress |
|
|
|
Record-Stand- |
Appears when video recording is paused. |
by |
|
|
|
Scene Counter |
Displays the elapsed time of the video that is cur- |
(Recorded |
rently being recorded. |
Time) |
|
|
|
Recording Me- |
Displays the icon of the media where videos are re- |
dia |
corded to. |
|
The recording media can be changed. |
|
"REC MEDIA FOR VIDEO (GZ-MS250/GZ- |
|
MS230)" A P.99 |
|
"VIDEO SLOT SELECTION (GZ-MS215/GZ- |
|
MS210)" A P.99 |
|
|
Battery Indica- |
Displays the approximate remaining battery power. |
tor |
Details of the battery power can be displayed by |
|
pressing the INFO button. |
|
"Remaining Recording Time/Battery Power" A |
|
P.39 |
|
|
|
|
Operation Buttons for Video Recording
|
. |
|
|
|
|
Operation |
|
Description |
Button |
|
|
|
|
|
T/W Zoom |
|
Allows the same functions as the zoom lever to be |
|
|
performed. |
|
|
Camera shake that often occurs when using the zoom |
|
|
lever can be minimized. |
|
|
"Zooming" A P.24 |
|
|
|
23
Recording
DIS |
Sets whether to reduce camera shake. |
|
"Reducing Camera Shake" A P.25 |
|
|
Recording |
Functions as the START/STOP button. |
Start/Stop |
"RECORD BUTTON" A P.96 |
|
|
Quick Re- |
Enables the most recently captured video to be |
view |
viewed. |
|
"Checking the Captured Image Immediately" A |
|
P.25 |
|
|
Auto/Manual |
Switches the recording mode between Auto and Man- |
|
ual. |
|
|
NOTE:
●The slider operation button cannot be used when the LCD monitor is flipped.
●The zoom appears when the slider is touched.
Useful Settings for Recording
●The aspect ratio for recording can be switched between 16:9 and 4:3.
"SELECT ASPECT RATIO" A P.79
●Videos can be found easily during playback by categorizing them when recording.
"Registering Files to Events Before Recording" A P.34
●When “QUICK RESTART” is set to “ON”, this unit turns on immediately if you open the LCD monitor within 5 minutes after the power is turned off by closing the monitor.
"QUICK RESTART" A P.97
●When “AUTO POWER OFF” is set to “ON”, this unit turns itself off automatically to conserve power when it is not operated for 5 minutes. (only when using the battery pack)
"AUTO POWER OFF" A P.95
CAUTION:
●Do not expose the lens to direct sunlight.
●Do not use this unit in the rain, snow, or places with high humidity like the bathroom.
●Do not use this unit in places subject to excessive humidity or dust, as well as places exposed to steam or smoke directly.
●The access lamp lights up when video recording is in progress. Do not remove the battery pack, AC adapter, or SD card when the lamp is lighted.
●Make a backup of important recorded data
It is recommended to copy your important recorded data to a DVD or other recording media for storage. JVC will not be responsible for any lost data.
NOTE:
●Before recording an important scene, it is recommended to conduct a trial recording.
●Check the remaining recording time in the media before you start shooting. If there is not enough space, move (copy) the data to a PC or disc.
●Do not forget to make copies after recording!
●Recording stops automatically as it cannot be performed for 12 or more consecutive hours according to specifications.
(It may take some time to resume recording.)
●For long recordings, the file is split into two or more files if the size exceeds 4 GB.
●You can connect this unit to the AC adapter to record for long hours indoors.
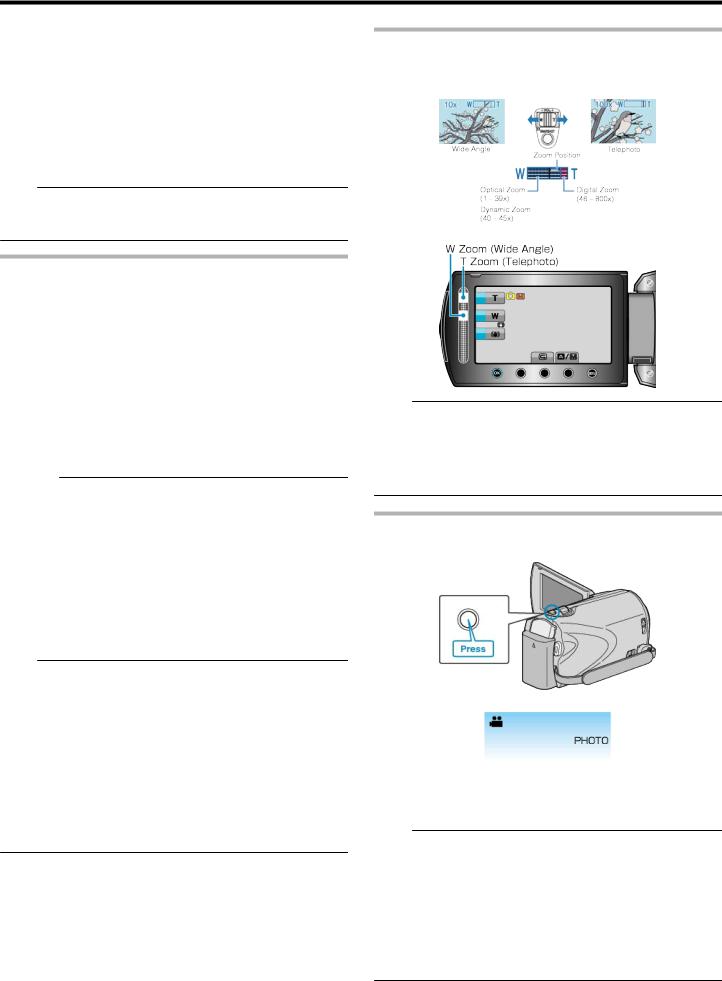
Zooming
The angle of view can be adjusted using zoom.
●Use the W end (wide angle end) to shoot a wider field of view.
●Use the T end (telephoto end) to magnify the subject for shooting.
.
● You can also use the slider's T/W zoom to zoom.
.
NOTE:
●You can expand the zoom area without degrading the image quality by using dynamic zoom.
●When digital zoom is used, the image becomes grainy as it is digitally enlarged.
●The zoom ratio range can be changed.
"ZOOM" A P.78
Capturing Still Images During Video Recording
Still images can be captured by pressing the SNAPSHOT button while in the video mode (standby or recording).
.
●"PHOTO" lights up on the screen when a still image is being captured.
●The still images captured during video recording are saved to the destination set in media settings.
"REC MEDIA FOR IMAGE (GZ-MS250/GZ-MS230)" A P.100
"IMAGE SLOT SELECTION (GZ-MS215/GZ-MS210)" A P.100
NOTE:
●The size of the still images captured in the video mode varies with the “SELECT ASPECT RATIO” setting.
“16:9” : 640×360
“4:3” : 640×480
"SELECT ASPECT RATIO" A P.79
●The picture quality varies with the “IMAGE QUALITY” setting. "Changing Still Image Picture Quality" A P.83
●When an effect (black and white/sepia) is applied to the video, the same effect will be applied to the still image.
"EFFECT (GZ-MS250/GZ-MS230)" A P.85
24
Recording
Reducing Camera Shake
When DIS is turned on, camera shake during recording can be effectively reduced.
.
● The setting of DIS switches with every touch.
Display |
Setting |
X (Image stabiliz- Activates image stabilizer. er 1)
Y (Image stabiliz- Reduces camera shake more effectively when er 2) shooting bright scenes on the wide angle end.
*Only on the wide angle end (approx. 5x)
Z (OFF) |
Deactivates image stabilizer. |
NOTE:
●It is recommended to switch off this mode when using a tripod and recording a subject with little movement.
●Complete stabilization may not be possible if camera shake is excessive.
●This setting is effective for video recording only.
Checking the Captured Image Immediately
You can check the most recently captured images while in the recording mode. (Quick Review)
NOTE:
●You can also delete the image after checking.
●Quick Review can no longer recall the most recently captured image once the power is turned off.
Use the playback mode to check the image in this case.
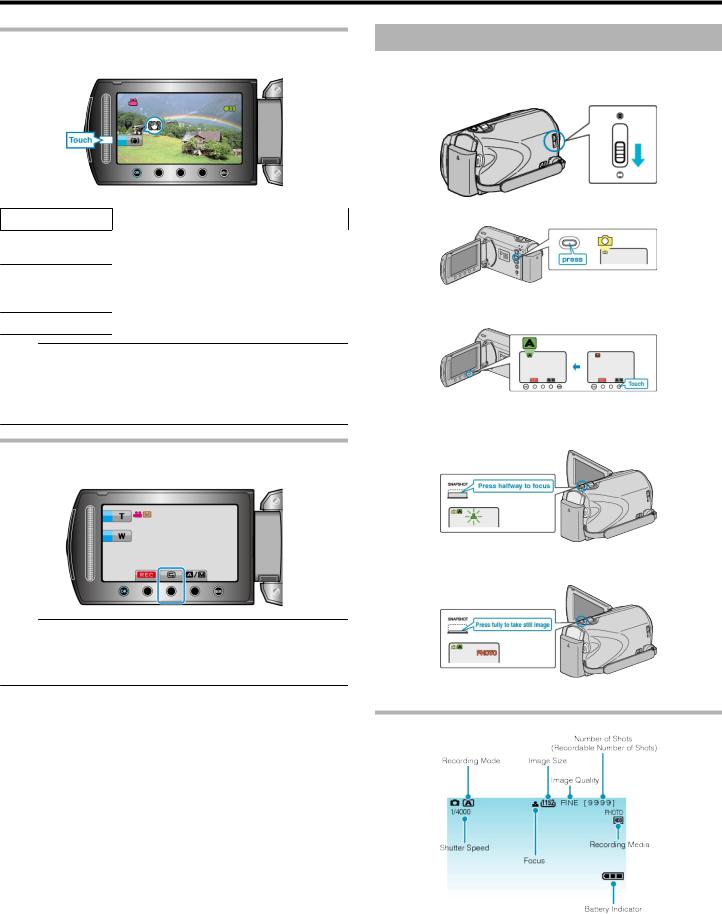
Taking Still Images in Auto Mode
You can record without worrying about the setting details by using the auto mode.
1 Open the lens cover.
.
2 Open the LCD monitor and select the still image mode.
.
● The still image mode icon appears.
3 Check if the recording mode is Auto.
.
●If the mode is Manual, touch the G/H button.
The mode changes between Auto and Manual with every touch.
4 Set the focus on the subject.
.
● When focused, the focus icon lights up in green.
5 Take a still image.
.
● PHOTO lights up when a still image is being captured.
Indications During Still Image Recording
.
25

Recording
Display Icon |
Description |
|
|
Recording |
Press the G/H button to switch the recording mode |
Mode |
between G (Auto) and H (Manual). |
|
|
Image Size |
Displays the icon of the image size. |
|
● The setting of image size cannot be changed. |
|
|
Image Quality |
Displays the icon of the “IMAGE QUALITY” setting |
|
selected in the recording menu. |
|
"IMAGE QUALITY" A P.83 |
|
|
Number of |
Displays the remaining number of shots for still im- |
Shots |
age recording. |
(Recordable |
|
Number of |
|
Shots) |
|
|
|
Shutter Speed |
Displays the shutter speed. |
|
|
Focus |
Lights up in green when focused. |
|
|
Recording in |
Appears when a still image is being captured. |
Progress |
|
|
|
Recording Me- |
Displays the icon of the media where still images |
dia |
are recorded to. |
|
The recording media can be changed. |
|
"REC MEDIA FOR IMAGE (GZ-MS250/GZ-MS230)" |
|
A P.100 |
|
"IMAGE SLOT SELECTION (GZ-MS215/GZ- |
|
MS210)" A P.100 |
|
|
Battery Indica- |
Displays the approximate remaining battery power. |
tor |
Details of the battery power can be displayed by |
|
pressing the INFO button M. |
|
"Remaining Recording Time/Battery Power" A |
|
P.39 |
|
|
26
Recording
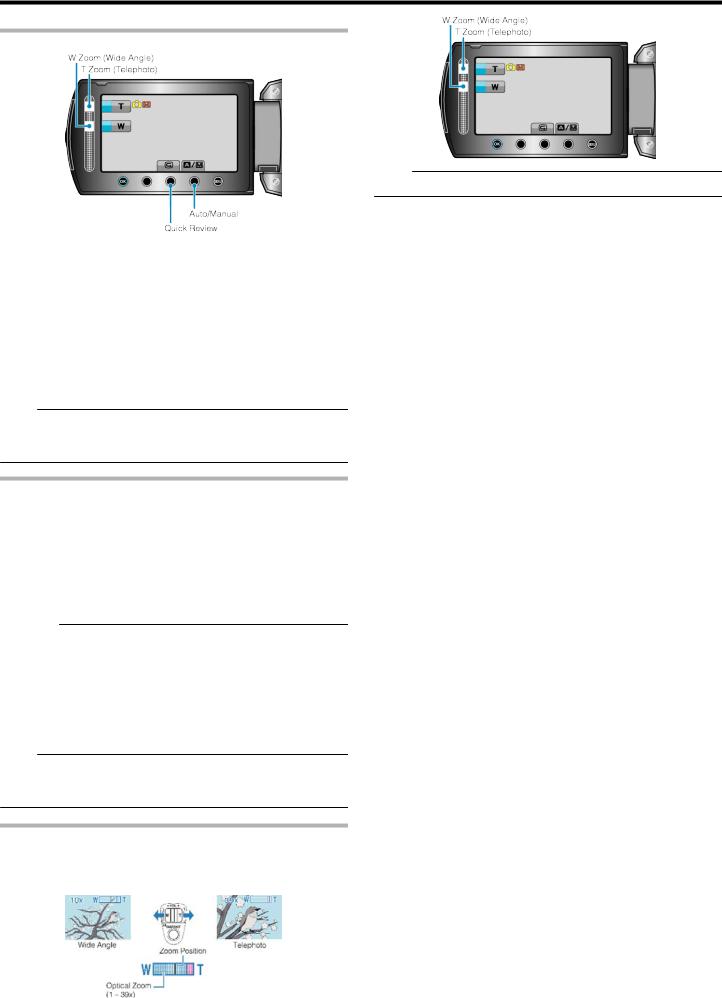
Operation Buttons for Still Image Recording
.
Operation But- |
Description |
ton |
|
|
|
T/W Zoom |
Functions as the zoom lever. |
|
"Zooming" A P.27 |
|
|
Quick Review |
Enables the most recently captured still image to |
|
be viewed. |
|
"Checking the Captured Image Immediately" A |
|
P.28 |
|
|
Auto/Manual |
Switches the recording mode between Auto and |
|
Manual. |
|
|
NOTE:
●The slider operation button cannot be used when the LCD monitor is flipped.
●The zoom appears when the slider is touched.
Useful Settings for Recording
●When “QUICK RESTART” is set to “ON”, this unit turns on immediately if you open the LCD monitor within 5 minutes after the power is turned off by closing the monitor.
"QUICK RESTART" A P.97
●When “AUTO POWER OFF” is set to “ON”, this unit turns itself off automatically to conserve power when it is not operated for 5 minutes. (only when using the battery pack)
"AUTO POWER OFF" A P.95
CAUTION:
●Do not expose the lens to direct sunlight.
●Do not use this unit in the rain, snow, or places with high humidity like the bathroom.
●Do not use this unit in places subject to excessive humidity or dust, as well as places exposed to steam or smoke directly.
●The access lamp lights up when still image recording is in progress. Do not remove the battery pack, AC adapter, or SD card when the lamp is lighted.
NOTE:
●Before recording an important scene, it is recommended to conduct a trial recording.
●DIS does not work when recording still images.
Zooming
The angle of view can be adjusted using zoom.
●Use the W end (wide angle end) to shoot a wider field of view.
●Use the T end (telephoto end) to magnify the subject for shooting.
.
NOTE:
● Only optical zoom is available in the still image recording mode.
.
● You can also use the slider's T/W zoom to zoom.
27
Recording
Checking the Captured Image Immediately
You can check the most recently captured images while in the recording mode. (Quick Review)
.
NOTE:
●You can also delete the image after checking.
●Quick Review can no longer recall the most recently captured image once the power is turned off.
Use the playback mode to check the image in this case.
Manual Recording
You can adjust settings, such as brightness and shutter speed, by using the manual mode.
Manual recording can be set for both video and still image modes.
1 Select video or still image mode.
.
● The video or still image mode icon appears.
2 Select the Manual recording mode.
.
● The mode changes between Auto and Manual with every touch.
3 Start recording.
.
●Press again to stop.
NOTE:
●The manual settings are displayed only in the manual mode.
Manual Recording Menu
The following items can be set.
Name |
Description |
|
|
|
|
SCENE SE- |
● Recordings that suit the shooting conditions can be |
|
LECT |
performed easily. |
|
|
"Scene Selection" A P.29 |
|
|
|
|
FOCUS |
● Use manual focus if the subject is not focused auto- |
|
|
matically. |
|
|
"Adjusting Focus Manually" A P.30 |
|
|
|
|
BRIGHT- |
● Overall brightness on the screen can be adjusted. |
|
NESS AD- |
● Use this when recording in a dark or bright location. |
|
JUST |
||
"Adjusting Brightness" A P.31 |
||
|
||
|
|
|
SHUTTER |
● Shutter speed can be adjusted. |
|
SPEED |
● Use this when shooting a fast-moving subject or to |
|
|
||
|
emphasize the subject's movement. |
|
|
"Setting Shutter Speed" A P.31 |
|
|
|
|
WHITE BAL- |
● Overall color on the screen can be adjusted. |
|
ANCE |
● Use this when the color on the screen appears dif- |
|
|
||
|
ferently from the actual color. |
|
|
"Setting White Balance" A P.32 |
|
|
|
|
BACKLIGHT |
● Corrects the image when the subject appears dark |
|
COMP. |
due to backlight. |
|
|
● Use this when shooting against the light. |
|
|
"Setting Backlight Compensation" A P.32 |
|
|
|
|
METERING |
● Brightness of a specified area can be set as the |
|
AREA/ TYPE |
standard. |
|
|
"Setting Metering Area" A P.33 |
|
|
|
28
Recording
EFFECT |
● Images that look like old photographs or black-and- |
|
white movies can be taken. |
|
"Recording with Effects (GZ-MS250/GZ-MS230)" A |
|
P.33 |
|
|
TELE MAC- |
● Use this to take close-up (macro) shots of the sub- |
RO |
ject. |
|
"Taking Close-up Shots" A P.34 |
|
|
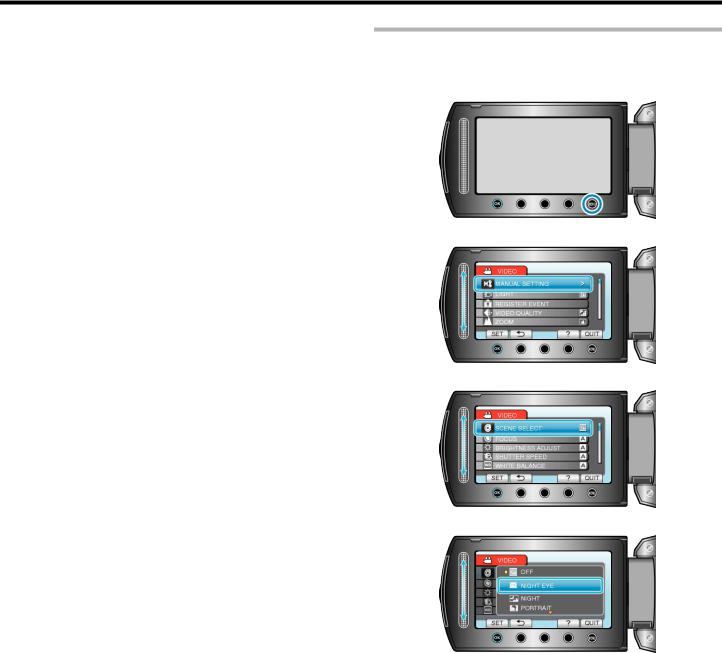
Scene Selection
Common scenes that are often encountered can be recorded with the most suitable settings.
1 Touch D to display the menu.
.
2 Select “MANUAL SETTING” and touch C.
.
3 Select “SCENE SELECT” and touch C.
.
4 Select the scene and touch C.
.
● After setting, touch D.
29
Recording
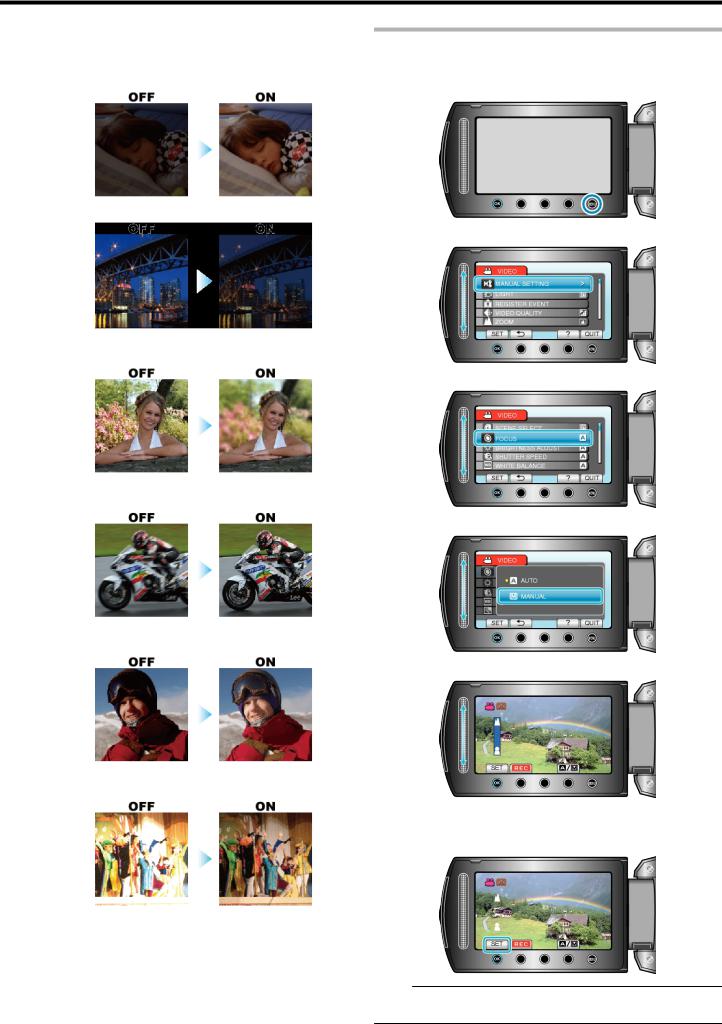
*The image is only an impression.
Setting |
Effect |
|
|
NIGHT |
Increases gain and brightens the scene automatically |
EYE |
when the surrounding is dark. |
|
To prevent camera shake, use a tripod. |
|
|
NIGHT |
Captures night scenes naturally. |
|
|
POR- |
Blurs the background to bring out the people in the pic- |
TRAIT |
ture. |
|
|
SPORTS |
Captures fast-moving subjects clearly in every single |
|
frame. |
|
|
SNOW |
Prevents the subject from appearing too dark when re- |
|
cording snow scenes on a sunny day. |
|
|
SPOT- |
Prevents the human subject from appearing too bright un- |
LIGHT |
der light. |
|
|
Adjusting Focus Manually
Set this when the focus is not clear in “AUTO” or when manual focusing is desired.
1 Touch D to display the menu.
.
2 Select “MANUAL SETTING” and touch C.
.
3 Select “FOCUS” and touch C.
.
4 Select “MANUAL” and touch C.
.
5 Adjust the focus with the slider.
.
●Slide upward to focus on a distant subject.
●Slide downward to focus on a near subject.
6 Touch C to confirm.
.
NOTE:
●A subject that is focused at the telephoto (T) end remains in focus when it is zoomed out to the wide angle (W) end.
30

Recording
Adjusting Brightness
You can adjust the brightness to your preferred level.
1 Touch D to display the menu.
.
2 Select “MANUAL SETTING” and touch C.
.
3 Select “BRIGHTNESS ADJUST” and touch C.
.
4 Select “MANUAL” and touch C.
.
5 Select the brightness value with the slider.
.
●Compensation range during video recording: -6 to +6
●Compensation range during still image recording: -2.0 to +2.0
●Slide upward to increase the brightness.
●Slide downward to decrease the brightness.
6 Touch C to confirm.
.
NOTE:
● Settings can be adjusted separately for videos and still images.
Setting Shutter Speed
You can set the shutter speed to suit the type of subject.
1 Touch D to display the menu.
.
2 Select “MANUAL SETTING” and touch C.
.
3 Select “SHUTTER SPEED” and touch C.
.
4 Select “MANUAL” and touch C.
.
5 Select the shutter speed with the slider.
.
●Shutter speed can be set from 1/2 to 1/4000. (Up to 1/1000 for still image.)
●Slide upward to increase the shutter speed.
●Slide downward to decrease the shutter speed.
6 Touch C to confirm.
.
NOTE:
31
Loading...