


 Loading...
INSTRUCTIONS
HARD DISK CAMCORDER
GZ-MG37U
GZ-MG27U
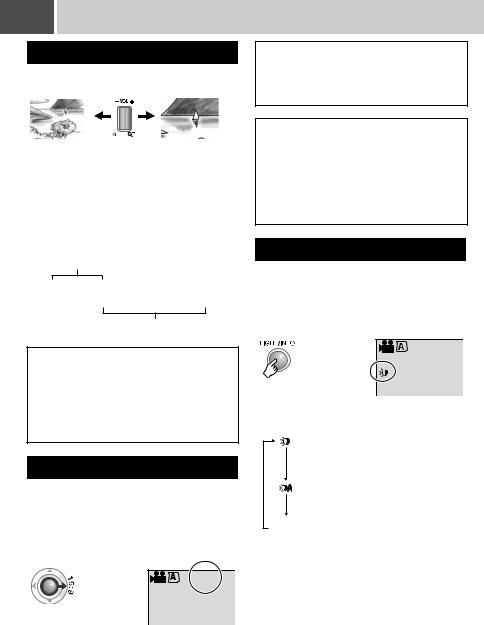
To deactivate the demonstration mode, set “DEMO MODE” to “OFF”. ( pg. 53)
Dear Customer,
Thank you for purchasing this hard disk camera. Before use, please read the safety information and precautions contained in pages 4 and 5 to ensure safe use of this product.
|
ENGLISH |
||
|
|
|
|
GETTING STARTED |
8 |
||
|
|
|
|
|
|
|
|
RECORDING |
|
16 |
|
|
|||
20 |
|||
|
|||
|
|
|
|
|
|
|
|
PLAYBACK |
|
26 |
|
|
|||
30 |
|||
|
|||
|
|
|
|
EDITING/PRINTING |
36 |
||
|
|
|
|
|
|
|
|
DUBBING |
47 |
||
|
|
|
|
|
|
|
|
MENU SETTINGS |
52 |
||
|
|
|
|
|
|
|
|
FURTHER |
58 |
||
INFORMATION |
|||
|
|
|
|
For Customer Use:
Enter the Model No. (located on the bottom of the camera) and Serial No. (located on the battery pack mount of the camera) below. Retain this information for future reference.
Model No.
Serial No.
LYT1533-001D EN
2 EN Major Features
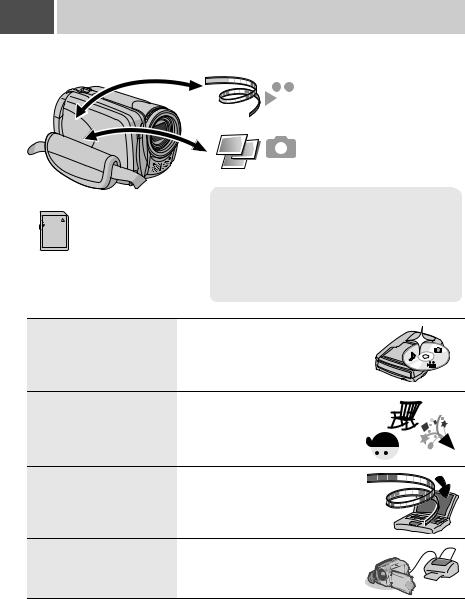
The camera has a built-in high-capacity HDD (hard disk drive) that enables you to record videos and still images in massive quantities.
SD Memory Card
You can also record onto SD cards.
“When Using an SD Card” ( pg. 15)
● To record videos ( pg. 16)  ● To playback videos ( pg. 26)
●To record still images ( pg. 20)
●To playback still images ( pg. 30)
Auto/Manual Recording Mode
You can record without using any complicated operations in Auto recording mode.
Manual recording mode, on the other hand, enables you to use special effects and make manual adjustments to record videos that are even more vivid.
“To change to manual recording mode” ( pg. 22)
DVD Creation Function
( pg. 47)
You can connect the camera to a DVD burner (sold separately) with a USB mini A/B cable to save recorded files easily to a DVD disc.
Video Event
Registration
( pg. 17)
You can register recorded videos to events according to their content. This enables you to search and select files by content (event).
Editing Files on Your PC
( SOFTWARE INSTALLATION
AND USB CONNECTION GUIDE)
USB 2.0 enables the smooth transfer of video and still images to a computer. With the bundled image editing software, you can easily edit video and create your own DVDs.
Direct Printing
( pg. 46)
If your printer is compatible with PictBridge, still images can be printed easily by connecting the camera directly to the printer with a USB cable.

Read This First! – How to Handle the Hard Disk Camera |
|
EN 3 |
|
|
|
Please read the following instructions before using the camera.
Make a backup of important recorded data
It is recommended to copy your important recorded data to a DVD or other recording media for storage. ( pg. 47)
Make a trial recording
Before the actual recording of important data, make a trial recording and play back the recorded data to check that the video and sound have been recorded correctly.
Check the compatibility of recording media
●The SD cards that are guaranteed to work with this camera are those by Panasonic, TOSHIBA, pqi (still image only) and SanDisk. If other media are used, they may fail to record data correctly, or they may lose data that had already been recorded.
●For video recording, use a high-speed SD card (at least 10 MB/s).
●MultiMediaCards are not supported.
Format recording medium before use
Before using this camera, format the built-in hard disk or SD cards. This will also ensure stable speeds and operation when accessing the recording medium. ( pg. 39)
Make sure you hold the camera correctly during recording
Do not cover the area near the lens, stereo microphone, or camera sensor with your finger or other object while recording. ( pg. 10)
When a certain length of time passes without operation
●When using the battery, the power will turn off automatically to conserve power. Use the power switch to turn on the power again.
●When using the AC adapter, the access lamp lights up, and the LCD turns off (the camera enters the sleep mode).
Reset the camera if it does not operate correctly
This camera uses a microcomputer. Factors such as background noise and interference can prevent it from operating correctly. If the camera does not operate correctly, reset the camera. ( pg. 58)
If a problem occurs with the SD card, bring the card together with the camera for repairs
When requesting repairs for breakdowns by your dealer or JVC service center, be sure to bring your camera together with the SD card. If one of them is not included, the cause cannot be diagnosed, and the repair cannot be made properly.
Precautions on handling batteries
●When discarding batteries, environmental problems must be considered and the local rules or laws governing the disposal of these batteries must be strictly followed.
●If the camera is subjected to electrostatic discharge, turn the power off before using it again.
●This product includes patented and other proprietary technology and will only operate with a JVC Data Battery. Use the JVC BN-VF707U/ VF714U/VF733U battery packs. Using generic non-JVC batteries can cause damage to the internal charging circuitry.
●If the battery operation time remains extremely short even after the battery is fully charged, the battery is worn out and needs to be replaced.
Please purchase a new one.
●Since the AC adapter processes electricity internally, it becomes warm during use. Be sure to use it only in well-ventilated areas.
●After 5 minutes has elapsed in record-standby mode, the camera will automatically turn off its power supplied from the AC adapter. In this case, battery charge starts if the battery is attached to the camera.
INFORMATION
Video recording (with sound) that was made especially for demonstration at shops might be remaining on the hard disk of the camera that you have purchased.
To delete this video file, please refer to “Deleting Files” ( pg. 36)/“Formatting a Recording Medium” ( pg. 39).
4 EN Safety Precautions
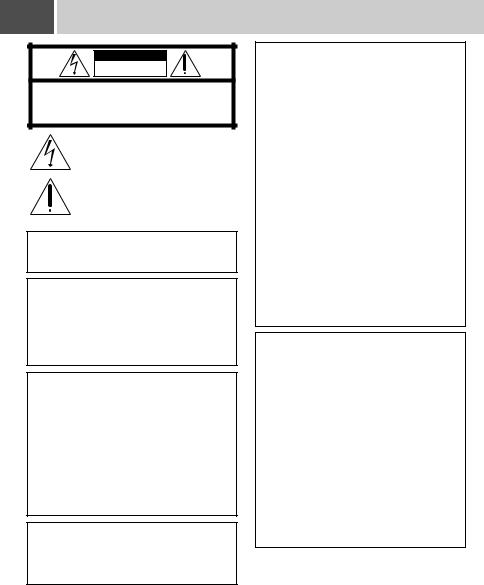
CAUTION
RISK OF ELECTRIC SHOCK
DO NOT OPEN
CAUTION: TO REDUCE THE RISK OF ELECTRIC SHOCK, DO NOT REMOVE COVER (OR BACK).
NO USER-SERVICEABLE PARTS INSIDE.
REFER SERVICING TO QUALIFIED SERVICE PERSONNEL.
The lightning flash with arrowhead symbol, within an equilateral triangle, is intended to alert the user to the presence of uninsulated "dangerous voltage" within the product's enclosure that may be of sufficient magnitude to constitute a risk of electric shock to persons.
The exclamation point within an equilateral triangle is intended to alert the user to the presence of important operating and maintenance (servicing) instructions in the literature accompanying the appliance.
WARNING: TO PREVENT FIRE OR SHOCK HAZARD, DO NOT EXPOSE THIS UNIT TO RAIN OR MOISTURE.
NOTES:
●The rating plate and safety caution are on the bottom and/or the back of the main unit.
●The serial number plate is on the battery pack mount.
●The rating information and safety caution of the AC adapter are on its upper and lower sides.
Caution on Replaceable lithium battery
The battery used in this device may present a fire or chemical burn hazard if mistreated. Do not recharge, disassemble, heat above 100°C or incinerate.
Replace battery with Panasonic (Matsushita Electric), Sanyo, Sony or Maxell CR2025. Danger of explosion or Risk of fire if the battery is incorrectly replaced.
●Dispose of used battery promptly.
●Keep away from children.
●Do not disassemble and do not dispose of in fire.
For USA-California Only
This product contains a CR Coin Cell Lithium Battery which contains Perchlorate Material – special handling may apply.
See www.dtsc.ca.gov/hazardouswaste/ perchlorate
When the equipment is installed in a cabinet or on a shelf, make sure that it has sufficient space on all sides to allow for ventilation (10 cm (3-15/ 16") or more on both sides, on top and at the rear).
Do not block the ventilation holes.
(If the ventilation holes are blocked by a newspaper, or cloth etc. the heat may not be able to get out.)
No naked flame sources, such as lighted candles, should be placed on the apparatus.
When discarding batteries, environmental problems must be considered and the local rules or laws governing the disposal of these batteries must be followed strictly.
The apparatus shall not be exposed to dripping or splashing.
Do not use this equipment in a bathroom or places with water.
Also do not place any containers filled with water or liquids (such as cosmetics or medicines, flower vases, potted plants, cups etc.) on top of this unit.
(If water or liquid is allowed to enter this equipment, fire or electric shock may be caused.)
Do not point the lens directly into the sun. This can cause eye injuries, as well as lead to the malfunctioning of internal circuitry. There is also a risk of fire or electric shock.
CAUTION!
The following notes concern possible physical damage to the camera and to the user.
Carrying or holding the camera by the LCD monitor can result in dropping the unit, or in a malfunction.
Do not use a tripod on unsteady or unlevel surfaces. It could tip over, causing serious damage to the camera.
CAUTION!
Connecting cables (Audio/Video, S-Video, etc.) to the camera and leaving it on top of the TV is not recommended, as tripping on the cables will cause the camera to fall, resulting in damage.
IMPORTANT SAFETY INSTRUCTIONS
1.Read these instructions.
2.Keep these instructions.
3.Heed all warnings.
4.Follow all instructions.
5.Do not use this apparatus near water.
6.Clean only with dry cloth.
7.Do not block any ventilation openings. Install in accordance with the manufacturer’s instructions.
8.Do not install near any heat sources such as radiators, heat registers, stoves, or other apparatus (including amplifiers) that produce heat.
9.Only use attachments/accessories specified by the manufacturer.
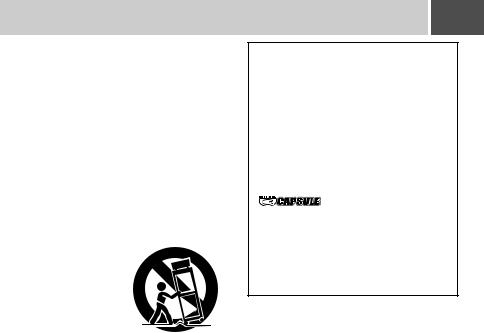
10.Use only with the
cart, stand, tripod, bracket, or table specified by the manufacturer, or sold with the apparatus. When a cart is used, use
caution when moving the cart/apparatus combination to avoid injury from tip-over.
11.Unplug this apparatus during lightning storms or when unused for long periods of time.
12.Refer all servicing to qualified service personnel. Servicing is required when the apparatus has been damaged in any way, such as power-supply cord or plug is damaged, liquid has been spilled or objects have fallen into the apparatus, the apparatus has been exposed to rain or moisture, does not operate normally, or has been dropped.
EN 5
Remember that this camera is intended for private consumer use only.
Any commercial use without proper permission is prohibited. (Even if you record an event such as a show, performance or exhibition for personal enjoyment, it is strongly recommended that you obtain permission beforehand.)
Trademarks
●Manufactured under license from Dolby Laboratories. “Dolby” and double-D symbol are
trademarks of Dolby Laboratories.
●


MascotCapsule is a registered trademark of HI CORPORATION in Japan.
Copyright © 2001 HI CORPORATION. All rights reserved.
●Other product and company names included in this instruction manual are trademarks and/or registered trademarks of their respective holders.

6 EN |
|
Contents |
|
|
|
GETTING STARTED |
|
Accessories ....................................................... |
8 |
Attaching the Shoulder Strap ......................... |
9 |
Attaching the Lens Cap .................................. |
9 |
Attaching the Core Filter ................................ |
9 |
Index .............................................................. |
10 |
Necessary Settings before Use ......................... |
12 |
Power Related Preparations (Using the Battery |
|
Pack) ............................................................ |
12 |
Language Setting ......................................... |
13 |
Date/Time Setting ........................................ |
13 |
Other Settings ................................................. |
14 |
Grip Adjustment ........................................... |
14 |
Tripod Mounting ........................................... |
14 |
Data Battery System .................................... |
14 |
When Using an SD Card .............................. |
15 |
RECORDING |
|
Video |
|
Video Recording .............................................. |
16 |
Registering Files to Events .......................... |
17 |
Zooming ....................................................... |
18 |
Changing the Screen Size ........................... |
18 |
LED Light ..................................................... |
18 |
Deleting a File .............................................. |
19 |
Checking the Remaining Space on the |
|
Recording Media .......................................... |
19 |
Still image |
|
Still Image Recording ....................................... |
20 |
Zooming ....................................................... |
21 |
Continuous Shooting .................................... |
21 |
LED Light ..................................................... |
21 |
Deleting a File .............................................. |
21 |
Video / Still image |
|
Manual Recording ............................................ |
22 |
Manual Setting in MSET Menu .................... |
22 |
Nightalive ..................................................... |
25 |
Backlight Compensation .............................. |
25 |
Spot Exposure Control ................................. |
25 |
PLAYBACK |
|
Video |
|
Video Playback ............................................... |
26 |
Various Operations during Playback ........... |
27 |
File Search Function .................................... |
28 |
Date Index Screen ................................... |
28 |
Event Screen ........................................... |
29 |
To Play Back Files in the [EXTMOV] Folder ..... |
29 |
Deleting a Video File ................................... |
29 |
Still image |
|
Still Image Playback ........................................ |
30 |
File Search Function .................................... |
30 |
Slide Show ................................................... |
31 |
Image Rotation ............................................ |
31 |
Playback Zoom ............................................ |
31 |
Deleting a Still Image File ............................ |
31 |
Video / Still image |
|
Watching Images on TV/Remote Control .......... |
32 |
Connecting to a TV, VCR or DVD Recorder ....... |
32 |
Playback on TV ........................................... |
32 |
Playback Using the Remote Control ............ |
33 |
Playback with Special Effects ........................... |
34 |
EDITING/PRINTING |
|
Video / Still image |
|
Managing Files ................................................ |
36 |
Deleting Files ............................................... |
36 |
Viewing File Information .............................. |
37 |
Protecting Files from Accidental Erasure ....... |
38 |
Formatting a Recording Medium ................. |
39 |
Cleaning Up a Recording Medium ............... |
40 |
Resetting the File Number ........................... |
40 |
Changing the Event Registration of Video Files |
|
after Recording ............................................ |
41 |
Video |
|
|
Playlists ......................................................... |
|
42 |
Creating Playlists ......................................... |
|
42 |
Playing Back Playlists .................................. |
|
44 |
Other Operations of Playlists ....................... |
|
44 |
Still image |
|
|
Print Setting ................................................... |
|
45 |
DPOF Print Setting ...................................... |
|
45 |
Direct Printing with PictBridge Printer |
.......... |
46 |
DUBBING |
|
|
Video |
|
|
Dubbing Video Files to DVD Discs ..................... |
|
47 |
Using a DVD Burner for Dubbing (DVD Creation |
||
Function) ...................................................... |
|
47 |
Using a VCR/DVD Recorder for Dubbing .... |
50 |
|
Still image |
|
|
Copying/Moving Still Image Files ..................... |
|
51 |
MENU SETTINGS |
|
|
Changing the Menu Settings ............................. |
|
52 |
Common Menus for All Modes .................... |
|
53 |
Video Recording Menus .............................. |
|
55 |
Video Playback Menus ................................ |
|
56 |
Still Image Recording Menus ....................... |
|
57 |
Still Image Playback Menus ......................... |
|
57 |
FURTHER INFORMATION |
|
|
Troubleshooting .............................................. |
|
58 |
Warning Indications ......................................... |
|
62 |
Cleaning the Camera ........................................ |
|
64 |
Cautions ......................................................... |
|
65 |
Specifications .................................................. |
|
68 |
Indications on LCD Monitor .............................. |
|
70 |
TERMS .............................................. |
Back cover |
|
EN 7
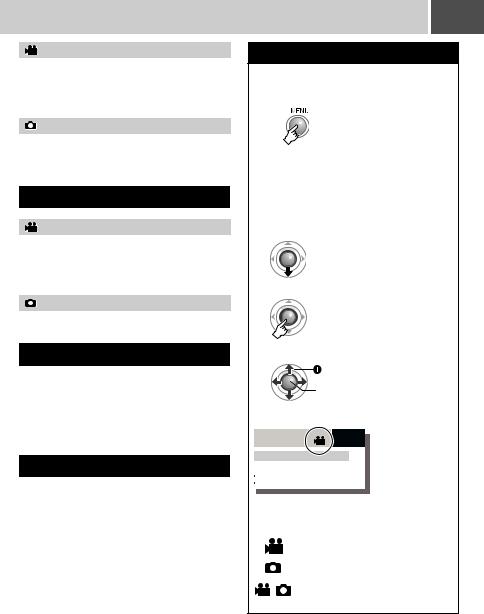
Regarding This Manual
Button operations
●Button operations are illustrated as shown below.
ex.)
●Regarding the control lever ( pg. 11)
There are two kinds of operation using the control lever: moving the lever towards up/ down/left/right, or pressing down the lever.
They are described and illustrated as shown below.
ex.)
1) Move the control lever downward:
Press  .
.
2) Press down the control lever:
Press 49.
3) Operate 1) and 2) continuously:
Select Press  /
/ /
/  /
/ 
to select, then press
 Set 49.
Icons at the top of pages
EN 27
otion playback
sed
Backward
Forward
When there are icons at the top of pages, they show whether the page is related to videos and/or still images.
Page related to videos
Page related to still images
Page common to videos and still images
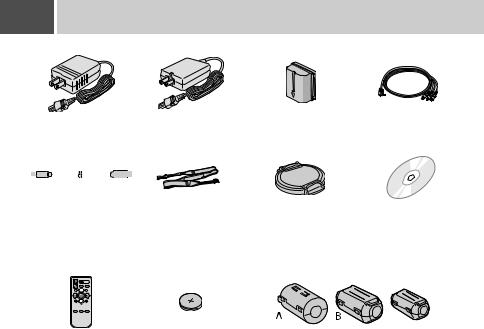
8 EN Accessories
or |
|
|
AC Adapter |
Battery Pack |
Audio/Video Cable |
AP-V18U / AP-V14U |
BN-VF707U |
|
|
|
|
|
|
|
|
|
|
|
|
|
|
|
|
|
|
|
|
|
|
|
|
|
|
|
|
|
|
|
|
|
|
|
|
USB Cable |
Shoulder Strap |
Lens Cap ( pg. 9) |
CD-ROM |
||||||
|
|
|
|
( SOFTWARE |
( pg. 9) |
|
|
|||||||
|
INSTALLATION AND |
|
|
|
||||||||||
|
|
USB CONNECTION |
|
|
|
|||||||||
|
|
|
|
|
GUIDE) |
|
|
|
||||||
Remote Control Unit |
Lithium Battery |
Core Filter for Cables ( pg. 9) |
RM-V730U ( pg. 33) |
CR2025 (for remote |
Large (A): Audio/Video Cable |
|
control unit) |
Large (B): USB Cable |
|
Pre-installed in the |
Small : DC Cord |
|
remote control unit at |
|
|
time of shipment. |
|
EN 9
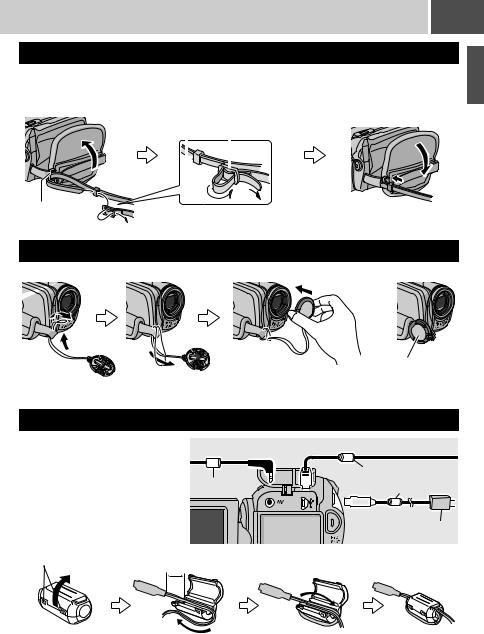
Attaching the Shoulder Strap
Peel off the pad and thread the end of the strap through the eyelet.
Thread the strap through the buckle, adjust its length, and use the strap guide to fix it in place.
Position the buckle near the eyelet and reattach the pad.
Strap Guide |
Buckle |
||
|
|
|
|
|
|
|
|
Eyelet
GETTING STARTED
Attaching the Lens Cap
To protect the lens, attach the provided lens cap to the camera as shown in the illustration.
Place here during recording.
Attaching the Core Filter
Attach the core filters to the cables. |
AV Cable |
|
The core filter reduces interference. |
||
|
||
When connecting a cable, attach the |
|
|
end with the core filter to the camera. |
Large (A) |
|
Attachment positions ( right) |
||
|
Release the stopper.
3 cm (1-3/16")
USB Cable
Large (B)
Small
DC Cord
AC Adapter
Wind once.

10 EN Index
20
17 |
|
|
18 |
13 |
|
19 |
||
|
|
23 |
24 |
21 |
22 |
|
|
|
How to open the LCD monitor
Push  and open the LCD monitor fully.
A
25
26
The LCD monitor can rotate 270°.
Power-linked operation
When the power switch is set to  , you can also turn the camera on/off by opening/closing the LCD monitor.
Controls
a Power Switch [OFF,  ,
,  ] ( pg. 12) b Lock Button ( pg. 12)
cZoom Lever [W 


 /T
/T  ] ( pg. 18) Speaker Volume Control [–VOL+] ( pg. 26)
dLight Button [LIGHT] ( pg. 18)/Information Button [INFO] ( pg. 37)
eMode Switch [MODE] ( pg. 16, 20, 26, 30)
fAuto/Manual Mode Button [AUTO] ( pg. 22)
gMenu Button [MENU] ( pg. 52)
hDelete Button [ ] ( pg. 19)
iRecording Start/Stop Button [REC/SNAP] ( pg. 16, 20)
jControl Lever
 : Reverse Skip ( pg. 27)/Up/Backlight
Compensation [  ] ( pg. 25)/Spot Exposure Control [
  ] ( pg. 25)
 : Forward Skip ( pg. 27)/Down/Manual
Set [ ] ( pg. 22)
 : Reverse Search [3] ( pg. 27)/Left/ Nightalive [NIGHT] ( pg. 25)
 : Forward Search [ 5] ( pg. 27)/Right/ Switch Screen Size (16:9/4:3) [16:9] ( pg. 18)
Press down: Play/Pause (49) ( pg. 26, 30)
kIndex Button [INDEX] ( pg. 28)/Remaining
Space Button [  ] ( pg. 19)/Data Battery Button [
 ] ( pg. 14)
lBattery Release Button [BATT.] ( pg. 12)
Connectors
The connectors are located beneath the covers. M S-Video Output Connector [S] ( pg. 32)
N Audio/Video Output Connector [AV] O USB (Universal Serial Bus) Connector
( SOFTWARE INSTALLATION AND USB CONNECTION GUIDE)
P DC Input Connector [DC] ( pg. 12)
EN 11
Indicators
Q Power/Charge Lamp [POWER/CHARGE] |
|
|
( pg. 12) |
|
|
R Access Lamp [ACCESS] (Lights up or blinks |
|
|
when you access files. Do not turn off the |
STARTED |
|
power or remove the battery pack/AC |
||
adapter while accessing files.) |
||
|
||
S Auto Lamp [AUTO] (Lights up in Auto |
|
|
recording mode. Also lights up when |
GETTING |
|
connecting to a DVD burner [sold |
||
|
||
separately].) ( pg. 47) |
|
Other Parts
TReset Button [RESET] ( pg. 58)
USpeaker ( pg. 26)
VBattery Pack Mount ( pg. 12)
WCamera Sensor
Remote Sensor ( pg. 33)
XLens
YStereo Microphone
aLED Light ( pg. 18, 21) bGrip Strap ( pg. 14)
cSD Card Cover [OPEN] ( pg. 15) dStud Hole ( pg. 14)
eTripod Mounting Socket ( pg. 14)
ATTENTION:
●Be careful not to cover W, X, Y and Z during shooting.
●Carrying or holding the camera by the LCD monitor can result in dropping the unit, or in a malfunction.
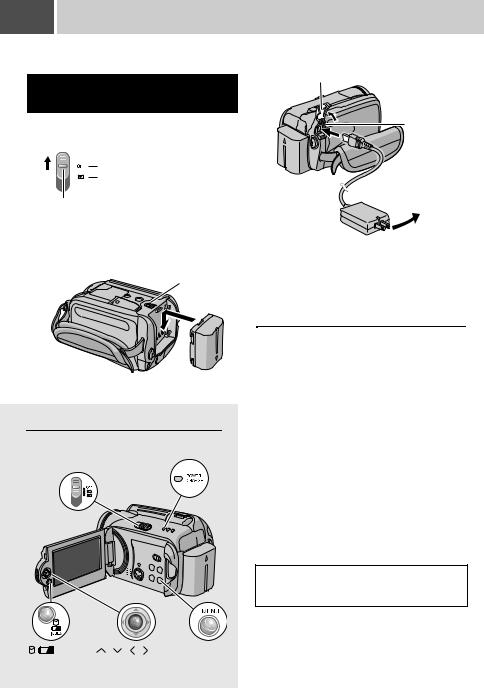
12 EN Necessary Settings before Use
Be sure to configure the following three settings before use.
Power Related Preparations
(Using the Battery Pack)
1 Set the power switch to OFF.
Slide while pressing down the lock button.
 Power off


 Playback
  Recording
Lock button
2 Attach the battery pack.
Slide the battery pack down until it locks in place.
Bottom of the Camera
BATT.
Controls in this section
Power/Charge Lamp
Power Switch
INDEX |
/ |
/ |
/ |
/ 49 |
MENU |
3 Charge the battery pack by connecting to the AC adapter.
Open the cover.
DC
Connector
To AC Outlet (110V to 240V)
AC Adapter
(ex. AP-V14U)
●The power/charge lamp blinks to indicate charging has started.
●When the lamp goes out, charging is finished. Unplug the AC adapter from the AC outlet and disconnect the AC adapter from the camera.
To detach the battery pack
Slide and hold BATT. ( step 2), then remove the battery pack.
To check the remaining battery power ( pg. 14)
Required charging / recording time
Battery pack |
Charging time |
Recording |
|
time |
|||
|
|
||
BN-VF707U |
1 hr. 30 min. |
1 hr. 10 min. |
|
(Provided) |
(1 hr. 5 min.) |
||
|
|||
|
|
|
|
BN-VF714U |
2 hr. 40 min. |
2 hr. 25 min. |
|
(2 hr. 20 min.) |
|||
|
|
||
|
|
|
|
BN-VF733U |
5 hr. 40 min. |
5 hr. 50 min. |
|
(5 hr. 30 min.) |
|||
|
|
||
|
|
|
The times shown above are approximate times. The values within ( ) are the times when the LED light is on.
NOTE:
You can also use the camera with just the AC adapter.
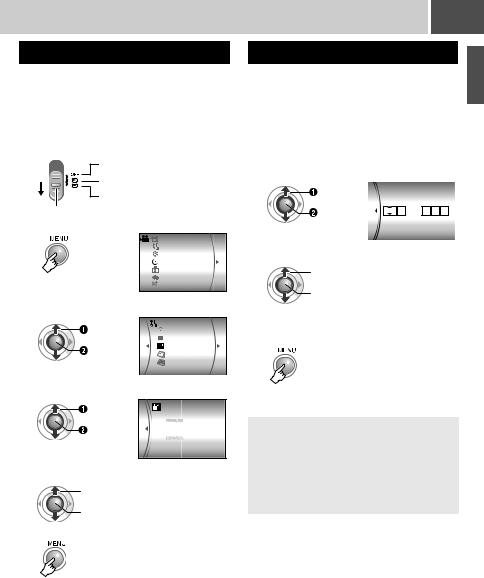
Language Setting
The language on the display can be changed. ( pg. 54)
1 Open the LCD monitor. ( pg. 10)
2 Set the power switch to  or
or  .
.
Slide while pressing down the lock button.
Power off |
|
Playback |
|
Recording |
|
Lock button |
|
3 |
CAMERA SETTING |
|
BASIC SETTING |
|
REC MEDIA SETTING |
|
DATE/DISPLAY |
|
REGISTER EVENT |
|
QUALITY |
|
WIND CUT |
4 Select [DATE/DISPLAY]. |
|
Select |
DATE/TIME |
|
SCENE COUNTER |
Set |
LANGUAGE |
CLOCK ADJUST |
|
|
DATE DISPLAY ORDER |
5 Select [LANGUAGE]. |
|
Select |
|
Set |
ENGLISH |
|
6 Select the desired language.
 Select
 Set
Set
7
EN 13
Date/Time Setting
The recording start date/time is recorded on the |
|
||||||
video/still image file and it can be checked by |
|
||||||
pressing INFO. ( pg. 26, 30) |
|
|
|
|
|
||
In addition, you can find the desired file from |
STARTED |
||||||
the date index screen. ( pg. 28) |
|
|
|
||||
After performing step 1-4 in “Language |
|||||||
|
|||||||
Setting” ( pg. 13) |
|
|
|
|
GETTING |
||
Select |
|
|
|
|
|||
5 Select [CLOCK ADJUST]. |
|
|
|
|
|||
|
|
CLOCK ADJUST |
|
|
|||
|
|
DATE |
|
TIME |
|
|
|
Set |
|
|
|
|
|
|
|
|
JAN 31 |
2006 |
11 : 07 AM |
|
|
||
|
|
|
|
|
|
||
|
|
|
|
|
|
|
|
6 Set the date and time.
 Select
 Set
Set
Repeat this step to input the month, day, year, hour and minute.
7
You have now finished configuring the necessary settings.
To use the camera right away
To record videos ( pg. 16)
To record still images ( pg. 20)
To configure other settings ( pg. 14)
14 EN Other Settings
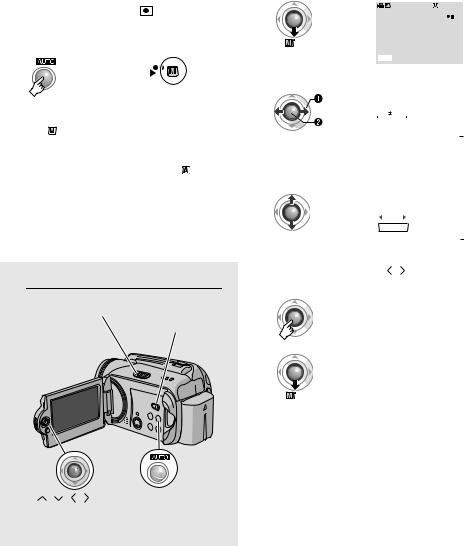
Check which buttons to use in the illustration of “Controls in this section” on page 12.
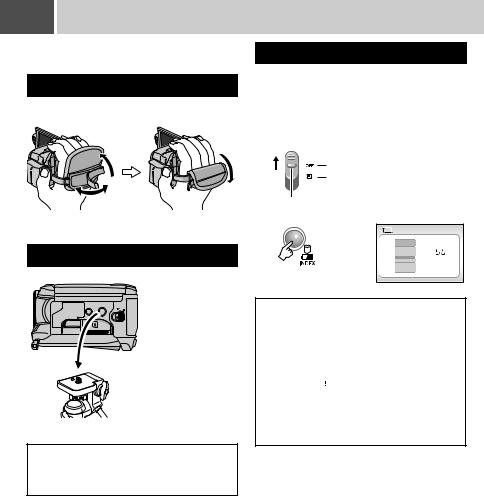
Grip Adjustment
Open the pad and make grip adjustments.
Tripod Mounting
Bottom of the
Camera
Align the camera stud hole with the tripod stud, and the mounting socket with the screw, and then rotate the camera clockwise to mount it to the tripod.
NOTE:
Do not use a tripod on unsteady or unlevel surfaces. It could tip over, causing serious damage to the camera.
Data Battery System
You can check the remaining battery power and the recordable time.
When the battery is attached
1 Set the power switch to OFF.
Slide while pressing down the lock button.
 Power off


 Playback
  Recording
Lock button
2

 BATTERY CONDITION
100%
MAX TIME

 min 50%

0%
NOTES:
●Battery information is displayed for approx. 3 seconds if the button is pressed and released quickly, and for approx. 15 seconds if the button is pressed and held for several seconds.
●If “COMMUNICATING ERROR” appears instead of the battery status even though you tried to press 
 several times, there may be a problem with your battery. In such a case, consult your nearest JVC dealer.
●The recordable time display should only be used as a guide. It is displayed in 10 minute units.
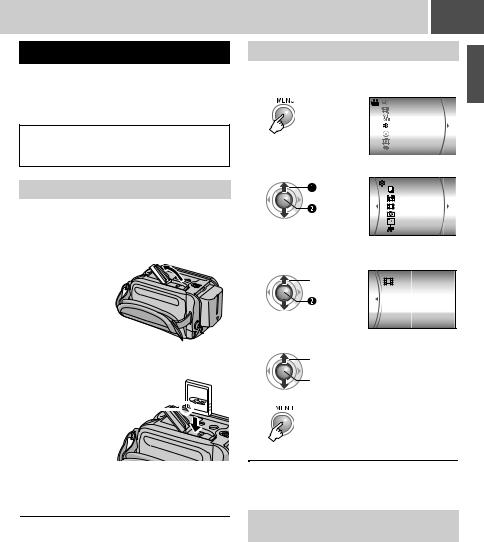
When Using an SD Card
By default, the HDD is set as the recording medium. If you want to record to an SD card, the following three operations need to be performed.
NOTE:
For details on compatible SD cards, see “Check the compatibility of recording media” ( pg. 3).
Insert an SD card
Insert and remove the SD card only while the power is turned off. Otherwise, data on the card may be corrupted.
1 Open the SD card cover.
Bottom of the
Camera
2 Firmly insert the card with its clipped edge first.
Clipped Edge 
Do not touch the terminal on the reverse side of the label.
3 Close the SD card cover.
To remove an SD card
Push the SD card once.
After the card comes out a little, pull it out.
EN 15
Change the recording medium
Preparation:
● Set the power switch to  or
or  .
.
1
DIS
CAMERA SETTING |
STARTED |
||
BASIC SETTING |
|||
REC MEDIA SETTING |
|
||
DATE/DISPLAY |
|
||
REGISTER EVENT |
|
||
QUALITY |
GETTING |
||
2 Select [REC MEDIA SETTING]. |
|||
|
|||
Select |
COPY/MOVE |
|
|
0 |
NO. RESET |
|
|
Set |
VIDEO MODE |
|
IMAGE MODE |
||
|
||
|
FORMAT |
|
|
CLEAN UP |
3 Select [VIDEO MODE] or [IMAGE MODE].
 Select
Set |
SD |
|
|
|
HDD |
4 Select [SD].
 Select
 Set
Set
5
\
To change the recording medium back to the HDD
Select [HDD] in step 4.
Format an SD card when using it for the first time
This will also ensure stable speeds and operation when accessing the SD card.
For details on how to format an SD card, see “Formatting a Recording Medium” ( pg. 39).
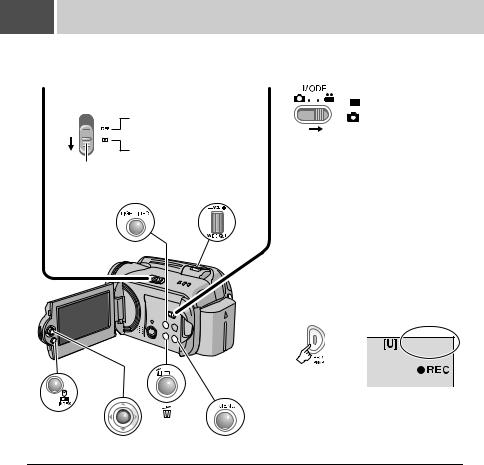
16 EN Video Recording
Preparation: Open the LCD monitor. ( pg. 10)
1Set the power switch to  .
.
Slide while pressing down the lock button.
Power off


 Playback
Recording
Lock button
LIGHT/INFO |
Zoom Lever |
2Set the MODE switch to 
 .
.

 : Video mode
: Still image mode
●The camera is programmed to record videos on the built-in hard disk when it is shipped from the factory. To change the recording medium, see page 15.


 INDEX
INDEX
 /
/ /
/  /
/  /49
/49
 3 Press the REC/SNAP button to start recording.
[0h56m]
● Approximate remaining time for recording appears.
MENU
To stop recording
Press the REC/SNAP button again.
To change the picture quality ( pg. 55)
To register a file to an event ( pg. 17)
NOTES:
●By default, the camera is set to record videos in 4:3 size. To record videos in 16:9 size, see “Changing the Screen Size” ( pg. 18).
●If the camera is not operated during recording or playback for 5 minutes when using the battery pack, it turns itself off automatically to conserve power. To turn the camera on again,
set the power switch to OFF, then to  or
or  . When using the AC adapter, the camera enters the sleep mode (the access lamp lights and the LCD monitor turns off). To cancel the sleep mode, perform any operation such as zooming.
●When the camera heats up, the 7REC indicator flashes. If the camera continues to heat up, shooting may be stopped to protect the recording medium. In this case, turn off the power, and then wait until the camera cools down.
●If data cannot be recorded or saved properly, the video files are not saved to the [SD_VIDEO] folder, which is for regular videos. Instead, the files are saved to the [EXTMOV] folder. To play back these files, see “To Play Back Files in the [EXTMOV] Folder” ( pg. 29).
●Video files are given the names MOV_001.MOD to MOV_009.MOD, MOV_00A.MOD to MOV_00F.MOD, and MOV_010.MOD in order of recording.
●After recording video for 12 consecutive hours, recording stops automatically.
●A new file will be created for every 4 GB of continuous shooting.
●This camera records video in MPEG2 format compliant with SD-VIDEO format. Remember that this camera is not compatible with other digital video formats.
●Before recording important video, be sure to make a trial recording.
●Do not move or shake the camera suddenly during recording. If you do, the sound of the hard disk drive may be recorded.
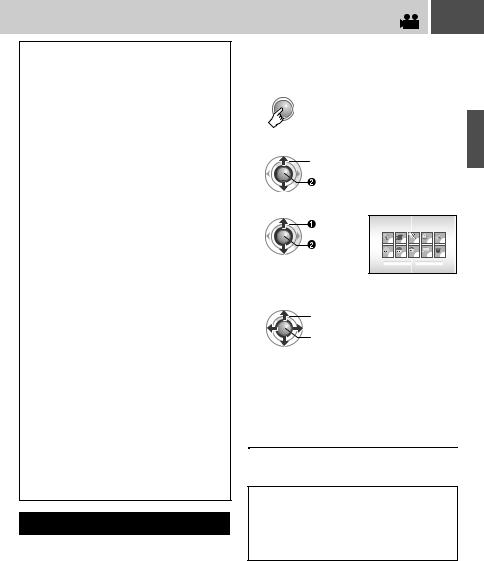
Registering Files to Events
If you select an event to register the file to before starting recording, the file will be registered to the selected event, thus making the file easy to find at playback. There are up to 3 different destinations within each event (for example: BABY1, BABY2, BABY3).
EN 17
Preparation:
●Set the power switch to  .
.
●Set the MODE switch to 
 .
.
1

2Select [REGISTER EVENT].
 Select
Select |
|
|
|
|
1/3 |
RECORDING |
Set |
|
|
|
|
|
|
3 Select [ON/SELECT]. |
|
|
|
|
|
|
|
|
SELECT EVENT |
|
|
||
|
|
VACATION |
|
|
|
|
Set |
1 |
1 |
1 |
1 |
1 |
|
|
|
|
|
|
|
|
|
1 |
1 |
1 |
1 |
1 |
|
|
NON SECTION |
NEXT PAGE |
|
|||
4 Select the event that you want to register the file to.
 Select
 Set
Set
●To select a different destination, select [NEXT PAGE].
●To cancel the event registration, select [NON SECTION].
The selected event is displayed on the screen. Press the REC/SNAP button to start recording.
To search by event for a file to play back ( pg. 29)
NOTE:
Once you select to register a file to a certain event, the setting will remain even if you turn the power off. Unless you change the setting, you will register a file to the same event that you had previously selected.
18 EN Video Recording (Continued)
Zooming
While recording |
|
Zoom out |
Zoom in |
|
|
|
|
|
|
|
|
|
|
|
|
|
|
|
|
|
|
|
|
|
|
|
|
|
|
|
|
W: Wide angle |
|
|
|
T: Telephoto |
||
●You can zoom in up to 32x by using the optical zoom.
●Zoom magnification over 32x is done through digital image processing, and is therefore called digital zoom. Digital zooming is possible up to 800x. Set [ZOOM] to [64X] or [800X]. ( pg. 55)
Optical zoom (up to 32x)
|
|
|
|
|
1 |
32 |
800 |
||
Digital zoom (up to 800x)
ATTENTION:
Videos which have been recorded in 16:9 size may appear to be slightly vertically stretched on a 4:3 screen TV. Record videos in 4:3 size if playing back on a 4:3 screen TV.
NOTES:
●If the recording mode is set to ECONOMY, you cannot change the screen size.
●If you want to burn the recorded videos onto DVD discs, it is recommended not to mix 16:9 size videos and 4:3 size videos.
●If you record videos in 16:9 size, the image may appear to be slightly vertically stretched when playing back on TV with the 4:3 screen.
LED Light
If you select to use this function, the LED light turns on to improve visibility during shooting.
Preparation:
●Set the power switch to  .
.
●Set the MODE switch to .
.
NOTES:
●Macro shooting is possible as close as approx. 5 cm (2") to the subject when the zoom lever is set all the way to W.
●When you zoom into a subject close to the lens, the camera may automatically zoom out depending on the distance to the subject. In this case, set [TELE MACRO] to [ON]. ( pg. 55)
Changing the Screen Size
You can record videos at 4:3 size and 16:9 size. By default, the camera is set to record videos at the 4:3 size.
Preparation:
●Set the power switch to  .
.
●Set the MODE switch to .
.
16:9
Each time you press the button, setting changes.
The light remains on regardless of the surrounding conditions.
The light turns on automatically when shooting in insufficient light conditions.
No |
Disables this function. |
|
display |
||
|
16:9
Each press switches the screen size.
Deleting a File
The file most recently recorded will be deleted.
After the recording is finished
1
DELETE?
EXECUTE
CANCEL
2 Select [EXECUTE].
 Select
 Set
Set
NOTE:
If the recording mode (video or still image) is switched, or the power is turned off and on again after recording, you cannot delete the file.
EN 19
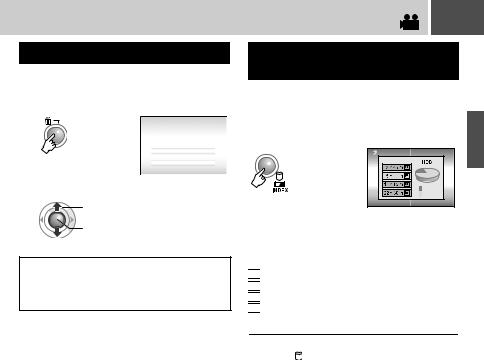
Checking the Remaining Space on the Recording Media
Preparation:
●Set the power switch to  .
.
●Set the MODE switch to 
 .
.
Example: When checking the HDD space
MAX RECORDING TIME |
|
37 |
RECORDING |
FREE |
|
USED |
|
The maximum recording time is displayed for |
|
each picture quality mode, and the remaining |
|
space is indicated by a pie chart. |
|
Displayed picture quality mode


 : ULTRA FINE


 : FINE


 : NORMAL


 : ECONOMY
For details on the picture quality, see page 69.
To return to the normal screen
Press the |
button again. |

20 EN Still Image Recording
Preparation: Open the LCD monitor. ( pg. 10)
1 Set the power switch to  .
.
Slide while pressing down the lock button.
 Power off

 Playback
 Recording
Lock button
Zoom Lever
2Set the MODE switch to  .
.
 : Video mode
 : Still image mode
●The camera is programmed to record still images on the built-in hard disk when it is shipped from the factory. To change the recording medium, see page 15.
3 Press the REC/SNAP button to start recording.
0 FINE
PHOTO
|
The PHOTO indicator appears during |
|
|
recording. |
|
|
● To check how the image looks before |
|
|
recording, press the REC/SNAP button |
|
|
halfway and hold. The indicator |
|
|
appears and becomes green when the |
|
LIGHT/INFO |
captured image is focused. To cancel the |
|
recording, release the REC/SNAP button. |
||
|
||
|
To record it on the recording medium, |
|
|
press the REC/SNAP button fully. |
To change the picture quality ( pg. 57)
NOTES:
●Still images are recorded at 4:3 size. They cannot be recorded at 16:9 size.
●If the camera is not operated during recording or playback for 5 minutes when using the battery pack, it turns itself off automatically to conserve power. To turn the camera on again, set the power switch to
OFF, then to  or
or  . When using the AC adapter, the camera enters the sleep mode (the access lamp lights and the LCD monitor turns off). To cancel the sleep mode, perform any operation such as zooming.
Zooming
While recording |
|
Zoom out |
Zoom in |
|
|
|
|
|
|
|
|
|
|
|
|
|
|
|
|
|
|
|
|
|
|
|
|
|
|
|
|
W: Wide angle |
|
|
|
T: Telephoto |
||
●You can zoom up to 32x by using the optical zoom.
●Digital zoom ( pg. 18) is not available.
Continuous Shooting
If the continuous shooting mode is set to on, keeping the REC/SNAP button pressed in step 3 ( pg. 20) provides an effect similar to serial photography. (Interval between still images: approx. 0.3 seconds)
Preparation:
●Set the power switch to  .
.
●Set the MODE switch to  .
.
Set the [CONTINUOUS SHOOTING] to [ON]. ( pg. 57)
0 FINE |
The |
indicator |
|
appears. |
|
|
|
|
●Continuous shooting may not work well depending on the recording medium.
●The continuous shooting speed will drop if this function is used repeatedly.
EN 21
LED Light
If you select to use this function, the LED light turns on to improve visibility during shooting.
Preparation:
●Set the power switch to  .
.
●Set the MODE switch to  .
.
Each time you press the button, setting |
RECORDING |
|
|
||
changes. |
|
|
|
The light remains on regardless |
|
|
of the surrounding conditions. |
|
|
The light turns on automatically |
|
|
when shooting in insufficient light |
|
|
conditions. |
|
No |
Disables this function. |
|
display |
|
|
|
|
|
Deleting a File
The file most recently recorded will be deleted.
After the recording is finished
1
DELETE?
EXECUTE
CANCEL
2 Select [EXECUTE].
 Select
 Set
Set
NOTE:
If the recording mode (video or still image) is switched, or the power is turned off and on again after recording, you cannot delete the file.
22 EN |
|
Manual Recording |
|
|
|
|
|
|
|
|
|
|
|
|
|
|
|
|||||
|
|
|
|
|
|
|
|
|
|
|
|
|
|
|
|
|
|
|
|
|
|
|
About manual recording mode |
|
|
|
|
|
|
|
|
|
|
|
|
|
|
|
|||||||
|
Manual Setting in MSET Menu |
|
|
|
|
|
|
|||||||||||||||
This mode enables you to set the focus and |
|
|
|
|
|
|
|
|||||||||||||||
screen brightness manually. You need to switch |
|
You can use manual recording functions easily |
||||||||||||||||||||
to this mode because auto recording mode, |
|
|||||||||||||||||||||
which adjusts these settings automatically, is |
|
by selecting items in the MSET menus. |
|
|
|
|
||||||||||||||||
selected by default. |
|
After performing “To change to manual |
|
|
|
|||||||||||||||||
|
|
|
|
|
|
|
|
|
|
|
|
|||||||||||
To change to manual recording mode |
|
recording mode” ( pg. 22) |
|
|
|
|
|
|
|
|
|
|||||||||||
Preparation: |
1 |
|
|
|
|
|
|
|
|
|
|
|
|
|
||||||||
● Set the power switch to . |
|
|
|
|
16:9 |
|
|
|
[0h56m] |
|
||||||||||||
|
|
|
|
|
|
|
|
|
|
|
|
|||||||||||
|
|
|
|
|
|
|
|
|
|
|
|
|
|
|
||||||||
● Select the file type (video or still image) using |
|
|
|
|
|
|
|
|
|
|
|
|
|
|
|
|||||||
|
the MODE switch. |
|
|
|
|
|
|
|
|
|
|
|
|
|
|
|
||||||
|
|
|
|
|
|
|
|
|
|
|
|
|
|
|
|
|
|
|
|
|
|
|
|
|
|
|
|
|
|
|
|
|
|
AUTO |
AUTO |
AUTO |
AUTO |
|
OFF |
OFF |
|
||||
|
|
|
|
|
|
|
|
|
|
|
AE |
AF |
|
WB |
S.SP |
|
P.AE |
EF |
|
|||
|
|
|
|
|
|
|
|
|
|
|
|
|
|
|
|
|
|
|
|
|
|
|
|
|
|
|
|
|
16:9 |
|
|
2 Select the desired menu. |
|
|
|
|
|
|
|
|
|||||
|
|
|
|
|
|
|
|
|
|
|
|
|
|
|
|
|
||||||
|
Press twice. |
|
|
|
|
|
Select |
|
|
|
|
|
|
|
|
|
|
|
|
|
||
|
|
|
|
|
|
|
|
|
|
|
|
|
|
|
|
|
|
|
|
|||
|
|
|
|
|
|
|
|
|
|
|
|
|
|
0 |
|
|
|
|
|
|
|
|
|
|
|
|
|
|
|
|
|
Set |
|
AUTO |
|
|
|
|
|
|
|
||||
The |
indicator appears. |
|
|
|
|
|
|
|||||||||||||||
|
|
|
AUTO |
AUTO |
AUTO |
AUTO |
|
|
||||||||||||||
|
|
|
|
|
|
|
|
|
|
|
|
|
||||||||||
|
|
|
|
|
|
|
|
|
|
|
AE |
|
AF |
WB |
S.SP |
|
|
|||||
To return to the auto recording mode |
|
For details on each menu, see pages 23 and |
||||||||||||||||||||
Press the AUTO button so that the indicator |
24. |
|
|
|
|
|
|
|
|
|
|
|
|
|
||||||||
|
3 Select the desired setting. |
|
|
|
|
|
|
|||||||||||||||
appears. |
|
|
|
|
|
|
|
|||||||||||||||
|
|
|
|
|
|
|
|
|
|
|
|
|
|
|
|
|
|
|
|
|
|
|
|
|
|
|
|
|
|
|
|
|
|
|
|
|
0 |
|
|
|
|
|
|
|
|
|
|
|
|
|
|
|
|
|
|
|
AUTO |
|
|
|
|
|
|
|
|
|||
|
|
|
|
|
|
|
|
|
|
|
AUTO |
AUTO |
AUTO |
AUTO |
|
|
||||||
|
|
|
|
|
|
|
|
|
|
|
AE |
|
|
AF |
WB |
S.SP |
|
|
||||
|
|
|
|
|
|
|
|
|
Depending on the kind of settings you select, |
|||||||||||||
Controls in this section |
|
you can set the value with |
/ |
|
after |
|
|
|
|
|||||||||||||
|
selecting. |
|
|
|
|
|
|
|
|
|
|
|
|
|
||||||||
4
Power Switch
MODE Switch
5
The menu disappears and the indicator for the set function appears.
/ |
/ |
/ |
/ 49 |
AUTO |
Loading...