


 Loading...
HARD DISK CAMCORDER
GZ-MG50E/EK GZ-MG40E/EK GZ-MG30E/EK GZ-MG20E/EK
ENGLISH |
|
GETTING STARTED |
7 |
VIDEO RECORDING & |
22 |
PLAYBACK |
|
STILL IMAGE RECORDING |
28 |
& PLAYBACK |
|
ADVANCED OPERATIONS |
31 |
MENU SETTINGS |
48 |
REFERENCES |
52 |
To deactivate the demonstration, set “DEMO MODE” to “OFF”. ( pg. 48)
INSTRUCTIONS
LYT1472-001C EN
2 EN
Major Features of this Camera
Built-in Hard Disk
This hard disk camera records images to a large, built-in hard disk drive (HDD) instead of a DV tape like conventional video cameras. This enables extended hours of high-resolution, MPEG2 video recording.
Various Recording Modes
You can select the most suitable recording mode for picture quality, image size, recording time, and computer environment. ( pg. 62)
Enjoying Various Playback Features
Unlike tape operation, playback is simple and easy in this camera since no time is needed for rewinding or fast forward operations.
Playlist, playback effects, and other functions are also available for enjoying many different
types of playback.
Editing Files on your PC
USB 2.0 enables the smooth transfer of video and still images to a computer. With the bundled image editing software, you can easily
edit video and create your own DVDs. (Refer to “Read this first!” and the software installation and USB connection guide.)
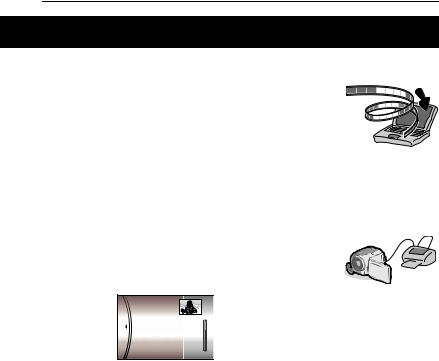
Direct Printing
If your printer is
compatible with PictBridge, still images can be printed easily by
connecting the camera
with USB cable directly to the printer. ( pg. 47)

Contents |
|
GETTING STARTED |
7 |
Provided Accessories ...................................... |
7 |
Index .............................................................. |
10 |
Power ............................................................. |
14 |
Operation Mode ............................................. |
17 |
Language Setting .......................................... |
18 |
Date/Time Settings ........................................ |
18 |
Brightness Adjustment of the Display ............ |
19 |
Grip Adjustment ............................................. |
19 |
Tripod Mounting ............................................. |
19 |
Inserting/Removing an SD Card .................... |
20 |
Formatting a Recording Medium ................... |
20 |
Selecting a Recording Medium ...................... |
21 |
Remaining Space on the Recording Media ... |
21 |
Drop Detection ............................................... |
21 |
VIDEO RECORDING & PLAYBACK |
22 |
Video Recording ............................................ |
22 |
Zooming ..................................................... |
23 |
Video Playback .............................................. |
24 |
How to Use the Scroll Bar ......................... |
25 |
Date Index Screen ..................................... |
25 |
Various Playback Operations .................... |
25 |
Playback Zoom .......................................... |
25 |
Connecting to a TV, VCR or VDR .................. |
26 |
Playback on a TV ...................................... |
26 |
Dubbing to a VCR (or DVD Recorder) ....... |
26 |
Playback Using the Remote Control .............. |
27 |
STILL IMAGE RECORDING & PLAYBACK |
28 |
Still Image Recording ..................................... |
28 |
Zooming ..................................................... |
28 |
Continuous Shooting ................................. |
28 |
Still Image Playback ...................................... |
29 |
Slide Show ................................................. |
29 |
Index Screen of Still Image Files ............... |
29 |
How to Use the Scroll Bar ......................... |
30 |
Date Index Screen ..................................... |
30 |
Image Rotation .......................................... |
30 |
Playback Zoom .......................................... |
30 |
|
|
EN 3 |
ADVANCED OPERATIONS |
|
31 |
RECORDING FEATURES ..................................... |
|
31 |
Backlight Compensation ................................ |
|
31 |
Spot Exposure Control ................................... |
|
31 |
LED Light ....................................................... |
|
31 |
Manual Settings in MSET Menu .................... |
|
32 |
How to Select a Menu Item ....................... |
|
32 |
Manual Exposure ....................................... |
|
32 |
Manual Focus ............................................ |
|
33 |
White Balance ........................................... |
|
34 |
Shutter Speed ............................................ |
|
35 |
Program AE ............................................... |
|
36 |
Effect ......................................................... |
|
36 |
PLAYBACK FEATURES ....................................... |
|
37 |
Wipe or Fader Effects .................................... |
|
37 |
Playback Effects ............................................ |
|
37 |
MANAGING FILES ............................................. |
|
38 |
Viewing File Information ................................ |
|
38 |
Protecting Files .............................................. |
|
38 |
Deleting Files ................................................. |
|
39 |
Cleaning Up a Recording Medium ................. |
|
40 |
Copying/Moving Still Image Files ................... |
|
41 |
Resetting the File Number ............................. |
|
42 |
Creating Play List ........................................... |
|
42 |
Playing Back Play List ................................... |
|
43 |
DPOF Print Setting ........................................ |
|
46 |
Direct Printing with a PictBridge Printer |
......... 47 |
|
MENU SETTINGS |
|
48 |
Changing the Menu Settings ......................... |
|
48 |
Common Menus for All Modes ...................... |
|
48 |
Video Recording Menus ................................ |
|
50 |
Video Playback Menus .................................. |
|
50 |
Still Image Recording Menus ......................... |
|
51 |
Still Image Playback Menus ........................... |
|
51 |
REFERENCES |
|
52 |
Troubleshooting ............................................. |
|
52 |
Warning Indications ....................................... |
|
55 |
Cleaning the Camera ..................................... |
|
57 |
Cautions ......................................................... |
|
57 |
Specifications ................................................. |
|
60 |
TERMS ............................................... |
Back cover |
|
4 EN
Dear Customer,
Thank you for purchasing this hard disk camera. Before use, please read the safety information and precautions contained in the pages 4 – 6 to ensure safe use of this product.
SAFETY PRECAUTIONS
IMPORTANT (for owners in the U.K.) Connection to the mains supply in the United Kingdom.
DO NOT cut off the mains plug from this equipment.
If the plug fitted is not suitable for the power points in your home or the cable is too short to reach a power point, then obtain an appropriate safety approved extension lead or consult your dealer.
BE SURE to replace the fuse only with an identical approved type, as originally fitted, and to replace the fuse cover.
If nonetheless the mains plug is cut off be sure to remove the fuse and dispose of the plug immediately, to avoid possible shock hazard by inadvertent connection to the mains supply.
If this product is not supplied fitted with a mains plug then follow the instructions given below: DO NOT make any connection to the Larger Terminal coded E or Green.
The wires in the mains lead are coloured in accordance with the following code:
Blue to N (Neutral)  or Black
Brown to L (Live) or Red
If these colours do not correspond with the terminal identifications of your plug, connect as follows:
Blue wire to terminal coded N (Neutral) or coloured black.
Brown wire to terminal coded L (Live) or coloured Red.
If in doubt — consult a competent electrician.
WARNING: TO PREVENT FIRE OR SHOCK HAZARD, DO NOT EXPOSE THIS UNIT TO RAIN OR MOISTURE.
CAUTIONS:
●To prevent shock, do not open the cabinet. No user serviceable parts inside. Refer servicing to qualified personnel.
●When you are not using the AC adapter for a long period of time, it is recommended that you disconnect the power cord from AC outlet.
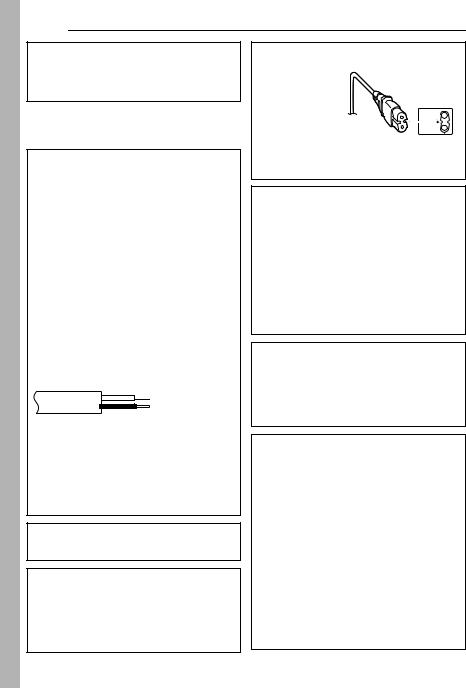
CAUTION:
To avoid electric shock or damage to the unit, first firmly insert the
small end of the power cord into
the AC Adapter until it is no longer wobbly,
and then plug the larger end of the power cord into an AC outlet.
CAUTIONS:
●This camera is designed to be used with PALtype colour television signals. It cannot be used for playback with a television of a different standard. However, live recording and LCD monitor playback are possible anywhere.
●Use the JVC BN-VF707U battery pack and, to recharge it or to supply power to the camera from an AC outlet, use the provided multivoltage AC adapter. (An appropriate conversion adapter may be necessary to accommodate different designs of AC outlets in different countries.)
NOTES:
●The rating plate and safety caution are on the bottom and/or the back of the main unit.
●The serial number plate is on the battery pack mount.
●The rating information and safety caution of the AC adapter are on its upper and lower sides.
Do not point the lens directly into the sun. This can cause eye injuries, as well as lead to the malfunctioning of internal circuitry. There is also a risk of fire or electric shock.
CAUTION!
The following notes concern possible physical damage to the camera and to the user.
Carrying or holding the camera by the LCD monitor can result in dropping the unit, or in a malfunction.
Do not use a tripod on unsteady or unlevel surfaces. It could tip over, causing serious damage to the camera.
CAUTION!
Connecting cables (Audio/Video, S-Video, etc.) to the camera and leaving it on top of the TV is not recommended, as tripping on the cables will cause the camera to fall, resulting in damage.
Information for Users on Disposal of Old Equipment
[European Union]
This symbol indicates that the electrical and electronic equipment
should not be disposed as general household
waste at its end-of-life. Instead, the product should be handed over to the applicable collection point for the recycling of electrical and electronic equipment for proper treatment, recovery and
recycling in accordance with your national legislation.
By disposing of this product correctly, you will help to conserve natural resources and will help prevent potential negative effects on the environment and human health which could otherwise be caused by inappropriate waste handling of this product. For more information about collection point and recycling of this product, please contact your local municipal office, your household waste disposal service or the shop where you purchased the product.
Penalties may be applicable for incorrect disposal of this waste, in accordance with national legislation.
(Business users)
If you wish to dispose of this product, please visit our web page www.jvc-europe.com to obtain information about the take-back of the product.
[Other Countries outside the European Union]
If you wish to dispose of this product, please do so in accordance with applicable national legislation or other rules in your country for the treatment of old electrical and electronic equipment.
EN 5
When the equipment is installed in a cabinet or on a shelf, make sure that it has sufficient space on all sides to allow for ventilation (10 cm or more on both sides, on top and at the rear).
Do not block the ventilation holes.
(If the ventilation holes are blocked by a newspaper, or cloth etc. the heat may not be able to get out.)
No naked flame sources, such as lighted candles, should be placed on the apparatus.
When discarding batteries, environmental problems must be considered and the local rules or laws governing the disposal of these batteries must be followed strictly.
The apparatus shall not be exposed to dripping or splashing.
Do not use this equipment in a bathroom or places with water.
Also do not place any containers filled with water or liquids (such as cosmetics or medicines, flower vases, potted plants, cups etc.) on top of this unit. (If water or liquid is allowed to enter this equipment, fire or electric shock may be caused.)
SOME DO’S AND DON’TS ON THE SAFE USE OF EQUIPMENT
This equipment has been designed and manufactured to meet international safety standards but, like any electrical equipment, care must be taken if you are to obtain the best results and safety is to be assured.
DO read the operating instructions before you attempt to use the equipment.
DO ensure that all electrical connections (including the mains plug, extension leads and interconnections between pieces of equipment) are properly made and in accordance with the manufacturer’s instructions. Switch off and withdraw the mains plug when making or changing connections.
DO consult your dealer if you are ever in doubt about the installation, operation or safety of your equipment.
DO be careful with glass panels or doors on equipment.
DON’T continue to operate the equipment if you are in any doubt about it working normally, or if it is damaged in any way — switch off, withdraw the mains plug and consult your dealer.
DON’T remove any fixed cover as this may expose dangerous voltages.
CONTINUED ON NEXT PAGE

6 EN
DON’T leave equipment switched on when it is unattended unless it is specifically stated that it is designed for unattended operation or has a standby mode. Switch off using the switch on the equipment and make sure that your family knows how to do this. Special arrangements may need to be made for infirm or handicapped people.
DON’T use equipment such as personal stereos or radios so that you are distracted from the requirements of road safety. It is illegal to watch television whilst driving.
DON’T listen to headphones at high volume, as such use can permanently damage your hearing.
DON’T obstruct the ventilation of the equipment, for example with curtains or soft furnishings. Overheating will cause damage and shorten the life of the equipment.
DON’T use makeshift stands and NEVER fix legs with wood screws — to ensure complete safety always fit the manufacturer’s approved stand or legs with the fixings provided according to the instructions.
DON’T allow electrical equipment to be exposed to rain or moisture.
ABOVE ALL
●NEVER let anyone especially children push anything into holes, slots or any other opening in the case — this could result in a fatal electrical shock;
●NEVER guess or take chances with electrical equipment of any kind — it is better to be safe than sorry!
Before Using this Camera
This camera records video in MPEG2 format compliant with SD-VIDEO format.
Remember that this camera is not compatible with other digital video formats.
Remember that this camera is intended for private consumer use only.
Any commercial use without proper permission is prohibited. (Even if you record an event such as a show, performance or exhibition for personal enjoyment, it is strongly recommended that you obtain permission beforehand.)
Do not strike or shake the hard disk.
Before recording important video, be sure to make a trial recording.
Play back your trial recording to make sure the video and audio have been recorded properly.
Make a backup of important recorded data
Protect your important recorded data by copying the files to PC. It is recommended to copy it from your PC to a DVD or other recording media for storage. Refer to the software installation and USB connection guide.
Important notes when requesting repair or inspection
When the camera is repaired or inspected, data may be erased, and the hard disk may be formatted. Back up all data before requesting repair or inspection.
If a problem occurs with the SD Memory Card, bring the card together with the camera.
When requesting repairs for breakdowns by your dealer or JVC service centre, be sure to bring your camera together with the SD Memory Card. If one of them is not included, the cause cannot be diagnosed, and the repair cannot be made properly.
Important notes for destroying and disposing of camera
When formatting or erasing data using the camera or PC functions, only the file administration information is changed. The data is not completely erased from the hard disk. If you want to completely erase all of the data, we recommend either using commercially available software that is specially designed for that purpose, or by physically destroying the camera with a hammer etc.
Also read “Cautions” on pages 57 to 59.
●Manufactured under license from Dolby Laboratories. “Dolby” and double-D symbol are trademarks of Dolby Laboratories.
●


MascotCapsule is registered trademark of HI CORPORATION in Japan.
Copyright © 2001 HI CORPORATION. All rights reserved.
●Other product and company names included in this instruction manual are trademarks and/or registered trademarks of their respective holders.
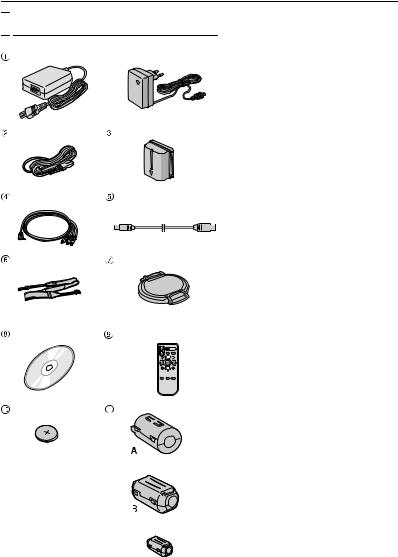

 Provided Accessories
OR
GETTING STARTED EN 7
a AC Adapter AP-V14E or AP-V17E |
|
|
b Power Cord (AP-V14E only) |
|
|
c Battery Pack BN-VF707U |
|
|
d Audio/Video Cable |
STARTED |
|
|
||
e USB Cable (Refer to the software installation |
|
|
and USB connection guide.) |
|
|
f Shoulder Strap (See page 8 for attachment) |
GETTING |
|
g Lens Cap (See page 8 for attachment) |
||
|
||
h CD-ROM |
|
|
i Remote Control Unit RM-V730UE |
|
|
j Lithium Battery CR 2025* (for remote control |
|
|
unit) |
|
|
k Core Filter for Cables (See page 9 for |
|
|
attachment) |
|
|
Large-A (x 1): Audio/Video Cable |
|
|
Large-B (x 2): USB/S-Video Cable |
|
|
Small (x 1): DC Cord |
|
*A lithium battery is pre-installed in the remote control unit at time of shipment (with insulation sheet). To use the remote control unit, remove the insulation sheet.
NOTES:
●In order to maintain optimum performance of the camera, provided cables may be equipped with one or more core filter. If a cable has only one core filter, the end that is closest to the filter should be connected to the camera.
●Make sure to use the provided cables for connections. Do not use any other cables.

8 EN GETTING STARTED
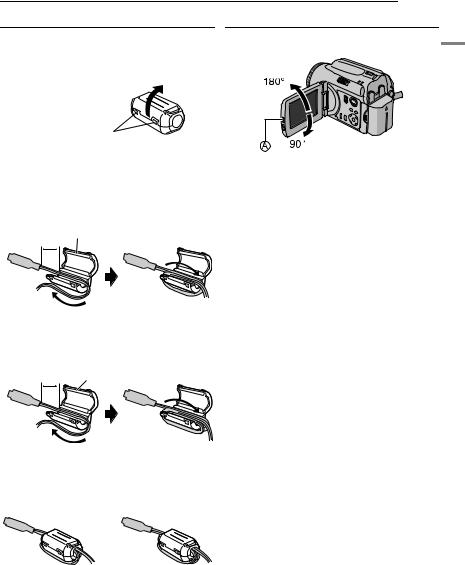
Attaching the Shoulder Strap
Follow the illustration.
1 Open the velcro strip.
2 Thread the strap through the eyelet.
3 Fold it back and thread it through the strap guide and the buckle.
●To adjust the length of the strap, loosen and then tighten the strap in the buckle.
4 Slide the strap guide fully towards the eyelet.
5 Close the velcro strip.
 1
1 
 5
5
2 |
4 |
Eyelet
Buckle
3

Attaching the Lens Cap
To protect the lens, attach the provided lens cap to the camera as shown in the illustration.
NOTE:
To confirm the lens cap is on correctly, make sure the cap is flush to the camera.
Place here during recording.
Strap Guide
GETTING STARTED EN 9
Attaching the Core Filter |
LCD Monitor |
Attach the core filters to the cables. The core filter reduces interference.
1 Release the stoppers on both ends of the core filter.
Stopper
2 Run the cable through the core filter, leaving approx. 3 cm of cable between the cable plug and the core filter.
S-Video/Audio/Video/USB cable
Wind the cable once around the outside of the core filter as shown in the illustration.
3 cm Core Filter (Large)
Wind once.
DC cord
Wind the cord twice around the outside of the core filter as shown in the illustration.
3 cm Core Filter (Small)
Wind twice.
● Wind the cable so that it is not slack.
3 Close the core filter until it clicks shut.
Pull on the end  of the LCD monitor and open the LCD monitor fully. It can rotate 270°.
GETTING STARTED
S-Video/Audio/Video/ |
DC Cord |
USB Cable |
NOTES:
●Take care not to damage the cable.
●When connecting a cable, attach the end with the core filter to the camera.

10 EN GETTING STARTED
 Index
Index
ATTENTION:
●Be careful not to cover b, c, d, and e during shooting.
●Be careful not to cover Y during playback.
GETTING STARTED EN 11
Controls
a Mode Switch [MODE] ( pg. 17) b Light Button [LIGHT] ( pg. 31)
c Information Button [INFO/
 ] ( pg. 38) d Play/Pause Button [49] ( pg. 24, 29)
e Forward Search Button [ |
(5)] ( pg. 25)/ |
||||
Right Button [ |
]/Auto/Manual Mode Switch |
||||
[ |
/ ] ( pg. 17) |
|
|||
f Forward Skip Button [ |
] ( pg. 25)/Down |
||||
Button [ |
]/Manual Set Button [ SET] |
||||
( pg. 32) |
|
|
|
||
g Reverse Search Button [ |
(3)] ( pg. 25)/ |
||||
Left Button [ ] |
|
|
|||
h Menu Button [MENU] ( pg. 48) |
|||||
i Delete Button [ |
] ( pg. 39) |
||||
j Reverse Skip Button [ |
] ( pg. 25)/Up |
||||
Button [ |
]/Backlight Compensation Button |
||||
[ |
|
] ( pg. 31)/Spot Exposure Control |
|||
|
|||||
Button ( pg. 31) |
|
||||
k Power Switch [OFF, , |
] ( pg. 17) |
||||
l Lock Button ( pg. 17) |
|
||||
m LCD Lock Button |
|
||||
n Zoom Lever [T/W] ( pg. 23) Speaker Volume Control ( pg. 24)
o Recording Start/Stop Button ( pg. 22, 28) p Battery Release Button [BATT.] ( pg. 14)
Indicators
U Power/Charge Lamp [POWER/CHARGE] ( pg. 14, 17)
V Access Lamp [ACCESS] (Lights up or blinks when you access to any files. Do not turn off the power or remove the battery pack/AC adapter while accessing to files during recording or playback.)
Other Parts
WReset Hole [RESET] ( pg. 52) XLCD Monitor
YSpeaker ( pg. 24)
aBattery Pack Mount ( pg. 14) bRemote Sensor ( pg. 27)
Camera Sensor
cLens
dLED Light ( pg. 31)
eStereo Microphone
fShoulder Strap Eyelet ( pg. 8)
gGrip Strap ( pg. 19)
hSD Card Cover ( pg. 20)
iStud Hole ( pg. 19)
jTripod Mounting Socket ( pg. 19)
GETTING STARTED
Connectors
The connectors are located beneath the covers. Q S-Video Output Connector [S] ( pg. 26)
R Audio/Video Output Connector [AV]
S USB (Universal Serial Bus) Connector (Refer to the software installation and USB connection guide.)
T DC Input Connector [DC] ( pg. 14)
12 EN GETTING STARTED
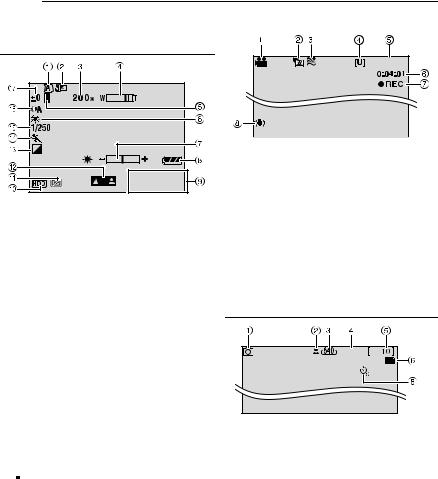
Indications on LCD Monitor |
During Video Recording only |
During both Video and Still Image Recording |
|
11:30 |
10.11. 2005 |
a Manual Mode Indicator ( pg. 17)
 : Auto Mode
 : Manual Mode
b Tele Macro Mode Indicator ( pg. 50) c Approximate Zoom Ratio ( pg. 23, 50) d Zoom Indicator ( pg. 23, 50)
e Iris Lock Indicator ( pg. 31, 32) f White Balance Indicator ( pg. 34)
g Brightness Control Indicator ( pg. 19, 49) h Battery Indicator ( pg. 55)
i Date/Time ( pg. 49)
j Selected Medium Indicator ( pg. 21, 49) k Drop Detection Indicator ( pg. 21)
l Manual Focus Adjustment Indicator ( pg. 33)
m Effect Mode Indicator ( pg. 36)
n Program AE Mode Indicator ( pg. 36) o Shutter Speed ( pg. 35)
 : Nightscope Indicator p Light Indicator ( pg. 31)
q ±: Exposure Adjustment Indicator ( pg. 32)
 : Backlight Compensation Indicator ( pg. 31)
 : Spot Exposure Control Indicator ( pg. 31)
[0h56m]
a Mode Indicator ( pg. 17)
b Wide Mode Indicator ( pg. 50) c Wind Cut Indicator ( pg. 50)
d Picture Quality: [U] (ultra fine), [F] (fine), [N] (normal), [E] (economy) ( pg. 50)
e Remaining Time ( pg. 22, 62) f Counter ( pg. 49)
g 7REC: (Appears during recording.) ( pg. 22)
79: (Appears during record-standby mode.) ( pg. 22)
h Digital Image Stabiliser (DIS) Indicator ( pg. 50)
During Still Image Recording only
FINE
PHOTO 
a Mode Indicator ( pg. 17) b Focus Icon ( pg. 28)
c Image Size: 1152 (1152 x 864)*, 1024 (1024 x 768)*, 640 (640 x 480) ( pg. 51)
* Not available for GZ-MG30E/EK/GZ-MG20E/EK. d Picture Quality: FINE (fine) or STD (standard)
( pg. 51)
e Remaining Number of Shots ( pg. 63) f : Continuous Shooting Mode Indicator
( pg. 28)
g Shooting Icon ( pg. 28)
h Self-Timer Recording Indicator ( pg. 51)

|
|
GETTING STARTED EN 13 |
|
During Video Playback |
|
During Still Image Playback |
|
|
|
|
|
10. 11. 2005 |
a Mode Indicator ( pg. 17)
b Play List Playback Indicator (Appears when play list is played back. pg. 43)
c Picture Quality: [U] (ultra fine), [F] (fine), [N] (normal), [E] (economy) ( pg. 50)
d Playback Mode ( pg. 24) U : Playback
9 : Pause
5 : Forward High-Speed Search
3 : Reverse High-Speed Search
9U : Forward Slow-Motion
Y9 : Reverse Slow-Motion
(The number on the left shows speed.) e Counter ( pg. 49)
f Volume Level Indicator
g Battery Indicator ( pg. 55) h Date ( pg. 49)
i Selected Medium Indicator ( pg. 21, 49) j Effect Mode Indicator ( pg. 36)
k Wipe/Fader Effect Indicator ( pg. 37, 50)
11:30 10. 11. 2005
a Mode Indicator ( pg. 17) b Folder/File Number
c Slide Show Playback Indicator ( pg. 29) d Battery Indicator ( pg. 55)
e Date/Time ( pg. 49)
f Selected Medium Indicator ( pg. 21, 49)
NOTE:
When the mode indicators disappear or blink, the functions of those modes are not available. Such a phenomenon also occurs when the LCD monitor is turned 180°. ( pg. 9)
GETTING STARTED
14 EN GETTING STARTED
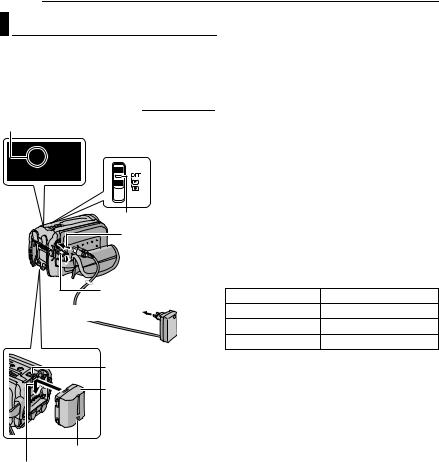
Power |
1 Set the power switch to OFF. |
||
2 With the arrow on the battery pack pointing |
|||
|
|||
This camera’s 2-way power supply system lets |
downward, push the battery pack slightly against |
||
you choose the most appropriate source of |
the battery pack mount. |
||
power. Do not use provided power supply units |
● If the battery mount cover is attached, remove it |
||
with other equipment. |
by sliding BATT. |
|
|
3 Slide down the battery pack until it locks in |
|||
Charging the Battery Pack |
|||
place. |
|
||
Power/Charge Lamp |
4 Connect the AC adapter to the camera. |
||
5 Connect the power cord to the AC adapter. |
|||
|
|||
Power Switch |
(AP-V14E only) |
|
|
6 Plug the power cord into an AC outlet. The |
|||
|
|||
|
power/charge lamp on the camera blinks to |
||
|
indicate charging has started. |
||
|
7 When the power/charge lamp goes out, |
||
Lock Button |
charging is finished. Unplug the power cord from |
||
the AC outlet. Disconnect the AC adapter from |
|||
To DC connector |
the camera. |
|
|
|
To detach the battery pack |
||
|
While sliding BATT., remove the battery pack. |
||
Open the cover. |
Required charging time |
||
Battery pack |
Charging time |
||
|
|||
To AC outlet |
BN-VF707U* |
Approx. 1 hr. 30 min. |
|
|
BN-VF714U |
Approx. 2 hr. 40 min. |
|
AC Adapter |
BN-VF733U |
Approx. 5 hr. 40 min. |
|
* Provided |
|
||
(ex. AP-V17E) |
|
||
BATT. |
Battery Pack |
Arrow |
Battery Pack Mount |

NOTES:
●This product includes patented and other proprietary technology and will operate only with JVC Data Battery. Use the JVC BNVF707U/VF714U/VF733U battery packs. Using generic non-JVC batteries can cause damage to the internal charging circuitry.
●If the protective cap is attached to the battery pack, remove it first.
●During charging, the camera cannot be operated.
●Charging is not possible if the wrong type of battery is used.
●Make sure to use the battery pack with the arrow ( ) mark. The camera does not turn on with the battery mount cover without the arrow (
 ) mark.
●When charging the battery pack for the first time or after a long storage period, the power/charge lamp may not light. In this case, remove the battery pack from the camera, then try charging again.
●If the battery operation time remains extremely short even after having been fully charged, the battery is worn out and needs to be replaced.
Please purchase a new one.
●Since the AC adapter processes electricity internally, it becomes warm during use. Be sure to use it only in well-ventilated areas.
●Using the optional AA-VF7 battery charger, you can charge the BN-VF707U/VF714U/VF733U battery pack without the camera.
●After 5 minutes has elapsed in record-standby mode, the camera will automatically turn off its power supplied from the AC adapter. In this case, the battery charge starts if the battery is attached to the camera.
GETTING STARTED EN 15
Using the Battery Pack |
|
|
||
Perform steps 2 – 3 in “Charging the Battery |
|
|
||
Pack”. |
|
STARTED |
||
|
Battery pack |
Recording time |
||
Maximum continuous recording time |
|
|
||
|
|
|
GETTING |
|
|
BN-VF714U |
Approx. 2 hr. 10 min. |
||
|
BN-VF707U* |
Approx. 1 hr. 00 min. |
|
|
|
|
(55 min.) |
|
|
|
|
(2 hr. 00 min.) |
|
|
|
|
|
|
|
|
BN-VF733U |
Approx. 5 hr. 00 min. |
|
|
|
|
(4 hr. 45 min.) |
|
|
|
|
|
|
|
* |
Provided |
|
|
|
( |
): When the LED light is on. |
|
|
|
NOTES:
●Recording time is reduced significantly under the following conditions:
•Zoom or record-standby mode is engaged repeatedly.
•Playback mode is engaged repeatedly.
●Before extended use, it is recommended that you prepare enough battery packs to cover 3 times the planned recording time.
ATTENTION:
●Before detaching the power source, make sure that the camera’s power is turned off. Failure to do so can result in a camera malfunction.
●If the camera is a subject to electrostatic discharge, turn the power off before using it again.

16 EN GETTING STARTED
Data Battery System Using AC Power
You can check the remaining battery power and the recordable time.
1
2 Open the LCD monitor fully.
3 Press INFO/
 repeatedly, and the battery status screen appears.
●It is displayed for approx. 3 seconds if the button is pressed and released quickly, and for approx. 15 seconds if the button is pressed and held for several seconds.
●If “COMMUNICATING ERROR” appears instead of the battery status even though you tried to press INFO/
 several times, there may be a problem with your battery. In such a case, consult your nearest JVC dealer.
●The recordable time display should only be used as a guide. It is displayed in 10 minute units.
Perform step 4 in “Charging the Battery Pack”.
NOTE:
The provided AC adapter features automatic voltage selection in the AC range from 110 V to 240 V.
About Batteries
DANGER! Do not attempt to take the batteries apart, or expose them to flame or excessive heat, as it may cause a fire or explosion. WARNING! Do not allow the battery or its terminals to come in contact with metals, as this can result in a short circuit and possibly start a fire.
To resume the original function of the accurate battery power indication
If the battery power indication differs from the actual operating time, fully charge the battery, and then run it down. However this function may not turn back if the battery was used for a long period of time under extremely high/low temperature condition or charged too many times.

GETTING STARTED EN 17
Operation Mode |
2 Recording/Playback Mode |
|||||
Select the recording/playback mode using the |
||||||
To turn on the camera, set the power switch to |
||||||
MODE switch. |
|
|
||||
or |
while pressing down the lock button |
: Video mode ( pg. 22, 24) |
||||
located on the switch. |
||||||
: Still image mode ( pg. 28, 29) |
||||||
● The power/charge lamp turns on. |
||||||
|
|
|
||||
To turn off the camera, set the power switch to |
3 Auto/Manual Mode |
|
||||
OFF. |
|
|
|
|||
1 Power Switch |
|
Press and hold |
( / |
) to switch the auto/ |
||
|
manual recording mode. When manual mode is |
|||||
|
|
|
||||
|
|
Power/Charge Lamp |
selected, the indicator |
appears on the LCD |
||
|
|
|
monitor. |
|
|
|
|
|
|
Auto mode: |
|
||
|
|
|
You can record using no special |
|||
|
|
|
effects or manual adjustments. |
|||
|
2 MODE |
Lock Button |
Manual mode: |
|||
|
|
|||||
LCD Monitor |
3 |
Manual recording is possible by |
||||
|
|
|
setting various functions. |
|||
|
|
|
( pg. 31 – 37) |
|||
Set the appropriate operation mode according to |
To return to the auto recording mode |
|||||
your preference using the power and MODE |
||||||
switches and ( / |
) button. |
Press ( / |
) again so that the indicator |
|||
|
|
|
appears. |
|
|
|
1 Power Switch Position
Set the power switch for recording ( ) or playback (
 ) while pressing down the lock button.
Power Switch
Power Off


 Playback
 Recording
4 Power-Linked Operation
When the power switch is set to  , you can also turn on/off the camera by opening/closing the LCD monitor.
GETTING STARTED
18 EN GETTING STARTED
|
|
Language Setting |
|
|
|
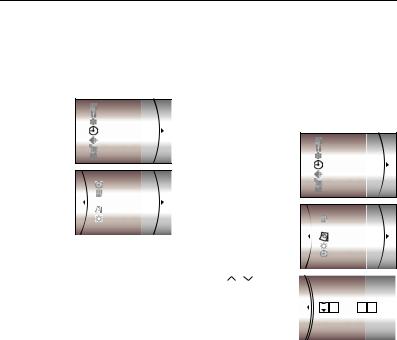
Date/Time Settings |
The language on the display can be changed. ( pg. 48, 49)
1 Set the power switch to  or
or  .
.
2 Press MENU. The menu screen appears.
3 Press  /
/  to select [DISPLAY], then press 49.
4 Press  /
/  to select [LANGUAGE], then press 49.
5 Press  /
/  to select the desired language, then press
49.
6 Press MENU to return to the
The recording start date/time is recorded on the video/still image file and it can be checked by pressing INFO during playback. ( pg. 24, 29) In addition, you can find the desired file by the date index screen. ( pg. 30)
1 Set the power switch to  or
or  .
.
2 Press MENU. The menu screen appears.
3 Press  /
/  to select [DISPLAY], then press 49.
4 Press  /
/  to select [CLOCK ADJUST], then press 49. The day is highlighted.
5 Press |
/ |
to input |
|
|
|
|
|
CLOCK ADJUST |
|||||
the day, then press 49. |
|
|||||
|
DATE |
|
TIME |
|||
Repeat to input the |
|
|
||||
|
|
|
|
|||
month, year, hour and |
|
31 01 |
2005 |
11 : 07 |
||
|
|
|
|
|||
minute. |
|
|
|
|
|
|
6 Press MENU to |
|
|
|
|
||
|
|
|
|
|||
return to the normal screen. |
|
|
|
|||
Built-in Clock’s Rechargeable Lithium Battery
If the camera is not used for approx. 3 months, the clock’s lithium battery will become discharged and the date/time stored in memory will be lost. When this occurs, first connect the camera to an AC outlet using the AC adapter for over 24 hours to charge the clock’s rechargeable lithium battery. Then perform the date/time setting before using the camera.
Note that the camera can be used without setting the date/time.

GETTING STARTED EN 19
Brightness Adjustment of the
Display
The brightness of the display can be adjusted.
1 Set the power switch to  or
or  while pressing down the lock button located on the switch.
2 Open the LCD monitor fully. ( pg. 9)
3 Press MENU. The menu screen appears.
4 Press  /
/  to select [DISPLAY], then press
49.
5 Press  /
/ to select [BRIGHT], and press 49. The brightness control indicator appears.
6 Press  /
/  until the appropriate brightness is reached.
7 Press 49 to clear the brightness control indicator from the display.

 Grip Adjustment
1 Adjust the velcro strip.
2 Pass your right hand through the loop and grasp the grip.
3 Adjust your thumb and fingers through the grip to easily operate the recording start/stop button, power switch and zoom lever. Be sure to fasten the velcro strip to your preference.

 Tripod Mounting
To attach the camera to a tripod, align the direction stud and screw to the mounting socket and stud hole on the camera. Then tighten the screw clockwise.
● Some tripods are not equipped with studs.
GETTING STARTED
20 EN GETTING STARTED
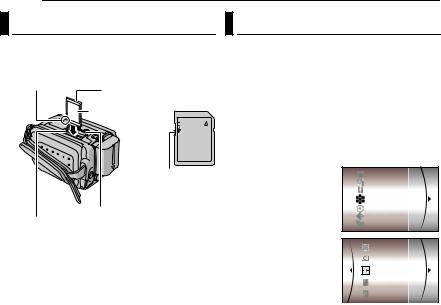
Inserting/Removing an SD Card |
Formatting a Recording Medium |
|
You can use an SD card as a recording medium |
You can format (initialise) the built-in hard disk |
|
in the SD slot. See page 62 for the guaranteed |
(HDD) or SD cards. You have to format the |
|
media to work with this camera. |
newly-purchased SD cards with this camera |
|
Clipped Edge |
before using them. This enables stable speeds |
|
and operation when accessing the recording |
||
SD Card (optional) |
||
Label |
medium. Be aware that all files and data |
|
including protected files will be erased. |
||
|
( pg. 38) |
Write/Erase
Protection Tab
SD Card Cover
SD Slot
1 Set the power switch to  or
or  .
.
2 Press MENU. The menu screen appears.
3 Press  /
/ to select [REC MEDIA SETTING], then press 49.
1 Make sure the camera’s power is off.
2 Open the SD card cover.
3 To insert an SD card, firmly insert it with its clipped edge first.
To remove an SD card, push it once. After the SD card comes out of the camera, pull it out.
●Do not touch the terminal on the reverse side of the label.
4 Close the SD card cover.
To protect valuable files
Slide the write/erase protection tab on the side of the SD card in the direction of “LOCK”. This prevents the SD card from being recorded over. To record on this SD card, slide the tab back to the position opposite to “LOCK” before inserting it.
NOTE:
Before using a new SD card, it is necessary to format the card. ( pg. 20)
ATTENTION:
Do not insert or remove the SD card while the camera is turned on, as this may cause the SD card to be corrupted or cause the camera to become unable to recognise whether or not the SD card is installed.
4 Press  /
/ to select [FORMAT], then press
49.
5 Press  /
/ to select [HDD] or [SD], then press 49.
6 Press  /
/ to select [EXECUTE], then press 49.
●By pressing the 49 button while selecting [HDD]
and holding down the  button in step 5, you can erase the data on the hard disk in a format that is difficult to recover. Moreover, by repeating this procedure, you can make the data even more difficult to recover. When formatting in this way, a formatting progress bar is displayed.
●To cancel the formatting, select [CANCEL], then press 49.
CAUTION:
Do not remove the SD card or perform any other operation (such as turning off the power) during format. Also, be sure to use the provided AC adapter, as the recording medium may be corrupted if the battery becomes exhausted during format. If the recording medium becomes corrupted, format it again.
NOTE:
Do not format the recording medium on the PC. Make sure to format the recording medium on the camera.
Loading...