


 Loading...
ENGLISH
DEUTSCH
FRANÇAIS
NEDERLANDS
CASTELLANO
ITALIANO
PORTUGUÊS
AV-21FT1SUG


AV-21FT1BUG
AV-29FT1SUG
AV-29FT1BUG
FARBFERNSEHGERÄT TELEVISEUR COULEUR KLEURENTELEVISIE TELEVISOR A COLOR TELEVISORE A COLORI TELEVISOR A CORES
CORES
INSTRUCTIONS
BEDIENUNGSANLEITUNG
MANUEL D'INSTRUCTIONS
GEBRUIKSAANWIJZING
MANUAL DE INSTRUCCIONES
INSTRUZIONI
INSTRUCÖES
(SOMENTE PARA MODELO AV-29FT1)

Thank you for buying this JVC colour television.
To make sure you understand how to use your new TV, please read this manual thoroughly before you begin.
1.WATER AND MOISTURE
The apparatus shall not be exposed to dripping or splashing water and no object filled with liquids, such as vases , should be placed on the apparatus.
2.HEAT
Never place the set near heat sources.
Never put a naked flame, such as a candle, on the top of TV set.
3.VENTILATION
Do not cover the ventilation openings in the cabinet and never place the set in a confined space such as in a bookcase or built-in cabinet unless proper ventilation is provided. Leave a minimum 10 cm gap all around the unit.
4.OBJECT ENTRY
Do not insert foreign objects, such as needles and coins, in the ventilation openings.
5.LIGHTNING STRIKE
You should disconnect the set from the mains and the aerial system during thunderstorms.
6.CLEANING
Unplug the set from the mains while cleaning.
7.AFTER MOVING THE SET
If the set is moved or turned, the MAIN POWER button must be switched off for at least 15 minutes in order to take out colour patches on the screen.
8.CAUTION
There is danger of choking or suffocation if the cap which is removed from the TV is accidentally swallowed by children. Store the cap out of the reach of children.

IDENTITY OF LOCAL & REMOTE CONTROL
LOCAL CONTROL
B1
B2
B3
B4
Front |
AV-21FT1 MODEL |
|
|
AV-29FT1 MODEL |
|
|
|
|
|
|
|
MAIN POWER button
FRONT S-VIDEO INPUT socket Ext-3 (only for AV-29FT1)
FRONT VIDEO INPUT socket Ext-3 FRONT AUDIO INPUT socket Ext-3
B5 |
|
HEADPHONE socket |
|
|
|
|
|
|
|
|
|
|
|
|
|
|
|
|
|
|
|
|
|
B6 |
|
STAND-BY indicator |
|
|
|
|
|
|
|
|
|
|
|
|
|
|
|
|
|
|
|
|
|
B7 |
|
REMOTE sensor |
|
|
|
|
|
|
|
|
|
|
|
|
|
|
|
|
|
|
|
|
|
B8 TV / AV button |
|
|
|
|
|
|
|
|
|
B1 |
B2 |
B3 |
B4 |
B5 |
B6 |
B7 |
B8 |
B9 |
B10 |
ENGLISH |
|||
B9 |
VOLUME UP/DOWN buttons |
|
|
|
|
|
|
|
|
|
|||||||||||||
B10 |
PROGRAM UP/DOWN buttons |
|
|
|
|
|
|
|
|
|
|
|
|
|
|
|
|
|
|
|
|
||
|
|
|
B1 |
B3 |
B4 |
B5 |
B6 |
B7 |
B8 |
B9 |
B10 |
|
|
|
|
|
|
|
|
|
|
|
|
|
Rear |
|
|
|
|
|
|
|
|
|
|
|
|
|
|
|
|
|
|
|
|
|
|
|
|
|
|
ANT |
|
|
|
|
|
|
|
|
|
|
|
|
|
|
|
|
|
|
|
|
|
|
AERIAL socket |
|
|
|
|
|
|
|
|
|
|
|
|
|
|
|
|
|
|
|
|
|
|
SCART 1 socket EXT-1 |
|
|
|
EXT-1 |
|
EXT-2 |
(S |
) |
|
|
|
|
|
|
|
|
|
|
|
||
|
|
SCART 2 socket EXT-2 |
|
|
|
|
|
|
|
|
|
|
|
|
|
|
|
|
|
|
|
|
|
|
REMOTE CONTROL |
|
|
|
|
|
|
|
|
|
|
|
|
|
|
|
|
|
|
|
|||
|
TV mode |
|
|
|
RM-C1514 |
|
|
|
TELETEXT mode |
|
|
||||||||||||
A1 |
|
|
SOUND MUTE |
A1 |
|
|
|
|
|
|
|
A2 |
A1 |
|
|
SOUND MUTE |
|
|
|
||||
A2 |
|
/I |
POWER |
|
|
|
|
|
|
|
A2 |
|
/I |
POWER |
|
|
|
|
|
||||
0 |
|
|
|
|
|
|
|
|
|
|
|
|
|
|
|
||||||||
A3 |
9 |
NUMBER 0..9 |
|
|
|
|
|
|
|
|
|
A3 |
0 |
9 |
NUMBER 0..9 |
|
|
|
|||||
A4 |
|
zoom |
ZOOM / SKIP |
|
|
|
|
|
|
|
|
|
A4 |
|
|
RED |
|
|
|
|
|
|
|
|
|
|
|
|
|
|
|
|
|
|
|
|
|
|
|
|
|
|
|
|
|
|
|
A5 |
|
|
SOUND EFFECT / MOVE |
|
|
|
|
|
|
|
|
A3 |
A5 |
|
|
GREEN |
|
|
|
|
|
||
|
|
|
|
|
|
|
|
|
|
|
|
|
|
|
|
|
|
||||||
A6 |
|
|
SLEEP / DELETE |
|
|
|
|
|
|
|
|
|
A6 |
|
|
YELLOW |
|
|
|
|
|
||
A7 |
|
|
Not used |
|
|
|
|
|
|
|
|
|
A7 |
|
|
CYAN |
|
|
|
|
|
|
|
A8 |
|
|
TV > TELETEXT |
A5 |
|
|
|
|
|
|
|
A6 |
A8 |
|
|
TELETEXT > TV |
|
|
|
||||
A9 |
PICTURE/OK |
PICTURE / OK |
1 |
|
|
|
|
|
|
|
|
A9 |
|
|
Not used |
|
|
|
|
|
|||
A10 |
|
MENU |
MENU |
A4 |
|
|
|
|
|
|
|
A7 |
A10 |
|
MENU |
VOL/BRIGHTNESS MENU |
|
|
|||||
|
A8 |
|
|
|
|
|
|
|
|
|
|
|
|||||||||||
A11 |
|
|
PROGRAM UP (CURSOR UP) |
|
|
|
|
|
|
|
A9 |
|
|
|
SELECTION |
|
|
|
|||||
|
|
A11 |
|
|
|
|
PICTURE/OK |
|
|
|
|
|
|
|
|||||||||
|
|
|
|
|
|
|
|
|
|
|
|
|
|
|
|
|
|
|
|
||||
A12 |
|
|
PROGRAM DOWN (CURSOR DOWN) |
|
|
|
|
|
|
MENU |
A10 |
A11 |
|
|
PAGE UP |
|
|
|
|
||||
A13 |
|
|
VOLUME DOWN (CURSOR LEFT) A15 |
|
|
|
|
|
|
|
A12 |
|
|
PAGE DOWN |
|
|
|
||||||
|
|
|
|
|
|
|
|
A14 |
|
|
|
|
|
||||||||||
A14 |
|
|
VOLUME UP (CURSOR RIGHT) |
|
|
|
|
|
|
|
A13 |
|
|
VOL / BRIGHTNESS DOWN |
|
|
|||||||
|
|
A13 |
|
|
|
|
|
|
|
|
|
|
|
|
|||||||||
A15 |
|
|
TV / AV |
|
|
|
|
|
|
|
|
A14 |
|
|
VOL / BRIGHTNESS UP |
|
|
||||||
|
AV |
|
|
|
|
|
|
|
A12 |
|
|
|
|
||||||||||
A16 |
|
|
Not used |
A17 |
|
|
|
|
|
|
A18 |
A15 |
|
|
Not used |
|
|
|
|
|
|||
A17 |
|
|
Not used |
A16 |
|
|
|
|
|
|
A19 |
A16 |
|
|
PAGE HOLD |
|
|
|
|||||
A18 |
|
|
Not used |
|
|
|
|
|
|
A17 |
|
|
Not used |
|
|
|
|
|
|||||
|
|
A20 |
|
|
|
|
|
|
A23 |
|
|
|
|
|
|
|
|||||||
A19 |
|
|
Not used |
|
|
|
|
|
|
A18 |
|
? |
REVEAL |
|
|
|
|
|
|||||
|
|
A21 |
|
|
|
|
|
|
A22 |
|
|
|
|
|
|
||||||||
A20 |
|
|
Not used |
|
|
|
|
|
|
A19 |
|
|
DOUBLE SIZE |
|
|
|
|||||||
|
|
|
|
|
|
|
|
|
|
|
|
|
|
||||||||||
A21 |
|
|
Not used |
A24 |
|
|
|
|
|
|
A26 |
A20 |
|
|
Not used |
|
|
|
|
|
|||
A22 |
|
|
Not used |
A25 |
|
|
|
|
|
|
|
|
A21 |
|
|
Not used |
|
|
|
|
|
||
A23 |
|
|
Not used |
|
|
|
|
|
|
|
|
|
A22 |
|
X |
CANCEL |
|
|
|
|
|
||
A24 |
|
L |
INFORMATION |
|
|
|
|
RM-C1514 |
|
|
|
A23 |
|
i |
INDEX |
|
|
|
|
|
|
||
A25 |
V |
D VCR / TELETEXT / DVD switch |
|
|
|
|
|
|
|
|
|
A24 |
|
|
SUBPAGE |
|
|
|
|
||||
A26 |
|
I / II |
MODE Stereo/Mono |
|
|
|
|
|
|
|
|
|
A25 |
|
|
VCR / TELETEXT / DVD switch |
|
||||||
2 |
|
|
Dual language I / II |
|
|
|
|
|
|
|
|
|
A26 |
|
|
Not used |
|
|
|
|
|
||
|
|
|
|
|
|
|
|
|
|
|
|
|
|
|
|
|
|
|
|
|
|
|
|
INSTALLATION
AUTO TUNING SYSTEM
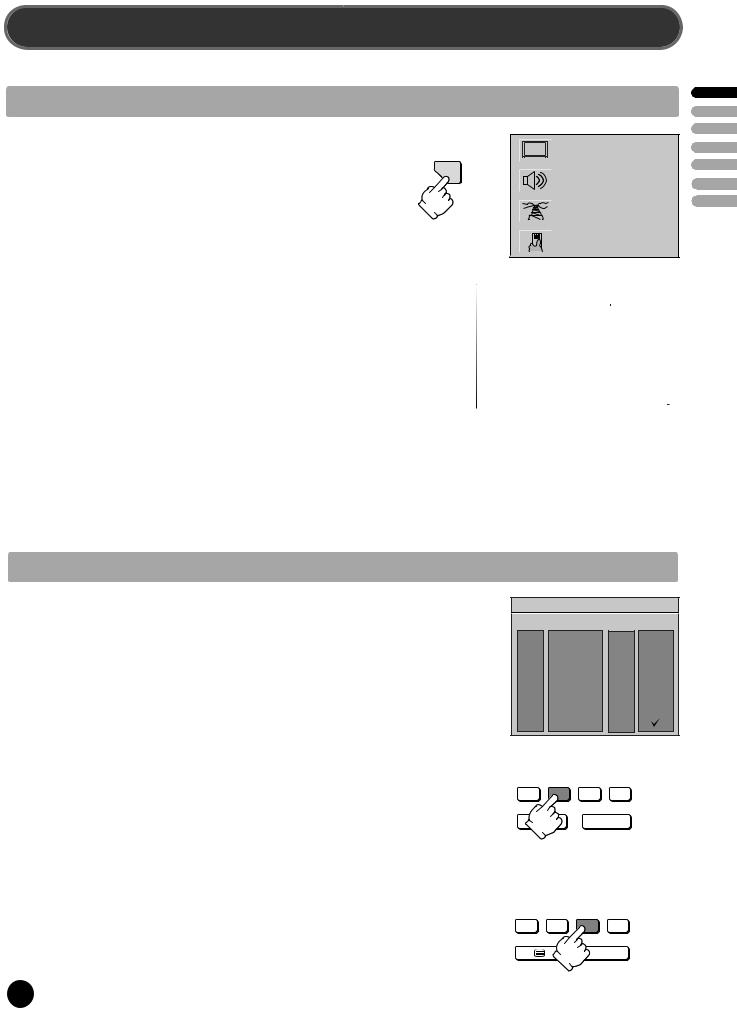
MENU SELECTION |
|
PICTURE |
|
Press remote control MENU button (A10) to display the MAIN MENU. |
|
||
MENU |
SOUND |
||
Move the cursor to INSTALL by using the remote control CURSOR |
|||
|
|||
UP (A11),DOWN(A12) buttons. |
|
INSTALL |
|
Then press the remote control OK button (A9). |
|
||
Note: All menus are removed within 60 seconds if you don't press |
|
FEATURES |
|
any button. |
|
|
COUNTRY SELECTION
Position the cursor at ATSS Menu and select country code where TV is used by pressing the remote control CURSOR LEFT (A13), RIGHT(A14) buttons.
The following countries can be selected.
A, |
B, |
CH, |
|
CZ, |
D, |
DK |
E, |
F, |
FIN, |
GB, |
H, |
I, |
|
IRL, |
N, |
NL, |
PL, S, |
Others |
||
|
INSTALL |
|
ATSS |
|
|
GB |
|
|
EDIT |
|
|
SYSTEM |
GB |
|
CHANNEL |
C 31 |
|
FREQUENCY |
551.25 |
|
NAME |
BBC1 |
|
PROGRAM |
01 |
|
STORE TO |
01 |
|
|
|
|
ATSS - Auto Tuning and Sorting System
After selecting country code, press and hold OK button for 3 - 4 seconds until "Please wait!" is displayed, then auto program tuning starts searching all the available TV stations in your area. When auto tuning and sorting is completed, the EDIT menu with the recorded programs appears on the screen.
To exit the EDIT menu, press MENU button 3 times, then the menu display will disappear from TV screen. Now you can select program using the remote control UP (A11) or DOWN (A12) buttons.
ENGLISH
EDIT MENU
The EDIT menu shows you the programme position assignment. When using the AUTO TUNING method, the broadcasts may not be found and stored in the order you desired. For example, BBC1 may not be allocated to programme number 01, and BBC2 may not be allocated to programme number 02, etc. The EDIT menu enables you to change the programme position assignment according to your personal preference.
To reach the EDIT menu you have to first select INSTALL menu from the MAIN menu.
CHANGING ORDER OF CHANNELS
Position the cursor to the programme number you want to move and press the remote control GREEN (A5) MOVE button. The programme turns to red colour. Then use the UP (A11) or DOWN (A12) buttons to move the programme number you wish to store it to and press MOVE button again to confirm the operation. Press MENU to return to INSTALL menu.
DELETE PROGRAMME POSITION DATA
Position the cursor to the programme number you wish to delete using the remote control UP (A11) or DOWN (A12) buttons. Press the YELLOW/DELETE (A6) button.
The delete programme is instantly moved to programme N° 99. The programme which was located at N° 99 will automatically move to N° 98.
|
|
|
EDIT |
PR |
NAME |
CH |
SKIP |
06 |
CH 4 |
C46 |
|
05 |
S4C |
C39 |
|
04 |
CH 4 |
C05 |
|
03 |
ITV |
C31 |
|
02 |
BBC 2 |
C34 |
|
01 |
BBC 1 |
C37 |
|
00 |
----- |
C21 |
|
PICTURE/OK
PICTURE/OK
4

SKIPPING THE CHANNELS
Position the cursor to the programme number you wish to skip, then press the RED (SKIP) (A4) button. A skipped programme is marked with the sign "  "
"
at its right end. The channel corresponding to a skipped programme will not 
 PICTURE/OK appear on screen when changing channels using PROGRAM UP (A11) /
DOWN (A12) buttons.
MANUAL CHANNEL TUNING
Tuning by ATSS (Auto Tuning Sorting System) is recommendable, as it is the easiest tuning method. But Manual Tuning is also possible using the following procedure.
BROADCASTING SYSTEM SELECTION
Select INSTALL menu and using the remote control CURSOR UP (A11) / DOWN (A12) buttons, move the cursor to SYSTEM menu and select the appropriate system by the LEFT (A13) or RIGHT (A14) button.
"FRANCE" |
France SECAM L/L' |
"GB" |
Great Britain / Ireland PAL-I/I' |
"EURO" |
Westen Europe PAL-SECAM B/G |
"E/EURO" |
Eastern Europe PAL-SECAM D/K |
|
INSTALL |
|
ATSS |
|
|
GB |
|
|
EDIT |
|
|
SYSTEM |
GB |
|
CHANNEL |
C 49 |
|
FREQUENCY |
551.25 |
|
NAME |
BBC1 |
|
PROGRAM |
01 |
|
STORE TO |
01 |
|
|
|
|
ACTIVATING MANUAL TUNING
Move the cursor to FREQUENCY (channel frequency) menu and press and hold for more than 2 seconds the remote control CURSOR LEFT (A13) or RIGHT (A14) buttons. When one channel is tuned, the corresponding station name is indicated automatically in NAME menu.
To tune the next channel, press the remote control CURSOR LEFT (A13) or RIGHT (A14) buttons again.
CHANNEL AND FREQUENCY MENU
If you know the channel or frenquency number you want to search, enter the data by 0...9 buttons. TV will tune that channel quickly.
PERFORM FINE TUNING
If you are unable to obtain good picture or reasonable sound volume due to poor reception it is possible to perform fine tuning.
- Select the "FREQUENCY" menu.
- Press for less than 2 seconds, the remote control CURSOR LEFT (A13) and CURSOR RIGHT (A14) buttons to activate FINE TUNING _ / + in steps of 0.05 MHz(50kHz).
STORING CHANNEL NAME
When one channel is tuned, the corresponding station NAME will be detected automatically. But in some cases, NAME will not be detected due to the broadcasting situation. You may put in the channel NAME yourself.
Position the cursor to NAME menu and press the remote control CURSOR RIGHT(A14) button. A cursor appears on the left end of NAME line ("-----"). Then press CURSOR UP (A11) or DOWN (A12) buttons untill you get the right letter or symbol. Move the cursor to the next position by using CURSOR LEFT (A13) or RIGHT (A14) buttons and repeat the operation. Press OK (A9) button to store the NAME.
PROGRAM MENU
The number on the right side of the PROGRAM menu indicates the program number of the currently displayed channel.
STORE TO MENU
Select STORE TO menu and select the program number by 0....9 buttons or CURSOR LEFT (A13) or RIGHT (A14) buttons to which you want to store the currently displayed channel then press OK button.
Warning ! If you store the number already programmed, the previous programmes will be erased automatically.
ENGLISH
5
Loading...