


JVC GET0701-001A, KD-R420, 0910DTSMDTJEIN, KD-R520, KD-A525 User Manual
...
Having TROUBLE with operation? Please reset your unit
Refer to page of How to reset your unit
Still having trouble??
USA ONLY
Call 1-800-252-5722
http://www.jvc.com
We can help you!
KD-R528/KD-A525/KD-R520:
•“Made for iPod,” and “Made for iPhone” mean that an electronic accessory has been designed to connect specifically to iPod, or iPhone, respectively, and has been certified by the developer to meet Apple performance standards. Apple is not responsible for the operation of this device or its compliance with safety and regulatory standards. Please note that the use of this accessory with iPod, or iPhone may affect wireless performance.
•iPhone, iPod, iPod classic, iPod nano, and iPod touch are trademarks of Apple Inc., registered in the U.S. and other countries.
EN, SP, FR |
|
© 2010 Victor Company of Japan, Limited |
0910DTSMDTJEIN |
ENGLISH
ESPAÑOL
KD-R528/KD-A525/ FRANÇAIS 
KD-R520/KD-R428/KD-R420
CD RECEIVER / RECEPTOR CON CD / RÉCEPTEUR CD
For canceling the display demonstration, see page 4. / Para cancelar la demostración en pantalla, consulte la página 4. / Pour annuler la démonstration des affichages, référez-vous à la page 4.
For installation and connections, refer to the separate manual. Para la instalación y las conexiones, refiérase al manual separado.
Pour l’installation et les raccordements, se référer au manuel séparé.
INSTRUCTIONS
MANUAL DE INSTRUCCIONES
MANUEL D’INSTRUCTIONS
For customer Use:
Enter below the Model No. and Serial No. which are located on the top or bottom of the cabinet. Retain this information for future reference. Model No.
Serial No.
GET0701-001A
[J]

Thank you for purchasing a JVC product.
Please read all instructions carefully before operation, to ensure your complete understanding and to obtain the best possible performance from the unit.
INFORMATION (For U.S.A.)
This equipment has been tested and found to comply with the limits for a Class B digital device, pursuant to Part 15 of the FCC Rules. These limits are designed to provide reasonable protection against harmful interference in a residential installation. This equipment generates, uses, and can radiate radio frequency energy and, if not installed and used in accordance with the instructions, may cause harmful interference to radio communications. However, there is no guarantee that interference will not occur in a particular installation. If this equipment does cause harmful interference to radio or television reception, which can be determined by turning the equipment off and on, the user is encouraged to try to correct the interference by one or more of the following measures:
–Reorient or relocate the receiving antenna.
–Increase the separation between the equipment and receiver.
–Connect the equipment into an outlet on a circuit different from that to which the receiver is connected.
–Consult the dealer or an experienced radio/TV technician for help.
Caution:
Changes or modifications not approved by JVC could void the user’s authority to operate the equipment.
IMPORTANT FOR LASER PRODUCTS
1.CLASS 1 LASER PRODUCT
2.CAUTION: Do not open the top cover. There are no user serviceable parts inside the unit; leave
all servicing to qualified service personnel.
3.CAUTION: (For U.S.A.) Visible and/or invisible class II laser radiation when open. Do not stare into beam.
(For Canada) Visible and/or invisible class 1M laser radiation when open. Do not view directly with optical instruments.
4.REPRODUCTION OF LABEL: CAUTION LABEL, PLACED OUTSIDE THE UNIT.
[European Union only]
Caution:
Adjust the volume so that you can hear sounds outside the car. Driving with the volume too high may cause an accident.
2ENGLISH
WARNING:
Stop the car before operating the unit.
Caution on volume setting:
Digital devices (CD/USB) produce very little noise compared with other sources. Lower the volume before playing these digital sources to avoid damaging the speakers by the sudden increase of the output level.
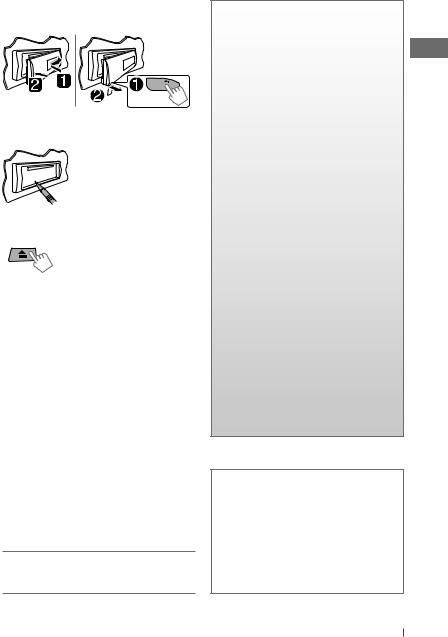
How to attach/detach the control panel
How to reset your unit
Your preset adjustments will also be erased.
How to forcibly eject a disc
[Hold]
•Be careful not to drop the disc when it ejects.
•If this does not work, reset your unit.
Maintenance
Cleaning the unit
Wipe off the dirt on the panel with a dry silicon or soft cloth. Failure to observe this precaution may result in damage to the unit.
Cleaning the connector
Wipe off dirt on the connector of the unit and panel. Use a cotton swab or cloth.
Caution for DualDisc playback:
The Non-DVD side of a “DualDisc” does not comply with the “Compact Disc Digital Audio” standard. Therefore, the use of Non-DVD side of a DualDisc on this product may not be recommended.
JVC bears no responsibility for any loss of data in an iPod/iPhone and/or USB mass storage class device while using this System.
CONTENTS
3How to attach/detach the control panel
3How to reset your unit
3How to forcibly eject a disc
3Maintenance
4Canceling the display demonstration
4Setting the clock
5Preparing the remote controller
5About discs
6Basic operations
7 Listening to the radio
8Listening to a disc
9Connecting the other external components
9Listening to the other external components
10Listening to a USB device
11Listening to an iPod/iPhone
(Available for KD-R528/KD-A525/KD-R520)
12Selecting a preset sound mode
13Menu operations
16 Troubleshooting
18Using Bluetooth® devices
19Specifications
Condensation : When the car is airconditioned, moisture may collect on the laser lens. This may cause disc read errors. In this case, remove the disc and wait for the moisture to evaporate.
Temperature inside the car : If you have parked the car for a long time in hot or cold weather, wait until the temperature in the car becomes normal before operating the unit.
ENGLISH 3
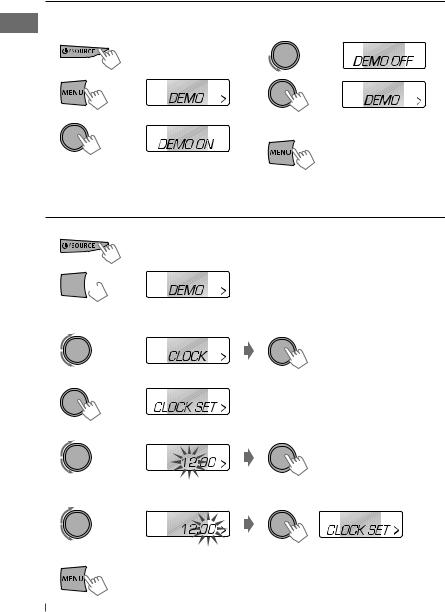
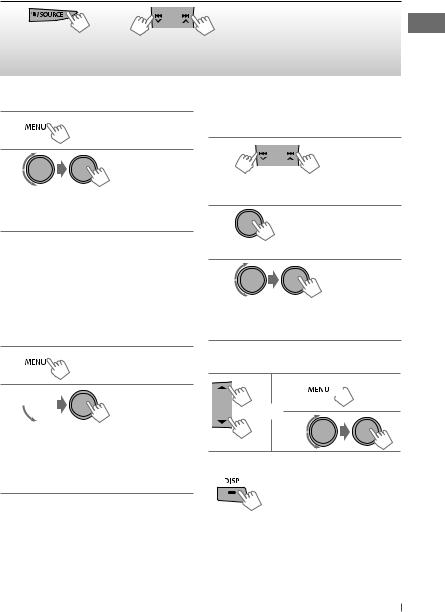
Canceling the display demonstration
Display demonstration will be activated automatically if no operation is done for about 20 seconds.
1 |
Turn on the power. |
4 |
Select <DEMO OFF>. |
2 |
[Hold] |
5 |
|
|
(Initial setting) |
|
|
3 |
|
6 |
Finish the procedure. |
(Initial setting)
Setting the clock
1 Turn on the power.
2 

 [Hold]
(Initial setting)
3 Select <CLOCK>.
4 Select <CLOCK SET>.
5 Adjust the hour.
(Initial setting)
6 Adjust the minute.
7 Finish the procedure.
4ENGLISH
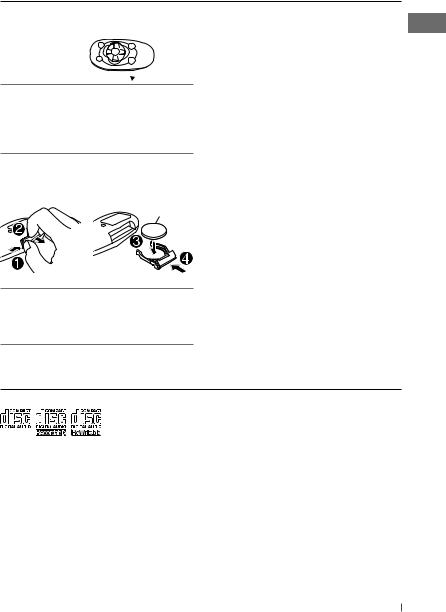
Preparing the remote controller
When you use the remote controller for the first time, pull out the insulation sheet.
Insulation sheet 

For USA-California Only:
This product contains a CR Coin Cell Lithium Battery which contains Perchlorate Material— special handling may apply. See www.dtsc. ca.gov/hazardouswaste/perchlorate
If the effectiveness of the remote controller decreases, replace the battery.
Replacing the lithium coin battery
CR2025
KD-R528/KD-A525/KD-R428 is equipped with the steering wheel remote control function.
•For details, refer also to the instructions supplied with the remote adapter.
Caution:
•Danger of explosion if battery is incorrectly replaced. Replace only with the same or equivalent type.
•Battery shall not be exposed to excessive heat such as sunshine, fire, or the like.
Warning (to prevent accidents and damage):
•Do not install any battery other than CR2025 or its equivalent.
•Do not leave the remote controller in a place (such as dashboards) exposed to direct sunlight for a long time.
•Store the battery in a place where children cannot reach.
•Do not recharge, short, disassemble, heat the battery, or dispose of it in a fire.
•Do not leave the battery with other metallic materials.
•Do not poke the battery with tweezers or similar tools.
•Wrap the battery with tape and insulate when throwing away or saving it.
About discs
This unit can only play the CDs with:
Discs that cannot be used:
•Discs that are not round.
•Discs with coloring on the recording surface or discs that are dirty.
•You cannot play a Recordable/ReWritable disc that has not been finalized. (For the finalization process refer to your disc writing software, and your disc recorder instruction manual.)
•3-inch CD cannot be used. Attempt to insert using an adapter can cause malfunction.
Handling discs:
•Do not touch the recording surface of the disc.
•Do not stick tape etc. on the disc, or use a disc with tape stuck on it.
•Do not use any accessories for the disc.
•Clean from the center of the disc and move outward.
•Clean the disc with a dry silicon or soft cloth. Do not use any solvents.
•When removing discs from this unit, pull them out horizontally.
•Remove the rims from the center hole and disc edge before inserting a disc.
ENGLISH 5
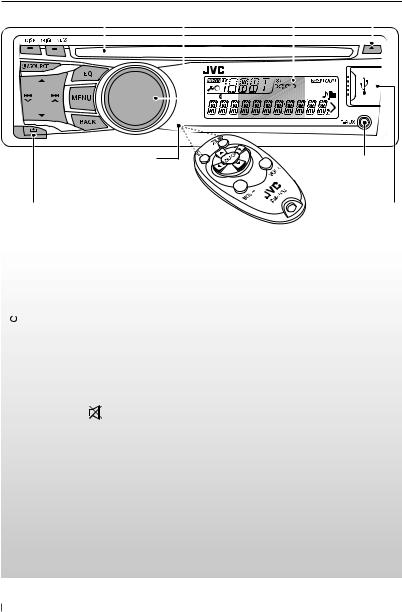
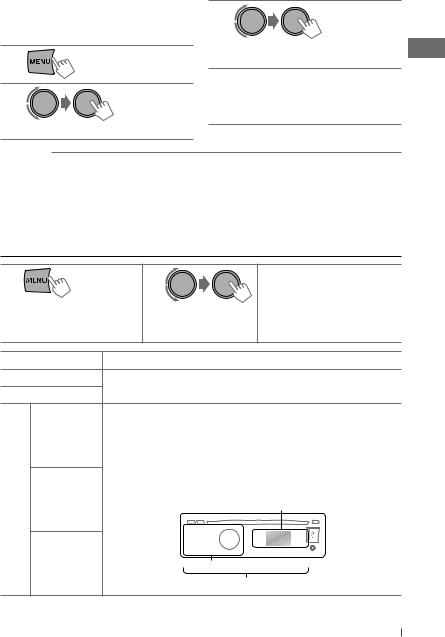
Basic operations
|
Loading slot |
Control dial |
Display window |
Ejects the disc |
||||||||
|
||||||||||||
|
|
|
|
|
|
|
|
|
|
|
|
|
|
|
|
|
|
|
|
|
|
|
|
|
|
|
|
|
|
|
|
|
|
|
|
|
|
|
|
|
|
|
|
|
|
|
|
|
|
|
|
|
|
|
|
|
|
|
|
|
|
|
|
|
|
|
|
|
|
|
|
|
|
|
|
|
|
Remote sensor
• DO NOT expose to bright sunlight.
Detaches the panel
Front auxiliary input jack
USB (Universal Serial Bus) input terminal
When you press or hold the following button(s)...
|
Main unit |
Remote |
General operation |
|
controller |
||
|
|
|
|
|
|
— |
• Turns on. |
|
|
• Turns off [Hold]. |
|
|
|
|
|
|
/ SOURCE |
|
Selects the sources (FM, CD, USB or USB-IPOD, F-AUX, BT AUDIO or |
|
|
||
|
SOURCE |
R-AUX or BT PHONE, AM). |
|
|
|
||
|
|
• “CD” or “USB” is selectable only when a disc is loaded or a USB |
|
|
|
|
|
|
|
|
device is connected. |
Control dial |
VOL – / + |
Adjusts the volume level. |
|
|
(turn) |
— |
Selects items. |
|
|
|
Mutes the sound during playback. If the source is “CD” or “USB/ |
Control dial |
|
USB-IPOD” playback pauses. |
|
|
(press) |
|
• Press the button again to cancel muting or resume playback. |
|
|
— |
Confirms selection. |
|
|
|
Selects the sound mode. |
|
EQ |
SOUND |
• Hold the EQ button on the main unit to enter tone level |
|
|
|
adjustment directly. (page 12) |
BRIGHTNESS |
— |
Enters <BRIGHTNESS> menu directly. (page 14) |
|
|
|
|
• Selects the controlling terminal of an iPod/iPhone* [Hold]. (page 11) |
|
BACK |
— |
• Returns to the previous menu. |
|
|
|
• Exit from the menu [Hold]. |
|
DISP |
— |
• Changes the display information. |
|
• Scrolls the display information [Hold]. |
||
|
|
|
|
* For KD-R528/KD-A525/KD-R520. |
|
||
6ENGLISH
Listening to the radio
~ |
|
Ÿ |
• [Press] Searches for stations automatically. |
|
• [Hold] Searches for stations manually. |
||
|
|
|
|
|
] “FM” or “AM” |
|
“M” flashes, then press the button |
|
|
repeatedly. |
|
|
|
|
“ST” lights up when receiving an FM stereo broadcast with sufficient signal strength.
Improving the FM reception
1 
[Hold]
2
] <TUNER> ] <MONO> ] <MONO ON> Reception improves, but stereo effect will be lost.
To restore the stereo effect, repeat the same procedure to select <MONO OFF>.
Automatic presetting (FM)—
SSM (Strong-station Sequential Memory)
You can preset up to 18 stations for FM.
While listening to a station...
1 
[Hold]
2 
] <TUNER> ] <SSM> ] <SSM 01 – 06 / 07 – 12 / 13 – 18>
“SSM” flashes and local stations with the strongest signal are searched and stored automatically.
To preset another 6 stations, repeat the above procedure by selecting one of the other SSM setting ranges.
Manual presetting (FM/AM)
You can preset up to 18 stations for FM and 6 stations for AM.
1
] Tune in to a station you want to preset.
2
[Hold]
“PRESET MODE” flashes.
3
] Selects preset number.
Preset number flashes and “MEMORY” appears.
Selecting a preset station
1 
or 2
Changing the display information
Frequency j Clock
Using the remote controller
5/∞ : Changes the preset stations.
2/3 : [Press] Searches for stations automatically.
[Hold] Searches for stations manually.
ENGLISH 7
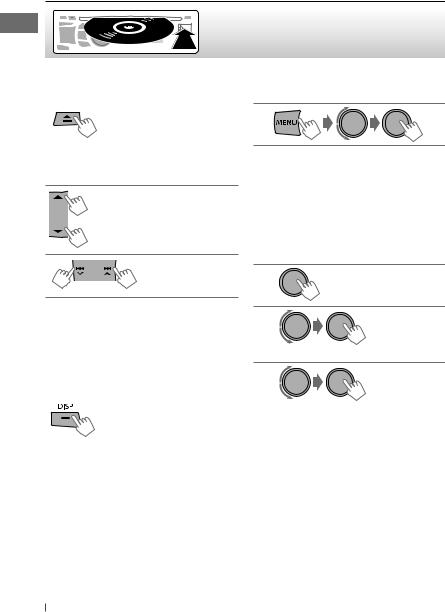
Listening to a disc
Playback starts automatically.
All tracks will be played repeatedly until you change the source or eject the disc.
Stopping playback and ejecting the disc
If the ejected disc is not removed within 15 seconds, it is automatically inserted into the loading slot.
Basic operations
Selects folder of the MP3/WMA.
[Press]Selects track. [Hold] Fast-forwards or reverses the track.
Using the remote controller
5/∞ : Selects folder of the MP3/WMA.
2/3 : [Press] Selects track.
[Hold] Fast-forwards or reverses the track.
Changing the display information
Disc title/Album name/performer (folder name)* = Track title (file name)* = Current track number with the elapsed playing time = Current track number with the clock time = (back to the beginning)
*“NO NAME” appears for conventional CDs or if not recorded.
Selecting a track/folder from the list
•If the MP3/WMA disc contains many tracks, you can fast search (±10, ±100) through the disc by turning the control dial quickly.
•To return to the previous menu, press BACK.
Selecting the playback modes
You can use only one of the following playback modes at a time.
1
[Hold]
2
] “REPEAT” j “RANDOM”
3
REPEAT 
TRACK RPT : Repeats current track FOLDER RPT : Repeats current folder
RANDOM 
FOLDER RND : Randomly plays all tracks
|
of current folder, then |
|
tracks of next folders |
ALL RND |
: Randomly plays all tracks |
To cancel repeat play or random play, select “RPT OFF” or “RND OFF.”
8ENGLISH
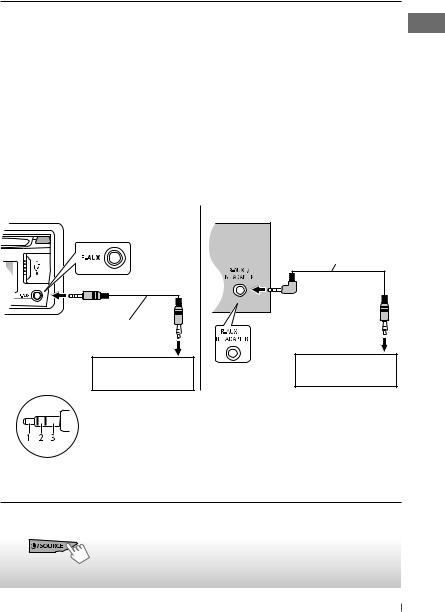
Connecting the other external components
You can connect an external component to the auxiliary input jack on the control panel (F-AUX) and/or on the rear side of the unit (R-AUX).
Summary of using the external components through the auxiliary input jacks:
|
Auxiliary |
Preparation |
Source |
Connecting |
|||
External component |
Menu setting |
Sub- |
|
cable/device |
|||
input jack |
Setting |
name |
|||||
|
|
item |
item |
|
|
(not supplied) |
|
Portable audio |
Front |
SRC SELECT |
F-AUX |
ON |
F-AUX |
See below. |
|
player |
Rear |
SRC SELECT |
R-AUX |
ON |
R-AUX |
||
|
|||||||
Bluetooth device |
Rear |
SRC SELECT |
R-AUX |
BT ADAPTER |
BT AUDIO/ |
KS-BTA100 |
|
|
|
|
|
|
BT PHONE* |
(page 18) |
|
* ”BT PHONE” appears when a Bluetooth phone is in use.
On the control panel (F-AUX): |
On the rear panel (R-AUX): |
3.5 mm (3/16”) stereo mini plug (with “L” shaped connector) (not supplied)
3.5 mm (3/16”) stereo mini plug |
|
(not supplied) |
|
Portable audio player, |
Portable audio player, |
etc. |
etc. |
Recommended to use a 3-terminal plug head stereo mini plug for optimum audio output.
Listening to the other external components
For details, refer also to the instructions supplied with the external components.
~ |
Ÿ Turn on the connected component and |
|
start playing the source. |
|
] “F-AUX” or “R-AUX” |
ENGLISH 9
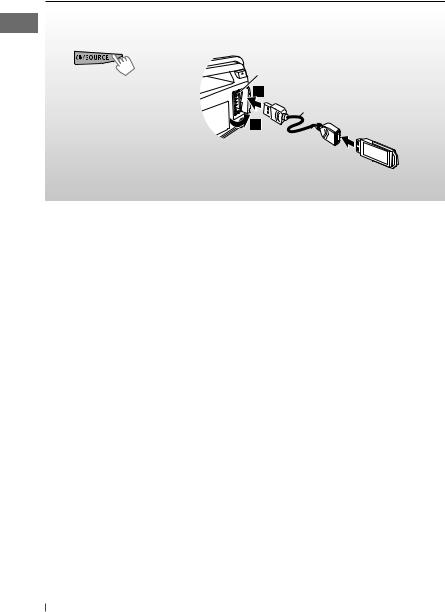
Listening to a USB device
You can operate the USB device in the same way you operate the files on a disc. (page 8)
•This unit can play MP3/WMA files stored in a USB mass storage class device (such as a USB memory, Digital Audio Player, etc.).
~ |
Ÿ |
USB input terminal
] Turn on the power.
USB cable (not supplied)
All tracks will be played repeatedly until you change the source or disconnect the USB device.
Cautions:
•Make sure all important data has been backed up.
•You cannot connect a computer or portable HDD to the USB input terminal of the unit.
•Avoid using the USB device if it might hinder your safety driving.
•Electrostatic shock at connecting a USB device may cause abnormal playback of the device.
In this case, disconnect the USB device then reset this unit and the USB device.
•Do not leave a USB device in the car, expose to direct sunlight, or high temperature to avoid deformation or cause damages to the device.
•This unit may not play back files in a USB device properly when using a USB extension cord.
•USB devices equipped with special functions such as data security functions cannot be used with the unit.
•When connecting a USB cable, use the USB 2.0 cable.
•Do not use a USB device with 2 or more partitions.
•Depending on the shape of the USB devices and connection ports, some USB devices may not be attached properly or the connection might be loose.
•This unit cannot recognize a USB device whose rating is other than 5 V and exceeds 500 mA.
•Do not pull out and attach the USB device repeatedly while “READING” is shown on the display.
•This unit may not recognize a memory card inserted into the USB card reader.
•Connect only one USB device to the unit at a time. Do not use a USB hub.
•Operation and power supply may not work as intended for some USB devices.
•The maximum number of characters for:
–Folder names : 63 characters
–File names : 63 characters
–MP3 Tag : 60 characters
–WMA Tag : 60 characters
•This unit can recognize a total of 65 025 files, 255 folders (255 files per folder including folder without unsupported files), and of 8 hierarchies.
10 ENGLISH
Listening to an iPod/iPhone
Available for KD-R528/KD-A525/KD-R520
~ |
Ÿ |
USB input terminal |
|
|
] Turn on the power.
USB 2.0 cable (accessory of the iPod/iPhone) 
Apple iPod/iPhone
All tracks will be played repeatedly until you change the source or disconnect the iPod/ iPhone.
Cautions:
•Avoid using the iPod/iPhone if it might hinder your safety driving.
•Make sure all important data has been backed up to avoid losing the data.
Selecting a track from the menu
Not applicable under <IPOD MODE / EXT MODE>.
1
Selecting the control terminal
[Hold]
] <HEAD MODE / IPOD MODE / EXT MODE>
•For details, see <IPOD SWITCH> setting on page 15.
Basic operations
Not applicable under <EXT MODE>.
[Press] Selects track/ chapter.
[Hold] Fast-forwards or reverses the track.
Using the remote controller
2/3 : [Press] Selects track/chapter. [Hold] Fast-forwards or reverses the
track.
2
] Select the desired menu. PLAYLISTS j ARTISTS j ALBUMS
j SONGS j PODCASTS j GENRES j COMPOSERS j (back to the beginning)
3
] Select the desired track.
Repeat this step until the desired track is selected.
•If the selected menu contains many tracks, you can fast search (±10, ±100, ±1 000, ±10 000) through the menu by turning the control dial quickly.
•To return to the previous menu, press BACK.
Continued...
ENGLISH 11
Selecting the playback modes
•You can use only one of the following playback modes at a time.
•Not applicable under <IPOD MODE / EXT MODE>.
1
[Hold]
2
] “REPEAT” j “RANDOM”
3
REPEAT 
ONE RPT : Functions the same as “Repeat One” of the iPod
ALL RPT : Functions the same as “Repeat All” of the iPod
RANDOM 
ALBUM RND : Functions the same as “Shuffle Albums” of the iPod
SONG RND : Functions the same as “Shuffle Songs” of the iPod
•To cancel random play, select “RND OFF.”
•“ALBUM RND” is not available for some iPod/ iPhone.
•To return to the previous menu, press BACK.
Changing the display information
Album name/performer = Track title = Current track number with the elapsed playing time = Current track number with the clock time = (back to the beginning)
Additional information
•Made for
iPod touch (1st, 2nd, and 3rd generation) iPod classic
iPod with video*
iPod nano (1st*, 2nd, 3rd, 4th, and 5th generation) iPhone 4
iPhone 3GS iPhone 3G iPhone
* <IPOD MODE / EXT MODE> are not available.
•Update iPod/iPhone software to the latest version. For details, visit <http://www.apple.com>.
•It is not possible to browse video files on the “Videos” menu in <HEAD MODE>.
•The song order displayed on the selection menu of this unit may differ from that of the iPod.
•When operating an iPod/iPhone, some operations may not be performed correctly or as intended. In this case, visit the following JVC web site: <http://www. jvc.co.jp/english/car/> (English website only).
Selecting a preset sound mode
You can select a preset sound mode suitable for the music genre.
FLAT = NATURAL = DYNAMIC = VOCAL BOOST = BASS BOOST = USER =
(back to the beginning)
While listening, you can adjust the subwoofer level and tone level of the selected sound mode.
12 ENGLISH
1
[Hold]
2
Adjust the level:
SUB.W * : 00 to 08
BASS/ MID/ TRE : –06 to +06
The sound mode is automatically stored and changed to “USER.”
*Subwoofer level is adjustable only when <L/O MODE> is set to <SUB.W>. (page 14)
Storing your own sound mode
You can store your own adjustments in memory.
1
[Hold]
2
] <PRO EQ> ] <BASS/ MIDDLE/ TREBLE>
3
Adjust the sound elements (see table below) of the selected tone.
4Repeat steps 2 and 3 to adjust other tones.
The adjustments made is automatically stored and changed to “USER.”
Frequency / Level / Q [Initial: Underlined]
BASS |
60/ 80/ 100/ 200 Hz |
–06 to +06 [ 00 ] |
Q1.0/ 1.25/ 1.5/ 2.0 |
MIDDLE |
0.5/ 1.0/ 1.5/ 2.5 kHz |
–06 to +06 [ 00 ] |
Q0.75/ 1.0/ 1.25 |
TREBLE |
10.0/ 12.5/ 15.0/ 17.5 kHz |
–06 to +06 [ 00 ] |
Q FIX |
Menu operations
1 |
2 |
|
[Hold] |
If no operation is done for about 60 seconds, the
operation will be canceled.
3Repeat step 2 if necessary.
•To return to the previous menu, press BACK.
•To exit from the menu, press
DISP or MENU.
Menu item
DEMO
CLOCK
BUTTON ZONE
DISP ZONE
COLOR*1
ALL ZONE
Selectable setting, [Initial: Underlined]
For settings, see page 4.
29 preset colors / USER / COLORFLOW 01/02/03 : Selects your preferred color for buttons illumination (except for DISP / BRIGHTNESS / 0) and display color separately.
•If <ALL ZONE> is selected, the button and display illumination will change to the current/selected <BUTTON ZONE> color.
•Initial color : BUTTON ZONE [ 06 ], DISP ZONE [ 01 ], ALL ZONE [ 06 ]
Display zone
Button zone
All zone
*1 For KD-R528.
Continued...
ENGLISH 13

|
|
|
Menu item |
|
Selectable setting, [Initial: Underlined] |
||
|
|
|
|
DAY |
BUTTON ZONE |
You can create your own day and night colors for <BUTTON ZONE> |
|
|
|
|
|
COLOR *3 |
|
|
and <DISP ZONE> separately. |
|
*2 |
|
|
DISP ZONE |
|
Perform step 2 to select a primary color (RED/ GREEN/ BLUE), |
|
|
|
SETUP |
|
|
|
|
then adjust the level [00 — 31]. Repeat this procedure until you |
|
|
|
NIGHT |
BUTTON ZONE |
|
||
|
|
|
|
have adjusted all the three primary colors. |
|||
|
|
COLOR |
|
COLOR *4 |
|
|
• If “00” is selected for all the primary colors for <DISP ZONE>, |
|
|
|
DISP ZONE |
|
|||
|
|
|
|
|
|||
|
|
|
|
|
|
||
|
|
|
|
|
|
nothing appear on the display. |
|
|
|
|
|
|
|
|
|
|
|
|
|
|
|
|
|
|
|
|
|
MENU COLOR |
ON : Changes the display and buttons (except for DISP / BRIGHTNESS / 0) |
||
|
|
|
|
|
illumination during menu, list search and playback mode operations. / OFF : Cancels. |
||
|
|
|
|
|
|
|
|
|
|
DIMMER |
|
DIMMER SET |
AUTO : Dims the display to the previous setting when you turn on the car headlights.*5 / |
||
|
|
|
|
ON : Dims the display and button illumination. / OFF : Cancels. |
|||
|
|
|
|
|
|||
|
|
|
|
BRIGHTNESS |
DAY [ 31 ] / NIGHT [ 15 ] : Selects the display and button illumination brightness |
||
|
|
|
|
|
level [00 — 31] for day and night. |
||
|
|
|
|
|
|
|
|
|
|
DISPLAY |
|
SCROLL *6 |
ONCE : Scrolls the displayed information once. / AUTO : Repeats scrolling (at 5-second |
||
|
|
|
|
intervals). / OFF : Cancels. |
|||
|
|
|
|
|
|||
|
|
|
|
|
(Pressing DISP for more than one second can scroll the display regardless of the setting.) |
||
|
|
|
|
|
|
|
|
|
|
|
|
TAG DISPLAY |
ON : Shows the Tag information while playing MP3/WMA tracks. / OFF : Cancels. |
||
|
|
|
|
|
|
||
|
|
PRO EQ |
For settings, see page 13. |
||||
|
|
|
|
|
|
|
|
|
|
|
|
FADER *7, *8 |
R06 — F06 [ 00 ] : Adjusts the front and rear speaker output balance. |
||
|
|
|
|
BALANCE *8 |
L06 — R06 [ 00 ] : Adjusts the left and right speaker output balance. |
||
|
|
|
|
LOUD |
ON : Boost low and high frequencies to produce a well-balanced sound at a low volume |
||
|
|
|
|
|
level. / OFF : Cancels. |
||
|
|
AUDIO |
|
VOL ADJUST |
–05 — +05 [ 00 ] : Presets the volume adjustment level of each source (except |
||
|
|
|
|
“FM”), compared to the FM volume level. The volume level will automatically increase or |
|||
|
|
|
|
decrease when you change the source. Before adjustment, select the source you want to |
|||
|
|
|
|
|
adjust. (“VOL ADJ FIX” appears on the display if “FM” is selected as the source.) |
||
|
|
|
|
L/O MODE *9 |
SUB.W : Selects if the REAR/SW terminals are used for connecting a subwoofer (through |
||
|
|
|
|
|
an external amplifier). / REAR : Selects if the REAR/SW terminals are used for connecting |
||
|
|
|
|
|
the speakers (through an external amplifier). |
||
|
|
|
|
SUB.W |
(For KD-A525) ON : Turns on the subwoofer output. / OFF : Cancels. |
||
*2 For KD-R528.
*3 Displayed only when <DIMMER> is set to <OFF>. *4 Displayed only when <DIMMER> is set to <ON>.
*5 The illumination control lead connection is required. (See “Installation/Connection Manual.”) This setting may not work correctly on some vehicles (particularly on those having a control dial for dimming). In this case, change the setting to any other than <DIMMER AUTO>.
*6 Some characters or symbols will not be shown correctly (or will be blanked) on the display. *7 If you are using a two-speaker system, set the fader level to “00.”
*8 This adjustment will not affect the subwoofer output. *9 For KD-R528/KD-R520/KD-R428/KD-R420.
14 ENGLISH

|
Menu item |
Selectable setting, [Initial: Underlined] |
|
|
|
|
|
|
SUB.W LPF*10 |
LOW 55Hz / LOW 85Hz / LOW 120Hz : Frequencies lower than |
|
||
|
|
|
55 Hz/85 Hz/120 Hz are sent to the subwoofer. |
|
||
|
|
|
|
|||
|
|
|
|
|
|
|
|
|
SUB.W LEVEL*10 |
00 — 08 [ 04 ] : Adjusts the subwoofer output level. |
|
|
|
|
|
|||||
|
|
HPF |
ON : Activates the High Pass Filter. The unit selects the cutoff frequency to the rear |
|
||
AUDIO |
|
|
speakers. / OFF : Deactivates (all signals are sent to the rear speakers). |
|
|
|
|
BEEP |
ON / OFF : Activates or deactivates the keypress tone. |
|
|
||
|
|
|
||||
|
|
TEL MUTING*11 |
ON : Mutes the sounds while using the cellular phone (not connected through |
|
||
|
|
|
KS-BTA100). / OFF : Cancels. |
|
||
|
|
|
|
|
|
|
|
|
AMP GAIN*12 |
LOW POWER : VOLUME 00 – VOLUME 30 (Selects if the maximum power |
|
||
|
|
|
of each speaker is less than 50 W to prevent damaging the speakers.) / |
|
||
|
|
|
HIGH POWER : VOLUME 00 – VOLUME 50 |
|
||
|
|
|
|
|
|
|
|
|
SSM |
Displayed only when the source is “FM.” For settings, see page 7. |
|
||
|
|
|
|
|
|
|
|
|
AREA |
US : When using in North/Central/South America. AM/FM intervals are set to |
|
||
|
|
|
10 kHz/200 kHz. / EU : When using in any other areas. AM/FM intervals are set to |
|
||
TUNER |
|
MONO |
9 kHz/50 kHz (50 kHz during auto search). / SA : When using in South American |
|
||
|
Displayed only when the source is “FM.” For settings, see page 7. |
|
||||
|
|
|
countries where FM interval is 50 kHz. AM interval is set to 10 kHz. |
|
||
|
|
|
|
|
|
|
|
|
IF BAND |
AUTO : Increases the tuner selectivity to reduce interference noises between adjacent |
|
||
|
|
|
stations. (Stereo effect may be lost.) / WIDE : Subject to interference noises from |
|
||
|
|
|
adjacent stations, but sound quality will not be degraded and the stereo effect will |
|
||
|
|
|
remain. |
|
||
|
|
|
|
|
||
IPOD SWITCH*13 |
HEAD MODE : Controls iPod playback through the unit. / IPOD MODE : Controls |
|
||||
|
|
|
iPod playback through the iPod/iPhone. / EXT MODE : The sound of any functions |
|
||
|
|
|
(musics, games, applications, etc.) running on the connected iPod/iPhone is emitted |
|
||
|
|
|
through the speakers connected to this unit. The display always show “EXT MODE.” |
|
||
|
|
|
|
|
|
|
SELECT |
|
AM*14 |
ON / OFF : Enable or disable “AM” in source selection. |
|
|
|
|
R-AUX*14 |
ON / OFF : Enable or disable “R-AUX” in source selection. / BT ADAPTER : Selects if |
|
|||
|
|
F-AUX*14 |
ON / OFF : Enable or disable “F-AUX” in source selection. |
|
|
|
SRC |
|
|
the rear auxiliary input jack is connected to the Bluetooth adapter, KS-BTA100. (page 9) |
|
||
|
|
|
|
|||
|
|
|
The source name changed to “BT AUDIO.” |
|
||
|
|
|
|
|
|
|
*10 For KD-R528/KD-R520/KD-R428/KD-R420: Displayed only when <L/O MODE> is set to <SUB.W>. *11 This setting does not work if <BT ADAPTER> is selected for <R-AUX> of the <SRC SELECT>.
*12 The volume level automatically changes to “VOLUME 30” if you change to <LOW POWER> with the volume level set higher than “VOLUME 30.”
*13 For KD-R528/KD-A525/KD-R520: Displayed only when “USB-IPOD” is selected.
*14 Displayed only when any source other than “AM/ F-AUX/ R-AUX/ BT AUDIO” is selected separately.
ENGLISH 15

Troubleshooting
|
|
|
Symptom |
Remedy/Cause |
|
|
|
||
|
|
|
|
|
|
|
|
Sound cannot be heard from the |
Adjust the volume to the optimum level. / Make sure the unit is not |
|
|
|
speakers. |
muted/paused. (page 6) / Check the cords and connections. |
|
|
|
“MISWIRING CHK WIRING THEN RESET |
Check to be sure the terminals of the speaker leads are covered with |
|
|
|
UNIT” appears on the display and no |
insulating tape properly, then reset the unit. (page 3) |
|
|
|
operations can be done. |
If the message does not disappear, consult your JVC car audio dealer |
|
|
General |
|
or a company supplying kits. |
|
|
The unit does not work at all. |
Reset the unit. (page 3) |
|
|
|
|
||
|
|
|
“F-AUX” or “R-AUX” cannot be selected. |
Check the <SRC SELECT> = <F-AUX / R-AUX> setting. (page 15) |
|
|
|
Sound is sometimes interrupted while |
Check to be sure the recommended stereo mini plug is used for |
|
|
|
listening to an external component |
connection. (page 9) |
|
|
|
connected to the auxiliary input jack. |
|
|
|
|
The correct characters are not displayed |
This unit can only display letters (upper case), numbers, and a |
|
|
|
(e.g. album name). |
limited number of symbols. |
|
|
FM/AM |
SSM automatic presetting does not |
Store stations manually. |
|
|
work. |
|
|
|
|
|
|
|
|
|
|
Static noise while listening to the radio. |
Connect the antenna firmly. |
|
|
|
“AM” cannot be selected. |
Check the <SRC SELECT> = <AM> setting. (page 15) |
|
|
|
Disc cannot be played back. |
Insert the disc correctly. |
|
|
|
CD-R/CD-RW cannot be played back |
Insert a finalized CD-R/CD-RW (finalize with the component which |
|
|
playback |
and track cannot be skipped. |
you used for recording). |
|
|
Disc sound is sometimes interrupted. |
Stop playback while driving on rough roads. / Change the disc. / |
|
|
|
|
||
|
|
|
|
Check the cords and connections. |
|
|
Disc |
“NO DISC” appears on the display. |
Insert a playable disc into the loading slot. |
|
|
“PLEASE” and “EJECT“ appear |
Press 0, then insert a disc correctly. |
|
|
|
|
alternately on the display. |
|
|
|
|
“IN DISC” appears on the display. |
The disc cannot be ejected properly. Make sure nothing is blocking |
|
|
|
|
the loading slot. |
|
|
|
Disc cannot be played back. |
Use a disc with MP3/WMA tracks recorded in a format compliant |
|
|
playback |
|
with ISO 9660 Level 1, Level 2, Romeo, or Joliet. / Add the extension |
|
|
|
code <.mp3> or <.wma> to the file names. |
|
|
|
|
|
|
|
|
|
Noise is generated. |
Skip to another track or change the disc. |
|
|
MP3/WMA |
“READING” keeps flashing on the |
A longer readout time is required. Do not use too many hierarchical |
|
|
have intended them to play. |
levels and folders. |
|
|
|
|
display. |
|
|
|
|
Tracks do not play back in the order you |
The playback order is determined when the files are recorded. |
|
|
|
|
|
|
|
|
The elapsed playing time is not correct. |
This sometimes occurs during playback. This is caused by how the |
|
|
|
|
tracks are recorded on the disc. |
|
|
USB playback |
“READING” keeps flashing on the |
A longer readout time is required. Do not use too many hierarchical |
|
|
display. |
USB device again. |
|
|
|
|
levels and folders. / Turn off the power then on again. / Reattach the |
|
|
|
|
|
|
16 |
|
ENGLISH |
|
|
|
|
|||

USB playback
iPod/iPhone playback (For KD-R528/KD-A525/KD-R520)
|
Symptom |
Remedy/Cause |
|
|
||
|
“NO FILE” appears on the display. |
Check whether the device contains playable files. |
|
|
||
|
|
|||||
|
Noise is generated. |
Skip to another file. |
|
|
||
|
||||||
|
“NOT SUPPORT” appears and track skips. |
Check whether the track is a playable file format. |
|
|
||
|
||||||
|
Tracks/folders are not played back in the |
The playback order is determined by the file name. Folders with |
|
|||
|
order you have intended. |
numbers on the initial of their names are sorted in numerical order. |
|
|||
|
|
However, folders with no numbers on the initial of their names are |
|
|||
|
|
sorted according to the file system of the USB device. |
|
|
||
|
“CANNOT PLAY” flashes on the display. / |
Check whether the connected USB device is compatible with this |
|
|||
|
“NO USB” appears on the display. / The |
unit. / Reattach the USB device again. |
|
|||
|
unit cannot detect the USB device. |
|
|
|
|
|
|
While playing a track, sound is |
The tracks have not been properly copied into the USB device. Copy |
|
|||
|
sometimes interrupted. |
tracks again into the USB device, and try again. |
|
|||
|
The iPod does not turn on or does not |
Check the connecting cable and its connection. / Update the |
|
|||
|
work. |
firmware version of the iPod/iPhone. / Charge the battery of |
|
|||
|
|
the iPod/iPhone. / Reset the iPod/iPhone. / Check whether |
|
|||
|
|
<IPOD SWITCH> setting is appropriate. (page 15) |
|
|
||
|
The sound is distorted. |
Deactivate the equalizer either on this unit or the iPod/iPhone. |
|
|
||
|
Noise is generated. |
Turn off (uncheck) the “VoiceOver” feature of the iPod. For details, |
|
|||
|
|
visit <http://www.apple.com>. |
|
|
||
|
Playback stops. |
The headphones are disconnected during playback. Restart the |
|
|||
|
|
playback operation. (page 11) |
|
|
||
|
“NO FILE” appears on the display. |
Check whether the device contains playable files. |
|
|
||
|
“RESTRICTED” appears on the display. |
Check whether the connected iPod/iPhone is compatible with this |
|
|||
|
|
unit. (page 12) |
|
|||
|
|
|
|
|
|
|
Additional information
• This unit can play back multi-session discs; however, |
• This unit can play back files recorded in VBR (variable |
unclosed sessions will be skipped while playing. |
bit rate). (Files recorded in VBR have a discrepancy in |
• This unit can play back files with the extension code |
elapsed time indication.) |
<.mp3> or <.wma> (regardless of the letter |
• The maximum number of characters for file/folder |
case—upper/lower). |
names vary depending on the disc format used (includes |
• This unit can play back the files meeting the conditions |
4 extension characters—<.mp3> or <.wma>). |
below: |
ISO 9660 Level 1 and 2, Romeo: 64 characters, Joliet: |
– Bit rate: MP3/WMA: 8 kbps — 320 kbps |
32 characters, Windows long file name: 64 characters |
– Sampling frequency: |
• This unit cannot play back the following files: |
MP3: 48 kHz, 44.1 kHz, 32 kHz, 24 kHz, 22.05 kHz, |
– MP3 files: encoded in MP3i and MP3 PRO format; an |
16 kHz, 12 kHz, 11.025 kHz, 8 kHz |
inappropriate format; layer 1/2. |
WMA: 48 kHz, 44.1 kHz, 32 kHz, 22.05 kHz |
– WMA files: encoded in lossless, professional, and |
• This unit can show WMA Tag and ID3 Tag Version |
voice format; not based upon Windows Media® |
1.0/1.1/2.2/2.3/2.4 (for MP3). |
Audio; copy-protected with DRM. |
• The search function works but search speed is not |
– Files which have data such as AIFF, ATRAC3, etc. |
constant. |
|
ENGLISH 17
 Loading...