


 Loading...
ENGLISH
VIDEO CASSETTE RECORDER
HR-S6960AA
INSTRUCTIONS
LPT0799-001A
CONTENTS |
|
SAFETY FIRST ............................................................................... |
1 |
Buttons, Connectors and Indicators ................................................ |
3 |
Basic Connections.......................................................................... |
4 |
Initial Settings .............................................................................. |
5 |
Video Channel Set.................................................................. |
5 |
Auto Set Up............................................................................ |
5 |
Clock setting........................................................................... |
6 |
Playback ...................................................................................... |
6 |
Recording..................................................................................... |
8 |
Timer Recording.......................................................................... |
10 |
G-CODETM/SHOWVIEWTM System Setup ................................... |
10 |
G-CODETM/SHOWVIEWTM Timer Programming ......................... |
11 |
Express Timer Programming.................................................. |
11 |
24H Express Timer Programming.......................................... |
12 |
Automatic Satellite Program Recording................................. |
13 |
Program Navigation.................................................................... |
14 |
Navigation............................................................................ |
14 |
Other functions........................................................................... |
15 |
Function Settings .................................................................. |
15 |
Special Features.......................................................................... |
17 |
Remote Control Functions .................................................... |
17 |
Tuner Setting .............................................................................. |
18 |
Editing ....................................................................................... |
20 |
Editing from a camcorder ..................................................... |
20 |
Edit to or from Another Video Recorder................................ |
20 |
System Connections .................................................................... |
21 |
Connecting/Using a Stereo System ....................................... |
21 |
Specifications.............................................................................. |
22 |
Information on Multi-System Compatibility................................... |
23 |
Troubleshooting .......................................................................... |
25 |
 SAFETY FIRST
Safety Precautions
The rating plate and the safety caution are on the rear of the unit.
WARNING: DANGEROUS VOLTAGE INSIDE
WARNING: TO PREVENT FIRE OR SHOCK HAZARD, DO NOT EXPOSE THIS UNIT TO RAIN OR MOISTURE.
CAUTION
When you are not using the recorder for a long period of time, it is recommended that you disconnect the power cord from the mains outlet.
Dangerous voltage inside. Refer internal servicing to qualified service personnel. To prevent electric shock or fire hazard, remove the power cord from the mains outlet prior to connecting or disconnecting any signal lead or aerial.
ATTENTION
1.This recorder can also receive SECAM colour television signals for recording and playback.
2.Recordings made of SECAM television signals produce monochrome pictures if played back on another video recorder of SECAM standard, or do not produce normal colour pictures if played back on another video recorder of PAL standard.
3.SECAM prerecorded cassettes or recordings made with a SECAM video recorder produce monochrome pictures when played back with this recorder.
IMPORTANT
Please read the various precautions on this page before installing or operating the recorder.
It should be noted that it may be unlawful to re-record prerecorded tapes, records, or discs without the consent of the owner of copyright in the sound or video recording, broadcast or cable programme and in any literary, dramatic, musical, or artistic work embodied therein.
Caution on Replaceable lithium battery
The battery used in this device may present a fire or chemical burn hazard if mistreated. Do not recharge, disassemble, heat above 100°C or incinerate.
Replace battery with Panasonic (Matsushita Electric), Sanyo, Sony or Maxell CR2025.
Danger of explosion or Risk of fire if the battery is incorrectly replaced.
Dispose of used battery promptly.
Keep away from children.
Do not disassemble and do not dispose of in fire.
●Cassettes marked “S-VHS” and “VHS” can be used with this video cassette recorder. However, S-VHS recordings are possible only with cassettes marked “S-VHS”.
By using the S-VHS ET function, it is possible to record and play back with S-VHS picture quality on VHS cassettes with this recorder.
●HQ VHS is compatible with existing VHS equipment.
●G-CODE is a trademark of Gemstar Development Corporation and is registered in the following countries and areas: Australia, China, Hong Kong, Japan, South Korea, New Zealand, and Taiwan. SHOWVIEW is a trademark of Gemstar Development Corporation and is registered in the following countries: Austria, Belgium,Czech Republic, Denmark, Finland, France, Germany, Greece, Hungary, Iceland, Italy, Luxembourg, Netherlands, Norway, Poland, Portugal, Russia, Slovakia, South Africa, Spain, Sweden and Switzerland. The G-CODE/SHOWVIEW system is manufactured under license from Gemstar Development Corporation.
G-CODE and SHOWVIEW are different trademarks used to represent the same easy recording feature. However, for simplicity, only the term G-CODE will be used in the instructions. If you use SHOWVIEW system, follow the same steps listed for the G-CODE system.
POWER SYSTEM
This set operates on voltage of AC110 V – 240 Vd (Rating), AC90 V – 260 Vd (Operating), 50 Hz/60 Hz with automatic switching.
The STANDBY/ON 1 button does not completely shut off mains power from the unit, but switches operating current on and off. “`” shows electrical power standby and “!” shows ON.
MOISTURE CONDENSATION
Moisture in the air will condense on the recorder when you move it from a cold place to a warm place, or under extremely humid conditions—just as water droplets form on the surface of a glass filled with cold liquid. Moisture condensation on the head drum will cause damage to the tape. In conditions where condensation may occur, keep the recorder turned on for a few hours to let the moisture dry.
ATTENTION
TO MOBILE PHONE USERS:
Using a mobile phone in the vicinity of the recorder may cause picture vibration on the TV screen or change the screen to a blue back display.
ON PLACING THE RECORDER:
Some TVs or other appliances generate strong magnetic fields. DO NOT place such appliance on top of the recorder as it may cause picture disturbance.
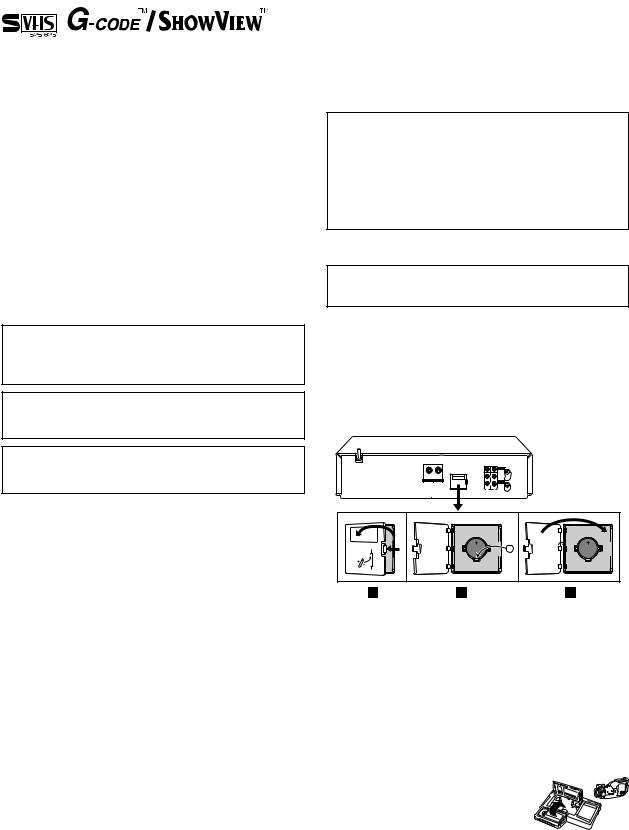
Installing/removing the lithium battery
Be sure to connect the power plug to an AC outlet first before installing the lithium battery; otherwise, the battery's service life will be drastically shortened.
AMake sure that the power plug is connected to an AC outlet and turn off the recorder power.
BOpen the battery cover while pressing the release tab as illustrated.
CInsert a lithium battery with the plus (+) side up and push it in.
●To remove the lithium battery, press the latch downward using a pointed non-metallic object, then pull out the lithium battery.
D Close the battery cover until it clicks in place.
Video tapes recorded with this video recorder in the LP (Long Play) or EP (Extended Play) mode cannot be played back on a single-speed video recorder.
When the equipment is installed in a cabinet or a shelf, make sure that it has sufficient space on all sides to allow for ventilation
(10 cm or more on both sides, on top and at the rear).
When discarding batteries, environmental problems must be considered and the local rules or laws governing the disposal of these batteries must be followed strictly.
Failure to heed the following precautions may result in damage to the recorder, remote control or video cassette.
1.DO NOT place the recorder …
…in an environment prone to extreme temperatures or humidity.
…in direct sunlight.
…in a dusty environment.
…in an environment where strong magnetic fields are generated.
…on a surface that is unstable or subject to vibration.
2.DO NOT block the recorder’s ventilation openings or holes. (If the ventilation openings or holes are blocked by a newspaper or cloth, etc., the heat may not be able to get out.)
3.DO NOT place heavy objects on the recorder or remote control.
4.DO NOT place anything which might spill on top of the recorder or remote control.
(If water or liquid is allowed to enter this equipment, fire or electric shock may be caused.)
5.DO NOT expose the apparatus to dripping or splashing.
6.DO NOT use this equipment in a bathroom or places with water. Also DO NOT place any containers filled with water or liquids (such as cosmetics or medicines, flower vases, potted plants, cups, etc.) on top of this unit.
7.DO NOT place any naked flame sources, such as lighted candles, on the apparatus.
8.AVOID violent shocks to the recorder during transport.
A |
Video heads cleaning
The heads get dirty in the following cases:
●in an environment prone to extreme temperature or humidity
●in a dusty environment
●flaw, dirt or mold on video tapes
●continuous usage for a long time
Use a dry cleaning cassette — TCL-2 — when:
●Rough, poor picture appears while a tape is played back.
●The picture is unclear or no picture appears.
●“USE CLEANING CASSETTE” appears on the screen (only with “O.S.D.” set to “ON” ( 16)).
Usable cassettes
● Compact VHS camcorder recordings can be played on this video recorder. Simply place the recorded cassette into a VHS Cassette Adapter and it can be used just like any full-sized VHS cassette.
●This video recorder can record on regular VHS and Super VHS cassettes. While only VHS signals can be recorded on regular VHS cassettes*, both VHS and Super VHS signals can be
recorded and played back using Super VHS cassettes.
*By using the S-VHS ET function, it is possible to record and play back with S-VHS picture quality on VHS cassettes with this recorder ( 16).
— 2 —

 Buttons, Connectors and Indicators
Front Panel
Infrared beam |
24H |
receiving window |
EXPRESS # |
1 Cassette loading slot |
Record 7 |
Advanced |
JOG dial |
S-VIDEO/VIDEO/ |
SP/LP/EP REC LINK Pause 9 Play 4 |
AUDIO input |
|
connectors |
S-VHS ET Stop/Eject 0 |
|
|
|
# |
Display panel |
|
|
Start Time |
|
|
indicator |
Stop Time indicator |
|
|
S-VHS |
|
|
|
|
Instant REVIEW indicator |
indicator |
“Timer” indicator |
|
|
|
Play indicator |
Channel/Clock/ |
|
|
Remain display |
|
Record indicator |
Mode display |
|
(L-1, L-2, F-1, |
||
|
||
|
S-1) |
Counter |
Tape speed |
display SP/LP/EP
To access covered connectors, pull and open the connector cover.
Rear Panel
Mains power cord
(MONO)
Lithium battery compartment
Remote control
|
|
CABLE/ |
VCR |
TV |
SAT/DVD |
number keys
Rewind |
Play 4 |
Record 7 |
Fast Forward |
|
|
Stop 8 |
Pause 9 |
Buttons with a small dot on the left side of the name can also be used to operate your TV ( 17).
On-screen display
If you press ENTER (OK ) on the remote control when “O.S.D.” is set to “ON” ( 16), you can see the current recorder status on the screen. To clear the on-screen display, press ENTER (OK ) again.
The indications are not recorded even if the recorder is in the recording mode.
A Operation mode indicators B Tape speed SP/LP/EP
C Colour system indicator ( 16) D Tape direction
E Counter display
F Tape remaining time indicator G Audio mode display ( 8)
H Tape position indicator ( 8) I Type of broadcast ( 10)
J Current day/month/year K Clock display
L Channel position number/Aux. indicator (L-1, F-1, S-1 or S-2) M Cassette loaded mark
NS-VHS ET indicator
(S-VHS ET: ON / S-VHS: OFF)
— 3 —
 Basic Connections
A Check contents
Make sure the package contains all of the accessories listed in “Specifications” ( 22).
B Situate recorder
Place the recorder on a stable, horizontal surface.
C Connect recorder to TV
Aerial terminal |
|
RF cable |
||||||||
|
|
|
|
|
|
|
|
|
|
(provided) |
|
|
|
|
|
|
|
|
|
|
|
|
|
|
|
|
|
|
|
|
|
|
|
|
|
|
|
|
|
|
|
|
|
|
|
|
|
|
|
|
|
|
|
|
|
|
|
|
|
|
|
|
|
|
|
|
|
|
|
|
|
|
|
|
|
|
|
|
|
|
|
|
|
|
|
|
|
|
|
|
|
|
|
|
|
|
|
|
|
|
|
|
|
|
|
|
|
|
|
Back of TV |
TV |
aerial |
|
|
cable |
AV-IN terminals |
AV cable |
|
(not provided) |
||
|
||
|
S-video cable |
|
|
(provided) |
Mains power cord
(MONO)
Back of recorder
Mains outlet S-VIDEO OUT |
AUDIO OUT/VIDEO OUT |
Connect the power plug to an AC outlet before installing the lithium battery. ( 2)
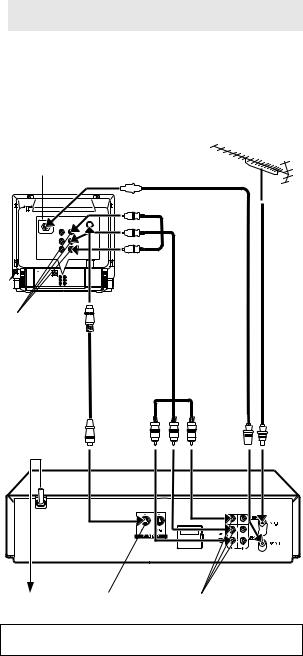
RF Connection
A Disconnect the TV aerial cable from the TV.
BConnect the TV aerial cable to the ANT. IN connector on the rear of the recorder.
CConnect the provided RF cable between the RF OUT connector on the rear of the recorder and the TV’s aerial connector.
AV Connection
If your TV is equipped with a AV Input Terminals connector, perform AV connection to improve picture quality during tape playback.
AConnect the aerial, recorder and TV as shown in the illustration.
BConnect an optional AV cable between the AUDIO OUT/ VIDEO OUT connector on the rear of the recorder and the AV-IN terminals.
S-video Connection
(allows you to make the most of the S-VHS picture performance.) If your TV is equipped with a S-video input connector
A Perform “RF Connection” previously described.
BConnect the supplied S-video cable between the S-VIDEO OUT connector on the rear of the recorder and the S-video input connector on the TV.
CConnect an audio cable between the AUDIO OUT connectors on the rear of the recorder and the audio input connectors on the TV.
●Even if you are using audio/video cables to connect your recorder to your TV, you must also connect it using the RF cable. This will ensure that you can record one show while watching another.
D Connect recorder to mains
Plug the mains power cord into a mains outlet.
— 4 —
 Initial Settings
Video Channel Set
Video channel (RF output channel) is the channel on which your TV receives picture and sound signals from the recorder through the RF cable. Before performing the following steps, make sure the recorder’s power is off and there is no cassette inserted in the recorder.
If you have connected the video recorder to your TV via the provided RF cable only (RF connection)...
A Hold down 0 on the recorder
until the display panel shows the following.
B Press PR + or – on the remote
control to set appropriate TV system that matches the system of TV being used (refer to the table
below).
1:B/G 2:D/K 3:I 4:H
Major Countries/Areas |
TV System |
|
|
New Zealand, Kuwait, U.A.E., Indonesia, |
|
Singapore, Thailand, Malaysia, Iran, Saudi |
B/G |
Arabia, Egypt, Morocco, Lebanon, Iraq |
|
|
|
China, Mongolia, Russia |
D/K |
|
|
Hong Kong |
I |
|
|
Australia |
H |
|
|
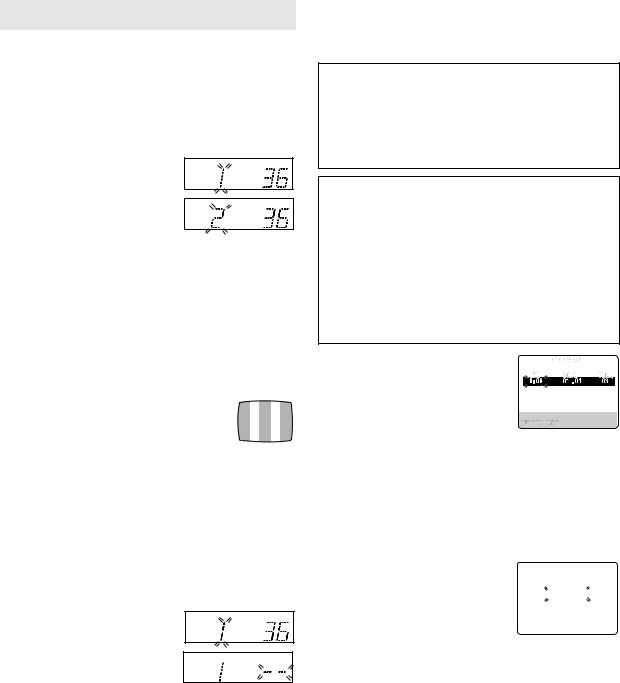
C Set your TV to UHF channel 36.
●If the two vertical white bars appear clearly on the screen as shown on the right, press OK and then go to step D.
●If the two vertical white bars do not appear clearly,
press OK and then PR + or – to set the recorder to a vacant channel between 28 and 60 which is not occupied by any local station in your area.
(Ex.) If channel 50 is available in your area...
Then set your TV to UHF channel 50 and check if the two vertical white bars appear clearly on the screen; if so, go to step D. If not, re-set the recorder to another vacant channel and try again.
D Press OK to finish video channel set.
If you have connected the video recorder to your TV via both the provided RF cable and an AV cable (AV connection) or via the provided RF cable, the provided S-Video cable and an Audio cable (S-VIDEO connection)...
A Hold down 0 on the recorder
until the display panel shows the following.
B Press OK, then press PR – until the
display panel shows the following. Now the video channel is set to off (– –).
C Press OK to finish video channel set.
●If Auto Set Up or Tuner Set has not previously been performed, the Language Select screen appears and Auto Set Up function takes place automatically.
Auto Set Up
The Auto Set Up function simplifies installation by guiding you through the procedures of setting the language, clock and tuner channels — simply follow the on-screen menus that appear.
Before starting, make sure of the following:
●The TV aerial cable should be connected to the recorder.
●The recorder's mains power cord should be connected to a mains outlet. ( 4)
●The “Video Channel Set” procedure should be done first and
the TV should be set to its AV mode (with AV or S-VIDEO connection ( 4)) or video channel (with RF connection ( 4)).
IMPORTANT
●Don't press any buttons on the recorder or remote that are not directly related to the step you are performing while Auto Set Up is in progress.
●If you perform Auto Set Up successfully during installation, there's no need to separately perform the Language Select, Clock Set or Channel Set procedures, but if adjustments
become necessary they can be performed as follows:
–To change the selected language ( 6)
–To reset or adjust the time ( 6)
–To add/delete channels manually ( 19)
–To reset the tuner after moving to a different location ( 18)
A Set time
Press PUSH JOG rt to set the time, then press OK or PUSH JOG e.
●Press and hold either button to delay or advance the time by 30 minutes.
[R/T] 

B Set date
Press PUSH JOG rtto set the date, then press OK or PUSH JOG e.
● Press and hold either button to change the date by 15 days.
C Set year
Press PUSH JOG rt to set the year, then press MENU.
D Select TV system
Press PUSH JOG rt to place the pointer next to the appropriate TV system (refer to the table on the left).
E Start auto channel set
Press OK or PUSH JOG e.
● Receivable channels in your area are automatically assigned to the PR +/–
buttons, and non-receivable channels START FINISH
are skipped.
■ ■ ■ ■ ■ ■ ■ ■ ■ ■ ■ ■ – – – – – – –
●When Auto Set Up is completed, the
lowest position number will appear on the front display panel. If “SCAN COMPLETED–NO SIGNAL–” is displayed on the screen, make sure that the aerial cable is connected to the recorder properly and press OK on the remote control. The recorder will try Auto Set Up again.
— 5 —
Clock setting
Turn on the TV and select the VIDEO channel or (AV mode).
A Access Main Menu screen, then Intial |
|
|
|
MAIN MENU |
|
Set screen |
PROGRAMME NAVIGATION |
|
|||
Press MENU on the Remote. Press PUSH |
FUNCTION SET |
|
|||
TUNER SET |
|
||||
INITIAL SET |
|
||||
JOG rt to place the pointer next to |
|
||||
|
|
|
|
|
|
“INITIAL SET”, then press OK or PUSH |
|
|
|
|
|
JOG e. |
[R/T] |
|
|
|
|
[MENU] : EXIT |
|
||||
B Access Clock Set screen |
|
|
|
INITIAL SET |
|
Press PUSH JOG rt to place the pointer |
|
|
|
|
|
CLOCK SET |
|
||||
next to “CLOCK SET”, then press OK or |
G-CODE/SHOWVIEW SETUP |
|
|||
|
|
|
|
|
|
PUSH JOG e. The Clock Set screen |
|
|
|
|
|
appears. |
[R/T] |
|
|
|
|
|
|
|
|
||
|
|
|
|||
|
[MENU] : EXIT |
|
|||
C Set Time, Date and Year |
|
|
|
|
|
Press PUSH JOG rt to set the time, date or year. Then press OK or PUSH JOG e.
●Press and hold either button to delay or advance the time by 30 minutes.
● Press and hold either button to change the date by 15 days.
Press MENU to return to normal screen.
NOTE:
If the year digits are automatically cleared, it is possible that you have input February 29th in a non-leap year. Input the correct data.
To make corrections any time during the process
Press OK or PUSH JOG e repeatedly until the item you want to change blinks, then press PUSH JOG rt.
 Playback
Basic Playback
Turn on the TV and select the video channel (or AV mode).
A Load a cassette
Make sure the window side is up, the rear label side is facing you and the arrow on the front of the cassette is pointing towards the recorder.
●Do not apply too much pressure when inserting.
●The recorder turns on, and the counter on the on-screen display is reset, automatically.
●Select the appropriate colour system with “PAL/MESECAM” and “NTSC” in Function settings ( 16).
●If the cassette’s record safety tab has been removed, playback begins automatically ( 8).
●If the record safety tab is intact, the recorder check the tape
information for Programme Navigation. For details, refer to “Navigation” ( 14).
B Start playback
Press 4.
ATTENTION
In the search, still, slow-motion or frame-by-frame playback mode,
●the picture will be distorted.
●the noise bars will appear.
●there may be a loss of colour.
During playback
Stop playback
Press 8 on the remote OR Press 0 on the recorder. control.
Pause playback and view still picture
Press 9.
● Press 4 to resume normal playback.
Pause and Frame-by-Frame playback
Press 9 to pause, then press 6(or 9) repeatedly. ● Press 4 to resume normal playback.
Picture search
Press 3 or 5. Press 3 and 5 again to perform highspeed search.
●Each time you press 3 or 5, the search speed changes between low-speed and high-speed.
●Press 4 to resume normal playback.
Variable speed search (including slow-motion)
Press PUSH JOG w or e repeatedly.
●Press 4 to resume normal playback.
●Each time you press PUSH JOG w or e, the playback speed changes. To decrease the speed during picture search, press the opposite direction button repeatedly.
●During still picture, press and hold PUSH JOG eto start forward (or PUSH JOG w to start reverse) slow motion playback. When you release the button, still picture resumes. During still picture, holding 9 for more than 2 seconds also starts forward slow motion playback. If you press 9 again, still picture resumes.
●During slow motion playback, some noise may appear on the screen. Press PR r/t to eliminate the noise.
— 6 —

Reverse |
|
|
|
|
Forward |
||
|
|
|
|
|
|
|
|
|
|
|
|
|
|
|
|
|
Reverse |
Reverse |
Reverse |
Slow |
Normal |
Forward |
|
|
search |
play |
slow |
motion |
play |
search |
|
|
|
|
motion |
|
|
|
|
-7, -5, -3 |
-1 |
-1/6 |
1/6 |
1 |
2, 3, 5, 7 |
||
|
|
|
|
|
|
|
|
B Adjust tracking manually
Press PR +/– to adjust tracking.
●To return to automatic tracking, press p on the remote control.
NOTE:
When a new tape is inserted, the recorder enters the automatic tracking mode automatically.
Repeat playback
Your video recorder can automatically play back the whole tape 100 times repeatedly.
When the tape is not running
Rewind/fast-forward
Press 3 or 5.
Eject the tape
Press 0.
● You can also eject the cassette when the recorder is turned off.
Turn off the recorder
Press 1.
Playback Features
Index search
Your recorder automatically marks index codes at the beginning of each recording. This function gives you quick access to any one of 9 index codes in either direction.
NOTE:
Before starting, make sure the recorder is in the Stop mode.
— Activate Index Search
Press PUSH JOG w or e (2 or 6) on the remote control. “2 1” or “6 1” is displayed on screen and search begins in the corresponding direction.
●To access index codes 2 through 9, press PUSH JOG w or e repeatedly until the correct index number is displayed.
Ex.:To locate the beginning of B from the current position, press PUSH JOG w twice. To locate the beginning of D from the current position, press PUSH JOG e once.
● When the specified index code is located, playback begins automatically.
Manual tracking
Your video recorder is equipped with automatic tracking control. During playback, you can override this and adjust the tracking manually by pressing the PR +/– buttons.
A Override automatic tracking
Press p on the remote control to engage manual tracking.
A Start playback
Press 4.
B Activate repeat playback
Press 4 and hold for over 5 seconds, then release.
●The Play indicator (u) on the display panel blinks slowly.
●The tape plays 100 times automatically, and then stops.
C Stop playback
● Press 8 at any time to stop playback.
NOTES:
●Pressing 4, 3, 5 or 9 also stops Repeat Playback.
●Repeat Playback is not possible with a PAL tape recorded in EP mode.
Next function memory
The Next Function Memory “tells” the recorder what to do after rewinding. Before continuing, ensure that the recorder is in the Stop mode.
a– For Automatic Start Of Playback After Tape Rewind...
...press 3, then press 4 within 2 seconds. b– For Automatic Power Off After Tape Rewind...
...press 3, then press 1 within 2 seconds.
c– For Automatic Timer Standby After Tape Rewind...
...press 3, then press # within 2 seconds.
NOTE:
It is not possible to select the Automatic Timer functions if the cassette’s record safety tab is removed.
Tape position indicator
The tape position indicator appears |
|
|
on screen when, from the Stop mode, |
|
|
you press 5, 3 or perform an |
|
|
Index Search. The position of “8” in |
|
|
relation to “0” (beginning) or “+” |
|
|
(end) shows you where you are on the |
|
|
tape. |
|
|
“O.S.D.” ( 16) must be set to |
Beginning |
End |
“ON”, or the indicator will not |
|
|
appear. |
|
|
NOTE:
Depending on the type of tape used, there may be times when the indication is not correct.
Skip search
— Skip over unwanted sections
Press 30 SEC 1 to 4 times during playback. Each press initiates a 30-second period of fast-motion playback. Normal playback resumes automatically.
NOTE:
Before return to normal playback during a Skip Search, press 4.
— 7 —
Instant Review
Simply by pressing a single button, the recorder power comes on, rewinds, and begins playback of the last timer-recorded programme. If you have several programmes recorded, you can easily access any of them.
NOTE:
Before starting, make sure that the recorder is off and that the Timer mode is disengaged.
— Activate Instant Review
Press REVIEW. The recorder power comes on and the recorder searches for the index code indicating the start of the last timerrecorded programme. Once it's found, playback begins automatically.
●The front display panel tells you how many programmes have been recorded. If you have, for example, 3 programmes, “REVIEW” and “3” appear and blink. To watch the first of the 3 programmes, press REVIEW three times. The recorder searches and begins playback automatically. You can access a programme as far as 9 index codes away from the current tape position.
NOTE:
Instant Review is not possible while the recorder is in the Timer mode.
Soundtrack selection
Your video recorder is capable of recording three soundtracks (HIFI L, HI-FI R and NORM) and will play back the one you select.
During Playback
Pressing AUDIO on the remote control changes the soundtrack being played back as follows:
Track |
Use |
|||||
|
|
|
|
|
||
On-screen Display |
||||||
|
||||||
|
|
|
|
|
|
|
|
HI FI |
For Hi-Fi stereo tapes |
||||
L |
|
|
|
R |
||
|
|
|
||||
|
|
|
|
|
|
|
|
HI FI |
For main audio of Bilingual |
||||
L |
|
|
|
|
tapes |
|
|
|
|
|
|
|
|
|
HI FI |
For sub audio of Bilingual |
||||
|
|
|
|
R |
tapes |
|
|
|
|
|
|||
|
|
|
|
|
|
|
NORM |
For audio-dubbed tapes |
|||||
|
|
|
|
|
|
|
|
HI FI |
For audio-dubbed tapes |
||||
NORM |
||||||
|
||||||
|
|
|
|
|
|
|
NOTES:
●“HIFI L 


 R” should normally be selected. In this mode, Hi-Fi stereo tapes are played back in stereo, and the NORM track is played back automatically for tapes with only normal audio.
●For instructions on recording stereo and bilingual programmes, refer to page 10.
●“O.S.D.” must be set to “ON” or the on-screen displays will not appear ( 16)
 Recording
Accidental erasure prevention
To prevent accidental recording on a |
|
recorded cassette, remove its safety |
|
tab. To record on it later, cover the |
|
hole with adhesive tape. |
Record safety tab |
Basic Recording
Turn on the TV and select the video channel (or AV mode).
A Load a cassette
Insert a cassette with the record safety tab intact.
●The recorder power comes on automatically.
●The recorder checks the tape information for Programme Navigation. For details, refer to “Navigation” ( 14).
●Select the appropriate colour system ( 16).
B Choose a programme
Press PR +/– or the number keys. Or push the JOG dial and turn it to the left or right to select the channel you wish to record.
C Set tape speed
Press p. Check the SP/LP/EP indicator on the recorder display panel to confirm the selected tape speed.
D Start recording
Press and hold 7 and 4 on the remote control, or press 7 on the recorder.
●B.E.S.T. takes place at the beginning of each first SP and first LP (or EP) recording after inserting the cassette ( 15).
During recording
Pause recording
Press 9.
●Press 4to resume recording.
●You can select channel in the recording pause mode.
Stop recording
Press 8on the remote |
OR Press 0on the recorder. |
control. |
|
|
|
NOTE:
When recording in NTSC, if EP is selected, recording will always be done in the VHS mode even if an S-VHS cassette is used.
Recording Resume Function
If there is a power outage during recording (or Instant Timer Recording or timer recording), the recording will resume automatically when power is restored to the recorder unless the recorder's memory backup has expired.
— 8 —
Recording Features
Record one programme while watching another
— Select channel to watch
Once recording is in progress, all you need to do is to set the channel controls on the TV for the station you wish to view.
●The programme selected with the TV's channel controls appears on the TV screen while the one selected with the PR +/– buttons is recorded on the tape.
Elapsed recording time indication
You can check the exact time of a recording.
A Set counter display
Press – –:– – until a counter reading appears on the display panel.
●By pressing the – –:– – button, you can change the display to show the counter reading, channel position*, clock time or tape remaining time.
*Channel position is not displayed during playback.
B Reset counter
Press 0000 before starting recording or playback.
●The counter is reset to “0:00:00” and shows the exact elapsed time as the tape runs.
Instant Timer Recording (ITR)
This easy method lets you record for from 30 minutes to 6 hours (selectable in 30-min. increments), and shuts the recorder off after recording is finished.
A Start recording
Press 7 on the recorder.
B Engage ITR mode
Press 7 again. “o” blinks and 0:30 appears on the front display panel.
C Set recording duration
If you want to record for more than 30 minutes, press 7 to extend the time. Each press extends recording time by 30 minutes.
NOTE:
You can only perform ITR using the 7 button on the recorder’s front panel.
Tape Remaining Time
— Display remaining time
Press – –:– – until the time remaining on the tape appears.
●The display panel shows the tape remaining time with “– –:– –” displayed.
●By pressing the – –:– – button, you can change the display to show the counter reading, channel position*, clock time or tape remaining time.
*Channel position is not displayed during playback.
NOTE:
Depending on the type of tape used, there may be times when the tape remaining time reading may not appear right away, or is not correct. “– –:– –” may sometimes appear, or the display may blink on occasion.
Super VHS ET (S-VHS ET)
— Recording on VHS cassettes with S-VHS quality
You can record in SP mode on VHS cassettes with S-VHS picture quality. You can play back a tape recorded using the S-VHS ET function on most of S-VHS recorders and of VHS recorders equipped with SQPB (S-VHS QUASI PLAYBACK) function. (Notice some recorders are not compatible with the S-VHS ET function.)
●You can activate the S-VHS ET function only before you start recording on a VHS cassette.
●Before recording, make sure that “B.E.S.T.” is set to “ON” ( 15).
Engage the S-VHS ET mode.
Press S-VHS ET on the recorder. You can check the current setting (“S-VHS ET : ON” or “S-VHS ET : OFF”). If “S-VHS ET : OFF” appears on the TV screen, press S-VHS ET again in about 5 seconds to set it to “ON”.
● The S-VHS indicator lights up on the front display panel.
NOTES:
●You cannot activate the S-VHS ET function...
... while recording is in progress.
... while timer-recording or Instant Timer Recording ( 9) is in
progress.
... while B.E.S.T. ( 15) is in progress.
●The S-VHS ET function does not work...
... with S-VHS cassettes.
... with recordings in LP/EP mode.
●To keep the highest quality recording and playback pictures over a long period of time, S-VHS recording on S-VHS cassettes is recommended .
●Use of high grade tapes is recommended for S-VHS ET recordings. On some tapes, picture quality will not improve even if the S-VHS ET function is used. Check the recording quality before you start important recordings.
●While playing back a tape recorded using the S-VHS ET function on some recorders, noise may appear. (If playback picture becomes blurred or interrupted, use a cleaning cassette.)
●In the high-speed search, still, slow-motion or frame-by-frame playback modes ( 6), noise may appear. If these modes are performed frequently on a tape recorded using the S-VHS ET function, the tape may be damaged and the picture may be deteriorated.
— 9 —
Loading...