


IMPRESSA Z5
Instructions for use
Art. Nr. 65475
9/05

|
|
|
|
|
|
|
JURA Elektroapparate AG, CH-4626 Niederbuchsiten, |
|
|
|
|
|
|
|
|
|
|
= Note |
|
= Important |
|
= Tip |
Internet http://www.jura.com |
|
|
|
|
||||
|
|
|
|

Fig. 1
Fig. 6
Fig. 11
Fig. 13:
Correct assembly of the cappuccino nozzle
Make sure there is always a small gap between the rear cappuccino nozzle and the connection piece. This will guarantee perfect operation of the cappuccino nozzle.
Fig. 2 |
Fig. 3 |
|
|
Fig. 4 |
Fig. 5 |
Fig. 7 |
Fig. 8 |
|
|
Fig. 9 |
Fig. 10 |
|
|
b |
a |
1 |
|
|
|
|
|
||
|
|
|
|
|
|
|
|
c |
|
|
|
Fig. 12 |
Fig. 13 |
|
|
Fig. 14 |
|
|
7 |
|
|
|
|
|
|
|
|
|
|
|
|
|
|
8 |
|
|
|
|
|
|
|
|
|
6 |
|
|
9 |
|
|
|
|
|
|
|
|
|
|
|
|
14 |
|
|
|
|
|
15 |
|
||
5 |
|
|
|
|
|
|
|
|
|
|||
|
|
10 |
|
|
|
|
|
|
|
|
|
|
|
|
|
|
|
|
|
|
|
|
|
|
|
|
|
|
11 |
|
|
|
|
|
|
|
|
|
4a |
|
|
|
|
|
|
|
|
|
|
|
|
|
|
|
12 |
|
|
|
|
|
|
|
|
|
|
|
|
13 |
|
2b |
|
|
|
|
|
|
16b |
|
|
|
16a |
|
|
|
A |
B |
C |
|
|
|
|
|
|
|
|
|
|
|
|
|
|||
4b |
|
|
|
|
|
|
|
|
|
|
|
|
3 |
2a |
1 |
D |
E |
F |
G |
H |
I |
J |
K |
L |
M |
|
|
|
||||||||||
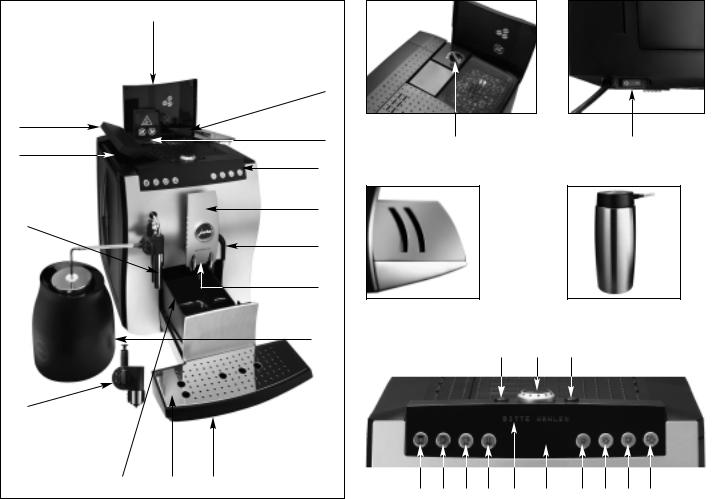
Description of the machine
1.Drip tray
2.a) Drip grate
b)Cup platform
3.Coffee grounds tray and container
4.a) One Touch Cappuccino nozzle* long spout
b)One Touch Cappuccino nozzle* short spout
5.Water tank with handle and level indicator
6.Water tank cover
7.Cover for bean tank and coffee powder tank
8.Aroma preservation cover
9.Filler funnel for pre-ground coffee
10.Control panel
11.Height-adjustable coffee spout
12.Height-adjustable hot water spout
13.Cup illumination
14.Rotary switch for setting the grinding degree
15.Power switch
16.a) Vacuum milk container
b)Stainless steel vacuum milk container
*hereinafter referred to as cappuccino nozzle
AON / OFF key
BRotary Switch
CMaintenance key
DMilk key
ECappuccino key
FSpecial Coffee key
GHot Water key
HText display
IGraphics display
J1 ESPRESSO key
K2 ESPRESSOS key
L1 COFFEE key
M2 COFFEES key
Contents
1. |
Safety information .............................................. |
page |
7 |
|
|
1.1 |
Warning.................................................. |
page |
7 |
|
1.2 |
Precautions.............................................. |
page |
7 |
2. |
Preparing the IMPRESSA Z5 ............................... |
page |
7 |
|
|
2.1 |
Check supply voltage.................................. |
page |
7 |
|
2.2 |
Check electrical fuse .................................. |
page |
8 |
|
2.3 |
Fill water tank ......................................... |
page |
8 |
|
2.4 |
Fill coffee beans ....................................... |
page |
8 |
|
2.5 |
Adjusting the grinding gear ......................... |
page |
8 |
|
2.6 |
Vacuum milk container............................... |
page |
8 |
|
2.6.1 |
Vacuum milk container (16a)....................... |
page |
8 |
|
2.6.2 |
Stainless steel vacuum milk container (16b) .... |
page |
9 |
|
2.7 |
Power switch............................................ |
page |
9 |
3. |
First use ........................................................... |
page |
9 |
|
|
3.1 |
Cup illumination ....................................... |
page 10 |
|
4. |
Adjusting your machine to the water hardness ........... |
page 10 |
||
5. |
Using the CLARIS plus filter cartridge .................... |
page 11 |
||
|
5.1 |
Installing the filter .................................... |
page 11 |
|
|
5.2 |
Changing the filter .................................... |
page 12 |
|
6. |
Rinsing the machine ............................................ |
page 13 |
||
7. |
Making coffee (1 espresso, 2 espressos, 1 coffee, |
|
|
|
|
2 coffees).......................................................... |
page 13 |
||
8. |
Making special coffee .......................................... |
page 13 |
||
9. |
Cappuccino ....................................................... |
page 14 |
||
|
9.1 |
Making cappuccino.................................... |
page 14 |
|
|
9.2 |
Cappuccino rinsing cycle ............................. |
page 14 |
|
|
9.3 |
Cappuccino cleaning cycle ........................... |
page 15 |
|
|
9.4 |
Cleaning the cappuccino nozzle .................... |
page 16 |
|
10. |
Making hot milk................................................. |
page 16 |
||
11. |
Making hot water ............................................... |
page 16 |
||
12. |
Brewing coffee using pre-ground coffee powder ......... |
page 17 |
||
13. |
Switching the IMPRESSA off ............................... |
page 17 |
||
14. |
Settings............................................................ |
page 18 |
||
14.1Setting the amount of water for coffee,
|
espresso (1 or 2 cups) and special coffee ........ |
page 18 |
|
14.2 |
Cappuccino setting .................................... |
page 18 |
|
14.3 |
Milk setting ............................................. |
page |
19 |
14.4 |
Setting the amount of hot water ................... |
page |
19 |
15. Programming..................................................... |
page |
20 |
15.1 Programming the filter............................... |
page |
20 |
15.2Programming your machine to the correct
water hardness (only with FILTER NO) .......... |
page |
20 |
15.3 Maintenance ............................................ |
page |
20 |
15.4Programming the temperature for coffee,
|
|
espresso, cappuccino and special coffee .......... |
page 20 |
|
15.5 |
Programming the coffe strength ................... |
page 21 |
|
15.6 |
Cappuccino programming ............................ |
page 22 |
|
15.7 |
Programming the milk ............................... |
page 22 |
|
15.8 |
Save energy ............................................. |
page 23 |
|
15.9 |
Setting the time........................................ |
page 24 |
|
15.10 |
Programming the automatic switch-on time..... |
page 25 |
|
15.11 |
Programming the automatic switch-off time .... |
page 25 |
|
15.12 |
Information ............................................. |
page 26 |
|
15.13 |
Renaming ................................................ |
page 27 |
|
15.14 |
Programming the language.......................... |
page 28 |
|
15.15 |
Programming the display ............................ |
page 28 |
16. |
Maintenance...................................................... |
page 29 |
|
|
16.1 |
Filling the water tank ................................ |
page 29 |
|
16.2 |
Emptying the coffee gronds ......................... |
page 30 |
|
16.3 |
Emptying the drip tray ............................... |
page 30 |
|
16.4 |
Drip tray missing ...................................... |
page 30 |
|
16.5 |
Grounds container missing........................... |
page 30 |
|
16.6 |
Filling the bean tank.................................. |
page 31 |
|
16.7 |
Aroma preservation cover missing ................. |
page 31 |
|
16.8 |
Removing stones from the grinding gear ......... |
page 31 |
|
16.9 |
Changing the filter .................................... |
page 31 |
|
16.10 |
Information about cleaning cycle .................. |
page 31 |
|
16.11 |
Information about decalcify ......................... |
page 32 |
|
16.12 |
Emptying the system .................................. |
page 32 |
17. |
Cleaning ........................................................... |
page 32 |
|
18. |
Decalcifying ...................................................... |
page 33 |
|
19. |
Disposal ........................................................... |
page 35 |
|
20. |
Tips for perfect coffee.......................................... |
page 35 |
|
21. |
Problems .......................................................... |
page 36 |
|
22. |
Legal information ............................................... |
page 37 |
|
23. |
Technical Data ................................................... |
page 37 |
|
6

Introduction
Thank you for purchasing the IMPRESSA Z5. To ensure perfect functioning of your IMPRESSA, carefully read this operating manual and keep it for future reference.
Should you need more information or if you encounter particular problems not specified in these operating instructions in sufficient detail, either contact us directly or contact your local authorized dealer.
You can download other languages from the JURA website at www.jura.com
You will also find useful tips on operation and maintenance of your IMPRESSA Z5 on the website at www.jura.com. Don’t forget to check out the Knowledge Builder our animated operating instructions. LEO, our assistant, will take you through all the functions.
If you have chosen the special chrome version of the IMPRESSA Z5, your machine is equipped with a stainless steel vacuum milk container (Fig. 16b) and an elegant cup platform (Fig. 2b). Also, the IMPRESSA Z5 Chrome is delivered with a microfibre cloth for cleaning the high-class chrome front.
We recommend that you wash the microfibre cloth with items of similar colour.
1. Safety information
1.1 Warning
Children do not realize the dangers involved in using electric appliances, for this reason always keep an eye on children when they use electric appliances.
The coffee machine may only be used by instructed persons.
Never use a defective coffee machine or a machine with a defective mains cable.
Never immerse the coffee machine in water.
1.2 Precautions
Never expose the coffee machine to weather (rain, snow, frost), |
E |
never touch the machine when your hands are wet. |
Place the IMPRESSA on a firm, level base that is resistant to any water that may leak. Never stand on hot or warm surfaces (oven hobs). Keep out of the reach of children.
If you don’t use the machine for a longer time (holidays, etc.) always disconnect the mains cable.
Always disconnect mains cable before cleaning the machine.
When disconnecting the mains cable never pull on the mains cable or the machine itself.
Never repair or open the coffee machine yourself. Any repairs may only be carried out by authorized service shops using original spare parts and accessories.
The coffee machine is connected to mains supply via a mains cable. Make sure nobody can trip over the mains cable. Make sure children and pets cannot reach the machine
Never put the coffee machine or individual parts of it into a dishwasher.
Make sure to install the machine at a place with sufficient air circulation, to prevent overheating of the machine.
2. Preparing the IMPRESSA Z5
2.1 Check supply voltage
The IMPRESSA Z5 is preset in the factory to the correct mains voltage. Check if your local mains supply voltage complies with the information given on the type plate on the underside of the IMPRESSA.
7

2.2 Check electrical fuse
The IMPRESSA Z5 is designed for an electric current of 10 amperes. Check if the electrical fuse has sufficient capacity.
2.3 Fill water tank
Only use fresh, cold water. Never fill in milk, mineral water or other liquids.
Remove the water tank and rinse it with cold tap water thoroughly (Fig. 1).
Then fill the water tank and reinstall it. Make sure to install the tank properly, it must engage audibly.
2.4 Fill coffee beans
To ensure that your machine will work perfectly for a long time and to avoid damage, please note that the grinding gear of your JURA coffee machine is not suitable for coffee beans which were treated, during or after roasting, with additives (e.g. sugar). Such coffee blends may damage the grinding gear. Any repair costs resulting from the use of such blends are not covered by warranty.
Open the bean tank cover (7) and remove the aroma preservation cover (8).
Remove any dirt or foreign matter from the bean tank.
Fill coffee beans into the bean tank (Fig. 2), replace the aroma preservation cover (8), make sure the rounded edges are pointing outwards, and close the lid.
2.5 Adjusting the grinding gear
You can adjust the grinding gear to the roast of your coffee. We recommend
a fine grinding degree |
|
for bright roasts |
a coarse degree |
|
for dark roasts |
The grinding degree may only be adjusted while the grinding gear is running.
Open the bean tank cover (7).
To adjust the grinding degree, turn the Rotary Switch (14) to the required position.
There are two options:
the narrower the bar, the finer the grind the broader the bar, the coarser the grind
2.6 Vacuum milk container
The vacuum milk container and the lid are NOT dishwasher safe
Wash out the vacuum milk container (16a/16b) thoroughly before you use it for the first time.
Fill the milk container with cool, fresh milk.
Always make sure there is enough milk in the vacuum milk container before you froth milk or make cappuccino.
If filled with refrigerated milk, the vacuum milk container will keep mil cool for about 8 hours.
Please do not fill ice cubes into the vacuum milk container since these could damage its coating.
Keep the vacuum milk container away from hot stove tops etc.
The vacuum milk container may be damaged if dropped.
2.6.1 Vacuum milk container (16a)
Never use shapr or pointed objects in the milk container since these could damage its coating.
8

2.6.2 Stainless steel vacuum milk container (16b)
Always clean the stainless steel vacuum milk container after you have used it. Rinse it with warm water, and with some detergent if necessery Remove the riser tube inside the milk container as well as the hose connection on the outside and give these parts including the lid a good rinse with clear water. Never use scouring agents, bleach, solvents or abrasive pads for cleaning. Leave the vacuum milk container OPEN if it’s not being used.
The stainless steel vacuum milk container is supplied with a hose set consisting of a 120 mm hose (fitted on both ends with a connection nipple) and a 360 mm hose. With the longer hose the container can be placed further away from the machine. You can also cut it to make 3 spare hoses each with a length of 120 mm.
Please note that in order to fasten the suction tube on the lid the (transparent) rubber seal first has to be inserted into the opening as far as the stop. Then insert the suction tube into the rubber seal as far as the stop.
Too little milk in the container may cause the milk to squirt out of the nozzle.
2.7 Power switch
Actuate the power switch (15) on your IMPRESSA Z5 before using the machine for the first time.
We recommend that you switch off your IMPRESSA Z5 with the power switch (15) if you intend not to use the machine for longer periods of time (e.g.during holidays)
3. First use
Press the power switch (15) at the bottom left of your IMPRESSA (Fig. 3)
The ON/OFF key lights up  (A) to indicate that the machine has been switched on with the power switch.
Switch the machine on using the ON/OFF key  (A). The light of the ON/OFF key goes off.
 LANGUAGE
 ENGLISH
Turn the Rotary Switch (B) until the required language is dis-
played. |
E |
Example: |
|
|
LANGUAGE |
|
ENGLISH |
Confirm the selected language by pressing the Rotary Switch |
|
(B). |
|
|
CONFIRMED |
|
√ |
|
TIME |
|
HOURS |
|
—:— |
To set the hours, turn the Rotary Switch (B) |
|
|
TIME |
|
HOURS |
|
12:00 |
Press the Rotary Switch (B) to confirm the hours and to activate the minutes.
 TIME
TIME


 MINUTES
12:00
To set the minutes, turn the Rotary Switch (B).
|
TIME |
|
MINUTES |
|
12:45 |
Confirm the minutes by pressing the Rotary Switch (B).
9

CONFIRMED
 √
√
 PRESS MAINTENANCE

Maintenance key 

 (C) lights up.
Place a cup each under the height-adjustable coffee spout (12)
and the cappuccino nozzle (4) and press the maintenance key


 (C).
(C).
 SYSTEM FILLS

The system now fills up automatically. While it is doing so, the maintenance key flashes. (A little water will leak from the cappuccino nozzle (4), then from the hot water spout (12).
 WELCOME TO
 JURA
JURA
 UNIT IS HEATING

 PRESS MAINTENANCE

Place a cup under the height-adjustable coffee spout (11).
Press the maintenance key 

 (C).
(C).
 RINSING

Now the water lines are flushed with fresh water. A little water will leak from the coffee spout (11).
 COFFEE READY

You can now make the machine dispense a product of your choice by pressing the corresponding key.
After putting the IMPRESSA into operation for the first time, do not disconnect it from the mains for at least 24 hours to ensure it is in perfect operating condition. Therefore, do not turn the machine off using the power switch during this time!
If FILL BEANS appears on the display, press one of the coffee product keys again. The mill is not yet completely filled with coffee beans.
For a perfect frothing result, adjust the coffee spout (11) to the size of your cup (Fig. 4).
3.1 Cup illumination
The cup illumination puts your coffee in a perfect light, making it a treat for the eyes as well.
When you switch on the IMPRESSA or press any key, the cup illumination is activated for 1 minute.
4. Adjusting your machine to the water hardness
The IMPRESSA heats up water. As a result, calcification occurs during normal use, and it is indicated automatically. The IMPRESSA must therefore be adjusted to the hardness of the water used. Use the supplied test sticks to determine the water hardness or contact your local waterworks.
1° German hardness is equivalent to 1.79° French hardness.
The water hardness programming step is no longer displayed if the filter is activated.
The IMPRESSA is preset to 16°e. This setting can be changed. To do so, proceed as follows:
10
 COFFEE READY

Press the Rotary Switch (B) until you hear an acoustic signal.
 FILTER
 NO
NO
Turn the Rotary Switch (B) until the following message is displayed:
 HARDNESS
 16°dH
16°dH
Now press the Rotary Switch (B) to start programming.
 HARDNESS
 16°dH
16°dH
Now turn the Rotary Switch until the correct water hardness is set.
 HARDNESS
 20°dH (example)
Confirm the selected setting by pressing the Rotary Switch (B).
CONFIRMED
|
√ |
|
HARDNESS |
|
20°dH (example) |
Now turn the Rotary Switch (B) until the following message is displayed:
 EXIT
EXIT

Now press the Rotary Switch (B) to leave the programming mode.
 COFFEE READY

5. Using the CLARIS plus filter cartridge
When using the CLARIS plus filter cartridge correctly, decalcifying your IMPRESSA will no longer be necessary. For more information on the CLARIS plus filter cartridge refer to brochure “CLARIS plus. Hard on limescale. Gentle
on your coffee machine.” |
E |
|
5.1 Installing the filter |
||
|
Press the Rotary Switch (B) until you hear an acoustic signal.
 FILTER
 NO
NO
Now press the Rotary Switch (B) to start programming.
Turn the Rotary Switch (B) until the following message is displayed:
 FILTER
 YES
YES
Confirm your setting by pressing the Rotary Switch (B).
CONFIRMED
 √
√
 INSERT FILTER
 PRESS BUTTON
Remove the water tank from the IMPRESSA. Empty out any remaining water. Fold up the cartridge holder (Fig.6). Attach the extension piece (contained in the Welcome Pack) to the top of the CLARIS plus filter cartridge. Now insert the filter cartridge in the water tank, applying gentle pressure (Fig. 6)
Close the cartridge holder until it engages audibly.
Fill the water tank with cold, fresh tap water and place it back into the machine.
11

Place a sufficiently large receptacle (min. 0.5 litres) under the cappuccino nozzle (4). We recommend attaching the short spout (4b).
Press the maintenance key 

 (C) to start rinsing the filter.
 FILTER RINS

Filter rinsing stops automatically.
 UNIT IS HEATING

 COFFEE READY

You have now activated the filter. The programming step for adjusting your machine to the correct water hardness is therefore no longer displayed.
The water might be slightly discoloured (no hazard to health).
You can interrupt the filter rinsing cycle (e.g. to empty the receptacle). To do so, press a key of your choice.
5.2 Changing the filter
After drawing off approx. 50 litres, the filter cartridge will be used up. A message requesting you to replace the filter will appear on the display. The scale on the cartridge holder in the water tank will tell you how much longer you can use the CLARIS plus filters.
 COFFEE READY
 FILTER-CHANGE
The maintenance key 

 (C) lights up. Press the maintenance key.
 INSERT FILTER
 PRESS BUTTON
Remove the water tank from the IMPRESSA. Empty out any remaining water. Fold up the cartridge holder (Fig.6). Attach the extension piece to the top of the CLARIS plus filter cartridge. Now insert the filter cartridge in the water tank, applying gentle pressure (Fig. 6).
Close the cartridge holder until it engages audibly.
Fill the water tank with cold, fresh tap water and place it back into the machine.
Place a sufficiently large receptacle (min. 0.5 litres) under the cappuccino nozzle (4). We recommend attaching the short spout (4b).
Press the maintenance key 

 (C) to start rinsing the filter.
 FILTER RINS

Filter rinsing stops automatically.
 UNIT IS HEATING

 COFFEE READY

You can also trigger a change of filter manually from the maintenance menu at any point in time (only if the filter has been activated) – see Chapter 15.3
The water might be slightly discoloured (no hazard to health).
You can interrupt the filter rinsing cycle (e.g. to empty the receptacle). To do so, press a key of your choice.
12
 Loading...