


IMPRESSA C50 Instructions for Use
The Instructions for Use has been awarded the seal of approval by the independent German Technical Inspection Agency, TÜV SÜD, due to its easy-to-understand style, its thoroughness and coverage of safety aspects.

Table of contents |
|
|
Your IMPRESSA C50 |
|
|
Control elements |
4 |
|
Important information |
6 |
|
|
Proper use ...................................................................................................................................................... |
6 |
|
For your safety............................................................................................................................................... |
6 |
1 Preparing and using for the first time |
10 |
|
|
JURA on the Internet.................................................................................................................................... |
10 |
|
Setting up the machine .............................................................................................................................. |
10 |
|
Filling the bean container........................................................................................................................... |
10 |
|
First-time use ................................................................................................................................................ |
10 |
|
Determining the water hardness .............................................................................................................. |
13 |
|
Adjusting the grinder .................................................................................................................................. |
13 |
|
Filling the water tank................................................................................................................................... |
14 |
|
Connecting milk........................................................................................................................................... |
15 |
2 |
Preparation |
16 |
|
Espresso and coffee ..................................................................................................................................... |
16 |
|
Two speciality coffees at the touch of a button...................................................................................... |
17 |
|
Cappuccino.................................................................................................................................................... |
17 |
|
Milk foam....................................................................................................................................................... |
18 |
|
Ground coffee............................................................................................................................................... |
19 |
|
Permanently setting the amount of water for the cup size ................................................................ |
20 |
|
Hot water....................................................................................................................................................... |
21 |
3 |
Daily operation |
22 |
|
Switching on ................................................................................................................................................ |
22 |
|
Daily maintenance...................................................................................................................................... |
22 |
|
Switching off ................................................................................................................................................ |
23 |
4 Permanent settings in programming mode |
24 |
|
|
Product settings .......................................................................................................................................... |
25 |
|
Setting the water hardness ....................................................................................................................... |
26 |
|
Energy-saving mode .................................................................................................................................. |
26 |
|
Automatic switch-off.................................................................................................................................. |
27 |
|
Unit for amount of water........................................................................................................................... |
28 |
|
Language...................................................................................................................................................... |
28 |
5 |
Maintenance |
29 |
|
Rinsing the machine................................................................................................................................... |
29 |
|
Rinsing the fine foam frother.................................................................................................................... |
30 |
|
Cleaning the fine foam frother ................................................................................................................. |
30 |
|
Dismantling and rinsing the fine foam frother....................................................................................... |
31 |
|
Dismantling and rinsing the professional fine foam frother............................................................... |
32 |
|
Inserting and activating the filter............................................................................................................. |
33 |
|
Changing the filter...................................................................................................................................... |
34 |
|
Cleaning the machine ................................................................................................................................ |
35 |
|
Descaling the machine .............................................................................................................................. |
36 |
|
Cleaning the bean container..................................................................................................................... |
38 |
|
Descaling the water tank ........................................................................................................................... |
39 |
2

Table of contents
6 |
Display messages |
40 |
7 |
Troubleshooting |
42 |
8 |
Transport and environmentally friendly disposal |
44 |
|
Transport / Emptying the system............................................................................................................. |
44 |
|
Disposal......................................................................................................................................................... |
44 |
9 |
Technical data |
45 |
10 |
Index |
46 |
11 JURA contact details / Legal information |
48 |
|
Symbol description
Warnings
J WARNING |
Always take note of any information marked with the words CAUTION or |
J CAUTION |
WARNING and a warning sign. The signal word WARNING draws your attention |
|
to potential serious injury, and the signal word CAUTION to potential minor |
|
injury. |
|
|
CAUTION |
CAUTION draws your attention to potential damage to the machine. |
|
|
Symbols used |
|
|
|
T |
Prompt to take action. This symbol means that you are being prompted to |
|
perform some action. |
|
|
E |
Information and tips to make it even easier to use your IMPRESSA. |
|
|
COFFEE |
Display |
|
|
3
Control elements
Control elements
1 |
9 |
|
|
|
10 |
|
11 |
2 |
|
|
12 |
3 |
|
|
13 |
4 |
|
|
14 |
5 |
15 |
|
|
6 |
|
7 |
|
8 |
|
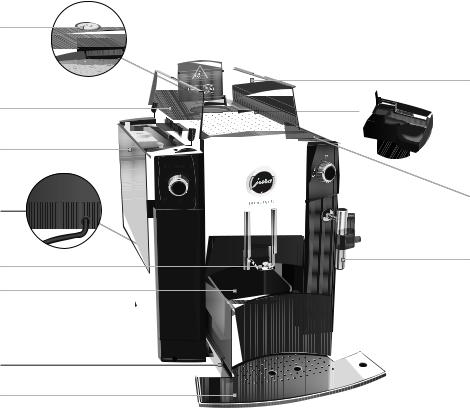
1 |
Q On/Off button |
9 |
Filler funnel cover |
2 |
Water tank cover |
10 |
Filler funnel for ground coffee |
3 |
Water tank |
11 |
Bean container cover |
4 |
Mains cable (back of the machine) |
12 |
Grinder adjustment switch |
5 |
Height-adjustable coffee spout |
13 |
Bean container with aroma preservation |
6 |
Coffee grounds container |
|
cover |
7 |
Drip tray |
14 |
Switch for hot water and steam preparation |
8 |
Cup grille |
15 |
Fine foam frother |
4
Control elements
1
2
|
|
|
|
|
|
|
|
|
|
|
|
|
|
|
|
|
|
|
|
|
|
|
|
|
|
|
|
|
|
|
|
|
|
|
|
|
|
|
|
|
|
|
|
|
|
|
|
|
|
|
|
|
|
|
|
|
|
|
|
|
3 |
4 |
5 |
|
|
|
|
||||
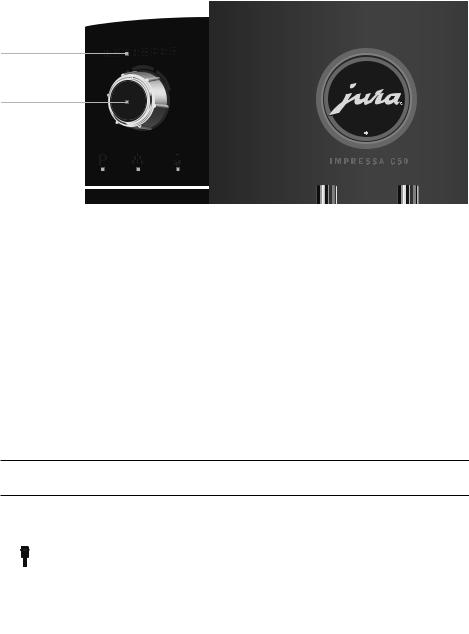
1 |
Display |
|
|
3 |
O |
P symbol (programming) |
|||||
2 |
Rotary Switch |
|
|
4 |
c |
Maintenance symbol |
|||||
|
|
|
|
|
|
5 |
n |
Steam symbol |
|||
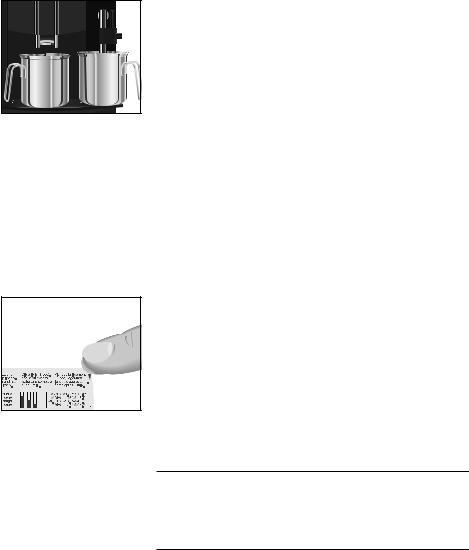
The Connector System© permits the use of different cappuccino frothers. These are available from stockists.
Professional fine foam frother |
Fine foam frother |
||
|
|
Milk foam |
Milk foam |
|
|
Hot milk |
|
|
|
|
|
|
|
|
|
|
|
|
|
5

Important information
Important information
Proper use
For your safety
J
The machine is designed and intended for private domestic use. It should only be used for coffee preparation and to heat milk and water. Use for any other purpose will be deemed improper. JURA Elektroapparate AG cannot accept any responsibility for the consequences of improper use.
Before using the machine read these instructions for use thoroughly and completely and comply with the instructions they contain. A warranty service is not applicable for damage or defects caused by non-compliance with the instructions for use. Keep these instructions for use close to the machine and pass them on to the next user.
Please carefully read and observe the important safety information set out below.
To avoid danger of potentially fatal electric shock:
UNever use a machine which is damaged or has a defective mains cable.
UIn the event of signs of damage, for example if there is a smell of burning, unplug the machine immediately from the mains supply and contact JURA service.
UIf the mains cable of this machine is damaged, it must be repaired either directly by JURA or by an authorised JURA service centre.
UMake sure that the IMPRESSA and the mains cable are not located close to hot surfaces.
UBe careful to ensure that the mains cable is not trapped and does not rub against sharp edges.
6
Important information
UNever open and repair the machine yourself. Do not modify the machine in any way that is not described in these instructions for use. The machine contains live parts. If opened, there is a danger of potentially fatal injury. Repairs may only be carried out by authorised JURA service centres, using original spare parts and accessories.
UTo completely and safely disconnect the machine from the power supply, first switch off the IMPRESSA using the On/Off button and then at the power switch. Only then should you remove the mains plug from the power socket.
There is a risk of scalds or burns on the spouts and fine foam frother:
UPlace the machine out of the reach of children.
UDo not touch any hot parts. Use the handles provided.
UBe careful to ensure that the fine foam frother is correctly installed and clean. If incorrectly fitted or if it becomes blocked, the fine foam frother or its parts might come off.
A defective machine is not safe and could cause injury or fire. To avoid damage and any associated risk of injury or fire:
UNever allow the mains cable to loosely hang down. The mains cable could pose a tripping hazard or become damaged.
UProtect the IMPRESSA from environmental influences such as rain, frost and direct sunlight.
7
Important information
U
U
U
U
U
U
U U
U
U U
Do not immerse the IMPRESSA, mains cable or connections in water.
Do not put the IMPRESSA or any individual parts in the dishwasher.
Switch your IMPRESSA off at the power switch before any cleaning operation. Always wipe the IMPRESSA with a damp cloth rather than a wet one, and protect it from prolonged exposure to water splash.
Only connect the machine to the mains voltage in accordance with the information on the rating plate. The rating plate is located on the underside of your IMPRESSA. Further technical data is provided in these instructions for use (see Chapter 9 ‘Technical data’).
Please only use original JURA maintenance products. Use of products that are not explicitly recommended by JURA could damage the IMPRESSA.
Do not use any coffee beans treated with additives or caramelised coffee beans.
Only fill the water tank with fresh, cold water. Switch the machine off at the power switch if you are going to be absent for a longer period of time.
Children may not clean or service the machine unless supervised by a responsible person. Do not allow children to play with the machine. Keep children under the age of 8 away from the machine, or supervise them constantly.
8
Important information
UChildren aged 8 and over may only operate the machine without supervision if they have been instructed in how to use it safely. Children must be able to recognise and understand the potential dangers arising from incorrect use.
People, including children, who
Udo not have the physical, sensory or mental capabilities to use the machine safely or
Uare inexperienced or lack knowledge in how to use the machine safely
must be supervised by a responsible person when using it, or must be instructed in how to use it correctly.
Safety when handling the CLARIS Blue filter cartridge:
UFilter cartridges should be kept out of the reach of children.
UStore filter cartridges in a dry place in the sealed packaging.
UProtect cartridges from heat and direct sunlight.
UDo not use damaged filter cartridges.
UDo not open filter cartridges.
9
1Preparing and using for the first time
1Preparing and using for the first time
JURA on the Internet |
Visit us on the Internet. You can download short operating instruc- |
|
|
tions for your machine from the JURA website (www.jura.com). You |
|
|
will also find interesting and up-to-date information on your |
|
|
IMPRESSA and on every aspect of coffee. |
|
Setting up the machine |
When setting up your IMPRESSA, please note the following: |
|
|
U |
Place the IMPRESSA on a horizontal surface that is not sensi- |
|
U |
tive to water. |
|
Choose a spot for your IMPRESSA which protects the machine |
|
|
|
against overheating. Ensure that the ventilation slots are not |
|
|
covered. |
Filling the bean container |
The bean container has an aroma preservation cover. This will ensure |
|
|
that your coffee beans retain their aroma for longer. |
|
CAUTION |
|
|
Coffee beans which have been treated with additives (e.g. sugar), |
||
|
ground coffee or freeze-dried coffee will damage the grinder. |
|
|
T |
Only use untreated coffee beans to fill the bean container. |
|
|
|
|
|
T Open the bean container cover and remove the aroma pres- |
|
|
ervation cover. |
|
|
T Remove any dirt or foreign objects from inside the bean |
|
|
container. |
|
|
T Fill the bean container with coffee beans, then close the |
|
|
aroma preservation cover and the bean container cover. |
First-time use |
When using the machine for the first time, you can choose whether |
|
|
you want to operate IMPRESSA with or without the CLARIS Blue fil- |
|
|
ter cartridge. If the water hardness is 10° dH or more, we recommend |
|
|
using the filter cartridge. If you do not know the hardness of your |
|
|
water, you can find this out first (see Chapter 1 ‘Preparing and using |
|
|
for the first time – Determining the water hardness’). |
|
J WARNING |
|
|
If the machine is operated with a defective mains cable, there is a |
||
|
danger of potentially fatal electric shock. |
|
|
T |
Never use a machine which is damaged or has a defective |
|
|
mains cable. |
|
|
|
10
First-time use with filter cartridge activation
1 Preparing and using for the first time
Precondition: The bean container has been filled.
T Insert the mains plug into a power socket.
QT Press the On/Off button to switch the IMPRESSA on.
SPRACHE DE appears on the display.
g T Turn the Rotary Switch until the required language is displayed, e.g. LANGUAGE EN.
k T Press the Rotary Switch to confirm the language.
OK appears briefly on the display to confirm the setting.
FILTER w / YES
ENow decide whether you want to operate your IMPRESSA with or without a CLARIS Blue filter cartridge.
k T Press the Rotary Switch.
OK appears briefly on the display.
FILTER INSERT, the Maintenance symbol c lights up.
cT Touch the Maintenance symbol.
FILL TANK
T Open the water tank cover.
T Remove the water tank and rinse it with cold water. T Open the filter holder.
T Remove the CLARIS Blue filter cartridge from the Welcome Pack.
T Insert the CLARIS Blue filter cartridge into the water tank, exerting slight pressure.
T Close the filter holder. It will click into place audibly.
EAfter two months, the filter will cease to work. Set the date on the date plate on the filter holder in the water tank.
T Fill the water tank with fresh, cold water and reinsert the tank.
SWITCH OPEN, the light segment on the switch lights up. T Place one receptacle under the coffee spout and another
under the fine foam frother.
h T Turn the switch to the m position.
FILTER RINSING, water flows out of the fine foam frother.
11
1Preparing and using for the first time
EYou can interrupt rinsing of the filter at any time. To do this, turn the switch clockwise. Turn the switch anticlockwise to continue rinsing the filter.
EThe water may be slightly discoloured. This is not harmful to health and does not affect the taste.
Rinsing of the filter stops automatically after approximately 500 ml. SWITCH CLOSE appears on the display.
j T Turn the switch to the o position.
SYSTEM FILLING, the system fills up with water. HEATING, the machine heats up.
RINSING, the system is rinsed. Water flows out of the coffee spout. The rinse stops automatically. ESPRESSO appears on the display. Your IMPRESSA is ready for use.
First-time use without filter |
g |
T Turn the Rotary Switch until FILTER - / NO is displayed. |
cartridge activation |
k |
T Press the Rotary Switch. |
OK appears briefly on the display.
16 °dH
E If you do not know the hardness of your water, you must find this out first (see Chapter 1 ‘Preparing and using for the first time – Determining the water hardness’).
g T Turn the Rotary Switch to change the water hardness setting, e.g. to 25 °dH.
k T Press the Rotary Switch.
OK appears briefly on the display.
FILL TANK
T Open the water tank cover.
T Remove the water tank and rinse it with cold water.
T Fill the water tank with fresh, cold water and reinsert the tank.
SWITCH OPEN, the light segment on the switch lights up.
12
Determining the water hardness
1 Preparing and using for the first time
T Place one receptacle under the coffee spout and another under the fine foam frother.
h T Turn the switch to the m position.
SYSTEM FILLING, the system fills up with water.
SWITCH CLOSE
j T Turn the switch to the o position.
SYSTEM FILLING, the system fills up with water. HEATING, the machine heats up.
RINSING, the system is rinsed. Water flows out of the coffee spout. The rinse stops automatically. ESPRESSO appears on the display. Your IMPRESSA is ready for use.
You can find out what the water hardness is by using the Aquadur® test strip supplied as standard.
THold the test strip briefly (for 1 second) under flowing water. Shake off the water.
TWait for about 1 minute.
TYou will then be able to read the degree of water hardness from the discolouration of the Aquadur® test strip and the description on the packaging.
|
|
|
|
|
|
|
|
|
|
|
|
|
|
|
|
|
|
|
|
|
|
|
|
|
|
|
|
|
|
|
|
|
|
|
|
|
|
|
|
|
|
|
|
|
|
|
|
|
|
|
|
|
|
|
|
|
|
|
|
|
|
|
|
|
|
|
|
|
|
|
|
|
|
|
|
|
|
|
|
|
|
|
|
|
|
|
|
|
|
|
|
|
|
|
|
|
|
|
|
|
|
|
|
|
|
|
|
|
|
|
|
|
|
|
|
|
|
|
|
|
|
|
|
|
|
|
|
|
|
|
|
|
|
|
Adjusting the grinder |
You can adjust the grinder on a continuous scale to suit the degree |
|||||||||||||
|
|
|
|
|
|
|
|
|
|
|
|
|
|
of roast of your coffee. |
CAUTION If you adjust the consistency of grind when the grinder is not operating, the grinder adjustment switch could be damaged.
TOnly adjust the consistency of grind when the grinder is running.
The consistency of grind is correct if the coffee flows regularly from the coffee spout. In addition a fine, thick crema forms.
Example: Proceed as follows to change the consistency of grind during the preparation of an espresso.
T Place a cup under the coffee spout.
13
1Preparing and using for the first time
TOpen the bean container cover and remove the aroma preservation cover.
k T Press the Rotary Switch to start preparation.
|
T Turn the grinder adjustment switch to the desired position |
|
while the grinder is running. |
|
The preset amount of water flows into the cup. Preparation |
|
stops automatically. |
|
T Fit the aroma preservation cover. |
|
T Close the bean container cover. |
Filling the water tank |
Daily maintenance of the machine and hygiene when handling milk, |
|
coffee and water are key to a perfect coffee result in the cup every |
|
time. You should therefore change the water daily. |
CAUTION Milk, sparkling mineral water or other liquids can damage the water tank or the machine.
TOnly fill the water tank with fresh, cold water.
T Open the water tank cover.
T Remove the water tank and rinse it with cold water.
T Fill the water tank with fresh, cold water and reinsert the tank.
T Close the water tank cover.
14
Connecting milk
1 Preparing and using for the first time
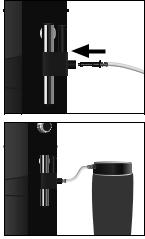
Your IMPRESSA creates fine, creamy, feather-light milk foam with a perfect consistency. The most important requirement for frothing milk is a milk temperature of 4–8 °C. We would therefore recommend using a milk cooler or a vacuum milk container.
T Remove the protective cover from the fine foam frother.
T Connect the milk pipe to the fine foam frother. To do this, attach the end of the milk pipe to the connector on the righthand side of the fine foam frother. Use the short pipe for a milk container and the long pipe for a milk carton.
T Connect the other end of the milk pipe to a milk container or immerse it in a milk carton. (Figure: JURA 0.4 litre stainless steel vacuum milk container).
15
 Loading...