


IMPRESSA F50 / F505
Instructions for use

Legend:
 DISPLAY: serves as information.
|
DISPLAY: please follow the instructions shown. |
= Note / Tip |
= Important |
2

Fig. 1
Fig. 6 |
Fig. 11
|
Fig. 14 |
|
|
Fig. 15 |
||
|
|
|
|
|
|
|
Fig. 2 |
Fig. 3 |
Fig. 4 |
Fig. 5 |
Fig. 7 |
|
|
Fig. 8 |
|
|
Fig. 9 |
|
|
Fig. 10 |
|||
|
|
|
|
|
|
|
|
|
|
|
|
|
Fig. 12 |
Fig. 13 |
Fig. 16 |
Fig.17 |
Fig. 18
Fig. 19
Temp. max.
Fig. 20
Temp. min.
3
11 |
|
22 |
|
|
|
|
|
|
|
|
|
|
13 |
21 |
|
|
|
|
|
12 |
10 |
|
|
|
|
|
13 |
|
|
|
|
|
|
|
9 |
3 |
4 |
5 |
6 |
7 |
8 |
2 |
|
|
|
|
|
14 |
1 |
|
|
|
|
|
15/16 |
|
|
|
|
|
|
|
|
|
|
|
|
|
17 |
|
|
|
|
|
|
18 |
Rotary Switch |
|
|
|
|
|
|
|
|
|
|
|
|
19 |
|
|
|
|
|
|
20 |
4 |
|
|
|
|
|
|
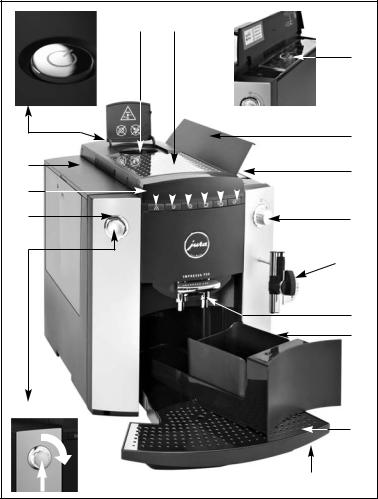
Control elements
1.Rotary Switch
2.Illuminated ring
3.Maintenance button
4.Preparation button, 1 espresso
5.Preparation button, 2 espressi
6.Preparation button, 1 coffee
7.Preparation button, 2 coffees
8.Steam preselection button
9.Display dialogue system
10.Water tank with handle
11.Filler funnel for preground coffee
12.Bean container cover
13.Aroma preservation cover
14.Steam / hot water draw-off tap
15.Removable Professional Cappuccino Frother with milk pipe
16.Removable hot-water nozzle (see Fig. 5)
17.Height-adjustable coffee spout
18.Coffee grounds container
19.Cup grille
20.Drip tray
21.On/Off button (= Zero-Energy Switch)
22.Metal shelf
Table of contents
1. |
Safety instructions . . . . . . . . . . . . . . . . . . . . . . . . . . . . . . . . . . . . . . . . . . . . . . . |
page |
6 |
14. |
Switching off the IMPRESSA. . . . . . . . . . . . . . . . . . . . . . . . . . . . . . . . . . . . |
page |
17 |
|
||
|
1.1 |
Proper use |
page |
6 |
15. |
Programming |
page |
17 |
|
|
|
|
|||||||||
|
1.2 |
Warnings. . . . . . . . . . . . . . . . . . . . . . . . . . . . . . . . . . . . . . . . . . . . . . . . . . . . |
page |
6 |
|
15.1 |
Buttons programme item . . . . . . . . . . . . . . . . . . . . . . . . . . . . . . . . |
page |
19 |
E |
|
1.3 |
Precautions . . . . . . . . . . . . . . . . . . . . . . . . . . . . . . . . . . . . . . . . . . . . . . . . . |
page |
6 |
|
15.2 |
Filter programme item. . . . . . . . . . . . . . . . . . . . . . . . . . . . . . . . . . . . |
page 20 |
||
2. |
Preparing the IMPRESSA . . . . . . . . . . . . . . . . . . . . . . . . . . . . . . . . . . . . . . . . |
page |
7 |
|
15.3 |
Water hardness programme item. . . . . . . . . . . . . . . . . . . . . . . |
page 20 |
|||
|
2.1 |
Checking the mains voltage . . . . . . . . . . . . . . . . . . . . . . . . . . . . . |
page |
7 |
|
15.4 |
Energy programme item . . . . . . . . . . . . . . . . . . . . . . . . . . . . . . . . . |
page 20 |
|
|
|
2.2 |
. . . . . . . . . . . . . . . . . . . . . . . . . . . . . . . .Checking the electric fuse |
page |
7 |
|
15.5 |
. . . . . . . . . .Automatic switch-off time programme item |
page 20 |
|
|
|
2.3 |
Filling the water tank. . . . . . . . . . . . . . . . . . . . . . . . . . . . . . . . . . . . . . |
page |
7 |
|
15.6 |
Rinse programme item . . . . . . . . . . . . . . . . . . . . . . . . . . . . . . . . . . . |
page |
21 |
|
|
2.4 |
Filling with coffee beans . . . . . . . . . . . . . . . . . . . . . . . . . . . . . . . . . . |
page |
7 |
|
15.7 |
Reset programme item . . . . . . . . . . . . . . . . . . . . . . . . . . . . . . . . . . . |
page |
21 |
|
|
2.5 |
Adjusting the grinder . . . . . . . . . . . . . . . . . . . . . . . . . . . . . . . . . . . . . |
page |
7 |
|
15.8 |
Information programme item . . . . . . . . . . . . . . . . . . . . . . . . . . . |
page 22 |
|
|
3. |
Using for the first time. . . . . . . . . . . . . . . . . . . . . . . . . . . . . . . . . . . . . . . . . . |
page |
8 |
|
15.9 |
ML/OZ display programme item . . . . . . . . . . . . . . . . . . . . . . . . |
page 23 |
|
||
4. |
Adjusting the water hardness . . . . . . . . . . . . . . . . . . . . . . . . . . . . . . . . . . |
page |
8 |
|
15.10 |
Language programme item. . . . . . . . . . . . . . . . . . . . . . . . . . . . . . |
page 24 |
|
||
5. |
Using the CLARIS filter cartridge. . . . . . . . . . . . . . . . . . . . . . . . . . . . . . . |
page |
9 |
16. |
Maintenance . . . . . . . . . . . . . . . . . . . . . . . . . . . . . . . . . . . . . . . . . . . . . . . . . . . . . . |
page 24 |
|
|||
|
5.1 |
Inserting the filter. . . . . . . . . . . . . . . . . . . . . . . . . . . . . . . . . . . . . . . . . . |
page |
9 |
|
16.1 |
Filling with water . . . . . . . . . . . . . . . . . . . . . . . . . . . . . . . . . . . . . . . . . . |
page 24 |
|
|
|
5.2 |
Changing the filter . . . . . . . . . . . . . . . . . . . . . . . . . . . . . . . . . . . . . . . . |
page |
10 |
|
16.2 |
Emptying coffee grounds container . . . . . . . . . . . . . . . . . . . . |
page 24 |
|
|
6. |
Rinsing the IMPRESSA. . . . . . . . . . . . . . . . . . . . . . . . . . . . . . . . . . . . . . . . . . . |
page |
10 |
|
16.3 |
Drip tray missing . . . . . . . . . . . . . . . . . . . . . . . . . . . . . . . . . . . . . . . . . . |
page 25 |
|
||
7. |
Adjusting the amount of water for coffee. . . . . . . . . . . . . . . . . . . . |
page |
11 |
|
16.4 |
Filling with coffee beans . . . . . . . . . . . . . . . . . . . . . . . . . . . . . . . . . . |
page 25 |
|
||
8. |
Preparing 1 cup of coffee . . . . . . . . . . . . . . . . . . . . . . . . . . . . . . . . . . . . . . . |
page |
11 |
|
16.5 |
Changing the filter . . . . . . . . . . . . . . . . . . . . . . . . . . . . . . . . . . . . . . . . |
page 25 |
|
||
9. |
Preparing 2 cups of coffee. . . . . . . . . . . . . . . . . . . . . . . . . . . . . . . . . . . . . . |
page |
12 |
|
16.6 |
Cleaning the IMPRESSA. . . . . . . . . . . . . . . . . . . . . . . . . . . . . . . . . . . |
page 25 |
|
||
10. |
Preparing preground coffee . . . . . . . . . . . . . . . . . . . . . . . . . . . . . . . . . . . . |
page |
12 |
|
16.7 |
IMPRESSA calcification . . . . . . . . . . . . . . . . . . . . . . . . . . . . . . . . . . . . |
page 25 |
|
||
11. |
Preparing hot water . . . . . . . . . . . . . . . . . . . . . . . . . . . . . . . . . . . . . . . . . . . . . |
page |
13 |
|
16.8 |
General cleaning instructions . . . . . . . . . . . . . . . . . . . . . . . . . . . . |
page 25 |
|
||
12. |
Preparing steam. . . . . . . . . . . . . . . . . . . . . . . . . . . . . . . . . . . . . . . . . . . . . . . . . . |
page |
13 |
|
16.9 |
Emptying the system . . . . . . . . . . . . . . . . . . . . . . . . . . . . . . . . . . . . . |
page 26 |
|
||
13. |
Professional Cappuccino Frother . . . . . . . . . . . . . . . . . . . . . . . . . . . . . . |
page |
14 |
17. |
Cleaning . . . . . . . . . . . . . . . . . . . . . . . . . . . . . . . . . . . . . . . . . . . . . . . . . . . . . . . . . . . |
page 26 |
|
|||
|
13.1 |
Preparing cappuccino with the |
|
|
18. |
Descaling . . . . . . . . . . . . . . . . . . . . . . . . . . . . . . . . . . . . . . . . . . . . . . . . . . . . . . . . . . |
page 27 |
|
||
|
|
Professional Cappuccino Frother . . . . . . . . . . . . . . . . . . . . . . . . |
page |
14 |
19. |
Disposal . . . . . . . . . . . . . . . . . . . . . . . . . . . . . . . . . . . . . . . . . . . . . . . . . . . . . . . . . . . |
page 28 |
|
||
|
13.2 |
Preparing hot milk with the |
|
|
20. |
Tips for a perfect coffee. . . . . . . . . . . . . . . . . . . . . . . . . . . . . . . . . . . . . . . . . |
page 29 |
|
||
|
|
Professional Cappuccino Frother . . . . . . . . . . . . . . . . . . . . . . . . |
page |
15 |
21. |
Messages. . . . . . . . . . . . . . . . . . . . . . . . . . . . . . . . . . . . . . . . . . . . . . . . . . . . . . . . . . |
page 30 |
|
||
|
13.3 |
Rinsing the Professional Cappuccino Frother. . . . . . . . . . |
page |
16 |
22. |
Problems . . . . . . . . . . . . . . . . . . . . . . . . . . . . . . . . . . . . . . . . . . . . . . . . . . . . . . . . . . |
page |
31 |
|
|
|
13.4 |
Dismantling and rinsing the |
|
|
23. |
Legal information . . . . . . . . . . . . . . . . . . . . . . . . . . . . . . . . . . . . . . . . . . . . . . . . |
page 32 |
|
||
|
|
Professional Cappuccino Frother . . . . . . . . . . . . . . . . . . . . . . . . |
page |
16 |
24. |
Technical data . . . . . . . . . . . . . . . . . . . . . . . . . . . . . . . . . . . . . . . . . . . . . . . . . . . . |
page 32 |
|
||
|
13.5 |
Cleaning the Professional Cappuccino Frother . . . . . . . . |
page |
16 |
|
|
|
|
|
|
5

Before you get started
Congratulations on purchasing this IMPRESSA. To ensure that your IMPRESSA works smoothly, please read these instructions for use carefully and keep them as a future reference.
If you need more information or if you experience any problems which are not covered in enough detail in these instructions for use, please contact your local stockist or ourselves.

 1. Safety instructions
1.1 Proper use
The machine is designed and intended for private domestic use. It should only be used for coffee preparation and to heat milk and water. Use for any other purpose will be deemed improper. JURA Elektroapparate AG cannot accept any responsibility for the consequences of improper use.
Before using the machine read these instructions for use thoroughly and completely and comply with the instructions they contain. Keep these instructions for use close to the machine and pass them on to the next user.
1.2 Warnings
Children are not aware of the dangers which may arise when using electric appliances, so never leave children unattended near electric appliances.
The IMPRESSA may only be operated by instructed persons.
People, including children, who
–do not have the physical, sensory or mental capabilities to use the machine safely or
–are inexperienced or lack knowledge in how to use the machine
safely
must be supervised by a responsible person when using it, or must be instructed in how to use it correctly.
Never start up a defective IMPRESSA or an IMPRESSA with a damaged supply cable.
In the event of signs of damage, for example if there is a smell of burning, unplug the machine immediately from the mains supply and contact JURA service.
If the mains cable of this machine is damaged, it must be repaired either directly by JURA or by an authorised JURA service centre.
Never repair or open the IMPRESSA yourself. Repairs and modifications to the machine may only be undertaken by authorised JURA service centres using genuine spare parts and accessories. The machine contains live parts. If opened, there is a danger of potentially fatal injury.
Do not immerse the IMPRESSA in water.
1.3 Precautions
Never subject the IMPRESSA to environmental influences (rain, snow, frost) and do not operate with wet hands.
Place the IMPRESSA on a sturdy, horizontal surface resistant to any water leaks. Never place on hot or warm surfaces (hobs). Select a site out of reach of children.
6

Be careful to ensure that the mains cable is not trapped and does not rub against sharp edges.
Always remove the mains plug during long periods of absence (holidays etc.).
Always remove the mains plug before cleaning.
When removing the mains plug, never tug the supply cable or the IMPRESSA itself.
The IMPRESSA is connected to the power supply by a supply cable. Make sure people can’t trip over the supply cable, bringing down the IMPRESSA. Make sure children and pets cannot reach the machine.
Never put the IMPRESSA or individual parts of it in the dishwasher.
Install the IMPRESSA in a place where the air can circulate well to prevent it from overheating.
2. Preparing the IMPRESSA
2.1 Checking the mains voltage
The IMPRESSA is set to the right mains voltage by default. Check whether your mains voltage matches that stated on the rating plate on the underside of your IMPRESSA.
2.3 Filling the water tank
Only top up with fresh, cold water. Never fill with milk, mineral water or other liquids.
Remove the water tank and rinse it well with cold mains water |
E |
(Fig. 4). |
Then fill the water tank and refit in the IMPRESSA. Be careful to ensure that the tank is correctly inserted and properly engaged.
2.4 Filling with coffee beans
To make sure you get lasting enjoyment from your machine and to avoid the need for repairs, please note that the grinder in your JURA coffee machine is not suitable for coffee beans that have been treated with additives (e.g. sugar) during or after roasting. Using coffee blends of this type may damage the grinder. Any resulting repair costs will not be covered by the warranty conditions.
Fold the bean container cover (12) open and remove the aroma preservation cover (13).
Remove any dirt or foreign objects from inside the bean container.
Fill the bean container with coffee beans and close the cover.
2.2 Checking the electric fuse
The IMPRESSA is rated for a current of 10 amps. Check whether a fuse for this rating is fitted.
2.5 Adjusting the grinder
You can adjust the grinder to the suit the degree of roast of your coffee. Our recommendations:
a light roast a finer setting (the smaller the dots, the finer the grinding)
a dark roast a coarser setting (the larger the dots, the coarser the grinding)
7
Only use the switch to adjust the consistency of grind when the grinder is running.
Open the bean container cover (12) and remove the aroma preservation cover (13).
To adjust the consistency of grind, turn the switch to the desired position during the grinding operation (Fig. 2).
3. Using for the first time
Fill the bean container with coffee beans (12).
Switch your IMPRESSA on with the On/Off button  (21).
(21).
 SPRACHE
DEUTSCH
The illuminated ring (2) is active.
Turn the Rotary Switch (1) until the desired language appears on the display.
Now confirm your selection by pressing the Rotary Switch (1).
 FILL
FILL
WATER TANK
Remove the water tank (10) and fill with fresh water. Refit the water tank in your IMPRESSA.
 OPEN TAP
Place receptacle under the Professional Cappuccino Frother (15) (Fig. 10).
Now open the steam / hot water draw-off tap (14) (Fig. 13).
 SYSTEM
FILLING
 CLOSE TAP
Close the steam / hot water draw-off tap (14).
 SYSTEM
FILLING
 HEATING
 PRESS
PRESS
RINSE
Press the Maintenance button 
 (3).
(3).
The machine rinses.
 RINSING
 READY
READY
If FILL BEANS appears on the display, again press any coffee preparation button. The grinder is not yet filled with coffee beans.
To get a really good crema you can individually adjust the height-adjustable coffee spout (17) to your cup sizes (Fig. 3).
4. Adjusting the water hardness
Water is heated in the IMPRESSA. Over time this will result in calcification and this is displayed automatically. The IMPRESSA must be set to the hardness of the water used. Use the test strips provided.
1° German hardness corresponds to 1.79° French hardness.
When the filter is activated, the water hardness programme item disappears.
8
The IMPRESSA is set to 16° dH by default. You can change this setting. Proceed as follows:
 READY
READY
Press and hold the Rotary Switch (1) until RINSE appears on the display.
The illuminated ring (2) is active.
Turn the Rotary Switch (1) until the following message appears on the display:
 HARDNESS
Now press the Rotary Switch (1) to enter the programme item.
 16° dH
Now turn the Rotary Switch (1) until the desired water hardness appears.
For example  20° dH.
Confirm the desired water hardness by pressing the Rotary Switch (1).
 OK
OK
 HARDNESS
Turn the Rotary Switch (1) until the following message appears on the display:
 EXIT
EXIT
Now press the Rotary Switch (1) to exit programming mode.
 READY
READY
5. Using the CLARIS filter cartridge
If you use the CLARIS filter cartridge correctly, your automatic coffee machine no longer has to be descaled. The DE-SCALE programme item no longer appears.
5.1 Inserting the filter
Press and hold the Rotary Switch (1) until RINSE appears on the dis- |
|
play. |
|
The illuminated ring (2) is active. |
E |
Turn the Rotary Switch (1) until the following message appears on |
|
the display: |
|
 FILTER –
Press the Rotary Switch (1) again to enter this programme item.
 NO –
NO –
Turn the Rotary Switch (1) until the following message appears on the display:
 YES
YES
Press the Rotary Switch (1) to activate the filter cartridge.
 OK
OK
 INSERT
OPEN TAP
Remove and empty the water tank (10).
Fold up the filter holder. Insert the filter cartridge in the water tank, exerting slight pressure (Fig. 1).
Close the filter holder until it audibly snaps into place.
Fill the water tank with cold, fresh mains water and reinsert the tank.
Place a sufficiently large receptacle (around 1 litre) under the Professional Cappuccino Frother (15) (Fig. 10).
Open the steam / hot water draw-off tap (14) (Fig. 13).
 FILTER
RINSING
9
You can interrupt rinsing of the filter at any time by closing the steam / hot water draw-off tap (14). To continue with filter rinsing, open the steam / hot water draw-off tap (14) again.
 CLOSE TAP
Close the steam / hot water draw-off tap (14), your IMPRESSA will now heat up to coffee temperature.
 HEATING
 READY
READY
You have now activated the filter. In programming mode, the Water hardness programme item  HARDNESS no longer appears.
5.2 Changing the filter
After drawing off around 50 litres of water, the filter will cease to work. You will be prompted to change the filter. Please use the scale on the filter holder on the water tank to monitor how long the CLARIS filter cartridge has been in use (max.
2months).
 READY
READY
FILTER
Press the Maintenance button 
 (3) until the following message appears:
 CHANGE
OPEN TAP
Remove the water tank from the machine and empty it.
Fold up the filter holder. Take out the old CLARIS filter cartridge and insert the new filter cartridge into the water tank, exerting slight pressure (Fig. 1).
Close the filter holder until it audibly snaps into place.
Fill the water tank with cold, fresh mains water and reinsert in the IMPRESSA.
Place a sufficiently large receptacle (around 1 litre) under the Professional Cappuccino Frother (15) (Fig. 10) and open the steam / hot water draw-off tap (14) (Fig. 13).
 FILTER
RINSING
 CLOSE TAP
Close the steam / hot water draw-off tap (14).
 HEATING
 READY
READY
6. Rinsing the IMPRESSA
If the IMPRESSA is switched off and has already cooled down, you are prompted to perform the rinse operation. A rinse operation is triggered automatically when shutting the coffee machine down.
Switch your IMPRESSA on with the On/Off button  (21).
(21).
 HEATING
 PRESS
PRESS
RINSE
Press the Maintenance button 
 (3).
(3).
 RINSING
 READY
READY
10
 Loading...