


LBH-781
BE078130B0A
MODEL
LBH-781-782-783-784
Before
operating
your
JUKI
Lock
stitch
Machine,
please
read
this
In
struction
Book
carefully
in
order
to
operite
it in
the
correct
and
efficient
HIGH
SPEED
SINGLE
NEEDLE
LOCKSTITCH
STRIAGHX
BUTTON
HOLING
SEWING
MACHINE
Instruction
Book
CAUTION
IN
OPERATION
SPECIFICATIONS
1.
The
machine
should
rotate
counterclockwise
as
observed
from
the
pulley.
Take
care
not
to
rotate
the
machine in
the
opposite
direction.
2. Never start the machine before filling the machine base
with
lubricating
oil.
3.
Remove
the
bobbin
case
and
the
needle
thread
from
the
machine before performing
the
trial
operation.
4. Clean up
the
sewing'
hook
and
the
bobbin
thread
trimmer
every
day
after
sewing
work.
Also
check
the
level
of
the
lubricating
oil.
Application
Sewing
speed
Buttonhole
length
Bar-tack
width
Needle
Presser
lift
Lubricating oil
1.
MOTOR
PULLEY
AND
V
BELT
1. Motors
of
300W, 4-pole are used for single-phase or three-phase
operation.
(If
a 250W
motor
has to be used, operate the machine
at
3,100
s.p.m.
or
less.)
2.
M-type
V
belts
are
used.
3. Refer to the following table for the motor pulleys, V belt length,
and
sewing speed.
Sewing speed
Frequency
Motor
pulley Part No.
3,600
s.p.m.
B7262-781-000
B7263-781-000
3,400
s.p.m.
B725
6-781-000
B7257-781-000
B725
3-781-000
High speed
Vbelt
44
inch
43
inch
44
inch
42
inch
43
inch
Low
speed
Vbelt
42
inch
42
inch
43
inch
42
inch
42
inch
LBH-781
LBH-782 LBH-783 LBH-784
Buttonholing
for
ordinary
cloth,
knit,
etc.
Max.
3,600
s.p.m.
6.4~19.0mni
6.4~25.4mm
6.4~31.7mm
12.7~38.0m
(l/4"~3/4")
(1/4"~1")
,i®/4"-l-l/4")
(l/2"-I-l/2
mrATn''\
-S.Omin
(3/32"~3/l
6")
DPx5
#11~#14
12mm
{15/32")
JUKI
New
Defrix
Oil
No.
1
i
3,100
s.p.m.
B7254-781-000
42
inch
2,900
s.p.m.
B7258-781-000
B7259-781-000
42
inch
42
inch
42
inch
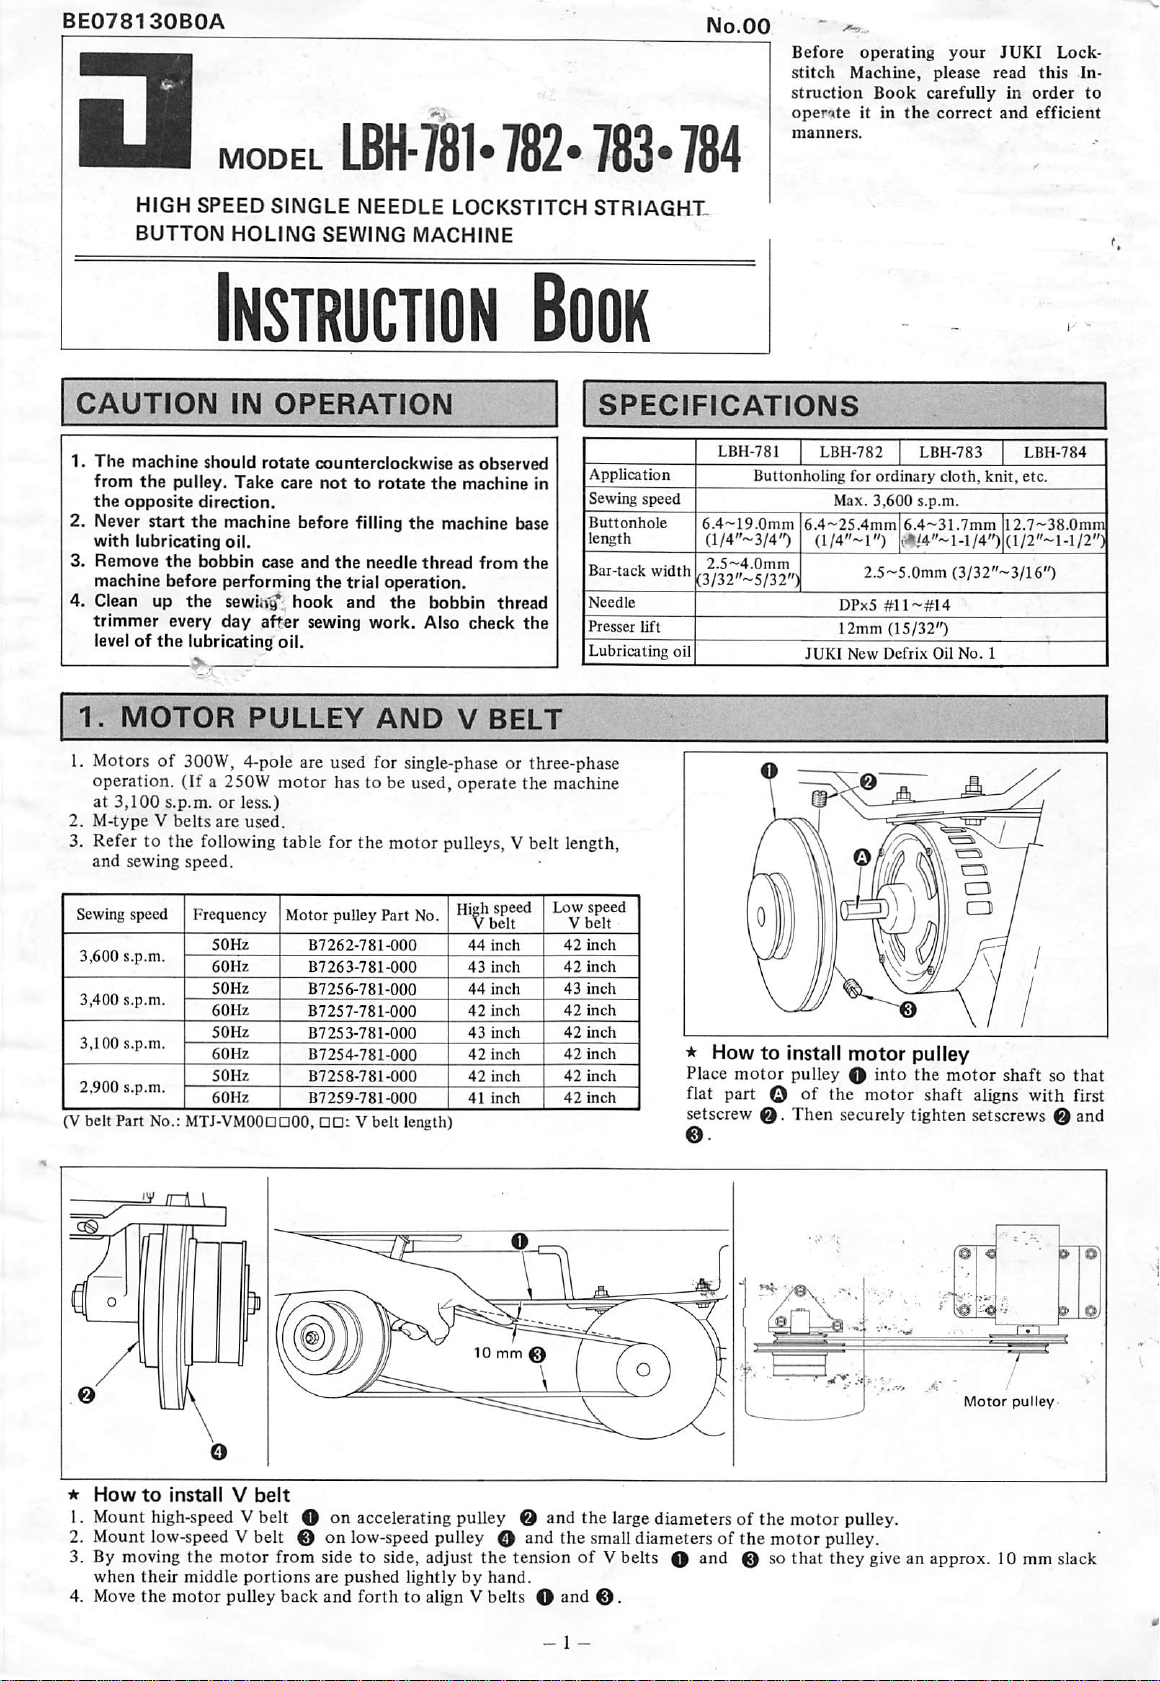
* How
to
install
motor
pulley
Place
motor
pulley 0
into
the
motor
shaft so
that
flat part © of the
motor
shaft aligns with first
setscrew o
Then
securely
tighten
setscrews
0
and
41
inch
(V
belt
Part No.: MTJ-VMOODDOO, V
belt
length)
*
How
to
install
V
belt
1. Mount high-speed V belt O oti accelerating pulley 0 and the large diameters of the motor pulley.
2. Mount low-speed V belt 0 on low-speed pulley 0 and the smalldiameters of the motor pulley.
3. By moving
the
motor
from
side to side, adjust
the
tension
of
V belts 0 and 0 so
that
they
give an approx. 10 mm slack
when
their
middle
portions
are
pushed
lightly
by
hand.
4. Move
the
motor
pulley
back
and
forth
to align V belts 0 and
0.
42
inch
i
Motor
pulley
From the library of: Superior Sewing Machine & Supply LLC
2.
SETTING
UP
THE
THREAD
STAND
3.
SETTING
UP
THE
MACHINE
HEAD
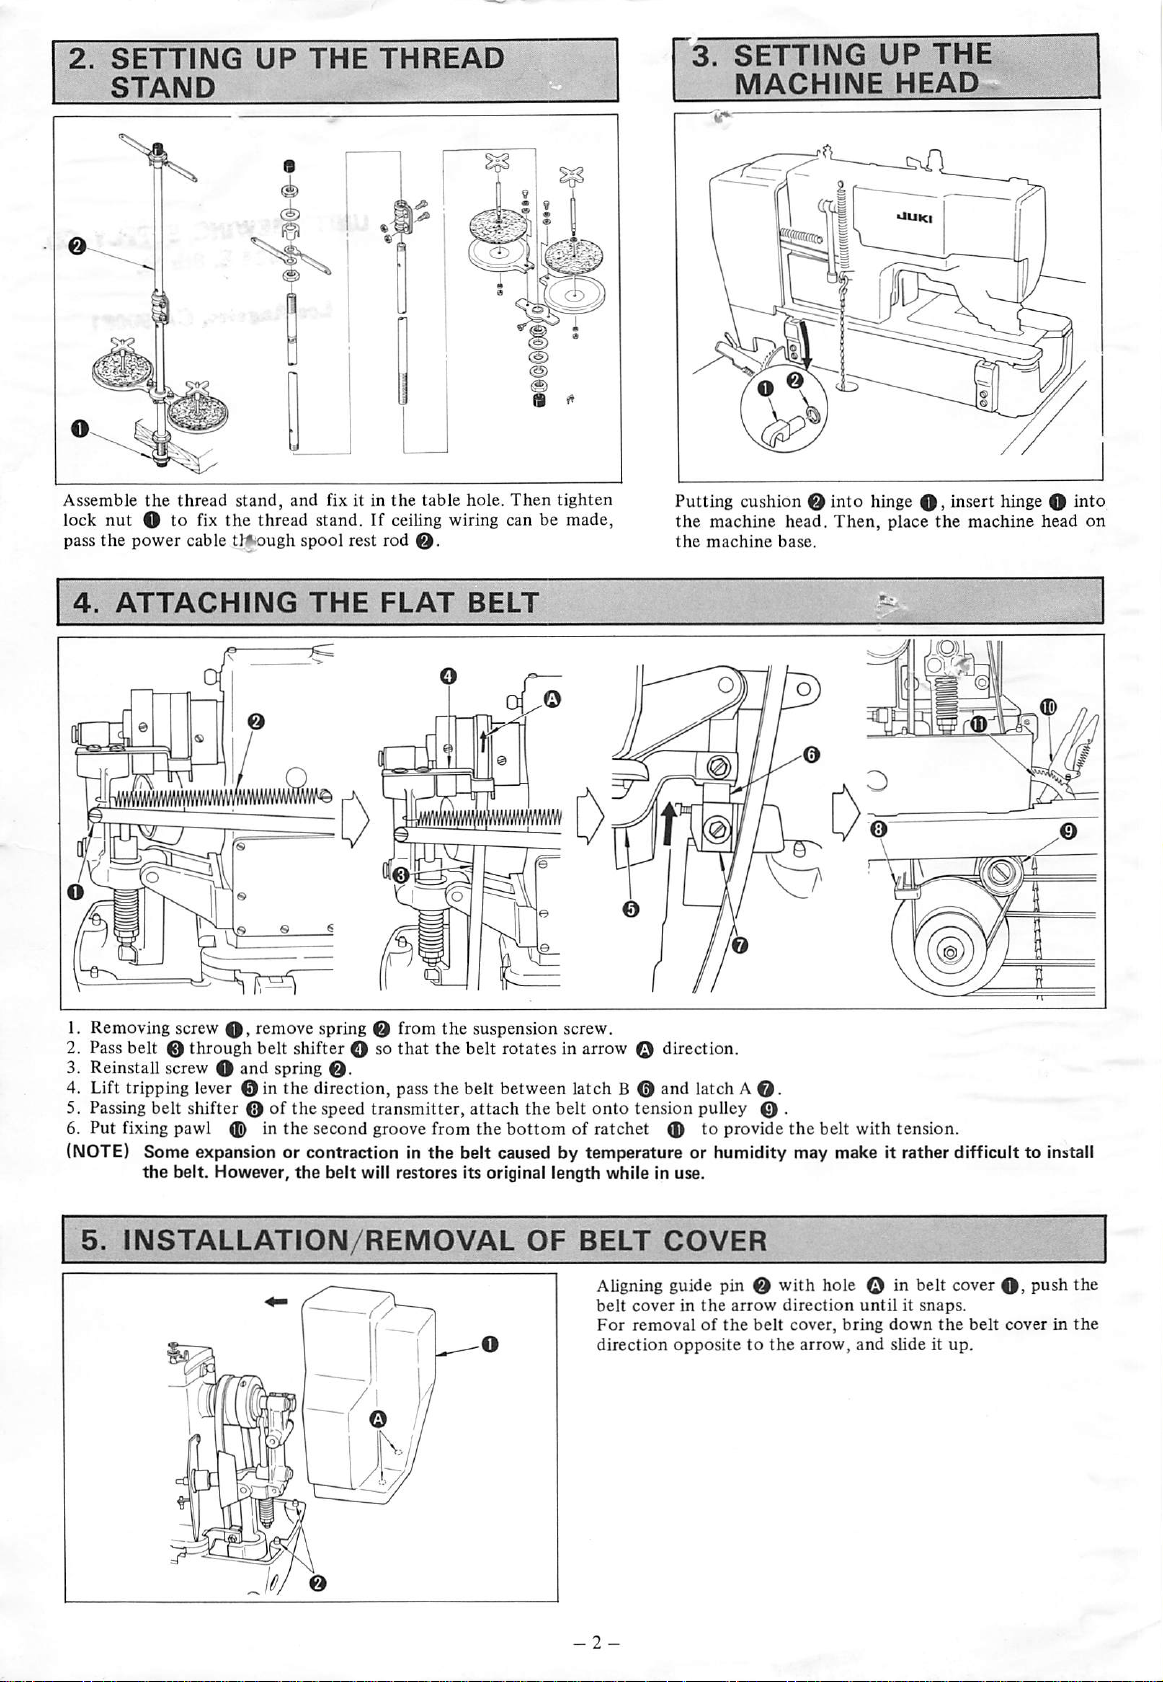
Assemble
the
thread
stand,
and
fix it in
the
table
hole.
Then
tighten
lock
nut
O to fix
the
thread stand. If ceiling wiring can be made,
pass
the
power
cable tl*iOugh
spool
rest
rod
0.
Putting cushion 0 into hinge
0,
insert hinge O into
the
machine
head.
Then,
place
the
machine
head
on
the
machine
base.
4.
ATTACHING
THE
FLAT
BELT
i
•iiiiiiiiliii'iiiiii
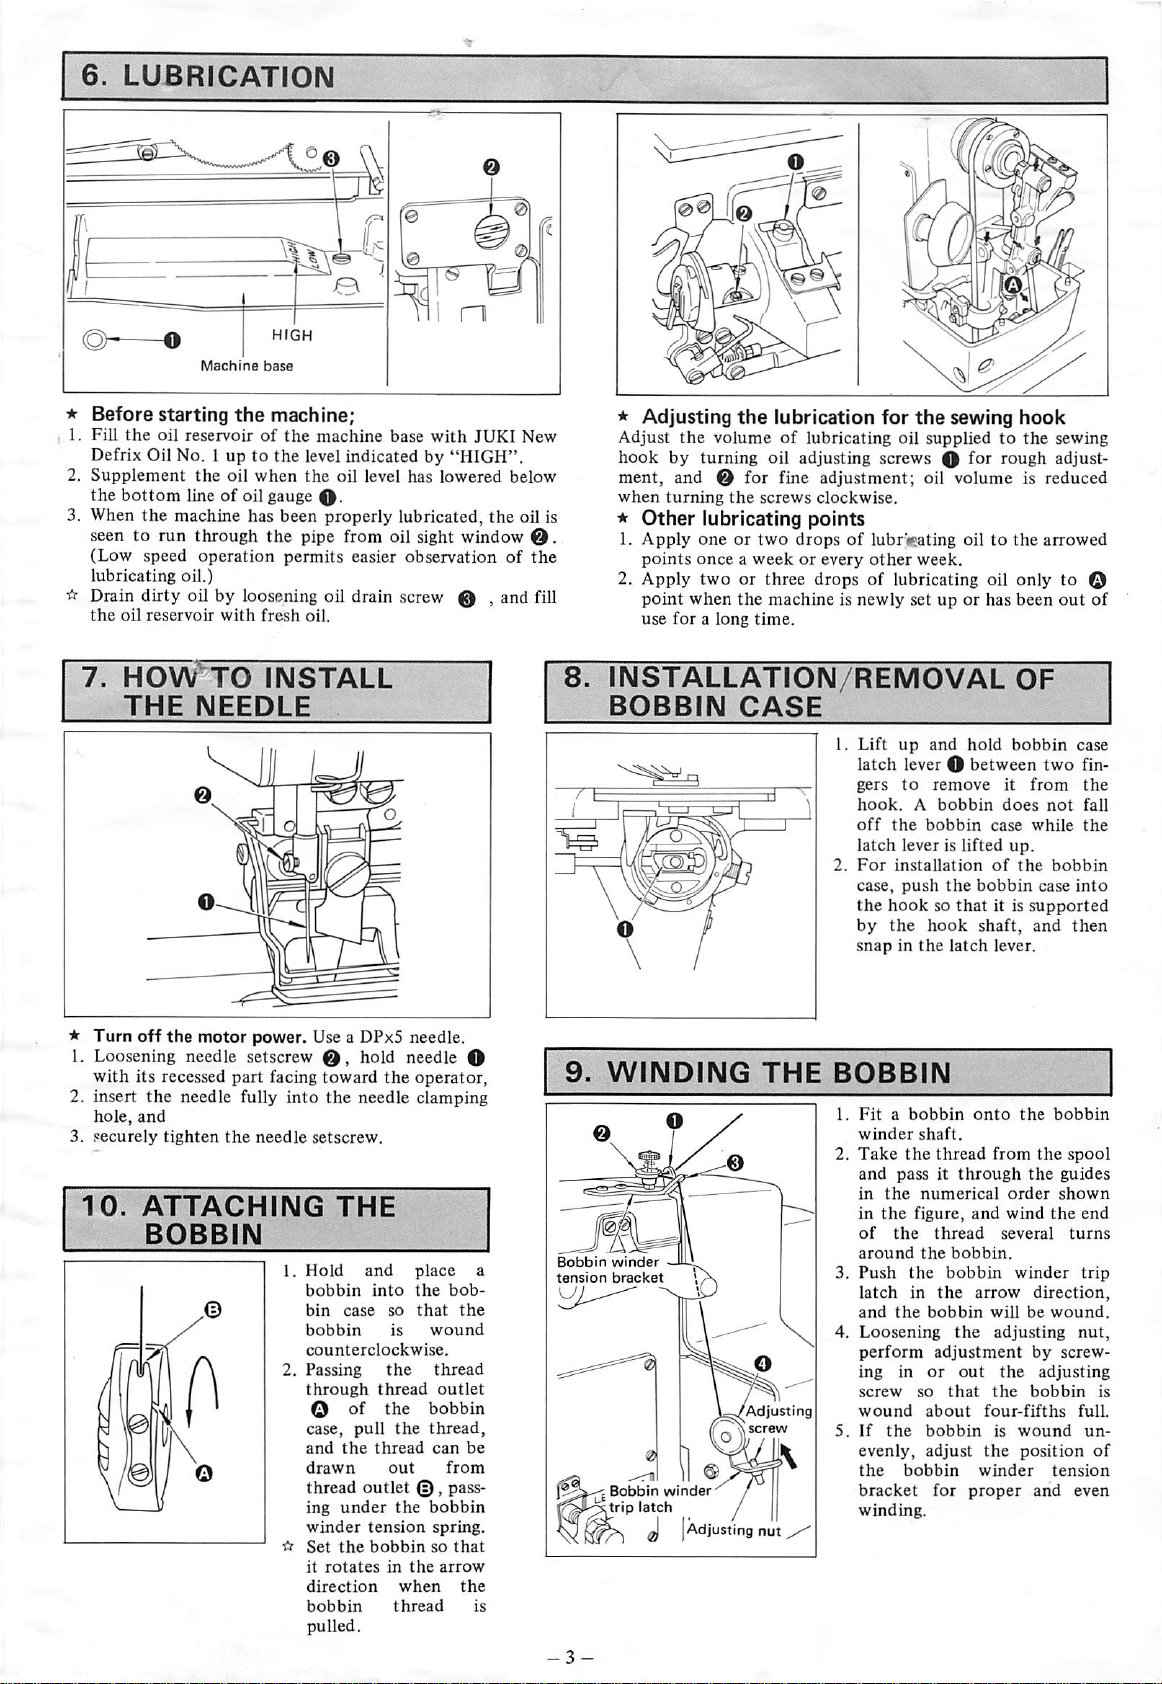
1. Removing screw
0,
remove spring 0 from
the
suspension screw.
2. Pass belt 0 through belt shifter 0 so that the belt rotates in arrow o direction.
3. Reinstall screw 0 and spring
0.
4. Lift tripping lever 0 in the direction, pass the belt between latch B 0 and latch A
0.
5. Passing
belt
shifter 0 of
the
speed
transmitter,
attach
the
belt
onto
tension pulley 0 .
6.
Put
fixing pawl 0 in
the
second
groove
from
the
bottom
of
ratchet
0
to
provide
the
belt
with
tension.
(NOTE) Some expansion or contraction In
the
belt caused by temperature or humidity may make It rather difficult to Install
the
belt. However,
the
belt
will restores its original length while In use.
5.
INSTALLATION/REMOVAL
OF
BELT
COVER
Aligning guide pin 0
with
hole 0 in belt cover
0,
push
the
belt
cover
in
the
arrow
direction
until
it
snaps.
For
removal
of
the
belt
cover,
bring
down
the
belt
cover
in
the
direction
opposite
to
the
arrow,
and
slide
it
up.
From the library of: Superior Sewing Machine & Supply LLC
6.
LUBRICATION
★
Before
Starting
the
machine;
1.
Fill
the
oil
reservoir
of
the
machine
base
with
JUKI
New
Defrix Oil No. I up to the level indicated by
"HIGH",
2.
Supplement
the
oil
when
the
oil
level has
lowered
below
the
bottom
line of oil gauge
0.
3. When
the
machine has been properly lubricated,
the
oil is
seen to
run
through
the
pipe from oil sight window
O.
(Low
speed
operation
permits
easier
observation
of
the
lubricating
oil.)
Drain dirty oil by loosening oil drain screw 0 , and fill
the
oil
reservoir
with
fresh
oil.
7.
HOW^TO
INSTALL
THE
NEEDLE
*
Adjusting
the
lubrication
for
the
sewing
hook
Adjust
the
volume
of
lubricating
oil supplied
to
the
sewing
hook
by turning oil adjusting screws O for rough adjust
ment, and 0 for fine adjustment; oil volume is reduced
when
turning
the
screws
clockwise.
*
Other
lubricating
points
1.
Apply
one
or
two
drops
of
lubr'ijating oil
to
the
arrowed
points
once
a
week
or
every
other
week.
2.
Apply
two
or
three
drops of lubricating oil
only
to O
point
when
the
machine
is
newly
set
up
or
has
been
out
of
use
for
a
long
time.
INSTALLATION/REMOVAL
OF
BOBBIN
CASE
1.
Lift
up
and
hold
bobbin
case
latch
lever O
between
two
fin
gers
to
remove
it
from
the
hook.
A
bobbin
does
not
fall
off
the
bobbin
case
while
the
latch
lever is lifted
up.
2.
For
installation
of
the
bobbin
case,
push
the
bobbin
case
into
the
hook
so
that
it is
supported
by
the
hook
shaft,
and
then
snap
in
the
latch
lever.
★
Turn
off
the
motor
power.
Use a
DPx5
needle.
1. Loosening needle setscrew hold needle O
with
its recessed
part
facing
toward
the
operator,
2.
insert
the
needle
fully
into
the
needle
clamping
hole,
and
3.
securely
tighten
the
needle
setscrew.
9.
WINDING
THE
BOBBIN
10.
ATTACHING
THE
BOBBIN
1.
Hold
and
place
a
bobbin
into
the
bob
bin
case
so
that
the
bobbin
is
wound
counterclockwise.
2.
Passing
the
thread
through
thread
outlet
O of
the
bobbin
case,
pull
the
thread,
and
the
thread
can
be
drawn
out
from
thread
outlet
0,
pass
ing
under
the
bobbin
winder
tension
spring.
^
Set
the
bobbin
so
that
it
rotates
in
the
arrow
direction
when
the
bobbin
thread
is
pulled.
Bobbin
winder
-
tension
bracket
Adjusting
!
screw
-^1
11
Bobbin
winder
/
trip latch /
X J I
Adjusting
nut
1.
Fit
a
bobbin
onto
the
bobbin
winder
shaft.
2.
Take
the
thread
from
the
spool
and
pass
it
through
the
guides
in
the
numerical
order
shown
in
the
figure,
and
wind
the
end
of
the
thread
several
turns
around
the
bobbin.
3.
Push
the
bobbin
winder
trip
latch
in
the
arrow
direction,
and
the
bobbin
will
be
wound.
4.
Loosening
the
adjusting
nut,
perform
adjustment
by
screw
ing
in
or
out
the
adjusting
screw
so
that
the
bobbin
is
wound
about
four-fifths
full.
5.
If
the
bobbin
is
wound
un
evenly,
adjust
the
position
of
the
bobbin
winder
tension
bracket
for
proper
and
even
winding.
From the library of: Superior Sewing Machine & Supply LLC
12.
REDUCTION
OF
SEWING
SPEED
AND
EMERGENCY
STOP
11.
THREADING
THE
NEEDLE-THREAD
r©/.
--
1. Pass
the
needle
thread
in
the
order
as
shown
in
the
figures.
2.
The
threading
can
be
done
easily
by
using
the
needle
threader
supplied
with
the
machine.
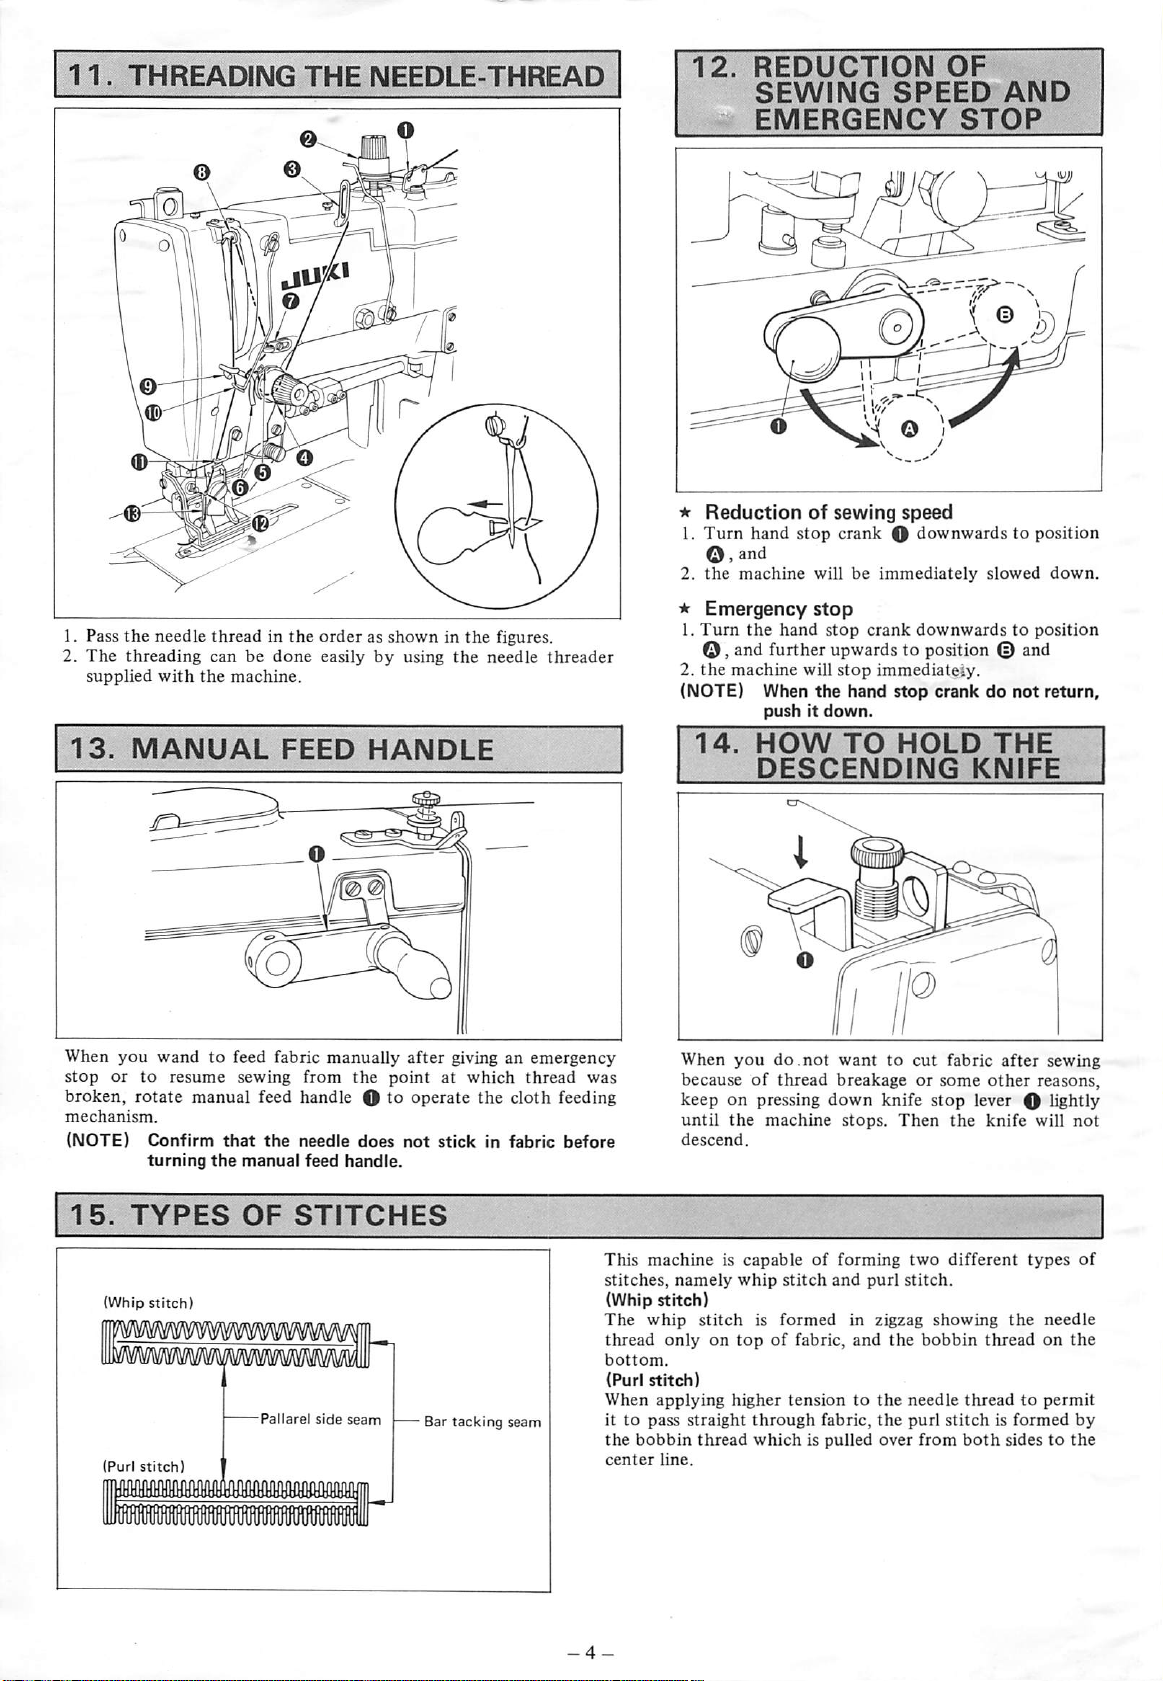
•k
Reduction
of
sewing
speed
1.
Turn
hand
stop
crank
O
downwards
to
position
O,
and
2.
the
machine
will
be
immediately
slowed
down.
★
Emergency
stop
1.
Turn
the
hand
stop
crank
downwards
to
position
o , and further upwards to position © and
2.
the
machine
will
stop
immediately.
(NOTE) When
the
hand
stop
crank
do
not
return,
push
It
down.
13.
MANUAL
FEED
HANDLE
14.
HOW
TO
HOLD
THE
DESCENDIIMG
KNIFE
m
When
you
wand
to
feed fabric
manually
after
giving an
emergency
stop
or
to
resume
sewing
from
the
point
at
which
thread
was
broken,
rotate
manual
feed handle O to operate
the
cloth
feeding
mechanism.
(NOTE)
Confirm
that
the
needle
does
not
stick
in
fabric
before
turning
the
manual
feed
handle.
When
you
do ,
not
want
to
cut
fabric
after
sewing
because
of
thread
breakage
or
some
other
reasons,
keep
on
pressing
down
knife
stop
lever O lightly
until
the
machine
stops.
Then
the
knife
will
not
descend.
15.
TYPES
OF
STITCHES
(Whip
stitch)
mmwmmimmimMimm
Pallarel side seam Bar tacking seam
(Purl
stitch)
This
machine
is
capable
of
forming
two
different
types
of
stitches,
namely
whip
stitch
and
purl
stitch.
(Whip stitch)
The
whip
stitch
is
formed
in
zigzag
showing
the
needle
thread
only
on
top
of
fabric,
and
the
bobbin
thread
on
the
bottom.
(Purl
stitch)
When
applying
higher
tension
to
the
needle
thread
to
permit
it
to
pass
straight
through
fabric,
the
purl
stitch
is
formed
by
the
bobbin
thread
which
is
pulled
over
from
both
sides
to
the
center
line.
From the library of: Superior Sewing Machine & Supply LLC
 Loading...