


 Loading...
2020 RENEGADE
OWNER’S MANUAL

This Owner’s Manual illustrates and describes the operation of features and equipment that are either standard or optional on this vehicle. This manual may also include a description of features and equipment that are no longer available or were not ordered on this vehicle. Please disregard any features and equipment described in this manual that are not on this vehicle. FCA US LLC reserves the right to make changes in design and specifications, and/or make additions to or improvements to its products without imposing any obligation upon itself to install them on products previously manufactured.
With respect to any vehicles sold in Canada, the name FCA US LLC shall be deemed to be deleted and the name FCA Canada Inc. used in substitution therefore.
If you are the first registered retail owner of your vehicle, you may obtain a complimentary printed copy of the Warranty Booklet by calling 1-877-426-5337 (U.S.) or 1-800-387-1143 (Canada) or by contacting your dealer.
This Owner’s Manual is intended to familiarize you with the important features of your vehicle. Your most up-to-date Owner’s Manual, Navigation/Uconnect manuals and Warranty Booklet can be found by visiting the website on the back cover. U.S. residents can purchase replacement kits by visiting www.techauthority.com and Canadian residents can purchase replacement kits by calling 1-800-387-1143.
 WARNING: Operating, servicing and maintaining a passenger vehicle or off-highway motor vehicle can expose you to chemicals including engine exhaust, carbon monoxide, phthalates, and lead, which are known to the State of California to cause cancer and birth defects or other reproductive harm. To minimize exposure, avoid breathing exhaust, do not idle the engine except as necessary, service your vehicle in a well-ventilated area and wear gloves or wash your hands frequently when servicing your vehicle. For more information go to www.P65Warnings.ca.gov/passenger-vehicle.

TABLE OF CONTENTS |
|
|
1 |
INTRODUCTION.............................................................................................................................. |
8 |
2 |
GETTING TO KNOW YOUR VEHICLE ................................................................................... |
11 |
3 |
GETTING TO KNOW YOUR INSTRUMENT PANEL ........................................................ |
78 |
4 |
SAFETY .......................................................................................................................................... |
99 |
5 |
STARTING AND OPERATING ............................................................................................... |
156 |
6 |
IN CASE OF EMERGENCY .................................................................................................... |
238 |
7 |
SERVICING AND MAINTENANCE ...................................................................................... |
279 |
8 |
TECHNICAL SPECIFICATIONS ............................................................................................ |
324 |
9 |
MULTIMEDIA .............................................................................................................................. |
332 |
10 |
CUSTOMER ASSISTANCE ..................................................................................................... |
466 |
11 |
INDEX............................................................................................................................................ |
470 |
1
2
3
4
5
6
7
8
9
10
11

2 
INTRODUCTION
HOW TO USE THIS MANUAL ................................. |
9 |
Essential Information.................................... |
9 |
Symbols.......................................................... |
9 |
ROLLOVER WARNING ........................................... |
9 |
WARNINGS AND CAUTIONS ............................... |
10 |
VEHICLE MODIFICATIONS/ALTERATIONS......... |
10 |
GETTING TO KNOW YOUR VEHICLE |
|
KEYS ...................................................................... |
11 |
Key Fob With Remote Control..................... |
11 |
IGNITION SWITCH................................................. |
15 |
Keyless Enter-N-Go — Ignition..................... |
15 |
REMOTE STARTING SYSTEM — IF EQUIPPED... |
16 |
How To Use Remote Start........................... |
16 |
Remote Start Cancel Message — |
|
If Equipped................................................... |
17 |
To Enter Remote Start Mode...................... |
17 |
To Exit Remote Start Mode Without Driving |
|
The Vehicle................................................... |
17 |
To Exit Remote Start Mode And Drive The |
|
Vehicle.......................................................... |
17 |
Remote Start Comfort Systems — |
|
If Equipped .................................................. |
18 |
Remote Start Windshield Wiper De-Icer And |
|
Rear Defrost Activation — If Equipped........ |
18 |
General Information .................................... |
18 |
SENTRY KEY.......................................................... |
19 |
Key Programming ....................................... |
19 |
Replacement Keys....................................... |
19 |
General Information.................................... |
19 |
VEHICLE SECURITY ALARM — IF EQUIPPED..... |
20 |
To Arm The System ..................................... |
20 |
To Disarm The System ............................... |
21 |
Disabling ...................................................... |
21 |
DOORS................................................................... |
21 |
Manual Door Locks...................................... |
21 |
Power Door Locks ....................................... |
22 |
Keyless Enter-N-Go — Passive Entry (If |
|
Equipped)..................................................... |
23 |
Automatic Unlock On Exit Feature — If |
|
Equipped...................................................... |
26 |
Dead Lock Device — If Equipped................ |
26 |
Child Locks .................................................. |
27 |
SEATS ................................................................... |
28 |
Manual Front Seats..................................... |
28 |
Manual Rear Seat Adjustment ................... |
29 |
Power Adjustment (Front) — If Equipped.... |
31 |
Heated Seats — If Equipped ....................... |
32 |
Unfolding The Rear Armrest 40/20/40..... |
33 |
HEAD RESTRAINTS.............................................. |
33 |
Front Head Restraints................................. |
34 |
Rear Head Restraints.................................. |
34 |
STEERING WHEEL................................................ |
35 |
Tilt/Telescoping Steering Column .............. |
35 |
Heated Steering Wheel — If Equipped ...... |
35 |
UCONNECT VOICE RECOGNITION QUICK |
|
TIPS ....................................................................... |
36 |
Introducing Voice Recognition.................... |
36 |
Get Started................................................... |
36 |
Basic Voice Commands .............................. |
37 |
General Information.................................... |
37 |
Additional Information................................. |
38 |
MIRRORS............................................................... |
38 |
Inside Day/Night Mirror .............................. |
38 |
Auto Dimming Mirror — If Equipped........... |
38 |
Outside Mirrors ........................................... |
38 |
Heated Mirrors — If Equipped..................... |
40 |
Illuminated Vanity Mirrors — If Equipped .. |
40 |
EXTERIOR LIGHTS................................................. |
40 |
Headlights ................................................... |
40 |
Daytime Running Lights (DRLs) — |
|
If Equipped .................................................. |
40 |
High Beams ................................................. |
40 |
Flash-To-Pass............................................... |
41 |
Automatic Headlights — If Equipped ......... |
41 |
Automatic High Beam Headlamp Control — |
|
If Equipped .................................................. |
41 |
Parking Lights.............................................. |
41 |
Headlight Delay .......................................... |
42 |
Front Fog Lights — If Equipped .................. |
42 |
Turn Signals................................................. |
42 |
Lane Change Assist..................................... |
43 |
Courtesy Lights............................................ |
43 |
INTERIOR LIGHTS ................................................ |
43 |
Courtesy Lights............................................ |
43 |

WIPERS AND WASHERS .................................... |
45 |
Front Wiper Operation................................. |
45 |
Rain Sensing Wipers — If Equipped ........... |
46 |
Rear Wiper Operation.................................. |
47 |
Windshield Wiper De-Icer — If Equipped.... |
48 |
CLIMATE CONTROLS ........................................... |
48 |
Air Outlet And Diffuser Locations — |
|
Passenger Compartment ............................ |
48 |
Manual Climate Controls Overview ............ |
49 |
Automatic Climate Control Overview.......... |
51 |
Climate Voice Commands........................... |
57 |
Operating Tips ............................................. |
58 |
WINDOWS.............................................................. |
60 |
Power Window Controls............................... |
60 |
Auto-Down Feature ..................................... |
60 |
Auto-Up Feature With Auto-Reverse |
|
Protection — If Equipped............................. |
61 |
Reset Auto-Up .............................................. |
61 |
Wind Buffeting ............................................ |
61 |
POWER MY SKY SUNROOF — IF EQUIPPED...... |
61 |
Power My Sky Operation ............................. |
61 |
Emergency Open/Close............................... |
63 |
Wind Buffeting ............................................ |
63 |
POWER GLASS SUNROOF WITH POWER |
|
SHADE — IF EQUIPPED ........................................ |
64 |
Opening........................................................ |
64 |
Closing.......................................................... |
64 |
Wind Buffeting ............................................ |
65 |
Power Sun Shade ........................................ |
65 |
Auto Reverse Feature.................................. |
65 |
Sunroof Maintenance.................................. |
66 |
HOOD .................................................................... |
66 |
To Open The Hood....................................... |
66 |
To Close The Hood....................................... |
66 |
LIFTGATE ............................................................... |
67 |
Opening........................................................ |
67 |
Closing.......................................................... |
68 |
Cargo Area Features.................................... |
68 |
INTERNAL EQUIPMENT........................................ |
71 |
Glove Compartment .................................... |
71 |
Sun Visors.................................................... |
71 |
USB/Media Player Control.......................... |
72 |
Power Outlets............................................... |
73 |
Power Inverter — If Equipped...................... |
74 |
Cigar Lighter — If Equipped......................... |
75 |
Ashtray — If Equipped.................................. |
75 |
Front Armrest............................................... |
76 |
Cupholders .................................................. |
76 |
Handle Grip.................................................. |
76 |
ROOF LUGGAGE RACK — IF EQUIPPED ............ |
77 |
GETTING TO KNOW YOUR INSTRUMENT PANEL
INSTRUMENT CLUSTER....................................... |
78 |
Instrument Cluster Descriptions................. |
79 |
INSTRUMENT CLUSTER DISPLAY ..................... |
80 |
Instrument Cluster Display Location And |
|
Controls........................................................ |
80 |
Oil Change Reset......................................... |
81 |
Instrument Cluster Display Menu Items ... |
82 |
TRIP COMPUTER .................................................. |
86 |
|
3 |
WARNING/INDICATOR LIGHTS AND |
|
MESSAGES ............................................................ |
86 |
Red Warning Lights..................................... |
87 |
Yellow Warning Lights................................. |
90 |
Yellow Indicator Lights................................ |
94 |
White Indicator Lights ................................. |
95 |
Blue Indicator Lights ................................... |
95 |
Green Indicator Lights................................. |
96 |
Gray Indicator Lights ................................... |
96 |
ONBOARD DIAGNOSTIC SYSTEM (OBD II) ........ |
96 |
Onboard Diagnostic System (OBD II) |
|
Cybersecurity ............................................... |
97 |
EMISSIONS INSPECTION AND MAINTENANCE |
|
PROGRAMS........................................................... |
97 |
SAFETY |
|
SAFETY FEATURES ............................................... |
99 |
Anti-Lock Brake System (ABS) ................... |
99 |
Electronic Brake Control (EBC) System.... |
100 |
AUXILIARY DRIVING SYSTEMS ....................... |
107 |
Blind Spot Monitoring (BSM) — |
|
If Equipped................................................. |
107 |
Forward Collision Warning (FCW) With |
|
Mitigation Operation — If Equipped.......... |
112 |
Tire Pressure Monitoring System |
|
(TPMS)........................................................ |
117 |
OCCUPANT RESTRAINT SYSTEMS ................. |
123 |
Occupant Restraint Systems.................... |
123 |
Important Safety Precautions................... |
123 |
Seat Belt Systems ..................................... |
124 |

4 |
|
Supplemental Restraint Systems (SRS)... |
130 |
Child Restraints ......................................... |
141 |
Transporting Pets....................................... |
153 |
SAFETY TIPS....................................................... |
153 |
Transporting Passengers .......................... |
153 |
Exhaust Gas .............................................. |
153 |
Safety Checks You Should Make Inside The |
|
Vehicle ....................................................... |
154 |
Periodic Safety Checks You Should Make |
|
Outside The Vehicle................................... |
155 |
STARTING AND OPERATING |
|
STARTING THE ENGINE..................................... |
156 |
Tip Start Feature ....................................... |
156 |
If Engine Fails To Start ............................. |
156 |
Cold Weather Operation............................ |
157 |
Extended Park Starting.............................. |
157 |
After Starting — Warming Up The |
|
Engine......................................................... |
158 |
Stopping The Engine.................................. |
158 |
Turbocharger “Cool Down” — |
|
If Equipped................................................. |
158 |
ENGINE BREAK-IN RECOMMENDATIONS ...... |
158 |
ELECTRIC PARK BRAKE (EPB)......................... |
159 |
Auto Park Brake......................................... |
161 |
SafeHold..................................................... |
161 |
Brake Service Mode .................................. |
162 |
MANUAL TRANSMISSION — IF EQUIPPED .... |
163 |
Shifting ....................................................... |
163 |
Downshifting.............................................. |
164 |
NINE-SPEED AUTOMATIC TRANSMISSION — IF
EQUIPPED .......................................................... |
165 |
Gear Selector............................................. |
166 |
Gear Ranges .............................................. |
167 |
Transmission Limp Home Mode............... |
170 |
Ignition Park Interlock............................... |
171 |
Brake/Transmission Shift Interlock |
|
System........................................................ |
171 |
FOUR WHEEL DRIVE.......................................... |
171 |
Four Wheel Drive (4x4).............................. |
171 |
SELEC-TERRAIN.................................................. |
173 |
Mode Selection Guide............................... |
173 |
ACTIVE GRILLE SHUTTERS — IF EQUIPPED .... |
174 |
POWER STEERING............................................. |
174 |
STOP/START SYSTEM ....................................... |
174 |
Automatic Mode......................................... |
174 |
Possible Reasons The Engine Does Not |
|
Autostop..................................................... |
175 |
To Start The Engine While In Autostop |
|
Mode........................................................... |
175 |
To Manually Turn Off The Stop/Start |
|
System........................................................ |
176 |
To Manually Turn On The Stop/Start |
|
System........................................................ |
176 |
System Malfunction................................... |
176 |
SPEED CONTROL — IF EQUIPPED.................... |
176 |
Activation.................................................... |
177 |
Setting A Desired Speed........................... |
177 |
Varying The Speed..................................... |
177 |
Accelerating For Passing........................... |
178 |
Resume Speed.......................................... |
178 |
Deactivation............................................... |
178 |
ADAPTIVE CRUISE CONTROL (ACC) — |
|
IF EQUIPPED....................................................... |
178 |
Adaptive Cruise Control (ACC) |
|
Operation ................................................... |
180 |
To Activate/Deactivate.............................. |
180 |
Activating Adaptive Cruise Control |
|
(ACC)........................................................... |
180 |
To Set A Desired ACC Speed..................... |
181 |
To Cancel ................................................... |
181 |
To Turn Off ................................................. |
181 |
To Resume................................................. |
182 |
To Vary The Speed Setting........................ |
182 |
Setting The Following Distance In ACC .... |
183 |
Overtake Aid............................................... |
184 |
Adaptive Cruise Control (ACC) Menu........ |
185 |
Display Warnings And Maintenance ........ |
185 |
Precautions While Driving With ACC......... |
187 |
General Information.................................. |
189 |
Normal (Fixed Speed) Cruise Control |
|
Mode .......................................................... |
189 |
REAR PARKSENSE — IF EQUIPPED................. |
191 |
Rear ParkSense Sensors.......................... |
191 |
Enabling And Disabling Rear |
|
ParkSense.................................................. |
192 |
Operation With A Trailer............................ |
193 |
Service The Rear ParkSense System....... |
193 |
ParkSense System Usage Precautions.... |
193 |

FRONT AND REAR PARKSENSE — |
|
IF EQUIPPED ...................................................... |
194 |
ParkSense Sensors ................................... |
195 |
ParkSense Warning Display...................... |
195 |
ParkSense Display..................................... |
195 |
Enabling And Disabling ParkSense .......... |
199 |
Service The ParkSense Park Assist |
|
System........................................................ |
200 |
Cleaning The ParkSense System.............. |
200 |
ParkSense System Usage Precautions.... |
200 |
Side Distance Warning (SDW) System..... |
201 |
PARKSENSE ACTIVE PARK ASSIST SYSTEM — |
|
IF EQUIPPED....................................................... |
204 |
Enabling And Disabling The ParkSense |
|
Active Park Assist System ......................... |
204 |
Parallel Parking Space Assistance |
|
Operation/Display...................................... |
205 |
Perpendicular Parking Space Assistance |
|
Operation/Display...................................... |
209 |
Exiting The Parking Space......................... |
214 |
LANESENSE — IF EQUIPPED ........................... |
218 |
LaneSense Operation................................ |
218 |
Turning LaneSense On Or Off................... |
218 |
LaneSense Warning Message.................. |
218 |
Changing LaneSense Status..................... |
222 |
REAR BACK UP CAMERA.................................. |
222 |
ADDING FUEL..................................................... |
223 |
VEHICLE LOADING ............................................ |
225 |
Certification Label...................................... |
225 |
TRAILER TOWING............................................... |
226 |
Common Towing Definitions..................... |
227 |
Trailer Hitch Classification........................ |
228 |
Trailer Towing Weights (Maximum Trailer |
|
Weight Ratings).......................................... |
229 |
Trailer And Tongue Weight........................ |
229 |
Towing Requirements ............................... |
230 |
Towing Tips................................................. |
232 |
RECREATIONAL TOWING .................................. |
233 |
Towing This Vehicle Behind Another |
|
Vehicle........................................................ |
233 |
Recreational Towing.................................. |
234 |
DRIVING TIPS...................................................... |
234 |
On-Road Driving Tips................................. |
234 |
Off-Road Driving Tips................................. |
235 |
IN CASE OF EMERGENCY |
|
HAZARD WARNING FLASHERS........................ |
238 |
ASSIST AND SOS SYSTEM — IF EQUIPPED..... |
238 |
General Information.................................. |
242 |
BULB REPLACEMENT ........................................ |
242 |
General Information.................................. |
242 |
Replacement Bulbs................................... |
243 |
Replacing Exterior Bulbs........................... |
244 |
Replacing Interior Bulbs............................ |
252 |
FUSES .................................................................. |
255 |
General Information.................................. |
255 |
Access To The Fuses................................. |
255 |
Engine Compartment Fuses/Distribution |
|
Unit ............................................................. |
256 |
|
5 |
Body Computer Fuse Center..................... |
259 |
Rear Cargo Fuse/Relay Distribution |
|
Unit............................................................. |
261 |
JACKING AND TIRE CHANGING ....................... |
262 |
Jack Location/Spare Tire Stowage .......... |
262 |
Preparations For Jacking ......................... |
263 |
Jacking Instructions .................................. |
264 |
Road Tire Installation................................ |
267 |
TIRE SERVICE KIT — IF EQUIPPED................... |
268 |
Tire Service Kit Storage............................. |
268 |
Tire Service Kit Components And |
|
Operation ................................................... |
268 |
Tire Service Kit Usage Precautions.......... |
269 |
Replacing The Sealant.............................. |
270 |
JUMP STARTING ................................................ |
270 |
Preparations For Jump Start..................... |
270 |
Jump Starting Procedure .......................... |
271 |
REFUELING IN EMERGENCY — |
|
IF EQUIPPED....................................................... |
272 |
IF YOUR ENGINE OVERHEATS.......................... |
273 |
GEAR SELECTOR OVERRIDE ........................... |
274 |
FREEING A STUCK VEHICLE ............................ |
275 |
TOWING A DISABLED VEHICLE ....................... |
276 |
Front Wheel Drive (FWD)........................... |
276 |
Four Wheel Drive (4WD)............................ |
277 |
Emergency Tow Hooks — If Equipped ...... |
277 |
ENHANCED ACCIDENT RESPONSE SYSTEM |
|
(EARS) ................................................................ |
278 |
EVENT DATA RECORDER (EDR)....................... |
278 |

6 
SERVICING AND MAINTENANCE
SCHEDULED SERVICING .................................. |
279 |
Maintenance Plan...................................... |
280 |
ENGINE COMPARTMENT .................................. |
287 |
1.3L Turbo Engine ..................................... |
287 |
2.4L Engine................................................ |
288 |
Checking Oil Level...................................... |
289 |
Cooling System .......................................... |
289 |
Adding Washer Fluid.................................. |
290 |
Maintenance-Free Battery ....................... |
290 |
Pressure Washing...................................... |
290 |
DEALER SERVICE .............................................. |
291 |
Engine Oil .................................................. |
291 |
Engine Oil Filter.......................................... |
292 |
Engine Air Cleaner Filter............................ |
292 |
Air Conditioner Maintenance.................... |
292 |
Body Lubrication........................................ |
293 |
Windshield Wiper Blades ......................... |
293 |
Exhaust System ........................................ |
295 |
Cooling System .......................................... |
296 |
Brake System............................................. |
299 |
Manual Transmission — If Equipped........ |
300 |
Automatic Transmission — If Equipped ... |
301 |
RAISING THE VEHICLE ...................................... |
302 |
TIRES................................................................... |
302 |
Tire Safety Information.............................. |
302 |
Tires — General Information...................... |
309 |
Tire Types................................................... |
313 |
Spare Tires — If Equipped ......................... |
314 |
Wheel And Wheel Trim Care ..................... |
315 |
Tire Chains And Traction Devices ............ |
316 |
Tire Rotation Recommendations ............. |
317 |
DEPARTMENT OF TRANSPORTATION UNIFORM |
|
TIRE QUALITY GRADES ..................................... |
318 |
Treadwear .................................................. |
318 |
Traction Grades ......................................... |
319 |
Temperature Grades................................. |
319 |
STORING THE VEHICLE...................................... |
319 |
BODYWORK ........................................................ |
320 |
Protection From Atmospheric Agents....... |
320 |
Body And Underbody Maintenance.......... |
321 |
Preserving The Bodywork.......................... |
321 |
INTERIORS ......................................................... |
322 |
Seats And Fabric Parts.............................. |
322 |
Plastic And Coated Parts........................... |
322 |
Leather Parts ............................................. |
322 |
Glass Surfaces .......................................... |
323 |
TECHNICAL SPECIFICATIONS |
|
VEHICLE IDENTIFICATION ................................. |
324 |
Vehicle Identification Number.................. |
324 |
BRAKE SYSTEM.................................................. |
324 |
WHEEL AND TIRE TORQUE |
|
SPECIFICATIONS ................................................ |
324 |
Torque Specifications................................ |
324 |
FUEL REQUIREMENTS ....................................... |
325 |
1.3L Turbo Engine..................................... |
325 |
2.4L Engine................................................ |
325 |
Reformulated Gasoline ............................. |
326 |
Gasoline/Oxygenate Blends .................... |
326 |
E-85 Usage In Non-Flex Fuel Vehicles...... |
326 |
CNG And LP Fuel System Modifications .. |
326 |
MMT In Gasoline........................................ |
327 |
Materials Added To Fuel........................... |
327 |
Fuel System Cautions................................ |
327 |
Carbon Monoxide Warnings ..................... |
328 |
FLUID CAPACITIES............................................. |
329 |
FLUIDS AND LUBRICANTS................................ |
330 |
Engine ........................................................ |
330 |
Chassis ...................................................... |
331 |
MULTIMEDIA |
|
CYBERSECURITY ............................................... |
332 |
UCONNECT SETTINGS ....................................... |
333 |
Customer Programmable Features — |
|
Uconnect 3 Settings.................................. |
333 |
Customer Programmable Features — |
|
Uconnect 4 Settings ................................. |
344 |
Customer Programmable Features — |
|
Uconnect 4C NAV With 8.4-inch Display |
|
Settings...................................................... |
356 |
UCONNECT INTRODUCTION.............................. |
371 |
Identifying Your Radio............................... |
371 |
Drag & Drop Menu Bar.............................. |
373 |
Safety And General Information............... |
374 |
UCONNECT MODES ........................................... |
376 |
Steering Wheel Audio Controls................. |
376 |
Radio Mode ............................................... |
377 |
Media Mode .............................................. |
389 |
Phone Mode .............................................. |
393 |

ANDROID AUTO™ & APPLE CARPLAY® — IF |
|
EQUIPPED........................................................... |
408 |
Android Auto™ ........................................... |
408 |
Apple CarPlay®.......................................... |
411 |
Android Auto™ And Apple CarPlay® Tips |
|
And Tricks................................................... |
414 |
NAVIGATION MODE — IF EQUIPPED (UCONNECT |
|
4C NAV WITH 8.4-INCH DISPLAY ONLY) ....... |
415 |
Operating Navigation ................................ |
415 |
Where To? ................................................. |
415 |
View Map ................................................... |
428 |
Information ................................................ |
437 |
Emergency ................................................. |
439 |
Map Updates ............................................. |
440 |
SiriusXM® Travel Link .............................. |
440 |
SiriusXM® Traffic Plus .............................. |
441 |
CONNECTED SERVICES— IF EQUIPPED ......... |
441 |
Introduction To SiriusXM Guardian™ ...... |
441 |
Getting Started With SiriusXM |
|
Guardian™ ................................................. |
442 |
Using SiriusXM Guardian™ ....................... |
444 |
Manage My SiriusXM Guardian™ |
|
Account....................................................... |
457 |
CONNECTED SERVICES FAQs........................... |
458 |
SiriusXM Guardian™ Business Hours: .... |
458 |
Connected Services SOS FAQs................. |
458 |
Connected Services Roadside Assistance |
|
FAQs ........................................................... |
458 |
Connected Services Send & Go FAQs ..... |
458 |
Connected Services Vehicle Finder |
|
FAQs ........................................................... |
459 |
Connected Services Stolen Vehicle |
|
Assistance FAQs ....................................... |
459 |
Connected Services Remote Door Lock/ |
|
Unlock FAQs .............................................. |
460 |
Connected Services Remote Horn & Lights |
|
FAQs............................................................ |
460 |
Connected Services Account FAQs........... |
460 |
Connected Services Remote Vehicle Start |
|
FAQs ........................................................... |
463 |
RADIO OPERATION AND MOBILE PHONES.... |
463 |
Regulatory And Safety Information........... |
463 |
|
7 |
CUSTOMER ASSISTANCE |
|
SUGGESTIONS FOR OBTAINING SERVICE FOR |
|
YOUR VEHICLE .................................................. |
466 |
Prepare For The Appointment .................. |
466 |
Prepare A List............................................. |
466 |
Be Reasonable With Requests................. |
466 |
IF YOU NEED ASSISTANCE .............................. |
466 |
FCA US LLC Customer Center................... |
467 |
FCA Canada Inc. Customer Center........... |
467 |
In Mexico Contact...................................... |
467 |
Puerto Rico And US Virgin Islands............ |
467 |
Customer Assistance For The Hearing Or |
|
Speech Impaired (TDD/TTY)..................... |
467 |
Service Contract ....................................... |
467 |
WARRANTY INFORMATION.............................. |
468 |
MOPAR PARTS................................................... |
468 |
REPORTING SAFETY DEFECTS ........................ |
468 |
In The 50 United States And |
|
Washington, D.C........................................ |
468 |
In Canada................................................... |
468 |
PUBLICATION ORDER FORMS ........................ |
469 |

8
INTRODUCTION
DearCustomer,congratulationsonselectingyournewvehicle. Beassuredthatitrepresentsprecisionworkmanship,distinctivestyling,and highquality.
This is a specialized utility vehicle. It can go places and perform tasks that are not intended for conventional passenger vehicles. It handles and maneuvers differently from many passenger vehicles both on-road and off-road, so take time to become familiar with your vehicle. If equipped, the two-wheel drive versionof this vehicle was designed for on-road use only. It is not intended for off-road driving or use inother severe conditions suited for a four-wheel drive vehicle. Before you start to drive this vehicle, read the Owner’s Manual. Be sure you are familiar with all vehicle controls, particularly those used for braking, steering, transmission, and transfer case shifting. Learn how your vehicle handles on different road surfaces. Your driving skills will improve with experience. When driving off-road, or working the vehicle, don’t overload the vehicle or expect the vehicle to overcome the natural laws of physics. Always observe federal, state, provincial and local laws wherever you drive. As with other vehicles of this type, failure to operate this vehicle correctly may result in loss of control or a collision. Refer to the “Driving Tips” in “Starting and Operating” for further information.
ThisOwner'sManualhasbeenprepared with theassistanceof serviceandengineeringspecialiststoacquaintyouwiththeoperationand maintenance of your vehicle. It is supplemented by Warranty Information, and customer-oriented documents. Within this information, you will find a description of the services that FCA US LLC offers to its customers, the vehicle's warranty coverage, and the details of the terms and conditions for maintaining its validity. Please take the time to read all of these publications carefully before driving your vehicle for the first time. Following the instructions, recommendations, tips, and important warnings in this manual will help assure safe and enjoyable operation of your vehicle.
ThisOwner'sManualdescribesallversionsofthisvehicle.Optionsand equipmentdedicatedtospecificmarketsor versionsarenot expressly indicated in the text. Therefore, you should only consider the information which is related to the trim level, engine, and version that you have purchased. Any content introduced throughout the Owner's Information, that may or may not be applicable to your vehicle, will be identified with the wording “If Equipped”. All data contained in this publication are intended to help you use your vehicle in the best possible way. FCA US LLC aims at a constant improvement of the vehicles produced. For this reason, it reserves the right to make changes to the model described for technical and/or commercial reasons. For further information, contact an authorized dealer.
When it comes to service, remember that authorized dealers know your Jeep® vehicle best, have factory-trained technicians and genuine MOPAR® parts, and care about your satisfaction.
|
9 |
HOWTOUSETHISMANUAL |
|
Essential Information |
1 |
Consult the Table of Contents to determine which section contains the information you desire.
Since the specification of your vehicle depends onthe items of equipment ordered, certain descriptions and illustrationsmay differ from your vehicle's equipment.
The detailed Index at the back of this Owner's Manual contains a complete listing of all subjects.
Symbols
Some vehicle components have colored labels whose symbols indicate precautions to be observed when using this component. Refer to “Warning/ Indicator Lights and Messages” in “Getting To Know Your Instrument Panel” for further information on the symbols used in your vehicle.
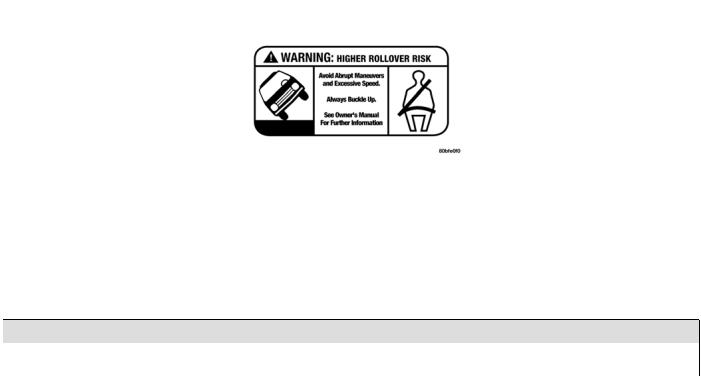
ROLLOVERWARNING
Utility vehicles have a significantly higher rollover rate than other types of vehicles. This vehicle has a higher ground clearance and a higher center of gravity than many passenger vehicles. It is capable of performing better in a wide variety of off-road applications. Driven in an unsafe manner, all vehicles can go out of control. Because of the higher center of gravity, if this vehicle is out of control it may roll over while some other vehicles may not.
Do not attempt sharp turns, abrupt maneuvers, or other unsafe driving actions that can cause loss of vehicle control. Failure to operate this vehicle safely may result in a collision, rollover of the vehicle, and severe or fatal injury. Drive carefully.
10 

Rollover Warning Label
Failuretousethedriverand passengerseatbeltsprovided isamajor causeof severeorfatalinjury. Infact, theUSgovernmentnotesthattheuniversal use of existing seat belts could cut the highway death toll by 10,000 or more each year and could reduce disabling injuries by two million annually. In a rollover crash, an unbelted person is significantly more likely to die than a person wearing a seat belt. Always buckle up.
WARNINGSANDCAUTIONS
This Owner’s Manual contains WARNINGS against operating procedures that could result in a collision, bodily injury and/or death. It also contains CAUTIONS against procedures that could result in damage to your vehicle. If you do not read this entire Owner’s Manual, you may miss important information. Observe all Warnings and Cautions.
VEHICLEMODIFICATIONS/ALTERATIONS
WARNING!
Any modifications or alterations to this vehicle could seriously affect its roadworthiness and safety and may lead to a collision resulting in serious injury or death.
11
GETTING TO KNOW YOUR VEHICLE
KEYS
Yourvehicleusesakeylessignitionsystem. The ignition system consists of a key fob with RemoteKeylessEntry(RKE)andaSTART/STOP push button ignition system. The Remote Keyless Entry system consists of a key fob and Keyless Enter-N-Go feature if equipped.
NOTE:
Thekeyfobmaynotbefoundifitislocatednext to a mobile phone, laptop or other electronic device; these devices may block the key fob’s wireless signal.
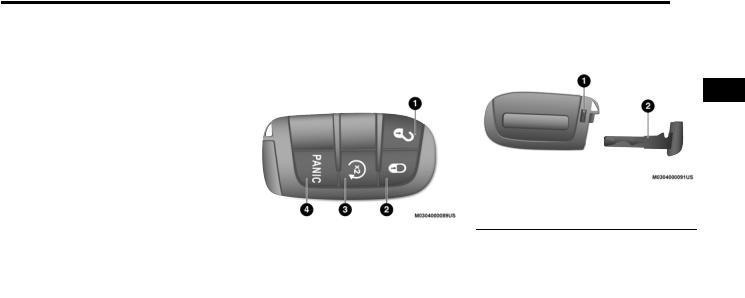
Key Fob With Remote Control
The key fob with Remote Control contains a Remote Keyless Entry (RKE) feature. The RemoteKeylessEntrysystemallowsyoutolock or unlock the doors and liftgate or activate the PanicAlarmfromdistancesuptoapproximately
66 ft (20 m). The key fob does not need to be pointed at the vehicle to activate the system.
Keyless IgnitionKey Fob
1 — Unlock
2 — Lock
3 — Remote Start
4 — PANIC
2
KeyFob EmergencyKey Release
1 — Emergency Key Release Button
2 — Emergency Key
Incasetheignitionswitchdoesnotchangewith thepushofabutton,thekeyfobmayhavealow or fully depleted battery. A low key fob battery can be verified by referring to the instrument cluster, which will display directions to follow.

12 GETTING TO KNOW YOUR VEHICLE
To Unlock The Doors And Liftgate
Push and release the unlock button on the key fob once to unlock the driver's door or twice within five seconds to unlock all doors and the liftgate.
All doors can be programmed to unlock on the first push of the unlock button. Refer to “Uconnect Settings”in “Multimedia” for further information.
NOTE:
If the vehicle is unlocked by a key fob, and no door is opened within 60 seconds, the vehicle will re-lock and if equipped, the security alarm will arm.
The turn signal lights will flash to acknowledge the unlock signal. The illuminated entry system will be activated.
1st Push Of Key Fob Unlock Button
This feature lets you program the system to unlock either the driver's door or all doors on the first push of the unlock button on the key fob. To change the current setting, refer to “Uconnect Settings” in “Multimedia” for further information.
NOTE:
If the vehicle is equipped with Passive Entry, referto“KeylessEnter-N-Go—PassiveEntry”in “Doors” in this chapter for further information.
To Lock The Doors And Liftgate
Pushandreleasethelockbuttononthekeyfob to lock all doors and liftgate.
The turnsignal lights willflashand the hornwill chirp to acknowledge the signal. Refer to “Uconnect Settings” in “Multimedia” for further programmable information.
If the vehicle is equipped with Passive Entry, referto“KeylessEnter-N-Go—PassiveEntry”in “Doors” in this chapter for further information.
Vehicles Equipped With Keyless Enter-N-Go — Passive Entry
If one or more doors are open, or the liftgate is open, the doors will lock. The doors will unlock again automatically if the key fob is left inside the passenger compartment, otherwise the doors will stay locked.
Replacing The Battery In The Key With Remote Control
The recommended replacement battery is one CR2032 battery.
NOTE:
Perchlorate Material — special handling may apply. See www.dtsc.ca.gov/hazardouswaste/perchlorate for further information.
Do not touch the battery terminals that are on the back housing or the printed circuit board.
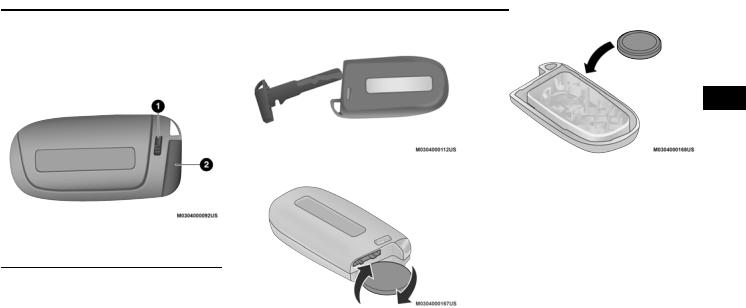
1.Remove the emergency key by sliding the mechanical latch on the back of the key fob sideways with your thumb and pull the emergency key out with your other hand.
EmergencyKeyRemoval
1 — Emergency Key Release Button
2 — Emergency Key
2.Separate the key fob halves using the tip of the emergency key, a #2 flat blade screwdriver,or acoinandgentlyprythetwo halves of the key fob apart. Make sure not to damage the seal during removal.
EmergencyKeyRemoval
Separating Case With ACoin
GETTING TO KNOW YOUR VEHICLE 13
13
2
KeyFob Battery Replacement
3.Remove the battery by turning the back cover over (battery facing downward) and tapping it lightly on a solid surface such as a table or similar and replace the battery. When replacing the battery, match the (+) sign on the battery to the (+) sign on the inside of the battery clip, located on the back cover. Avoid touching the new battery with your fingers. Skin oils may cause battery deterioration. If youtouch a battery, clean it with rubbing alcohol.
4.Toassemble thekeyfob case, snapthetwo halves together.

14 GETTING TO KNOW YOUR VEHICLE
Programming Additional Key Fobs
Programming the key fob may be performed by an authorized dealer.
Request For Additional Key Fobs
NOTE:
Only key fobs that are programmed to the vehicle electronics can be used to start and operate the vehicle. Once a key fob is programmed to a vehicle, it cannot be programmed to any other vehicle.
WARNING!
Always remove the key fobs from the vehicle and lock all doors when leaving the vehicle unattended.
Always remember to place the ignition in the OFF mode.
Duplication ofkeyfobs may beperformed at an authorized dealer. This procedure consists of programming a blank key fob to the vehicle electronics. A blank key fob is one that has never been programmed.
NOTE:
When having the Sentry Key Immobilizer System serviced, bring all vehicle keys with you to an authorized dealer.
Keys must be ordered to the correct key cut to match the vehicle locks.
General Information
Thefollowingregulatorystatementappliestoall Radio Frequency (RF) devices equipped in this vehicle:
FCC ID: RX2TCUFCA025N
IC: 4983A-TCUFCA02SN
This device complies with Part 15 of the FCC Rules and with Innovation, Science and EconomicDevelopmentCanadalicense-exempt RSS standard(s). Operation is subject to the following two conditions:
1.This device may not cause harmful interference, and
2.This device must accept any interference received, including interference that may cause undesired operation.
Le présent appareil est conforme aux CNR d`Innovation, Science and Economic Development applicables aux appareils radio exemptsdelicence.L'exploitationest autorisée aux deux conditions suivantes:
1.l'appareil ne doit pas produire de brouillage, et
2.l'utilisateur de l'appareil doit accepter tout brouillage radioélectrique subi, même si le brouillage est susceptible d'en compromettre le fonctionnement.
La operación de este equipo está sujeta a las siguientes dos condiciones:
1.esposiblequeesteequipoodispositivono cause interferencia perjudicial y
2.este equipo o dispositivo debe aceptar cualquier interferencia, incluyendo la que pueda causar su operación no deseada.
NOTE:
Changes or modifications not expressly approved by the party responsible for compliance could void the user’s authority to operate the equipment.
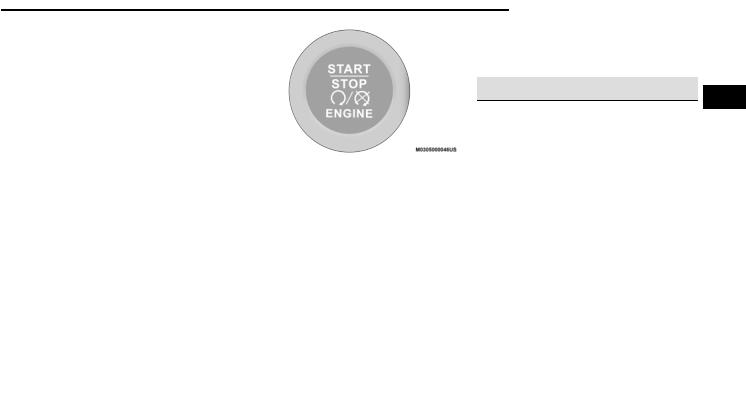
IGNITIONSWITCH
Keyless Enter-N-Go — Ignition
This feature allows the driver to operate the ignitionswitch withthe push ofa buttonaslong asthekeyfob isinthepassengercompartment.
The push button ignition has three operating positions. The three positions are OFF, ON, and RUN.
NOTE:
If the ignition switch does not change with the push of a button, the key fob may have a low or depleted battery. In this situation, a back up method can be used to operate the ignition switch. Put the nose side (side opposite of the emergency key) of the key fob against the START/STOP ignition button and push to operate the ignition switch.
START/STOPIgnitionButton
The push button ignition can be placed in the following positions:
OFF
The engine is stopped.
No electrical devices are available.
ON
The vehicle is not running.
Some electrical devices are available
RUN
Driving position.
All the electrical devices are available.
GETTING TO KNOW YOUR VEHICLE 15
15
NOTE:
Thevehiclewillnotstartif thekeyfob islocated inside the cargoarea and the liftgate isopened.
WARNING! 2
When leaving the vehicle, always remove the key fob from the vehicle and lock your vehicle.
Never leave children alone in a vehicle, or with access to an unlocked vehicle.
Allowing children to be in a vehicle unattended is dangerous for a number of reasons.Achildorotherscouldbeseriously or fatally injured. Children should be warned not to touch the parking brake, brake pedal or the gear selector.
Do not leave the key fob in or near the vehicle, or in a location accessible to children,anddonotleavetheignitionintheON or RUN mode. A child could operate power windows, other controls, or move the vehicle.
Do not leave children or animals inside parked vehicles in hot weather. Interior heat build-up may cause serious injury or death.

16 GETTING TO KNOW YOUR VEHICLE
CAUTION!
An unlocked vehicle is an invitation for thieves. Always remove key fob from the vehicle and lock all doors when leaving the vehicle unattended.
NOTE:
For further information, refer to "Starting The Engine" in "Starting And Operating".
REMOTESTARTINGSYSTEM—IFEQUIPPED
This system uses the key fob to start the engine conveniently from outside the vehicle while still maintaining security. The system has a range of approximately 328 ft (100 m).
NOTE:
The vehicle must be equipped with an automatic transmission to be equipped with Remote Start.
Obstructions between the vehicle and key fob may reduce this range.
How To Use Remote Start
Push Remote Start button on the key fob twice within five seconds. Pushing the Remote Start button a third time shuts the engine off.
To drive the vehicle, pushthe unlock button, and place the ignition in the ON/RUN position.
With remote start, theenginewillonly runfor 15minutes (timeout) unless the ignition is placed in the ON/RUN position.
The vehicle must be manually started with a pushoftheSTART/STOPignitionbuttonafter two consecutive timeouts.
All of the following conditions must be met before the engine will remote start:
Gear Selector in PARK
Doors closed
Hood closed
Liftgate closed
Hazard switch off
Brake switch inactive (brake pedal not pushed)
Battery at an acceptable charge level
PANIC button not pushed
System not disabled from previous remote start event
Vehicle alarm system indicator flashing
Ignition in STOP/OFF position
Fuel level meets minimum requirement
Malfunction Indicator Light is not illuminated
WARNING!
Do not start or run an engine in a closed garage or confined area. Exhaust gas contains Carbon Monoxide (CO) which is odorlessandcolorless.CarbonMonoxideis poisonous and can cause serious injury or death when inhaled.
Keep key fobs away from children. Operation of the Remote Start System, windows, door locks or other controls could cause serious injury or death.

Remote Start Cancel Message — If Equipped
The following messages will display in the instrument cluster if the vehicle fails to remote start or exits remote start prematurely:
Remote Start Cancelled — Door Open
Remote Start Cancelled — Hood Open
Remote Start Cancelled — Fuel Low
Remote Start Cancelled — Liftgate Open
Remote Start Cancelled — Too Cold
Remote Start Cancelled — Time Expired
Remote Start Disabled — Start Vehicle To Reset
The messagewill stay active until the ignitionis placed in the ON/RUN position.
To Enter Remote Start Mode
Push and release the Remote Start button on the key fob twice within five seconds. The vehicledoorswilllock, theturnsignalswillflash twice, and the horn will chirp. Then the engine will start, and the vehicle will remain in the Remote Start mode for a 15 minute cycle.
NOTE:
If an engine fault is present or fuel level is low, thevehicle will start and thenshut down in 10 seconds.
The park lamps will turn on and remain on during Remote Start mode.
For security, power window and power sunroof operations are disabled when the vehicle is in the Remote Start mode.
The engine can be started two consecutive times (two 15 minute cycles) with the key fob. However, the ignition must be placed in the ON/RUN position before you can repeat the start sequence for a third cycle.
To Exit Remote Start Mode Without Driving The Vehicle
Push and release the remote start button one time or allow the engine to run for the entire 15 minute cycle.
NOTE:
To avoid unintentional shut downs, the system will disable for two seconds after receiving a valid remote start request.
GETTING TO KNOW YOUR VEHICLE 17
17
To Exit Remote Start Mode And Drive The Vehicle
Before the end of 15 minute cycle, push and release the unlock button on the key fob to unlock the doors, or unlock the vehicle using 2 KeylessEnter-N-Go—PassiveEntryviathedoor handles, and disarm the vehicle security alarm
(if equipped). Then, prior to the end of the 15 minute cycle, push and release the START/ STOP ignition button.
NOTE:
For vehicles equipped with the Keyless Enter-N-Go — Passive Entry feature, the message “Remote Start Active — Push Start Button” will display in the instrument cluster display until you push the ignition START/STOP ignition button.

18 GETTING TO KNOW YOUR VEHICLE
Remote Start Comfort Systems — If Equipped
When Remote Start is activated, the heated steering wheel and driver heated seat features will automatically activate when ambient temperature is less than 40°F (4.4°C). These features will stay on through the duration of Remote Start.
Refer to"UconnectSettings"in"Multimedia"for further information.
Remote Start Windshield Wiper De–Icer And Rear Defrost Activation — If Equipped
When remote start is active and the outside ambienttemperatureislessthan40°F(4.4°C), the Windshield Wiper De-Icer and the Rear Defrost willbeenabled. Exitingremote start will resume previous operation, except if the Windshield Wiper De-Icer is active. The Windshield Wiper De-Icer timer and operation will continue.
Refer to"UconnectSettings"in"Multimedia"for further information.
General Information
Thefollowingregulatorystatementappliestoall Radio Frequency (RF) devices equipped in this vehicle:
FCC ID: RX2TCUFCA025N
IC: 4983A-TCUFCA02SN
This device complies with Part 15 of the FCC Rules and with Innovation, Science and EconomicDevelopmentCanadalicense-exempt RSS standard(s). Operation is subject to the following two conditions:
1.This device may not cause harmful interference, and
2.This device must accept any interference received, including interference that may cause undesired operation.
Le présent appareil est conforme aux CNR d`Innovation, Science and Economic Development applicables aux appareils radio exemptsdelicence.L'exploitationest autorisée aux deux conditions suivantes:
1.l'appareil ne doit pas produire de brouillage, et
2.l'utilisateur de l'appareil doit accepter tout brouillage radioélectrique subi, même si le brouillage est susceptible d'en compromettre le fonctionnement.
La operación de este equipo está sujeta a las siguientes dos condiciones:
1.esposiblequeesteequipoodispositivono cause interferencia perjudicial y
2.este equipo o dispositivo debe aceptar cualquier interferencia, incluyendo la que pueda causar su operación no deseada.
NOTE:
Changes or modifications not expressly approved by the party responsible for compliance could void the user’s authority to operate the equipment.
SENTRYKEY
The Sentry Key Immobilizer system prevents unauthorized vehicleoperationbydisablingthe engine. The system does not need to be armed oractivated. Operationisautomatic,regardless of whether the vehicle is locked or unlocked.
Thesystemusesakeyfob, keylesspush button ignition and a Radio Frequency (RF) receiver to prevent unauthorized vehicle operation.
Therefore, only key fobs that are programmed to the vehicle can be used to start and operate thevehicle.Thesystemwillnotallowtheengine tocrankif aninvalid key fob isusedtostart and operate the vehicle. The system will shut the engine off intwo seconds ifaninvalid keyfob is used to start the engine.
After placing the ignition switch in the ON/RUN position,thevehiclesecuritylightwillturnonfor three seconds for a bulb check. If the light remains on after the bulb check, it indicates that there is a problem with the electronics. In addition, if the light begins to flash after the bulb check, it indicates that someone used an invalid key fob to start the engine. Either of these conditions will result in the engine being shut off after two seconds.
If the vehicle security light turns on during normal vehicle operation (vehicle running for longer than10 seconds), it indicates that there is a fault in the electronics. Should this occur, havethevehicleservicedassoonaspossibleby an authorized dealer.
CAUTION!
The Sentry Key Immobilizer system is not compatible with some aftermarket remote starting systems. Use of these systems may result invehicle startingproblems and loss of security protection.
All of the key fobs provided with your new vehicle have been programmed to the vehicle electronics.
Key Programming
Key fob programming is performed at an authorized dealer.
Replacement Keys
NOTE:
Only key fobs that are programmed to the vehicle electronics can be used to start and operate the vehicle. Once a key fob is programmed to a vehicle, it cannot be programmed to any other vehicle.
GETTING TO KNOW YOUR VEHICLE 19
19
CAUTION!
Always remove the key fobs from the vehicle and lock all doors when leaving the
vehicle unattended.
2
For vehicles equipped with Keyless Enter-N-Go — Ignition, always remember to place the ignition in the OFF position.
NOTE:
Duplicationofkeyfobs may beperformed at an authorized dealer. This procedure consists of programming a blank key fob to the vehicle electronics. A blank key fob is one that has never been programmed.
When having the Sentry Key Immobilizer System serviced, bring all vehicle keys with you to an authorized dealer.
General Information
Thefollowingregulatorystatementappliestoall Radio Frequency (RF) devices equipped in this vehicle:
FCC ID: RX2TCUFCA025N
IC: 4983A-TCUFCA02SN

20 GETTING TO KNOW YOUR VEHICLE
This device complies with Part 15 of the FCC Rules and with Innovation, Science and EconomicDevelopmentCanadalicense-exempt RSS standard(s). Operation is subject to the following two conditions:
1.This device may not cause harmful interference, and
2.This device must accept any interference received, including interference that may cause undesired operation.
Le présent appareil est conforme aux CNR d`Innovation, Science and Economic Development applicables aux appareils radio exemptsdelicence.L'exploitationest autorisée aux deux conditions suivantes:
1.l'appareil ne doit pas produire de brouillage, et
2.l'utilisateur de l'appareil doit accepter tout brouillage radioélectrique subi, même si le brouillage est susceptible d'en compromettre le fonctionnement.
La operación de este equipo está sujeta a las siguientes dos condiciones:
1.esposiblequeesteequipoodispositivono cause interferencia perjudicial y
2.este equipo o dispositivo debe aceptar cualquier interferencia, incluyendo la que pueda causar su operación no deseada.
NOTE:
Changes or modifications not expressly approved by the party responsible for compliance could void the user’s authority to operate the equipment.
VEHICLESECURITYALARM—IFEQUIPPED
The vehicle security alarm monitors the vehicle doors, hood, liftgate, and the Keyless Enter-N-Go — Ignition for unauthorized operation. While the vehicle security alarm is armed, interior switches for door locks and liftgate release are disabled. If something triggers the alarm, the vehicle security alarm will provide the following audible and visible signals:
The horn will pulse.
The turn signals will flash.
The vehicle security light in the instrument cluster will flash.
To Arm The System
Follow these steps to arm the vehicle security alarm:
1.Make sure the vehicle’s ignition is placed in the OFF position.
2.Perform one of the following methods to lock the vehicle:
Push the lock button on the interior power door lock switch with the driver and/or passenger door open.
Push the lock button on the exterior Passive Entry Door Handle with a valid key fob available in the same exterior zone. Refer to “Keyless Enter-N-Go — Passive Entry” in "Doors" in this chapter for further information.
Push the lock button on the key fob.
3.If any doors are open, close them.

To Disarm The System
The vehicle security alarm can be disarmed using any of the following methods:
Push the unlock button on the key fob.
Grasp the Passive Entry door handle to unlockthedoor.Referto“KeylessEnter-N-Go
—PassiveEntry”in"Doors"inthischapterfor further information.
Place the ignition in the OFF mode to disarm the system.
NOTE:
Thedriver'sdoor key cylinderand theliftgate button on the key fob cannot arm or disarm the vehicle security alarm.
The vehicle security alarm remains armed during liftgate entry. If someone enters the vehicle through the liftgate and opens any door, the alarm will sound.
When the vehicle security alarm is armed, the interior power door lock switches will not unlock the doors.
Thevehiclesecurityalarmisdesignedtoprotect your vehicle. However, you can create conditionswherethesystemwillgiveyouafalse alarm.Ifoneofthepreviouslydescribedarming sequences has occurred, the vehicle security alarmwillarm, regardless ofwhetheryouarein the vehicle or not. If you remain in the vehicle and open a door, the alarm will sound. If this occurs, disarm the vehicle security alarm.
If the vehicle security alarm is armed and the battery becomes disconnected, the vehicle security alarm will remain armed when the battery is reconnected; the exterior lights will flash, and the horn will sound. If this occurs, disarm the vehicle security alarm.
Disabling
Tocompletelydisablethealarm(e.g.inthecase of long inactivity of the car), lock the doors by turning the emergency key in the exterior door lock cylinder.
NOTE:
If the batteries in the key fob discharge in the event of a failure to the system or to turn the alarmoff,placetheignitionintheON/RUNposition.
GETTING TO KNOW YOUR VEHICLE 21
21
DOORS
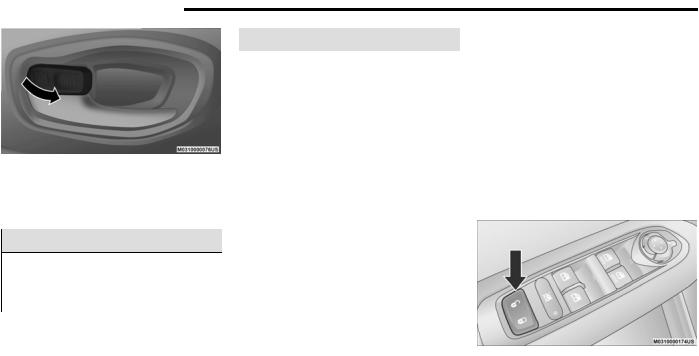
Manual Door Locks
To lock each door, rotate the door lock button
on each door trim panel forward. To unlock the 2 doors, pull the inside door handle to the first detent or rotate the door lock button until the lock symbol is no longer visible.
If the lock symbol is visible when the door is shut, the door will lock. Therefore, make sure the key fob is not inside the vehicle before closing the door.
Alldoorsand theliftgatecanbeprogrammedto unlock on the use of one of the front door interiorhandles.Referto“UconnectSettings”in “Multimedia” for further information on programming locking and unlocking preferences.
Locking/Unlocking Doors From Outside
Withthedoorsclosed,inserttheemergencykey into the driver exterior door lock cylinder and turn to the right to lock the driver's door.
To unlock the driver’s door, insert the emergencykeyinto thedriverexterior doorlock cylinder and turn to the left to unlock the driver's door.
22 GETTING TO KNOW YOUR VEHICLE
ManualDoorLock
NOTE:
The manual lock knob unlocks each individual door separately.
WARNING!
For personal security and safety in the event of a collision, lock the vehicle doors before you drive as well as when you park and leave the vehicle.
(Continued)
WARNING! (Continued)
When leaving the vehicle, always remove the key fob from the vehicle and lock your vehicle. Always make sure the ignition is in “OFF” mode, remove the key fob from the vehicle and lock the vehicle. Unsupervised useofvehicleequipmentmaycausesevere personal injuries or death.
Never leave children alone in a vehicle, or with access to an unlocked vehicle. Allowing children to be in a vehicle unattended is dangerous for a number of reasons.Achildorotherscouldbeseriously or fatally injured. Children should be warned not to touch the parking brake, brake pedal or the gear selector.
Do not leave the key fob in or near the vehicle, or in a location accessible to children,anddonotleavetheignitionintheON or RUN mode. A child could operate power windows, other controls, or move the vehicle.
Power Door Locks
A power door lock switch is located on each of the front door trim panels. Use this switch to lock or unlock the doors, liftgate and fuel door.
NOTE:
The key fob may not be able to be detected by the vehicle’s Keyless Enter-N-Go system if it is located next to a mobile phone, laptop or other electronic device; these devices may block the key fob’s wireless signal and prevent the Keyless Enter-N-Go system from starting the vehicle.
Power DoorLock Switch
Thedoorscanalsobelockedandunlockedwith the Keyless Enter-N-Go — Passive Entry system if equipped. Refer to “Keyless Enter-N-Go — Passive Entry” in this section for further information.
Keyless Enter-N-Go — Passive Entry (If Equipped)
ThePassiveEntrysystemisanenhancementto the vehicle’s Remote Keyless Entry system and a feature of Keyless Enter-N-Go. This feature allows you to lock and unlock the vehicle’s door(s) without having to push the key fob lock or unlock buttons.
NOTE:
Passive Entry can be enabled or disabled. Referto“Uconnect Settings”in“Multimedia” for further information.
If wearing gloves on your hands, or if it has been raining/snowing on the Passive Entry door handle, the unlock sensitivity can be affected, resulting in a slower response time.
Ifthevehicleisunlocked bythePassiveEntry door handle, and no door is opened within 60 seconds, the vehicle will re-lock and if equipped, the security alarm will arm.
Thekeyfobmaynotbeabletobedetectedby the vehicle’s Passive Entry system if it is located next to a mobile phone, laptop or other electronic device; these devices may block the key fob’s wireless signal and prevent the Passive Entry system from locking/unlocking the vehicle.
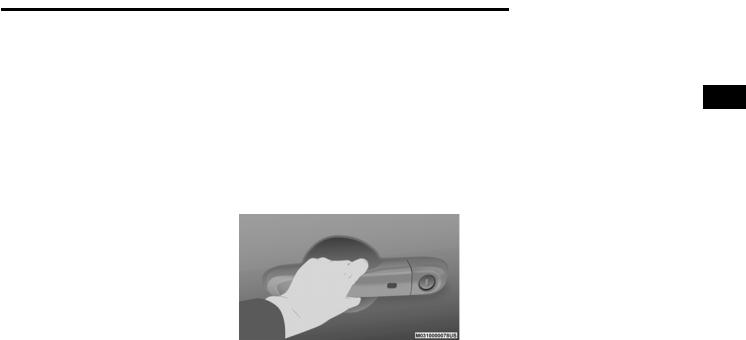
To Unlock From The Driver's Side
With a valid Passive Entry key fob within 5 ft (1.5 m) of the driver's door handle, grab the front driver door handle to unlock the driver's door automatically.
GrabThe DoorHandle To Unlock
GETTING TO KNOW YOUR VEHICLE 23
23
NOTE:
If “Unlock All Doors 1st Press” is programmed, all doors will unlock when you grab hold of the front driver’s door handle. To select between “Unlock Driver Door 1st Press” and “Unlock All
Doors 1st Press,” refer to “Uconnect Settings” 2 in “Multimedia” for further information.
To Unlock From The Passenger Side
With a valid Passive Entry key fob within 5 ft (1.5 m) of the passenger door handle, grab the front passenger door handle to unlock all four doors and the liftgate automatically.
NOTE:
All doors will unlock when the front passenger door handle is grabbed regardless of the driver’sdoorunlockpreferencesetting(“Unlock Driver Door 1st Press” or “Unlock All Doors 1st Press”).
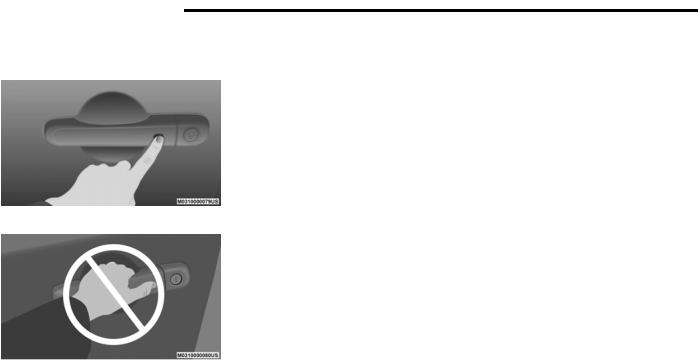
To Lock The Vehicle’s Doors And Liftgate
With oneof the vehicle’s PassiveEntry key fobs within 5 ft (1.5 m) of the driver or passenger front door handles, push the door handle lock button to lock all four doors.
24 GETTING TO KNOW YOUR VEHICLE
Do NOTgrab the door handlewhenpushingthe door handle lock button. This could unlock the door(s).
PushThe Door Handle ButtonToLock
DONOT GrabThe DoorHandle When Locking
NOTE:
The Passive Entry system will not operate if the key fob battery is depleted.
After pushing the door handle button, you mustwaittwosecondsbeforeyoucanlockor unlock the doors using any Passive Entry door handle. This is done to allow you to check if the vehicle is locked by pulling the door handle without thevehicle reactingand unlocking.
The vehicle doors can also be locked by using the lock button located onthe vehicle’s interior door panel.
PreventingInadvertentLockingOfPassiveEntry Key Fob In Vehicle (FOBIK-Safe)
To minimize the possibility of unintentionally locking a Passive Entry key fob inside your vehicle, the Passive Entry system is equipped with an automatic door unlock feature.
FOBIK-Safe only executes in vehicles with Passive Entry. There are three situations that triggeraFOBIK-SafesearchinanyPassiveEntry vehicle:
1.A lock request is made by a valid Passive Entry key fob while a door is open.
2.A lock request is made by the Passive Entry door handle while a door is open.
3.A lock request is made by the door panel switch while the door is open.
When any of these situations occur, after all opendoorsareshut,theFOBIK-Safesearchwill be executed. If it finds a Passive Entry key fob inside the vehicle, and it does not find any PassiveEntry key fobsoutside thevehicle,then the vehicle will unlock and alert the customer.
NOTE:
The vehicle will only unlock the doors when a valid Passive Entry key fob is detected inside thevehicle,andnovalidPassiveEntrykeyfobis detected outside the vehicle. The vehicle will not unlock the doors when any of the following conditions are met:
Thedoorsaremanuallylockedusingthedoor lock knobs.
There isa valid Passive Entry key fob outside the vehicle and within 5 ft (1.5 m) of either Passive Entry door handle.
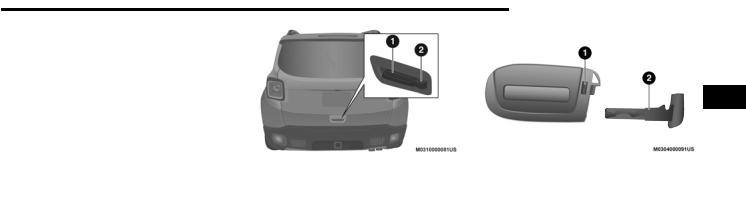
To Unlock/Enter The Liftgate
The liftgatePassive Entry unlockfeatureis built into the electronic liftgate release. With a valid Passive Entry key fob within 5 ft (1.5 m) of the liftgate, push the Electronic Liftgate release to open with one fluid motion.
To Lock The Liftgate
With a valid Passive Entry key fob within 5 ft (1.5 m) of the liftgate, push the Passive Entry lock button located to the right of electronic liftgate release.
NOTE:
TheliftgatePassiveEntrylockbuttonwilllock theliftgateand the doors. Theliftgate unlock feature is built into the electronic liftgate release.
If “Unlock All Doors 1st Press” is programmed in the instrument cluster display, if equipped, only the liftgate will unlock when you push the Electronic Release. If "Unlock Driver Door 1st Press" is programmed in Uconnect, the liftgate will unlock when you push the electronic unlock/ lock button on the liftgate. For further information, refer to “Uconnect Settings” in “Multimedia.”
LiftgateRelease/PassiveEntry
1 — Electronic Liftgate Release
2 — Liftgate Passive Entry Location
Emergency Unlocking Driver Door
If the key fob battery is low or depleted, the emergencykeycanbeusedtounlock thedriver side door lock cylinder.
To release the emergency key, proceed as follows:
1.Slide the emergency key release button to the side.
2.Remove the emergency key from the key fob with Remote Control housing.
GETTING TO KNOW YOUR VEHICLE 25
25
2
EmergencyKey Release
1 — Emergency Key Release Button
2 — Emergency Key
NOTE:
The emergency key can be inserted into the door lock cylinder from either direction.

26 GETTING TO KNOW YOUR VEHICLE
WARNING!
Never leave children alone in a vehicle, or with access to an unlocked vehicle. Allowing children to be in a vehicle unattended is dangerous for a number of reasons.Achild orotherscouldbeseverely injuredorkilled.Childrenshouldbewarned not to touch the parking brake, brake pedal,orthegearselector.Donotleavethe key fob in or near the vehicle, or in a location accessible to children, and do not leavetheignitionintheONor RUNmode. A childcould start thevehicle, operatepower windows, other controls, or move the vehicle.
Do not leave children or animals inside parked vehicles in hot weather. Interior heat buildup may cause them to be severely injured or killed
General Information
Thefollowingregulatorystatementappliestoall Radio Frequency (RF) devices equipped in this vehicle:
FCC ID: RX2TCUFCA025N
IC: 4983A-TCUFCA02SN
This device complies with Part 15 of the FCC Rules and with Innovation, Science and EconomicDevelopmentCanadalicense-exempt RSS standard(s). Operation is subject to the following two conditions:
1.This device may not cause harmful interference, and
2.This device must accept any interference received, including interference that may cause undesired operation.
Le présent appareil est conforme aux CNR d`Innovation, Science and Economic Development applicables aux appareils radio exemptsdelicence.L'exploitationest autorisée aux deux conditions suivantes:
1.l'appareil ne doit pas produire de brouillage, et
2.l'utilisateur de l'appareil doit accepter tout brouillage radioélectrique subi, même si le brouillage est susceptible d'en compromettre le fonctionnement.
La operación de este equipo está sujeta a las siguientes dos condiciones:
1.esposiblequeesteequipoodispositivono cause interferencia perjudicial y
2.este equipo o dispositivo debe aceptar cualquier interferencia, incluyendo la que pueda causar su operación no deseada.
NOTE:
Changes or modifications not expressly approved by the party responsible for compliance could void the user’s authority to operate the equipment.
Automatic Unlock On Exit Feature — If Equipped
If Auto Unlock is enabled, this feature will unlock all the doors when any door is opened if the vehicle is stopped and in PARK.
Refer to “Uconnect Settings” in “Multimedia” for further information.
Dead Lock Device — If Equipped
The Dead Lock Device is a safety device that preventstheuseof theinternaldoorhandlesof the vehicle and the power door lock switch.
This device prevents the doors from opening within the passenger compartment.
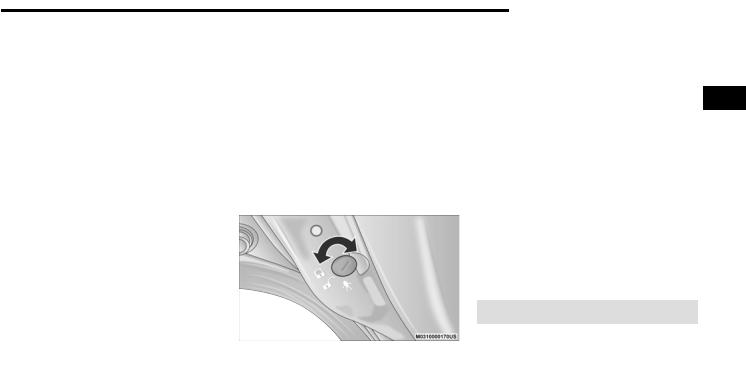
Arming The Dead Lock Device
The device works on all doors and requires twopushes ofthelock buttononthe key fob. ForvehiclesequippedwithPassiveEntry, the device will also work by pushing the lock button on the driver’s or passenger’s side exterior door handle.
Thearmingofthedeviceisindicatedbythree flashes of the turn signals.
The device does not operate if one or more doors are not properly closed.
Disarming The Device
The device will automatically disarm by pushingtheunlockbuttononthekeyfob.For vehicles equipped with Passive Entry, the device will also disarm by using the driver or passenger Passive Entry door handle to unlock and open the door.
Placing the ignition in the ON/RUN position.
Child Locks
To provide a safer environment for small children riding in the rear seats, the rear doors are equipped with a Child-ProtectionDoor Lock system.
To use the system, open each rear door, use a flat blade screwdriver (or emergency key) and rotate the dial to the lock or unlock position. When the system on a door is engaged, that door can only be opened by using the outside doorhandleeveniftheinsidedoorlockisinthe unlocked position.
Child-ProtectionDoor Lock Location
GETTING TO KNOW YOUR VEHICLE 27
27
NOTE:
When the Child-ProtectionDoor Lock system is engaged, the door can only be opened by using the outside door handle even though
the inside door lock is in the unlocked posi- |
2 |
tion. |
|
After disengaging the Child-Protection Door Lock system, always test the door from the inside to make certain it is in the desired position.
AfterengagingtheChild-ProtectionDoorLock system, always test the door from the inside to make certain it is in the desired position.
Foremergencyexitwiththesystemengaged, rotate the lock/unlock dial to the unlocked position, roll down the window, and open the door with the outside door handle.
WARNING!
Avoid trapping anyone in a vehicle in a collision. Remember that the rear doors can only be opened from the outside when the Child-Protection locks are engaged (locked).
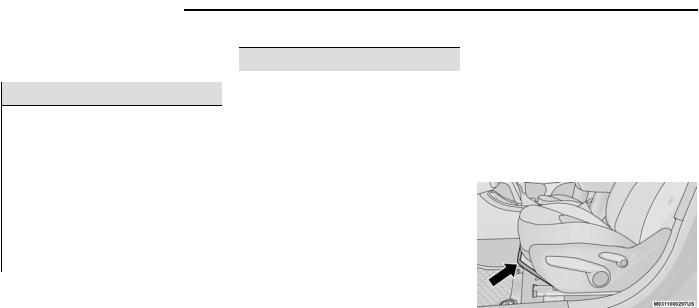
28 GETTING TO KNOW YOUR VEHICLE
SEATS
Seats are a part of the Occupant Restraint System of the vehicle.
WARNING!
It is dangerous to ride in a cargo area, inside or outside of a vehicle. In a collision, peopleridingintheseareasaremorelikely to be seriously injured or killed.
Do not allow people to ride in any area of yourvehiclethat isnotequipped withseats and seat belts. In a collision, people riding in these areas are more likely to be seriously injured or killed.
Besureeveryoneinyourvehicleisinaseat and using a seat belt properly.
Manual Front Seats
WARNING!
Adjustingaseat whilethevehicleismoving isdangerous.Thesuddenmovementofthe seat could cause you to lose control. The seat belt might not be adjusted properly and you could be injured. Adjust the seat only while the vehicle is parked.
Do not ride with the seatback reclined so that the shoulder belt is no longer resting against your chest. In a collision you could slideundertheseatbeltandbeseriouslyor even fatally injured. Use the recliner only when the vehicle is parked.
Manual Front Seats Forward/Rearward Adjustment
On models equipped with manual seats, the adjustingbarislocatedatthefront oftheseats, nearthefloor.Whilesittingintheseat, liftupon the barand movethe seat forward or rearward. Release the bar once you have reached the desired position. Then, using body pressure, move forward and rearward on the seat to be sure that the seat adjusters have latched.
Forward/Rearward Adjustment Bar
Loading...