


 Loading...
SECTION
TABLE OF CONTENTS
PAGE
1
2
3
4
5
6
7
8
9
10
. . . . . . . . . . . . . . . . . . . . . . . . . . . . . . . . . . . . . . . . . . . . . . . . . . . . . . . . . . .INTRODUCTION |
. . 3 |
1 |
|
|
|
THINGS TO KNOW BEFORE STARTING YOUR VEHICLE . . . . . . . . . . . . . . . . . . . . . . . . . . . . . |
. . 9 |
2 |
|
|
|
UNDERSTANDING THE FEATURES OF YOUR VEHICLE . . . . . . . . . . . . . . . . . . . . . . . . . . . . . . |
.83 |
3 |
|
|
|
INSTRUMENT PANEL AND CONTROLS . . . . . . . . . . . . . . . . . . . . . . . . . . . . . . . . . . . . . . . . . |
185 |
4 |
|
|
|
STARTING AND OPERATING . . . . . . . . . . . . . . . . . . . . . . . . . . . . . . . . . . . . . . . . . . . . . . . . . |
273 |
5 |
|
|
|
WHAT TO DO IN EMERGENCIES . . . . . . . . . . . . . . . . . . . . . . . . . . . . . . . . . . . . . . . . . . . . . . . |
383 |
6 |
|
|
|
MAINTAINING YOUR VEHICLE . . . . . . . . . . . . . . . . . . . . . . . . . . . . . . . . . . . . . . . . . . . . . . . |
395 |
7 |
|
|
|
MAINTENANCE SCHEDULES . . . . . . . . . . . . . . . . . . . . . . . . . . . . . . . . . . . . . . . . . . . . . . . . . . |
451 |
8 |
|
|
|
IF YOU NEED CONSUMER ASSISTANCE . . . . . . . . . . . . . . . . . . . . . . . . . . . . . . . . . . . . . . . . . . |
459 |
9 |
|
|
|
INDEX . . . . . . . . . . . . . . . . . . . . . . . . . . . . . . . . . . . . . . . . . . . . . . . . . . . . . . . . . . . . . . . . . . . . |
469 |
10 |

|
INTRODUCTION |
|
|
|
|
|
|
|
1 |
||
|
|
|
|
|
|
CONTENTS |
|
|
|
|
|
m Introduction . . . . . . . . . . . . . . . . . . |
. . . . . . . . . 4 |
m Warnings And Cautions . . . . . . . . . . . . . . . . . . . |
7 |
|
|
m Rollover Warning . . . . . . . . . . . . . . . |
. . . . . . . . . 4 |
m Vehicle Identification Number . . . . . . . . . . . . . . . |
7 |
|
|
m How To Use This Manual . . . . . . . . . |
. . . . . . . . . 5 |
m Vehicle Modifications / Alterations . . . . . . . . . . . |
8 |
|
|

4 INTRODUCTION
INTRODUCTION
This manual has been prepared with the assistance of service and engineering specialists to acquaint you with the operation and maintenance of your new vehicle. It is supplemented by a Warranty Information Booklet and various customer oriented documents. You are urged to read these publications carefully. Following the instructions and recommendations in this manual will help assure safe and enjoyable operation of your vehicle.
NOTE: After you read the manual, it should be stored in the vehicle for convenient reference and remain with the vehicle when sold, so that the new owner will be aware of all safety warnings.
When it comes to service, remember that your dealer knows your vehicle best, has the factory-trained technicians and genuine Mopart parts, and is interested in your satisfaction.
ROLLOVER WARNING
Utility vehicles have a significantly higher rollover rate than other types of vehicles. This vehicle has a higher ground clearance, and a higher center of gravity than many passenger cars. It is capable of performing better in a wide variety of off-road applications. Driven in an unsafe manner, all vehicles can be caused to go out of control. Because of the higher center of gravity, if this vehicle is out of control it may rollover when some other vehicles may not.
Do not attempt sharp turns or abrupt maneuvers or other unsafe driving actions that can cause loss of vehicle control. Failure to operate this vehicle safely may result in an accident, rollover of the vehicle, and severe or fatal injury. Drive carefully.
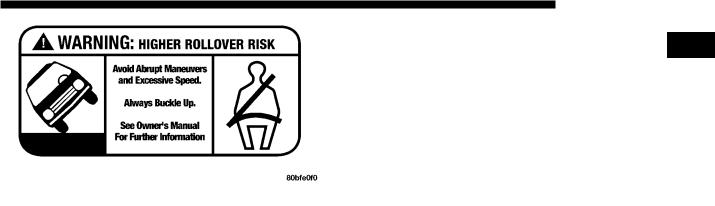
Rollover Warning Label
Failure to use driver and passenger seat belts provided is a major cause of severe or fatal injury. In fact, the U.S. government notes that the universal use of existing seat
INTRODUCTION 5
belts could cut the highway death toll by 10,000 or more each year, and could reduce disabling injuries by 2 1 million annually. In a rollover crash, an unbelted person
is significantly more likely to die than a person wearing a seat belt. Always buckle up.
HOW TO USE THIS MANUAL
Consult the table of contents to determine which section contains the information you desire.
The detailed index, at the rear of this manual, contains a complete listing of all subjects.
Consult the following table for a description of the symbols that may be used on your vehicle or throughout this owner manual:

6 INTRODUCTION
|
|
|
INTRODUCTION 7 |
||
WARNINGS AND CAUTIONS |
|
|
|||
|
|
|
|
||
|
|
|
1 |
||
This manual contains WARNINGS against operating |
|
|
|
||
procedures, which could result in an accident or bodily |
|
|
|
|
|
injury. It also contains CAUTIONS against procedures, |
|
|
|
|
|
which could result in damage to your vehicle. If you do |
|
|
|
|
|
not read this entire manual, you may miss important |
|
|
|
|
|
information. Observe all Warnings and Cautions. |
|
|
|
|
|
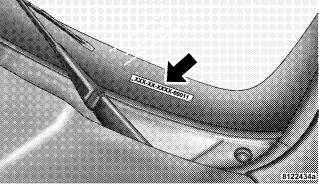
VEHICLE IDENTIFICATION NUMBER |
|
|
|
|
|
The vehicle identification number (VIN) is found on the |
|
|
|
|
|
left front corner of the instrument panel. The VIN is |
|
|
|
|
|
visible from outside of the vehicle through the wind- |
|
|
|
|
|
shield. This number also appears on the Automobile |
|
Vehicle Identification Number |
|||
Information Disclosure Label affixed to a window on |
NOTE: |
It is illegal to remove the VIN. |
|||
your vehicle, the vehicle registration, and the title. |
|||||
|
|
|
|
||

8 INTRODUCTION
VEHICLE MODIFICATIONS / ALTERATIONS
WARNING!
Any modifications or alterations to this vehicle could seriously affect its roadworthiness and safety and may lead to an accident resulting in serious injury or death.

THINGS TO KNOW BEFORE STARTING YOUR VEHICLE
2
CONTENTS
m A Word About Your Keys . . . . . . . . . . . . . . . . . . |
12 |
N Ignition Key Removal . . . . . . . . . . . . . . . . . . . |
12 |
N Key-In-Ignition Reminder . . . . . . . . . . . . . . . . |
14 |
m Sentry Key . . . . . . . . . . . . . . . . . . . . . . . . . . . . |
14 |
N Replacement Keys . . . . . . . . . . . . . . . . . . . . . . |
16 |
N Customer Key Programming . . . . . . . . . . . . . . |
16 |
N General Information . . . . . . . . . . . . . . . . . . . . |
17 |
m Steering Wheel Lock Ð If Equipped . . . . . . . . . . |
18 |
N To Manually Lock The Steering Wheel . . . . . . . |
18 |
N To Release The Steering Wheel Lock . . . . . . . . .18 m Security Alarm System Ð If Equipped . . . . . . . . .18
N Rearming Of The System . . . . . . . . . . . . . . . . .19
N To Arm The System . . . . . . . . . . . . . . . . . . . . .19
N To Disarm The System . . . . . . . . . . . . . . . . . . .19
m Illuminated Entry System . . . . . . . . . . . . . . . . . .20
m Remote Keyless Entry . . . . . . . . . . . . . . . . . . . . .20
N To Unlock The Doors And Liftgate . . . . . . . . . .21
N To Lock The Doors And Liftgate . . . . . . . . . . . .22

10 THINGS TO KNOW BEFORE STARTING YOUR VEHICLE
N To Unlatch The Liftgate Flip-Up Window |
. . . . .24 |
N Using The Panic Alarm . . . . . . . . . . . . . |
. . . . .24 |
N Programming Additional Transmitters . . . |
. . . . .25 |
N Battery Replacement . . . . . . . . . . . . . . . |
. . . . .25 |
N General Information . . . . . . . . . . . . . . . |
. . . . .26 |
m Remote Starting System Ð If Equipped . . . |
. . . . .27 |
N How To Use Remote Start . . . . . . . . . . . |
. . . . .28 |
m Door Locks . . . . . . . . . . . . . . . . . . . . . . . |
. . . . .29 |
N Manual Door Locks . . . . . . . . . . . . . . . . |
. . . . .29 |
N Power Door Locks . . . . . . . . . . . . . . . . |
. . . . .31 |
N Child-Protection Door Lock System (Rear |
|
Doors) . . . . . . . . . . . . . . . . . . . . . . . . . |
. . . . .33 |
m Windows . . . . . . . . . . . . . . . . . . . . . . . . |
. . . . .36 |
N Power Windows . . . . . . . . . . . . . . . . . . |
. . . . .36 |
N Wind Buffeting . . . . . . . . . . . . . . . . . . . |
. . . . .39 |
m Liftgate . . . . . . . . . . . . . . . . . . . . . . . . . . |
. . . . .40 |
m Occupant Restraints . . . . . . . . . . . . . . . . . |
. . . . .41 |
N Lap/Shoulder Belts . . . . . . . . . . . . . . . . |
. . . . .42 |
N Lap/Shoulder Belt Untwisting Procedure |
. . . . .47 |
N Seat Belt Pretensioners . . . . . . . . . . . . . . |
. . . . .47 |
N Enhanced Seat Belt Use Reminder System |
|
(BeltAlert) . . . . . . . . . . . . . . . . . . . . . . |
. . . . .48 |
N Automatic Locking Mode Ð If Equipped |
. . . . .49 |
N Energy Management Feature . . . . . . . . . |
. . . . .50 |
N Seat Belts And Pregnant Women . . . . . . . |
. . . . .50 |
N Seat Belt Extender . . . . . . . . . . . . . . . . . |
. . . . .51 |
N Driver And Front Passenger Supplemental |
|
Restraint System (SRS) - Airbag . . . . . . . . . . . . |
52 |
N Child Restraint . . . . . . . . . . . . . . . . . . . . . . . . |
69 |
m Engine Break-In Recommendations . . . . . . . . . . . |
79 |
m Safety Tips . . . . . . . . . . . . . . . . . . . . . . . . . . . . |
79 |
N Transporting Passengers . . . . . . . . . . . . . . . . . |
79 |
THINGS TO KNOW BEFORE STARTING YOUR VEHICLE |
11 |
N Lock Your Vehicle . . . . . . . . . . . . . . . . . . . . . . |
80 |
N Exhaust Gas . . . . . . . . . . . . . . . . . . . . . . . . . . |
80 |
N Safety Checks You Should Make Inside The |
2 |
Vehicle . . . . . . . . . . . . . . . . . . . . . . . . . . . . . . |
81 |
N Periodic Safety Checks You Should Make |
|
Outside The Vehicle . . . . . . . . . . . . . . . . . . . . |
82 |
12 THINGS TO KNOW BEFORE STARTING YOUR VEHICLE
A WORD ABOUT YOUR KEYS
You can insert the double-sided keys into the locks with either side up.
The dealer that sold you your new vehicle has the key code numbers for your vehicle locks. These numbers can be used to order duplicate keys from your dealer. Ask your dealer for these numbers and keep them in a safe place.
Ignition Key Removal
Automatic Transmission
Place the selector lever in ªPº (Park). Turn the key to the ACC position and then push the key and cylinder inward slightly and rotate the key to the LOCK position. Then remove the key.
Vehicle Key
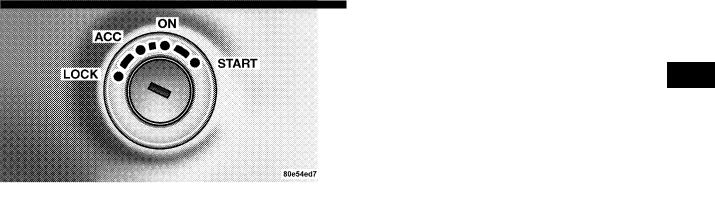
Ignition Key Positions
Manual Transmission Ð If Equipped
Turn the key to the ACC position and then push the key and cylinder inward slightly and rotate the key to the LOCK position. Then remove the key.
THINGS TO KNOW BEFORE STARTING YOUR VEHICLE 13
NOTE:
²For vehicles not equipped with the Electronic Vehicle
Information Center (EVIC), features such as the power window switches, radio, power sunroof or Sky Slidert 2 (if equipped), and power outlets will remain active for 45 seconds after the ignition switch is turned to the LOCK position. Opening either front door will cancel this feature.
²For vehicles equipped with the EVIC, features such as the power window switches, radio, power sunroof or Sky Slidert (if equipped), and power outlets will remain active for up to 10 minutes after the ignition switch is turned to the LOCK position. Opening either front door will cancel this feature. The time for this feature is programmable. For details, refer to ªDelay Power Off to Accessories Until Exit,º under ªPersonal Settings (Customer Programmable Features),º under ªElectronic Vehicle Information Center (EVIC)º in Section 4 of this manual.

14 THINGS TO KNOW BEFORE STARTING YOUR VEHICLE
WARNING!
Never leave children alone in a vehicle. Leaving children in a vehicle unattended is dangerous for a number of reasons. A child or others could be seriously or fatally injured. Don't leave the key in the ignition. A child could operate power windows, other controls, or move the vehicle.
CAUTION!
An unlocked vehicle is an invitation to thieves. Always remove the key from the ignition, and lock all doors when leaving the vehicle unattended.
Key-In-Ignition Reminder
If you open the driver's door and the key is in the ignition, a chime will sound to remind you to remove the key.
NOTE: The Key-In-Ignition reminder only sounds when the ignition key is placed in the LOCK or ACC position.
SENTRY KEY
The Sentry Key Immobilizer System prevents unauthorized vehicle operation by disabling the engine. The system does not need to be armed or activated. Operation is automatic, regardless of whether the vehicle is locked or unlocked.
The system uses ignition keys, which have an embedded electronic chip (transponder), to prevent unauthorized vehicle operation. Therefore, only keys that are programmed to the vehicle can be used to start and operate

the vehicle. The system will shut the engine off in two (2) seconds if someone uses an invalid key to start the engine.
NOTE: A key, which has not been programmed, is also considered an invalid key even if it is cut to fit the ignition switch lock cylinder for that vehicle.
During normal operation, after turning on the ignition switch, the Vehicle Security Alarm Indicator Light will turn on for three (3) seconds for a bulb check. If the light remains on after the bulb check, it indicates that there is a problem with the electronics. In addition, if the light begins to flash after the bulb check, it indicates that someone used an invalid key to start the engine. Either of these conditions will result in the engine being shut off after two (2) seconds.
If the Vehicle Security Alarm Indicator Light turns on during normal vehicle operation (vehicle running for
THINGS TO KNOW BEFORE STARTING YOUR VEHICLE 15
longer than 10 seconds), it indicates that there is a fault in the electronics. Should this occur, have the vehicle serviced as soon as possible.
2
NOTE:
²The Sentry Key Immobilizer System is not compatible with some after-market remote starting systems. Use of these systems may result in vehicle starting problems and loss of security protection.
²Exxon/Mobil Speed Pass,™ additional Sentry Keys, or any other transponder-equipped components on the same key chain will not cause a key-related (transponder) fault unless the additional part is physically held against the ignition key being used when starting the vehicle. Cell phones, pagers, or other RF electronics will not cause interference with this system.
All of the keys provided with your new vehicle have been programmed to the vehicle electronics.

16 THINGS TO KNOW BEFORE STARTING YOUR VEHICLE
Replacement Keys
NOTE: Only keys that are programmed to the vehicle electronics can be used to start and operate the vehicle. Once a Sentry Key is programmed to a vehicle, it cannot be programmed to any other vehicle.
CAUTION!
Always remove Sentry Keys from the vehicle and lock all doors when leaving the vehicle unattended.
At the time of purchase, the original owner is provided with a four-digit PIN number. Keep the PIN in a secure location. This number is required for dealer replacement of keys. Duplication of keys may be performed at an authorized dealer or by using the Customer Key Programming procedure. This procedure consists of programming a blank key to the vehicle electronics. A blank key is one, which has never been programmed.
NOTE: When having the Sentry Key Immobilizer System serviced, bring all vehicle keys with you to the dealer.
Customer Key Programming
If you have two valid sentry keys, you can program new sentry keys to the system by performing the following procedure:
1.Cut the additional Sentry Key Transponder blank(s) to match the ignition switch lock cylinder key code.
2.Insert the first valid key into the ignition switch. Turn the ignition switch to the ªONº position for at least 3 seconds, but no longer than 15-seconds. Then, turn the ignition switch to the ªLOCKº position and remove the first key.
3.Insert the second valid key into the ignition switch. Turn the ignition switch to the ªONº position within 15 seconds. After ten seconds, a chime will sound. In

addition, the Vehicle Security Alarm Indicator Light will begin to flash. Turn the ignition switch to the ªLOCKº position and remove the second key.
4. Insert a blank Sentry Key into the ignition switch. Turn the ignition switch to the ªONº position within 60 seconds. After 10 seconds, a single chime will sound. In addition, the Vehicle Security Alarm Indicator Light will stop flashing. To indicate that programming is complete, the indicator light will turn on again for 3 seconds and then turn off.
The new Sentry Key is programmed. The Keyless Entry
Transmitter will also be programmed during this procedure.
Repeat this procedure to program up to 8 keys. If you do not have a programmed sentry key, contact your dealer for details.
THINGS TO KNOW BEFORE STARTING YOUR VEHICLE 17
NOTE: If a programmed key is lost, see your dealer to have all remaining keys erased from the systems memory. This will prevent the lost key from starting your vehicle. The remaining keys must then be repro- 2 grammed. All vehicle keys must be taken to the dealer at the time of service to be reprogrammed.
General Information
The Sentry Key system complies with FCC rules part 15 and with RSS-210 of Industry Canada. Operation is subject to the following conditions:
²This device may not cause harmful interference.
²This device must accept any interference that may be received, including interference that may cause undesired operation.

18 THINGS TO KNOW BEFORE STARTING YOUR VEHICLE
STEERING WHEEL LOCK Ð IF EQUIPPED
Your vehicle may be equipped with a passive steering wheel lock (manual transmission only). This lock prevents steering the vehicle without the ignition key. If the steering wheel is moved a half turn in either direction and the key is not in the ignition, the steering wheel will lock.
To Manually Lock the Steering Wheel
With the engine running, rotate the steering wheel 1/2 revolution from straight ahead position, turn off the engine, and remove the key. Rotate the steering wheel slightly in both directions until the lock engages.
To Release the Steering Wheel Lock
Insert the key in the ignition and turn the wheel slightly to the right or left to disengage the lock.
NOTE: If you turned the wheel to the right to engage the lock, you must turn the wheel slightly to the right to
disengage it. If you turned the wheel to the left to engage the lock, turn the wheel slightly to the left to disengage it.
SECURITY ALARM SYSTEM Ð IF EQUIPPED
The Vehicle Security Alarm (VSA) system monitors the vehicle doors, liftgate, and liftgate flip-up window for unauthorized entry and ignition for unauthorized operation.
If something triggers the alarm, the system will sound the horn intermittently, flash the headlights and taillights, and flash the Vehicle Security Alarm Indicator Light in the cluster.
NOTE: The ªPanicº and ªSecurityº alarms are quite different. Please take a moment to activate the ªPanicº and the ªSecurityº modes to hear the differences in the horn. In case one should go off in the future, you will need to know which mode has been activated in order to deactivate it.

Rearming of the System:
If something triggers the alarm, and no action is taken to disarm it, the system will turn off the horn after 3 minutes, turn off all of the visual signals after 15 minutes, and then the system will rearm itself.
To Arm the System:
1.Remove the key from the ignition switch and exit the vehicle.
2.Lock the doors and liftgate by pressing the power door lock switch or the Lock button on the Remote Keyless Entry (RKE) transmitter.
NOTE: The system will not arm if you lock the doors with the manual door lock plungers or the driver's door lock cylinder.
3. Close all doors. The Vehicle Security Alarm Indicator Light in the instrument cluster will flash rapidly for about 16 seconds to signal that the system is arming.
THINGS TO KNOW BEFORE STARTING YOUR VEHICLE 19
During this period, opening any door or the liftgate will |
|
cancel the arming process. If the system arms success- |
|
fully, the Vehicle Security Alarm Indicator Light will flash |
2 |
at a slower rate to indicate the alarm is set. |
NOTE: For added security, whenever the Security Alarm is armed, the HomeLinkt/Garage Door Opener (if equipped) is disabled as well.
To Disarm the System:
Either press the Unlock button on the RKE transmitter or insert a valid sentry key into the ignition lock cylinder and turn the key to the ON position.
NOTE:
²Unlocking the doors with the manual door lock plungers or the driver's door lock cylinder will not disarm the system.
²When the system is armed, the interior power door lock switches will not unlock the doors.

20 THINGS TO KNOW BEFORE STARTING YOUR VEHICLE
The Security Alarm System is designed to protect your vehicle; however, you can create conditions where the system will give you a false alarm. If the previously described arming sequence has occurred, the system will arm regardless of whether you are inside or outside the vehicle. If you remain inside the vehicle and open a door, the alarm will sound. If this occurs, disarm the system.
Tamper Alert
If something has triggered the alarm in your absence, the horn will sound three times when you unlock the doors. Check the vehicle for tampering.
ILLUMINATED ENTRY SYSTEM
The interior lights will turn on when you use the Remote Keyless Entry (RKE) transmitter or open a door.
This feature also turns on the approach lighting (if so equipped). For details, refer to ªIllumination Approach,º
under ªPersonal Settings (Customer Programmable Features),º under ªElectronic Vehicle Information Center (EVIC)º in Section 4 of this manual.
The interior lights will fade to off after about 30 seconds or they will immediately fade to off once the ignition switch is turned on.
NOTE:
²The illuminated entry system will not operate the interior lights if the dimmer control is in the ªdefeatº position (extreme downward position).
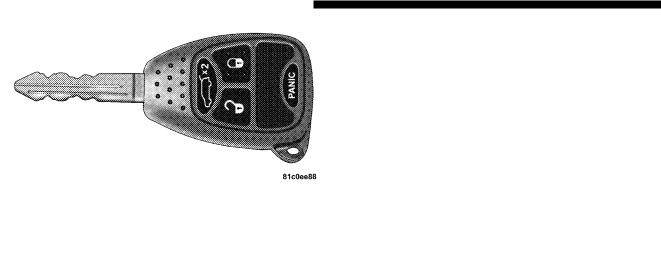
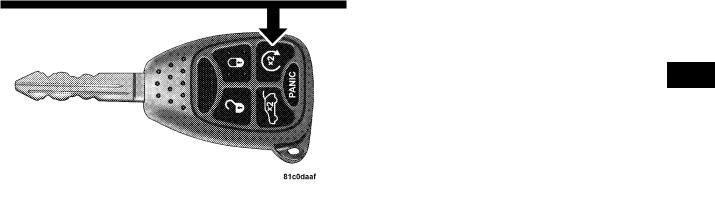
REMOTE KEYLESS ENTRY
This system allows you to lock or unlock the doors and liftgate, open the liftgate flip-up window, or activate the panic alarm from distances up to 23 feet (7 meters) using a hand held radio transmitter. The transmitter need not be pointed at the vehicle to activate the system. However, the line of transmission must not be blocked with metal objects when using the transmitter.
NOTE: Inserting the key into the ignition switch disables all buttons on the transmitter.
Vehicle Key
To Unlock the Doors and Liftgate:
Press and release the Unlock button on the transmitter once to unlock the driver's door, or twice to unlock all doors and the liftgate. The turn signal lights will flash to acknowledge the unlock signal. The illuminated entry system will also turn on.
THINGS TO KNOW BEFORE STARTING YOUR VEHICLE 21
Remote Key Unlock, Driver Door/All Doors First
This feature lets you program the system to unlock either the driver's door or all doors and the liftgate on the first press of the Unlock button on the transmitter. To change 2 the current setting, proceed as follows:
²For vehicles equipped with the Electronic Vehicle Information Center (EVIC), refer to ªRemote Key Unlock,º under ªPersonal Settings (Customer Programmable Features),º under ªElectronic Vehicle Information Center (EVIC)º in Section 4 of this manual
²For vehicles not equipped with the EVIC, perform the following steps:
1.Press and hold the Lock button on a programmed (i.e. functional) transmitter for at least 4 seconds, but no longer than 10 seconds. Then, press and hold the Unlock button while still holding the Lock button.
2.Release both buttons at the same time.

22 THINGS TO KNOW BEFORE STARTING YOUR VEHICLE
3.Test the feature from outside the vehicle by pressing the Lock and Unlock buttons on the transmitter.
4.Repeat these steps if you want to return this feature to its previous setting.
NOTE: Pressing the Lock button on the transmitter while you are inside the vehicle will activate the Security Alarm. Opening a door with the Security Alarm activated will cause the alarm to sound. Press the Unlock button to deactivate the Security Alarm.
Illuminated Approach Ð If Equipped
This feature activates the headlights for up to 90 seconds when the doors are unlocked with the transmitter. The time for this feature is programmable on vehicles equipped with the Electronic Vehicle Information Center (EVIC). For details, refer to ªIllumination Approach,º under ªPersonal Settings (Customer Programmable Features),º under ªElectronic Vehicle Information Center (EVIC)º in Section 4 of this manual.
To Lock the Doors and Liftgate:
Press and release the Lock button on the transmitter to lock all doors and the liftgate. The turn signal lights will flash and the horn will chirp to acknowledge the lock signal.
Sound Horn with Lock
This feature will cause the horn to chirp when the doors are locked with the transmitter. This feature can be turned on or turned off. To change the current setting, proceed as follows:
²For vehicles equipped with the Electronic Vehicle Information Center (EVIC), refer to ªSound Horn with Remote Key Lock,º under ªPersonal Settings (Customer Programmable Features),º under ªElectronic Vehicle Information Center (EVIC)º in Section 4 of this manual.

²For vehicles not equipped with the EVIC, perform the following steps:
1.Press the Lock button on a programmed (i.e. functional) transmitter for at least 4 seconds, but no longer than 10 seconds. Then, press the Panic button while still holding the Lock button.
2.Release both buttons at the same time.
3.Test the feature from outside the vehicle by pressing the Lock button on the transmitter.
4.Repeat these steps if you want to return this feature to its previous setting.
NOTE: Pressing the Lock button on the transmitter while you are inside the vehicle will activate the Security Alarm. Opening a door with the Security Alarm activated will cause the alarm to sound. Press the Unlock button to deactivate the Security Alarm.
THINGS TO KNOW BEFORE STARTING YOUR VEHICLE 23
Flash Lights with Lock
The feature will cause the turn signal lights to flash when the doors are locked or unlocked with the transmitter. This feature can be turned on or turned off. To change the 2 current setting, proceed as follows:
²For vehicles equipped with the Electronic Vehicle Information Center (EVIC), refer to ªFlash Lights with Remote Key Lock,º under 9Personal Settings (Customer Programmable Features),º under ªElectronic Vehicle Information Center (EVIC)º in Section 4 of this manual.
²For vehicles not equipped with the EVIC, perform the following steps:
1. Press and hold the Unlock button on a programmed (i.e. functional) transmitter for at least 4 seconds, but no longer than 10 seconds. Then, press and hold the Lock button while still holding the Unlock button.
24 THINGS TO KNOW BEFORE STARTING YOUR VEHICLE
2.Release both buttons at the same time.
3.Test the feature from outside the vehicle by pressing the Lock and Unlock buttons on the transmitter.
4.Repeat these steps if you want to return this feature to its previous setting.
NOTE: Pressing the Lock button on the transmitter while you are inside the vehicle will activate the Security Alarm. Opening a door with the Security Alarm activated will cause the alarm to sound. Press the Unlock button to deactivate the Security Alarm.
To Unlatch the Liftgate Flip-Up Window:
Press the Rear Release button twice to unlatch the liftgate flip-up window.
WARNING!
To avoid injury stand back when opening. Glass will automatically rise.
Using the Panic Alarm
NOTE: The ªPanicº and ªSecurityº alarms are quite different. Please take a moment to activate the ªPanicº and the ªSecurityº modes to hear the differences in the horn. In case one should go off in the future, you will need to know which mode has been activated in order to deactivate it.
To turn the panic alarm feature ON or OFF, press and hold the Panic button on the transmitter for at least one second and release. When the panic alarm is on, the

headlights and turn signal lights will flash, the horn will pulse on and off, and the illuminated entry system will turn on.
The panic alarm will stay on for 3 minutes unless you turn it off by pressing the Panic button a second time or if the vehicle speed is 5 mph (8 km/h) or greater.
During the Panic Mode, the door locks and remote keyless entry system will function normally. Panic mode will not disarm the security system on vehicles so equipped.
NOTE: You may need to be close to the vehicle when using the transmitter to turn off the panic alarm due to the radio frequency noises emitted by the system.
THINGS TO KNOW BEFORE STARTING YOUR VEHICLE 25
Programming Additional Transmitters
Refer to SENTRY KEY ªCustomer Key Programming.º in this section.
NOTE: If you do not have a programmed transmitter, 2 contact your dealer for details.
Battery Replacement
The recommended replacement battery is CR2032.
NOTE:
²Perchlorate Material Ð special handling may apply. See www.dtsc.ca.gov/hazardouswaste/perchlorate.
²Do not touch the battery terminals that are on the back housing or the printed circuit board.
1. Remove the screw from the transmitter case (if equipped).
26 THINGS TO KNOW BEFORE STARTING YOUR VEHICLE
2. With the transmitter buttons facing down, use a flat blade tool to pry the two halves of the transmitter case apart. Make sure not to damage the seal during removal.
Separating Case Halves
3.Remove and replace the batteries. Avoid touching the new batteries with your fingers. Skin oils may cause battery deterioration. If you touch a battery, clean it with rubbing alcohol.
4.To assemble the transmitter case, snap the two halves together.
5.Reinstall and tighten the screw until snug (if equipped).
General Information
This device complies with part 15 of FCC rules and with RS-210 of Industry Canada. Operation is subject to the following conditions:
1.This device may not cause harmful interference.
2.This device must accept any interference that may be received including interference that may cause undesired operation.
NOTE: Changes or modifications not expressly approved by the party responsible for compliance could void the user's authority to operate the equipment.
If your Keyless Entry Transmitter fails to operate from a normal distance, check for these two conditions.
1.Weak batteries in transmitter. The expected life of the batteries is from one to two years.
2.Closeness to a radio transmitter such as a radio station tower, airport transmitter, and some mobile or CB radios.
REMOTE STARTING SYSTEM Ð IF EQUIPPED
This system uses the Remote Keyless Entry (RKE) transmitter to start the engine conveniently from outside the vehicle while still maintaining security. The system has a targeted range of 328 ft. (100 m).
THINGS TO KNOW BEFORE STARTING YOUR VEHICLE 27
2
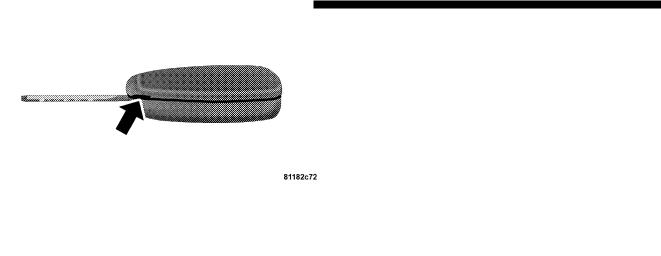
Remote Start Button
NOTE: The vehicle must be equipped with an automatic transmission to be equipped with Remote Start.

28 THINGS TO KNOW BEFORE STARTING YOUR VEHICLE
How To Use Remote Start
All of the following conditions must be met before the engine will remote start:
²Gear selector lever in ªPº (Park).
²Doors closed.
²Hood closed.
²Liftgate closed.
²Hazard switch off.
²Brake switch inactive (brake pedal not pressed).
²Ignition key removed from ignition switch.
²Battery at an acceptable charge level.
²RKE Panic button not pressed.
To Enter Remote Start Mode
Press and release the Remote Start button on the RKE transmitter twice. The engine will start and the vehicle will remain in the Remote Start mode for a 15-minute cycle.
NOTE:
²For security, power window operation and sunroof or Sky Slidert operation (if equipped) is disabled when the vehicle is in the Remote Start mode.
²The engine can be started two consecutive times (two 15-minute cycles) with the RKE transmitter. However, the ignition switch must be cycled to the ON position before you can repeat the start sequence for a third cycle.
To Exit Remote Start Mode without Driving the Vehicle
Allow the engine to run for the entire 15-minute cycle.
To Exit Remote Start Mode & Drive the Vehicle
Before the end of the 15-minute cycle, press and release the Unlock button on the RKE transmitter to unlock the doors and disarm the Vehicle Security Alarm (if equipped). Then, insert the key into the ignition switch and turn the switch to the ON position.
NOTE: The ignition switch must be in the ON position in order to drive the vehicle.
To Turn Off the Engine While in Remote Start Mode
Press and release the remote start button one time.
NOTE: To avoid inadvertent shut downs, the system will disable the one-time press of the remote start button for two seconds after receiving a valid remote start request.
THINGS TO KNOW BEFORE STARTING YOUR VEHICLE 29
DOOR LOCKS
Manual Door Locks
To lock each door, push the door lock plunger on each 2 door trim panel downward. To unlock each door, pull the door lock plunger on each door trim panel upward.
Manual Lock Plunger

30 THINGS TO KNOW BEFORE STARTING YOUR VEHICLE
If the door lock plunger is down when you shut the door, the door will lock. Therefore, make sure the keys are not inside the vehicle before closing the door.
NOTE: The manual door locks will not lock or unlock the liftgate.
WARNING!
²For personal security and safety in the event of an accident, lock the vehicle doors as you drive as well as when you park and leave the vehicle.
²When leaving the vehicle always remove the key from the ignition lock, and lock your vehicle. Unsupervised use of vehicle equipment may cause severe personal injuries and death.
²Never leave children alone in a vehicle. Leaving children in a vehicle unattended is dangerous for a number of reasons. A child or others could be seriously or fatally injured. Don't leave the keys in the ignition. A child could operate power windows, other controls, or move the vehicle.
Loading...