


Studio™ Series
S120PII
Powered Subwoofer
Service Manual
JBL Consumer Products |
|
250 Crossways Park Dr. |
|
Woodbury, New York 11797 |
Rev3 2/2006 |
- CONTENTS -
BASIC SPECIFICATIONS …………….……..…………..1 DETAILED SPECIFICATIONS ……….……..…………..2 CONNECTIONS………………………...……..…...…..…4 OPERATION ……..………………….……...…….….…...7 BASIC TROUBLESHOOTING..…………………… ……8 BULLETIN JBL2003-06………..…………….………..….9 S120PII AMPLIFIER BLOCK DIAGRAM………………10 S120PII EXPLODED VIEW…………….…………….....11 S120PII TEST SET UP AND PROCEDURE….……....12 S120PII ELECTRICAL PARTS LIST ..……….…….….13 P.C.B. DRAWINGS….……………………………...…….20 S120PII IC/TRANSISTOR PINOUTS..……..….…….….22 S120PII SCHEMATICS………..…………….……….….23 S120PII PACKAGE……………………………………....27
JBL S120PII SPECIFICATIONS
Amplifier Power (RMS): |
400 Watts |
Driver: |
12" PolyPlas™ (polymer-coated cellulose |
|
fiber) (4.4 ohms DCR) |
Inputs: |
Line Level (switchable to LFE), BassQ™ and |
|
Speaker Level |
Outputs: |
BassQ and Speaker Level (High-Pass) |
Low-Pass Frequency: |
Continuously variable from 50Hz – 150Hz |
High-Pass Frequency: |
150Hz when using speaker-level outputs |
Frequency Response: |
22Hz – Low-pass crossover setting |
Dimensions (H x W x D): |
17-3/16" x 16-3/16" x 18" (19" with grille) |
(with feet, without spikes) |
437 x 411 x 457mm (483mm with grille) |
Weight: |
56 lb/25.5kg |
All features and specifications are subject to change without notice.
1

S120PII Studio Series
S120PII 300W Powered Sub/ Plate Amp
LINE VOLTAGE |
Yes/No |
Hi/Lo Line |
Nom. |
Unit |
Notes |
US 120vac/60Hz |
Yes |
108-132 |
120 |
Vrms |
Normal Operation |
EU 230vac/50-60Hz |
Yes |
207-264 |
230 |
Vrms |
Normal operation, MOMS required |
|
|
|
|
|
|
|
|
|
QA Test |
|
|
Parameter |
Spec |
Unit |
Limits |
Conditions |
Notes |
Amp Section |
|
|
|
|
|
|
|
|
|
|
Bridge type amplifier, None of the speaker |
|
|
|
|
|
terminals must be connected to system GND at |
Type (Class AB, D, other) |
D |
n/a |
n/a |
|
any time. |
Load Impedance (speaker) |
6 |
Ohms |
n/a |
Nominal |
|
|
|
|
|
|
Limiter prevents continuous power to exceed |
Rated Output Power |
275 |
Watts |
220 |
1 input driven |
220 Watts. |
THD @ Rated Power |
0.1 |
% |
1 |
22k filter |
|
THD @ 1 Watt |
0.1 |
% |
0.5 |
22k filter |
|
DC Offset |
10 |
mV-DC |
60 |
@ Speaker Outputs |
|
|
|
|
|
|
Measured at the speaker cable. 200 Watts, |
|
|
|
|
|
measured at speaker output terminals located at |
Damping factor |
>50 |
DF |
23 |
Measured at amplifier board |
the amp board. |
|
|
|
|
|
|
Input Sensitivity |
|
|
|
|
|
Input Frequency |
50 |
Hz |
50 |
Nominal Freq. |
|
L&R |
425 |
mVrms |
±2dB |
To 200 Watts |
Single input driven |
LFE Mode selected |
425 |
mVrms |
±2dB |
To 200 Watts |
LFE Mode selected, single input driven |
Bass Q Input |
0.9 |
Vrms |
±2dB |
To 200 Watts |
Single input driven |
Speaker/Hi Level Input |
5.5 |
Vrms |
±2dB |
To 200 Watts |
Single input driven |
|
|
|
|
|
|
Signal to Noise |
|
|
|
|
|
SNR-A-Weighted |
100 |
dBA |
85 |
relative to rated power |
A-Weighting filter |
SNR-unweighted |
90 |
dBr |
85 |
relative to rated power |
22k filter |
SNR rel. 1W-unweighted |
65 |
dBr |
60 |
relative to 1W Output |
22k filter |
|
|
|
|
Volume @max, using RMS reading |
|
Residual Noise Floor |
1 |
mVrms |
2 |
DMM/VOM (or A/P) |
|
|
|
|
|
Volume @max, w/ A/P Swept |
|
|
|
|
|
Bandpass Measurement (Line |
|
Residual Noise Floor |
1 |
mVrms(max) |
2 |
freq.+ harmonics) |
|
|
|
|
|
|
|
Input Impedance |
|
|
|
|
|
Line Input (L, R,LFE) |
10K |
ohms |
n/a |
Nominal |
|
Speaker/Hi Level Input |
10K |
ohms |
n/a |
Nominal |
|
|
|
|
|
|
|
Filters |
|
|
|
|
|
LP 4th order fixed |
50-150 |
Hz |
± 10 |
|
2nd order variable and 2nd order fixed |
Subsonic filter (HPF) 3rd Order |
Fixed |
|
|
|
|
LFE Low pass 2nd order |
Fixed |
Hz |
± 10 |
LFE input driven only |
|
|
|
|
|
|
|
Limiter |
|
|
|
|
|
THD at Max. Output Power |
YES |
n/a |
functional |
Maximum Output Power |
|
|
|
|
|
|
|
Features |
-- |
|
|
|
|
Auto - On -Off switch |
YES |
-- |
functional |
|
Refer to ATO section |
Phase switch |
0-180 |
deg |
functional |
|
|
Volume pot Taper (lin/log) |
LOG |
-- |
functional |
|
A Taper |
Variable crossover 50-150 Hz |
YES |
|
functional |
|
|
|
|
|
|
|
HP single order filter 180 Hz @ 8 Ohms, 90 Hz |
HP Speaker out |
|
|
functional |
|
@ 4 Ohms load |
LFE -Normal Select switch |
YES |
-- |
functional |
|
Disables LP filter, intended for LFE |
BassQ Input |
YES |
|
functional |
|
6.3mm Phono Jack |
BassQ Output |
YES |
|
functional |
|
Bypass, loop-through - Designed for daisy chain |
|
|
|
|
|
|
Input Configuration |
|
|
|
|
|
Line In (L,R) & LFE |
YES |
-- |
functional |
|
Dual RCA jack |
Bass Q in |
YES |
|
functional |
|
6.3m phono mono Jack |
Spkr/Hi Level In |
YES |
-- |
functional |
|
Binding post connector L&R |
|
|
|
|
|
|
|
|
|
|
|
|
Signal Sensing (ATO) |
|
|
|
|
|
Auto-Turn-On (yes/no) |
YES |
|
functional |
Auto - on selection switch in Auto |
|
ATO Input test frequency |
50 |
Hz |
functional |
" |
|
ATO Level LFE Input |
2 |
mV |
functional |
" |
|
ATO Level Speaker in |
50 |
mV |
functional |
" |
|
ATO Level Bass Q input |
2 |
mV |
functional |
" |
|
|
|
|
|
Amp connected and AC on, then |
|
ATO Turn-on time |
1 |
seconds |
functional |
input signal applied |
|
|
|
|
|
T before muting, after signal is |
Auto turn of time (T) must be 10 > T < 17 |
Auto Mute/ Turn-OFF Time |
15 |
minutes |
17 |
removed |
Minutes |
|
|
|
|
|
|
Power on Delay time |
3 |
sec. |
4 |
AC Power Applied |
|
2

S120PII Studio Series
|
|
|
QA Test |
|
|
Parameter |
Spec |
Unit |
Limits |
Conditions |
Notes |
|
|
|
|
|
|
Transients/Pops |
|
|
|
|
|
ATO Transient |
5 |
mV-peak |
n/a |
@ Speaker Outputs |
|
Turn-on Transient |
50 |
mV-peak |
2v-pp |
@ Speaker Outputs |
AC Line cycled from OFF to ON |
Turn-off Transient |
50 |
mV-peak |
2v-pp |
@ Speaker Outputs |
AC Line cycled from ON to OFF |
|
|
|
|
|
|
Efficiency |
|
|
|
|
|
Efficiency |
70 |
% |
65 |
Rated power |
Nominal Line voltage 120 VAC |
|
|
|
|
|
Maximum allowable input power under nominal |
|
|
|
|
|
Input voltage and frequency, in stand-by mode |
Stand-by Input Power |
12 |
Watts |
15 |
@ nom. line voltage |
(HOT or COLD operation). |
Power Cons. @ rated power |
400 |
Watts |
400 |
@ nom. line voltage |
250 Watts @ 6.0 Ohms nominal line voltage |
|
|
|
|
|
|
Protection |
|
|
|
|
|
|
|
|
|
|
Amplifier should resume operation after short |
Short Circuit Protection |
YES |
|
functional |
Direct short at output |
circuit condition removal |
|
|
|
|
|
Temperature rise in accessible metal parts |
|
|
|
|
|
should not exceed 35K rise for domestic version |
Thermal Protection |
YES |
|
functional |
@1/8 max unclipped Power |
or 30K rise for European versions |
DC Offset Protection |
YES |
|
- |
DC present at Speaker Out leads |
Relay or crowbar (for driver/fire protection), |
Line Fuse Rating |
|
|
|
|
|
USA-Domestic |
4 |
Amps |
|
Type-T or Slo Blo-250 V |
|
EU |
2 |
Amps |
|
Type-T or Slo Blo-250 V |
Internal fuse with UL/SEMKO rated holder |
3

S120PII Studio Series
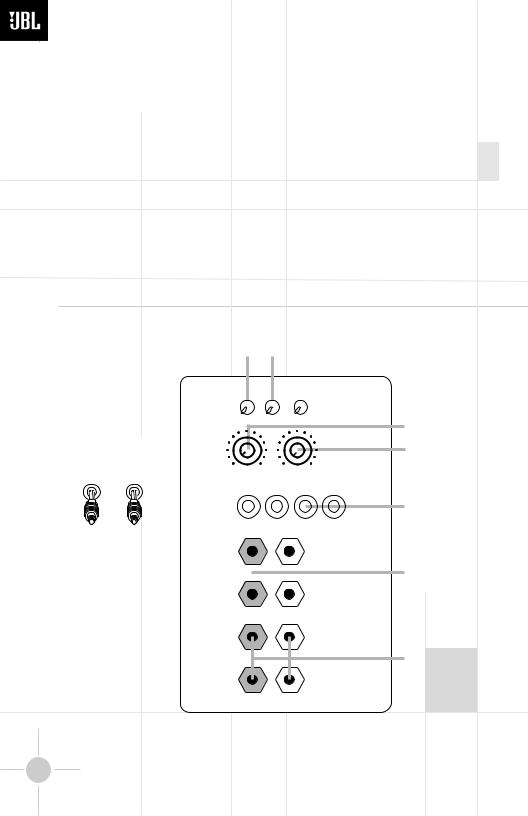
S P E A K E R C O N N E C T I O N
When we designed the |
description best matches |
under the collar. Insert the |
|
S120PII powered subwoofer, |
your system and follow the |
bare end of the wire through |
|
our goal was to offer the user |
corresponding hookup |
the hole in the post, then |
|
the best possible performance |
instructions. |
screw the collar back down |
|
combined with the most |
To use the binding-post |
until the connection is tight. |
|
flexible and complete |
The holes in the center of the |
||
speaker terminals •ª with |
|||
installation options. Please |
collars are intended for |
||
bare wire, unscrew the collar |
|||
look over the following three |
banana-type connectors. |
||
until the pass-through hole in |
|||
examples to determine which |
|
||
the center post is visible |
|
||
|
|
||
|
|
|
Dolby* Pro Logic* (Non-Digital) – Speaker Level |
Left Front |
|
|
Center |
|
Right Front |
|||||
+ |
– |
|
|
– |
+ |
– |
|||||
|
|
+ |
|||||||||
Use this installation method |
and right terminals on the |
|
|
|
|
|
|
|
|
||
for Dolby Pro Logic appli- |
subwoofer that are marked |
|
|
|
Subwoofer |
|
|
||||
cations (not Dolby Digital, |
“High Level In” •. Connect |
|
|
|
|
|
L L |
|
|
||
DTS |
® |
or other digital |
the left and right terminals on |
|
|
|
|
|
|
• |
|
|
|
|
|
|
LEVEL |
|
|||||
|
|
|
|
|
|
|
|
HIGH |
|
|
|
processing), where the |
the subwoofer that are |
|
|
|
|
|
IN |
|
|
||
|
|
|
+ |
– |
R R |
|
|
||||
receiver/processor does not |
marked “High Level Out” ª |
|
|
|
L |
|
|
||||
|
|
|
|
|
|
ª |
|||||
have a subwoofer output or |
to the corresponding |
|
|
|
|
|
LEVEL |
|
|||
|
|
|
|
|
|
|
|
|
HIGH |
|
|
a volume-controlled preamp |
terminals on the back of your |
|
|
|
|
|
OUT` |
|
|
||
|
|
|
|
|
R |
|
|
||||
(line-) level output: |
front left and right speakers. |
|
|
|
|
|
|
|
|
||
If your receiver features bass |
Connect your receiver or |
|
|
|
|
Receiver |
|
|
|||
|
Left Front |
|
Center |
|
Right Front |
||||||
management capabilities that |
amplifier’s center, left and |
|
+ |
– |
|
+ |
– |
+ |
– |
||
require you to configure your |
right surround-speaker |
|
|
|
|
|
|
|
|
||
speaker settings, make sure |
terminals to the corre- |
|
Left Surround |
|
|
|
Right Surround |
||||
to set your leftand right-front |
sponding terminals on the |
|
+ |
– |
|
|
|
+ |
– |
||
speakers to “LARGE”. |
back of your center, left and |
|
|
|
|
|
|
|
|
||
Connect your receiver or |
right surround speakers. |
|
Left Surround |
|
|
|
Right Surround |
||||
|
|
+ |
– |
|
|
|
+ |
– |
|||
amplifier’s front left and right |
|
|
|
|
|
||||||
|
|
|
|
|
|
|
|
|
|||
speaker terminals to the left |
|
|
|
|
|
|
|
|
|
||
4
S120PII Studio Series |
|
|
|
|
|
|
|
|
|
|
|
|
|
|
|
|
|
|
|
|
|
|
|
|
|
|
|
|
|
||||||||||
|
|
|
|
|
|
|
|
|
|
|
|
|
|
|
|
|
|
|
|
|
|
|
|
|
|
|
|
|
|||||||||||
|
|
|
|
|
|
|
|
|
|
|
|
|
|
|
|
|
|
|
|
|
|
|
|
|
|
|
|
|
|
|
|
|
|
|
|
|
|
|
|
|
|
|
|
|
|
|
|
|
|
|
|
|
|
|
|
|
|
|
|
|
|
|
|
|
|
|
|
|
|
|
|
|
|
|
|
|
|
|
|
|
|
|
Dolby Pro Logic (Non-Digital) – Line Level |
|
|
|
|
|
|
|
|
|
|
|
|
|
|
||||||||||||||||||||||
|
|
|
Use this installation method |
|
|
|
in the “Normal” position. Do |
terminals on your receiver or |
|||||||||||||||||||||||||||||||
|
|
|
|
||||||||||||||||||||||||||||||||||||
|
|
|
for Dolby Pro Logic appli- |
|
|
|
not use the “LFE” position |
|
|
amplifier. |
|
|
|
|
|
|
|
|
|||||||||||||||||||||
|
|
|
cations (not Dolby |
Digital, DTS |
|
|
with Dolby Pro Logic-only |
|
|
Make sure your receiver or |
|||||||||||||||||||||||||||||
|
|
|
or other digital |
processing), |
|
|
|
processors. |
|
|
|
|
|
||||||||||||||||||||||||||
|
|
|
|
|
|
|
|
|
|
|
processor is configured cor |
- |
|
|
|||||||||||||||||||||||||
|
|
|
where the receiver/processor |
|
|
Note: If your receiver or |
|
|
rectly: Make sure that the sub- |
|
|
||||||||||||||||||||||||||||
|
|
|
is equipped with a subwoofer |
|
|
|
|
|
|
||||||||||||||||||||||||||||||
|
|
|
|
|
amplifier only has one |
|
|
woofer is configured as “On.” |
|
|
|||||||||||||||||||||||||||||
|
|
|
output or a volume-controlled |
|
|
|
|
|
|
||||||||||||||||||||||||||||||
|
|
|
|
|
subwoofer output jack, |
|
|
Note for advanced users: If |
|||||||||||||||||||||||||||||||
|
|
|
preamp (line-) level output: |
|
|
|
|
|
|||||||||||||||||||||||||||||||
|
|
|
|
|
|
then you may connect the |
|
|
|||||||||||||||||||||||||||||||
|
|
|
|
|
|
|
|
your receiver/processor has |
|||||||||||||||||||||||||||||||
|
|
|
|
|
|
|
|
|
|
|
|
|
|
|
|
||||||||||||||||||||||||
|
|
|
Use RCA-type patch cords |
|
|
|
subwoofer output on your |
|
|
||||||||||||||||||||||||||||||
|
|
|
|
|
|
|
|
a built-in low-pass crossover |
|||||||||||||||||||||||||||||||
|
|
|
to connect the line-level |
|
|
|
receiver/preamplifier to either |
||||||||||||||||||||||||||||||||
|
|
|
|
|
|
filter for the subwoofer output, |
|||||||||||||||||||||||||||||||||
|
|
|
subwoofer outputs on your |
|
|
|
the left or right Line Level |
|
|
||||||||||||||||||||||||||||||
|
|
|
|
|
|
|
|
then the LFE switch ™ should |
|||||||||||||||||||||||||||||||
|
|
|
|
|
|
|
|
|
|
|
|
|
|
|
|
|
|
|
|
|
|
|
|
|
|
|
|
|
|
|
|||||||||
|
|
|
receiver or amplifier to the |
|
|
|
input ¶ on the subwoofer. It |
be set to the “LFE” position to |
|||||||||||||||||||||||||||||||
|
|
|
Line Level inputs ¶ on the |
|
|
|
makes no difference which |
|
|
||||||||||||||||||||||||||||||
|
|
|
|
|
|
|
|
bypass the subwoofer’s |
|||||||||||||||||||||||||||||||
|
|
|
subwoofer. IMPORTANT: |
|
|
|
jack you choose. |
|
|
|
|
|
|||||||||||||||||||||||||||
|
|
|
|
|
|
|
|
|
|
|
internal crossover. |
||||||||||||||||||||||||||||
|
|
|
Make sure that the LFE toggle |
|
|
|
|
|
|
|
|
|
|
|
|
|
|
|
|
|
|
|
|||||||||||||||||
|
|
|
|
|
Connect each speaker to the |
|
|
|
|
|
|
|
|
|
|||||||||||||||||||||||||
|
|
|
|
|
|
|
|
|
|
|
|
|
|
||||||||||||||||||||||||||
|
|
|
switch ™ on the subwoofer is |
|
|
|
|
|
|
|
|
|
|
|
|||||||||||||||||||||||||
|
|
|
|
|
corresponding speaker |
|
|
|
|
|
|
|
|
|
|
|
|||||||||||||||||||||||
|
|
|
|
|
|
|
|
|
|
|
|
|
|
|
|
|
|
|
|
|
|
|
|
|
|
|
|
|
|
|
|
|
|
|
|
|
|
|
|
|
|
|
|
|
|
|
|
|
|
|
|
|
|
|
|
|
|
|
|
|
|
|
|
|
|
|
|
|
|
|
|
|
|
|
|
|
|
|
|
|
|
|
|
|
|
|
|
|
|
|
|
|
|
|
|
|
|
|
|
|
|
|
|
|
|
|
|
|
|
|
|
|
|
|
|
|
|
|
|
|
|
|
|
|
|
|
|
|
|
|
|
|
|
|
¡ ™ £ |
|
|
|
|
|
|
|
|
|
|
|
|||||||||||||
|
|
|
|
|
|
|
|
|
|
|
|
|
|
|
|
|
|
|
|
|
|
|
|
|
|
|
|
|
|
|
|
|
|
|
|
|
|
|
|
|
|
|
|
|
|
|
|
|
|
|
|
|
|
|
|
180 |
° |
|
LFE |
|
|
ON |
|
|
|
|
|
|
|
|
|
|
|
||||||
|
|
|
|
|
|
|
|
|
|
|
|
|
|
PHASE |
|
|
|
|
|
|
|
|
|
|
|
|
AUTO |
|
|
|
|
|
|
|
|
|
|
|
|
|
|
|
|
|
|
|
|
|
|
|
|
|
|
|
|
0° |
|
|
|
NORMAL |
|
OFF |
|
|
|
¢ |
|
|
|
|
|
||||||||
|
|
|
|
|
|
RECEIVER |
|
|
|
|
|
|
|
|
|
80Hz |
|
|
|
|
|
|
|
|
|
|
|
|
|
|
|
|
|||||||
|
|
|
|
|
|
|
|
|
|
|
|
|
|
|
|
|
|
|
|
|
|
|
|
|
|
|
|
|
|
|
|
|
|
|
|
||||
|
|
|
|
|
Subwoofer |
|
|
CROSSOVER |
|
|
|
|
|
|
|
|
|
|
|
|
LEVEL |
|
|
∞ |
|||||||||||||||
|
|
|
|
|
|
|
FREQUENCY |
|
|
|
|
|
|
|
|
|
|
|
|
|
|
||||||||||||||||||
|
|
|
|
|
|
Out |
|
|
|
|
|
|
|
|
|
|
|
|
|
|
|
|
|
|
|
|
|
|
|
|
|
|
|
|
|
|
|
|
|
|
|
|
|
L |
R |
|
|
|
|
|
|
50Hz |
|
|
|
150Hz |
|
|
|
MIN |
|
MAX |
|
|
|
|
|
|
|
|
|
|
|
||||||
|
|
|
|
|
|
|
|
|
|
|
|
|
|
|
|
|
|
|
|
|
|
|
|
|
|
|
|
|
|
|
|
|
|
|
|||||
|
|
|
|
|
|
|
|
|
|
|
|
|
|
|
|
|
|
|
|
|
|
|
|
|
|
|
|
|
|
|
|
|
§ |
|
|
|
|
|
|
|
|
|
|
|
|
|
|
|
|
|
|
|
|
|
|
|
|
|
|
|
|
|
|
|
|
|
|
|
|
|
LINE |
|
|
|
|
|
|
||
|
|
|
|
|
|
|
|
|
|
|
|
|
|
|
|
|
|
|
|
|
|
|
|
|
|
|
|
|
|
|
|
¶ |
|
|
|
|
|
||
|
|
|
|
|
|
|
|
|
|
|
|
BASSQ |
|
|
|
|
|
|
|
|
|
|
|
|
|
|
|
LEVEL IN |
|
|
|
|
|
|
|||||
|
|
|
|
|
|
|
|
|
|
|
(See owner’s |
|
|
|
|
|
|
|
|
|
|
|
|
|
|
|
(For LFE |
|
|
|
|
|
|
|
|
||||
|
|
|
|
|
|
|
|
|
|
|
|
manual |
|
IN |
|
OUT |
|
R |
L |
|
use R or L) |
|
|
|
|
|
|
|
|
||||||||||
|
|
|
|
|
|
|
|
|
|
|
before use) |
|
|
|
|
|
|
|
|
|
|
|
|
|
|||||||||||||||
|
|
|
|
|
|
|
|
|
|
|
|
|
|
|
|
|
|
|
|
|
|
|
|
|
|
|
|
L |
|
|
|
|
|
|
|
|
|
|
|
|
|
|
|
|
|
|
|
|
|
|
|
|
|
|
|
|
|
|
|
|
|
|
|
|
|
|
|
HIGH |
|
|
• |
||||||||
|
|
|
|
|
|
|
|
|
|
|
|
|
|
|
|
|
|
|
|
|
|
|
|
|
|
|
|
LEVEL |
|
|
|||||||||
|
|
|
|
|
|
|
|
|
|
|
|
|
|
|
|
|
|
|
|
|
|
|
|
|
|
|
|
IN |
|
|
|
|
|
|
|
|
|
|
|
|
|
|
|
|
|
|
|
|
|
|
|
|
|
|
|
|
|
|
|
|
|
|
|
|
|
|
|
|
|
|
|
|
|
|
|
|
|
|
|
|
|
|
|
|
|
|
|
|
|
|
|
|
|
|
|
|
|
|
|
|
|
|
|
|
|
|
|
R |
|
|
|
|
|
|
|
|
|
|
|
|
|
|
|
|
|
|
|
|
|
|
|
|
|
|
|
+ |
|
|
|
– |
|
|
|
|
|
|
|
|
|
|
|
|
|
||||||
|
|
|
|
|
|
|
|
|
|
|
|
|
|
|
|
|
|
|
|
|
|
|
|
|
|
|
|
|
|
|
|
|
|||||||
|
|
|
|
|
|
|
|
|
|
|
|
|
|
|
|
|
|
|
|
|
|
|
|
|
|
|
|
L |
|
|
|
|
|
|
|
|
|
|
|
|
|
|
|
|
|
|
|
|
|
|
|
|
|
|
|
|
|
|
|
|
|
|
|
|
|
|
|
HIGH |
|
|
ª |
|
|
|
|
|
|||
|
|
|
|
|
|
|
|
|
|
|
|
|
|
|
|
|
|
|
|
|
|
|
|
|
|
|
|
LEVEL |
|
|
|
|
|
|
|
||||
|
|
|
|
|
|
|
|
|
|
|
|
|
|
|
|
|
|
|
|
|
|
|
|
|
|
|
|
OUT |
|
|
|
|
|
|
|
|
|
||
R
5

S120PII Studio Series |
|
|
|
|
|
|
|
|
|
|
|
|
|
|
|
|
|
|
|
|
|
|
|
|
||||||||||
|
|
|
|
|
|
|
|
|
|
|
|
|
|
|
|
|
|
|
|
|
|
|
|
|
|
|
|
|
|
|
|
|
|
|
|
|
|
|
|
|
|
|
|
|
|
|
|
|
|
|
|
|
|
|
|
|
|
|
|
|
|
|
|
|
|
|
|
|
|
|
|
|
Dolby Digital or DTS (or Other Digital |
Surround Mode) |
Connection |
|
|
|
|
|
|
|
||||||||||||||||||||||
|
|
|
Use this installation method |
Note: If your receiver or |
|
|
Make sure that |
you have |
|
|
|
|
|
|||||||||||||||||||||
|
|
|
|
|
|
|
|
|
||||||||||||||||||||||||||
|
|
|
for Dolby Digital, DTS or other |
amplifier has only one |
|
|
|
|
configured your |
surround |
|
|
|
|
|
|||||||||||||||||||
|
|
|
digital surround processors: |
subwoofer output jack, |
|
|
|
|
sound processor |
for |
|
|
|
|
|
|||||||||||||||||||
|
|
|
IMPORTANT: Make sure that |
then you may connect the |
|
|
“Subwoofer On” |
or “LFE On.” |
||||||||||||||||||||||||||
|
|
|
the LFE toggle switch ™ on |
subwoofer output on your |
|
|
The front left, front right, |
|||||||||||||||||||||||||||
|
|
|
receiver/preamplifier to either |
center and rear speakers |
||||||||||||||||||||||||||||||
|
|
|
the subwoofer is in the “LFE” |
|||||||||||||||||||||||||||||||
|
|
|
the left or right Line Level |
|
|
should be set to “Small” or |
||||||||||||||||||||||||||||
|
|
|
position. Use the Line Level |
|
|
|||||||||||||||||||||||||||||
|
|
|
input ¶ on the subwoofer. It |
|
|
“Large” depending on their |
||||||||||||||||||||||||||||
|
|
|
input jacks ¶ for the Low- |
|
|
|||||||||||||||||||||||||||||
|
|
|
makes no difference which |
|
|
size and frequency response. |
||||||||||||||||||||||||||||
|
|
|
Frequency Effects channel. |
|
|
|||||||||||||||||||||||||||||
|
|
|
|
|
|
|
|
|
|
|
|
|
|
|
|
|
|
|
|
|
|
|
|
|
|
|
||||||||
|
|
|
Connect these jacks to the |
jack you choose. |
|
|
|
|
Consult your receiver’s or |
|||||||||||||||||||||||||
|
|
|
|
|
|
|
|
|
|
|
|
|
|
|
|
processor’s owner’s manual. |
||||||||||||||||||
|
|
|
LFE output or subwoofer |
Connect each speaker to the |
|
|
||||||||||||||||||||||||||||
|
|
|
|
|
|
|
|
|
|
|
|
|
|
|
|
|||||||||||||||||||
|
|
|
|
|
|
|
|
|
|
|
|
|
|
|
|
|
|
|
|
|
|
|
|
|
|
|
|
|
|
|
|
|
||
|
|
|
output on your receiver or |
corresponding speaker |
|
|
|
|
|
|
|
|
|
|
|
|
|
|
|
|||||||||||||||
|
|
|
amplifier. |
terminals on your receiver or |
|
|
|
|
|
|
|
|
|
|
|
|
|
|||||||||||||||||
|
|
|
|
|
|
|
|
|
|
|
amplifier. |
|
|
|
|
|
|
|
|
|
|
|
|
|
|
|
|
|
|
|||||
|
|
|
|
|
|
|
|
|
|
|
|
¡ ™ £ |
|
|
|
|
|
|
|
|
|
|
|
|
|
|||||||||
|
|
|
|
|
|
|
|
|
|
|
|
|
|
|
|
|
|
|
|
|
|
|
|
|
|
|
|
|
|
|
|
|
|
|
|
|
|
|
|
|
|
|
|
|
|
|
|
180 |
° |
|
LFE |
ON |
|
|
|
|
|
|
|
|
|
|
|
|
|
||||
|
|
|
|
|
|
|
|
|
|
|
|
PHASE |
|
|
|
|
|
|
|
|
AUTO |
|
|
|
|
|
|
|
|
|
|
|
|
|
|
|
|
|
|
|
|
|
|
|
|
|
|
0° |
|
|
NORMAL |
OFF |
|
|
|
|
|
¢ |
|
|
|
|
|
|
|
||||
|
|
|
RECEIVER/PREAMPLIFIER |
CROSSOVER |
80Hz |
|
|
|
|
|
|
|
|
|
|
|
|
|
|
|
|
|
||||||||||||
|
|
|
|
|
|
|
LEVEL |
|
|
∞ |
||||||||||||||||||||||||
|
|
|
|
|
|
|
|
|
|
|
|
|
||||||||||||||||||||||
|
|
|
|
|
|
|
|
|
|
|
|
|
|
|
|
|
|
|
|
|
||||||||||||||
|
|
|
|
|
|
|
|
|
|
|
FREQUENCY |
|
|
|
|
|
|
|
|
|
|
|
|
|
||||||||||
|
|
|
|
|
Subwoofer |
|
|
|
|
|
|
|
|
|
|
|
|
|
|
|
|
|
|
|
|
|
|
|
|
|||||
|
|
|
|
|
|
|
50Hz |
|
|
150Hz |
|
|
MIN |
MAX |
|
|
|
|
|
§ |
|
|
|
|
|
|
|
|||||||
|
|
|
|
|
Output/LFE |
|
|
|
|
|
|
|
|
|
|
|
|
|
|
|
|
|
|
|
|
|
|
|
|
|||||
|
|
|
|
|
|
|
|
|
|
|
|
|
|
|
|
|
|
|
|
|
|
|
|
LINE |
|
¶ |
|
|
|
|
|
|
|
|
|
|
|
|
|
|
|
|
|
|
|
|
|
|
|
|
|
|
|
|
|
|
|
|
|
|
|
|
|
|
|
|
|||
|
|
|
|
|
|
|
|
|
|
|
BASSQ |
|
|
|
|
|
|
|
|
|
|
|
LEVEL IN |
|
|
|
|
|
|
|
|
|||
|
|
|
|
|
|
|
|
|
|
|
(See owner’s |
|
|
|
|
|
|
|
|
|
|
|
(For LFE |
|
|
|
|
|
|
|
|
|
||
|
|
|
|
|
|
|
|
|
|
|
manual |
|
IN |
|
OUT |
R |
L |
|
use R or L) |
|
|
|
|
|
|
|
|
|
||||||
|
|
|
|
|
|
|
|
|
|
|
before use) |
|
|
|
|
|
|
|
|
|
|
|
|
|
|
|||||||||
|
|
|
|
|
|
|
|
|
|
|
|
|
|
|
|
|
|
|
|
|
L |
|
|
|
|
|
|
|
|
|
|
|
|
|
|
|
|
|
|
|
|
|
|
|
|
|
|
|
|
|
|
|
|
|
|
HIGH |
|
|
|
• |
|||||||||
|
|
|
|
|
|
|
|
|
|
|
|
|
|
|
|
|
|
|
|
|
LEVEL |
|
|
|
||||||||||
|
|
|
|
|
|
|
|
|
|
|
|
|
|
|
|
|
|
|
|
|
IN |
|
|
|
|
|
|
|
|
|
|
|
|
|
|
|
|
|
|
|
|
|
|
|
|
|
|
|
|
|
|
|
|
|
|
R |
|
|
|
|
|
|
|
|
|
|
|
|
|
|
|
|
|
|
|
|
|
|
|
|
|
|
+ |
|
|
– |
|
|
|
|
|
|
|
|
|
|
|
|
|
|
|
|||
|
|
|
|
|
|
|
|
|
|
|
|
|
|
|
|
|
|
|
|
|
L |
|
|
|
|
|
|
|
|
|
|
|
|
|
|
|
|
|
|
|
|
|
|
|
|
|
|
|
|
|
|
|
|
|
|
|
|
|
|
|
|
|
|
|
|
|
|
|
|
|
|
|
|
|
|
|
|
|
|
|
|
|
|
|
|
|
|
|
|
|
HIGH |
|
|
|
ª |
|
|
|
|
|
|
|
||
|
|
|
|
|
|
|
|
|
|
|
|
|
|
|
|
|
|
|
|
|
LEVEL |
|
|
|
|
|
|
|
|
|
|
|||
|
|
|
|
|
|
|
|
|
|
|
|
|
|
|
|
|
|
|
|
|
OUT |
|
|
|
|
|
|
|
|
|
|
|
||
|
|
|
|
|
|
|
|
|
|
|
|
|
|
|
|
|
|
|
|
|
R |
|
|
|
|
|
|
|
|
|
|
|
|
|
|
|
|
BassQ |
™ Jacks |
|
|
|
|
|
|
|
|
|
|
|
|
|
|
|
|
|
|
|
|
|
|
|
|
|
|
||||
|
|
|
|
|
|
|
|
|
|
|
|
|
|
|
|
|
|
|
|
|
|
|
|
|
|
|
|
|
||||||
|
|
|
The jacks marked “BassQ” § |
your system’s bass response |
|
|
device. Do not use the BassQ |
|||||||||||||||||||||||||||
|
|
|
are for use with the JBL |
by equalizing the output of |
|
|
jacks § without having first |
|||||||||||||||||||||||||||
|
|
|
BassQ bass equalization |
multiple subwoofers to |
|
|
|
|
read the BassQ owner’s |
|
|
|
||||||||||||||||||||||
|
|
|
|
|
|
|
|
|||||||||||||||||||||||||||
|
|
|
module that will be released |
best match your listening |
|
|
manual. |
|
|
|
|
|
|
|
|
|
||||||||||||||||||
|
|
|
in the near future. The BassQ |
environment. DO NOT con- |
|
|
|
|
|
|
|
|
|
|
|
|
|
|||||||||||||||||
|
|
|
|
|
|
|
|
|
|
|
|
|
|
|
|
|||||||||||||||||||
|
|
|
will enable you to optimize |
nect these jacks to any other |
|
|
|
|
|
|
|
|
|
|
|
|
|
|||||||||||||||||
|
|
|
|
|
|
|
|
|
|
|
|
|
|
|
|
|||||||||||||||||||
|
|
|
|
|
|
|
|
|
|
|
|
|
6 |
|
|
|
|
|
|
|
|
|
|
|
|
|
|
|
|
|
||||
|
|
|
|
|
|
|
|
|
|
|
|
|
|
|
|
|
|
|
|
|
|
|
|
|
|
|
|
|
|
|||||
|
|
|
|
|
|
|
|
|
|
|
|
|
|
|
|
|
|
|
|
|
|
|
|
|
|
|
|
|
|
|
|
|
|
|
S120PII Studio Series
|
|
|
|
|
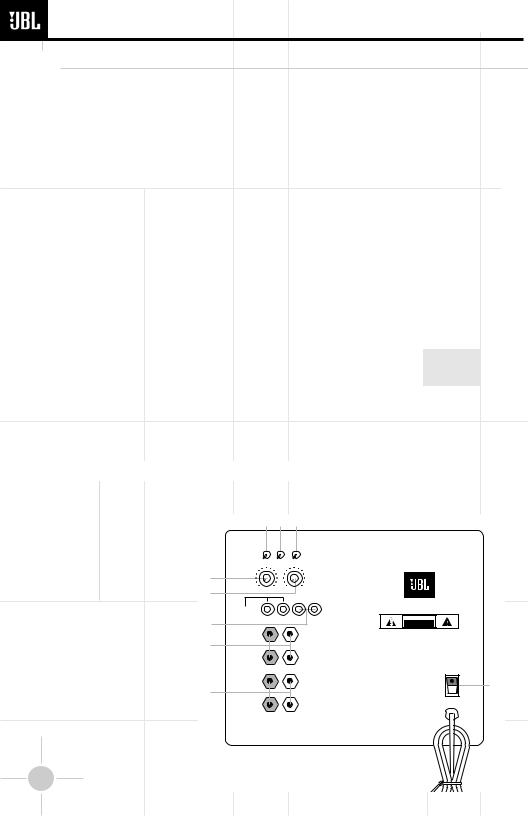
O P E R A T I O N |
|
|
|
|
|
|
|
|
|
|
|
|
|
|
||
|
|
|
Power |
|
|
|
|
|
||
|
|
|
The S120PII is equipped with |
Auto As long as no audio |
return to Standby mode, |
|||||
|
|
|
||||||||
|
|
|
both a master Power switch |
signal is received, the |
indicated by the LEDs |
|||||
|
|
|
‚ and an Auto turn-on/turn- |
subwoofer is in Standby |
turning red. |
|||||
|
|
|
off switch £. In order to |
mode to conserve |
Off The subwoofer is off at |
|||||
|
|
|
function, the S120PII must |
power, indicated by the |
all times, even if an |
|
|
|||
|
|
|
be plugged into an active |
red color of the LEDs on |
audio signal is present |
|
|
|||
|
|
|
electrical outlet (but not an |
the front of the unit. |
at its inputs. |
|
|
|||
|
|
|
accessories outlet |
on another |
When an audio signal is |
If you plan to be away for an |
|
|
||
|
|
|
|
|
||||||
|
|
|
component of your |
audio |
sensed, the subwoofer |
extended time, or if the |
||||
|
|
|
system such as a |
receiver), |
will switch itself into the |
subwoofer will not be used, |
||||
|
|
|
and the master Power switch |
fully On mode and begin |
you may wish to turn off the |
|||||
|
|
|
‚ must be turned on |
playing the program |
master Power switch ‚. |
|||||
|
|
|
|
|
|
|
|
|
|
|
|
|
|
(the “•” position). |
material. The LEDs will |
|
|
|
|
||
|
|
|
The Auto turn-on/turn-off |
turn green. When a |
|
|
|
|
||
|
|
|
switch £ has three positions: |
period of about twenty |
|
|
|
|
||
|
|
|
On The subwoofer is on at |
minutes goes by during |
|
|
|
|
||
|
|
|
all times and ready to |
which no signal is |
|
|
|
|
||
|
|
|
play program material. |
sensed, the S120PII will |
|
|
|
|
||
|
|
Level Control |
|
|
|
|
|
|||
|
|
|
The subwoofer Level Control |
room size, subwoofer |
When using a Dolby Digital/ |
|
||||
|
|
|
∞ adjusts the volume of the |
placement, type of main |
DTS receiver, adjust the LFE |
|
||||
|
|
|
|
|
|
|
|
|
|
|
|
|
|
subwoofer relative to the rest |
speakers and listener position. |
level on the receiver to 0dB, |
|||||
|
|
|
of the system. Proper level |
Adjust the subwoofer level so |
and then adjust the subwoofer |
|||||
|
|
|
adjustment depends on |
that the volume of the bass |
Level Control ∞ for the |
|||||
|
|
|
several |
variables such as |
information is pleasing to you. |
desired amount of bass. |
||||
|
|
|
|
|
|
|
|
|
|
|
Crossover Adjustments
The Crossover Frequency Control ¢ determines the highest frequency at which the subwoofer reproduces sounds. If your main speakers can comfortably reproduce some low-frequency sounds, set this control ¢ to a lower frequency setting, between
50Hz – 100Hz. This will concentrate the subwoofer’s efforts on the ultradeep bass sounds required by today’s films and music. If you are using smaller bookshelf speakers that do not extend to the lower bass frequencies, set the low-pass Crossover
control ¢ to a higher setting,
between 120Hz – 150Hz. This control ¢ is not used when
¡ ™ £
|
|
180° |
LFE |
ON |
|
|
PHASE |
|
|
AUTO |
|
|
|
0° |
NORMAL |
OFF |
|
|
|
80Hz |
|
|
|
¢ |
CROSSOVER |
|
|
|
LEVEL |
FREQUENCY |
|
|
|
||
∞ |
50Hz |
150Hz |
MIN |
MAX |
|
|
|
|
|
|
|
§ |
BASSQ |
|
|
|
LINE |
|
|
|
LEVEL IN |
||
|
(See owner’s |
|
|
|
(For LFE |
|
manual |
IN |
OUT |
R |
use R or L) |
¶ |
before use) |
L |
|||
|
|
|
|
|
|
|
|
|
|
L |
|
• |
|
|
|
|
HIGH |
|
|
|
|
LEVEL |
|
|
|
|
|
|
IN |
|
|
|
|
R |
|
|
|
+ |
– |
|
|
|
|
|
|
L |
|
ª |
|
|
|
|
HIGH |
|
|
|
|
LEVEL |
|
|
|
|
|
|
OUT |
|
|
|
|
R |
|
the LFE switch ™ is in the “LFE” position.
S120PII
CAUTION
RISK OF ELECTRIC SHOCK
DO NOT OPEN
WARNING: TO REDUCE THE RISK OF FIRE OR ELECTRIC SHOCK,
DO NOT EXPOSE THIS APPLIANCE TO RAIN OR MOISTURE.
AVERTISSEMENT: POUR PRÉVENIR LES RISQUES D’INCENDIE OU
DE CHOC ÉLECTRIQUE ÉVITER D’EXPOSER CET APPAREIL A LA
PLUIE OU A L’HUMIDITÉ.
ON
‚
OFF
7
S120PII Studio Series |
|
|
|
|
|
|||
|
|
|
|
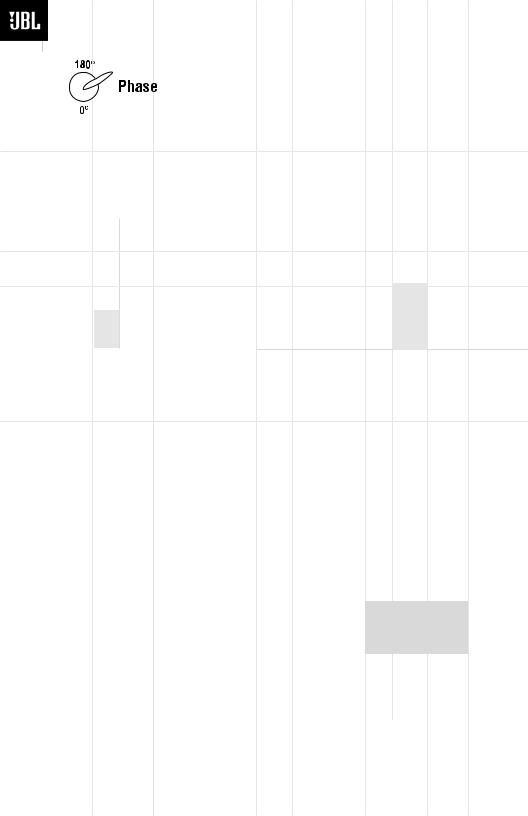
Phase Control |
|
|
||
|
|
|
|
subwoofer placement and |
you happen to rearrange your |
|||
|
|
|
|
|
|
listening room and move |
||
|
|
|
|
listener position. Adjust the |
||||
|
|
|
|
Phase switch ¡ to maximize |
your speakers, you should |
|||
|
|
|
|
bass output at the listening |
experiment with the Phase |
|||
|
|
|
|
position. |
switch ¡ in both positions, |
|||
|
|
The Phase Control ¡ |
Remember, every system, |
and leave it in the position |
||||
|
|
determines whether the |
room and listener is different. |
that maximizes bass |
||||
|
|
subwoofer’s piston-like action |
There are no right or wrong |
performance. |
||||
|
|
moves in and out in phase |
settings; this switch ¡ offers |
|
|
|||
|
|
with the main speakers or |
the added flexibility to adjust |
|
|
|||
|
|
opposite the main speakers. |
your subwoofer for optimum |
|
|
|||
|
|
There is no correct or |
performance for your specific |
|
|
|||
|
|
|
|
|
|
|
|
|
|
|
incorrect setting. Proper |
listening conditions without |
|
|
|||
|
|
phase adjustment depends on |
having to move your speakers. |
|
|
|||
|
|
several variables such as |
If at some time in the future |
|
|
|||
T R |
O U B L E S H O O T I N G |
|
|
|
|
|
|
|
||
If you used the High Level |
If there is low (or no) bass |
If you used the |
Line Level |
|||||||
(speaker) inputs • and there |
output: |
inputs ¶ and there is no |
||||||||
is no sound from any of the |
• Make sure the connections |
sound from the subwoofer: |
||||||||
speakers: |
|
|
|
|
|
|
|
|||
to the left and right “Speaker |
• Check that receiver/amplifier |
|||||||||
|
|
|||||||||
• Check that receiver/amplifier |
Inputs” • have the correct |
is on and a source is playing. |
||||||||
is on and a source is playing. |
polarity (+ and –). |
• Check that powered |
||||||||
• Check that powered |
• Make sure that the |
subwoofer is plugged into an |
||||||||
subwoofer is plugged into |
subwoofer is plugged into an |
active electrical outlet and |
||||||||
an active electrical outlet |
active electrical outlet and |
that both Power switches |
||||||||
and is switched on £‚. |
that both power switches |
are on £‚. |
||||||||
• Check all wires and |
are on £‚. |
• Check all wires and con- |
||||||||
connections between |
• Adjust the Crossover point |
nections between receiver/ |
||||||||
receiver/amplifier and |
¢. |
amplifier and subwoofer. |
||||||||
speakers. Make sure all wires |
• Flip the Phase Control |
Make sure all wires are |
||||||||
are connected. Make sure |
switch ¡ to the opposite |
connected. Make sure none |
||||||||
none of the speaker wires |
position. |
of the wires are frayed, cut |
||||||||
are frayed, cut or punctured. |
• If you are using a Dolby |
or punctured. |
||||||||
Make sure no wires are |
Digital/DTS receiver or |
• Review proper operation of |
||||||||
touching other wires or |
processor, make sure that the |
your receiver/amplifier. |
||||||||
terminals and creating a |
subwoofer adjustments on |
• Slowly turn the Level |
||||||||
short circuit. |
the receiver/processor are |
Control ∞ clockwise until |
|
|
|
|||||
• Review proper operation |
set up correctly. When using |
you begin to hear the desired |
||||||||
of your receiver/amplifier. |
the S120PII’s Speaker Level |
amount of bass. |
||||||||
|
|
inputs •, you should set your |
• Make sure that you have |
|||||||
|
|
receiver to configure the |
configured |
your |
receiver/ |
|||||
|
|
main left and right speakers |
processor |
so that the |
||||||
|
|
as “LARGE”. |
subwoofer/LFE output is on. |
|||||||
|
|
• Slowly turn the Level |
|
|
|
|
|
|
|
|
|
|
Control ∞ clockwise until |
|
|
|
|
|
|
|
|
|
|
you begin to hear the desired |
|
|
|
|
|
|
|
|
|
|
amount of bass. |
|
|
|
|
|
|
|
|
|
|
8 |
|
|
|
|
|
|
|
|
|
|
|
|
|
|
|
|
|
||
|
|
|
|
|
|
|
|
|
||
|
|
|
|
|
|
|
|
|
|
|
 Loading...