


MODEL HF106
IMPORTANT SAFETY
INSTRUCTIONS
When using an electrical appliance, basic safety precautions should always be followed, including the followings:
Read all instructions before using this appliance.
DANGER– To reduce the risk of electric shock:
1.An appliance should never be left unattended when plugged in. Always unplug this sewing machine from the electric outlet immediately after using and before cleaning.
2.Always unplug before replacing a sewing machine bulb. Replace bulb with same type rated 15 Watts.
WARNING– To reduce the risk of burns, fire, electric shock,or injury to persons:
1.Do not allow to be used as a toy. Close attention is necessary when this sewing machine is used by or near children.
2.Use this appliance only for its intended use as described in this ownerÕs manual.
Use only attachments recommended by the manufacturer as contained in this ownerÕs manual.
3.Never operate this sewing machine if it has a damaged cord or plug, if it is not working properly, if it has been dropped or damaged, or dropped into water.
Return this sewing machine to the nearest authorized dealers or service center for examination,
repair, electrical or mechanical adjustment.
4.Never operate the appliance with any air opening blocked. Keep ventilation openings of this sewing machine and foot controller free from accumulation of lint, dust and loose cloth.
5.Never drop or insert any object into any opening.
6.Do not use outdoors.
7.Do not operate where aerosol (spray) products are being used or where oxygen is being adminis-tered.
8.To disconnect, turn all controls to the off (ÒOÓ) position, then remove plug from outlet.
9.Do not unplug by pulling on cord. To unplug, grasp the plug, not the cord.
10.Keep fingers away from all moving parts. Special care is required around the sewing machine needle.
11.Always use the proper needle plate. The wrong plate can cause the needle to break.
12.Do not use bent needles.
13.Do not pull or push fabric while stitching. It may deflect the needle causing it to break.
14.Switch this sewing machine off (ÒOÓ) when making any adjustment in the needle area, such as threading the needle, changing the needle, threading the bobbin or changing the presser foot, and the like.
15.Always unplug this sewing machine from the electrical outlet when removing covers, lubricating, or when making any other adjustments mentioned in this ownerÕs manual.
SAVE THESE INSTRUCTIONS
Designs and specifications are subject to change without prior notice.

1. Name of Parts |
11 |
10 |
9 |
|
|
|
|
|
2 |
1 |
|
|
1. |
Thread guide |
|||
|
|
12 |
||||||
|
|
|
|
|||||
|
|
|
|
|
|
2. |
Thread take-up lever |
|
|
|
|
|
|
8 |
|
||
3 |
|
|
|
|
|
3. |
Tension dial unit |
|
|
|
|
|
|
|
|||
|
|
|
|
|
|
4. |
Extension table |
|
|
|
|
|
|
|
|
||
|
|
|
|
|
|
|
5. |
Presser foot lifter |
|
|
|
|
|
|
|
6. Reverse button |
|
|
|
|
|
|
|
|
7. Pattern selector dial |
|
4 |
|
|
|
|
|
|
8. |
Handwheel |
|
|
|
|
|
|
9. |
Bobbin winder stopper |
|
|
|
|
|
|
|
|
||
|
|
|
|
|
|
|
10. Bobbin winder spindle |
|
|
|
|
|
|
|
|
11. Bobbin winder thread |
|
|
|
|
|
|
|
|
|
guide |
|
|
|
|
|
|
|
12. Spool pin |
|
5 |
6 |
7 |
2. Standard Accessories
Bobbins |
Seam ripper |
Felt
Buttonhole foot |
Needles |
|
3. Free Arm Sewing
For free arm sewing, pull out the extension table to the left and remove it.
To replace extension table:
Slide the extension table along the free arm inserting the tab into the slot.
Extension table
Accessory kit
Standard accessories are located inside the extension table.
Accessory storage
4. Power Connection |
Power outlet |
Power switch
Machine socket
Power plug
Machine plug
1.Turn the power switch off. Insert the machine plug into the machine socket.
2.Insert the power plug into the power outlet. Turn the power switch on.
Disconnect the power plug when the machine is not in use.
5. Controlling Sewing Speed
The foot control regulates sewing speed.
The harder depress the foot control, the faster the machine runs.
Operating Instructions:
The symbol Ò Ò of a switch indicates the ÒOFFÓ position of a switch. For appliances with a polarized plug (one blade is wider than the other).
To reduce the risk of electric shock, this plug is intended to fit in a polarized outlet only one way. If it does not fit fully in the outlet, reverse the plug.
If it still does not fit, contact a qualified electrician to install the proper outlet. Do not modify the plug in any way.
Foot controller Model YC-482-J or TJC-150 is used with sewing machine Model HF106.
6. Raising and Lowering the Presser Foot
The presser foot lifter raises and lowers the presser foot.
You can raise it about 1/4Ó higher than normal up position.
This helps when removing the foot or when sewing thick materials.
7. Changing the Needle
To remove the needle:
Loosen the needle clamp screw by turning it toward you.
Remove the needle by pulling it downward.
To replace the needle:
Insert a new needle into the needle clamp with flat side away from you.
Push the needle up as far as it will go. Tighten the needle clamp screw firmly with a screwdriver.
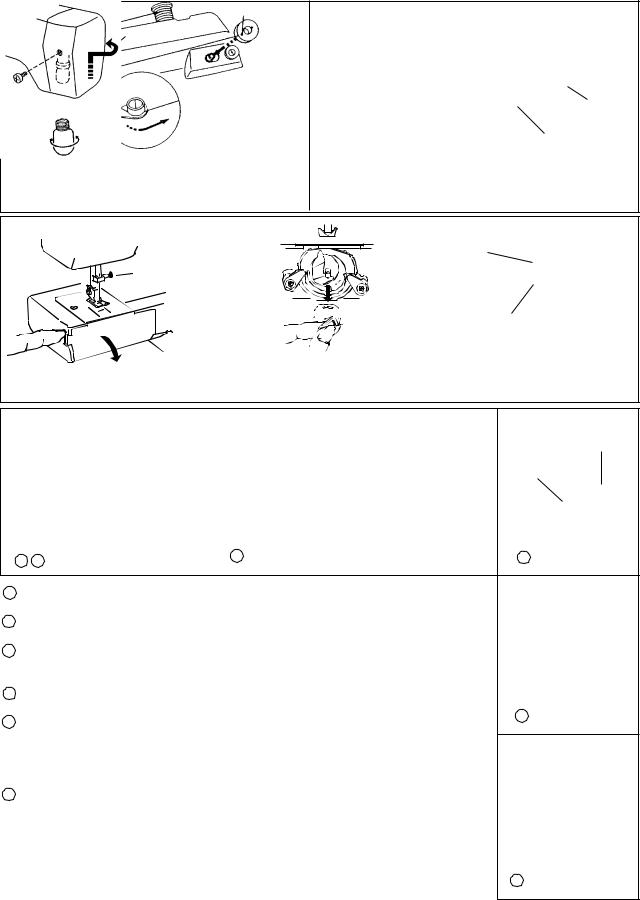
8. Sewing Light
Face Plate
To replace:
Loosen the setscrew and remove the face plate to the direction of arrow.
Turn the bulb counterclockwise to remove it.
Turn t the bulb clockwise to replace it.
Bulb
9. Spool Pin
Felt
Spool pin
The spool pin holds the spool of thread for feeding the thread to the machine.
Pull out the spool pin and place the felt on it.
10. Removing and Inserting the Bobbin Case
Open
Open the hook cover.


 Latch
Latch
Raise the needle by turning the handwheel toward you.
Lift the latch and pull out the bbobin case.
Hook race recess
Finger
Latch
When inserting the bobbin case, place the finger into the recess of the hook race.
11. Winding the Bobbin
Bobbin winder stopper
Bobbin winder spindle
1 |
6 |
2 |
3 |
1 Pull the handwheel out to the right.
2 Pull the thread from the spool and draw it around the thread guides.
3Draw the thread through the hole on the bobbin from the inside to outside, put the bobbin on the bobbin winder spindle and push to the right.
4 |
Hold the free end of the thread with your hand and depress the foot control. |
|
5 |
Stop the machine when it has made a few turns. Cut the thread close to the |
4 |
|
||
|
hole on the bobbin. Depress the foot control again. |
|
|
When the bobbin is fully wound, push the bobbin winder spindle to the left and |
|
|
cut the thread. |
|
6 |
Push the handwheel in for sewing. |
|
Note: Do not move the bobbin winder spindle while the machine is running.
5
 Loading...