


Luxura 6634

BUILDER/COMFORT BATH SERIES
INST ALLA TION AND OPERA TING INSTRUCTIONS
SERIE DE TINAS BUILDER/COMFORT
MANUAL DE INSTALACIÓN Y OPERACIÓN
Installer: Leave this manual for homeowner.
Homeowner: Read this manual and keep for future reference.
Instalador: Deje este manual para el propietario.
Propietario: Lea este manual y guardelo para referencia en el futuro.
©1996 Jacuzzi Whirlpool Bath K272000AC 12/04

IMPORTANT SAFETY INSTRUCTIONS
READ AND FOLLOW ALL INSTRUCTIONS
SAVE THESE INSTRUCTIONS
ENGLISH
CAUTION: TEST THE GROUND FAULT CIRCUIT INTERRUPTER PROTECTING THIS APPLIANCE PERIODI-
CALLY IN ACCORDANCE WITH MANUFACTURER'S INSTRUCTIONS.
WARNING: RISK OF ACCIDENTAL INJURY OR DROWNING; CHILDREN SHOULD NOT USE HYDROMASSAGE
BATHTUB WITHOUT ADULT SUPERVISION.
WARNING: TO AVOID INJURY, EXERCISE CAUTION WHEN ENTERING OR EXITING THE HYDROMASSAGE
BATHTUB
WARNING: RISK OF ACCIDENTAL INJURY OR DROWNING; DO NOT USE HYDROMASSAGE BATHTUB
UNLESS ALL SUCTION GUARDS ARE INSTALLED TO PREVENT BODY AND HAIR ENTRAPMENT.
WARNING: KEEP BODY AND HAIR A MINIMUM OF 6" AWAY FROM SUCTION FITTING AT ALL TIMES WHEN
THE WHIRLPOOL SYSTEM IS OPERATING. HAIR LONGER THAN SHOULDER LENGTH SHOULD BE SECURED
CLOSE TO THE HEAD.
WARNING: NEVER DROP OR INSERT ANY OBJECT INTO ANY OPENING.
WARNING: RISK OF ELECTRICAL SHOCK; DO NOT PERMIT ELECTRICAL APPLIANCES (SUCH AS HAIR
DRYER, LAMP, TELEPHONE, RADIO OR TELEVISION) WITHIN 60" (1.5 M) OF THIS HYDROMASSAGE
BATHTUB.
WARNING: RISK OF ACCIDENTAL INJURY OR DROWNING; DO NOT USE DRUGS OR ALCOHOL BEFORE OR
DURING THE USE OF HYDROMASSAGE BATHTUB EQUIPPED WITH A HEATER TO AVOID UNCONSCIOUSNESS AND POSSIBLE DROWNING.
WARNING: RISK OF FETAL INJURY; PREGNANT OR POSSIBLY PREGNANT WOMEN SHOULD CONSULT A
PHYSICIAN BEFORE USING A HYDROMASSAGE BATHTUB EQUIPPED WITH A HEATER.
WARNING: RISK OF HYPERTHERMIA AND POSSIBLE DROWNING; DO NOT USE A HYDROMASSAGE
BATHTUB EQUIPPED WITH A HEATER IMMEDIATELY FOLLOWING STRENUOUS EXERCISE.
WARNING: RISK OF HYPERTHERMIA AND POSSIBLE DROWNING; WATER TEMPERATURE IN EXCESS OF
104°F (40°C) MAY BE INJURIOUS TO YOUR HEALTH. CHECK AND ADJUST WATER TEMPERATURE BEFORE
USE.
WARNING: RISK OF HYPERTHERMIA; PEOPLE USING MEDICATIONS AND/OR HAVING AN ADVERSE
MEDICAL HISTORY SHOULD CONSULT A PHYSICIAN BEFORE USING A HYDROMASSAGE BATHTUB
EQUIPPED WITH A HEATER.
THIS UNIT MUST BE CONNECTED ONLY TO A SUPPLY CIRCUIT(S) THAT IS PROTECTED BY A GROUND
FAULT CIRCUIT INTERRUPTER (GFCI). SUCH A GFCI SHOULD BE PROVIDED BY THE INSTALLER AND
SHOULD BE TESTED ON A ROUTINE BASIS. TO TEST THE GFCI, PUSH THE TEST BUTTON. THE GFCI
SHOULD INTERRUPT POWER. PUSH THE RESET BUTT ON. POWER SHOULD BE RESTORED. IF THE GFCI
FAILS T O OPERA TE IN THIS MANNER, THERE IS A GROUND CURRENT FLOWING , INDICATING A POSSIBILITY OF AN ELECTRIC SHOCK. DO NOT USE THIS UNIT. DISCONNECT THE UNIT AND HAVE THE PROBLEM
CORRECTED BY A QUALIFIED ELECTRICIAN BEFORE USING.
A PRESSURE WIRE CONNECTOR IS PROVIDED ON THE EXTERIOR OF THE MOTOR TO PERMIT CONNECTION OF AN NO. 8 AWG (8.4 MM) SOLID COPPER BONDING CONDUCTOR BETWEEN THIS UNIT AND
ALL OTHER ELECTRIC EQUIPMENT AND EXPOSED METAL IN THE VICINITY, AS NEEDED TO COMPLY WITH
LOCAL REQUIREMENTS.

PRECAUTIONS
• Do not operate the whirlpool system unless the bath is filled with water to at least 1" above the highest jet.
• Do not immerse the control panel by overfilling the bath.
• Do not use oil-based bath additives in your whirlpool bath.
• When cleaning your bath, do not use abrasive substances which will damage the bath’s surface.
• To prevent discoloration of the acrylic finish, do not fill the bath with water in excess of 140°F (60°C).
• The whirlpool system should be purged at least twice a month. For your convenience, we have devel-
oped a plumbing system cleaner (Systems Clean™) specifically for whirlpool baths. For availability call
1-800-288-4002.
• Use this unit only for its intended purpose as described in this manual. Do not use attachments not
recommended by the manufacturer.
• A pressure wire connector is provided on the exterior of the motor to permit connection of an No. 8 AWG
(8.4 mm) solid copper bonding conductor between this unit and all other electric equipment and exposed
metal in the vicinity, as needed to comply with local requirements.
• This unit should be electrically grounded and installed by a licensed contractor , electrician, and plumber .
• For built-in and drop-in units, install to permit access for servicing.
Note: This is a professional grade product. A knowledge of construction techniques, plumbing and electrical installation according to codes are required for proper installation and user satisfaction. We recommend that a licensed contractor perform the installation of all Jacuzzi Whirlpool Bath products. Our warranty does not cover improper installation related problems.
ENGLISH

ADDENDUM
r
Safety Instructions Change
IMPORTANT SAFETY INSTRUCTIONS
READ AND FOLLOW ALL INSTRUCTIONS
SAVE THESE INSTRUCTIONS
INSTRUCTIONS PERTAINING TO A RISK OF FIRE, ELECTRIC
SHOCK, OR INJURY TO PERSONS
WARNING — WHEN USING THIS UNIT, BASIC PRECAUTIONS SHOULD ALWAYS BE FOLLOWED,
INCLUDING THE FOLLOWING:
DANGER: TO REDUCE THE RISK OF INJURY, DO NOT PERMIT CHILDREN TO USE THIS UNIT
UNLESS THEY ARE CLOSELY SUPERVISED AT ALL TIMES.
WARNING — USE THIS UNIT ONL Y FOR ITS INTENDED USE AS DESCRIBED IN THIS MANUAL. DO
NOT USE ATTACHMENTS NOT RECOMMENDED BY THE MANUFACTURER.
WARNING — NEVER DROP OR INSERT ANY OBJECT INTO ANY OPENING.
WARNING — DO NOT OPERATE THIS UNIT WITHOUT THE GUARD OVER THE SUCTION FITTING.
WARNING — THIS UNIT MUST BE CONNECTED ONLY TO A SUPPLY CIRCUIT THAT IS PROTECTED
BY A GROUND FAULT CIRCUIT INTERRUPTER (GFCI). SUCH A GFCI SHOULD BE PROVIDED BY
THE INSTALLER AND SHOULD BE TESTED ON A ROUTINE BASIS. TO TEST THE GFCI, PUSH THE
TEST BUTTON. THE GFCI SHOULD INTERRUPT POWER. PUSH THE RESET BUTTON. POWER
SHOULD BE RESTORED. IF THE GFCI FAILS TO OPERATE IN THIS MANNER, THE GFCI IS
DEFECTIVE. IF THE GFCI INTERRUPTS POWER TO THE BATHTUB WITHOUT THE TEST BUTTON
BEING PUSHED, A GROUND CURRENT FLOWING, INDICATING A POSSIBILITY OF AN ELECTRIC
SHOCK. DO NOT USE THIS HYDROMASSAGE BATHTUB. DISCONNECT THE HYDROMASSAGE
BATHTUB AND HAVE THE PROBLEM CORRECTED BY A QUALIFIED SERVICE REPRESENTATIVE
BEFORE USING.
WARNING: (FOR PERMANENTLY CONNECTED UNITS) A GREEN COLORED TERMINAL (OR A WIRE
CONNECTOR MARKED “G”, “GR”, “GROUND”, OR “GROUNDING”) IS PROVIDED WITHIN THE TERMINAL
COMPARTMENT. TO REDUCE THE RISK OF ELECTRIC SHOCK, CONNECT THE TERMINAL OR
CONNECTOR TO THE GROUNDING TERMINAL OF YOUR ELECTRIC SERVICE OR SUPPLY PANEL WITH
A CONDUCTOR EQUIVALENT IN SIZE TO THE CIRCUIT CONDUCTORS SUPPLYING THIS EQUIPMENT.
OPERA TING INSTRUCTIONS
WARNING — PROLONGED IMMERSION IN HOT WATER MAY INDUCE HYPERTHERMIA. HYPER-
THERMIA OCCURS WHEN THE INTERNAL TEMPERA TURE OF THE BODY REACHES A LEVEL SEV ERAL DEGREES ABOVE THE NORMAL BODY TEMPERATURE OF 98.6°F. THE SYMPTOMS OF
HYPERTHERMIA INCLUDE AN INCREASE IN THE INTERNAL TEMPERATURE OF THE BODY, DIZZINESS, LETHARGY, DROWSINESS AND FAINTING. THE EFFECTS OF HYPERTHERMIA INCLUDE:
A) FAILURE TO PERCEIVE HEAT
B) FAILURE TO RECOGNIZE THE NEED TO EXIT THE SPA OR HOT TUB,
C) UNAWARENESS OF IMPENDING HAZARD,
D) FETAL DAMAGE IN PREGNANT WOMEN,
E) PHYSICAL INABILITY TO EXIT THE SPA OR HOT TUB, AND
F) UNCONSCIOUSNESS RESULTING IN DANGER OF DROWNING.
WARNING — THE USE OF ALCOHOL, DRUGS OR MEDICATION CAN GREATLY INCREASE THE
RISK OF FATAL HYPERTHERMIA.
WARNING — DO NOT TAMPER WITH USER-OPERATED CONTROLS OR SUCH DEVICES.
©
Printed on Recycled Pape
2005 Jacuzzi Whirlpool Bath DA38000A 06/05
Printed in the U.S.A.

INST ALLATION INSTRUCTIONS
r
WARNING — WHEN USING THIS UNIT, BASIC PRECAUTIONS SHOULD ALWAYS BE FOLLOWED,
INCLUDING THE FOLLOWING:
DANGER — RISK OF ELECTRIC SHOCK. CONNECT ONLY TO A CIRCUIT PROTECTED BY A GROUND
FAULT CIRCUIT INTERRUPTER (GFCI).
CAUTION
PERIODICALLY IN ACCORDANCE WITH MANUFACTURER’S INSTRUCTIONS.
WARNING
USE ATTACHMENTS NOT RECOMMENDED BY THE MANUFACTURERS.
WARNING
WARNING
WHEN THE HYDROMASSAGE SYSTEM IS OPERATING. HAIR LONGER THAN SHOULDER LENGTH
SHOULD BE SECURED CLOSE TO THE HEAD.
WARNING
DRYER, LAMP, TELEPHONE, RADIO OR TELEVISION) WITHIN 60" (1.5 M) OF THIS HYDROMASSAGE BATHTUB.
WARNING
BEFORE OR DURING THE USE OF HYDROMASSAGE BATHTUB EQUIPPED WITH A HEATER TO AVOID
UNCONSCIOUSNESS AND POSSIBLE DROWNING.
WARNING
CONSULT A PHYSICIAN BEFORE USING A HYDROMASSAGE BATHTUB EQUIPPED WITH A HEATER.
WARNING
BATHTUB EQUIPPED WITH A HEATER IMMEDIATELY FOLLOWING STRENUOUS EXERCISE.
WARNING
EXCESS OF 104°F (40°C) MAY BE INJURIOUS TO YOUR HEALTH. CHECK AND ADJUST WATER
TEMPERATURE BEFORE USE.
WARNING
MEDICAL HISTORY SHOULD CONSULT A PHYSICIAN BEFORE USING A HYDROMASSAGE BATHTUB
EQUIPPED WITH A HEATER.
— TEST THE GROUND FAULT CIRCUIT INTERRUPTER PROTECTING THIS APPLIANCE
— USE THIS UNIT ONLY FOR ITS INTENDED USE AS DESCRIBED IN THIS MANUAL. DO NOT
— TO AVOID INJURY, EXERCISE CAUTION WHEN ENTERING OR EXITING THE HYDROMASSAGE BATHTUB.
— KEEP BODY AND HAIR A MINIMUM OF 6" AWAY FROM SUCTION FITTING AT ALL TIMES
— RISK OF ELECTRICAL SHOCK; DO NOT PERMIT ELECTRICAL APPLIANCES (SUCH AS HAIR
— RISK OF ACCIDENTAL INJURY OR DROWNING; DO NOT USE DRUGS OR ALCOHOL
— RISK OF FETAL INJURY; PREGNANT OR POSSIBLY PREGNANT WOMEN SHOULD
— RISK OF HYPERTHERMIA AND POSSIBLE DROWNING; DO NOT USE A HYDROMASSAGE
— RISK OF HYPERTHERMIA AND POSSIBLE DROWNING; WATER TEMPERATURE IN
— RISK OF HYPERTHERMIA; PEOPLE USING MEDICATIONS AND/OR HAVING AN ADVERSE
FOR BUILT-IN AND DROP-IN UNITS, INSTALL TO PERMIT ACCESS FOR SERVICING.
THIS UNIT SHOULD BE ELECTRICALLY GROUNDED AND INSTALLED BY A LICENSED CONTRACTOR,
ELECTRICIAN, AND PLUMBER.
BUILDING MATERIALS AND WIRING SHOULD BE ROUTED AWAY FROM THE MOTOR/PUMP OR
BLOWER OR OTHER HEAT PRODUCING COMPONENTS OF THIS UNIT.
A PRESSURE WIRE CONNECTOR IS PROVIDED ON THE EXTERIOR OF THE MOTOR/PUMP AND
HEATER TO PERMIT CONNECTION OF AN NO. 8 AWG (8.4 MM) SOLID COPPER BONDING CONDUCTOR
BETWEEN THIS UNIT AND ALL OTHER ELECTRIC EQUIPMENT AND EXPOSED METAL IN THE VICINITY,
AS NEEDED TO COMPLY WITH LOCAL REQUIREMENTS.
PRECAUTIONS
••
• Do not operate the hydromassage system unless the bath is filled with water to at least 1" above the highest jet.
••
••
• Do not immerse the control panel by overfilling the bath.
••
••
• Do not use oil-based bath additives in your hydromassage bath.
••
••
• When cleaning your bath, do not use abrasive substances which will damage the bath's surface.
••
••
• To prevent discoloration of the acrylic finish, do not fill the bath with water in excess of 140°F (60°C).
••
NOTE: This is a professional grade product. A knowledge of construction techniques, plumbing and electrical installation according to codes are required for proper installation and user satisfaction. W e recommend
that a licensed contractor perform the installation of all Jacuzzi Whirlpool Bath© products. Our warranty
does not cover improper installation related problems.
PRODUCT SPECIFICATIONS ARE SUBJECT TO CHANGE WITHOUT NOTICE.
USE INSTALLATION INSTRUCTIONS SUPPLIED WITH PRODUCT.
The Company has obtained applicable code (standards) listings generally available on a national basis for products of this type.
It is the responsibility of the installer/owner to determine specific local code compliance prior to installation of the product. The
Company makes no representation or warranty regarding, and will not be responsible for any code compliance.
©
Printed on Recycled Pape
2005 Jacuzzi Whirlpool Bath DA38000A 06/05
Printed in the U.S.A.

CONTENTS
Specifications _________________________________________________________________________ 1-5
Roughing-in Reference _________________________________________________________________ 6-11
ENGLISH
Installation Instructions __________________________________________________________________ 12-18
Framing and Support _________________________________________________________________ 12
Skirts______________________________________________________________________________ 13
Service Access _____________________________________________________________________ 14
Electrical Connections ________________________________________________________________ 15
Plumbing and Water Supply ___________________________________________________________ 16
UnderMount Installation Instructions _____________________________________________________ 17-18
Operation ____________________________________________________________________________ 19-20
Maintenance __________________________________________________________________________ 21
General Troubleshooting Guide ___________________________________________________________ 22
Repair Parts __________________________________________________________________________ 23-28
Authorized Service _____________________________________________________________________ 30
Warranty _____________________________________________________________________________ 31-32
Save These Instructions for Future Use.
Owner's Record
Date Purchased ____________________________________________________________
Purchased From ____________________________________________________________
Installed By ________________________________________________________________
Serial Number _____________________________________________________________
Model ____________________________________________________________________
NOTE: To obtain a referral for a service agent in your area call 800-288-4002 . You may also visit our web site at
http://www.jacuzzi.com/. To find the service agent listing, click on For The Trade.
Then click on Repair Services in the left hand box.
Depending on the problem, click on Electrical/Mechanical Repairs or Finish, Surface or Shell-Related Problems or
Repair Parts or Accessories for a listing of authorized agents, contractors, or distributors.
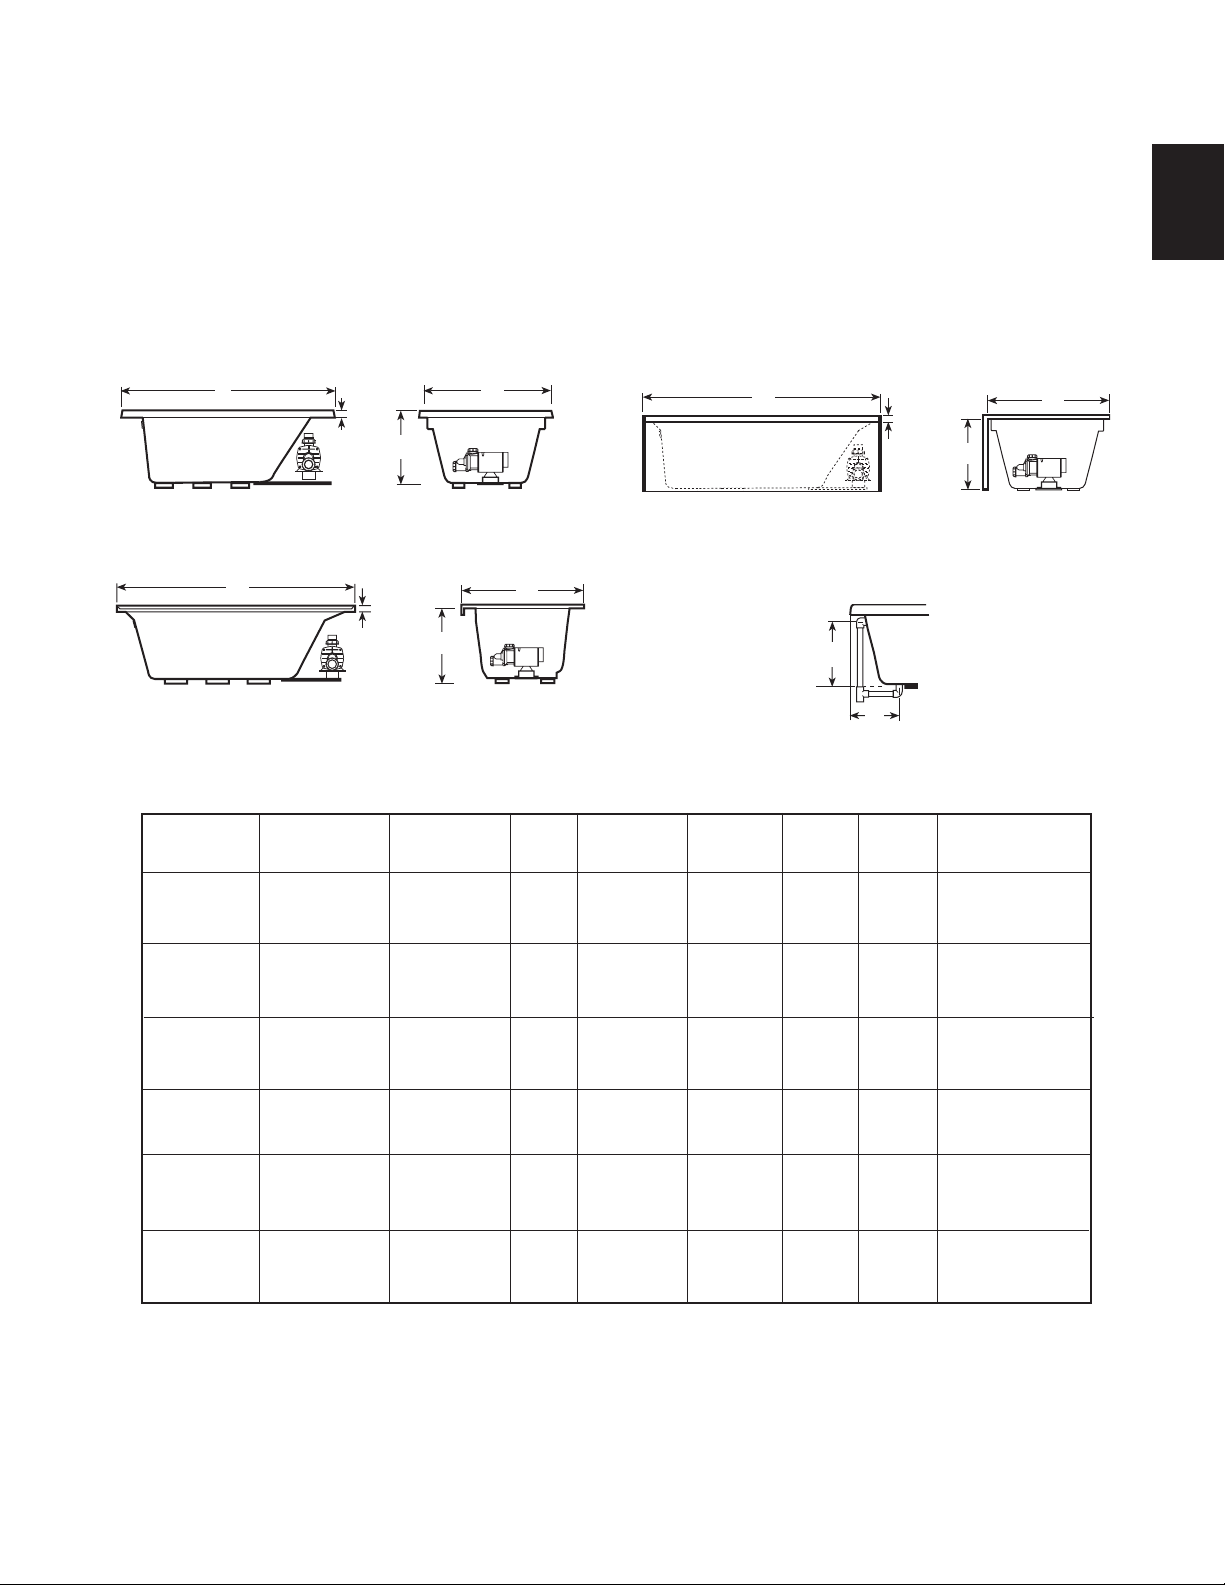
SPECIFICATIONS
Important: Read complete instructions before beginning installation.
Each whirlpool bath arrives ready for installation, completely equipped with motor/pump assembly and plumbing and fittings necessary for
whirlpool operation. An optional drain/overflow kit is available for installation on the bath.
Remove the bath from the carton. Retain the shipping carton until satisfactory inspection of the product has been made. Do not lift the bath
by the plumbing at any time; handle by the shell only.
Immediately upon receipt, inspect the shell before installing. Should inspection reveal any damage or defect in the finish, do not install the
bath. Damage or defect to the finish claimed after the bath is installed is excluded from the warranty . Jacuzzi Whirlpool Bath's responsibility for
shipping damage ceases upon delivery of the products in good order to the carrier. Refer any claims for damage to the carrier. For definitions of
warranty coverage and limitations, refer to the published warranty information packed with the product.
All bath units are factory tested for proper operation and watertight connections prior to shipping. Note: Prior to installation, the bath must
be filled with water and operated to check for leaks that may have resulted from shipping damage or mishandling. Jacuzzi Whirlpool
Bath is not responsible for any defect that could have been discovered, repaired, or avoided by following this inspection and testing procedure.
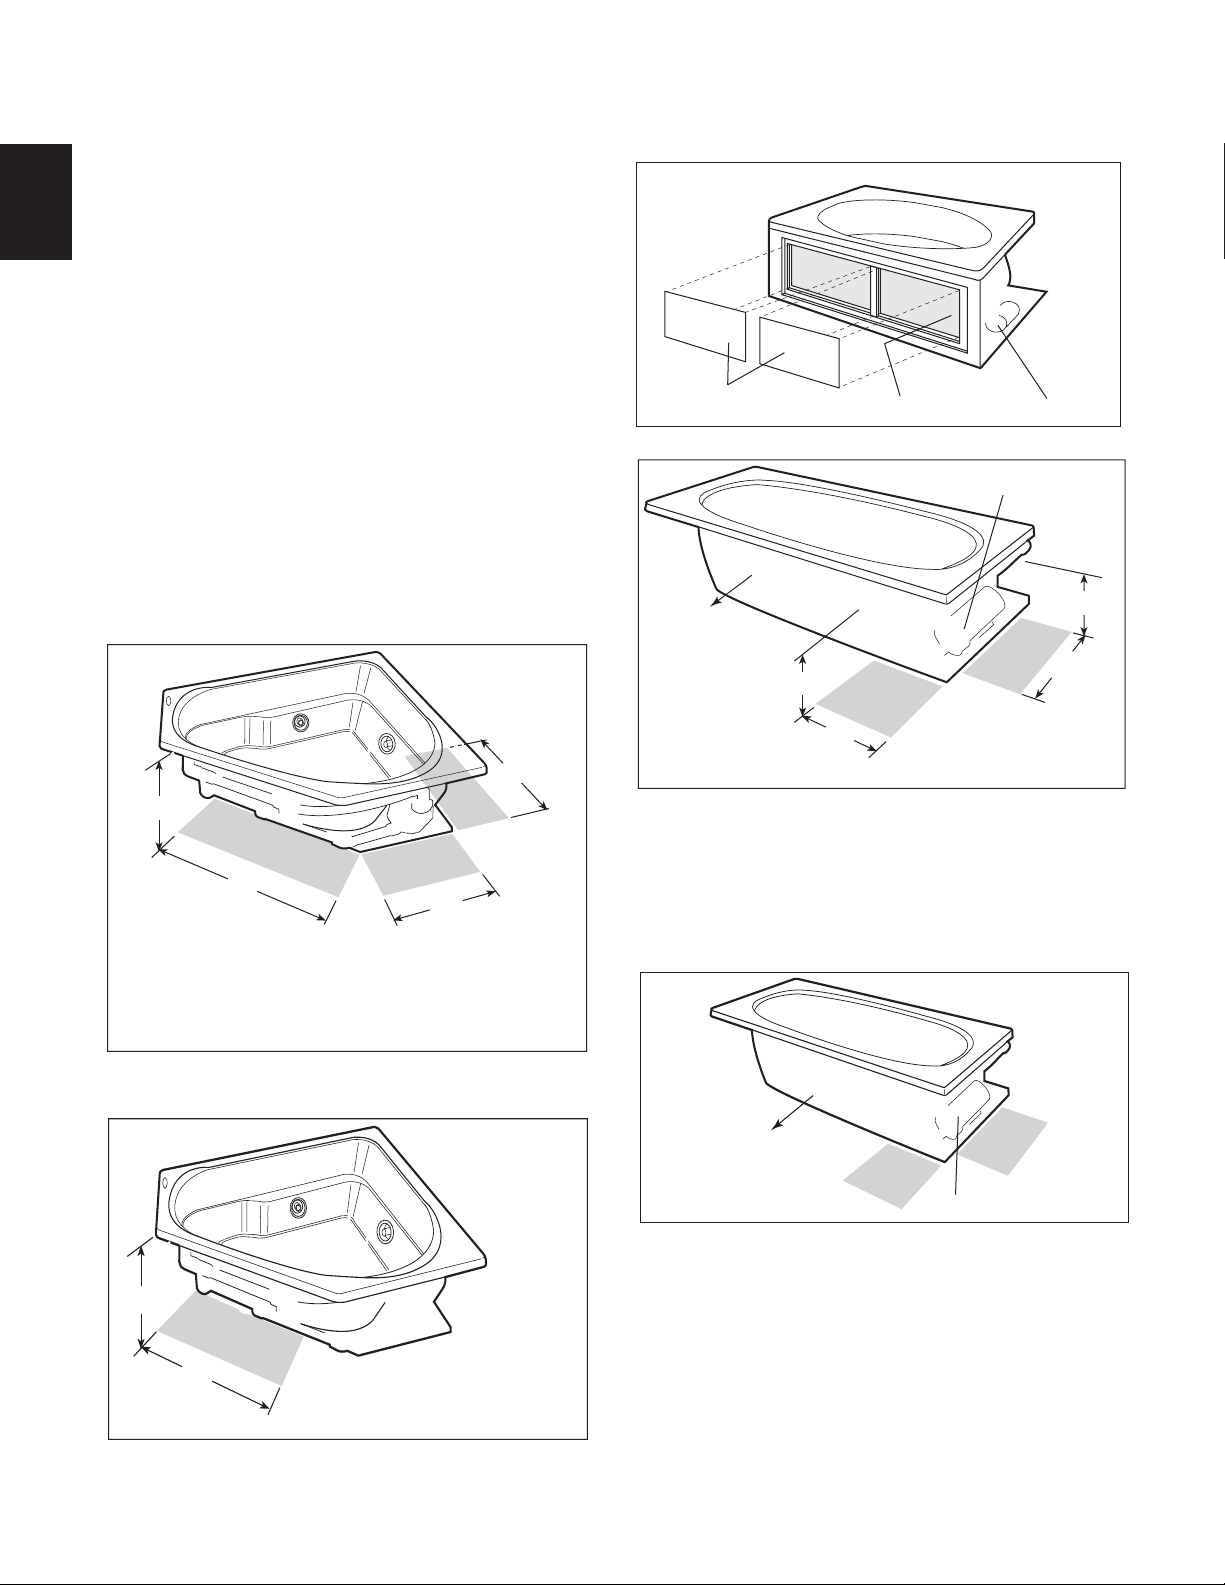
RECTANGULAR BATHS
ENGLISH
L
2"
(51 mm)
H
SIDE VIEW
BATHS WITHOUT INTEGRAL SKIRT
L
(25 mm)
W
END VIEW
L
(25 mm)
1"
SIDE VIEW
BATHS WITH INTEGRAL SKIRT
W
1"
SIDE VIEW
BATHS WITH 3-SIDED TILE FLANGE
H
END VIEW
A
B
DRAIN/OVERFLOW
SPECIFICATIONS (Rectangular)
OPERATING
GALLONAGE
50 U.S. gal
(186 liters)
50 U.S. gal
(186 liters)
73 U.S. gal
(276 liters)
46 U.S. gal
(174 liters)
43 U.S. gal
(163 liters)
48 U.S. gal
(181 liters)
PRODUCT
WEIGHT
105 lb
(48 kg)
129 lb
(59 kg)
135 lb
(61 kg)
94 lb
(43 kg)
89 lb
(41 kg)
92 lb
(42 kg)
SKIRT &
MOUNTING
Optional,
U-Frame
Integral
Optional,
U-Frame
Integral
Optional
U-Frame
Optional
U-Frame
NA
NA
58"
X
30-1/4"
58"
X
34-1/4"
TOTAL WEIGHT/
FLOOR LOADING
772 lb
(351 kg)/
43 lb/sq. ft.
(210 kg/sq. m)
796 lb
(362 kg)/
44 lb/sq. ft.
(214 kg/sq. m)
993 lb
(451 kg)/
41 lb/sq. ft.
(200 kg/sq. m)
727 lb
(330 kg)/
55 lb/sq. ft.
(268 kg/sq. m)
697 lb
(317 kg)/
53 lb/sq. ft.
(259 kg/sq. m)
742 lb
(337 kg)/
50 lb/sq. ft.
(244 kg/sq. m)
MODEL
AMIGA™
AMIGA™
WITH INTEGRAL
SKIRT
©
BIANCA
©
CETRA
WITH INTEGRAL
SKIRT
CETRA© 532
CETRA© 536
DIMENSIONS
72" (1829 mm) L*
36" ( 914 mm) W
20-3/4" ( 533 mm) H
72" (1829 mm) L*
36" ( 914 mm) W
20-3/4" ( 533 mm) H
72" (1829 mm) L*
48" (1219 mm) W
20-1/2" ( 521 mm) H
60" (1524 mm) L*
32" ( 813 mm) W
20-1/2" ( 521 mm) H
60" (1524 mm) L*
31-7/8" ( 791 mm) W
21-1/4" ( 553 mm) H
60" (1524 mm) L*
36" ( 914 mm) W
21-1/4" ( 553 mm) H
DRAIN/OVERFLOW
DIMENSIONS
16-7/8" (429 mm) A
14" (356 mm) B
16-7/8" (429 mm) A
14" (356 mm) B
16" (406 mm) A
8-1/2" (216 mm) B
17-7/8" (454 mm) A
9-3/8" (238 mm) B
18-1/2" ( 470 mm) A
9" ( 229 mm) B
18-1/2" ( 470 mm) A
9" ( 229 mm) B
CUTOUT
70" x 34"
70" x 46"
*Add 1/4" to this dimension when roughing-in for 3-wall niche.
NOTE: The overall dimensions are nominal with a tolerance of +0 and -1/4".
FOR ALL UNITS: Electrical Service Requirements: All require a dedicated GFCI protected separate circuit.
RapidHeat: 115 VAC, 15 AMP, 60 Hz. dedicated GFCI protected separate circuit.
Motor/Pump: 115 VAC, 15 Amp, 60 Hz. dedicated GFCI protected separate circuit.
W
H
END VIEW
HEATER READY
FOR FIELD
INSTALLATION
Yes
(S750000 HEATER KIT)
Yes
(S750000 HEATER KIT)
Yes
(S750000 HEATER KIT)
Yes
(S750000 HEATER KIT)
Yes
(S750000 HEATER KIT)
Yes
(S750000 HEATER KIT)
1
Jacuzzi Whirlpool Bath© K272000AC 12/04
ENGLISH
SPECIFICATIONS (Rectangular)
MODEL
CETRA© 536
WITH INTEGRAL
SKIRT
LUXURA™ 5
LUXURA™ 5
WITH INTEGRAL
SKIRT
LUXURA™ 5.5 66" (1676 mm) L*
WITH INTEGRAL
SKIRT
MAJORA© 5
MAJORA© 6
MAJORA© 6
WITH INTEGRAL
SKIRT
MITO© 5
MITO© 6 17-1/2" (445 mm) A
NOVA© 5
DIMENSIONS
60" (1524 mm) L*
36" ( 914 mm) W
21-1/4" ( 553 mm) H
60" (1524 mm) L
32" ( 813 mm) W
20-1/4" ( 514 mm) H
60" (1524 mm) L
32" ( 813 mm) W
20-1/4" ( 514 mm) H
34" ( 864 mm) W
20" ( 508 mm) H
60" (1524 mm) L*
30" ( 762 mm) W
20-1/4" ( 483 mm) H
60" (1524 mm) L*
42" (1067 mm) W
19-1/2" ( 495 mm) H
72" (1829 mm) L*
42" (1067 mm) W
19-3/4" ( 502 mm) H
72" (1829 mm) L*
42" (1067 mm) W
19-3/4" ( 502 mm) H
60" (1524 mm) L*
42" (1067 mm) W
21" ( 533 mm) H
72" (1829 mm) L*
42" (1067 mm) W
21-1/2" ( 546 mm) H
60" (1524 mm) L*
42" (1067 mm) W
18-1/2" ( 470 mm) H
DRAIN/OVERFLOW
DIMENSIONS
18-1/2" ( 470 mm) A
9" ( 229 mm) B
*
15-1/4" (387 mm) A
8-1/4" (210 mm) B
15-1/4" (387 mm) A
8-1/4" (210 mm) B
15-1/4" (387 mm) A
8-3/8" (213 mm) B
16-3/4" (425 mm) A
9-1/4" (235 mm) B
15" (381 mm) A
8-3/4" (222 mm) B
15-5/8" (397 mm) A
10-1/2" (267 mm) B
15-5/8" (397 mm) A
10-1/2" (267 mm) B
17-1/2" (445 mm) A
11-7/8" (302 mm) B
11-7/8" (302 mm) B
14-3/4" (375 mm) A
8-1/2" (216 mm) B
CUTOUT
NA
Molded-in
Tile Flange
NA
64" x 32"
NALUXURA™ 530
58" x 40"
70" x 40"
NA
58" x 40"
70" x 40"
58" x 40"
TOTAL WEIGHT/
FLOOR LOADING
742 lb
(337 kg)/
50 lb/sq. ft.
(244 kg/sq. m)
697 lb
(264 kg)/
52 lb/sq. ft.
(254 kg/sq. m)
700 lb
(318 kg)/
53 lb/sq. ft.
(259 kg/sq. m)
823 lb
(374 kg)/
53 lb/sq. ft.
(259 kg/sq. m)
662 lb
301 kg)/
53 lb/sq. ft.
(259 kg/sq. m)
728 lb
(331 kg)/
42 lb/sq. ft.
(205 kg/sq. m)
937 lb
(423 kg)/
44 lb/sq. ft.
(215 kg/sq. m)
947 lb
(430 kg)/
45 lb/sq. ft.
(220 kg/sq. m)
866 lb
(394 kg)/
50 lb/sq. ft.
(244 kg/sq. m)
993 lb
(451 kg)/
47 lb/sq. ft.
(229 kg/sq. m)
722 lb
(328 kg)/
41 lb/sq. ft.
(200 kg/sq. m)
OPERATING
GALLONAGE
48 U.S. gal
(181 liters)
44 U.S. gal
(167 liters)
42 U.S. gal
(159 liters)
58 U.S. gal
(220 liters)
38 U.S. gal
(144 liters)
46 U.S. gal
(172 liters)
70 U.S. gal
(265 liters)
70 U.S. gal
(265 liters)
62 U.S. gal
(235 liters)
76 U.S. gal
(288 liters)
45 U.S. gal
(170 liters)
PRODUCT
WEIGHT
92 lb
(42 kg)
80 lb
(36kg)
100 lb
(45 kg)
90 lb
(41 kg)
95 lb
(43 kg)
95 lb
(43 kg)
104 lb
(47 kg)
114 lb
(52 kg)
100 lb
(45 kg)
110 lb
(50 kg)
97 lb
(44 kg)
SKIRT &
MOUNTING
IntegralNA
Optional,
U-Frame
Integral
Optional,
U-Frame
Integral
Not
Available
Not
Available
Integral
Optional,
U-Frame
Not
Available
Optional,
U-Frame
HEATER READY
FOR FIELD
INSTALLATION
Yes
(S750000 HEATER KIT)
Yes
(S750000 HEATER KIT)
Yes
(S750000 HEATER KIT)
Yes
(S750000 HEATER KIT)
Yes
(U395000 HEATER KIT)
Yes
(S750000 HEATER KIT)
Yes
(S750000 HEATER KIT)
Yes
(S750000 HEATER KIT)
Yes
(S750000 HEATER KIT)
Yes
(S750000 HEATER KIT)
Yes
(S750000 HEATER KIT)
*Add 1/4" to this dimension when roughing-in for 3-wall niche.
NOTE: The overall dimensions are nominal with a tolerance of +0 and -1/4".
FOR ALL UNITS: Electrical Service Requirements: All require a dedicated GFCI protected separate circuit.
RapidHeat: 115 VAC, 15 AMP, 60 Hz. dedicated GFCI protected separate circuit.
Motor/Pump: 115 VAC, 15 Amp, 60 Hz. dedicated GFCI protected separate circuit.
2
Jacuzzi Whirlpool Bath© K272000AC 12/04

SPECIFICATIONS (Rectangular)
MODEL
©
5
NOVA
WITH INTEGRAL
3-SIDED TILE
FLANGE
©
5
NOVA
WITH INTEGRAL
SKIRT
NOVA© 6
NOVA© 536
©
NOVA
536
WITH INTEGRAL
SKIRT
©
636
NOVA
WITH INTEGRAL
SKIRT
©
SIGNA
5
SIGNA© 5 WITH
INTEGRAL SKIRT,
FRONT RIGHT
MOTOR/PUMP
SIGNA© 5
WITH INTEGRAL
3-SIDED TILE
FLANGE
SIGNA© 6
DIMENSIONS
60" (1524 mm) L
42" (1067 mm) W
18-1/2" ( 470 mm) H
60" (1524 mm) L
42" (1067 mm) W
18-1/2" ( 470 mm) H
72" (1829 mm) L*
42" (1067 mm) W
20-1/2" ( 521 mm) H
60" (1524 mm) L*
36" ( 914 mm) W
19-1/4" ( 489 mm) H
60" (1524 mm) L*
36" ( 914 mm) W
19-1/4" ( 489 mm) H
72" (1829 mm) L
36" ( 914 mm) W
19" ( 483 mm) H
60" (1524 mm) L*
42" (1067 mm) W
22" ( 559 mm) H
60" (1524 mm) L*
42" (1067 mm) W
22" ( 559 mm) H
60" (1524 mm) L*
42" (1067 mm) W
22" ( 559 mm) H
72" (1829 mm) L*
42" (1067 mm) W
22" ( 559 mm) H
DRAIN/OVERFLOW
DIMENSIONS
14-3/4" (375 mm) A
*
8-1/2" (216 mm) B
15-7/8" (403 mm) A
*
9-1/4" (235 mm) B
14-3/4" (375 mm) A
8-1/2" (216 mm) B
15-1/8" (384 mm) A
9" (229 mm) B
14-5/8" (372 mm) A
9" (229 mm) B
14-5/8" (372 mm) A
*
9-3/8" (238 mm) B
17-1/2" (445 mm) A
12-1/2" (318 mm) B
17-7/8" (451 mm) A
12-3/4" (330 mm) B
17-1/2" (445 mm) A
12-1/2" (318 mm) B
16-7/8" (429 mm) A
14" (356 mm) B
CUTOUT
NA
NA
70" x 40"
58" x 34"
NA
NA
58" x 40"
NA
NA
70" x 40"
TOTAL WEIGHT/
FLOOR LOADING
722 lb
(328 kg)/
41 lb/sq. ft.
(200 kg/sq. m)
737 lb
(335 kg)/
42 lb/sq. ft.
(205 kg/sq. m)
876 lb
(398 kg)/
42 lb/sq. ft.
(205 kg/sq. m)
683 lb
(310 kg)/
46 lb/sq. ft.
(224 kg/sq. m)
698 lb
(317 kg)/
47 lb/sq. ft.
(229 kg/sq. m)
824 lb
(375 kg)/
47 lb/sq. ft.
(229 kg/sq. m)
708 lb
(321 kg)/
40 lb/sq. ft.
(195 kg/sq. m)
723 lb
(329 kg)/
41 lb/sq. ft.
(200 kg/sq. m)
708 lb
(321 kg)/
40 lb/sq. ft.
(195 kg/sq. m)
826 lb
(375 kg)/
39 lb/sq. ft.
(190 kg/sq. m)
OPERATING
GALLONAGE
45 U.S. gal
(170 liters)
45 U.S. gal
(170 liters)
62 U.S. gal
(235 liters)
42 U.S. gal
(159 liters)
42 U.S. gal
(159 liters)
56 U.S. gal
(223 liters)
42 U.S. gal
(159 liters)
42 U.S. gal
(159 liters)
42 U.S. gal
(159 liters)
55 U.S. gal
(208 liters)
PRODUCT
WEIGHT
97 lb
(44 kg)
112 lb
(51 kg)
110 lb
(50 kg)
83 lb
(38 kg)
98 lb
(45 kg)
108 lb
(49 kg)
108 lb
(49 kg)
126 lb
(56 kg)
108 lb
(49 kg)
118 lb
(54 kg)
SKIRT &
MOUNTING
Not
Available
Integral
Optional,
U-Frame
Not
Available
Integral
Integral
Optional,
U-Frame
Integral
Optional,
U-Frame
Not
Available
HEATER READY
FOR FIELD
INSTALLATION
Yes
(S750000 HEATER KIT)
No
Yes
(S750000 HEATER KIT)
No
No
Yes
(S750000 HEATER KIT)
Yes
(S750000 HEATER KIT)
Yes
(U395000 HEATER KIT)
Yes
(S750000 HEATER KIT)
Yes
(S750000 HEATER KIT)
ENGLISH
*Add 1/4" to this dimension when roughing-in for 3-wall niche.
NOTE: The overall dimensions are nominal with a tolerance of +0 and -1/4".
FOR ALL UNITS: Electrical Service Requirements: All require a dedicated GFCI protected separate circuit.
RapidHeat: 115 VAC, 15 AMP, 60 Hz. dedicated GFCI protected separate circuit.
Motor/Pump: 115 VAC, 15 Amp, 60 Hz. dedicated GFCI protected separate circuit.
3
Jacuzzi Whirlpool Bath© K272000AC 12/04
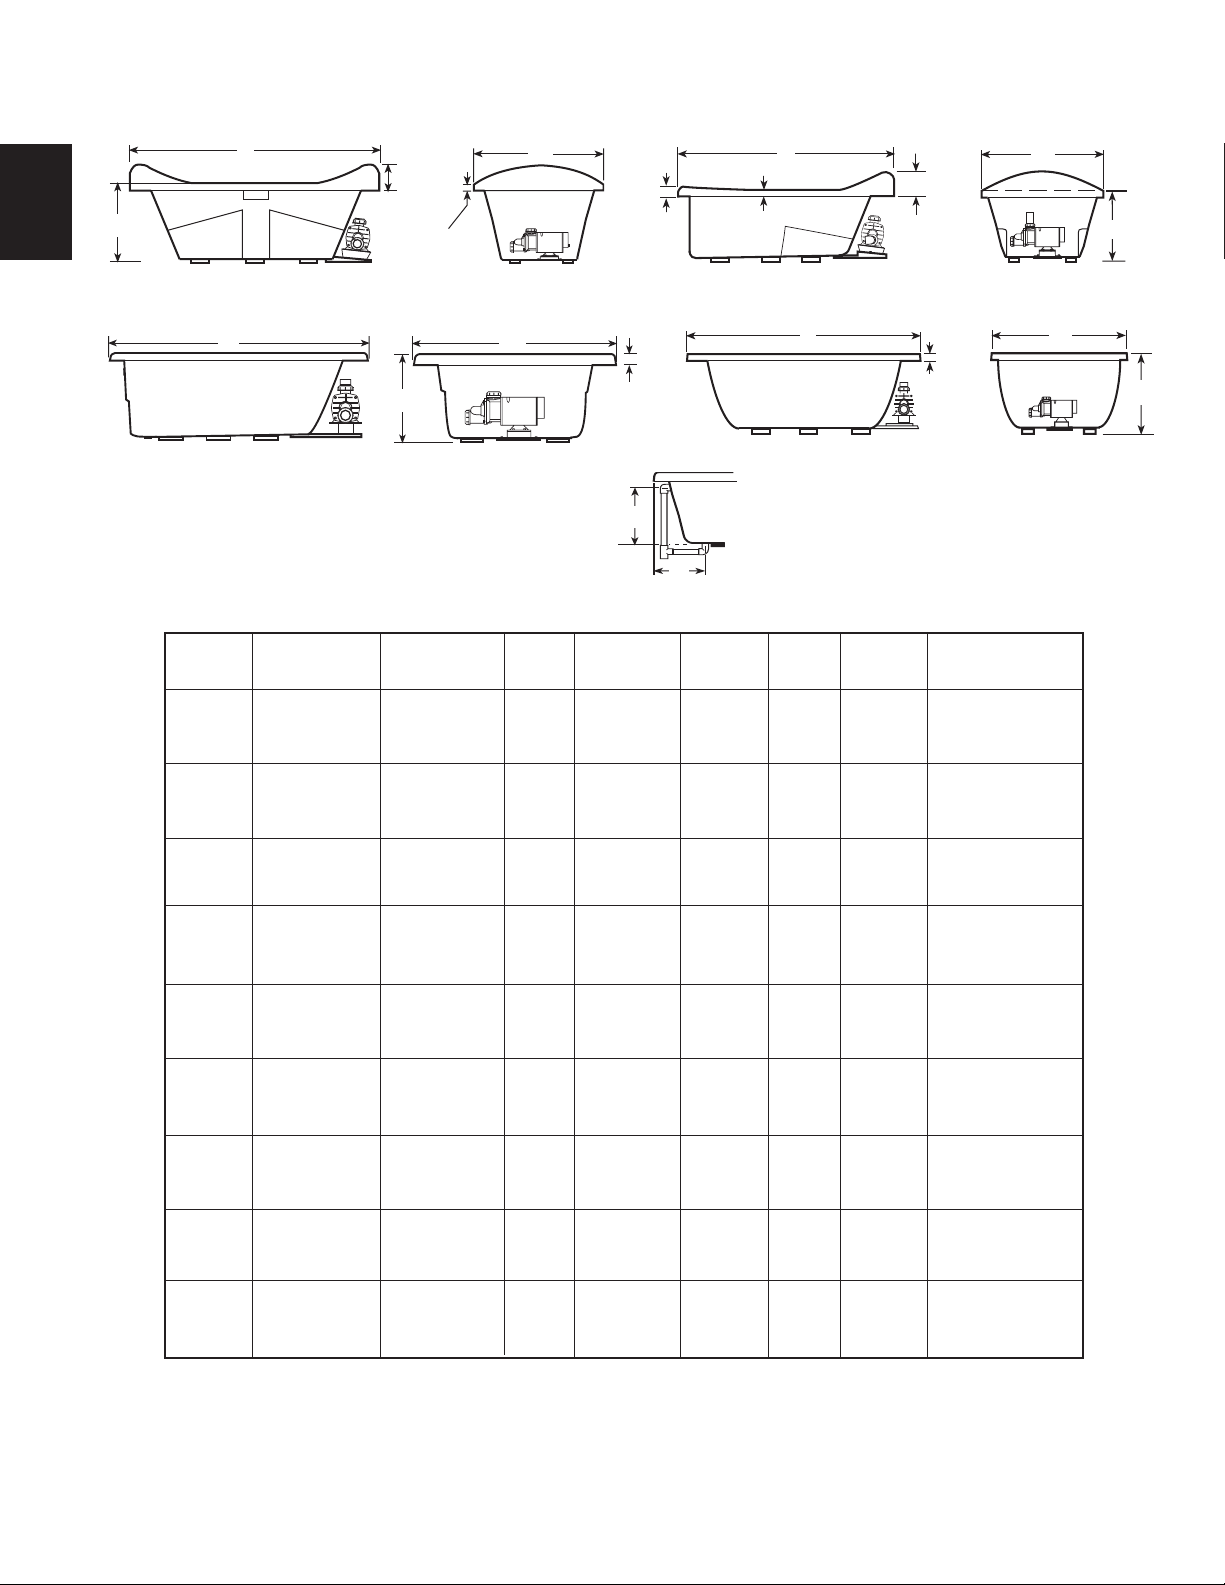
RIMLESS OVAL BATHS
H
ENGLISH
L
SIDE VIEW
FRESCO
L
SIDE VIEW
RIVA 5 & RIVA 6
GALLERY 5 OVAL & GALLERY 6 OVAL
SPECIFICATIONS (Oval)
MODEL
©
FRESCO
GALLERY™ 5
OVAL
GALLERY™ 6
OVAL
GALLERY™ 6
OVAL
UNDERMOUNT
LUNA™
MILANO™ 72" (1829 mm) L
OPALIA™ 72" (1829 mm) L
RIVA© 5 62" (1575 mm) L
RIVA© 6
DIMENSIONS
71-1/2" (1816 mm) L
42" (1067 mm) W
26-1/4" ( 603 mm) H*
62" (1575 mm) L
43" (1092 mm) W
19" ( 483 mm) H
72" (1829 mm) L
42" (1067 mm) W
20-1/2" ( 521 mm) H
72" (1829 mm) L
42" (1067 mm) W
20-1/2" ( 521 mm) H
72" (1829 mm) L
42" (1118 mm) W
23" ( 584 mm) H
40" (1016 mm) W
20-3/4" ( 527 mm) H
44" (1118 mm) W
22-1/4" ( 565 mm) H
43" (1092 mm) W
19" ( 483 mm) H
72" (1829 mm) L
42" (1067 mm) W
20-1/2" ( 521 mm) H
7-1/2"
(191 mm)
2"
(51 mm)
H
DRAIN/OVERFLOW
DIMENSIONS
20-1/8" (511 mm) A
11-3/4" (299 mm) B
14-3/4" (375 mm) A
9-1/2" (241 mm) B
16" (406 mm) A
11-1/2" (292 mm) B
16" (406 mm) A
11-1/2" (292 mm) B
19-1/8" (486 mm) A
11" (279 mm) B
18-1/2" (470 mm) A
11" (279 mm) B
18-3/4" (476 mm) A
12" (305 mm) B
14-3/4" (375 mm) A
9-1/2" (241 mm) B
16" (406 mm) A
11-1/2" (292 mm) B
END VIEW
W
END VIEW
CUTOUT
Template
Provided
P188000
Template
Provided
P186000
Template
Provided
P186000
Template
Provided
P186000
Template
Provided
P819000
Template
Provided
P188000
Template
Provided
P186000
Template
Provided
P186000
Template
Provided
P186000
W
P/N
P/N
P/N
P/N
P/N
P/N
P/N
P/N
P/N
3-1/2"
(89 mm)
2''
(51 mm)
A
DRAIN/OVERFLOW
TOTAL WEIGHT/
FLOOR LOADING
921 lb
(419 kg)/
44 lb/sq. ft.
(220 kg/sq. m)
746 lb
(339 kg)/
40 lb/sq. ft.
(195 kg/sq. m)
871 lb
(395 kg)/
42 lb/sq. ft.
(205 kg/sq. m)
871 lb
(395 kg)/
42 lb/sq. ft.
(205 kg/sq. m)
1221 lb
(555 kg)/
58 lb/sq. ft.
(283 kg/sq. m)
893 lb
(406 kg)/
45 lb/sq. ft.
(220 kg/sq. m)
978 lb
(445 kg)/
45 lb/sq. ft.
(220 kg/sq. m)
746 lb
(339 kg)/
40 lb/sq. ft.
(195 kg/sq. m)
871 lb
(396 kg)/
42 lb/sq. ft.
(205 kg/sq. m)
B
OPERATING
GALLONAGE
63 U.S. gal
(239 liters)
48 U.S. gal
(182 liters)
62 U.S. gal
(235 liters)
62 U.S. gal
(235 liters)
96 U.S. gal
(364 liters)
60 U.S. gal
(227 liters)
70 U.S. gal
(265 liters)
48 U.S. gal
(182 liters)
62 U.S. gal
(235 liters)
L
2'' (51 mm)
SIDE VIEW
SIDE VIEW
PRODUCT
WEIGHT
146 lb
(66 kg)
96 lb
(44 kg)
105 lb
(48 kg)
105 lb
(48 kg)
(55 kg)
143 lb
(65 kg)
145 lb
(66 kg)
96 lb
(44 kg)
105 lb
(48 kg)
L
121 lb
MILANO
LUNA
SKIRT &
MOUNTING
Not
Available
Not
Available
Not
Available
Not
Available
Not
Available
Not
Available
Not
Available
Not
Available
Not
Available
8"
(203 mm)
2"
(51 mm)
HEATER READY
FOR FIELD
INSTALLATION
(S750000 HEATER KIT)
(S750000 HEATER KIT)
(S750000 HEATER KIT)
(S750000 HEATER KIT)
(S750000 HEATER KIT)
(S750000 HEATER KIT)
(S750000 HEATER KIT)
(S750000 HEATER KIT)
(S750000 HEATER KIT)
W
H
END VIEW
W
H
END VIEW
Yes
Yes
Yes
Yes
Yes
Yes
Yes
Yes
Yes
* For Fresco™ models H551, H549, and H550 this height is 23-3/4"
NOTE: The overall dimensions are nominal with a tolerance of +0 and -1/4".
FOR ALL UNITS: Electrical Service Requirements: All require a dedicated GFCI protected separate circuit.
RapidHeat: 115 VAC, 15 AMP, 60 Hz. dedicated GFCI protected separate circuit.
Motor/Pump: 115 VAC, 15 Amp, 60 Hz. dedicated GFCI protected separate circuit.
4
Jacuzzi Whirlpool Bath© K272000AC 12/04
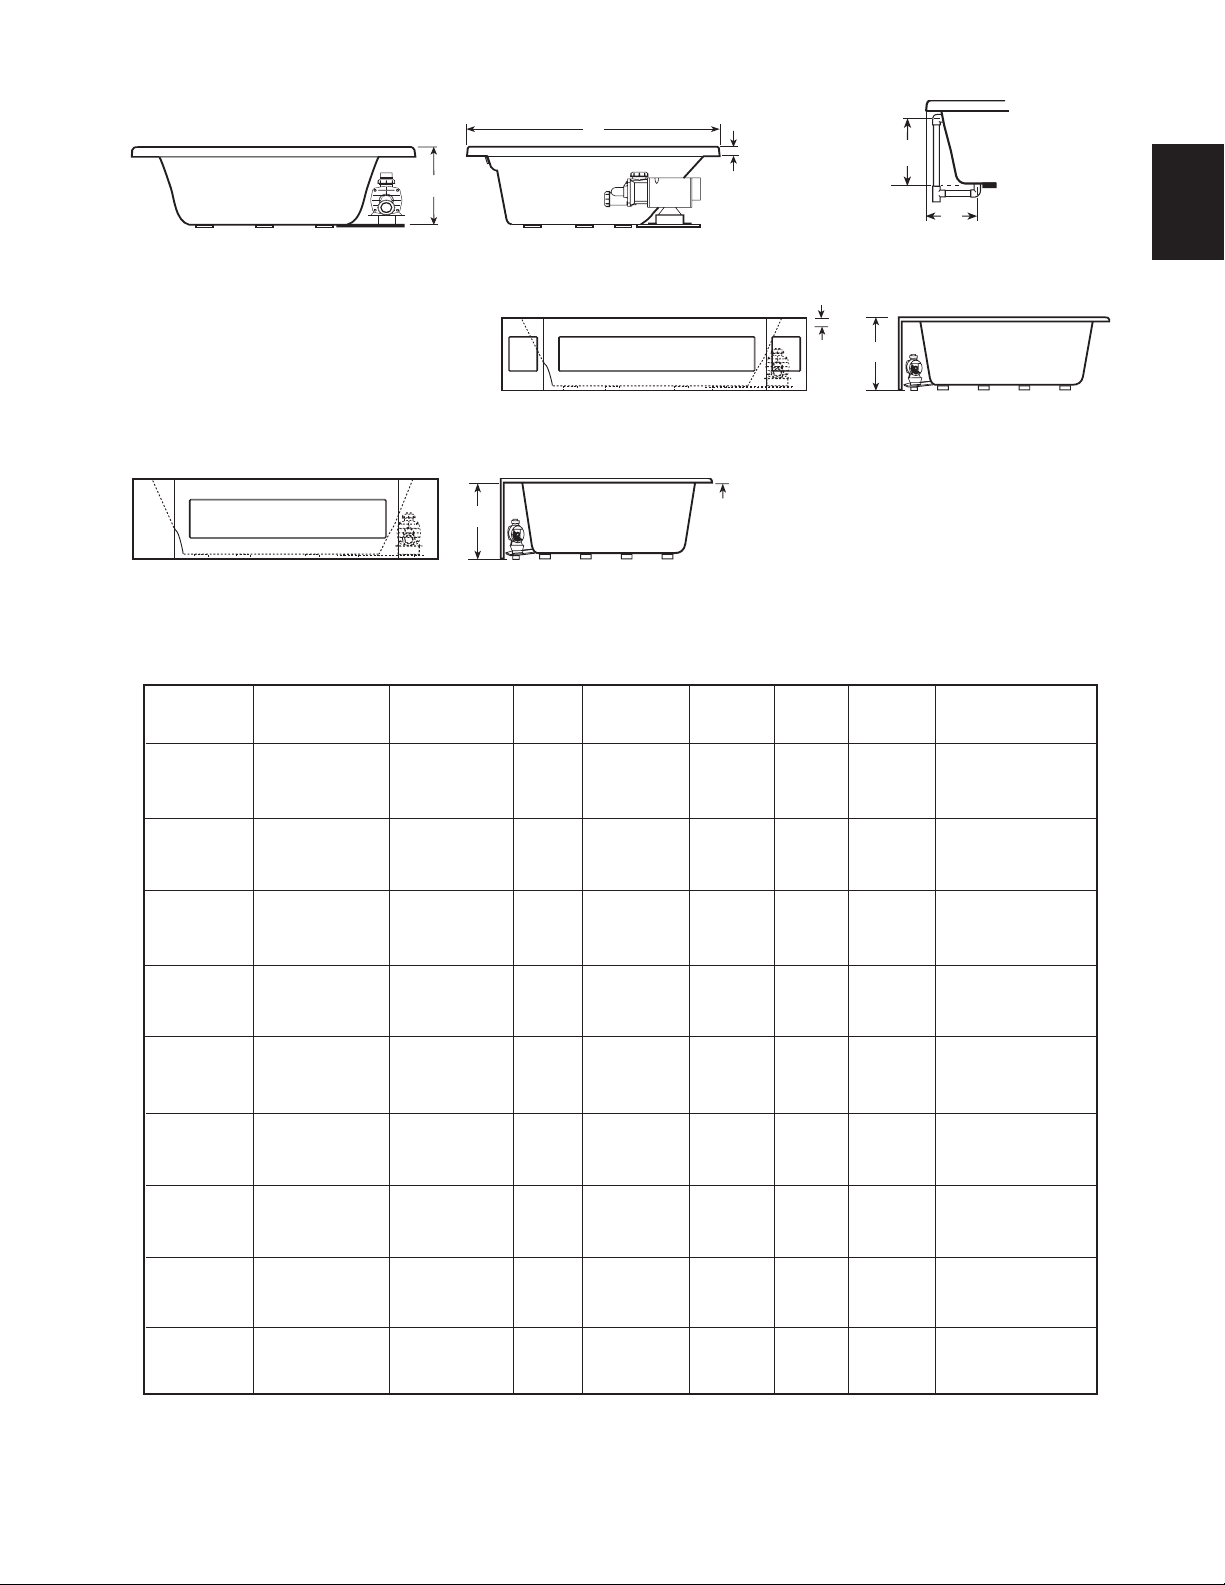
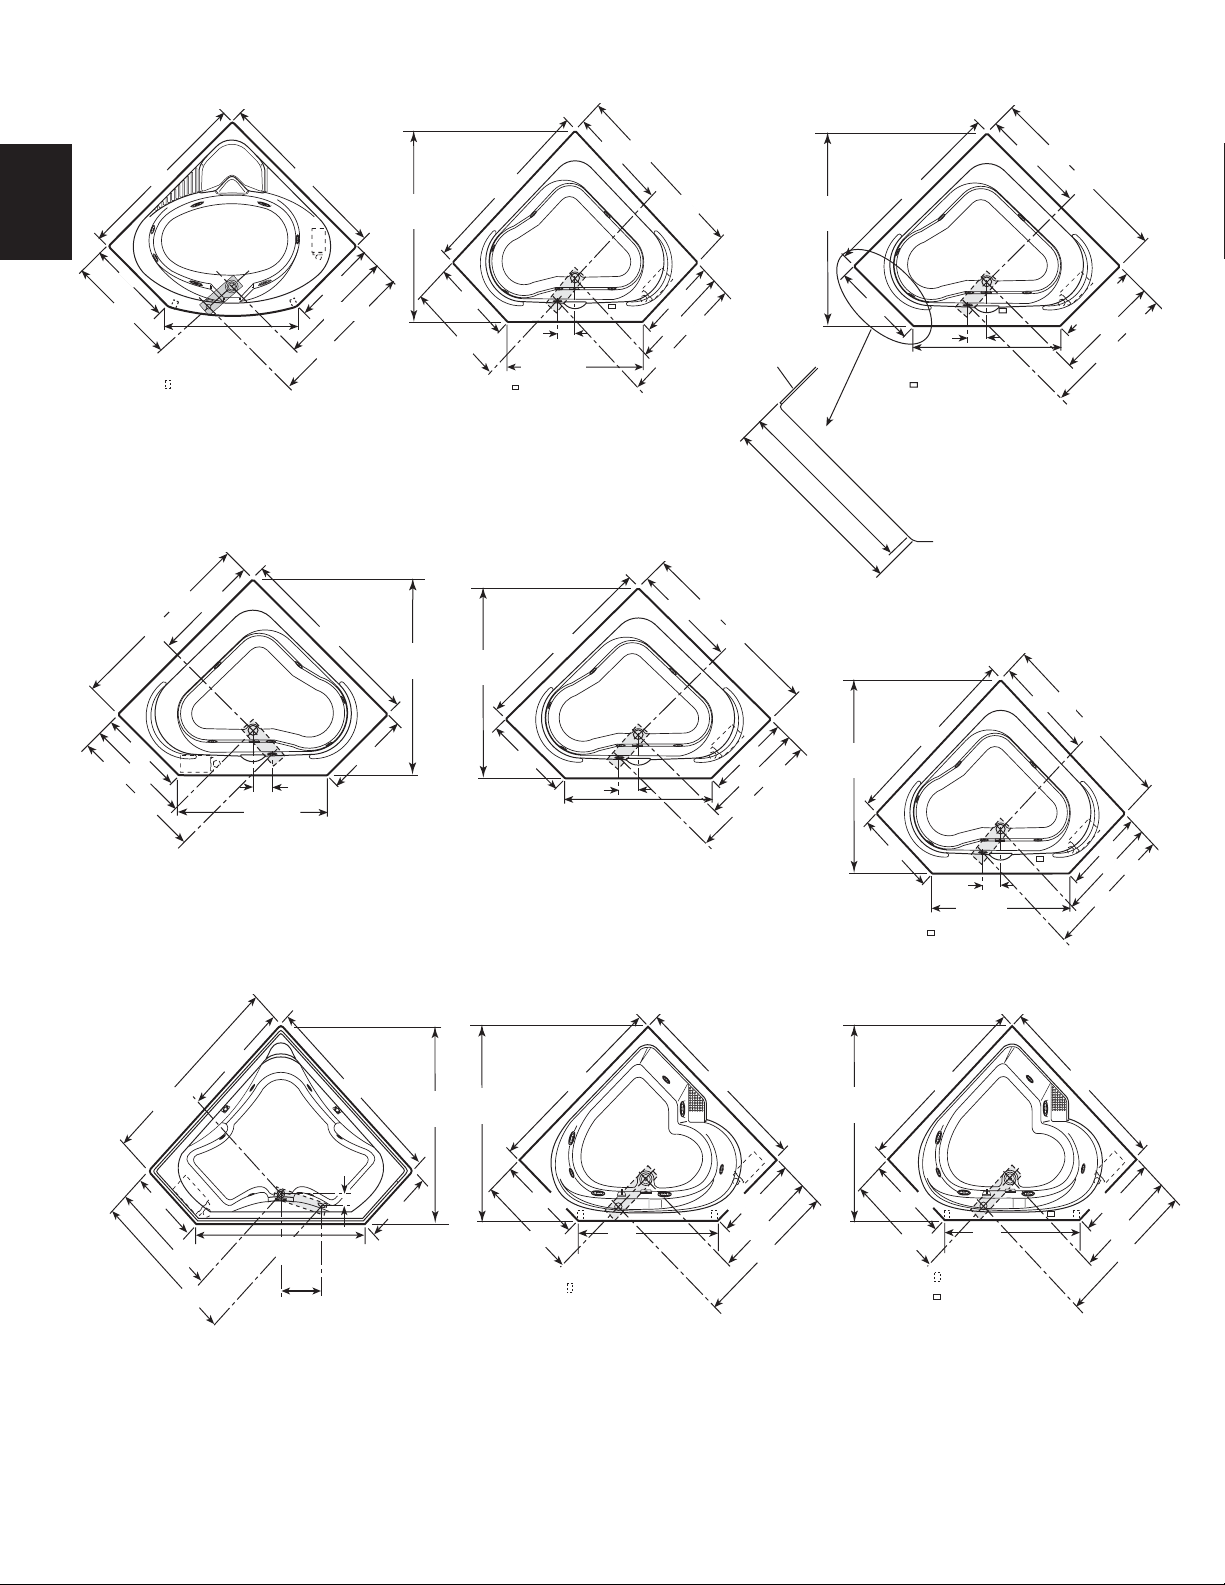
CORNER BATHS
SIDE VIEW
H
CORNER SIDE BATH
L
END VIEW
2"
(51 mm)
1"
(25 mm)
A
B
DRAIN/OVERFLOW
H
ENGLISH
FRONT VIEW
CAPELLA 55, CAPELLA 60, & TARA WITH INTEGRAL SKIRT
1"
(25 mm)
FRONT VIEW
H
SIDE VIEW
CAPELLA SPACESAVER WITH INTEGRAL SKIRT
SPECIFICATIONS (Corner)
MODEL
CAPELLA© 55
CAPELLA© 55
WITH INTEGRAL
SKIRT
©
CAPELLA
SPACESAVER
WITH INTEGRAL
SKIRT
CAPELLA© 60
FRONT LEFT
MOTOR/PUMP
CAPELLA© 60 60" (1524 mm) L
CAPELLA© 60
WITH INTEGRAL
SKIRT
GALLERY™
CORNER
TARA™
TARA™
WITH INTEGRAL
SKIRT
DIMENSIONS
55" (1397 mm) L
55" (1397 mm) L
20-1/4" ( 514 mm) H
55" (1397 mm) L
55" (1397 mm) L
20-1/2" ( 521 mm) H
60" (1524 mm) L
60" (1524 mm) L
20-1/2" ( 521 mm) H
60" (1524 mm) L
60" (1524 mm) L
20-1/2" ( 521 mm) H
60" (1524 mm) L
20-1/2" ( 521 mm) H
60" (1524 mm) L
60" (1524 mm) L
20-1/2" ( 521 mm) H
60" (1524 mm) L
60" (1524 mm) L
22-1/2" ( 572 mm) H
60" (1524 mm) L
60" (1524 mm) L
20-3/4" ( 527 mm) H
60" (1524 mm) L
60" (1524 mm) L
20-3/4" ( 527 mm) H
DRAIN/OVERFLOW
DIMENSIONS
17-1/2" (445 mm) A
9-5/8" (245 mm) B
18" (457 mm) A
12-1/8" (308 mm) B
18" (457 mm) A
12-3/8" (308 mm) B
18" (457 mm) A
12-1/8" (308 mm) B
18" (457 mm) A
12-1/8" (308 mm) B
18" (457 mm) A
12-1/8" (308 mm) B
18-1/8" (451 mm) A
12" (305 mm) B
16" (406 mm) A
12-3/8" (314 mm) B
16" (406 mm) A
12-3/8" (314 mm) B
CUTOUT
See
Page 11
NA
NA
See
Page 11
See
Page 11
NA
See
Page 11
See
Page 11
NA
TOTAL WEIGHT/
FLOOR LOADING
791 lb
(360 kg)/
38 lb/sq. ft.
(185 kg/sq. m)
833 lb
(379 kg)/
40 lb/sq. ft.
(195 kg/sq. m)
880 lb
(400 kg)/
35 lb/sq. ft.
(171 kg/sq. m)
870 lb
(395 kg)/
35 lb/sq. ft.
(171 kg/sq. m)
870 lb
(395 kg)/
35 lb/sq. ft.
(171 kg/sq. m)
880 lb
(400 kg)/
35 lb/sq. ft.
(171 kg/sq. m)
984 lb
(447 kg)/
39 lb/sq. ft.
(244 kg/sq. m)
984 lb
(447 kg)/
39 lb/sq. ft.
(190 kg/sq. m)
999 lb
(454 kg)/
40 lb/sq. ft.
(195 kg/sq. m)
OPERATING
GALLONAGE
51 U.S. gal
(193 liters)
55 U.S. gal
(208 liters)
60 U.S. gal
(227 liters)
60 U.S. gal
(227 liters)
60 U.S. gal
(227 liters)
60 U.S. gal
(227 liters)
74 U.S. gal
(280 liters)
74 U.S. gal
(280 liters)
74 U.S. gal
(280 liters)
PRODUCT
WEIGHT
116 lb
(53 kg)
125 lb
(54 kg)
130 lb
(59 kg)
120 lb
(54 kg)
120 lb
(54 kg)
130 lb
(59 kg)
118 lb
(54 kg)
118 lb
(54 kg)
133 lb
(61 kg)
NOTE: The overall dimensions are nominal with a tolerance of +0 and -1/4".
FOR ALL UNITS: Electrical Service Requirements: All require a dedicated GFCI protected separate circuit.
RapidHeat: 115 VAC, 15 AMP, 60 Hz. dedicated GFCI protected separate circuit.
Motor/Pump: 115 VAC, 15 Amp, 60 Hz. dedicated GFCI protected separate circuit.
SKIRT &
MOUNTING
Optional
Integral
Integral
Not
Available
Not
Available
Integral
Not
Available
Optional
Integral
SIDE VIEW
HEATER READY
FOR FIELD
INSTALLATION
Yes
(S750000 HEATER KIT)
No
No
No
No
No
Yes
(S750000 HEATER KIT)
Yes
(S750000 HEATER KIT)
No
5
Jacuzzi Whirlpool Bath© K272000AC 12/04
ROUGHING-IN REFERENCE (RECTANGULAR)
Note: Baths shown are left-hand unless otherwise specified. Right-hand is a mirror image.
ENGLISH
18''
36''
17-3/8''
24"
*72''
16'' x 4''
2''
14''
14-1/2''
AMIGA
*72''
16'' x 4''
2''
AMIGA WITH INTEGRAL SKIRT
* 72"
13-1/2" x 4"
48"
36''
12" x 4"
18"
9"
CETRA 536
17-3/8"
12" x 4"
9"
CETRA 536 WITH INTEGRAL SKIRT
*60"
8-1/4"
60"
36"
*60"
36"
8-1/2"
13-3/4"
(Left-hand only as shown.)
15-5/8"
2"
9-3/8"
CETRA WITH INTEGRAL SKIRT
16"
9"
BIANCA
*60"
10" x 4"
*60"
12" x 4"
CETRA 532
32"
32"
16"
15" x 5"
2-1/2"
LUXURA 5
*60"
9-1/4"
15-5/8"
15" x 5"
2-1/2"
LUXURA 5 WITH INTEGRAL SKIRT
*66"
8-3/8"
17"
15" x 5"
2-1/2"
LUXURA 5.5
32"
32"
34"
*Add 1/4" to this dimension when roughing-in for 3-wall niche.
Note: 1. THE OVERALL DIMENSIONS ARE NOMINAL WITH A TOLERANCE OF +0 AND -1/4".
2. Measurements inside each unit represent cutout in floor to allow for drain/overflow.
3. All measurements are in inches. To convert to millimeters, multiply inches by 25.4.
6
Jacuzzi Whirlpool Bath© K272000AC 12/04
ROUGHING-IN REFERENCE (RECTANGULAR)
Note: Baths shown are left-hand unless otherwise specified. Right-hand is a mirror image.
*60"
9-1/8"
14-1/2"
15" x 5"
2-1/2"
30"
11-7/8"
*72"
10" x 4"
2"
ENGLISH
42"
LUXURA 530 WITH INTEGRAL SKIRT
8-3/4"
21"
10-1/2"
21"
8-1/2"
*60"
2"
10" x 4"
MAJORA 5
*72"
2"
12" x 4"
MAJORA 6
*72"
2"
42"
42"
36"
(Right hand shown.
Left hand is a mirror image.)
MITO 6
*60"
21''
11" x 4"
2''
8-1/2''
21''
2''
8-1/2''
NOVA 5 WITH 3-SIDED TILE FLANGE
2''
NOVA 5
*60"
11" x 4"
2''
*60"
42''
42''
20-1/2"
12" x 4"
42"
20''
2''
MAJORA 6 WITH INTEGRAL SKIRT
*60"
10" x 4"
2"
11-7/8"
30"
(Right hand shown.
Left hand is a mirror image.)
MITO 5
*Add 1/4" to this dimension when roughing-in for 3-wall niche.
Note: 1. THE OVERALL DIMENSIONS ARE NOMINAL WITH A TOLERANCE OF +0 AND -1/4".
2. Measurements inside each unit represent cutout in floor to allow for drain/overflow.
3. All measurements are in inches. To convert to millimeters, multiply inches by 25.4.
42"
9-7/8''
NOVA 5 WITH INTEGRAL SKIRT
21''
2''
10-7/8''
7
Jacuzzi Whirlpool Bath© K272000AC 12/04
11" x 4"
2''
14" x 4"
2''
NOVA 6
42''
*72''
42''
ROUGHING-IN REFERENCE (RECTANGULAR)
Note: Baths shown are left-hand unless otherwise specified. Right-hand is a mirror image.
*60"
*60"
ENGLISH
18"
17-1/4"
18-1/8"
10" x 4"
2"
9"
9-3/4"
NOVA 536 WITH INTEGRAL SKIRT
NOVA 536
*60"
10" x 4"
2"
*72"
10" x 4"
36"
36"
36"
42"
6-3/4"
(Right hand only as shown.)
SIGNA 5 WITH INTEGRAL SKIRT
Front Right Motor/Pump
42"
5"
Left hand is a mirror image.)
SIGNA 5 WITH 3-SIDED FLANGE
42"
16" x 5"
4-1/4"
*60"
13" x 5"
4-1/4"
(Right hand shown.
*72"
18-1/2" x 5"
30"
30"
12-3/4"
12"
2"
10-1/8"
NOVA 636 WITH INTEGRAL SKIRT
1/4"
11-
5"
(Right hand shown.
Left hand is a mirror image.)
*60"
42"
13" x 5"
5"
12"
4-1/4"
30"
(Right hand shown.
Left hand is a mirror image.)
SIGNA 5
*Add 1/4" to this dimension when roughing-in for 3-wall niche.
Note: 1. THE OVERALL DIMENSIONS ARE NOMINAL WITH A TOLERANCE OF +0 AND -1/4".
2. Measurements inside each unit represent cutout in floor to allow for drain/overflow.
3. All measurements are in inches. To convert to millimeters, multiply inches by 25.4.
12-1/2"
36"
SIGNA 6
Jacuzzi Whirlpool Bath© K272000AC 12/04
8
ROUGHING-IN REFERENCE (OVAL)
Note: Baths shown are left-hand unless otherwise specified. Right-hand is a mirror image.
These units have been provided with cutout templates included in shipping carton.
See CUTOUT information for each model on page 4.
62"
ENGLISH
43"
11-3/4"
(Right hand shown.
Left hand is a mirror image.)
FRESCO
21"
14" x 4"
2"
12-1/2"
12" x 4"
2"
71-1/2"
36"
72"
2"
GALLERY 6 OVAL
72"
13" X 6"
3"
42"
42"
21-1/2"
9-1/2"
42"
40"
12" x 4"
2"
2"
GALLERY 5 OVAL
72"
14" x 4"
GALLERY 6 UNDERMOUNT
11 "
71-1/2"
2"
20"
12" x 4"
43"
21"
2"
12-1/2"
2"
11"
36"
(Right-hand only.)
LUNA
72"
21-1/2"
2"
9-1/2"
44"
13" X 4"
3"
4"
(Left-hand unit shown.)
OPALIA
36"
32"
12"
72"
21"
14" x 4"
42"
2"
2"
11-1/2"
RIVA 6
NOTE: THE OVERALL DIMENSIONS ARE NOMINAL WITH A TOLERANCE OF +0 AND -1/4".
MILANO
62"
12" x 4"
2"
(Left-hand only as shown.)
RIVA 5
43"
9
Jacuzzi Whirlpool Bath© K272000AC 12/04
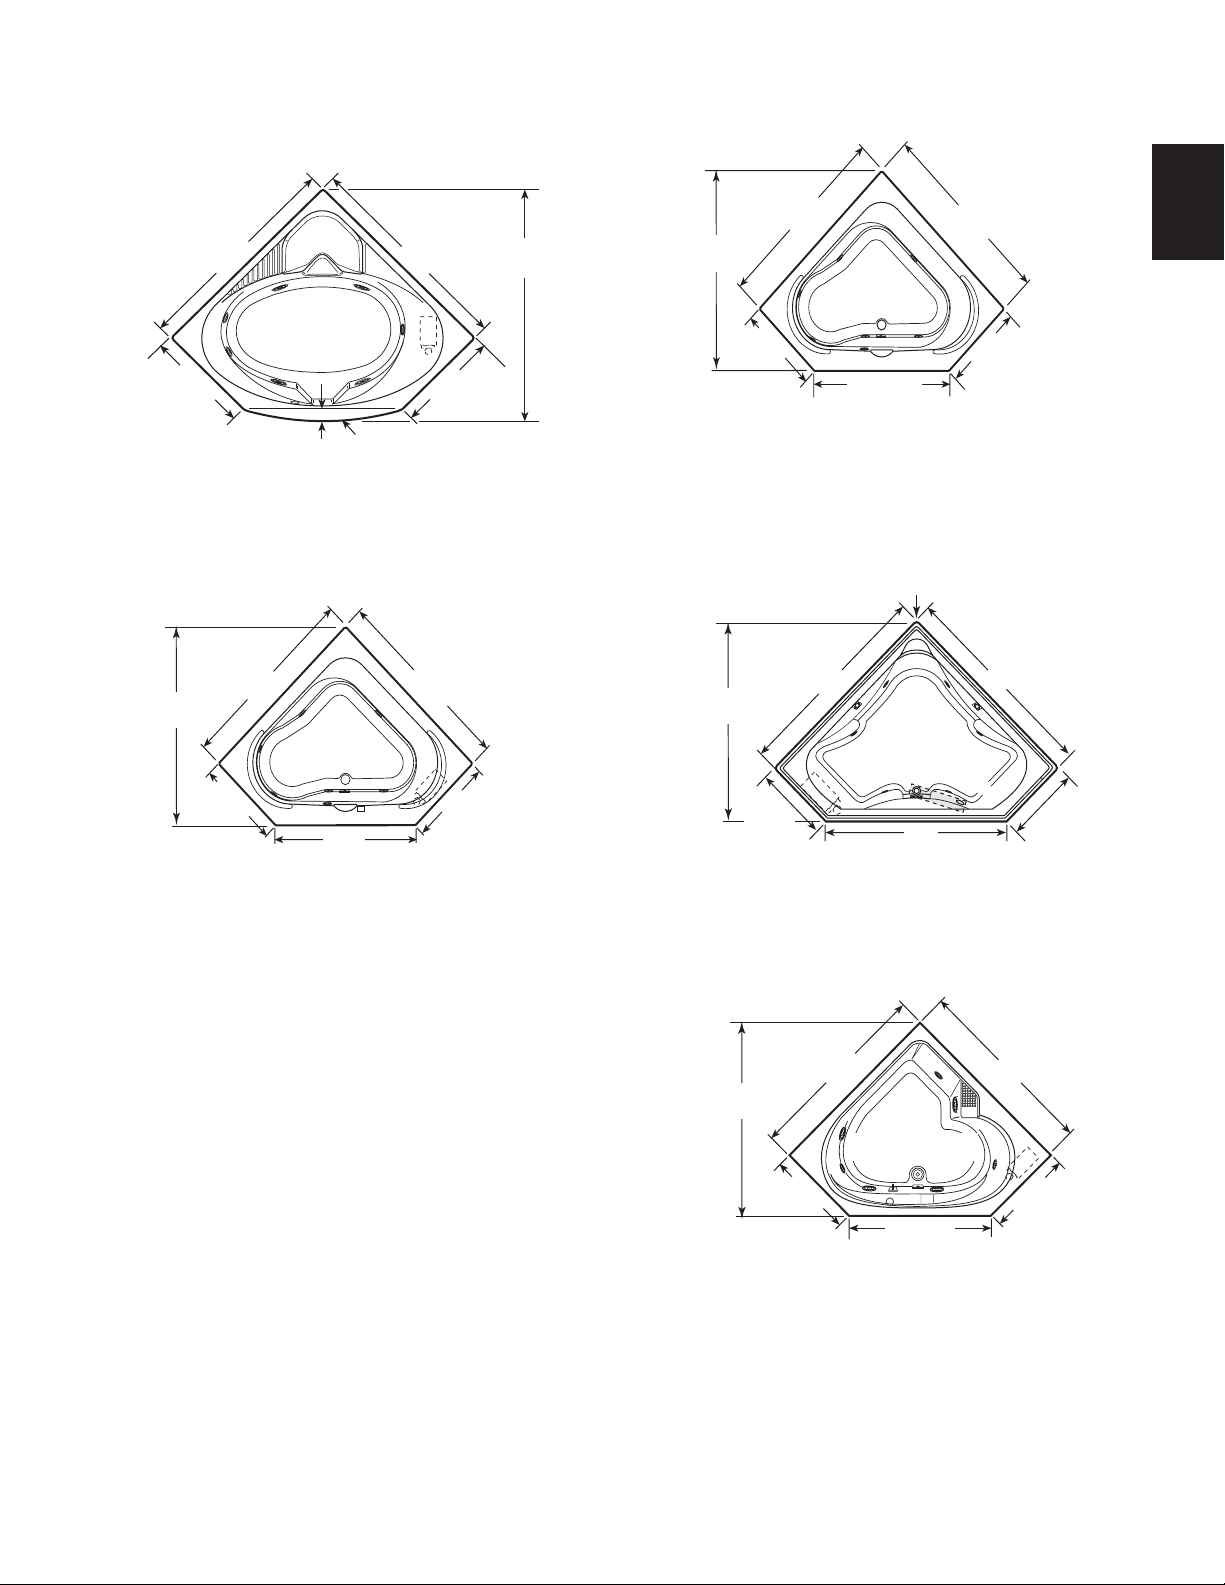
ROUGHING-IN REFERENCE (CORNER)
"
"
Note: Baths shown are left-hand unless otherwise specified. Right-hand is a mirror image.
ENGLISH
36 1/2"
34-15/16"
43-1/8"
55"
12" x 4"
27"
39 1/2"
- 2" x 4" Stud
(Right-hand only as shown.)
CAPELLA 55
33-1/2"
60"
14" X 4"
27"
46-5/8"
55"
6"
27"
36 1/2"
44 1/2"
60"
27"
57-1/4"
Ref.
61-1/2
Ref.
32-1/4"
55"
16" X 4"
26"
29-3/8"
CAPELLA 55 WITH INTEGRAL SKIRT
61-1/2"
Ref.
9-7/8"
40-7/16"
- Junction Box
(Right-hand only as shown.)
60"
14" X 4"
27"
6"
46-5/8"
55"
26"
32-1/2"
43-7/8"
33-1/2"
60-1/4"
Ref.
TILE
FLANGE
To Beginning of Radius
23-7/16"
25-1/4"
60"
27"
34-15/16"
43-1/8"
25-1/4"
61-1/2"
Ref.
33-13/16"
60"
14" X 4"
6"
49"
- Junction Box
(Capella right hand shown.)
CAPELLA SPACESAVER
33-1/2"
60"
14" X 4"
60"
25-1/4"
33-13/16
41-9/16"
60"
CAPELLA 60 w/Front Left Motor/Pump
34"
60"
60"
19" X 4"
7-1/2"
24"
34"
47-3/4"
50-1/4"
13"
(Right hand shown. Left hand is a mirror image.)
GALLERY CORNER
24"
(Right hand shown. Left hand is a mirror image.)
CAPELLA 60
60"
61-5/8"
59-1/2"
Ref.
Ref.
14" x 4"
27-1/4"
35"
46"
- 2" x 4" Stud
(Right hand shown. Left hand is a mirror image.)
TARA
60"
27-1/4"
35"
44"
27"
6"
46-5/8"
- Junction Box
(Right-hand only as shown.)
CAPELLA 60 WITH INTEGRAL SKIRT
61-5/8"
Ref.
60"
14" x 4"
27-1/4"
35"
46"
- 2" x 4" Stud
- Junction Box
(Right hand only as shown.)
TARA WITH INTEGRAL SKIRT
27"
34-15/16"
43-1/8"
60"
27-1/4"
35"
44"
Note: 1. THE OVERALL DIMENSIONS ARE NOMINAL WITH A TOLERANCE OF +0 AND -1/4".
2. Measurements inside each unit represent cutout in floor to allow for drain/overflow.
3. All measurements are in inches. To convert to millimeters, multiply inches by 25.4.
10
Jacuzzi Whirlpool Bath© K272000AC 12/04
CUTOUT- CORNER BATHS
ENGLISH
(1346 mm)
25-3/4"
(654 mm)
57-5/8"
Ref.
23-1/2"
(597 mm)
53"
(1473 mm)
2-3/4"
(70 mm)
CAPELLA 55
58"
(1224 mm)
CAPELLA SPACESAVER
48"
R = 70"
53"
(1346 mm)
25-3/4"
(654 mm)
58"
(1473 mm)
23-1/2"
(597 mm)
59"
1499 mm
59"
Ref.
25-1/2"
(648 mm)
58"
(1473 mm)
58"
(1473 mm)
25-1/2"
(648 mm)
45-9/16"
(1157 mm)
CAPELLA 60
CAPELLA 60 W/ FRONT LEFT MOTOR/PUMP
(Motor/Pump position not shown.)
3" RADIUS
CORNERS
(5 PLACES)
58"
(1473 mm)
57"
Ref.
90°
22-5/8"
(575 mm)
50"
(1270 mm)
GALLERY CORNER
58"
(1473 mm)
90°
22-5/8"
(575 mm)
11
59"
Ref.
(648 mm)
58"
(1473 mm)
25-1/2"
45-9/16"
(1157 mm)
TARA
Jacuzzi Whirlpool Bath© K272000AC 12/04
58"
(1473 mm)
25-1/2"
(648 mm)
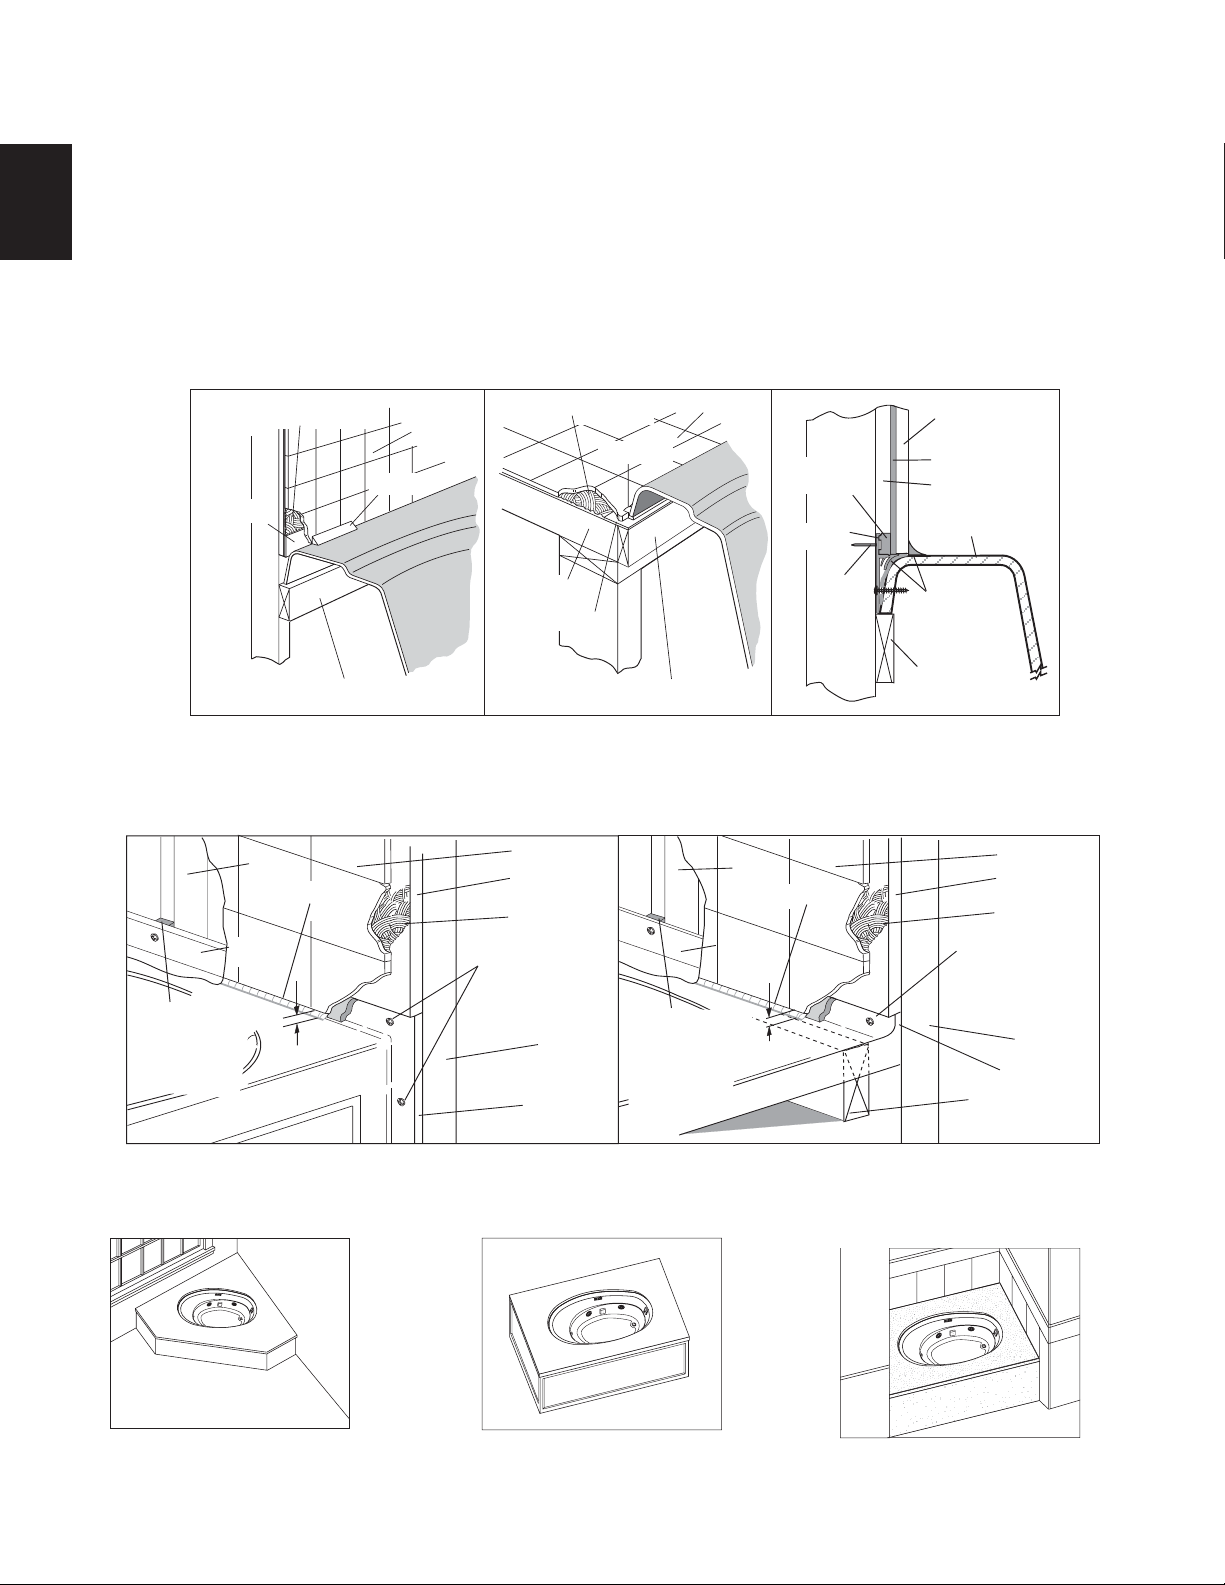
Framing and Support
The drain/overflow of the bath extends below the bottom of the bath. Note that this requires a cutout in the floor.
The floor structure beneath the bath must be able to support a total weight of bath, water , and bather. Refer to the t able under tota l
weight for your model. The unit must be supported from the bottom of the bath and not from the bath rim or tile flange. If the subfloor is level
and a continuous surface, no other preparation is necessary . You can proceed to install the bath. If the subfloor is not level, you MUST level the
entire surface prior to installing the bath. The use of materials that shim or provide a level installation are allowed provided the method used will
insure a level bath that is supported from the bottom. Materials that may be used are a floor leveling compound, mortar, plaster or minimal
expansion structural foam having a density of a minimum of 5 lbs./cubic ft.; however the bath must remain level in order for it to drain properly
and all foam feet must make full contact with the leveling material. Both sides of a joint or splice of subfloor should be level to each other. When
ENGLISH
attaching baths with flanges to stud wall, use shims to fill any gaps between the bath flange and studs.
The rim of the bath is not designed to support weight. If finish material is to overlap or contact the bath, the added weight must be fully self-
supporting.
The protective film liner inside the bath is used to prevent damage to the finish during installation. Before installation, remove liner
to inspect for any defects, reapply and do not remove until final cleanup.
Important: If a skirt is to be used, it must be installed at the time of unit installation – refer to skirt installation instructions. Install
optional trim parts when all installation has been completed.
TYPICAL INSTALLATIONS
MORTAR OR ADHESIVE
FLASHING
TILE
MORTAR OR ADHESIVE
SEALANT
SEALANT
TILE
PLASTER
FILLER
FLANGE
FINISHING
MATERIAL
MORTAR
CEMENT
BOARD
BATH RIM
NAIL
OR
SCREW
STUD
WALL
SILICONE
SEALANT
1" X 4" (NOT FOR
SUPPORT)
OPTIONAL TILE FLANGE KIT
1" X 4" (NOT FOR SUPPORT)
FLUSH TO WALL
SUB-FLOOR
FLASHING
1" X 4" (NOT FOR SUPPORT)
SEMI-SUNKEN
NOTE: ON the Riva 5 and Riva 6, the discharge plumbing extends slightly beyond the bath rim. When installing either bath as semisunken, lower the pump/motor side in first into the cutout.
TYPICAL FLANGE MOUNTING DETAIL
SHIM IF
NECESSARY
TO FILL GAPS
BETWEEN
STUD
AND FLANGE
STUD
FLANGE
CAULKING
1/8" GAP
TILE
CEMENT
BOARD
TILE
ADHESIVE
ATTACH WITH
SCREWS
PROVIDED
STUD
FLANGE
SHIM IF
NECESSARY
TO FILL GAPS
BETWEEN
STUD
AND FLANGE
STUD
CAULKING
FLANGE
1/8" GAP
TILE
CEMENT
BOARD
TILE
ADHESIVE
ATTACH WITH
SCREWS
PROVIDED
STUD
FLANGE
1"X 4"
(NOT FOR
SUPPORT)
UNDERMOUNT INST ALLATION OPTIONS
The undermount gives the opportunity to be flexible in the design and location of the bath. Examples are shown for possible
installations. Refer to pages 17-18 for undermount installation instructions.
FREE STANDINGCORNER NICHE
12
Jacuzzi Whirlpool Bath© K272000AC 12/04
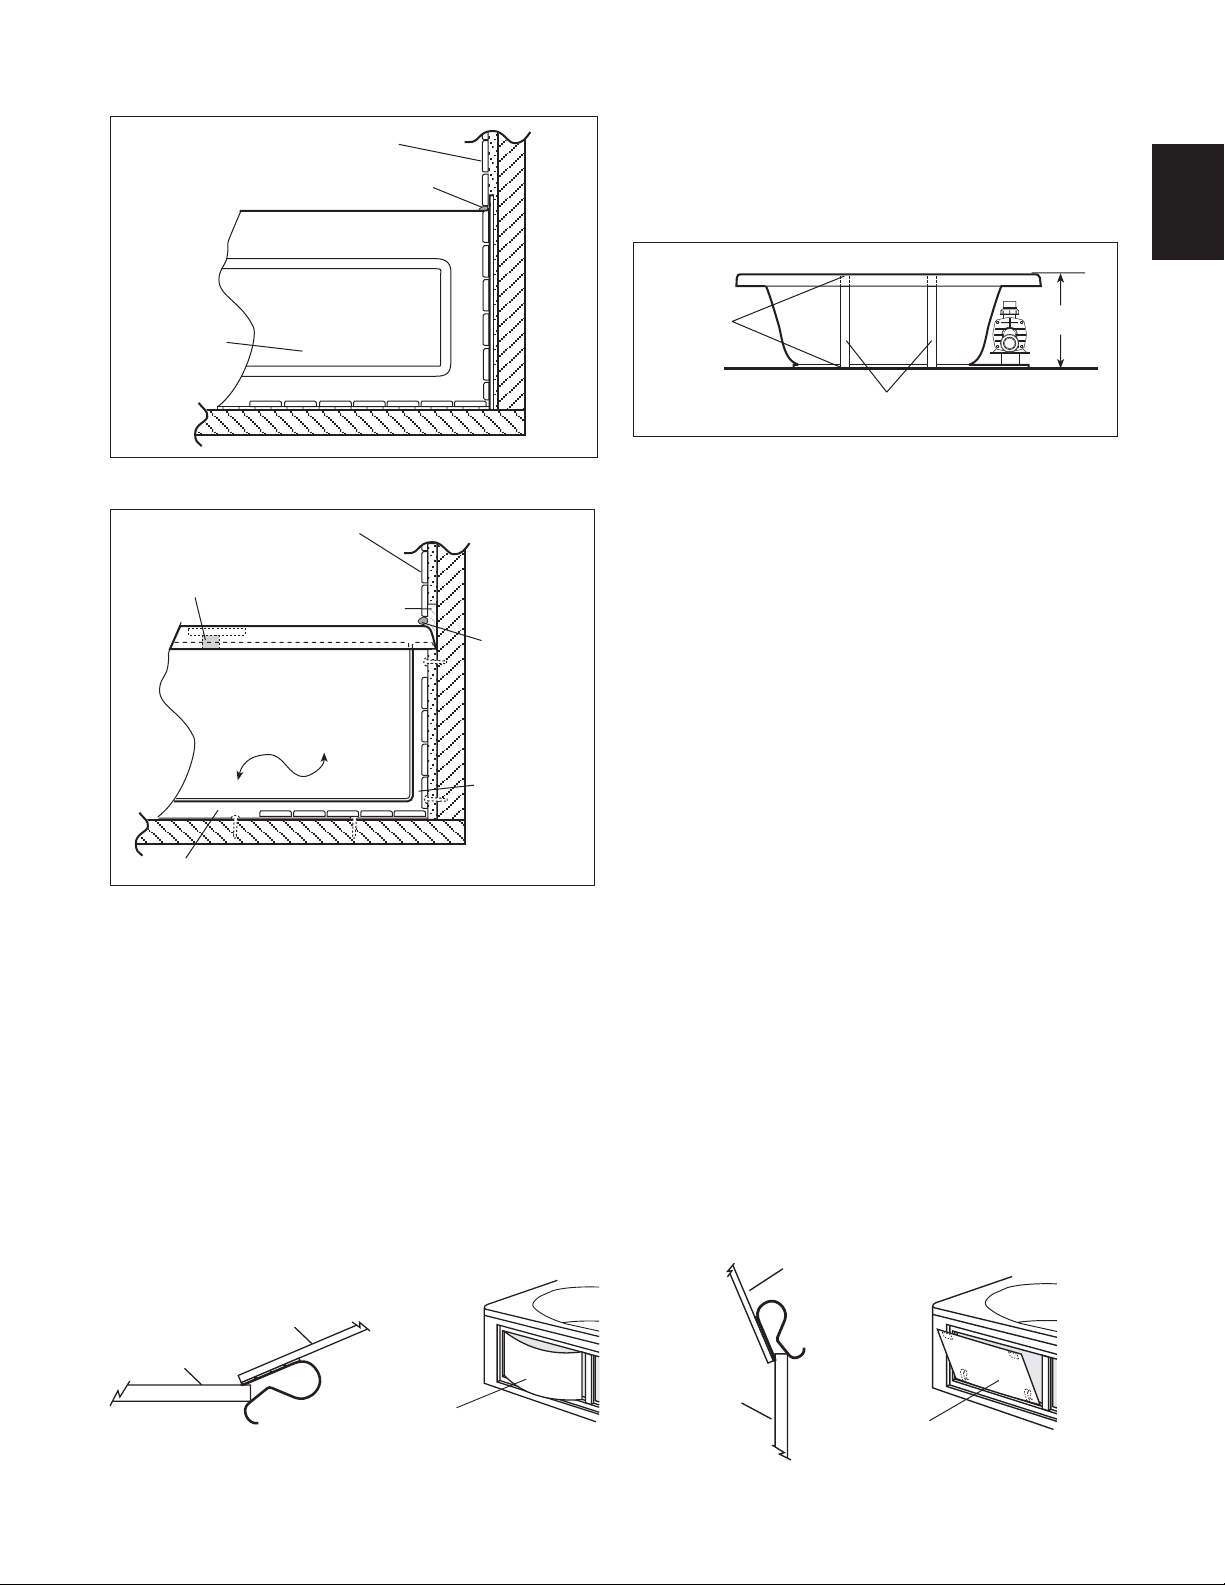
Skirts
INTEGRAL SKIRT MOUNTING DETAIL
FINISHING
MATERIALS
CAULKING BEAD
Corner Baths with Skirt
If an optional skirt is used on a corner bath, additional support is
necessary in the front of the unit. Measure the height from the floor to
the underside of the bath rim. Cut two 2" x 4" studs, apply adhesive
to both ends and install (See Specifications in reference).
SUPPORT FOR CORNER BATHS
ENGLISH
SKIRT
PANEL
U FRAME SKIRT MOUNTING DETAIL
FINISHING MATERIALS
SECURE SHELL CLIP
UNDER CENTER
BATH RIM
FILLER (Optional)
SKIRT
PANEL
SECURE BOTTOM OF FRAME TO FLOOR
CAULKING
BEAD
SKIRT
FRAME
APPLY
ADHESIVE
H
2" x 4" STUD
Reinstalling Removable Skirt Panel
Hold at an angle to the skirt and insert clip under edge of skirt
opening. Bow the panel outward and insert clip on other side.
ACCESS
PANEL
SKIRT
BOW
ACCESS
PANEL
Or slide clips over bottom lip of skirt opening and tilt up until velcro
tabs make contact.
ACCESS
PANEL
SKIRT
ACCESS
PANEL
13
Jacuzzi Whirlpool Bath© K272000AC 12/04
Service Access
For partially or fully sunken installations, allow for access to service connections. It is the installer's responsibility to provide sufficient service access. The recommended minimum dimensions allowable for service to the bath are shown in the "Service Access"
illustration.
Provide adequate area around unit for air circulation for cooling
the motor and to supply sufficient air to the jets. Do not insulate this
area or around motor.
ENGLISH
Optional RapidHeat Service Access
Where tubs have been ordered with the optional RapidHeat
heater consider an additional service access.
If service access has not been provided, it is the home owners
responsibility to remove the bath and provide the required
access, should a repair become necessary.
Service Access with Skirt
An optional skirt fits along the side of the bath for above-floor
installations and is also an access panel for servicing. Allow a sp ace
of at least 8 inches away from the bath for skirt removal.
The skirt is designed to accommodate the added height of the
tile, linoleum, or other floor coverings up to 1-1/4 inches above the
floor, and will be flush with the floor when installed.
More detailed instructions on skirt installation are provided with
the optional skirt assembly.
SERVICE ACCESS
(CORNER BATHS)
Service Access with Integral Skirt
Service access is through the removable skirt panels.
SERVICE ACCESS
REMOVABLE SKIRT
ACCESS PANELS
SERVICE ACCESS
FRONT
(WITH INTEGRAL SKIRT)
ACCESS AREA
(WITHOUT SKIRT)
MOTOR
MOTOR
12"
18"
C
36"
RIGHT HAND UNIT SHOWN
A - Preferred access
B - Acceptable alternative if access A is not possible
C - Optional access for equipment
NOTE: Left hand unit access is on the opposite
side (mirror Image).
B
A
24"
SERVICE ACCESS
(BG55 CAPELLA CORNER BATH ONLY)
20"
12"
ALTERNATE
ACCESS
In some cases, access may not have been provided because of
the design of the bath environment and having full understanding that
in this case, it may be necessary to remove the unit for service.
If this is the case, diagnosing a problem may not be possible without complete access to the plumbing system. This would necessitate
the removal of the unit. Although this practice is not commonly implemented, it is an acceptable method.
FRONT
18"
AREA
18"
PREFERRED
ACCESS
A
AREA
B
MOTOR
12"
18"
Preferred access area
Jacuzzi Whirlpool Bath© K272000AC 12/04
In some cases access may have been provided in Area A but
service is required in Area B which requires the unit to be pulled for
service and reinstalled.
If service access has not been provided, it is the home owners
responsibility to remove the bath and provide the required access, should a repair become necessary.
14
T
M
INSTALL SEPERATE
GFCI PROTECTED CIRCUITS
HEATER
ELECTRICAL CONNECTION RAPIDHEAT
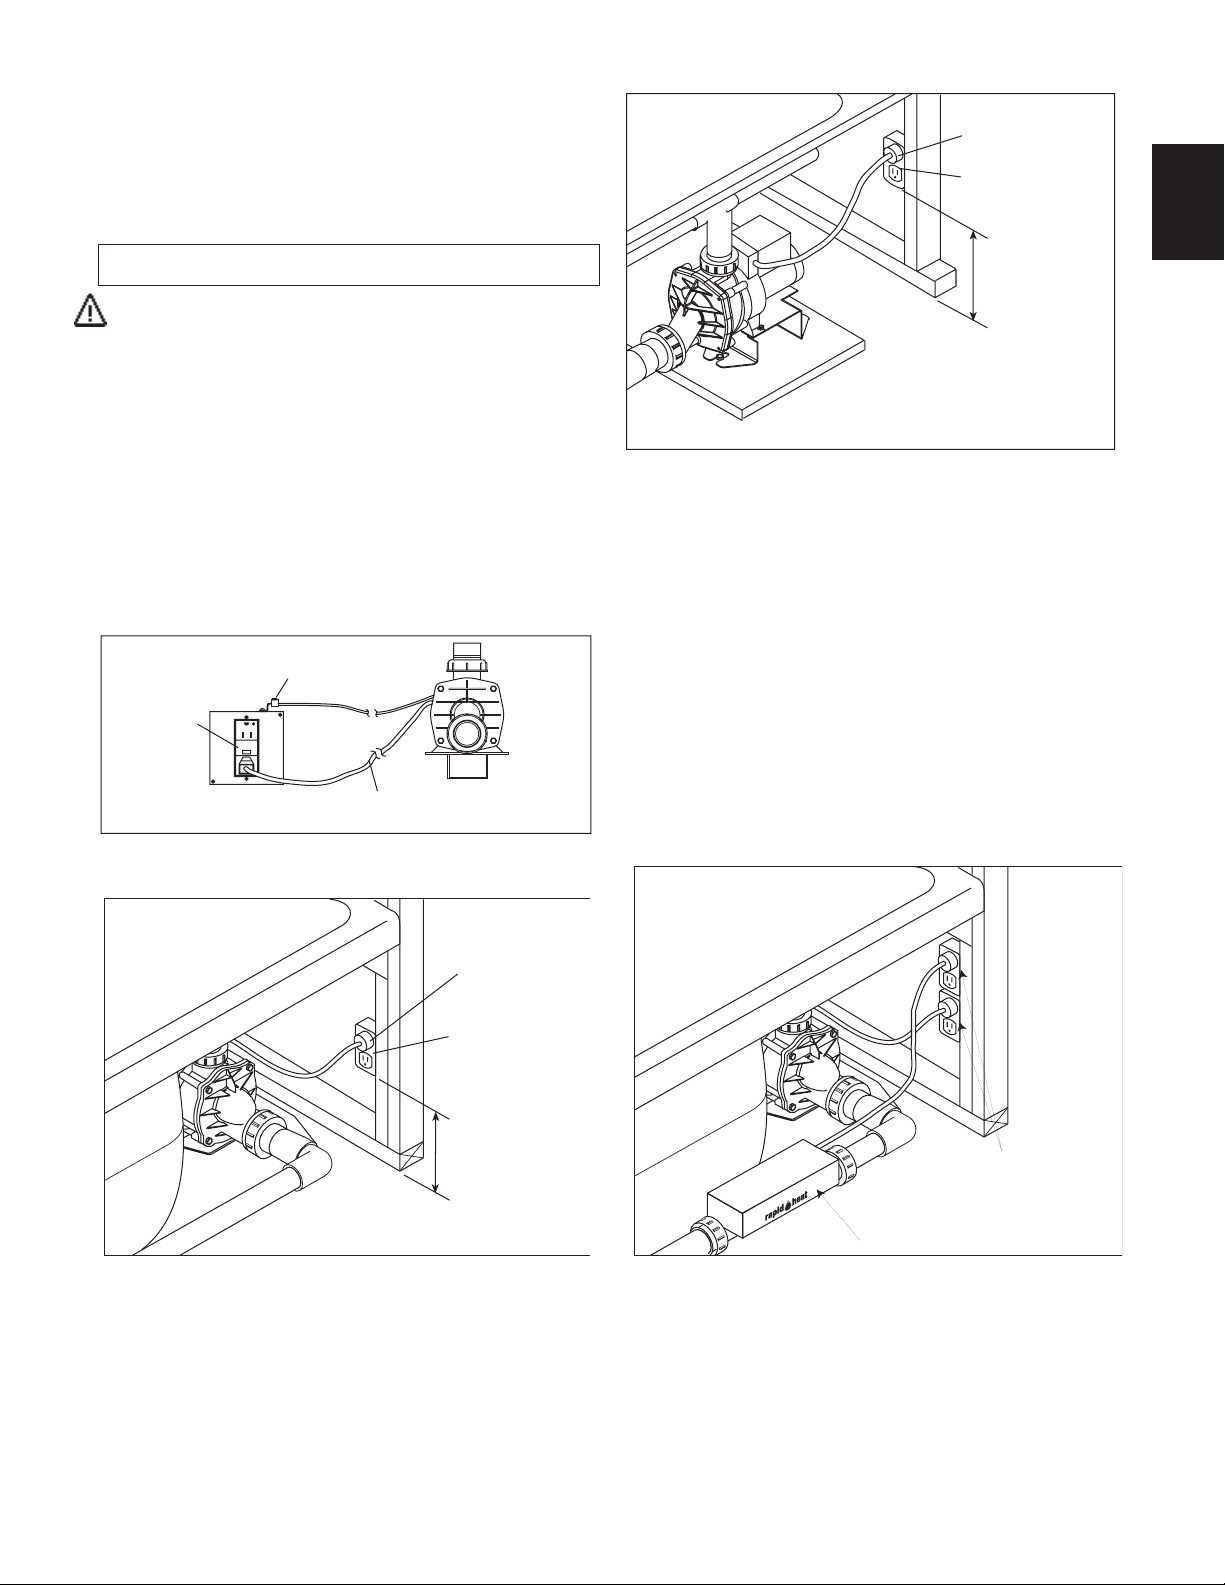
Electrical Connections
A separate circuit, which must be protected by a Ground Fault
Circuit Interrupter (GFCI), is required. Install a duplex outlet to the
studwall underneath the bathtub, at least 4 inches above the floor.
The duplex outlet is not provided. Because these units are manufactured with a safe, convenient Magic Touch whirlpool ON/OFF switch
on the bath itself, no remote switch or timer is necessary. If an optional timer is desired, one is available from Jacuzzi Whirlpool Bath
for 115 VAC operation.
DANGER: RISK OF ELECTRIC SHOCK. Connect only to a circuit
protected by a Ground Fault Circuit Interrupter.
CAUTION: Operating the motor/pump without enough water in
the bath can cause leaking and permanent damage to the pump.
Before power is applied to the installation, make sure the switch
is in the OFF position to avoid pump damage.
ELECTRICAL CONNECTION
(FOR CORNER BATHS)
3 PRONG
PLUG
ENGLISH
DUPLEX
RECEPT.*
4" MIN.
OR IN
ACCORDANCE
WITH LOCAL
BUILDING OR
ELECTRICAL
CODES
FLOOR
On the Capella 55 with integral skirt, Capella 60 with integral skirt,
Capella Spacesaver with integral skirt and Tara with integral skirt a
duplex junction box has been provided. To access, remove skirt access panel. See top views for location.
A separate GFCI protected outlet* (not provided) is required for
pump/motor and is to be installed in the junction box. The junction
box is to be hard wired. The motor is bonded to the junction box at
the factory.
CAPELLA 55, CAPELLA 60, CAPELLA SPACESAVER
& TARA JUNCTION BOX
BONDING TO PUMP/MOTOR
*GFCI
POWER CORD
TO MOTOR
ELECTRICAL CONNECTION
(FOR SIDE/END DRAIN BATHS)
3 PRONG
PLUG
*(NOT PROVIDED)
Electrical Connection RapidHeat
Before installing electrical connection, inspect the heater nameplate and determine if you have a 120 VAC or a 240 VAC unit (240
VAC unit not available in U.S.A.).
Install a separate 120 VAC 15 AMP or 240 VAC 15 AMP dedicated circuit with GFCI protection. With a #8 solid copper wire, bond
the heater to the house electrical panel or approved local bond. A
bonding lug is provided on the heater.
At initial start-up and before each use thereafter with power ON,
push the GFCI test button. The reset button should pop out. Push
this button in to reset. If the interrupter fails to operate in this manner,
there is a ground current flowing or a device malfunction, indicating
the possibility of electrical shock. Turn off power and do not use
the bath until the source of the problem has been identified and
corrected.
*(NOT PROVIDED)
FLOOR
DUPLEX
RECEPT.*
4" MIN.
OR IN
ACCORDANCE
WITH LOCAL
BUILDING OR
ELECTRICAL
CODES
15
Jacuzzi Whirlpool Bath© K272000AC 12/04

Plumbing and Water Supply
Drain Information
A drain/overflow assembly (sold separately) must be installed on the bath, water tested, and connected to the sanitary system of the house.
After opening the carton, inspect for damage and verify that the kit is of the proper finish. In the Jacuzzi Whirlpool Bath drain/overflow kit, note that
the waste flange, strainer, overflow cover and cover screws are packaged in a separate p ackage within the kit to protect the trim finish. Follow the
installation instructions provided with your drain/overflow kit. After the drain is fully installed, test for proper drainage. If the unit does not drain
properly, rectify this condition before proceeding with the inst allation. Jacuzzi Whirlpool Bath is not responsible for removal and or reinst allation
ENGLISH
costs.
NOTE: Watertight installation of the drain is the installer's responsibility. Drain leakage is excluded from the Jacuzzi Whirlpool
Bath warranty of this product.
Plumbing
Pump, jets, and suction fittings for the whirlpool system are factory plumbed in Schedule 40 PVC piping.
All Jacuzzi Whirlpool Bath products are factory tested for proper operation and watertight connections prior to shipping. If leaks are detected,
notify Jacuzzi Whirlpool Bath. Do not install the unit.
Water Supply
Consult local authorities for plumbing code requirements in your area.
IMPORTANT: Proper installation of the fill spout plumbing and compliance with local codes are the responsibility of the installer.
Jacuzzi Whirlpool Bath does not warrant connections of water supply fittings and piping, fill systems, or drain/overflow systems. Nor
is it responsible for damage to the bath which occurs during installation.
CAUTION: A nonflammable protective barrier must be placed between soldering work and bath unit to prevent damage to the bath.
Clean-Up After Installation
To avoid dulling and scratching the surface of the bath, never use abrasive cleaners. A mild liquid detergent and warm water w ill clean soiled
surfaces.
Remove spilled plaster with a wood or plastic edge. Metal tools will scratch the surface. Spots left by plaster or grout can be removed if lightly
rubbed with detergent on a damp cloth or sponge.
Major scratches and gouges which penetrate the acrylic surface will require refinishing. Contact your Jacuzzi Whirlpool Bath dealer for
special instructions.
Jacuzzi Whirlpool Bath© K272000AC 12/04
16
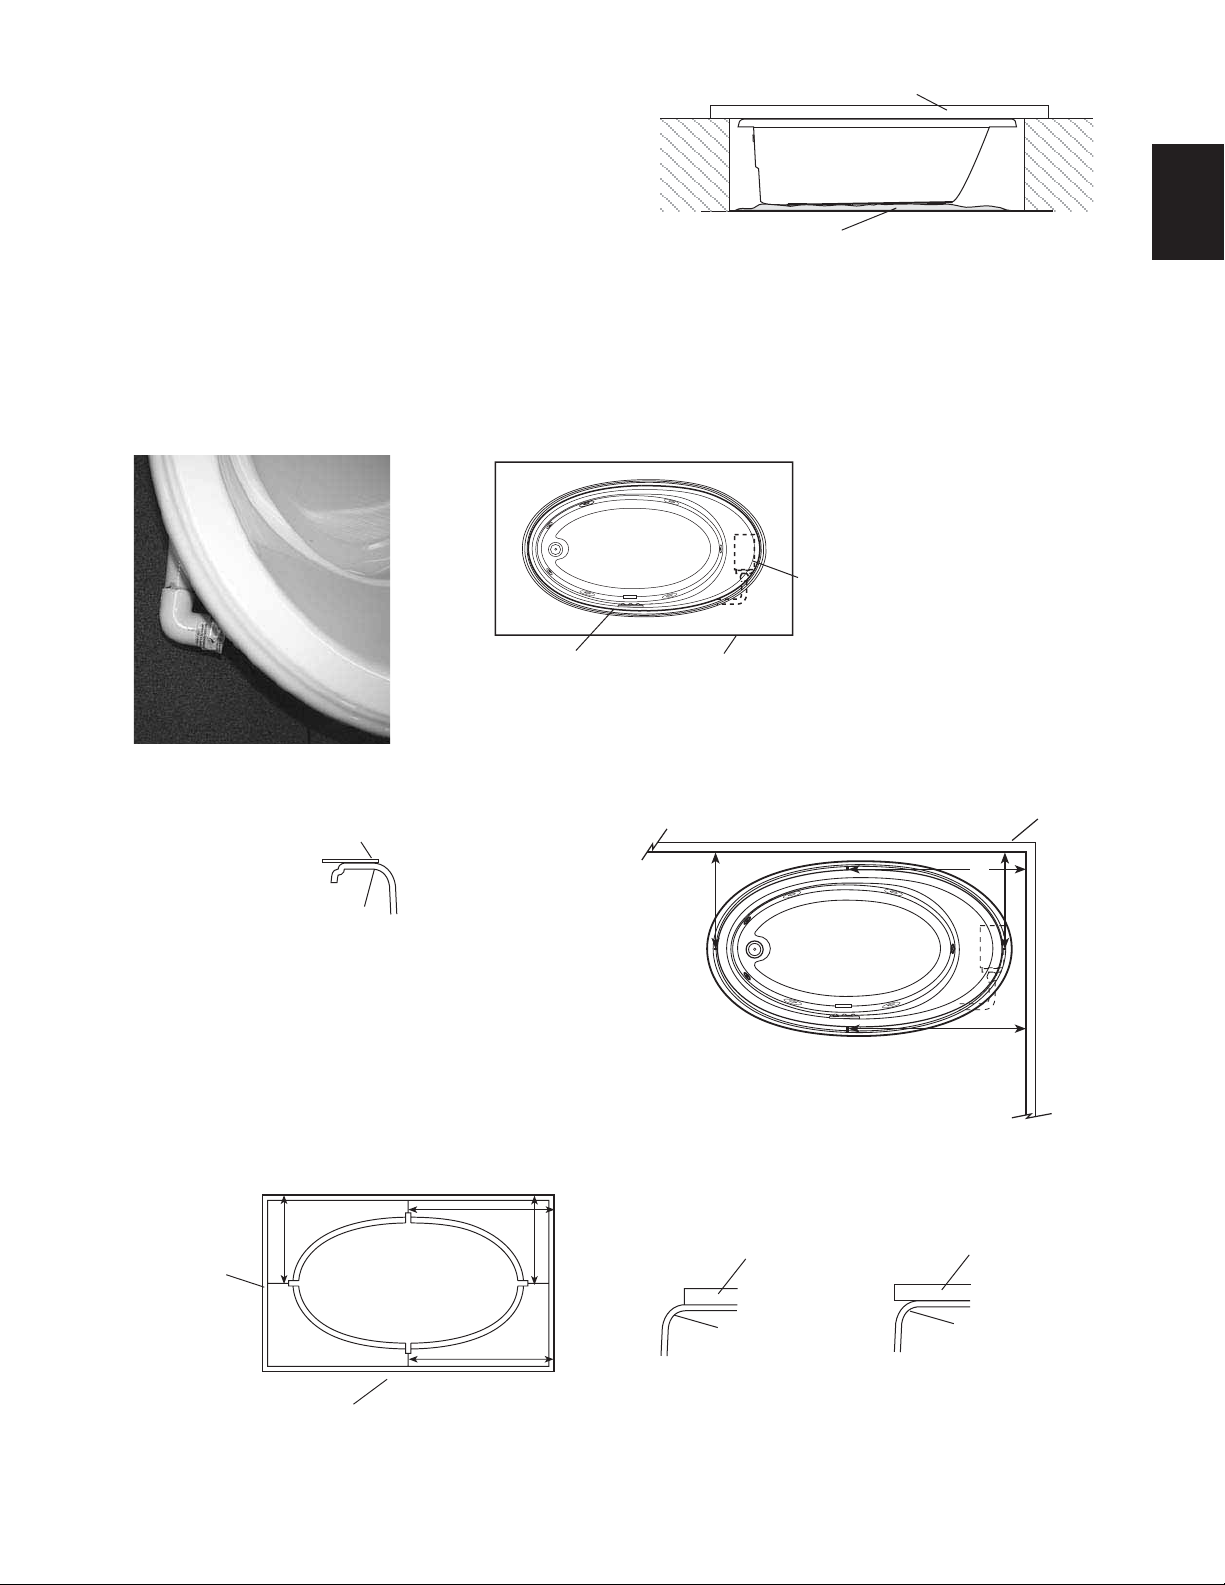
UNDERMOUNT INSTALLA TION INSTRUCTIONS
T
TEMPLATE
STUD WALL
COUNTER
COUNTER
Installation
A typical installation will have these construction characteristics.
MORTAR*
Unit Protection
*MORTAR MUST BE IN CONTACT WITH ALL FOAM FEE
If protective film has been removed, reapply film. For added protection, place a drop cloth or other material in the bottom
of bath for protection. Be careful not to scratch the bath surface.
Counter Preparation
NOTE: On pump/motor side of bath, the counter should extend a minimum of 4" past the outer edge of bath, in order
to clear the pump/motor plumbing extending beyond the rim of the bath.
MOTOR/PUMP
COUNTER
ENGLISH
INSIDE EDGE
OF RIM
COUNTER
Position the template so that the cutout oval aligns with
the rim edge.
A
BATH RIM
B
C
In this position, using a grease pencil, mark on the bath
the center line positions through the cut out slots. Remove template. Measure from marked center lines to a
D
fixed point such as a wall.
MEASURE FROM
CENTERLINE
MARKS TO WALL
Transfer these measurements to counter and mark center lines positions. Position template and cut counter for the
desired offset.
A
TEMPLATE
B
C
D
COUNTER
BATH RIM
OFFSET
After cutting is complete, perform any needed routing, edge work or polishing to the counter.
17
Jacuzzi Whirlpool Bath© K272000AC 12/04
BATH RIM

UNDERMOUNT INSTALLATION INSTRUCTIONS
APPLY SILICONE
P
T
Position the counter on top of the bath to ensure correct
fit and appearance. Make any adjustments that may be
necessary. Remove the counter.
ENGLISH
Adhering Counter to Bath
Clean any dirt or debris from the bath rim. Do not use
abrasive cleaners.
Where the counter will make contact with top of the bath
rim, apply a bead of silicone sealant.
CAUTION: Do not use an adhesive or adhesive
sealant to secure the counter to the bath rim. If
maintenance or remodelling is required the counter
may have to be removed. Adhesive will permanently
bond the counter to the bath. This will make removal
difficult and costly and may cause damage to the
counter or bath.
COUNTER
BATH
SEALANT TO TO
OF BATH RIM
COUNTER
Carefully position the counter onto the bath rim. The
counter will need to be held in place while the sealant
cures. Follow the manufacturer's instructions to determine time required for curing.
Apply a continuous bead of silicone sealant around the
entire seam between the counter and bath rim. Allow
sealant to skin over or cure before cleaning the counter
or bath.
BATH
APPLY SILICONE SEALAN
WEIGHTS
Jacuzzi Whirlpool Bath© K272000AC 12/04
18
 Loading...