


PROFILE PRO
USB TURNTABLE WITH INPUT
QUICKSTART GUIDE
ENGLISH ( 3 – 6 )
MANUAL DE INICIO RÁPIDO
ESPAÑOL ( 7 – 10 )
GUIDE D’UTILISATION RAPIDE
FRANÇAIS ( 11 – 14 )
KURZANLEITUNG
DEUTSCH ( 15 – 18 )
MANUALE RAPIDO DI UTILIZZAZIONE
ITALIANO ( 19 – 22 )
SNELSTARTGIDS
NEDERLANDS ( 23 – 26 )

QUICKSTART GUIDE
o Make sure that the items listed below are included in the box:
o |
PROFILE PRO Turntable |
o |
Slipmat |
o |
45 RPM Adapter |
o |
USB Cable |
o |
CD |
o |
Quickstart Guide |
o Safety Instructions & Warranty Information
o READ SAFETY INSTRUCTION BOOKLET BEFORE USING THE PRODUCT
o Go to http://www.ion-audio.com for product registration.
INTRODUCTION
PROFILE PRO connects directly to your computer to turn your treasured vinyl recordings into digital music. We have included several software packages to aid you in converting your vinyl recordings. You should install one of the following applications to take advantage of computer recording:
EZ Vinyl/Tape Converter (PC only) is the quickest and easiest way to turn your recordings into digital media. EZ Vinyl/Tape Converter conveniently saves your recordings in your iTunes* library. Novice users may find this application preferable. We have included a handy Software Quickstart Guide with step-by-step instructions on software installation and operation.
EZ Audio Converter (Mac only) is a basic converter application for Mac OS X and is ideal for novice users. Please refer to the included Software Quickstart Guide for step-by-step instructions on software installation and operation.
To install the software: simply insert the included CD into your computer and follow the on-screen instructions. After you finish converting your vinyl, you can then burn to CD or load onto portable media devices.
* iTunes and iPod are trademarks of Apple, Inc., registered in the U.S.A. and other countries.
3
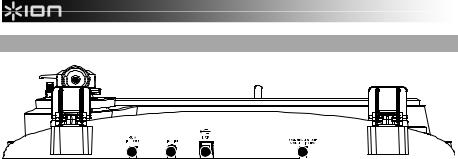
REAR PANEL FEATURES
2 |
3 |
4 |
1 |
1.Power Cable: This power cable should be plugged into a wall receptacle AFTER all audio connections are made.
2.RCA Audio Output Cables: These cables should be plugged into the audio inputs of your home stereo system. (Please note: you can still copy records to your computer, even if the audio outputs of the turntable are not connected to a stereo system).
3.1/8” Stereo Line Input: Connect Tape Players, Reel to Reel, or any other audio source here. This signal is sent to the computer through the USB. Make sure that your RCA cables are either plugged into speaker system or not in contact with metal.
4.USB Audio Output: Use the included USB Cable to connect your turntable to your computer. The USB connection will provide audio from the turntable and stereo input to your computer. The USB connection will also output audio from your computer through the turntable’s RCA outputs. For transferring your vinyl records to your computer, we have provided two different software packages on the included CD. EZ Vinyl/Tape Converter (PC) and EZ Audio Converter (Mac) are the easiest and quickest ways to transfer your vinyl records and should be used if you are a beginner.
4

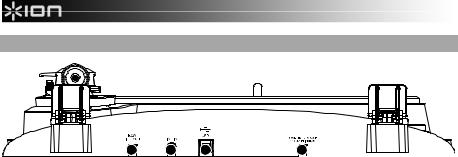
GENERAL CONTROLS |
|
6 |
|
|
10 |
|
5 |
|
9 |
8 |
7 |
5.Platter: This platter must be securely fastened to the turntable prior to operation. The Motor Drive Belt can be found on the drive ring underneath the platter.
6.45 RPM Adapter Holder: Holds the included 45 RPM adapter. When not using the adapter, please place it in this holder.
7.Stop Button: This button stops the turntable motor.
IMPORTANT
Make sure that the slipmat is always placed on top of the platter while using the turntable. Failure to use the slipmat may cause damage to your media as well as damage to the turntable.
Remove the plastic cartridge cover (needle cover) before operating the turntable.
8.33 and 45 RPM Buttons: These buttons control the RPM of the turntable platter.
9.Arm Clip: This specially designed arm clip secures the tone arm while at rest or when not in use. The arm clip has been designed to remain in the up position while unlocked.
10.Raise / Lower Lever – Raises and lowers the tonearm.
5

TROUBLESHOOTING
Refer to the following troubleshooting scenarios if you experience difficulty recording your vinyl to your computer.
|
|
PROBLEM |
|
|
|
|
CAUSE |
|
|
|
|
SOLUTION |
|
|
||||
|
|
|
|
|
|
|
|
|
Needle is not on the record. |
|
|
|
Place the needle on the record. |
|
|
|||
|
I am not hearing any audio |
|
|
Turntable not powered. |
|
|
|
Make sure that the turntable is connected to a live power outlet |
|
|||||||||
|
|
|
|
|
|
and that it is powered on. |
|
|
|
|||||||||
|
when I am recording. |
|
|
|
|
|
|
|
|
|
|
|
||||||
|
|
|
|
|
|
|
|
|
|
|
|
|
|
|||||
|
|
|
|
|
|
|
|
|
RCA outputs not connected to |
|
Make sure you have connected the turntable’s RCA outputs to a |
|||||||
|
|
|
|
|
|
|
|
|
speaker system. |
|
|
|
speaker system and that the speaker system is powered on. |
|||||
|
|
|
|
|
|
|
|
|
Cartridge |
connection is |
not |
|
Cartridge must be securely connected to the tonearm whenever |
|||||
|
I |
am |
experiencing |
poor |
|
|
secure. |
|
|
|
|
you are using the turntable. |
|
|
|
|||
|
|
|
|
|
|
|
|
|
|
|
|
|
||||||
|
sound quality. |
|
|
|
|
|
Vinyl record is dirty or |
|
|
Try dusting off and gently wiping the surface of the record before |
|
|||||||
|
|
|
|
|
|
|
|
|
|
|
|
|||||||
|
|
|
|
|
|
|
|
|
scratched. |
|
|
|
|
playing it. |
|
|
|
|
|
|
|
|
|
|
|
|
|
|
|
|
|
|
|
|
|
|
|
|
|
|
|
|
|
|
|
|
|
|
|
|
|
Make sure that your computer’s audio playback options are |
||||
|
I cannot hear my recordings |
|
|
|
|
|
|
|
configured in one of the following ways: |
|
|
|||||||
|
|
|
|
|
|
|
|
In Windows XP, go to Start X Control Panel X Sounds |
||||||||||
|
when I try to play them from |
|
|
|
|
|
|
|||||||||||
|
|
|
|
|
|
|
|
|
and Audio Devices (on Windows XP) or Start X Control |
|||||||||
|
my computer. |
|
|
|
|
|
|
|
|
|
|
|
||||||
|
|
|
|
|
|
|
|
|
|
|
|
Panel X Sound (on Windows Vista) and make sure that |
||||||
|
|
|
|
|
|
|
|
|
Computer audio output not set |
|
|
|
||||||
|
|
|
|
|
|
|
|
|
|
|
|
your computer’s audio card is selected as the Sound |
||||||
|
|
|
|
|
|
|
|
|
correctly. |
|
|
|
|
|
Playback device under the Audio tab. |
|
|
|
|
While |
the |
turntable |
is |
|
|
|
|
|
|
|
Alternatively, you can |
play audio from |
your computer |
||||
|
|
|
|
|
|
|
|
|
through the turntable’s RCA audio outputs. |
Simply select |
||||||||
|
connected, I cannot listen to |
|
|
|
|
|
|
|
|
|||||||||
|
|
|
|
|
|
|
|
|
“USB Audio Codec” as the Sound Playback device and any |
|||||||||
|
any |
music |
from |
my |
|
|
|
|
|
|
|
|
||||||
|
|
|
|
|
|
|
|
|
audio from your computer will play through the turntable’s |
|||||||||
|
computer. |
|
|
|
|
|
|
|
|
|
|
|
||||||
|
|
|
|
|
|
|
|
|
|
|
|
RCA outputs. |
|
|
|
|||
|
|
|
|
|
|
|
|
|
|
|
|
|
|
|
|
|
|
|
|
|
|
|
|
|
|
|
|
|
|
|
|
|
In Vista, you may need to manually specify “stereo” for the |
|
|||
|
|
|
|
|
|
|
|
|
|
|
|
|
|
recording input. |
|
|
|
|
|
When |
recording |
into |
my |
|
|
|
|
|
|
|
Go to Start X Control Panel X Sound (in Classic View). Then, |
|
|||||
|
computer on Windows Vista, |
|
|
Recording |
input properties |
in |
|
|
click on the Recording tab and highlight the Microphone input |
|
||||||||
|
my |
recordings |
are mono |
|
|
Vista not set to “stereo”. |
|
|
|
(USB Audio Codec). Click on Properties to bring up the input |
|
|||||||
|
instead of stereo. |
|
|
|
|
|
|
|
|
|
settings. Next, click on the Advanced tab and select “2 channel, |
|
||||||
|
|
|
|
|
|
|
|
|
|
|
|
|
|
16 bit, 44100 Hz (CD quality)” in the Default Format pull-down |
|
|||
|
|
|
|
|
|
|
|
|
|
|
|
|
|
menu. Lastly, click Apply to accept the settings. |
|
|
||
|
My |
music is |
playing |
at a |
|
|
Incorrect speed selected on the |
|
|
Make sure that you are playing your records at the speed they |
|
|||||||
|
|
|
|
|
were intended to be played. |
Select between the two different |
|
|||||||||||
|
strange pitch. |
|
|
|
|
|
turntable. |
|
|
|
|
|
||||||
|
|
|
|
|
|
|
|
|
|
speeds by pressing 33RPM or 45RPM. |
|
|
||||||
|
|
|
|
|
|
|
|
|
|
|
|
|
|
|
|
|||
|
|
|
|
|
|
|
|
|
|
|
|
|
|
|
|
|
|
|
BEFORE RETURNING THE PRODUCT, please contact ION Audio or your retailer for technical support. Contact information can be found in the Safety Instruction Booklet included with this product.
6

GUÍA DE INICIO RÁPIDO
o Asegúrese de que todos los elementos abajo indicados estén incluidos en la caja.
o Giradiscos PROFILE PRO o Alfombrilla Antideslizante o Adaptador para 45 RPM o Cable USB
o CD
o Guía de inicio rápido
o Folleto de información sobre la seguridad y la garantía
oLEA EL FOLLETO DE INSTRUCCIONES DE SEGURIDAD ANTES DE UTILIZAR EL PRODUCTO.
o Visite http://www.ion-audio.com para registrar el producto.
INTRODUCCIÓN
PROFILE PRO se conecta directamente a su computadora para convertir sus valiosos vinilos en música digital. Hemos incluido varios paquetes de software para ayudarle a convertir sus grabaciones de vinilo. Debe instalar una de las siguientes aplicaciones para aprovechar la función de grabación de su computadora:
EZ Vinyl/Tape Converter (PC únicamente) es la forma más rápida y fácil de convertir las grabaciones en medios digitales. Este software guarda convenientemente sus grabaciones en la biblioteca de iTunes*. Es posible que los usuarios novicios prefieran esta aplicación. Incluimos una práctica Guía de inicio rápido con instrucciones paso a paso sobre la instalación y la operación del software.
EZ Audio Converter (Mac únicamente) es una aplicación de convertidor básica para Mac OS X, ideal para usuarios novicios. Consulte en la Guía de inicio rápido del software incluida las instrucciones detalladas sobre la instalación y la operación del software.
Para instalar el software: inserte simplemente el CD incluido instrucciones de la pantalla. Después de terminar de convertir su cargarlo en dispositivos de medios portátiles.
en la computadora y siga las vinilo, puede quemarlo en CD o
* iTunes e iPod son marcas registradas de Apple, Inc., registradas en EE.UU. y otros países.
7
CARACTERÍSTICAS DEL PANEL TRASERO
2 |
3 |
4 |
1 |
1.Cable de alimentación: Este cable de alimentación se debe enchufar a un tomacorriente en la pared DESPUÉS de que se hagan todas las conexiones de audio.
2.Cables RCA de salida de audio: Estos cables se deben enchufar en las entradas de audio de su sistema estéreo hogareño. (Para tener en cuenta: igualmente se pueden copiar discos en su computadora, incluso si las salidas de audio del giradiscos no están conectadas a un sistema estéreo).
3.Entrada de línea estéreo de 1/8”: Puede conectar aquí reproductores de casetes y cintas o cualquier otra fuente de audio. Esta señal se envía a la computadora por el USB. Asegúrese de que sus cables RCA estén enchufados a una sistema de altavoces o que no estén en contacto con partes metálicas.
4.Salida de audio USB: Use el cable USB incluido para conectar el giradiscos a su computadora. La conexión USB proporciona audio proveniente del giradiscos y señal estéreo a la computadora. La conexión USB también entrega audio desde la computadora a través de las salidas RCA del giradiscos. Para transferir sus discos de vinilo a la computadora, proporcionamos dos paquetes de software diferentes en el CD incluido. EZ Vinyl/Tape Converter (PC) y EZ Audio Converter (Mac) representan la manera más rápida y sencilla para transferir sus discos de vinilo y los principiantes deben usarlos.
8

CONTROLES GENERALES |
|
6 |
|
|
10 |
|
5 |
|
9 |
8 |
7 |
5.Plato: Este plato se debe ajustar firmemente al giradiscos antes de hacerlo funcionar. La correa de transmisión del motor se puede encontrar en el aro impulsor debajo del plato.
6.Soporte del Adaptador de 45 RPM: Sostiene el adaptador de 45 RPM incluido. Cuando no use el adaptador, póngalo en este soporte.
7.Botón Stop: Con este botón se detience el motor del giradiscos.
IMPORTANTE :
Asegúrese de que la alfombrilla esté siempre colocada sobre el plato cuando se usa el giradiscos. Si no se usa la alfombrilla, puede dañarse el medio, así como el giradiscos.
Retire la cubierta plástica de la cápsula (cubierta de la púa) antes de hacer funcionar el giradiscos.
8.Botones de 33 y 45 RPM: Estos botones controlan las RPM del plato del giradiscos.
9.Clip del brazo: Este clip diseñado especialmente fija el brazo mientras está en reposo o no se usa. El clip ha sido diseñado para que permanezca hacia arriba mientras está desbloqueado.
10.Palanca de Subir / Bajar: Levanta y baja el brazo de lectura.
9
 Loading...