

Invacare Wheeler User Manual
Wheeler
Manual
English


1
WHEELER
Read the back cover of the instruction manual, which features a number of points affecting your personal safety. Read
them carefully!
Invacare is only responsible for product changes carried out by personnel whom we authorise. We reserve the
right to make any changes to equipment and specications
without prior notice.
Wheeler is a wheelchair for children and teenagers, and
has many adjustment options and accessories. To ensure
that the user benets as much as possible from Wheeler,
and in order to Wheeler’s options justice, the chair must
be tested and adjusted by competent personnel. The user
and the assistant/parents must have received instructions
for using Wheeler.
This manual includes a description of the parts of the
chair, simple adjustment options, how to use Wheeler safely
and how to transport the chair. It also describes how the
most common accessories are adjusted. The manual must
be read through thoroughly before the chair is used. We
also include an accessories manual, that describes how all
accessories are tted and slightly more advances settings.
As Wheeler has many different components and versions of accessories, the appearance of the accessories you
have for your Wheeler may differ from those shown.
Check that all components match the delivery note. Any
transport damage must be reported immediately to the
transport company. Remember to keep the packaging until
the transport company has checked the goods and a settlement has been reached.
Wheeler
Delivery check
NB!!!
!

2 WHEELER
3
WHEELER
3
WHEELER
Contents
Parts of the wheelchair ............................................ 3
Upholstery and frame colours ........................ 4
Equipment ........................................................ 4
Technical Data .................................................. 5
Assembly......................................................................... 6
How to adjust your wheelchair ............................ 7
Settings
Seat
Seat depth.......................................................................... 8
Seat shape.......................................................................... 8
Seat width.......................................................................... 9
Footrest
Height ............................................................................... 11
Depth................................................................................ 11
Angle................................................................................. 11
Backrest
Height ............................................................................... 12
Shape................................................................................. 12
Angle................................................................................. 12
Seat angle
Seat angle......................................................................... 13
Armrest
Height ............................................................................... 14
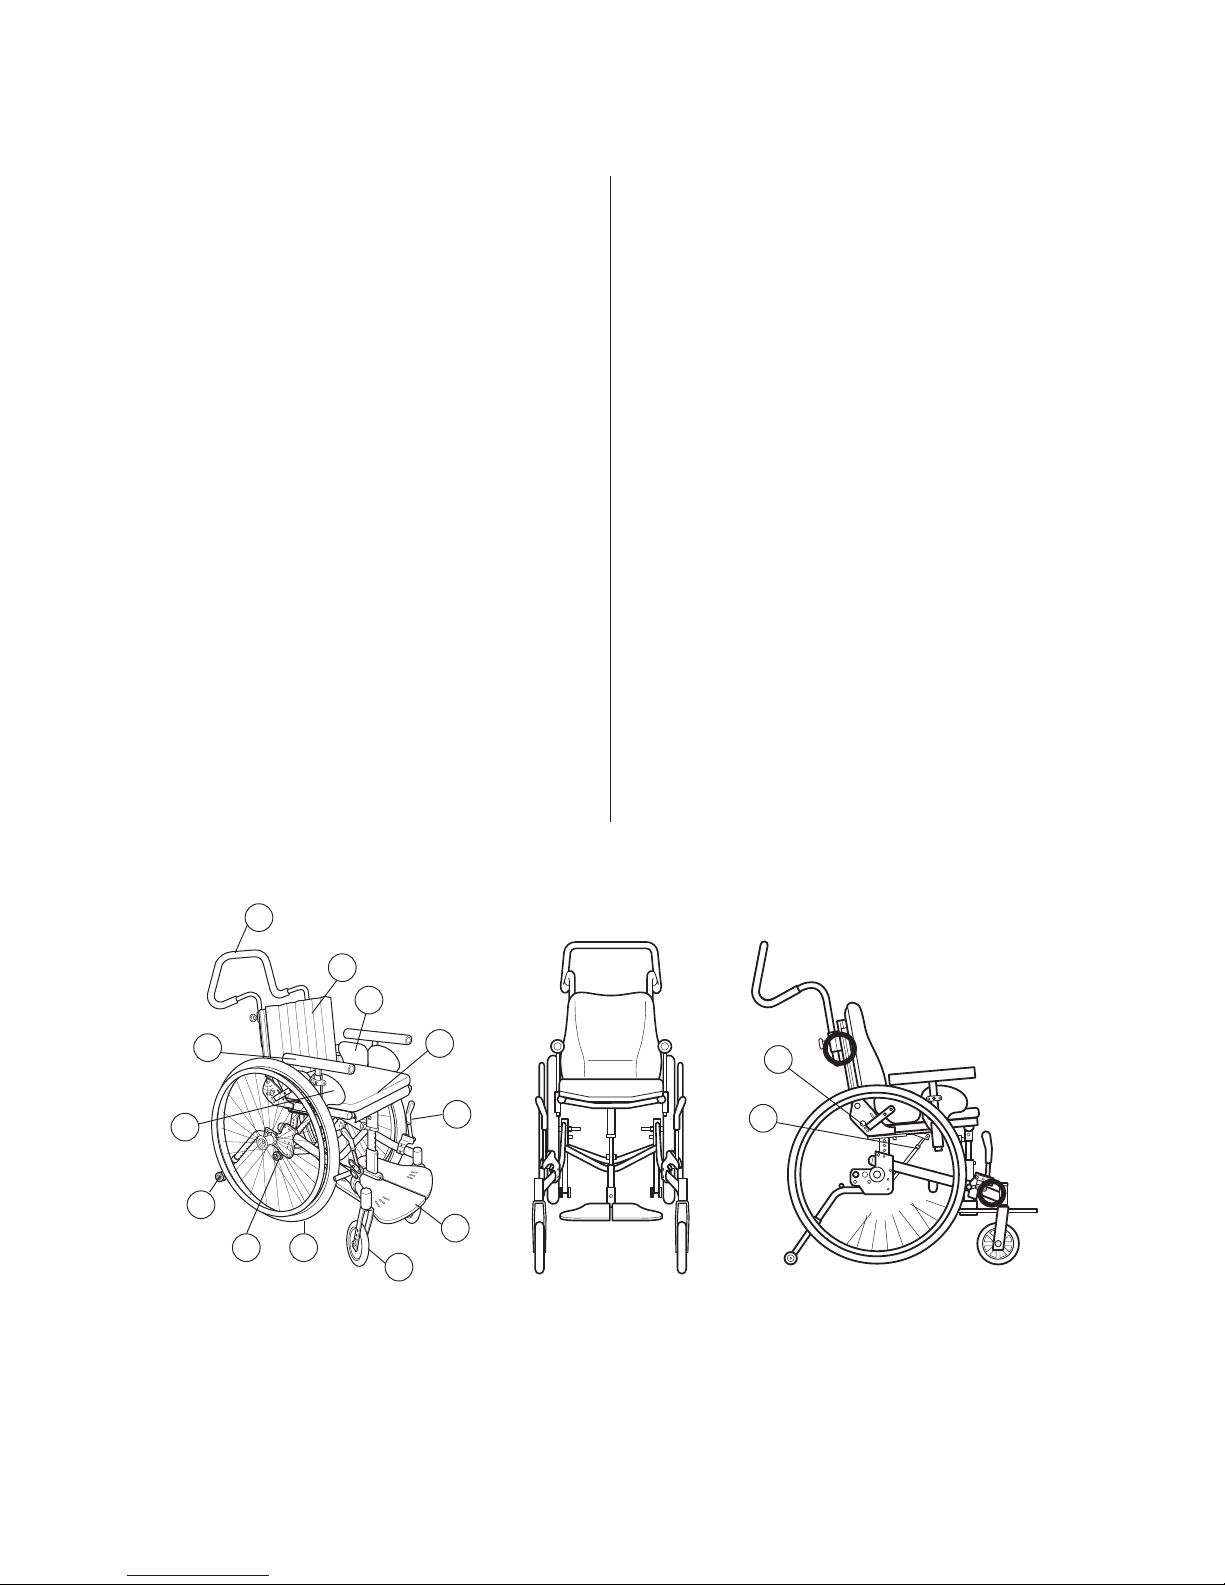
1. Seat
2. Footrest
3. Backrest
4. Backrest angle adjustment
5. Armrest
6. Seat angle adjustment
7. Drive wheel
Parts of the wheelchair
8. Drive wheel plate
9. Hip support
10. Side guard
11. Push bar
12. Anti-tip device
13. Brake
14. Castors
Always lift the wheelchair by gripping
the frame at the points shown in the
diagram. This applies irrespective of
whether the user is or is not in the
chair.
Never lift the wheelchair by the removable
armrests or the footrests. Ensure that the
backrest and push bar are securely in place.
See ”Transport” for more information.
14
2
13
1
9
3
11
5
10
12
8 7
6
4
Seat height
Seat height ....................................................................... 14
Driving characteristics
Balance.............................................................................. 15
Drive wheels................................................................... 16
Castors............................................................................. 17
When the child grows .................................................. 18
Other settings
Brake................................................................................. 19
Push bar............................................................................ 20
Anti tip device................................................................. 21
Headrest........................................................................... 22
Pelvic belt......................................................................... 22
Trunk support................................................................. 23
Washing-upholstery.......................................................23
Transport
...................................................................... 24
Transport of wheelchairs in vehicles................ 26
Saftety instructions / Propelling techniques 29
Product description/Areas of use...................... 30
Guarantee..................................................................... 31

4 WHEELER
5
WHEELER
Wheeler
Seat width: 26, 29, 32, 35 cm
Seat depth: 26-38 cm
Upholstery:
Blue plush ”Check pattern”
Yellow plush ”Teddy bear”
Black dartex
Frame colours: red shiny, blue glitter, yellow shimmer, black
metallic, green shiny, orange, light red, light yellow, black,
blue shiny.
Upholstery and frame colours
Equipment
Wheeler has a wide range of accessories and options. It is possible that some of the accessories
are not available in certain countries.
Seat unit Adjustable backrest
Adjustable seat
Comfort backrest
Comfort seat
Seating pad standard 3 cm
Extra seat cover
Seat plate only
Back plate only
Seat angle
adjustment Mechanical
Carer-operated with gas piston (operated by foot or hand)
Legrest 90º legrest
Legrest for plaster casts
Lower leg support
Foot straps
Castors Fixed / 100 mm -150 mm (4”, 5”, 6”) pneumatic or solid
Drive wheels 16”, 20”, 22”, 24”, pneumatic or solid
Brake User-operated brake
Carer-operated brake

5
WHEELER
Technical data - Wheeler
26, 29, 32, 35* cm 26-38 cm
39-50 cm
26-38 cm
15-26 cm
17-40 cm -4°-+30°
Seat width + 19 cm Min. with 20”
wheels: 85 cm
Max. with 24”
wheels: 112 cm
20” wheels 69 cm
24” wheels 80 cm
14 kg
Max. 60 kg Transport weight
Seat unit: 5 kg
Chassis: 5 kg
Drive wheels: 4 kg
* = +/- 3 cm
Miscellaneous Armrest with padded tubing or wide armrest pad
Side guard
Push handles or push bar
Headrest, simple or shaped
Pump
Mudguard for 16” transport wheels or 20”, 22”, 24”
drive wheels
Activity table
Stabilising table
Trunk supports comfort backrest or adjustable for all backrests
4-point belt
4-degree camber
Pommel
Rucksack
Spoke guard
Reectors
B
C
6 WHEELER
7
WHEELER
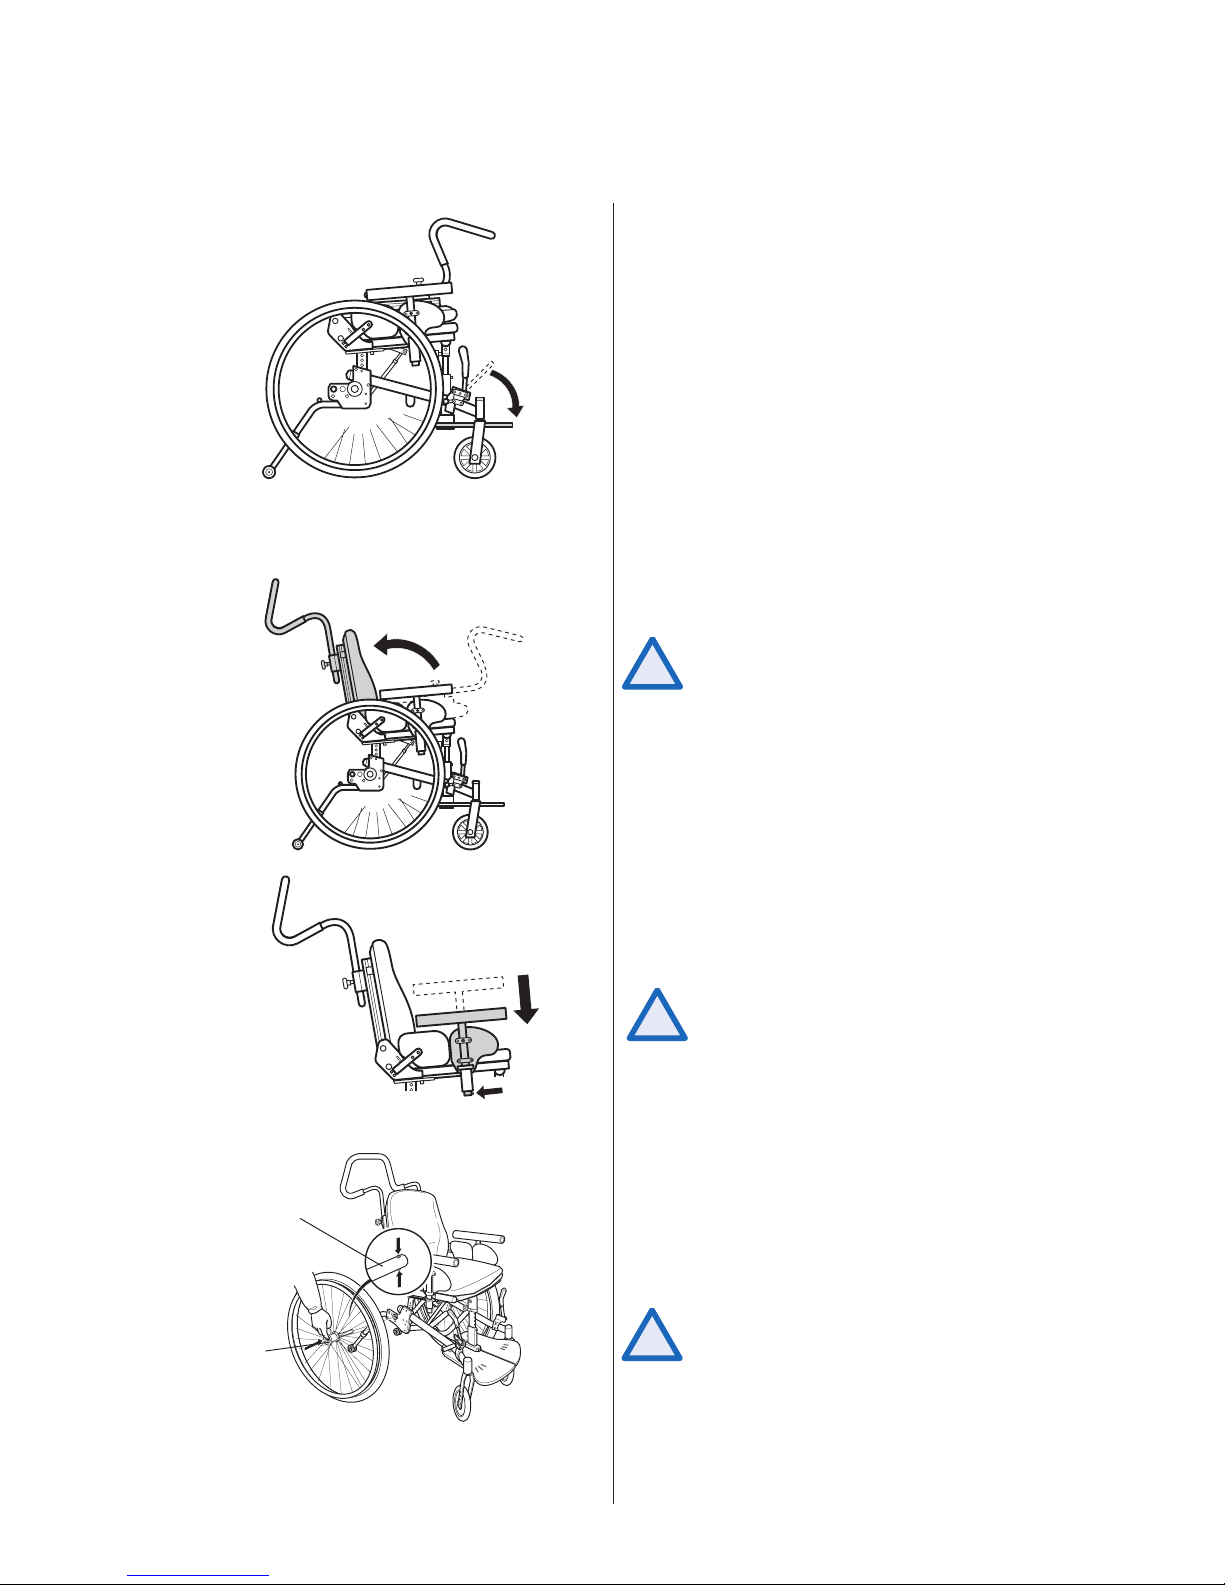
2. Hold the backrest and pull it upwards until you
hear it click.
Be careful not to trap your ngers.
Assembly
1.
2.
1. Fold down the foot plates.
3.
4. 4. You t the rear wheels by pressing the push
button (B) in the middle of the hub and keeping
it depressed whilst you insert the axle (C) into
the rear wheel attachment of the positioning
plate.
To check that the wheel has been properly secu-
red, try to pull out the wheel after releasing
the button. This should not be possible.
!
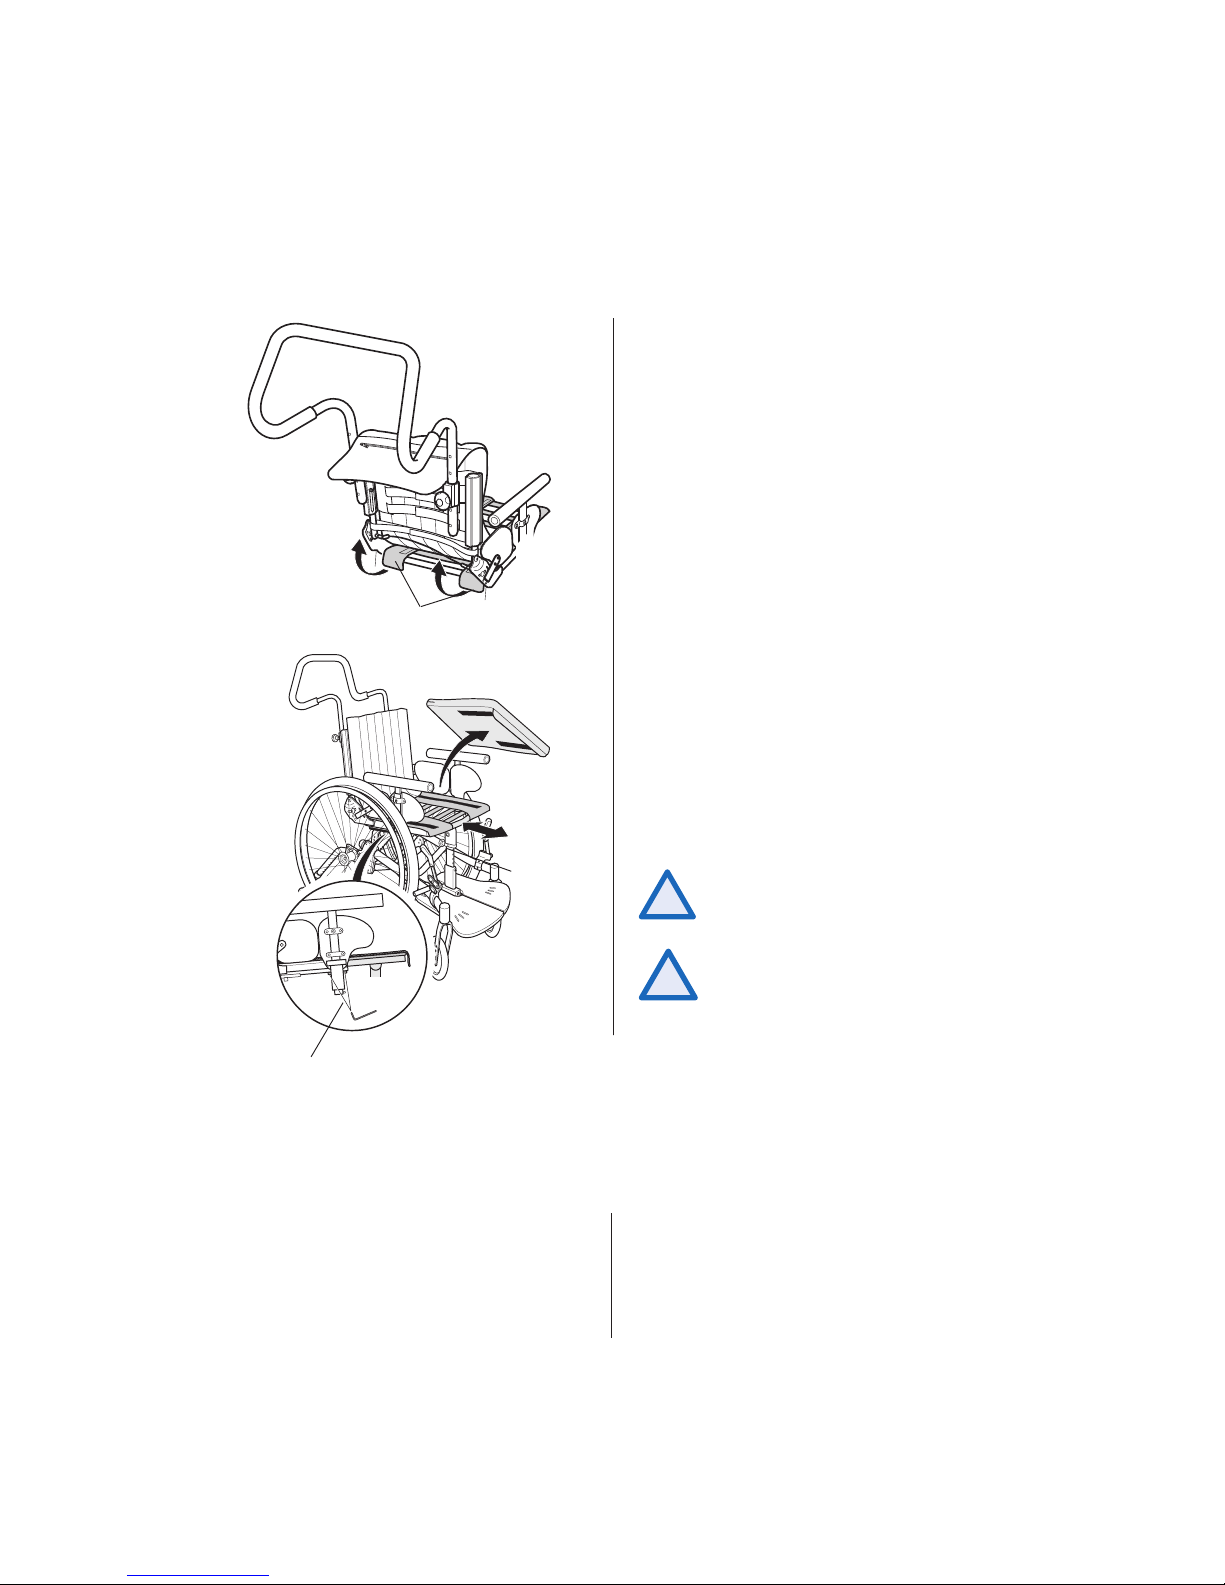
3. Fit the armrests by rst pressing in the lock
button (A) and then pushing them down into
the attachments on the sides of the wheelchair.
Push down rmly until you feel that the armrests are properly secured.
Be careful not to trap your ngers.
!
!

7
WHEELER
Adjustment of Reason
Seat Depth
This is to be adjusted to give the user sufcient seat depth to sit comfortably, as well as stability for
the legs. If the seat depth is too short, it may be difcult for the user to keep his or her balance.
Form
The Velcro strips under the seat can be loosened if you want a fully or partially rounded form.
If the user’s knees are pressed together, the seat cover must be tightened. A completely at
seat is best, although slight rounding of the seat under the bottom may help for balance.
Width
The hip supports are to be adjusted to help keep the body in the centre of the Wheeler chair.
They can be widened if body size changes or when the user wears thicker clothes.
Footrest Height
Correctly adjusted foot plate height is important for keeping balance in the whole body. When
the height is correct, the thighs should rest relaxed against the seat. If the knee angle is 90º,
this will give better seating stability. If the foot plate is too close to the castors, raise the seat
(see below). If the child’s legs are different lengths, you can adjust the foot plate to different
heights, so that the child can sit straighter.
Depth
This is to be adjusted if the user’s feet are to be further forward.
Angle
This is to be used if the ankle joint is stiff or if the foot cannot be level in relation to the seat
for any other reason.
Backrest Height
This should not be adjusted higher than to the shoulder blades so that the arms are free to
move and so that the user can use long strokes when propelling the chair. Sometimes the
backrest must be raised further to help maintain balance in the upper body.
Form
The backrest upholstery can be rounded and formed to facilitate stability if necessary. A at
backrest is best with the option of slight curving by the lower back. The child should be able
to hold his or her head upright.
Angle
For most children, the angle of the backrest is to be at 90º to the seating surface. If the child
cannot hold up his or her head, the backrest can be angled backwards slightly. Another option
is to angle the whole seat unit (see below).
Seat angle The whole seating unit, including seat and backrest, can be angled to achieve a relaxed seating
position. It can also be angled forwards for an active seating position, that facilitates getting in
and out of the chair, for example. If the chair has mechanic seat angle adjustment, the seat can
be set in a xed position.
Armrest
Height
Correctly adjusted armrest height gives the body support.
Width
To achieve a larger seating area and wider seat, the armrests can be moved sideways.
Seat height
To obtain the correct distance to the handrims, you can adjust the height. This enables the
user to propel Wheeler with large strokes. If the wheels are too high, the child must move his
or her shoulders upwards to a greater extent. If the wheels are too low, the child must work
more with his or her upper body to propel Wheeler.
Propelling
The whole seating unit can be moved backwards or forwards over the rear wheels, en-
characteristics, abling the child to get nearer to the handrims. The further back the child sits, the more
balance weight is applied to the drive wheels. This makes Wheeler easier to propel, but also increases
the risk of the chair tipping. Fine adjustment is necessary. Use the anti-tip devices when testing
to nd the right balance setting. Always check that the child can easily cope with the new
balance setting.
How to adjust your new Wheeler wheelchair
We suggest that you adjust Wheeler in the order below. The same numbered order is included in the list of contents,
as well as in the descriptions of the different parts. The information below is to be seen as general guidelines and may
differ considerably between different users, as everyone has different requirements for support and assistance.
C
A
B
8 WHEELER
9
WHEELER
Settings
Seat
SEAT DEPTH
The depth of the seat can be adjusted by 12 cm. The distance between the hollow
of the knee / calf and the seat pad is to be as short as possible, without the hollow
of the knee/calf contacting the seat pad.
1. If your Wheeler has adjustable upholstery, the
upholstery tabs (A) are to be folded upwards
rst.
1.
2.
2. Adjust the depth of the seat by removing the
seat pad which is fastened with Velcro strips.
The two screws (B) are then loosened on both
sides of the armrest attachment on both sides
of the chair. Take hold of the legrest tube (C)
and pull the seat forwards or backwards, and
then retighten the screws. Finally put the seat
pad back into place.
When the seat is pulled forwards, the seat
depth must not exceed 38 cm.
Be careful not to injure yourself on protru-
ding components when you push the seat
in as far as it will go.
!
SEAT SHAPE
The shape of the seat is adjusted using the Velcro strips.
Loosen the Velcro strips to obtain a rounder shape.
Tighten the Velcro strips to obtain a atter seat. It is
better that the seat is slightly too at than far too
rounded.
!
9
WHEELER
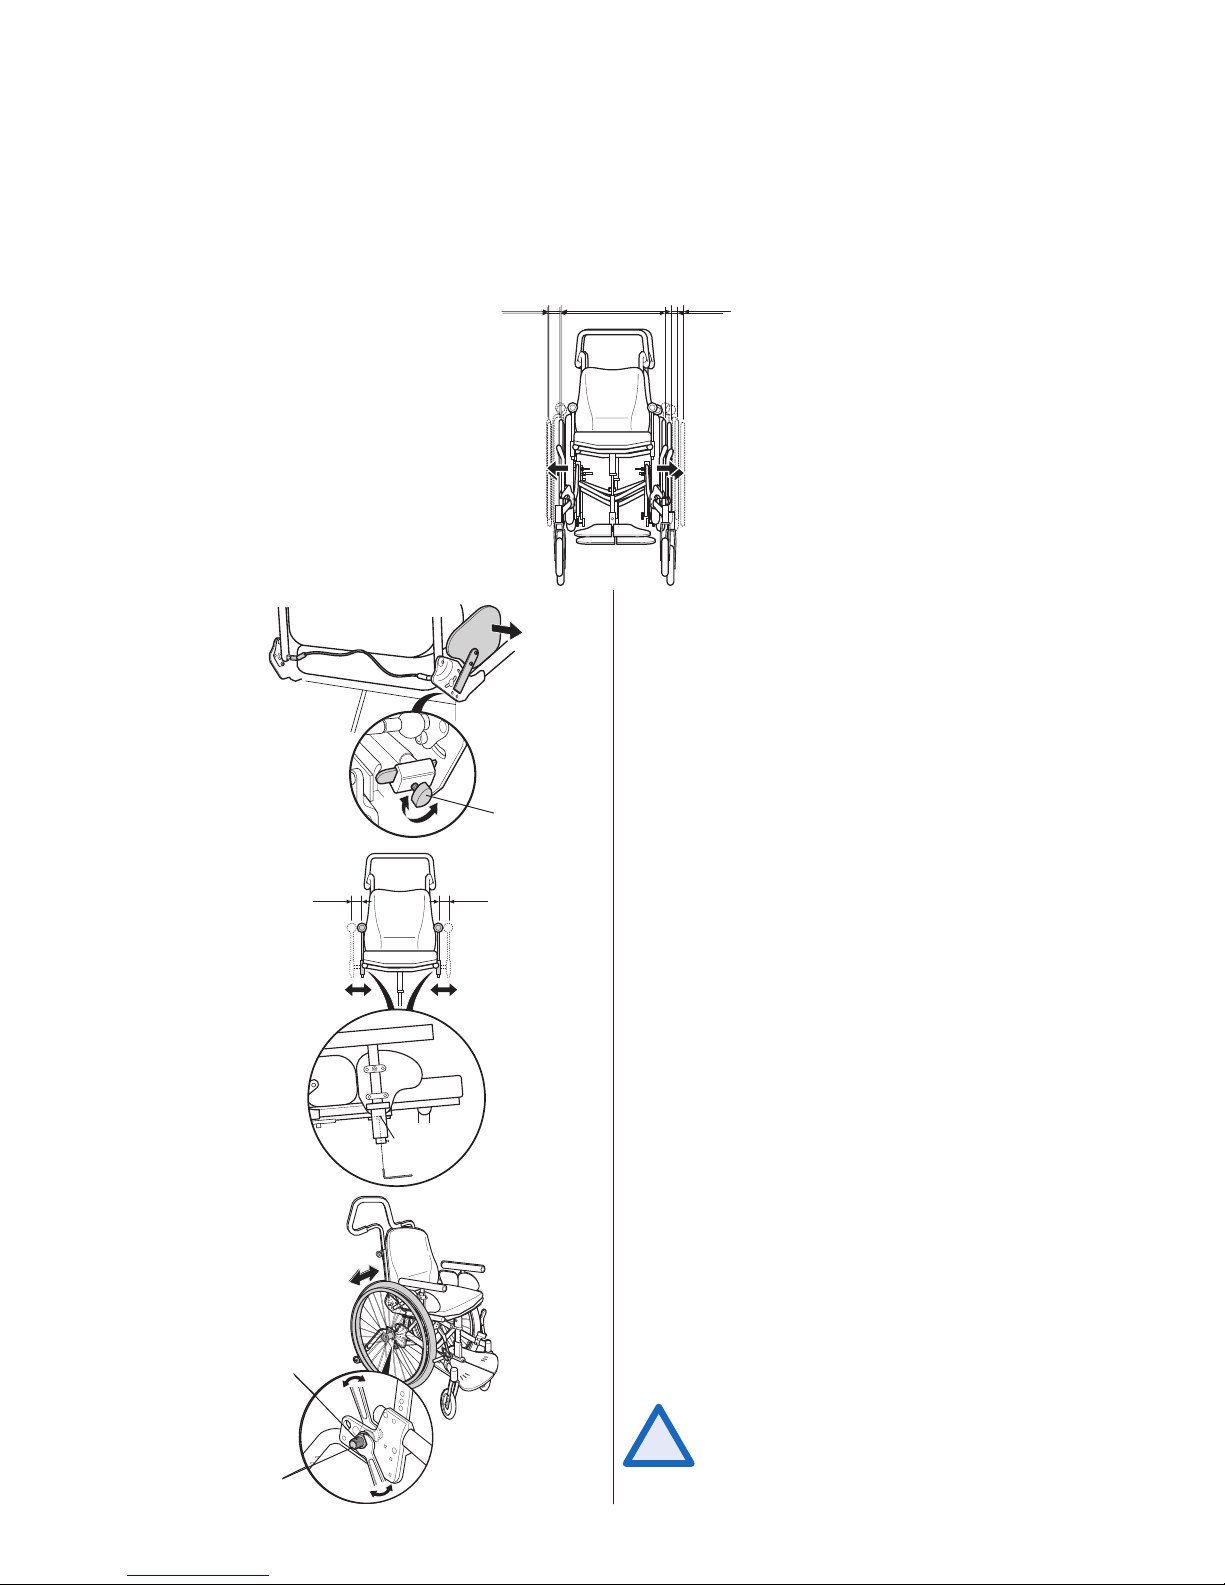
SEAT WIDTH
Wheeler is a wheelchair to grow in. The seat width can be adjusted by 3 cm, by
moving the side supports and hip supports. It is important that the drive wheels
are also moved outwards when you increase the seat width.
Increase seat width
Hip supports
1. Loosen the knob (B) on the inside of the hip support
attachment and move the hip support outwards
an amount equal to the side guards.
1.
2.
3.
B
C
D
A
1,5 cm
1,5 cm
1,5 cm
1,5 cm
!
Side guards
2. Loosen the screw (A) under the side guard on both
sides. Move the side guard outwards. Tighten the
screws.
Drive wheels
3. Loosen the axle housing nut (C) using a spanner.
Ensure that you tighten the axle housing nut
securely when you have moved the drive wheels
outwards an amount equal to the side guards and
the hip supports.
3 mm of the casing (D) must protrude from the
nut.
Check following when you are ready: There
should not be risk of trapping ngers between rear wheels and xed parts on the
seat, for example, armrest. If there is a
risk please adjust the distance, see "seat
width"
B
C
D
A
 Loading...