

Invacare Pronto M71, Pronto M71 Standard, Pronto M71 Formula PTO Plus Owner's Operator And Maintenance Manual
Owner’s Operator and Maintenance Manual
Pronto® M71™with
™
SureStep
M71 Standard
M71 with Formula™PTO Plus
DEALER: This manual MUST be given to
the user of the wheelchair.
USER:
this manual and save for future reference.
BEFORE using this wheelchair, read
For more information regarding
Invacare products, parts, and services,
please visit www.invacare.com

WARNING
A QUALIFIED TECHNICIAN MUST PERFORM THE INITIAL SET UP
OF THIS WHEELCHAIR. ALSO, A QUALIFIED TECHNICIAN MUST
PERFORM ALL PROCEDURES IN THE SERVICE MANUAL.
WHEELCHAIR USERS: DO NOT SERVICE OR OPERATE THIS
EQUIPMENT WITHOUT FIRST READING AND UNDERSTANDING
(1) THE OWNER’S OPERATOR AND MAINTENANCE MANUAL
AND (2) THE SEATING SYSTEM’S MANUAL (IF APPLICABLE). IF
YOU ARE UNABLE TO UNDERSTAND THE WARNINGS,
CAUTIONS, AND INSTRUCTIONS, CONTACT INVACARE
TECHNICAL SUPPORT BEFORE ATTEMPTING TO SERVICE OR
OPERATE THIS EQUIPMENT - OTHERWISE INJURY OR DAMAGE
MAY RESULT.
DEALERS AND QUALIFIED TECHNICIANS: DO NOT SERVICE OR
OPERATE THIS EQUIPMENT WITHOUT FIRST READING AND
UNDERSTANDING (1) THE OWNER’S OPERATOR AND
MAINTENANCE MANUAL, (2) THE SERVICE MANUAL (IF
APPLICABLE) AND (3) THE SEATING SYSTEM’S MANUAL (IF
APPLICABLE). IF YOU ARE UNABLE TO UNDERSTAND THE
WARNINGS, CAUTIONS AND INSTRUCTIONS, CONTACT
INVACARE TECHNICAL SUPPORT BEFORE ATTEMPTING TO
SERVICE OR OPERATE THIS EQUIPMENT - OTHERWISE, INJURY
OR DAMAGE MAY RESULT.
NOTE: Updated versions of this manual are available on www.invacare.com.
Pronto® M71™with SureStep
™
2 Part No 1141449

TABLE OF CONTENTS
TABLE OF CONTENTS
REGISTER YOUR PRODUCT................................................................ 8
SPECIAL NOTES .............................................................................. 11
LABEL LOCATIONS ......................................................................... 13
Wiring Label on M71 Standard..............................................................................................................13
Wiring Label on M71 Standard and M71 Formula PTO Plus.........................................................13
M71 With Formula PTO Plus Only......................................................................................................14
LABEL LOCATIONS ......................................................................... 15
Wheelchairs With TRRO.......................................................................................................................15
Wheelchairs Without TRRO.................................................................................................................15
TYPICAL PRODUCT PARAMETERS .................................................. 16
Pronto M71................................................................................................................................................16
Formula PTO Plus ....................................................................................................................................17
SECTION 8—GENERAL GUIDELINES ................................................. 18
Controller Settings/Repair or Service .................................................................................................18
Operation Information............................................................................................................................18
Wheelchairs With Powered Seating Systems Only.....................................................................20
Accessories ................................................................................................................................................20
Batteries......................................................................................................................................................20
Charging Batteries ...............................................................................................................................21
Grounding Instructions ...........................................................................................................................21
Rain Test.....................................................................................................................................................22
Weight Training ........................................................................................................................................22
Weight Limitation.....................................................................................................................................22
M71 Wheelchairs Without Powered Seating Systems................................................................22
M71 Wheelchairs With Formula PTO Plus Powered Seating System ....................................22
SECTION 9—EMI INFORMATION ..................................................... 23
SECTION 10—SAFETY/HANDLING OF WHEELCHAIRS ....................... 25
Stability and Balance.................................................................................................................................25
Coping with Everyday Obstacles ..........................................................................................................26
A Note to Wheelchair Assistants ........................................................................................................26
Lifting/Stairways ........................................................................................................................................27
Transferring To and From Other Seats ..............................................................................................28
Percentage of Weight Distribution ......................................................................................................29
Reaching, Leaning and Bending - Forward ..........................................................................................29
Reaching and Bending - Backward ........................................................................................................30
Part No 1141449 3 Pronto® M71™with SureStep
™

TABLE OF CONTENTS
TABLE OF CONTENTS
SECTION 11—SAFETY INSPECTION/TROUBLESHOOTING .................. 31
Safety Inspection Checklists...................................................................................................................31
All Wheelchairs ....................................................................................................................................31
Additional Requirements for Wheelchairs with Formula Pto Plus Seating Systems ............33
Troubleshooting Guide ...........................................................................................................................34
All Wheelchairs ....................................................................................................................................34
Wheelchairs With Formula PTO Plus Systems ............................................................................35
Checking Battery Charge Level.............................................................................................................35
SECTION 12—WHEELCHAIR OPERATION ......................................... 36
Operating the Wheelchair......................................................................................................................36
Turning the Power On/Off................................................................................................................36
Using the Joystick to Drive the Wheelchair..................................................................................37
Operating the Formula PTO Plus System...........................................................................................38
A Note About Drive Lock-Out........................................................................................................39
Increasing the Tilt Angle.....................................................................................................................39
Decreasing the Tilt Angle...................................................................................................................40
SPJ-80 Joystick Switches and Indicators ..............................................................................................40
On/Off Toggle Switch .........................................................................................................................40
Speed Control Knob ...........................................................................................................................40
Joystick....................................................................................................................................................41
Battery Gauge Display ........................................................................................................................41
Charger/Programming Input..............................................................................................................41
SPJ Joystick Switches and Indicators ....................................................................................................41
On/Off Toggle Switch .........................................................................................................................42
Speed Control knob............................................................................................................................42
Joystick....................................................................................................................................................42
Charger/Programming Input..............................................................................................................42
Using the Horn.....................................................................................................................................42
Information Gauge...............................................................................................................................42
DPJ Joystick Switches and Indicators ...................................................................................................44
Drive Select Toggle Switch................................................................................................................44
Speed Control knob............................................................................................................................44
Joystick....................................................................................................................................................44
Mode (On/Off) Switch........................................................................................................................45
Battery Gauge Display (BGD)...........................................................................................................45
Pronto® M71™with SureStep
™
4 Part No 1141449

MPJ Joystick Switches and Indicators...................................................................................................45
Drive Select Toggle Switch................................................................................................................45
Speed Control ......................................................................................................................................46
Joystick....................................................................................................................................................46
LCD Display ..........................................................................................................................................46
Emergency Stop/Reset Switch...........................................................................................................47
Emergency Stop/Reset Input .............................................................................................................48
Remote On/Off Switch.......................................................................................................................48
SPJ+ Joystick Switches and Indicators..................................................................................................48
On/Off Button ......................................................................................................................................48
Speedometer.........................................................................................................................................49
Speed Control Buttons.......................................................................................................................49
Joystick....................................................................................................................................................49
Charger/Programming Input..............................................................................................................49
Service Indicator...................................................................................................................................50
Information Gauge Display ................................................................................................................50
SECTION 13—ARMS ........................................................................ 52
Removing/Installing/Adjusting the Van Seat Arms ............................................................................52
Removing/Installing ..............................................................................................................................52
Adjusting Width ...................................................................................................................................52
Adjusting Angle.....................................................................................................................................53
Adjusting Height...................................................................................................................................53
Installing/Removing Flip Back Armrests ..............................................................................................54
Installing..................................................................................................................................................54
Removing ...............................................................................................................................................54
Positioning/Adjusting Flip Back Armrests ...........................................................................................55
Positioning Flip Back Armrests for User Transfer .......................................................................55
Positioning Flip Back Armrests for Use ..........................................................................................55
Adjusting ................................................................................................................................................55
SECTION 14—SEAT ......................................................................... 56
Adjusting the Back Angle - Van Seat ....................................................................................................56
Adjusting the Back Angle - ASBA Seat ................................................................................................56
Adjusting the Headrest ...........................................................................................................................57
Replacing Seat Positioning Strap ...........................................................................................................58
Wheelchairs with TRRO Option .....................................................................................................58
Removing/Installing the Seat Assembly................................................................................................59
Removing ...............................................................................................................................................59
Installing..................................................................................................................................................59
Part No 1141449 5 Pronto® M71™with SureStep
™

TABLE OF CONTENTS
TABLE OF CONTENTS
Tilting the Seat Assembly........................................................................................................................60
Tilting the Seat Assembly Back .........................................................................................................60
Tilting the Seat Assembly Forward..................................................................................................61
Adjusting the Seat Height .......................................................................................................................61
Adjusting the Seat Position on the Seat Frame .................................................................................64
ASBA and Formula PTO Plus Models .............................................................................................64
Van Seat Models ...................................................................................................................................64
Adjusting Seat Depth - Van Seat Only.................................................................................................65
SECTION 15—FOOTBOARD ASSEMBLY ............................................ 67
Removing/Installing the Footboard Assembly....................................................................................67
Removing ...............................................................................................................................................67
Installing..................................................................................................................................................67
Adjusting the Footboard Assembly ......................................................................................................68
Angle Adjustment ................................................................................................................................68
Depth Adjustment ...............................................................................................................................69
SECTION 16—FRONT RIGGINGS ...................................................... 70
Installing/Removing Front Riggings .......................................................................................................70
Installing..................................................................................................................................................70
Removing ...............................................................................................................................................70
Adjusting Footrest Height ......................................................................................................................71
on PHWH93 Front Riggings..............................................................................................................71
on PH904A and PHAL4A Front Riggings .......................................................................................71
Replacing Heel Loops ..............................................................................................................................72
Raising/Lowering Elevating Front Riggings ..........................................................................................72
Adjusting/Replacing Telescoping Front Rigging Supports................................................................73
Removing/Installing the Center Mount Footrest ..............................................................................74
Removing ...............................................................................................................................................74
Installing..................................................................................................................................................74
Adjusting the Height of the Center Mount Footrest.......................................................................75
Adjusting the Angle of the Center Mount Footrest.........................................................................76
Adjusting the Footplate Angle ...............................................................................................................76
Adjusting the Tension of the Flip Up Footplate ................................................................................77
SECTION 17—SHROUD/WHEELS ....................................................... 78
Replacing the Foam Filled or Pneumatic Tires onto the Wheel Rim...........................................78
Part No 1141449 6 Pronto® M71™with SureStep
™

TABLE OF CONTENTS
TABLE OF CONTENTS
Removing/Installing the Shrouds ...........................................................................................................78
Removing ...............................................................................................................................................78
Installing..................................................................................................................................................79
Engaging/Disengaging Motor Release Lever .......................................................................................80
Replacing the Front/Rear Caster Assemblies.....................................................................................81
Adjusting Forks .........................................................................................................................................81
SECTION 18—BATTERIES ................................................................ 82
Warnings For Handling and Replacing Batteries ...............................................................................82
Using the Proper Batteries.....................................................................................................................82
Removing/Installing Batteries from/into Battery Tray......................................................................83
Removing ...............................................................................................................................................84
Installing..................................................................................................................................................84
Connecting/Disconnecting Battery Cables.........................................................................................85
Connecting Battery Cables................................................................................................................85
Disconnecting Battery Cables...........................................................................................................88
Charging Batteries....................................................................................................................................88
Battery Charger Operation....................................................................................................................89
On-Board Battery Charger................................................................................................................90
Charging Using an Independent Charger Plugged Into the Joystick.........................................92
SECTION 19—ELECTRONICS ............................................................ 93
Repositioning Joystick..............................................................................................................................93
Van Seat Models ...................................................................................................................................93
Adjustable Seat Back Angle Models (ASBA)..................................................................................94
Disconnecting/Connecting the Joystick...............................................................................................95
Disconnecting .......................................................................................................................................95
Connecting ............................................................................................................................................96
SECTION 20—TRANSPORT ............................................................. 97
Transporting the Wheelchair ................................................................................................................97
Disassembly...........................................................................................................................................98
Assembly ............................................................................................................................................. 101
SECTION 21—TRANSPORT READY PACKAGE ................................ 103
About Transport Ready Packages...................................................................................................... 104
Compliance Information ...................................................................................................................... 104
Specifications...................................................................................................................................... 104
Part No 1141449 7 Pronto® M71™with SureStep
™

Securing the Wheelchair to the Vehicle .......................................................................................... 105
Positioning the Wheelchair in the Vehicle ..................................................................................105
Securement Points............................................................................................................................ 106
Securing the Wheelchair ................................................................................................................. 106
Securing the Occupant......................................................................................................................... 107
Wheelchair-Anchored Belts........................................................................................................... 107
Vehicle-Anchored Belts................................................................................................................... 108
Seating System ................................................................................................................................... 108
Positioning Belts ................................................................................................................................ 109
LIMITED WARRANTY ................................................................... 112
REGISTER YOUR PRODUCT
The benefits of registering:
1. Safeguard your investment.
2. Ensure long term maintenance and servicing of your purchase.
3. Receive updates with product information, maintenance tips, and industry news.
4. Invacare can contact you or your provider, if servicing is needed on your product.
5. It will enable Invacare to improve product designs based on your input and needs.
Register ONLINE at www.invacare.com
Complete and mail the form on the next page
Any registration information you submit will be used by Invacare Corporation only, and
protected as required by applicable laws and regulations.
Pronto® M71™with SureStep
™
- or -
8 Part No 1141449

PRODUCT REGISTRATION FORM
Register ONLINE at www.invacare.com - or -
Complete and mail this form
Name_______________________________________________________________
Address _____________________________________________________________
City ___________________State/Province __________
Zip/Postal Code ________
Email ___________________________________Phone No. _________________
Invacare Model No. ______________________ Serial No. __________________
Purchased From _________________________Date of Purchase:___________
1. Method of purchase: (check all that apply)
❏ Medicare ❏ Insurance ❏ Medicaid ❏ Other __________________________
2. This product was purchased for use by: (check one)
❏ Self ❏ Parent ❏ Spouse ❏ Other
3. Product was purchased for use at:
❏ Home ❏ Facility ❏ Other
4. I purchased an Invacare product because:
Cut Along Line
❏ Price ❏ Features (list features) _________________________________________
5. Who referred you to Invacare products? (check all that apply)
❏ Doctor ❏ Therapist ❏ Friend ❏ Relative ❏ Dealer/Provider ❏ Other_________
❏ Advertisement (circle one): TV, Radio, Magazine, Newspaper ❏ No Referral_____
6. What additional features, if any, would you like to see on this product?
7. Would you like information sent to you about Invacare products that may be available for a
__________________________________________________________________________
particular medical condition? ❏ Yes ❏ No
If yes, please list any condition(s) here and we will send you information by email and/or mail about
any available Invacare products that may help treat, care for or manage such condition(s):
__________________________________________________________________________
Fold
here
Fold
here
8. Would you like to receive updated information via email or regular mail about the Invacare
home medical products sold by Invacare's dealers? ❏ Yes ❏ No
9. What would you like to see on the Invacare website?
__________________________________________________________________________
10. Would you like to be part of future online surveys for Invacare products? ❏ Yes ❏ No
11. User's Year of birth: ______________________________________________________
If at any time you wish not to receive future mailings from us, please contact us at Invacare Corporation,
CRM Department, 39400 Taylor Parkway, Elyria, OH 44035, or fax to 877-619-7996 and we will remove
you from our mailing list.
To find more information about our products, visit www.invacare.com.
Part No 1141449 9 Pronto® M71™with SureStep
™
Fold
here
Fold
here
Cut Along Line
Pronto® M71™with SureStep
™
Invacare Product Registration Form
Please Seal with
Tape Before Mailing
10 Part No 1141449

SPECIAL NOTES
SPECIAL NOTES
Signal words are used in this manual and apply to hazards or unsafe practices which
could result in personal injury or property damage. Refer to the table below for
definitions of the signal words.
SIGNAL WORD MEANING
DANGER
WARNING
CAUTION
Danger indicates an imminently hazardous situation which,
if not avoided, will result in death or serious injury.
Warning indicates a potentially hazardous situation which, if
not avoided, could result in death or serious injury.
Caution indicates a potentially hazardous situation which, if
not avoided, may result in property damage.
NOTICE
THE INFORMATION CONTAINED IN THIS DOCUMENT IS SUBJECT TO
CHANGE WITHOUT NOTICE.
WHEELCHAIR USER
As a manufacturer of wheelchairs, Invacare endeavors to supply a wide variety of
wheelchairs to meet many needs of the end user. However, final selection of the
type of wheelchair to be used by an individual rests solely with the user and his/her
healthcare professional capable of making such a selection.
WHEELCHAIR TIE-DOWN RESTRAINTS AND SEAT RESTRAINTS (TRRO OR
TRBKTS)
TRRO includes four factory-installed transport brackets and a wheelchair anchored
pelvic belt. TRRO has been crash-tested in accordance with ANSI/RESNA WC Vol 1
Section 19 Frontal Impact Test requirements for wheelchairs with a 168 lb crash
dummy, which corresponds to a person with a weight of 114 to 209 lbs.
TRBKTS includes four factory-installed wheelchair transport brackets. TRBKTS has
not been crash-tested in accordance with WC 19. Use these transport brackets only
to secure an unoccupied wheelchair during transport.
As of this date, the Department of Transportation has not approved any tie-down
systems for transportation of a user while in a wheelchair, in a moving vehicle of any
type. It is Invacare’s position that users of wheelchairs should be transferred into
appropriate seating in vehicles for transportation and use be made of the restraints
made available by the auto industry. Invacare cannot and does not recommend any
wheelchair transportation systems.
Refer to Transport Ready Package
on page 103 for more information about trans-
porting the wheelchair.
Part No 1141449 11 Pronto® M71™with SureStep
™

SPECIAL NOTES
TRRO AND TRBKTS WARNINGS
Only use the transport brackets included with TRRO and TRBKTS for the purposes
described in this manual.
WARNING
Invacare products are specifically designed and manufactured for use in conjunction
with Invacare accessories. Accessories designed by other manufacturers have not
been tested by Invacare and are not recommended for use with Invacare products.
The seat positioning strap is a positioning belt only. It is not designed for use as a
safety device withstanding high stress loads such as auto or aircraft safety belts. If
signs of wear appear, belt MUST be replaced immediately.
POWERED SEATING SYSTEMS ONLY - This seating system has been customer
designed and will be assembled to the wheelchair base before delivery to the user.
The information contained in this manual is for maintaining and adjusting the
seating system. There are very few adjustments that can safely be made by the user.
If there is a procedure or adjustment that needs to be performed on the seating
system that is not in this manual, DO NOT perform that procedure. Have the
seating system serviced by a qualified technician.
The drive behavior initially experienced by the user may be different from other
chairs previously used. This Power Wheelchair has Invacare’s SureStep technology,
a feature that provides the wheelchair with optimum traction and stability when
driving forward over transitions and thresholds of up to 2-inches. The following
warnings apply specifically to the SureStep Feature:
• DO NOT use on inclines greater than 9°.
• DO NOT use on inclines with wet, slippery, icy or oily surfaces. This may include
certain painted or otherwise treated wood surfaces.
• DO NOT traverse down ramps at high speed. Doing so will reduce traction and
increase stopping distance.
• The end user’s weight can materially affect traction on sloped surfaces. Great
care should be taken when traversing such slopes.
To determine and establish your particular safety limits, practice use of this product
on various sloping surfaces in the presence of a qualified healthcare provider
BEFORE attempting active use of this wheelchair. Other general warnings listed
within this document also apply.
Wheelchairs should be examined during maintenance for signs of corrosion (water
exposure, incontinence, etc.). Electrical components damaged by corrosion should
be replaced IMMEDIATELY.
Wheelchairs that are used by incontinent users and/or are frequently exposed to
water may require replacement of electrical components more frequently.
Pronto® M71™with SureStep
™
12 Part No 1141449
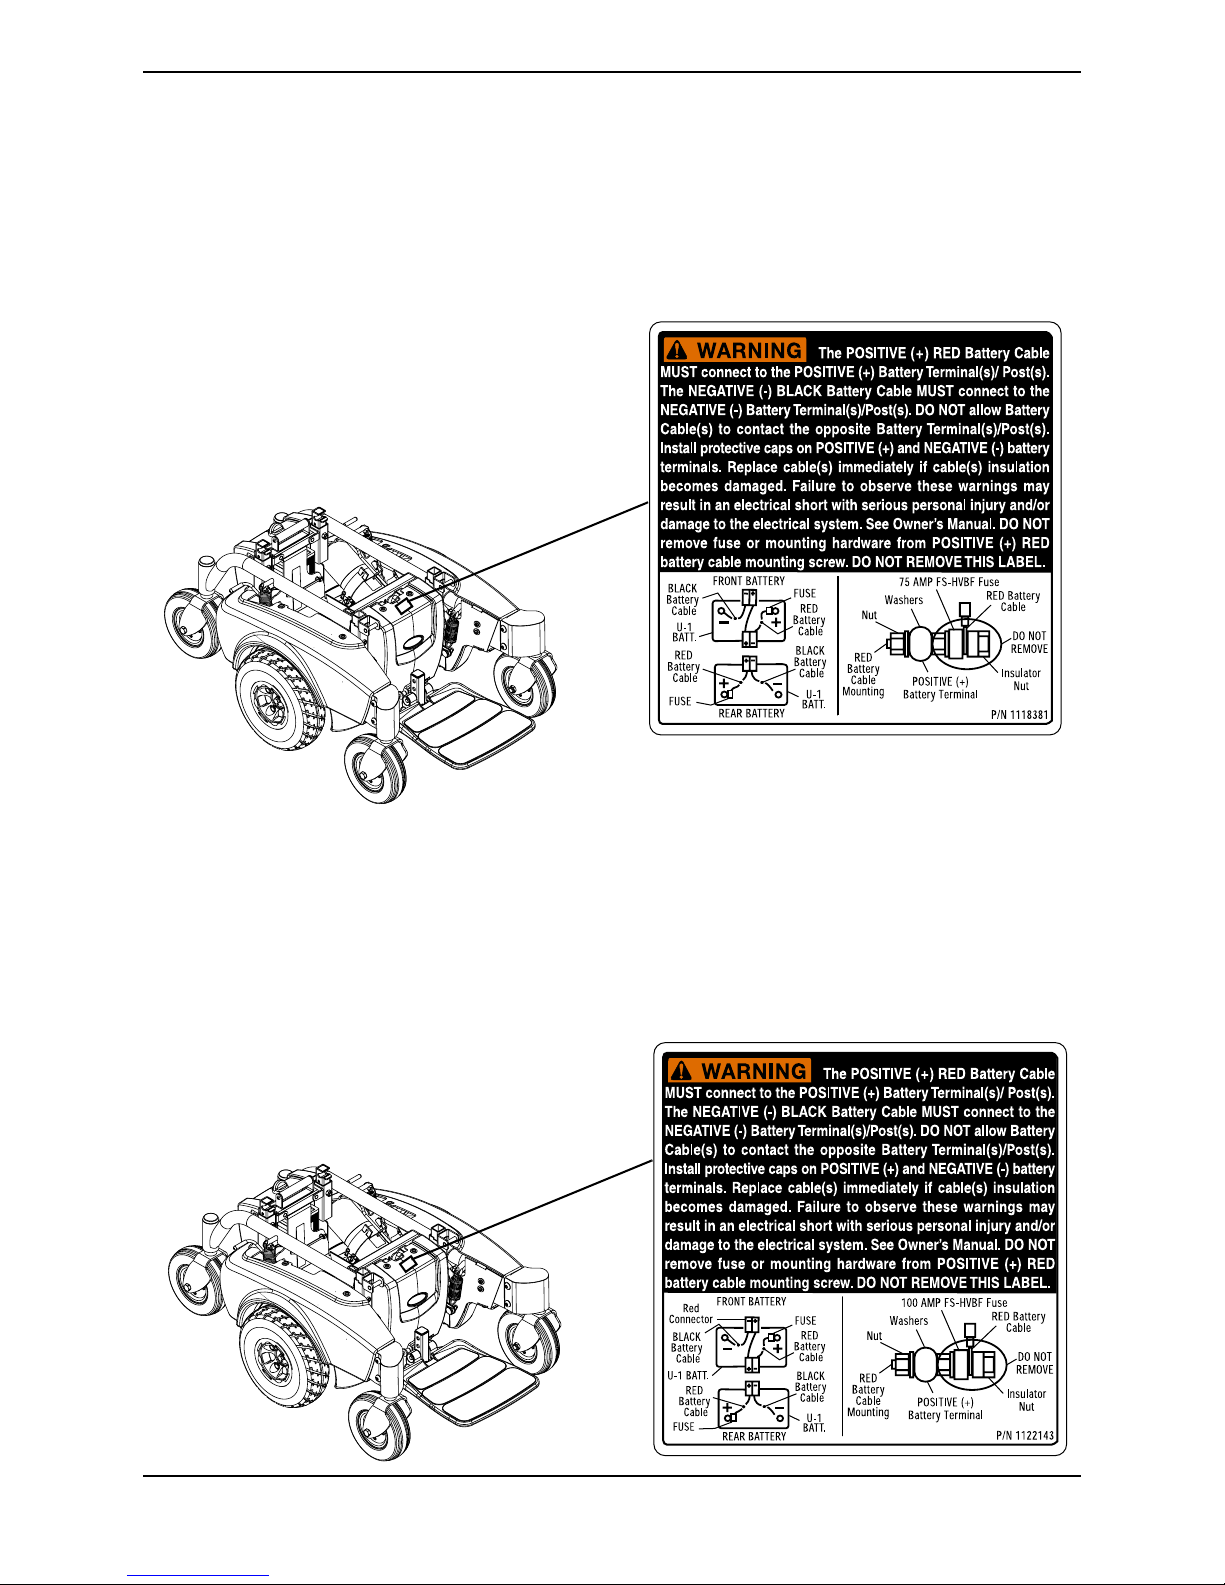
LABEL LOCATIONS
Wiring Label on M71 Standard
NOTE: Wiring Label on M71 Standard with MK5™NX™Controller.
LABEL LOCATIONS
Wiring Label on M71 Standard and M71 Formula PTO
Plus
NOTE: Wiring Label on M71 Standard and M71 Formula PTO Plus with MK5 NX-80 or MK5
EX™Controller
Part No 1141449 13 Pronto® M71™with SureStep
™
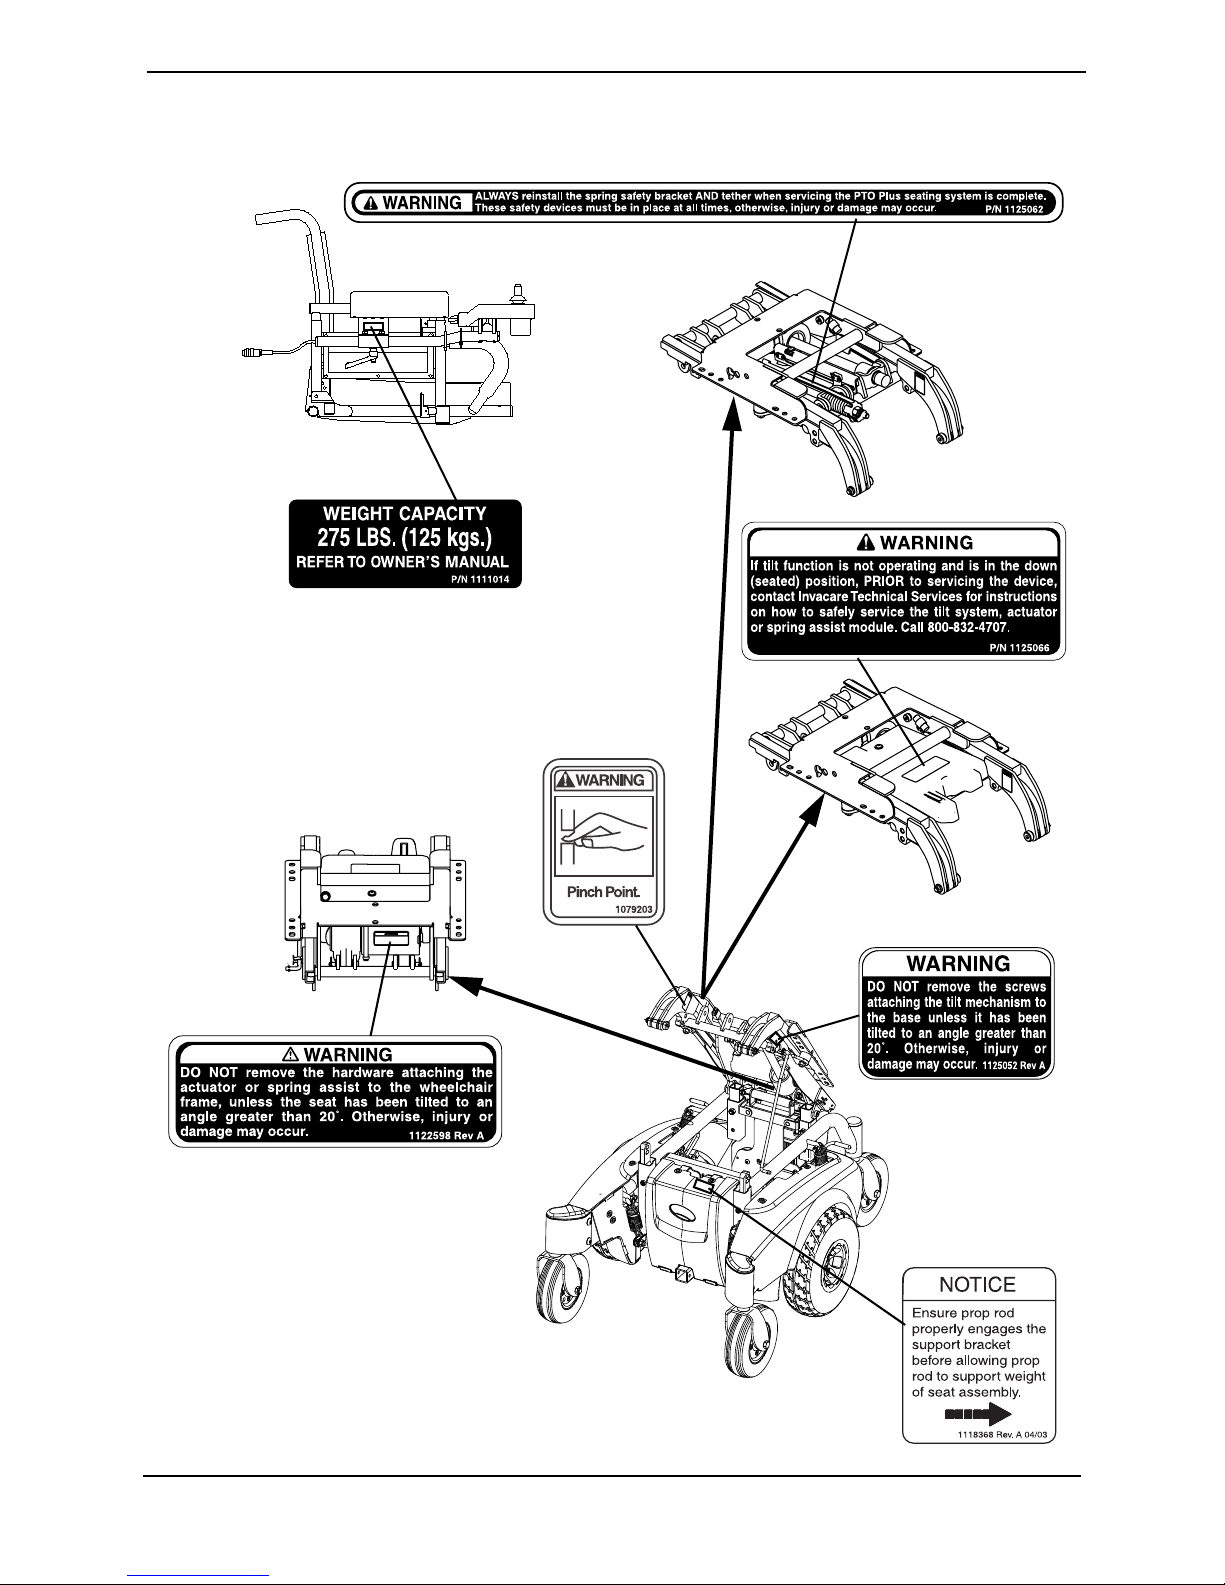
LABEL LOCATIONS
M71 With Formula PTO Plus Only
rear view of
actuator
Pronto® M71™with SureStep
™
14 Part No 1141449
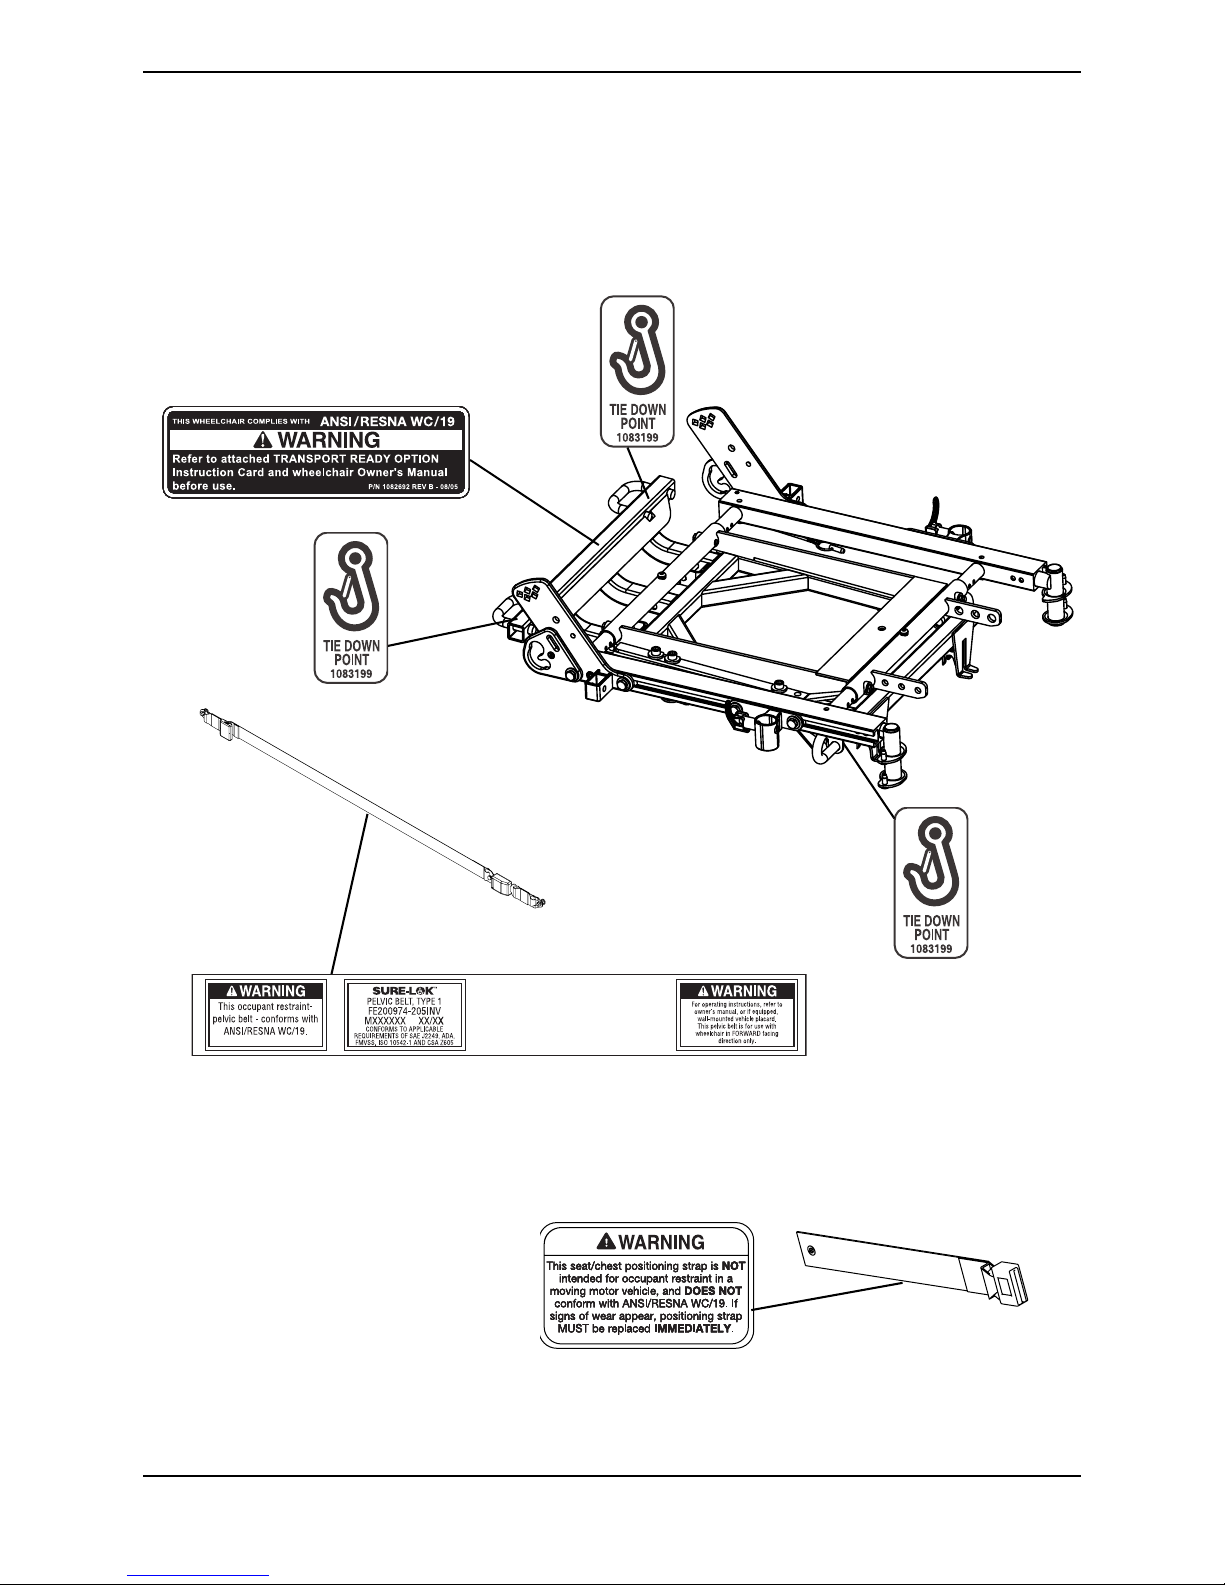
LABEL LOCATIONS
Wheelchairs With TRRO
NOTE: Also
on opposite
side.
LABEL LOCATIONS
NOTE: Also
on opposite
side.
Wheelchairs Without TRRO
NOTE: Auto style seat positioning
strap shown. This label is also on the
airline style seat positioning strap.
NOTE: Also
on opposite
side.
Part No 1141449 15 Pronto® M71™with SureStep
™

TYPICAL PRODUCT PARAMETERS
TYPICAL PRODUCT PARAMETERS
Pronto M71
18-INCH VAN
SEAT
SEAT WIDTH: 18 inches 20 inches 16-20 inches
SEAT DEPTH: 16-18 inches 18-20 inches 16-20 inches
BACK HEIGHT: 18 inches 18 inches 16-20 inches
SEMI-RECLINE 35°-115° 35°-115° N/A
BACK ANGLE RANGE: N/A N/A Standard - 85°-105°
UPHOLSTERY: Grey Cloth, Grey Vinyl, Tan Vinyl Black Nylon Back
SEAT TO FLOOR: 21-23 inches (cushion not compressed) 18-20 inches
OVERALL WIDTH OF BASE (W/O
JOYSTICK): 24 inches
OVERALL HEIGHT: 48 inches
OVERALL LENGTH
FOOTBOARD FOLDED:
FOOTBOARD EXTENDED:
WEIGHT
WITHOUT BATTERIES:
WITH BATTERIES:
SHIPPING (WITHOUT BATTERIES):
DRIVE WHEELS/TIRES
(PNEUMATIC) 10 x 3½ inches
CASTERS W/PRECISION SEALED
BEARINGS: 6 x 2 inches
FOOTRESTS/LEGRESTS: Flip Up, Depth and Height Adjustable, Footboard, Swingaway Front
ARMRESTS: Adjustable Width, Angle and Height
BATTERY REQUIREMENTS: Use only U1 batteries (Quantity - 2)
*WEIGHT LIMITATION: up to 300 pounds
INCLINE CAPABILITY: 9°
PERFORMANCE
SPEED:
TURNING RADIUS:
**RANGE (VARIABLE):
2
20-INCH VAN
SEAT
35 inches
39½ inches
150 pounds
203 pounds
200 pounds
Rigging, Elevating Legrest
up to 4 MPH
19½ inches with footboard
up to 12 miles
ADJUSTABLE
ASBA
with Seat Pan
(to seat pan)
1
1. Based on 18-inch deep seat.
2. Includes seating systems and accessories.
*NOTE: Refer to Percentage of Weight Distribution on page 29.
Pronto® M71™with SureStep
™
16 Part No 1141449

TYPICAL PRODUCT PARAMETERS
**NOTE: Values for range are calculated for maximum chair weight rating using largest batteries
applicable (U1), per test procedures described in ANSI/RESNA WC/VOL2-1998 Section 4 and
meet federal reimbursement requirements for this product. While considered typical, they are
derived based on certain ideal conditions. Variances in battery condition, user weight, usage
pattern or overall terrain conditions will result in actual values for range that differ from these
stated values. Users should become accustomed to how their unique conditions impact their
individual results. Users should become familiar with the battery discharge indicator on the
joystick to determine the range of their wheelchair. Refer to Battery Charger Operation on page 89
for more information about the battery discharge indicator.
Formula PTO Plus
SEAT WIDTH RANGE: 16 - 20 inches
SEAT DEPTH RANGE (1-INCH INCREMENTS): 16 - 20 inches
BACK HEIGHT RANGE: 16 - 24 inches
BACK ANGLE RANGE (ADJUSTABLE ASBA): 85° to 105° in 5° increments
SEAT-TO-FLOOR HEIGHT*: 17¾ inches ± ¼ inch
OVERALL WIDTH
WITHOUT JOYSTICK:
WITH JOYSTICK AND TRSS:
OVERALL HEIGHT: 35¾ - 43¾ inches
OVERALL LENGTH WITH FRONT RIGGINGS: 43¼ inches
TILT RANGE
0° SEAT PAN ANGLE:
5° SEAT PAN ANGLE:
TURNING RADIUS WITH FRONT RIGGINGS: 28 inches
SEAT CUSHION: Cushion (Optional)
WEIGHT OF FORMULA PTO PLUS: 25 lbs
ARMRESTS: Adjustable Angle, Height and Depth
WEIGHT LIMITATION OF M71 WITH FORMULA PTO
PLUS: Up to 275 lbs
24 inches
26 inches
0 - 55°
5 - 60°
*NOTE: The seat-to-floor height is based on 18-inch deep seat with 0° (±1°) seat pan angle and
pneumatic tires or flat free inserts. Seat-to-floor height measured from the front edge of seat to floor.
The height is measured with properly inflated new tires. This height can vary ±¼-inch due to tire
wear.
If the seating system is mounted onto a power wheelchair that has a weight limitation greater than that of the seating system, the weight limitation is maintained at
the seating system’s weight limitation. Example: The M71 Standard wheelchair has
a 300 lb weight limitation, the seating system has a weight limitation of 275 lbs, so
the M71 Standard wheelchair now has a 275 lb. weight limitation.
Part No 1141449 17 Pronto® M71™with SureStep
WARNING
™

SECTION 8—GENERAL GUIDELINES
SECTION 8—GENERAL GUIDELINES
WARNING
SECTION 1 - GENERAL GUIDELINES contains important information for the safe
operation and use of this product. DO NOT use this product or any available
optional equipment without first completely reading and understanding these
instructions and any additional instructional material such as Owner’s Manuals,
Service Manuals or Instruction Sheets supplied with this product or optional
equipment. If you are unable to understand the Warnings, Cautions or Instructions,
contact a healthcare professional, dealer or technical personnel before attempting
to use this equipment - otherwise, injury or damage may occur.
Controller Settings/Repair or Service
Set-up of the Electronics Control Unit is to be performed ONLY by a qualified technician.
The final adjustments of the controller may affect other activities of the wheelchair.
Damage to the equipment could occur if improperly set-up or adjusted.
DO NOT service or adjust your wheelchair while occupied, unless otherwise noted.
If tilt function is not operating and is in the down (seated) position, PRIOR to servicing
the device, contact Invacare Technical Services for instructions on how to safely service
the tilt system, actuator or spring assist module. Call 800-832-4707.
ALWAYS reinstall the spring safety bracket and tether when servicing the PTO Plus
seating system is complete. These safety devices MUST be in place at all times, otherwise,
injury or damage may occur.
TRANSPORT READY PACKAGES ARE NOT RETROFITTABLE TO EXISTING
MODELS AND ARE NOT FIELD SERVICEABLE.
Wheelchairs should be examined during maintenance for signs of corrosion (water
exposure, incontinence, etc.). Electrical components damaged by corrosion should be
replaced IMMEDIATELY.
Wheelchairs that are used by incontinent users and/or are frequently exposed to water
may require replacement of electrical components more frequently.
Operation Information
Performance adjustments should only be made by professionals of the healthcare field or
persons fully conversant with this process and the driver's capabilities. Incorrect settings
could cause injury to the driver, bystanders, damage to the wheelchair and to
surrounding property.
After the wheelchair has been set-up, check to make sure that the wheelchair performs to
the specifications entered during the set-up procedure. If the wheelchair does NOT
perform to specifications, turn the wheelchair Off immediately and reenter set-up
specifications. Repeat this procedure until the wheelchair performs to specifications.
Pronto® M71™with SureStep
™
18 Part No 1141449

SECTION 8—GENERAL GUIDELINES
ALWAYS shift your weight in the direction you are turning. DO NOT shift your weight in
the opposite direction of the turn. Shifting your weight in the opposite direction of the
turn may cause the inside drive wheel to lose traction and the wheelchair to tip over.
DO NOT shift your weight or sitting position toward the direction you are reaching as the
wheelchair may tip over.
DO determine and establish your particular safety limits by practicing bending, reaching
and transferring activities in the presence of a qualified healthcare professional BEFORE
attempting active use of the wheelchair.
DO NOT attempt to reach objects if you have to move forward in the seat.
DO NOT attempt to reach objects if you have to pick them up from the floor by reaching
down between your knees.
DO NOT lean over the top of the back upholstery to reach objects behind you as this may
cause the wheelchair to tip over.
DO NOT store items under seat - interference with seat latch may result.
DO NOT use an escalator to move a wheelchair between floors. Serious bodily injury may
occur.
Before attempting to transfer in or out of the wheelchair, every precaution should be
taken to reduce the gap distance. Turn both casters parallel to the object you are
transferring onto. Also be certain the power is Off and wheel locks are engaged to prevent
the wheels from moving.
DO NOT engage or disengage the motor release levers until the power is in the Off
position.
DO NOT operate on roads, streets or highways.
DO NOT climb, go up or down ramps or traverse slopes greater than 9°.
Invacare strongly recommends proceeding down ramps or slopes at half speed or slower
and to avoid hard braking or sudden stops.
DO NOT leave elevating legrests in the fully extended position when proceeding down
ramps or slopes.
DO NOT attempt to move up or down an incline with a water, ice or oil film.
DO NOT attempt to drive over curbs or obstacles. Doing so may cause your wheelchair
to turn over and cause bodily harm or damage to the wheelchair.
DO NOT leave the power button in the On position when entering or exiting your
wheelchair.
DO NOT attempt to lift the wheelchair by lifting on any removable (detachable) parts.
Lifting by means of any removable (detachable) parts of a wheelchair may result in injury
to the user or damage to the wheelchair.
DO NOT stand on the frame of the wheelchair.
Anti-tippers MUST be attached at all times.
Part No 1141449 19 Pronto® M71™with SureStep
™

SECTION 8—GENERAL GUIDELINES
DO NOT stand on the footplates or footboard. When getting in or out of the wheelchair,
make sure that the footboard or footplates are in the upward position or swing the
footrests towards the outside of the wheelchair.
ALWAYS wear your seat positioning strap. The seat positioning strap is a positioning belt
ONLY. It is not designed for use as a safety device withstanding high stress loads such as
auto or aircraft safety belts. If signs of wear appear, belt must be replaced immediately.
DO NOT adjust the rear seat posts higher than the front seat posts.
Before performing any maintenance, adjustment or service verify that On/Off switch on
the joystick is in the OFF position.
Avoid storing or using the wheelchair near open flame or combustible products. Serious
injury or damage to property may result.
ALWAYS keep hands and fingers clear of moving parts to avoid injury.
NEVER leave an unoccupied wheelchair on an incline.
Wheelchairs With Powered Seating Systems Only
DO NOT operate the seating system while on an incline.
DO NOT operate the seating system while the wheelchair is moving.
NEVER operate the wheelchair while in any tilted/reclined/back angle position over 20°
relative to the vertical position. If the drive lock-out does not stop the wheelchair from
operating in a tilt position over 20° relative to the vertical position, DO NOT operate the
wheelchair. DO NOT attempt to adjust the drive lock-out. Have the wheelchair serviced
by a qualified technician.
DO NOT operate tilt seat around children.
ALWAYS keep hands and feet out from underneath tilt seat - otherwise serious injury
may result.
DO NOT tip the seating system/wheelchair without assistance.
Wiring must be routed and secured properly to ensure that wiring does not become
entangled and damaged during normal operation of seating system.
Accessories
EXTREME care should be exercised when using oxygen in close proximity to electric
circuits and other combustible materials. Contact your oxygen supplier for instruction in
the use of oxygen.
Batteries
The warranty and performance specifications contained in this manual are based on the
use of deep cycle gel cell batteries. Invacare strongly recommends their use as the power
source for this unit.
Carefully read battery/battery charger information prior to installing, servicing or
operating your wheelchair.
Pronto® M71™with SureStep
™
20 Part No 1141449

SECTION 8—GENERAL GUIDELINES
Charging Batteries
DANGER
When using an extension cord, use only a three wire extension cord having at least
16 AWG (American Wire Gauge) wire and the same or higher electrical rating as
the device being connected. Use of improper extension cord could result in risk of
fire and electric shock. Three prong to two prong adapters should not be used. Use
of three prong adapters can result in improper grounding and present a shock hazard to the user.
NEVER attempt to recharge the batteries by attaching cables directly to the battery terminals.
DO NOT attempt to recharge the batteries and operate the wheelchair at the same time.
DO NOT operate wheelchair with extension cord attached to the AC cable.
DO NOT attempt to recharge the batteries when the wheelchair has been exposed to ANY
type of moisture.
DO NOT attempt to recharge the batteries when the wheelchair is outside.
DO NOT sit in the wheelchair while charging the batteries.
DO NOT attempt to recharge batteries using BOTH the on-board battery charger AND an
independent battery charger (plugged into the joystick charger port) at the SAME time.
Doing so will reduce the life of the batteries.
Read and carefully follow the manufacturer’s instructions for each charger (supplied or
purchased). If charging instructions are not supplied, consult a qualified technician for
proper procedures.
After charging batteries, ALWAYS make sure that the battery charger cord is securely
wrapped and stored within the hook and loop strap assembly on the rear of the battery
tray. Failure to do so may result in damage to the cord or personal injury to the user or
bystanders.
Ensure the pins of the extension cord plug are the same number, size, and shape as those
on the charger.
DO NOT under any circumstances cut or remove the round grounding plug from the
charger AC cable plug or the extension cord plug.
Grounding Instructions
DO NOT, under any circumstances, cut or remove the round grounding prong from any
plug used with or for Invacare products. Some devices are equipped with three-prong
(grounding) plugs for protection against possible shock hazards and fire. Where a twoprong wall receptacle is encountered, it is the personal responsibility and obligation of the
customer to contact a qualified electrician and have the two-prong receptacle replaced with
a properly grounded three-prong wall receptacle in accordance with the National Electrical
Code. If you must use an extension cord, use ONLY a three-wire extension cord having the
same or higher electrical rating as the device being connected. In addition, Invacare has
placed RED/ORANGE warning tags on some equipment. DO NOT remove these tags.
Part No 1141449 21 Pronto® M71™with SureStep
™

SECTION 8—GENERAL GUIDELINES
Rain Test
Invacare has tested its power wheelchairs in accordance with ISO 7176 “Rain Test.” This
provides the end user or his/her assistant sufficient time to remove his/her power
wheelchair from a rain storm and retain wheelchair operation.
DO NOT leave power wheelchair in a rain storm of any kind.
DO NOT use power wheelchair in a shower.
DO NOT store power wheelchair in a damp area for an extended period of time.
Direct exposure to excessive rain or dampness may cause the wheelchair to malfunction
electrically and mechanically, may cause the wheelchair to prematurely rust or may
damage the upholstery.
Check to ensure that the RED and GREY battery terminal caps are secured in place,
joystick boot is NOT torn or cracked where water can enter and that all electrical
connections are secure at all times.
DO NOT use the wheelchair if the joystick boot is torn or cracked. If the joystick boot
becomes torn or cracked, replace IMMEDIATELY.
Weight Training
Invacare DOES NOT recommend the use of its wheelchairs as a weight training
apparatus. Invacare wheelchairs have NOT been designed or tested as a seat for any kind
of weight training. If occupant uses said wheelchair as a weight training apparatus,
Invacare shall NOT be liable for bodily injury and the warranty is void.
Weight Limitation
M71 Wheelchairs Without Powered Seating Systems
The weight limitation of M71 wheelchairs without powered seating systems is up to 300
lbs.
M71 Wheelchairs With Formula PTO Plus Powered Seating System
The weight limitation of M71 wheelchairs with Formula PTO Plus seating systems is up
to 275 lbs.
Pronto® M71™with SureStep
™
22 Part No 1141449

SECTION 9—EMI INFORMATION
SECTION 9—EMI INFORMATION
WARNING
CAUTION: IT IS VERY IMPORTANT THAT YOU READ THIS INFORMATION
REGARDING THE POSSIBLE EFFECTS OF ELECTROMAGNETIC
INTERFERENCE ON YOUR POWERED WHEELCHAIR.
Electromagnetic Interference (EMI) From Radio Wave Sources
Powered wheelchairs and motorized scooters (in this text, both will be referred to
as powered wheelchairs) may be susceptible to electromagnetic interference (EMI),
which is interfering electromagnetic energy (EM) emitted from sources such as
radio stations, TV stations, amateur radio (HAM) transmitters, two way radios, and
cellular phones. The interference (from radio wave sources) can cause the powered
wheelchair to release its brakes, move by itself, or move in unintended directions. It
can also permanently damage the powered wheelchair's control system. The
intensity of the interfering EM energy can be measured in volts per meter (V/m).
Each powered wheelchair can resist EMI up to a certain intensity. This is called its
"immunity level." The higher the immunity level, the greater the protection. At this
time, current technology is capable of achieving at least a 20 V/m immunity level,
which would provide useful protection from the more common sources of radiated
EMI.
There are a number of sources of relatively intense electromagnetic fields in the
everyday environment. Some of these sources are obvious and easy to avoid.
Others are not apparent and exposure is unavoidable. However, we believe that by
following the warnings listed below, your risk to EMI will be minimized.
The sources of radiated EMI can be broadly classified into three types:
1) Hand-held Portable transceivers (transmitters-receivers with the antenna
mounted directly on the transmitting unit. Examples include: citizens band (CB)
radios, "walkie talkie", security, fire and police transceivers, cellular telephones,
and other personal communication devices).
NOTE: Some cellular telephones and similar devices transmit signals while they are ON,
even when not being used.
2) Medium-range mobile transceivers, such as those used in police cars, fire trucks,
ambulances and taxis. These usually have the antenna mounted on the outside of
the vehicle; and
3) Long-range transmitters and transceivers, such as commercial broadcast
transmitters (radio and TV broadcast antenna towers) and amateur (HAM)
radios.
NOTE: Other types of hand-held devices, such as cordless phones, laptop computers,
AM/FM radios, TV sets, CD players, cassette players, and small appliances, such as electric shavers and hair dryers, so far as we know, are not likely to cause EMI problems to
your powered wheelchair.
Part No 1141449 23 Pronto® M71™with SureStep
™

SECTION 9—EMI INFORMATION
WARNING
Powered Wheelchair Electromagnetic Interference (EMI)
Because EM energy rapidly becomes more intense as one moves closer to the
transmitting antenna (source), the EM fields from hand-held radio wave sources
(transceivers) are of special concern. It is possible to unintentionally bring high
levels of EM energy very close to the powered wheelchair's control system while
using these devices. This can affect powered wheelchair movement and braking.
Therefore, the warnings listed below are recommended to prevent possible
interference with the control system of the powered wheelchair.
Electromagnetic interference (EMI) from sources such as radio and TV stations,
amateur radio (HAM) transmitters, two-way radios, and cellular phones can affect
powered wheelchairs and motorized scooters.
FOLLOWING THE WARNINGS LISTED BELOW SHOULD REDUCE THE
CHANCE OF UNINTENDED BRAKE RELEASE OR POWERED WHEELCHAIR
MOVEMENT WHICH COULD RESULT IN SERIOUS INJURY.
1) Do not operate hand-held transceivers (transmitters receivers), such as citizens
band (CB) radios, or turn ON personal communication devices, such as cellular
phones, while the powered wheelchair is turned ON;
2) Be aware of nearby transmitters, such as radio or TV stations, and try to avoid
coming close to them;
3) If unintended movement or brake release occurs, turn the powered wheelchair
OFF as soon as it is safe;
4) Be aware that adding accessories or components, or modifying the powered
wheelchair, may make it more susceptible to EMI (NOTE: There is no easy way
to evaluate their effect on the overall immunity of the powered wheelchair); and
5) Report all incidents of unintended movement or brake release to the powered
wheelchair manufacturer, and note whether there is a source of EMI nearby.
Important Information
1) 20 volts per meter (V/m) is a generally achievable and useful immunity level
against EMI (as of May 1994) (the higher the level, the greater the protection);
2) The immunity level of the product is unknown.
Modification of any kind to the electronics of this wheelchair as manufactured by
Invacare may adversely affect the RFI immunity levels.
Pronto® M71™with SureStep
™
24 Part No 1141449

SECTION 10—SAFETY/HANDLING OF WHEELCHAIRS
SECTION 10—SAFETY/HANDLING
OF WHEELCHAIRS
“Safety and Handling” of the wheelchair requires the close attention of the wheelchair
user as well as the assistant. This manual points out the most common procedures and
techniques involved in the safe operation and maintenance of the wheelchair. It is
important to practice and master these safe techniques until you are comfortable in
maneuvering around the frequently encountered architectural barriers.
Use this information only as a “basic” guide. The techniques that are discussed on the
following pages have been used successfully by many.
Individual wheelchair users often develop skills to deal with daily living activities that
may differ from those described in this manual. Invacare recognizes and encourages each
individual to try what works best for him/her in overcoming architectural obstacles that
they may encounter, however ALL WARNINGS and CAUTIONS given in this manual
MUST be followed. Techniques in this manual are a starting point for the new wheelchair
user and assistant with “safety” as the most important consideration for all.
Stability and Balance
WARNING
ALWAYS wear your seat positioning strap.
The seat positioning strap is a positioning belt ONLY. It is not designed for use as a
safety device withstanding high stress loads such as auto or aircraft safety belts. If
signs of wear appear, belt must be replaced immediately
DO NOT climb, go up or down ramps or traverse slopes greater than 9°.
Invacare strongly recommends proceeding down ramps or slopes at half speed or
slower and to avoid hard braking or sudden stops.
DO NOT leave elevating legrests in the fully extended position when proceeding
down ramps or slopes.
To assure stability and proper operation of your wheelchair, you must at all times
maintain proper balance. Your wheelchair has been designed to remain upright and
stable during normal daily activities as long as you do not move beyond the center of
gravity. DO NOT lean forward out of the wheelchair any further than the length of the
armrests.
Part No 1141449 25 Pronto® M71™with SureStep
™
SECTION 10—SAFETY/HANDLING OF WHEELCHAIRS
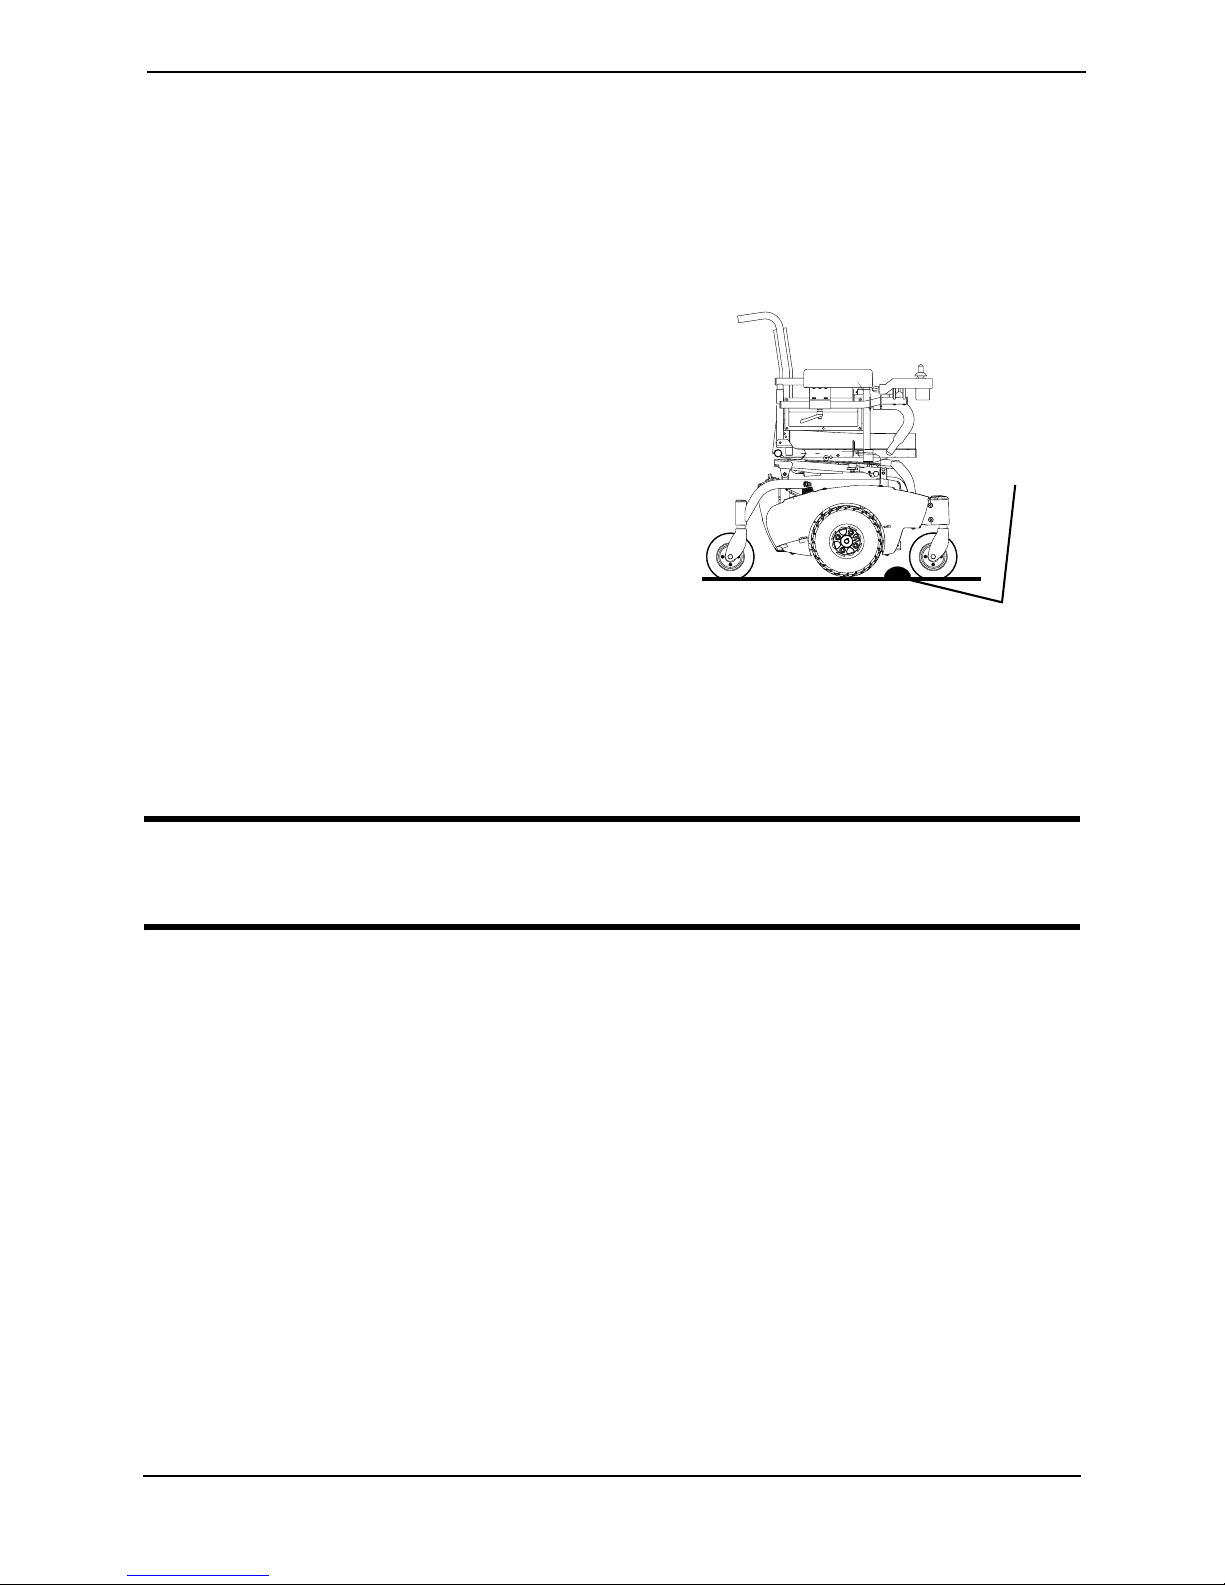
Coping with Everyday Obstacles
NOTE: For this procedure, refer to
FIGURE 10.1.
Coping with the irritation of everyday
obstacles can be alleviated somewhat by
learning how to manage your wheelchair.
Keep in mind your center of gravity to
maintain stability and balance.
While the walking beam allows to traverse
up to a 2-inch bump or threshold, stopping
after the wheels cross the bump poses a
problem. The wheelchair cannot reverse
over the bump at this point. Continue
forward and then turn around.
While the M71 is designed for use
primarily in and around the home, the
provider should determine whether this
wheelchair is suitable for the actual
environment the wheelchair will be used
in.
FIGURE 10.1 Coping with Everyday
2-inch Bump
or Threshold
Obstacles
DO NOT go down ramp at full speed. Some seat/back positions will cause wheelchair to
feel unstable.
CAUTION
Be aware of condition of ramp. Traction will be diminished/nonexistent on a slippery surface. Proceed with caution.
A Note to Wheelchair Assistants
When assistance to the wheelchair user is required, remember to use good body
mechanics. Keep your back straight and bend your knees whenever tipping wheelchair
or traversing curbs or other impediments.
Also, be aware of detachable parts such as arms or legrests. These must NEVER be used
to move the wheelchair or as lifting supports, as they may be inadvertently released,
resulting in possible injury to the user and/or assistant(s).
When learning a new assistance technique, have an experienced assistant help you before
attempting it alone.
Pronto® M71™with SureStep
™
26 Part No 1141449
SECTION 10—SAFETY/HANDLING OF WHEELCHAIRS
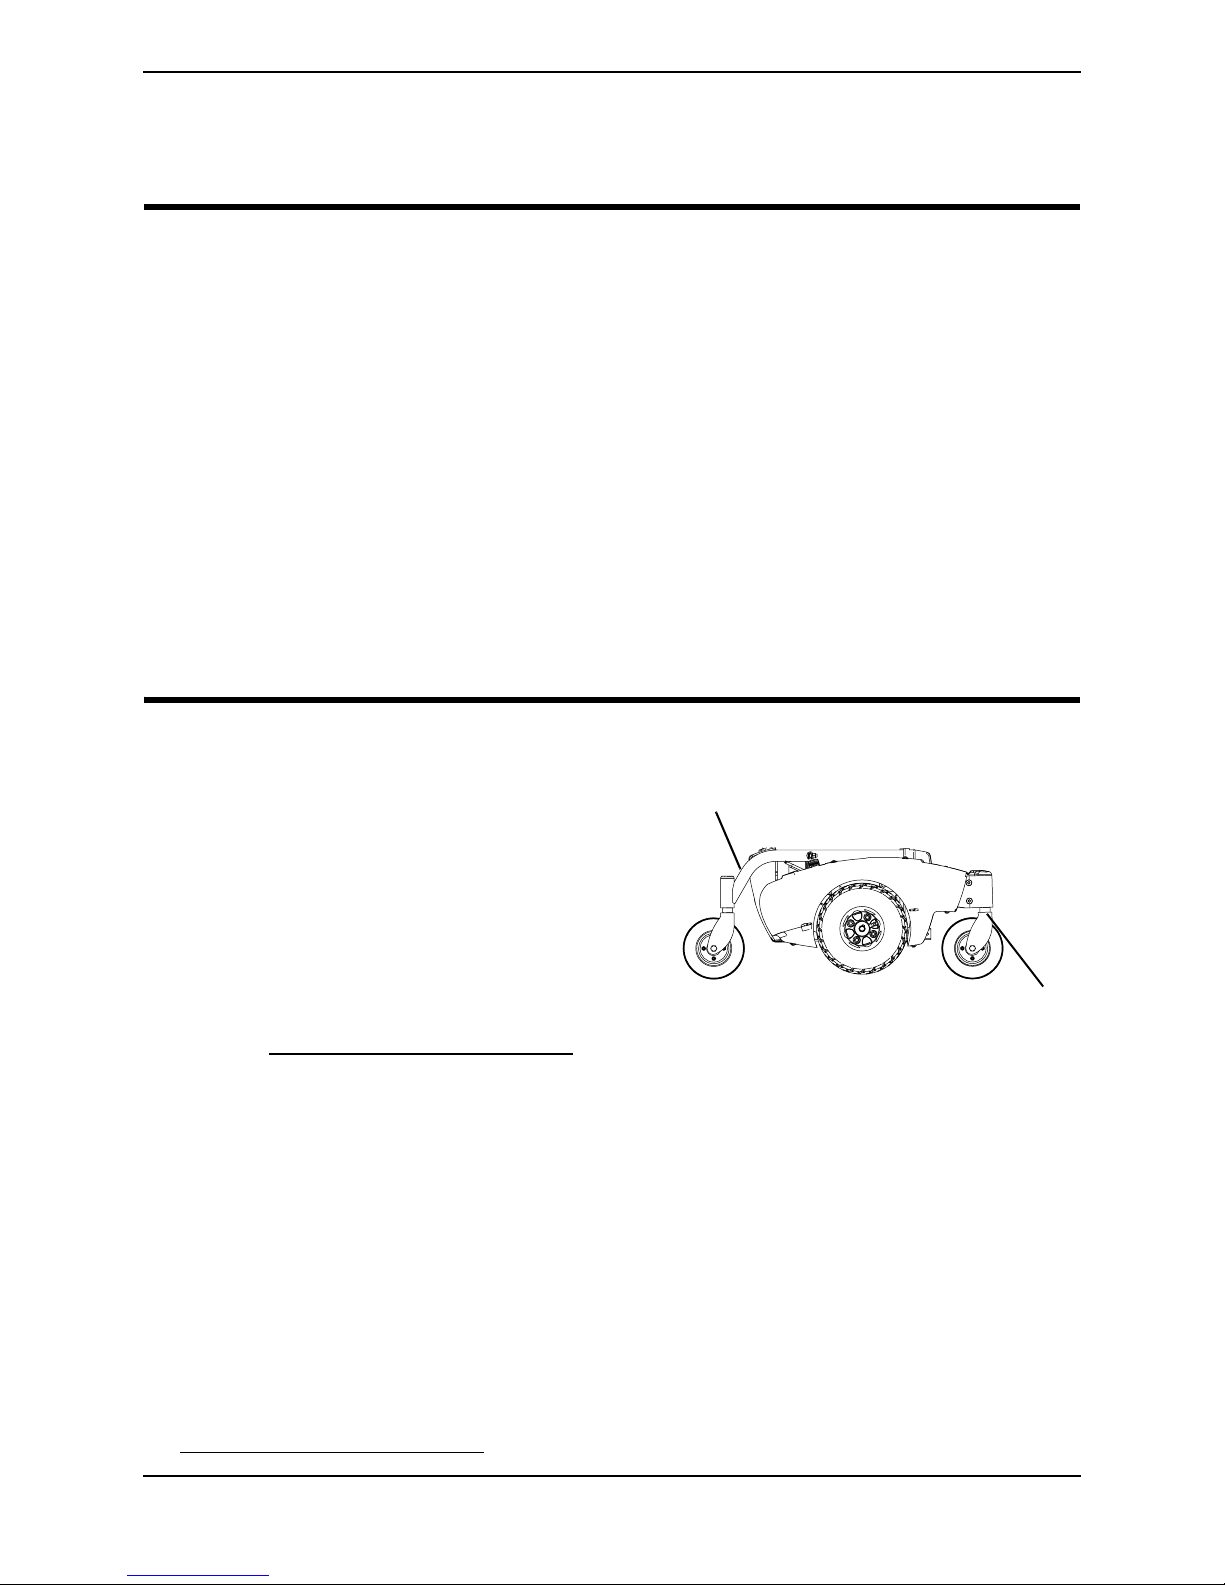
Lifting/Stairways
NOTE: For this procedure, refer to FIGURE 10.2.
WARNING
DO NOT attempt to move an occupied power wheelchair between floors using a
stairway. Use an elevator to move an occupied power wheelchair between floors. If
moving a power wheelchair between floors by means of a stairway, the occupant
MUST be removed and transported independently of the power wheelchair.
Extreme caution is advised when it is necessary to move an unoccupied power
wheelchair up or down the stairs. Invacare recommends using two assistants and
making thorough preparations.
Use ONLY secure, nondetachable parts for hand-hold supports.
It is strongly recommended to lift the wheelchair only by the rear frame and the
front forks - otherwise injury or damage may occur.
DO NOT attempt to lift the wheelchair by any removable (detachable) parts.
Lifting by means of any removable (detachable) parts of a wheelchair may result in
injury to the user or damage to the wheelchair.
The weight of the wheelchair with batteries and without the user is between 203
and 318 lbs. Use proper lifting techniques (lift with your legs) to avoid injury.
Follow this procedure for moving the wheelchair between floors when an elevator is NOT
available or lifting the wheelchair is necessary:
NOTE: When using a stairway to move the
Rear Frame
wheelchair, seat and any accessories, move all
wheelchair components away from the stairway
prior to reassembly.
1. Remove the occupant from the
wheelchair.
2. M71 Without Powered Seating System
Only - Disassemble the wheelchair.
Refer to Transporting the Wheelchair
on page 97.
FIGURE 10.2 Lifting/Stairways - Hand Hold
Supports
Front Forks
(Front
3. Bend your knees and keep your back straight.
4. Perform one of the following:
A. M71 Without Powered Seating System Only - Using nonremovable (non-
detachable) parts of the assemblies, transfer the individual pieces.
B. M71 With Formula PTO Plus System Only - Using the rear frame and the front
edge of the front forks as hand hold supports, transfer the wheelchair base to the
desired location.
5. Move the wheelchair or assemblies away from the stairway.
6. M71 Without Powered Seating System Only - Reassemble the wheelchair. Refer to
Transporting the Wheelchair
Part No 1141449 27 Pronto® M71™with SureStep
on page 97.
™

SECTION 10—SAFETY/HANDLING OF WHEELCHAIRS
WARNING: ESCALATORS
DO NOT use an escalator to move a wheelchair between floors. Serious bodily
injury may occur.
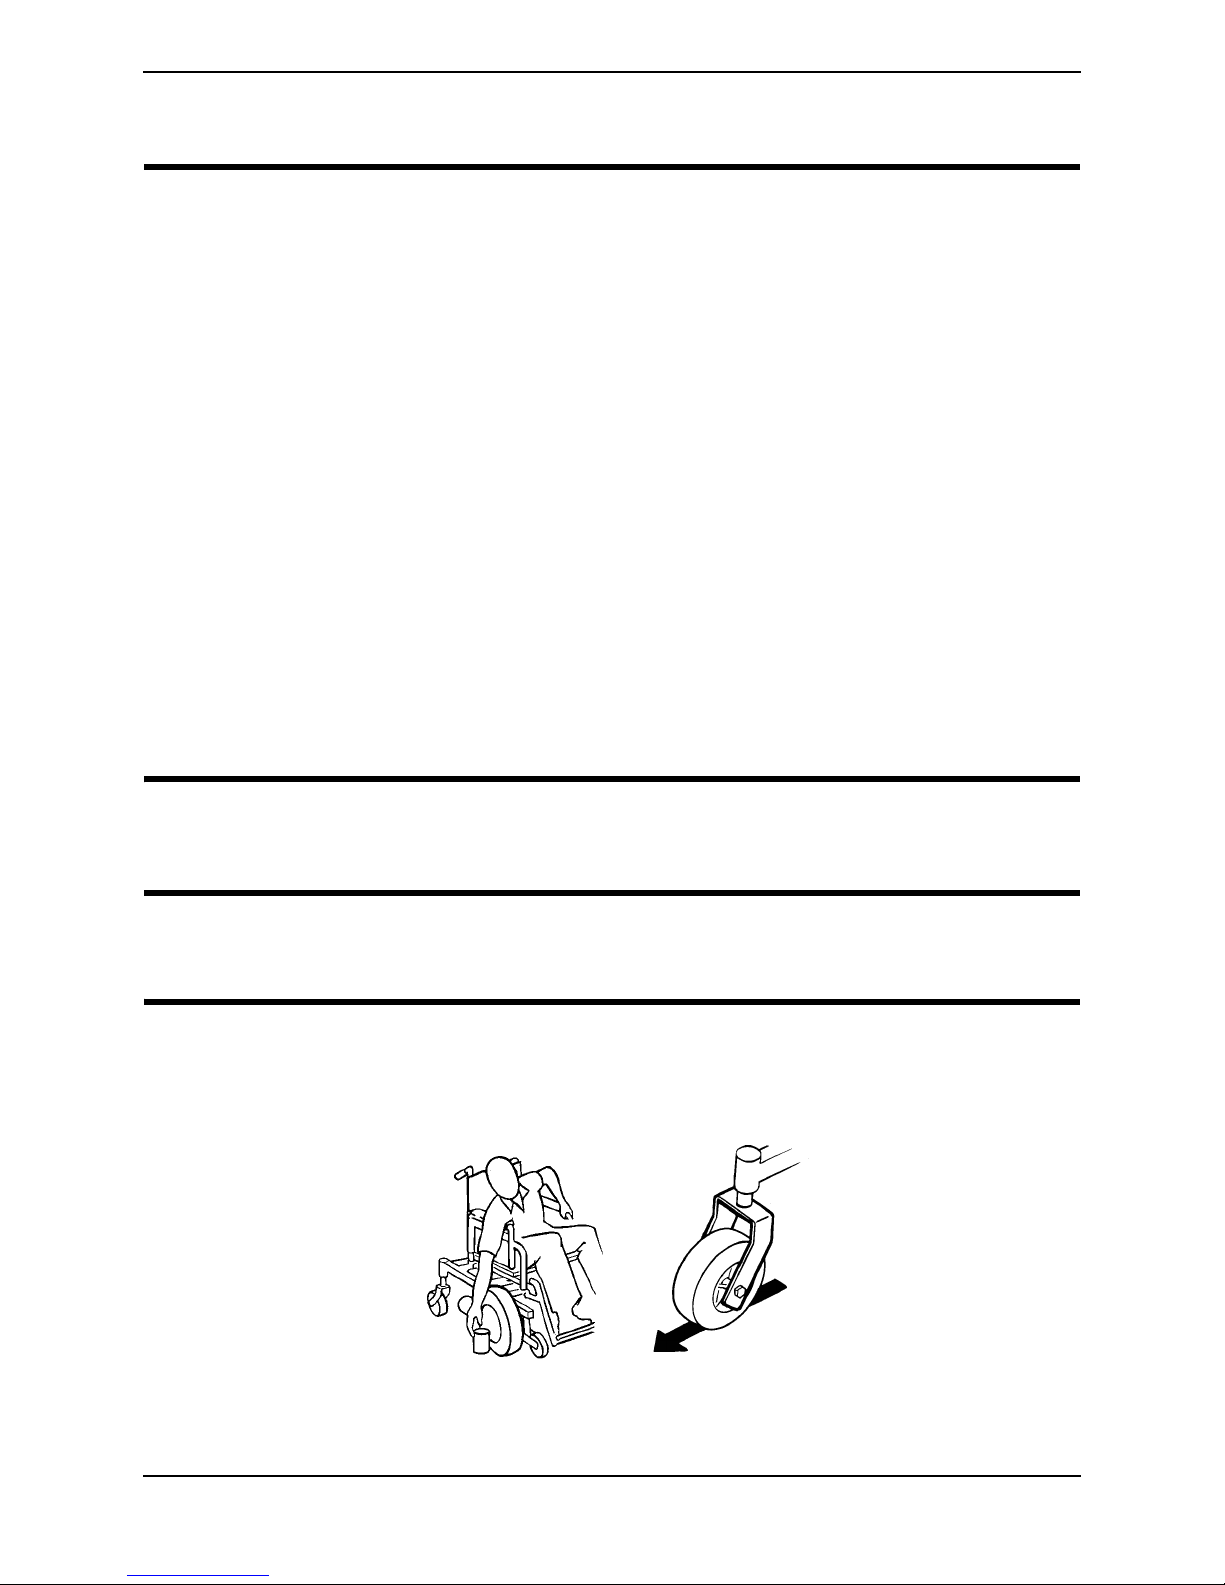
Transferring To and From Other Seats
WARNING
ALWAYS turn the wheelchair power OFF and engage the Motor Release Levers to
prevent the wheels from moving BEFORE attempting to transfer in or out of the
wheelchair. Also, make sure every precaution is taken to reduce the gap distance by
aligning both the front AND rear casters parallel with the object you are
transferring onto.
CAUTION
When transferring, position yourself as far back as possible in the seat. This will prevent broken screws, damaged upholstery and the possibility of the wheelchair tipping forward.
NOTE: For this procedure, refer to
FIGURE 10.3.
NOTE: This activity may be performed
independently provided you have adequate
mobility and upper body strength.
1. Position the wheelchair as close as
possible along side the seat to which
you are transferring, with the rear
casters pointing away from it.
2. After the wheelchair is positioned
FIGURE 10.3 Transferring To and From
Other Seats
properly for transfer, verify that the
Motor Release Levers are engaged.
Refer to Engaging/Disengaging Motor
Release Lever on page 80.
3. Flip back or remove arm on side of wheelchair you are transferring from.
4. Shift body weight into seat with transfer.
During independent transfer, little or no seat platform will be beneath you. Use a transfer
board if at all possible.
Pronto® M71™with SureStep
™
28 Part No 1141449
SECTION 10—SAFETY/HANDLING OF WHEELCHAIRS
Percentage of Weight Distribution
WARNING
DO NOT attempt to reach objects if you have to move forward in the seat or pick
them up from the floor by reaching down between your knees.
Many activities require the wheelchair user to reach, bend and transfer in and out of
the wheelchair. These movements will cause a change to the normal balance,
center of gravity, and weight distribution of the wheelchair. To determine and
establish your particular safety limits, practice bending, reaching and transferring
activities in several combinations in the presence of a qualified healthcare
professional BEFORE attempting active use of the wheelchair.
Proper positioning is essential for your safety. When reaching, leaning, bending or
bending forward, it is important to use the casters as a tool to maintain stability and
balance.
The Pronto M71 with SureStep has a weight limitation of 300 lbs.
The Pronto M71 with SureStep and Formula PTO Plus has a weight limitation of
275 lbs.
M71 without Formula PTO Plus - For users over 250 lbs, the seat MUST be
mounted in the furthest rearward position and the front seat posts MUST be in the
1-inch raised position or lower.
DO NOT adjust the rear seat posts higher that the front seat posts.
Reaching, Leaning and Bending - Forward
WARNING
DO NOT attempt to reach objects if you have to move forward in the seat or pick
them up from the floor by reaching down between your knees.
NOTE: For this procedure, refer to FIGURE 10.4.
Position the front AND rear casters so that they are extended as far forward as possible
and engage Motor Release Levers.
FIGURE 10.4 Reaching, Leaning and Bending - Forward
Part No 1141449 29 Pronto® M71™with SureStep
™
SECTION 10—SAFETY/HANDLING OF WHEELCHAIRS
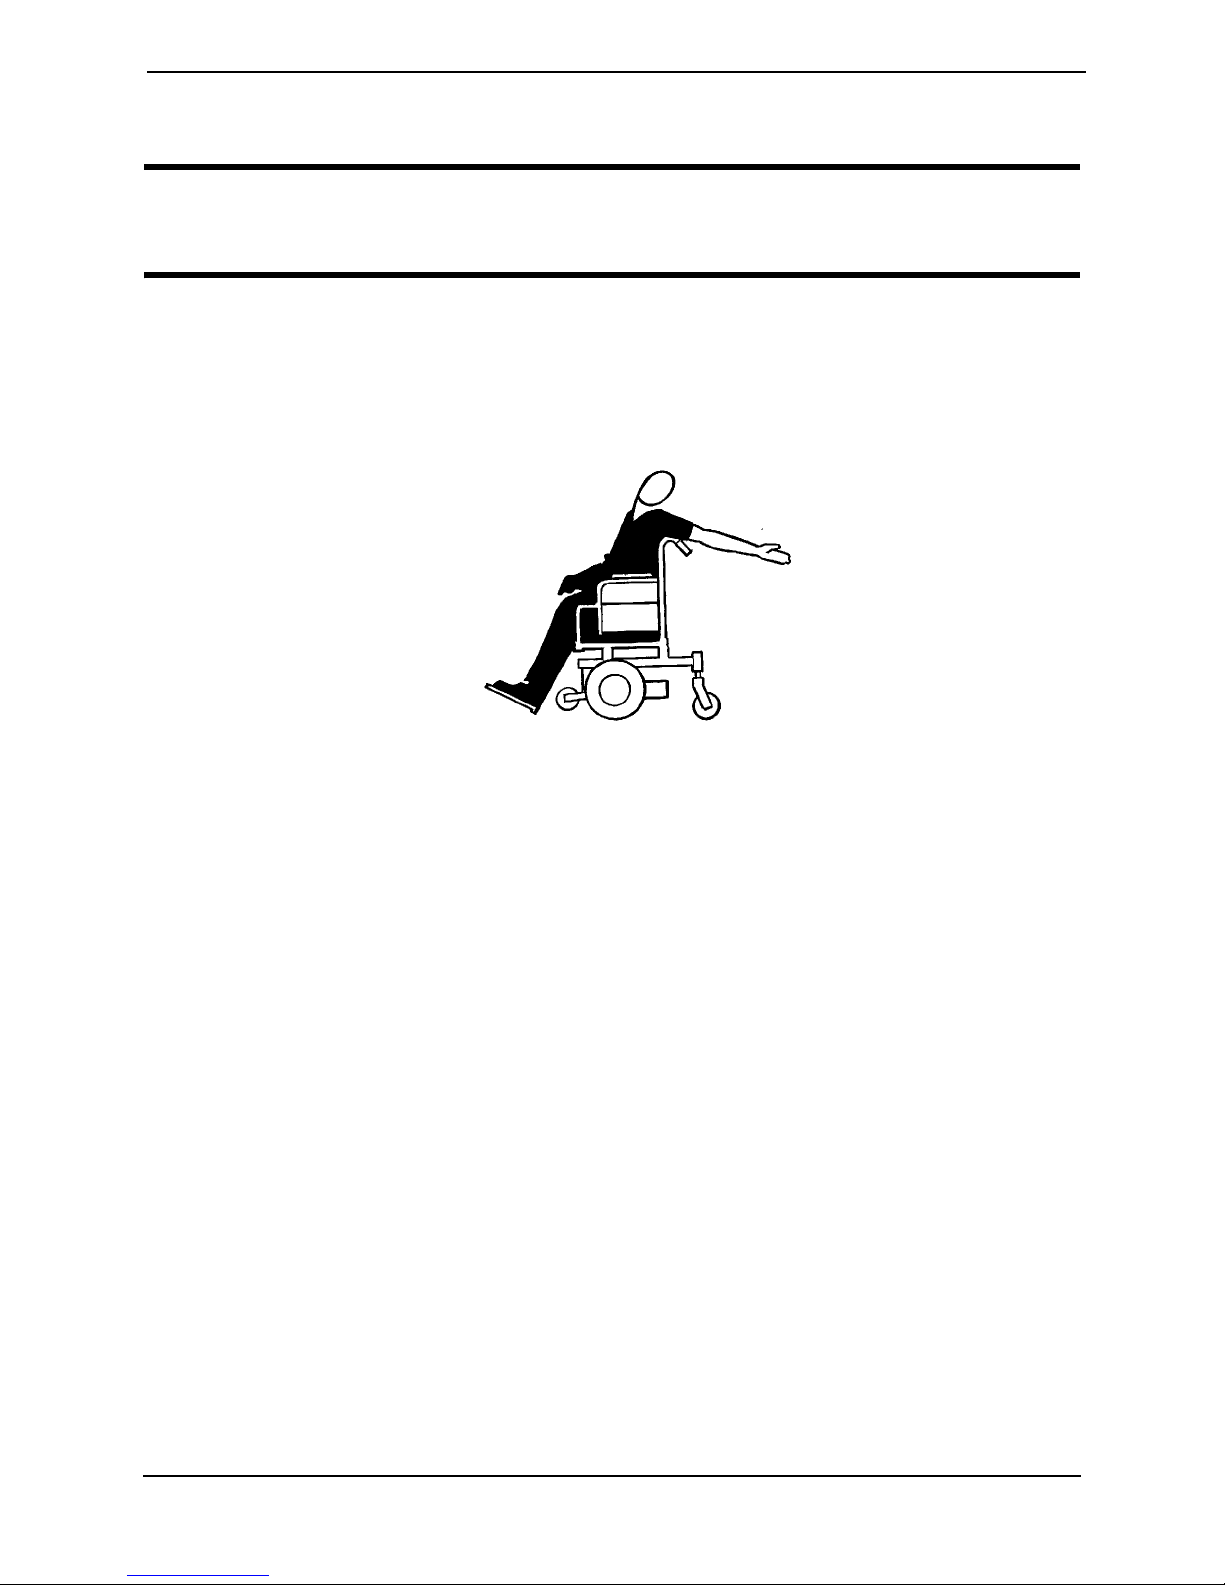
Reaching and Bending - Backward
WARNING
DO NOT lean over the top of the back upholstery. This will change your center of
gravity and may cause you to tip over.
NOTE: For this procedure, refer to FIGURE 10.5.
Position wheelchair as close as possible to the desired object. Point the front AND rear
casters rearward to create the longest possible wheelbase. Reach back only as far as your
arm will extend without changing your sitting position.
FIGURE 10.5 Reaching and Bending - Backward
Pronto® M71™with SureStep
™
30 Part No 1141449
 Loading...