

Invacare Perfecto2 Series, Perfecto2 IRC5PO2AW, Perfecto2 IRC5PO2VAW User Manual
User Manual
English . . . . . . . . . . . . . . . . . 1
Danish . . . . . . . . . . . . . . . . 33
Swedish . . . . . . . . . . . . . . . 66
Norwegian. . . . . . . . . . . . . 99
Finnish . . . . . . . . . . . . . . . 132
0434
Invacare®Perfecto
Oxygen Concentrators with SensO
HomeFill® Compatible
Model IRC5PO2AW
Model IRC5PO2VAW
™
Series
2
2
Dealer: This manual MUST be given to the end
user.
User:
BEFORE using this product, read this
manual and save for future reference.

WARNING
WARNING
DO NOT use this product or any available optional
equipment without first completely reading and
understanding these instructions and any additional
instructional material such as owner’s manuals, service
manuals or instruction sheets supplied with this product or
optional equipment. If you are unable to understand the
warnings, cautions or instructions, contact a healthcare
professional, dealer or technical personnel before attempting
to use this equipment - otherwise, injury or damage may
occur.
ACCESSORIES WARNING
Invacare products are specifically designed and
manufactured for use in conjunction with Invacare
accessories. Accessories designed by other manufacturers
have not been tested by Invacare and are not recommended
for use with Invacare products.
ACCESSORIES
There are many different types of humidifiers, oxygen tubing,
cannulas and masks that can be used with this device. You
should contact your local home care provider for
recommendations on which of these devices will be best for
you. They should also give you advice on the proper usage,
maintenance, and cleaning.
The supply accessories (nasal cannula, mask, tubing,
humidifier, etc.) used to deliver oxygen to the patient need to
include a means to reduce the propagation of fire in the
accessories for the safety of the patient and others. If a
commercially available, fire-activated flow stop device is used
in the accessories setup, it should be placed as close to the
patient as practicable.
Refer to OPTIONAL ACCESSORIES on page 31 for a list of
additional accessories compatible with these models.
Perfecto2™Series 2 Part No 1163147

TABLE OF CONTENTS
ACCESSORIES ......................................................2
SPECIAL NOTES ...................................................4
Contraindications ..........................................................................................5
LABEL LOCATION ................................................6
SECTION 1—GENERAL GUIDELINES .....................7
Radio Frequency Interference...................................................................9
SECTION 2—FEATURES ......................................10
SECTION 3—HANDLING ....................................11
Unpacking.......................................................................................................11
Inspection.......................................................................................................11
Storage............................................................................................................11
SECTION 4—TECHNICAL DESCRIPTION .............12
Intended Use.................................................................................................12
Technical Description ................................................................................12
SECTION 5—TYPICAL PRODUCT PARAMETERS .13
SECTION 6—OPERATING INSTRUCTIONS ..........16
Introduction...................................................................................................16
Select a Location..........................................................................................16
Set Up..............................................................................................................17
Flowrate..........................................................................................................21
SensO2 Oxygen Purity Indicator.............................................................22
Initial Startup of the Concentrator ........................................................22
Elapsed Time Meter (Hour Meter)........................................................23
SECTION 7—MAINTENANCE .............................24
Routine Maintenance..................................................................................24
SECTION 8—TROUBLESHOOTING GUIDE ............28
SECTION 9—OPTIONAL ACCESSORIES ...............31
RECYCLING INFORMATION ..............................32
CUSTOMER SERVICE AND WARRANTY
INFORMATION ................................................165
Part No 1163147 3 Perfecto2™Series

SPECIAL NOTES
SPECIAL NOTES
Signal words are used in this manual and apply to hazards or
unsafe practices which could result in personal injury or
property damage. Refer to the following table for definitions
of the signal words.
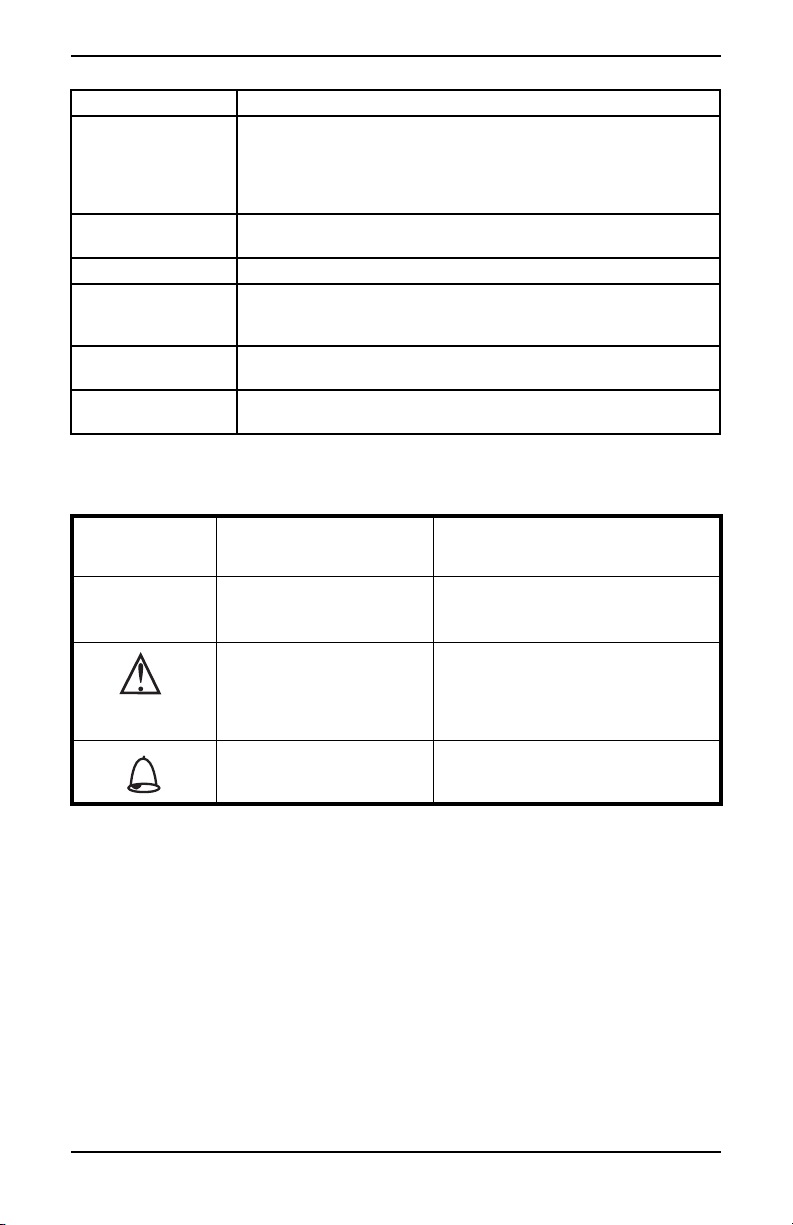
SIGNAL WORD MEANING
Danger indicates an imminently hazardous situation
DANGER
WARNING
CAUTION
which, if not avoided, will result in death or serious
injury.
Warning indicates a potentially hazardous situation
which, if not avoided, could result in death or
serious injury.
Caution indicates a potentially hazardous situation
which, if not avoided, may result in property
damage or minor injury or both.
NOTICE
The information contained in this document is subject to
change without notice.
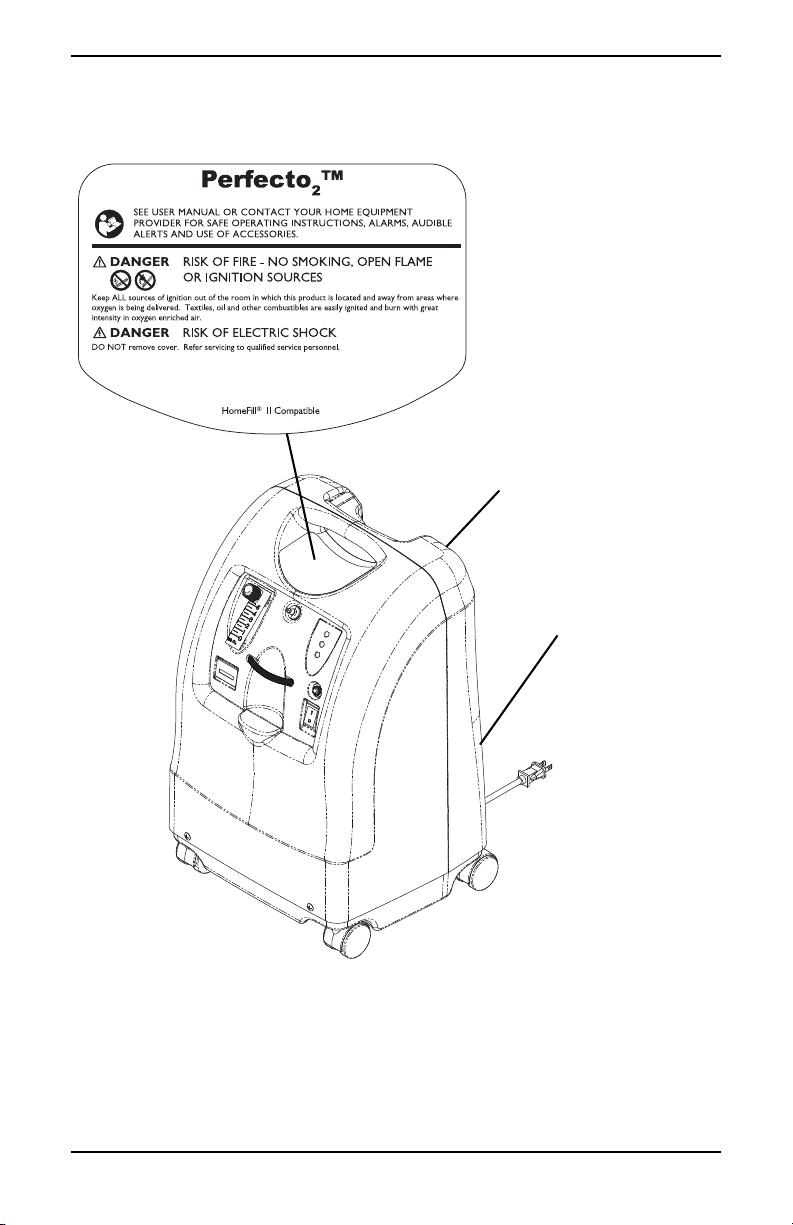
DANGER
DO NOT SMOKE while using this device. Keep all
matches, lit cigarettes or other sources of ignition out of
the room in which this product is located and away from
where oxygen is being delivered.
NO SMOKING signs should be prominently displayed.
Textiles and other materials that normally would not
burn are easily ignited and burn with great intensity in
oxygen enriched air. Failure to observe this warning can
result in severe fire, property damage and cause physical
injury or death.
Perfecto2™Series 4 Part No 1163147

SPECIAL NOTES
CAUTION
“Caution: Statutory law can restrict this device to sale by or on
order of a physician, or any other practitioner licensed by the
law of the governmental agency in which he/she practices to
use or order the use of this device.”
Invacare recommends an alternate source of supplemental
oxygen in the event of a power outage, alarm condition or
mechanical failure. Consult your physician or equipment
provider for the type of reserve system required.
This equipment is to be used as an oxygen supplement and is
not considered life supporting or life sustaining.
Contraindications
Invacare is not aware of any contraindications for the Invacare
Perfecto2 Concentrator Series.
Part No 1163147 5 Perfecto2™Series
LABEL LOCATION
Serial Number Label is
located on the resonator
intake assembly
Specification Label is
located on the back
near the bottom
LABEL LOCATION
Perfecto2™Series 6 Part No 1163147

SECTION 1—GENERAL GUIDELINES
SECTION 1—GENERAL GUIDELINES
In order to ensure the safe installation, assembly and
operation of the Perfecto2 concentrator these instructions
MUST be followed.
WARNING
This section contains important information for the safe
operation and use of this product.
DANGER
Risk of electric shock. DO NOT disassemble. Refer servicing
to qualified service personnel. No user serviceable parts.
TO REDUCE THE RISK OF BURNS, ELECTROCUTION,
FIRE OR INJURY TO PERSONS.
Avoid using while bathing. If continuous usage is required
by the physician’s prescription, the concentrator MUST be
located in another room at least 2.5 m (7 ft) from the bath.
DO NOT come in contact with the concentrator while wet.
DO NOT place or store product where it can drop into water
or other liquid.
DO NOT reach for product that has fallen into water.
Unplug IMMEDIATELY.
If the concentrator has a damaged cord or plug, if it is not
working properly, if it has been dropped or damaged, or
dropped into water, call qualified technician for
examination and repair.
A spontaneous and violent ignition may occur if oil, grease
or greasy substances come in contact with oxygen under
pressure. These substances MUST be kept away from the
oxygen concentrator, tubing and connections, and all other
oxygen equipment. DO NOT use any lubricants unless
recommended by Invacare.
Part No 1163147 7 Perfecto2™Series

SECTION 1—GENERAL GUIDELINES
DANGER
Avoid creation of any spark near medical oxygen
equipment. This includes sparks from static electricity
created by any type of friction.
Operating Information
For optimum performance, Invacare recommends that each
concentrator be on and running for a minimum of 30 minutes
at a time. Shorter periods of operation may reduce maximum
product life.
Keep the oxygen tubing, cord, and unit out from under such
items as blankets, bed coverings, chair cushions, clothing and
away from heated or hot surfaces, including space heaters,
stoves and similar electrical appliances.
DO NOT move or relocate concentrator by pulling on the
power cord.
NEVER drop or insert any object or liquid into any opening.
Invacare recommends that Crush-Proof oxygen tubing be
used with this product and not exceed 15.2 m (50 ft) in length.
There are no user serviceable parts. This does not include
normal maintenance items. See maintenance section for user
maintenance items.
A product should NEVER be left unattended when plugged
in. Make sure the Perfecto2 is Off when not in use.
Close supervision is necessary when this product is used near
children or physically-challenged individuals.
Additional monitoring or attention may be required for
patients using this device who are unable to hear or see
alarms or communicate discomfort.
DO NOT connect the concentrator in parallel or series with
other oxygen concentrators or oxygen therapy devices.
Perfecto2™Series 8 Part No 1163147

SECTION 1—GENERAL GUIDELINES
Radio Frequency Interference
This equipment has been tested and found to comply with
EMC limits specified by IEC/EN 60601-1-2. These limits are
designed to provide a reasonable protection against
electromagnetic interference in a typical medical installation.
Other devices may experience interference from even the low
levels of electromagnetic emissions permitted by the above
standards. To determine if the emissions from the Perfecto2 is
causing the interference, turn the Perfecto2 Off. If the
interference with the other device(s) stops, then the Perfecto2
is causing the interference. In such rare cases, interference
may be reduced or corrected by one of the following
measures:
• Reposition, relocate, or increase the separation
between the equipment.
• Connect the equipment into an outlet on a circuit
different from that to which the other device(s) is
connected.
Part No 1163147 9 Perfecto2™Series
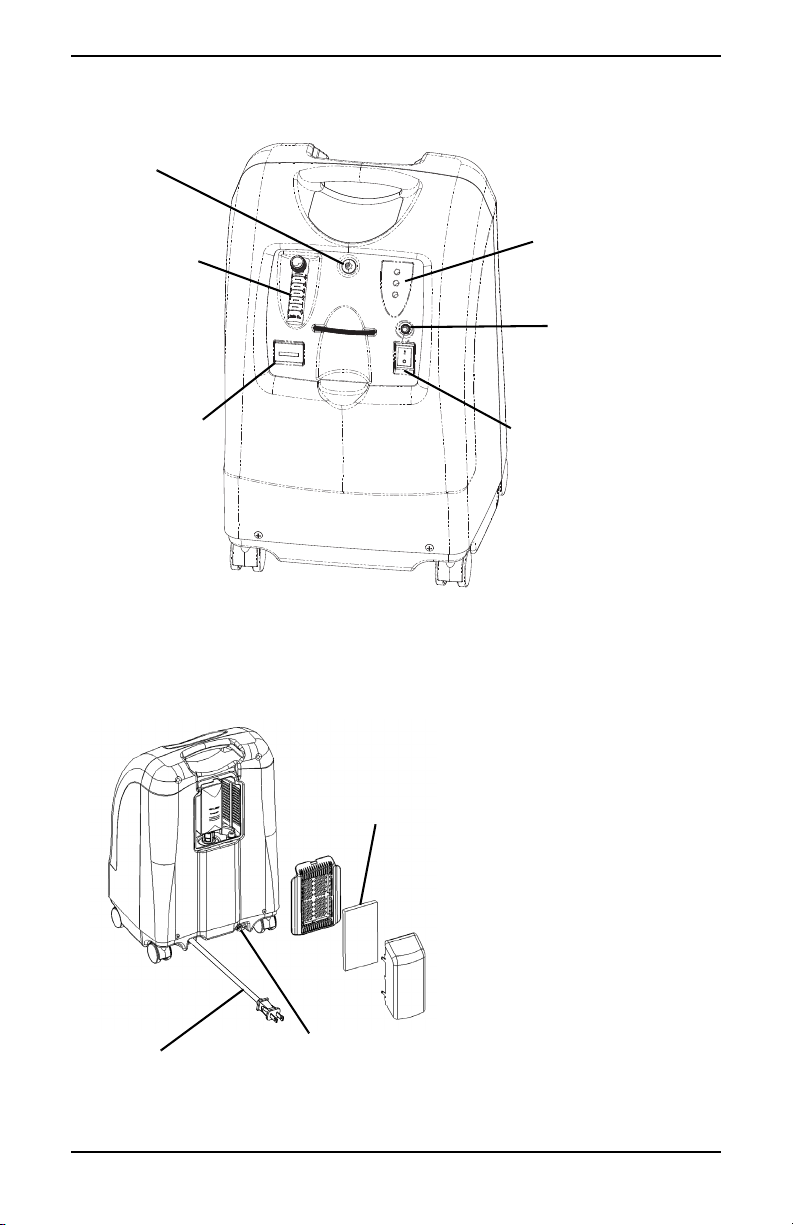
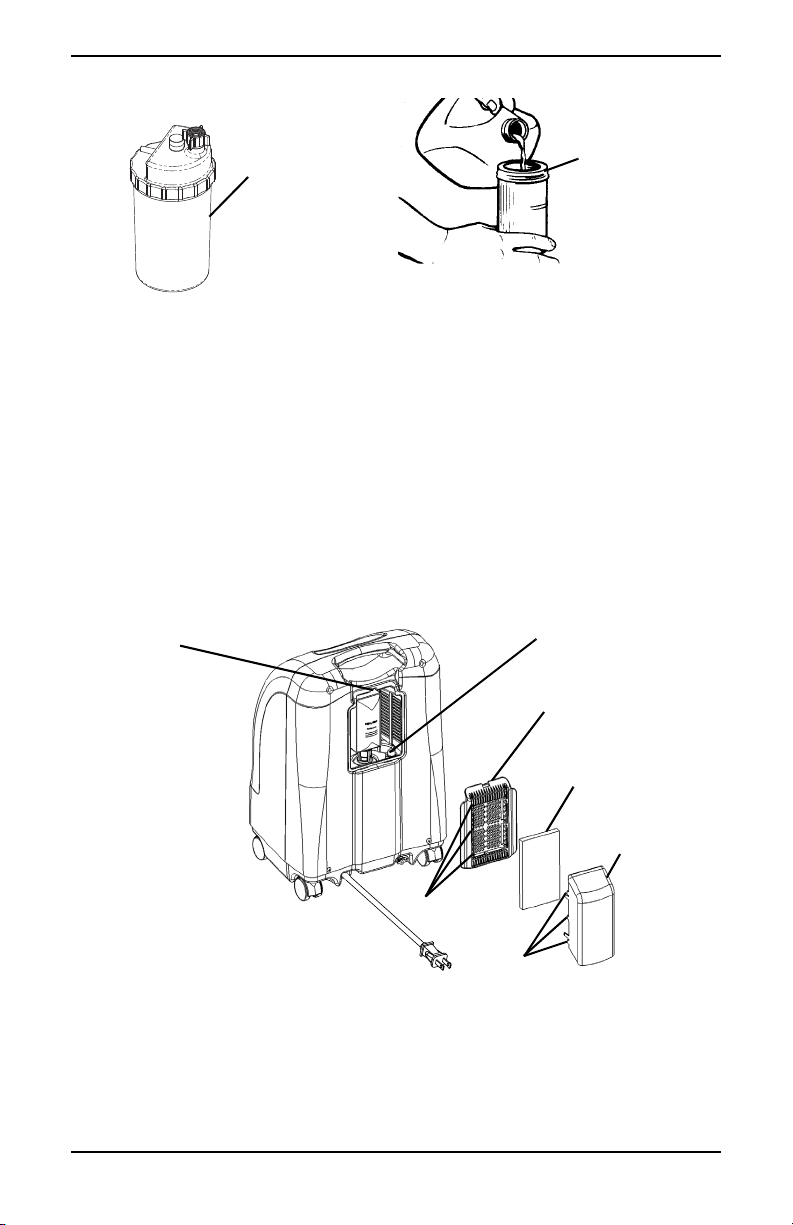
SECTION 2—FEATURES
Oxygen Outlet
Flowmeter
Oxygen Purity Indicator
Lights / Fault and Power
Indicator Lights
Power Switch
Circuit Breaker
Elapsed Time
Meter
Cabinet
Filter
REAR VIEW
*HF Outlet
Fitting
Power
Cord
*NOTE: This outlet fitting
is to be used only for filling
oxygen cylinders with the
HomeFill home oxygen
compressor. The outlet
fitting does not affect
concentrator performance.
Refer to the HomeFill
owner's manual, part
number 1145806, for
connection and operating
instructions. When not in
use, the plug provided with
the concentrator should be
inserted into the outlet
fitting. For more
information about the
HomeFill, contact your
Invacare dealer.
SECTION 2—FEATURES
Perfecto2™Series 10 Part No 1163147
SECTION 3—HANDLING
SECTION 3—HANDLING
The concentrator should ALWAYS be kept in the upright
position to prevent cabinet damage while being transported.
If the concentrator is to be reshipped by common carrier,
additional cartons are available from Invacare.
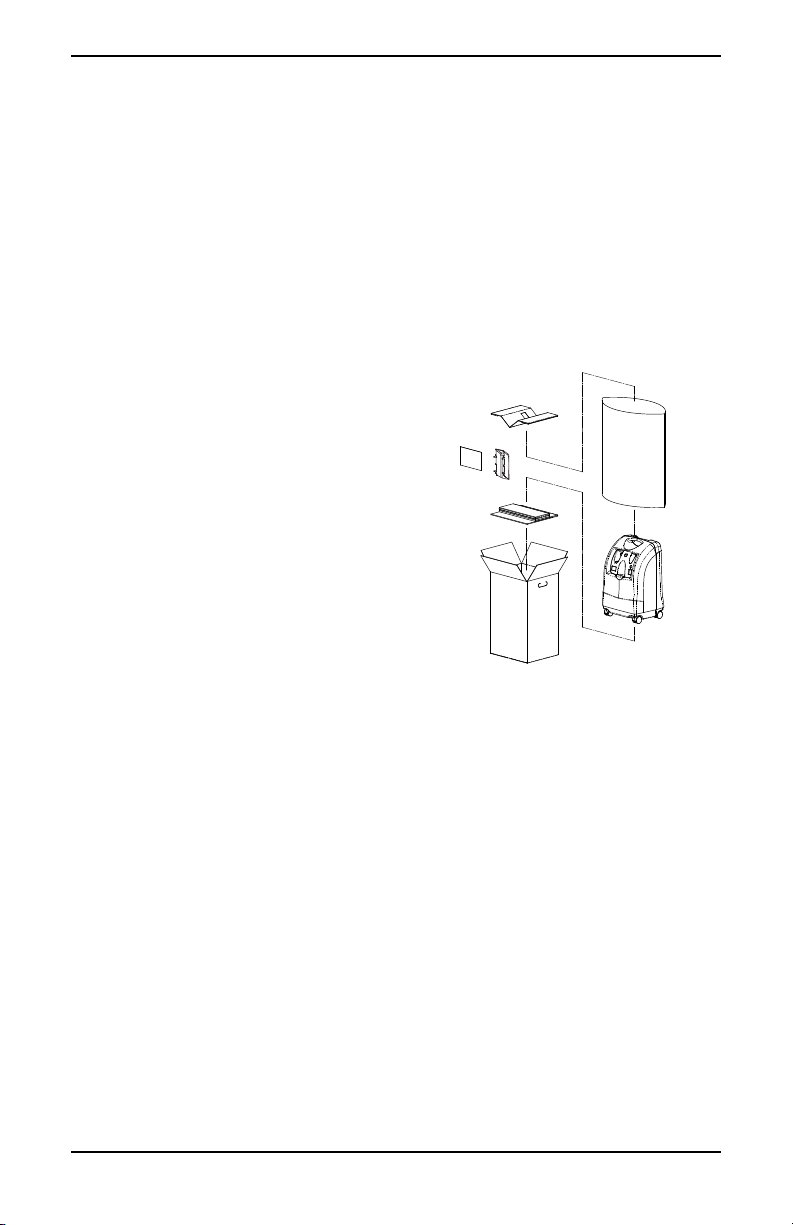
Unpacking
NOTE: For this procedure, refer to FIGURE 3.1.
1. Check for any obvious
damage to the carton or
its contents. If damage is
evident, notify the
carrier, or your local
dealer.
2. Remove all loose packing
from the carton.
3. Carefully remove the
concentrator, power cord,
air inlet scoop, assembly
instructions, labels and
user manual from the
carton.
NOTE: Unless the oxygen concentrator is to be used
IMMEDIATELY, leave concentrator in its packaging for storage
until use of the concentrator is required.
FIGURE 3.1 Unpacking
Inspection
1. Inspect/examine exterior of the oxygen concentrator for
nicks, dents, scratches or other damages. Inspect all
components.
Storage
1. Store the repackaged oxygen concentrator in a dry area.
2. DO NOT place objects on top of repackaged concentrator.
Part No 1163147 11 Perfecto2™Series

SECTION 4—TECHNICAL DESCRIPTION
SECTION 4—TECHNICAL
DESCRIPTION
Intended Use
Your oxygen concentrator is intended for individual use by
patients with respiratory disorders who require supplemental
oxygen. The device is not intended to sustain or support life.
The concentrator is intended for use within a home or
institutional environment.
Technical Description
The Invacare Perfecto2 concentrator is used by patients with
respiratory disorders who require supplemental oxygen. The
device is not intended to sustain or support life.
The oxygen concentration level of the output gas ranges from
87% to 95.6%. The oxygen is delivered to the patient through
the use of a nasal cannula.
The Invacare Perfecto2 concentrator uses a molecular sieve
and pressure swing adsorption methodology to produce the
oxygen gas output. Ambient air enters the device, is filtered
and then compressed. This compressed air is then directed
toward one of two nitrogen adsorbing sieve beds.
Concentrated oxygen exits the opposite end of the active sieve
bed and is directed into an oxygen reservoir where it is
delivered to the patient.
The Invacare Perfecto2 concentrator is capable of operation by
the patient in a home environment or in an institutional
environment. Device operates at a nominal 230 VAC/50 Hertz
supply.
NOTE: Both concentrator models (IRC5PO2AW and
IRC5PO2VAW) have identical operating parameters with the
exception of the product weight and power consumption.
Service information will be available upon request to
qualified technical personnel only.
Perfecto2™Series 12 Part No 1163147

SECTION 5—TYPICAL PRODUCT PARAMETERS
IPX1
SECTION 5—TYPICAL PRODUCT
PARAMETERS
NOTE: All parameters apply to both concentrator models (IRC5PO2AW and IRC5PO2VAW)
unless otherwise specified.
Alternating Current
Type BF equipment
Unit running
Unit not running
Attention - Consider Accompanying Documents
DO NOT smoke
Class II, Double Insulated
Protected against dripping water
No open flame
RISK OF ELECTRIC SHOCK
This product complies with Directive 93/42/EEC concerning medical
devices.
The launch date of this product is stated in the CE
declaration of conformity.
Electrical
Requirements:
Rated Current Input: 1.5 A
Sound Level: 40 dBA Average
Altitude: Up to 6,000 ft (1828 meters) above sea level without degradation of
Oxygen Output
Concentration Levels:
Maximum Outlet
Pressure: 34.5 kPa ± 3.45 kPa (5 psi ± 0.5 psi)
Part No 1163147 13 Perfecto2™Series
230 VAC ± 10% (253 VAC/207 VAC), 50 Hz
concentration levels. Not recommended for use above 6,000 ft
(1828 meters).
Atmospheric pressure range: 101.33kPa - 81.22kPa
87% to 95.6% at 0.5 to 5 L/min
93% ± 3% at 2 L/min
NOTE: Stated concentration levels achieved after initial warm-up
period (approximately 30 minutes).

SECTION 5—TYPICAL PRODUCT PARAMETERS
Flow Range: 0.5 to 5 L/min (maximum)
For flowrates less than 1 L/min, we recommend the use of the
Invacare Pediatric Flowmeter Accessory (IRCPF16AW)
Potential Obstruction
Alert:
0 L/min to 0.5 L/min
The concentrator detects a condition that may indicate a potential
obstruction of the output oxygen.
Rapid audible beeping alert (this alert is deactivated when
accessories are connected). May be associated with flow setting of
0.5 L/min or less.
Power
Consumption:
Perfecto
Perfecto
AW - 300 W @ 5 L/min, 280 W @3 L/min
2
VAW - 320 W@ 5 L/min
2
Pressure Relief
Mechanism
241 kPa ± 24.1 kPa (35 psi ± 3.5 psi)
Operational at:
Change in maximum
recommended flow
0.7 L/min
when back pressure of
7kPa is applied:
Filters: Cabinet, Outlet HEPA and Compressor Inlet
Safety System: Current overload or line surge shutdown
High temperature compressor shutdown
High Pressure Alarm w/compressor shutdown Low Pressure Alarm
w/compressor shutdown Battery Free Power Loss Alarm
SensO2 Oxygen System Possible Obstruction Alert.
Width: 38.1 cm ± 1 cm (15 in ± 3/8 in)
Height: 58.4 cm ± 1 cm (23 in ± 3/8 in)
Depth: 30.5 cm ± 1 cm (12 in ± 3/8 in)
Weight: Perfecto
Perfecto2VAW Models - 18.1 kg ± 1 kg (40 lbs ± 2 lbs)
AW Models - 20.5 kg ± 1 kg (45 lbs ± 2 lbs)
2
Shipping Weight: Perfecto2AW Models - 22.7 kg ± 1 kg (50 lbs ± 2 lbs)
Perfecto
VAW Models - 20.4 kg ± 1 kg (45 lbs ± 2 lbs)
2
Operating Ambient
Conditions: 10°C - 35°C (50°F - 95°F) at 20-60% relative humidity
Exhaust Cooling Air
Temperature: Less than Ambient +19°C (+ 45°F)
Oxygen Output
Temperature: Less than Ambient +3°C (+ 8°F)
Cabinet: Impact Resistant flame-retardant plastic cabinet that conforms to UL
94-V0
No AP/APG Not suitable for use in the presence of a flammable anaesthetic
mixture
Standards and
Regulatory Listing:
IEC/EN 60601-1, A1, A2
IEC/EN 60601-1-2
IEC/EN61000-3-2,
IEC/EN61000-3-3
ISO8359
MDD 93/42/EEC, Annex I and IX
CE marked model IRC5PO2AW & IRC5PO2VAW
Perfecto2™Series 14 Part No 1163147
SECTION 5—TYPICAL PRODUCT PARAMETERS
O
2
Electrical: No extension cords
Placement: No closer than 30,5 cm (12 in) from any wall, furniture, draperies, or
Tubing: 2 m (7 ft) cannula with a maximum 15 m (50 ft) of Crush-Proof
Time of Operation: Up to 24 hours per day
Recommended
Storage and Shipping
Temperature:
Environment: Smoke and soot-free
Minimum Operating
Time: 30 Minutes
furniture to assure sufficient air flow
Avoid deep pile carpets and heaters, radiators or hot air registers
Floor location only
No confined spaces (Example: No closets)
Tubing (DO NOT pinch)
-29°C to 65°C (-20°F to 150°F) at 15-95% relative humidity
No confined spaces (Example: No closets)
O2 INDICATORS
LABEL
SYMBOL
O2 PURITY INDICATOR LIGHTS (LED)
SYSTEM OKAY
O2 over 85%
Between 73%
O
2
to 85%
SYSTEM FAILURE
O2 Below 73%
GREEN Indicator Light
YELLOW Indicator light
A. YELLOW Solid
B. YELLOW Flashing Sensor
Failure
Call a qualified technician.
RED Indicator Light
Continuous Audible Alarm
Sieve-GARD Compressor Shutdown
Part No 1163147 15 Perfecto2™Series

SECTION 6—OPERATING INSTRUCTIONS
SECTION 6—OPERATING
INSTRUCTIONS
Introduction
Your oxygen concentrator is intended for individual use. It is an
electronically operated device that separates oxygen from room
air. It provides high concentration of oxygen directly to you
through a nasal cannula. Clinical studies have documented that
oxygen concentrators are therapeutically equivalent to other
types of oxygen delivery systems.
Your provider will show you how to use your oxygen
concentrator. He/She should be contacted with any questions or
problems regarding your oxygen concentrator. This owner’s
manual will tell you about your concentrator and will serve as a
reference as you use your concentrator.
Select a Location
WARNING
NEVER block the air openings of the product or place it on a soft
surface, such as a bed or couch, where the air opening may be
blocked. Keep the openings free from lint, hair and the like.
Move oxygen concentrator at least 30,5 cm (12 inches) away from
walls, draperies or furniture.
You may select a room in your house where using your oxygen
concentrator would be most convenient. Your concentrator can
be easily rolled from room to room on its casters.
Your oxygen concentrator will perform best when operated
under the conditions outlined in the Typical Product Parameters
on page 13.
Perfecto2™Series 16 Part No 1163147

SECTION 6—OPERATING INSTRUCTIONS
Usage in environments other than those described may result in
the need for increased equipment maintenance. The air intake of
the unit should be located in a well ventilated area to avoid
airborne pollutants and/or fumes. DO NOT use in a closet.
Set Up
1. Plug in power cord to an electrical outlet.
2. Connect Humidifier (If So Prescribed)
WARNING
DO NOT fill humidifier bottle with hot water. Allow boiled
water to cool to room temperature before filling.
DO NOT overfill humidifier.
DO NOT reverse the oxygen input and output connections.
Water from the humidifier bottle will travel through the cannula
back to the patient.
When using tubing connections longer than 2.1 m (7 feet) in
length, position the humidifier as close to the patient as possible
to allow for maximum humidification output.
NOTE: For this procedure, refer to FIGURE 6.1, FIGURE 6.2 on
page 18, FIGURE 6.3 on page 20.
1. Remove cap from bottle.
2. Fill humidifier with boiled tap water or bottled water to the
level indicated by the manufacturer. Boil tap water for
approximately 10 minutes and cool to room temperature
prior to use.
Part No 1163147 17 Perfecto2™Series
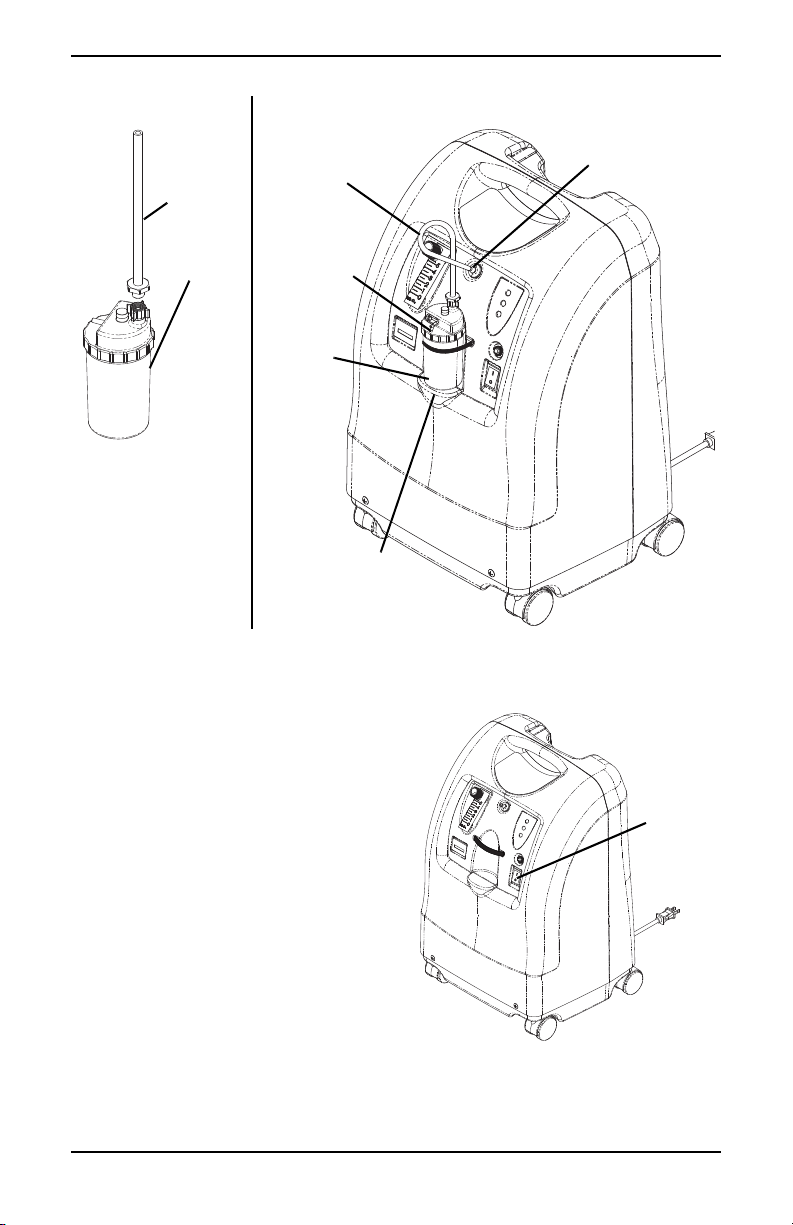
SECTION 6—OPERATING INSTRUCTIONS
Humidifier
Bottle w/o Cap
Humidifier
Bottle with Cap
Insert Flat
Head
Screwdriver
Here
Filter Access
Door
Humidifier Bottle
Adapter
Cabinet Filter
Air
Scoop
Tabs
Slots
FIGURE 6.1 Filling the Humidifier
3. Insert a flathead screwdriver in the plate groove on the top
edge of the filter access door and gently pry the filter access
door off (FIGURE 6.2).
4. Pull up and remove the humidifier bottle adapter (FIGURE
6.2).
5. Replace the filter access door and install the air scoop onto the
filter access door by inserting the six tabs on the air scoop into
the six slots on the sides of the filter access door.
6. Attach the humidifier bottle adapter to the humidifier bottle
Perfecto2™Series 18 Part No 1163147
FIGURE 6.2 Humidifer Bottle Adapter
by turning the wing nut on the humidifier bottle
counterclockwise until it is securely fastened. See Detail “A”
in FIGURE 6.3.

SECTION 6—OPERATING INSTRUCTIONS
7. Select the location for the humidifier bottle/adapter
assembly:
•When placing the humidifier bottle in the
compartment on the concentrator, attach the
humidifier bottle/adapter tube to the oxygen outlet
connector on the concentrator. See Detail “B” in
FIGURE 6.3.
•To position the humidifier bottle in a patient side
location, place the humidifier bottle/adapter
assembly in the humidifier bottle holder (M1521,
Refer to Optional Accessories on page 31) and place
on a flat surface as close to the patient as possible.
Attach an oxygen tubing connector (MS4301, Refer
to Optional Accessories on page 31) to the end of
the humidifier bottle/adapter tube. Connect one
end of the oxygen supply tubing (MS4107 or
MS4121, Refer to Optional Accessories on page 31)
to the free end of the oxygen tubing connector and
the opposite end to the oxygen outlet connector on
the concentrator.
NOTE: When using tubing connections longer than 2.1 m (7 feet)
in length, position the humidifier as close to the patient as possible
to allow for maximum humidification output.
8. Attach the patients’ nasal cannula supply tube to the
humidifier bottle outlet. See Detail “B” in FIGURE 6.3.
9. After assembly, ensure that oxygen is flowing through the
nasal cannula.
Part No 1163147 19 Perfecto2™Series
SECTION 6—OPERATING INSTRUCTIONS
Humidifier
Bottle
Humidifier
Compartment
Humidifier
Bottle
Adapter
Humidifier
Bottle
DETAIL “A”
DETAIL “B”
Oxygen
Tubing
Oxygen
Outlet
Connector
Humidifier
Bottle
Outlet
On/Off
(I/O)
Power
Switch
FIGURE 6.3 Humidifier Compartment
Power Switch
NOTE: For this procedure, refer to
FIGURE 6.4.
1. Press power switch to On
position. All the panel
lights and the audible
alarm will come on for one
second, indicating that the
unit is functioning
properly.
FIGURE 6.4 Power Switch
Perfecto2™Series 20 Part No 1163147

SECTION 6—OPERATING INSTRUCTIONS
Flowrate
NOTE: For this procedure, refer to FIGURE 6.5.
NOTE: Take care not to set the flow above RED ring. An oxygen flow
greater than 5 L/min will decrease the oxygen concentration.
1. Turn the flowrate knob to the setting prescribed by your
physician or therapist.
WARNING
DO NOT change the L/min setting on the flowmeter unless a
change has been prescribed by your physician or therapist.
NOTE: To properly read the flowmeter, locate the prescribed flowrate
line on the flowmeter. Next, turn the flow knob until the ball rises to the
line. Now, center the ball on the L/min line prescribed. ‘
NOTE: A Potential Obstruction Alert indicates a condition that may
be associated with a partial or complete obstruction of oxygen output.
2. If the flowrate on the flowmeter ever falls below 0.5 L/min
more than about one minute, the Potential Obstruction Alert
will be triggered. This is a rapid beeping of the audible alarm.
Check your tubing or accessories for blocked or kinked
tubing or a defective humidifier bottle. After rated flow is
restored between 0.5 L/min and 0.75 L/min, the Potential
Obstruction Alert will turn off.
NOTE: The use of some accessories such as the PreciseRx pediatric
flowmeter and the HomeFill compressor will deactivate the Potential
Obstruction Alert.
Part No 1163147 21 Perfecto2™Series
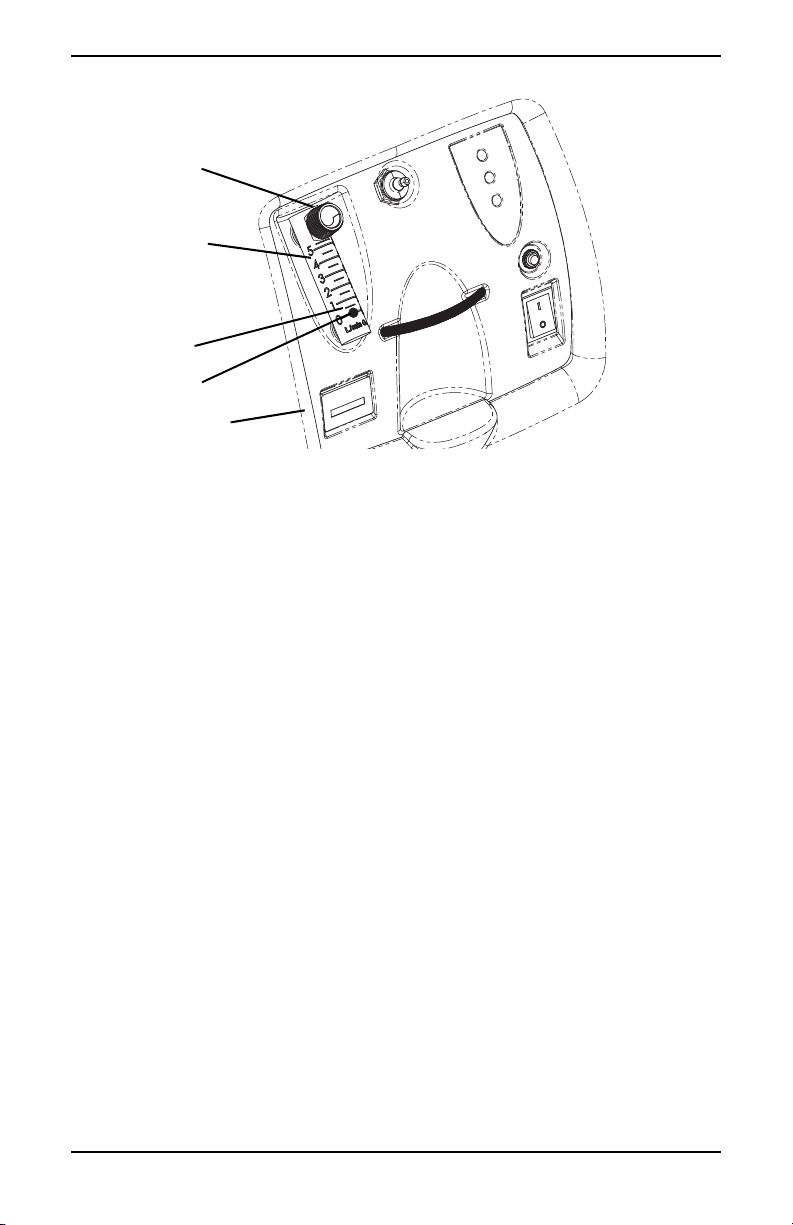
SECTION 6—OPERATING INSTRUCTIONS
Flow Knob
Ball
Flowmeter
Front Panel
0.5 L/min
FIGURE 6.5 Flowrate
SensO2 Oxygen Purity Indicator
This feature monitors the purity of oxygen generated by the
oxygen concentrator. If purity falls below factory preset
standards, indicator lights on the control panel will illuminate.
Initial Startup of the Concentrator
NOTE: Concentrator may be used during the initial start warm-up
time (approximately 30 min) while waiting for the O2 purity to reach
maximum.
When the unit is turned on, the GREEN light will come on
(SYSTEM OK/O2 greater than 85%). After five minutes, the
oxygen sensor will be operating normally and will control the
indicator lights depending on oxygen concentration values.
Explanation of Oxygen Purity Indicator Lights
NOTE: For this procedure, refer to FIGURE 6.6 on page 23.
GREEN light (O2) - Normal Operation.
Perfecto2™Series 22 Part No 1163147
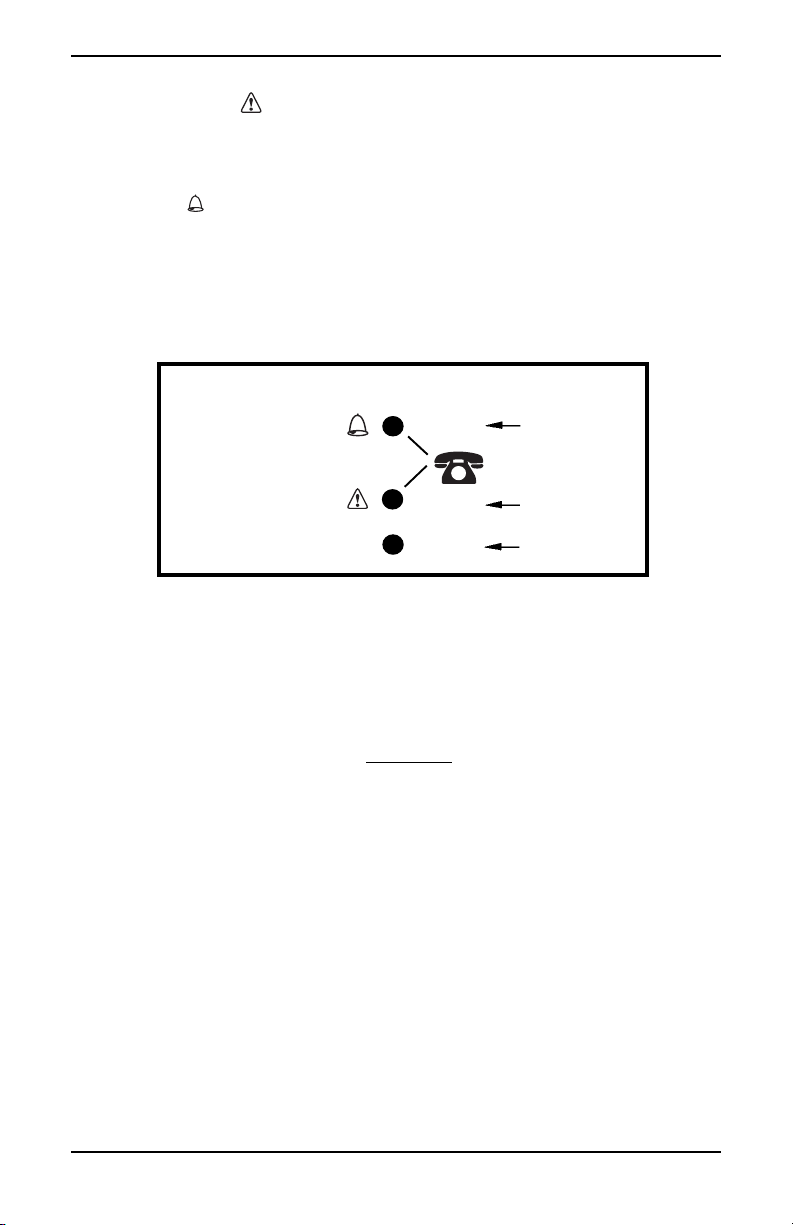
SECTION 6—OPERATING INSTRUCTIONS
O
2
Auto Shut Down
Use Backup
Below
Normal
Normal
RED
Call Supplier
YELLOW
GREEN
OXYGEN PURITY
YELLOW light ( ) - Immediately call supplier. You may
continue to use the concentrator unless instructed otherwise by
your supplier. Be certain that backup oxygen is nearby.
RED light ( ) - Total unit shutdown. Immediately switch to
backup oxygen supply and call supplier.
GREEN light - with YELLOW light flashing - Immediately call
supplier. Oxygen sensor malfunctioning; you may continue to
use the concentrator.
FIGURE 6.6 Explanation of Oxygen Purity Indicator Lights
Elapsed Time Meter (Hour Meter)
The hour meter displays the cumulative number of hours the
unit has operated. Reference Features on page 10 for specific
location.
Part No 1163147 23 Perfecto2™Series

SECTION 7—MAINTENANCE
SECTION 7—MAINTENANCE
WARNING
The Invacare concentrators are specifically designed to
minimize routine preventive maintenance. Only qualified
personnel should perform preventive maintenance on the
concentrator.
Unplug the concentrator when cleaning. To avoid electrical
shock, DO NOT remove cabinet.
NOTE: At a minimum, preventive maintenance MUST be
performed according to the maintenance record guidelines. In places
with high dust or soot levels, maintenance may need to be performed
more often. Refer to Preventive Maintenance Record on page 27.
Routine Maintenance
Cleaning the Cabinet Filter
CAUTION
DO NOT operate the concentrator without the filter installed.
NOTE: For this procedure, refer to FIGURE 7.1 on page 25.
NOTE: There is one cabinet filter located on the back of the cabinet.
1. Remove the filter and clean as needed.
NOTE: Enviromental conditions that may require more frequent
inspection and cleaning of the filter include, but are not limited to:
high dust, air pollutants, etc.
2. Clean the cabinet filter with a vacuum cleaner or wash in
warm soapy water and rinse thoroughly.
3. Dry the filter thoroughly before reinstallation.
Perfecto2™Series 24 Part No 1163147
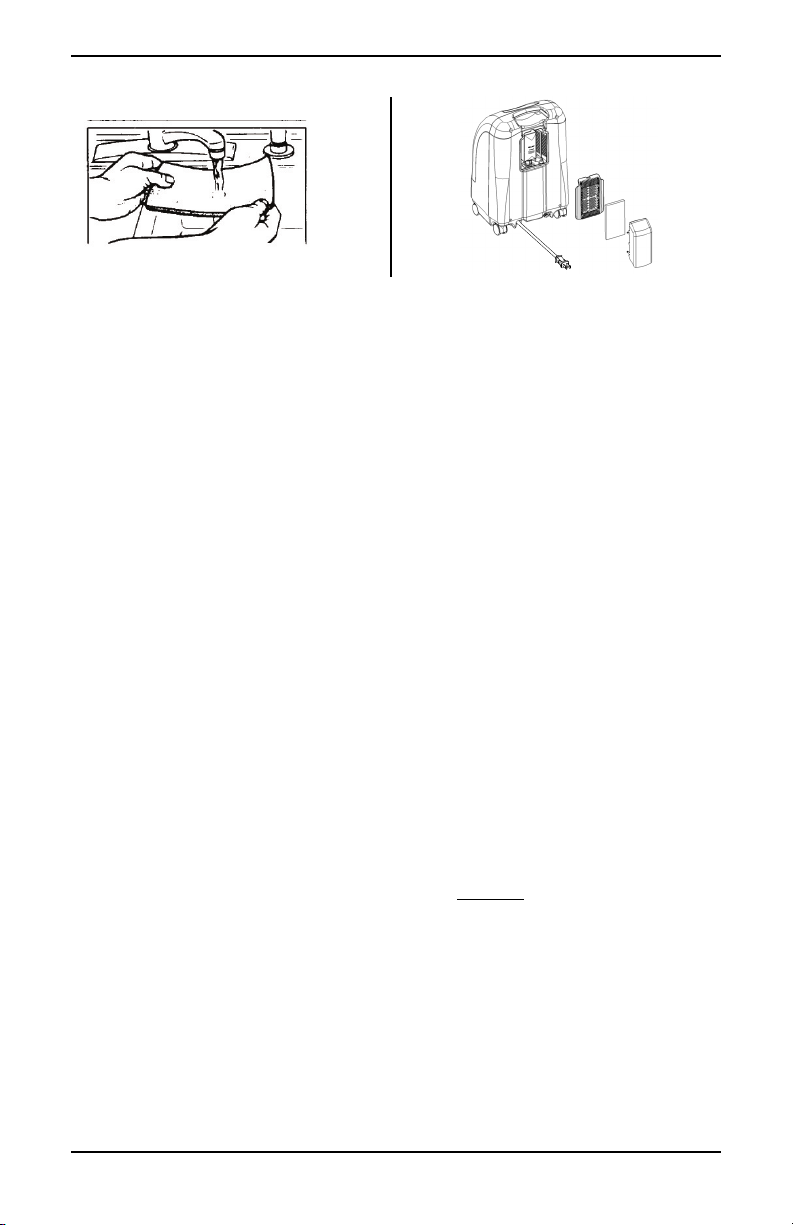
SECTION 7—MAINTENANCE
FIGURE 7.1 Cleaning the Cabinet Filter
Cleaning the Cabinet
1. Clean the cabinet with a mild household cleaner and
non-abrasive cloth or sponge.
Humidifier Cleaning and Thermic Disinfection
NOTE: Clean and disinfect the oxygen humidifier daily to reduce
limestone deposits and eliminate possible bacterial contamination.
Follow the instructions provided by the manufacturer. If none are
provided, follow these STEPS:
1. Wash humidifier in soapy water and rinse with a solution
of ten parts water and one part vinegar.
2. Rinse thoroughly with hot water.
3. Immerse humidifier completely in water at 65°C for 15
minutes.
4. Air dry thoroughly.
NOTE: To limit bacterial growth, air dry the humidifier thoroughly
after cleaning when not in use. Refer to Set Up on page 17 for use.
Part No 1163147 25 Perfecto2™Series

SECTION 7—MAINTENANCE
Cleaning and Disinfection Between Patients
WARNING
ONLY qualified personnel should perform cleaning and
disinfection of the concentrator and accessories between
patients.
NOTE: Follow these instructions to eliminate possible pathogen
exchange between patients due to contamination of components or
accessories. Preventive Maintenance should also be performed at
this time if necessary.
1. Dispose of and replace all patient side accessories not
suitable for multiple patient use, including but not limited
to:
• Nasal Cannula and Tubing
•Mask
• Humidifier
2. Perform Routine Maintenance on page 24 and Preventive
Maintenance on page 27, as applicable.
3. Check concentrator for possible external damage or signs
that may require service or repair.
4. Ensure concentrator functions properly and all alarms are
in working order.
5. Before repackaging and distribution to new patient,
ensure packaging contents contain the concentrator,
power cord, air inlet scoop, assembly instructions,
humidifier, cannula, labels and user manual.
Perfecto2™Series 26 Part No 1163147
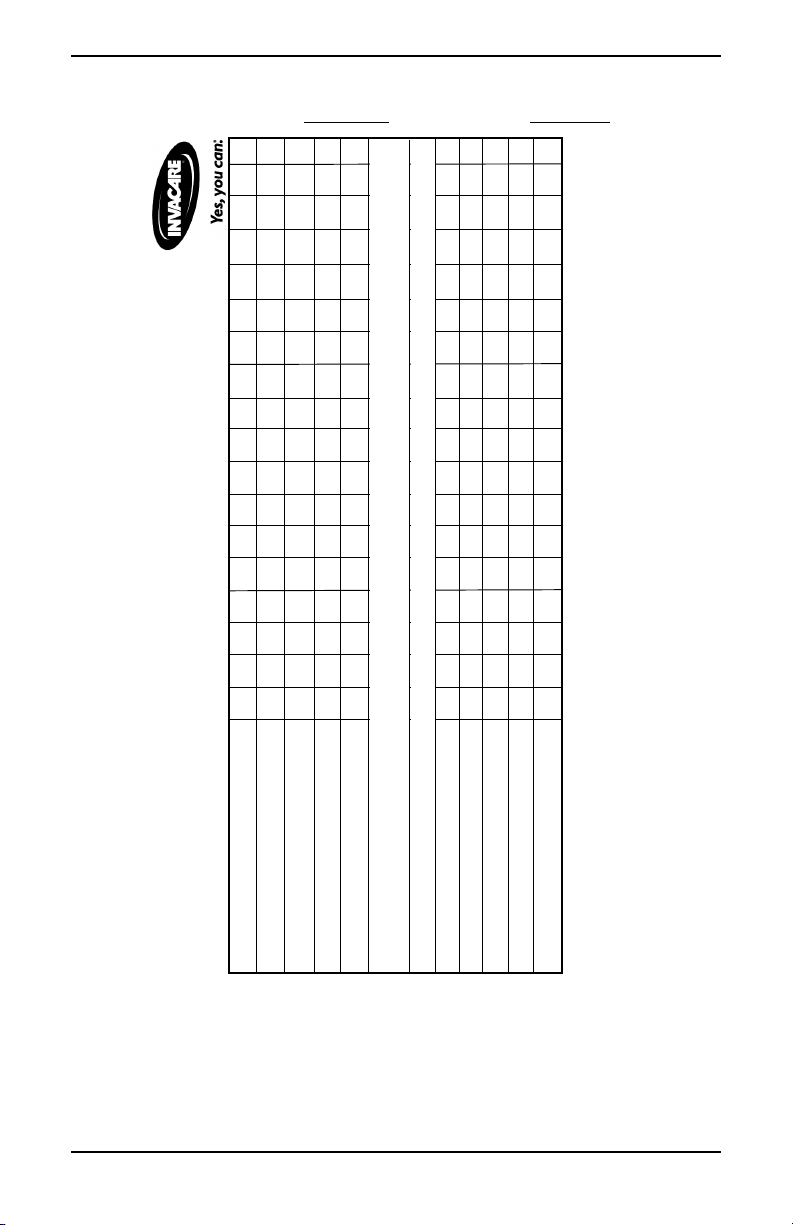
SECTION 7—MAINTENANCE
MODEL NO. IR C SERIAL NO.
PREVENTIVE MAINTENANCE RECORD
Record Date of Service
Record Elapsed Hours On Hour Meter
Clean Cabinet Filter(s)
Check Prescribed L/min. Flow Rate
- EVERY
26,280 HOURS
Check Oxygen Concentration
UNITS WITH SensO
2
Clean/Replace Cabinet Filter(s)
Check Outlet HEPA Filter*
Check Compressor Inlet Filter*
Check Power Loss Alarm
*NOTE: Refer to Preventive Maintenance section of Service Manual.
NOTE:
26,280 hours are equivalent to usage 24 hours per day, 7 days per week, for 3 years.
ON EACH INSPECTION
DURING PREVENTIVE MAINTENANCE SCHEDULE, OR BETWEEN PATIENTS
FIGURE 7.2 Preventive Maintenance Record
Part No 1163147 27 Perfecto2™Series

SECTION 8—TROUBLESHOOTING GUIDE
SECTION 8—TROUBLESHOOTING
GUIDE
SYMPTOM: PROBABLE CAUSE: SOLUTION:
Alarm:
Short beeps, long
pause
Concentrator not
operating,
power switch On.
Beep......Beep......
Alarm:
Continuous
Concentrator not
operating, Power
Switch On.
Beeeeeeeep....
Main Power Loss:
1. Power cord not
plugged in.
2. No power at outlet. 2. Inspect house circuit
3. Tripped circuit
breaker.
System Failure:
1. Unit overheating due
to blocked air intake.
2. Insufficient power at
outlet.
3. Internal repairs
required.
1. Insert plug into outlet.
breakers or fuses. If problem
recurs, use a different outlet.
3. Push/reset circuit breaker.
If problem recurs, call Service
Provider.
1a. Remove and clean cabinet
filters.
1b. Move oxygen
concentrator at least 30,5 cm
(12 inches) away from walls,
draperies or furniture.
2. DO NOT use extension
cords. Move to another
electrical outlet or circuit.
3. Call Service Provider.
Perfecto2™Series 28 Part No 1163147

SECTION 8—TROUBLESHOOTING GUIDE
SYMPTOM: PROBABLE CAUSE: SOLUTION:
YELLOW or RED
light Illuminated.
Alarm:
Continuous
On RED light
only.
* Only applies to
IRC5PO2AW &
IRC5PO2VAW
models
1. Low oxygen purity.* 1. Clean or Replace filters.
2. Kinked or blocked
tubing, cannula or
humidifier.*
3. Flowmeter set at 0.5
L/min *.
4. Unit overheating due
to blocked air intake.
5. Insufficient power at
outlet.
6. Internal repairs
required.
2. Inspect for kinks or
blockages. Correct, clean or
replace item. Once
corrected, turn power Off for
60 seconds and then turn
power back On.
3. Check flowmeter is set to
1.0 L/min or more. Refer to
Typical Product Parameters
on page 13.
4a. Remove and clean cabinet
filters.
4b. Move concentrator at
least 30,5 cm (12 inches)
from walls, draperies, and
furniture.
5. DO NOT use extension
cords. Move to another
electrical outlet or circuit.
6. Call Service Provider.
GREEN light with
YELLOW Light
Flashing.
Alarm:
Rapid
Beep....Beep...
Beep...Beep
Part No 1163147 29 Perfecto2™Series
1. Internal repairs
required.
Potential Obstruction
Alert
1a. Possible internal
obstruction in the oxygen
path.
1b. Kinked or blocked
tubing, cannula or
humidifier.
1. Call Service Provider.
1. Inspect for kinks or
blockages. Correct, clean or
replace item. Once
corrected, turn power Off for
60 seconds and then turn
power back ON.

SECTION 8—TROUBLESHOOTING GUIDE
SYMPTOM: PROBABLE CAUSE: SOLUTION:
2. Flowmeter set at 0.5
L/min.
2. Flowrates less than 1 L/min
are not recommend.
NOTE: The use of the
pediatric flowmeter will
deactivate the Potential
Obstruction Alert.
Perfecto2™Series 30 Part No 1163147
 Loading...