

Invacare isg4002647 Owner's Manual

AUTOMATIC WRIST
Owner’s Manual
for model: ISG4002647
Automatic Wrist
Blood Pressure Monitor
• Personal Alert Level
• Irregular Heartbeat Detector
• 3 Zones of 40 Memory - 120 Memory Total
• Memory Average of Last 3 Measurements
• Time and Date Indications

Before using your blood pressure monitor, you should read
and understand all instructions and follow all warnings.
Information in this manual is provided for informational purposes only. This product and manual are not meant to be a
substitute for the advice provided by your own physician or
other medical professional. You should not use this product,
or the information contained herein, for diagnosing or treating a health problem, disease, or prescribing any medication. If you have or suspect that you have a medical problem,
promptly contact your medical provider.
Important Warnings/Medical
Disclaimer
1
Important Warnings/Medical Disclaimer

2
Important Warnings/Medical Disclaimer ________________1
Watching Your Health ___________________________3-4
Commonly Asked Questions About Blood Pressure________5-8
Intended Use _____________________________________8
Measurement Method ______________________________9
Important Reminders _______________________________10
Applying the Cuff to Your Wrist ______________________11
Main Unit and Accessories __________________________12
Special Features __________________________________13
Accuracy _______________________________________14
Special Conditions ________________________________14
Battery Installation________________________________14
Digital Display Symbols _____________________________15
Setting Date, Time and Levels ______________________16-17
Taking a Blood Pressure Measurement __________________18
Storing, recalling, and erasing measurement data ________19-20
3 Zones of 40 Memory _____________________________20
Taking Care of Your Blood Pressure Monitor ______________21
Troubleshooting ________________________________22-23
Limited Lifetime Warranty_________________________24-25
Specifications____________________________________26
Blood Pressure Diary_____________________________27-28
Table of Contents
Table of Contents

3
Watching Your Health
Purchasing this blood pressure monitor is your first step in living
a healthier life, but it is only the beginning. It is also important
to:
STAY ACTIVE - Start out by taking just a short walk each
day. Over time you'll begin to feel more energetic. Walking is a
fun, easy way to help lose weight and also aids in building
stronger bones and a healthier heart!
EAT HEALTHY - Adding more fruits and vegetables to your
diet is a great way to start. Also, look at incorporating more
whole grains, fish and low fat dairy products and keep a check
on your sodium intake. If you're using a blood pressure monitor,
you should already be aware of how sodium can affect your
blood pressure. As always, consult your physician before beginning any dietary changes.
Watching Your Health

4
Watching Your Health
Watching Your Health
STAY POSITIVE - A healthy mind goes hand in hand with a
healthy body. Daily relaxation techniques such as meditation and
yoga may be just what you need to alleviate stress. Keep your
mind focused on the positive things in life. Start out by giving
yourself a pat on the back for those walks you are now taking or
that apple you just ate!
WATCH YOUR WEIGHT - Sometimes just a small amount
of weight loss may have a positive effect on your blood pressure.
If you have already started exercising and eating healthier, the
weight loss may just happen on its own!
REMEMBER: Consult your physician before you start or
change your exercise routine, diet, vitamin/supplement intake
and/or blood pressure monitoring.

5
Why Should I Monitor My Blood Pressure At Home?
By monitoring at home you can manage your health care between
visits to the doctor. Also, you now have the means to keep a record
of your blood pressure measurements, a valuable tool for both you
and your healthcare provider.
Home monitoring may help alleviate White Coat Hypertension.
This term refers to what may cause a person's blood pressure to
be higher when taken in a medical setting. At times the stress of
just being in a doctor's office may cause blood pressure to rise.
When monitoring at home you may get a truer indication of your
blood pressure because you are in a relaxed, comfortable space.
What is Blood Pressure?
The term "blood pressure" refers to the force or pressure that is
exerted on the body's arteries as blood flows through them. Each
time the heart beats or contracts, it produces pressure in the arteries. This blood pressure is what moves blood through the body,
supplying oxygen and nutrients to every organ.
Commonly Asked Questions About Blood Pressure
Commonly Asked Questions
About Blood Pressure
6
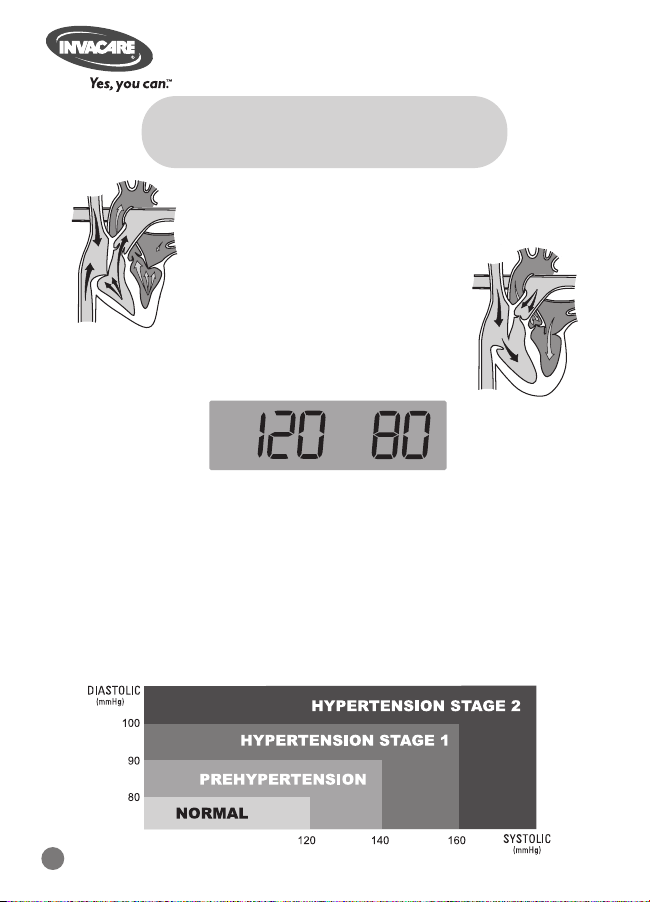
When the heart contracts it sends blood out into
the body. This pressure is referred to as systolic.
The pressure that is created as
the heart pulls blood back thorough is called diastolic.
Blood Pressure is recorded as
systolic over diastolic.
What is considered Normal Blood Pressure?
The Seventh Report of the Joint National Committee on
Prevention, Detection, Evaluation, and Treatment of High Blood
Pressure from the National Heart, Lung and Blood Institute has
set forth the following guidelines regarding high blood pressure.
Guidelines provided are for information purposes only. Please
consult with your physician for proper diagnosis.
Commonly Asked Questions
About Blood Pressure
Commonly Asked Questions About Blood Pressure

Why Does My Blood Pressure Fluctuate?
Blood pressure changes with every beat of the heart and is in
constant fluctuation throughout the day. In addition to natural
changes, other factors that may affect blood pressure are:
Commonly Asked Questions
About Blood Pressure
Commonly Asked Questions About Blood Pressure
7
•
Temperature
(too hot or cold)
•
Humidity
•
Restlessness
•
Lack of sleep
•
Physical exercise
•
Constipation
•
Fear
•
Anger
•
Anxiety
•
Food / beverage
consumption
•
Your physical
condition
•
Stress
Be sure to speak with your healthcare professional to determine
what is affecting your blood pressure.
How Do I Know If I Have High Blood Pressure?
People have the misconception that they can "feel" their blood
pressure rise. In reality it is nearly impossible to tell if your pressure is elevated without having it checked. This is why hypertension has been named "the silent killer". Start monitoring your
blood pressure today and discuss the results with your healthcare
professional.

Why Is It Important To Control My Blood Pressure?
Left uncontrolled hypertension can place an incredible amount of
stress on your heart and arteries. They are both forced to work
harder to keep blood flowing through your body. Over time this
stress may result in health related problems including enlargement
of the heart, loss of artery elasticity, heart disease, stroke or death.
Making simple lifestyle changes now may help you stay healthy in
the future.
8
Commonly Asked Questions
About Blood Pressure
Commonly Asked Questions About Blood Pressure/Intended Use
Intended Use
Invacare blood pressure monitors are designed for home use. They
are noninvasive; no part enters your body, and provide systolic,
diastolic and pulse rate measurements. These monitors are not
recommended for use by people under 18 years of age and are not
suitable for clinical use.

9
Invacare monitors measure blood pressure and pulse rate by
using an oscillometric method, meaning the fluctuations in pressure are measured. Once the cuff is wrapped on your wrist, turn
the monitor on and the cuff is automatically inflated. The inflation of the cuff creates pressure around the arteries inside the
wrist. Within the cuff is a gauge which senses the fluctuations
(oscillations) in pressure. The fluctuations measured are the
arteries contracting with each heart beat as a result of the pressure the cuff has placed on the wrist. The monitor measures
these contractions and converts the information to a digital
value. That is the result displayed on the monitor screen. Once
the measurement is complete the cuff will automatically
deflate.
Measurement Method
Measurement Method

10
Important Reminders
While taking a measurement:
Sit still and quietly. Talking or moving may elevate mea-
surements.
For consistency, it is a good idea to measure your blood
pressure around the same time each day and using the
same wrist. If possible, we suggest using the left.
When taking multiple measurements right after each other,
make sure you have allowed at least 10 minutes between
measurements. This allows your blood vessels to return to
their normal state.
Sit with your legs uncrossed and feet flat on the floor. Do
not touch the cuff or monitor while the measurement is
being taken.
Keep your wrist at level with your heart.
Relax.
Important Reminders
•
•
•
•
•
•
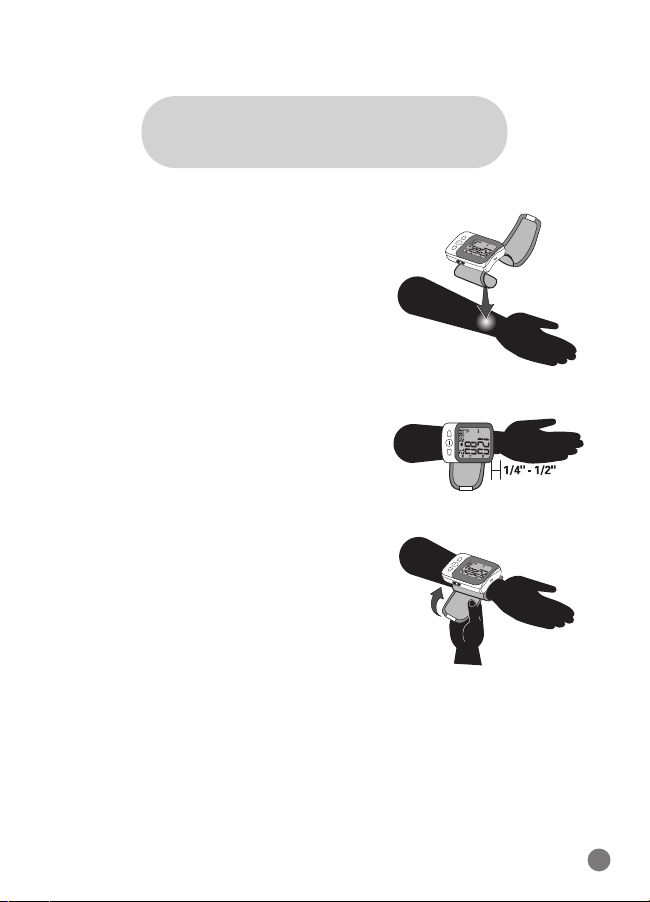
The cuff needs to be wrapped
around your bare wrist. Make
sure to rollup your sleeve or
remove any clothing or jewelry
that is covering your wrist. If
rolling up a sleeve, make sure this
does not constrict blood circulation in your arm.
Wrap the cuff around your wrist
(preferably the left) making sure it
is secure, but not too tight. The
monitor should be facing up at
you.
Place your arm on a table with
your palm facing up. It is important for the wrist cuff to be at the
same level as your heart. You can
rest your wrist on the enclosed
storage case.
Applying the Cuff to Your Wrist
11
Applying the Cuff to Your Wrist
•
•
•
MODE
START
STOP
MEMORY
M
O
D
E
S
T
A
R
T
S
T
O
P
M
E
M
O
R
Y
M
O
D
E
S
T
A
R
T
S
T
O
P
M
E
M
O
R
Y
12
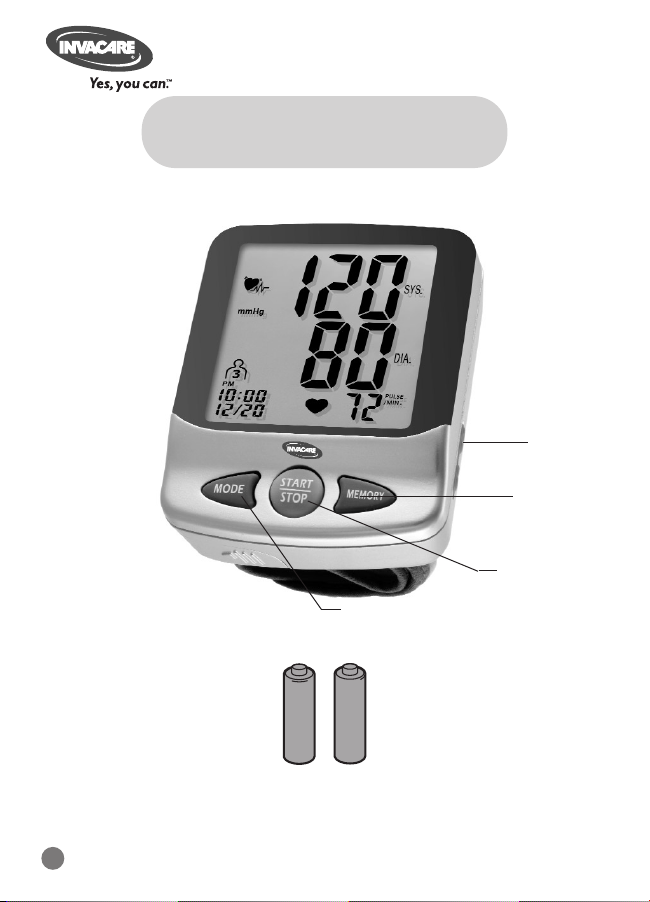
Main Unit and
Accessories
Main Unit and Accessories
Main Unit
Accessories
Includes:
* 2 AAA Alkaline Batteries
* Storage/Travel Pouch
Start/Stop
button
Mode
button
Memory
button
Up and
Down button

The Heart Sense Inflation System senses your
blood pressure before the measurement is complete, signaling the monitor to adjust the air pressure amount. The result is a quick, comfortable measurement each
time you check your blood pressure.
13
Special Features
Special Features
Heart Sense
Quiet Inflation
Large 3 Row Display Screen
Irregular Heartbeat Detector
A unique, low noise, rolling motor system allows our monitors to
inflate quietly.
To make reading your result easier, the monitor comes with a large
3 row LCD display screen.
This symbol will appear on left of screen indicating an irregular
heartbeat was detected.
Personal Alert Level
If the Systolic or Diastolic rate of your reading result is greater than
your set personalized level, the result on screen will flash.
Memory Feature
Your Invacare Wrist Monitor features memory capability of up to
120 measurements and provides the average of the 3 most recent
readings!
Time and Date
The time and date will appear as long as the batteries are in the
monitor. Once the batteries are removed the time and date will
have to be reset. The data in memory will remain.
14
Accuracy/Special Conditions/Battery Installation
Invacare monitors have been clinically tested against a scientific
device called a sphygmomanometer, considered the gold standard in
blood pressure measurement. All Invacare monitors have performed
equivalent to measurements taken with this scientific device and are
within the accuracy limits prescribed by the American National
Standard for Electronic or Automated Sphygmomanometers. Invacare
monitors have been clinically tested and have met all the requirements to achieve AAMI (Association for the Advancement of Medical
Instrumentation) certification.
Special Conditions
Accuracy
All Invacare BPMs are safe and accurate to use with arrhythmias such
as atrial or ventricular premature beats and atrial fibrillation. We recommend, however, that if you have these conditions or any other special conditions you should check with your physician before using your
Invacare BPM.
Using the 2 AAA Alkaline batteries included, locate the
battery compartment on the bottom of the monitor.
Remove the battery cover and insert the batteries,
making sure the polarities (+/-) are correct. Snap the
battery cover back into place.
When the display screen shows “ ” it is time to
replace with 2 new AAA batteries.
Battery Installation
* To make the batteries last longer, you may want to remove them if you
are not using your monitor for an extended period of time.
15
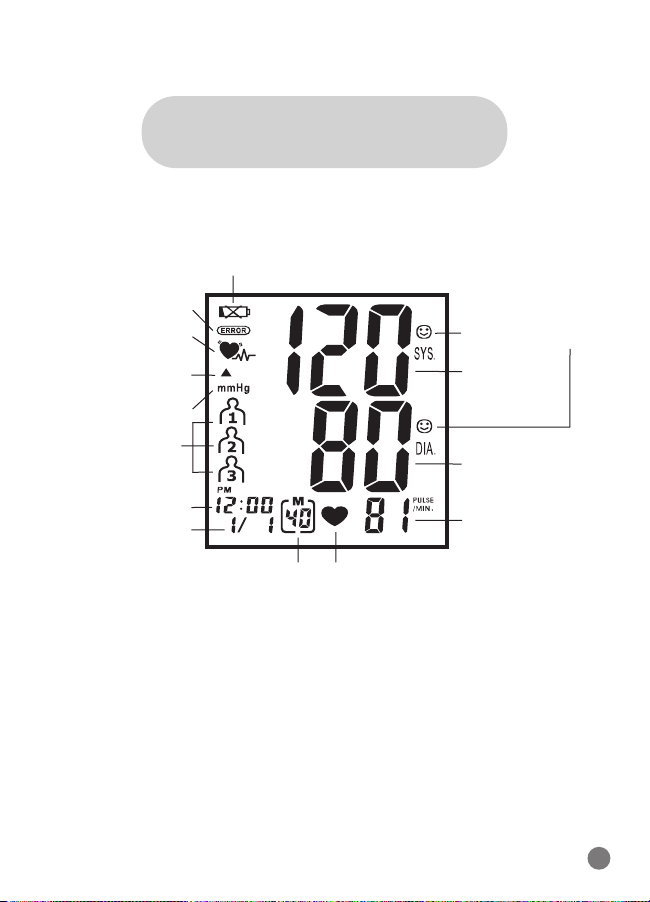
Digital Display Symbols
Digital Display Symbols
Self-Diagnostic
Smile Face Symbol
Systolic Rate
Diastolic Rate
Pulse Rate
Low Battery
Display
Error Symbol
Memory
Set
Inflation Symbol
Memory Zone
Indicator
Mesurement Reading Screen
Irregular Heart Beat
Symbol
Blood Pressure Unit
Pulse
Symbol
Hour and Minute
Month and Date
a.
b.
c.
d.
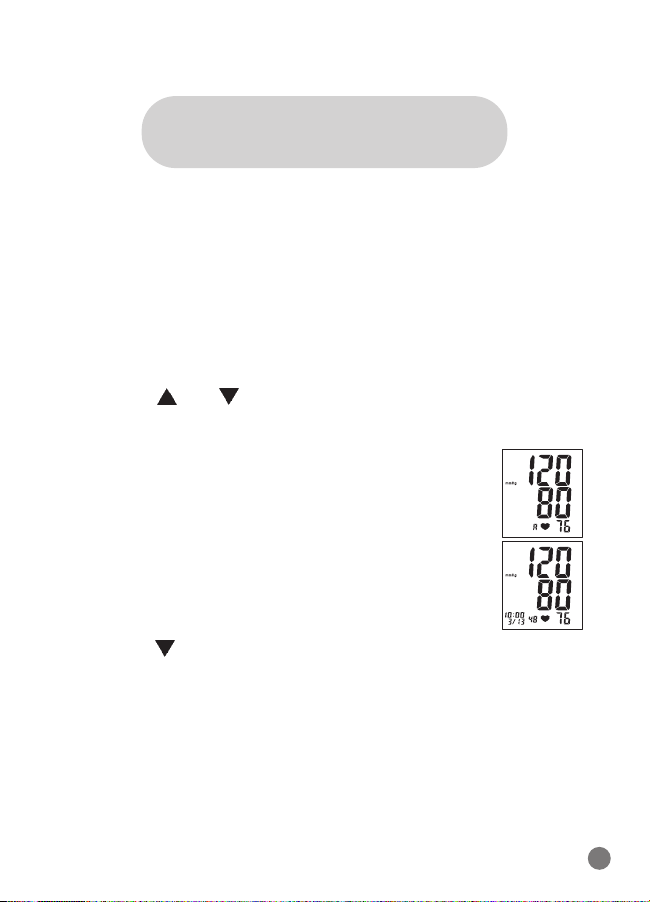
Setting Date, Time and Levels
16
Setting Date, Time and Levels
Setting date and time
Press "MODE" button ("month" starts flashing)
Press "[
]" and "[ ]" button to set and adjust the correct
month (1, 2, 3 ....12)
Press "MODE" button again ("date" starts flashing)
Press "[
]" and "[ ]" button to set and adjust the correct
date
Press "MODE" button again ("hour" starts flashing)
Press "[
]" and "[ ]" button to set and adjust the correct
hour in 12-hour format. A "PM" will appear for PM and disappear for AM.
Press "MODE" button again ("minute" starts flashing)
Press "[
]" and "[ ]" button to set and adjust the correct
minute (00, 01, 02 ...59)
After setting the minute you will automatically be prompted to
set the personalized level for Memory Zone 1. The storage of
120 memory readings is divided into 3 memory zones, each
maintaining up to 40 memory readings. The following explains
how to set your personalized level in each zone.
Your personalized level should be decided between you
and your healthcare provider.
Before setting your levels it is important to know:
*Your systolic rate is set between 70 and 250 mmHg.
*Your diastolic rate is set is between 40 and 115 mmHg.
17
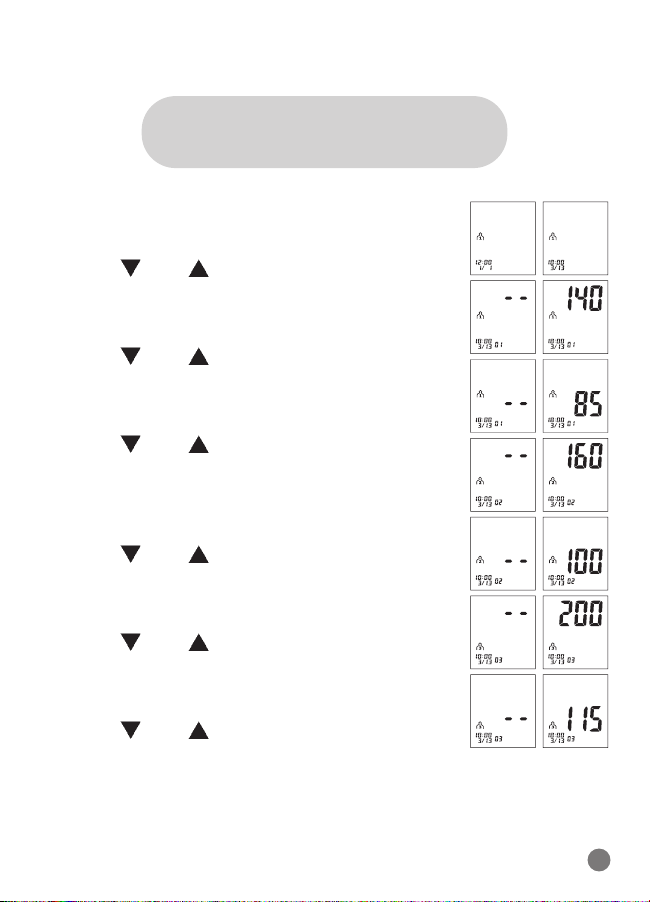
Setting Date, Time and Levels
Setting Date, Time and Levels
Press "MODE" button
(" - - " will flash for 1st systolic self-management)
Press "
" or " " button to set/adjust the personalized systolic rate
Press "MODE" button
(" - - " will flash for 1st diastolic self-management)
Press "
" or " " button to set/adjust the personalized diastolic rate
Press "MODE" button
(" - - " will flash for 2nd systolic self-management)
Press "
" or " " button to set/adjust the personalized systolic rate
Press "MODE" button
(" - - " will flash for 2nd diastolic self-management)
Press "
" or " " button to set/adjust the personalized diastolic rate
Press "MODE" button
(" - - " will flash for 3rd systolic self-management)
Press "
" or " " button to set/adjust the personalized systolic rate
Press "MODE" button
(" - - " will flash for 3rd diastolic self-management)
Press "
" or " " button to set/adjust the personalized diastolic rate
Setting personalized levels
a.
b.
c.
d.
e.
f.
The examples above illustrate setting personalized levels in all
3 zones. After setting your Personalized Alert Level, you will be
returned to the Rest mode and can take a measurement by
pressing START/STOP.
Taking a Blood Pressure
Measurement
18
Taking a Blood Pressure Measurement
Wrap the cuff around the wrist (refer to previous page)
•
Sit upright in a chair with feet flat on the floor.
•
Press " " or " " button to select a particular memory zone then
press the "START/STOP" button to start the measurement. The
monitor will automatically inflate to the level that is right for you.
•
When taking repeat measurements, make sure to select the same
memory zone before pressing "START/STOP", so the measurement
is registered to the appropriate memory.
•
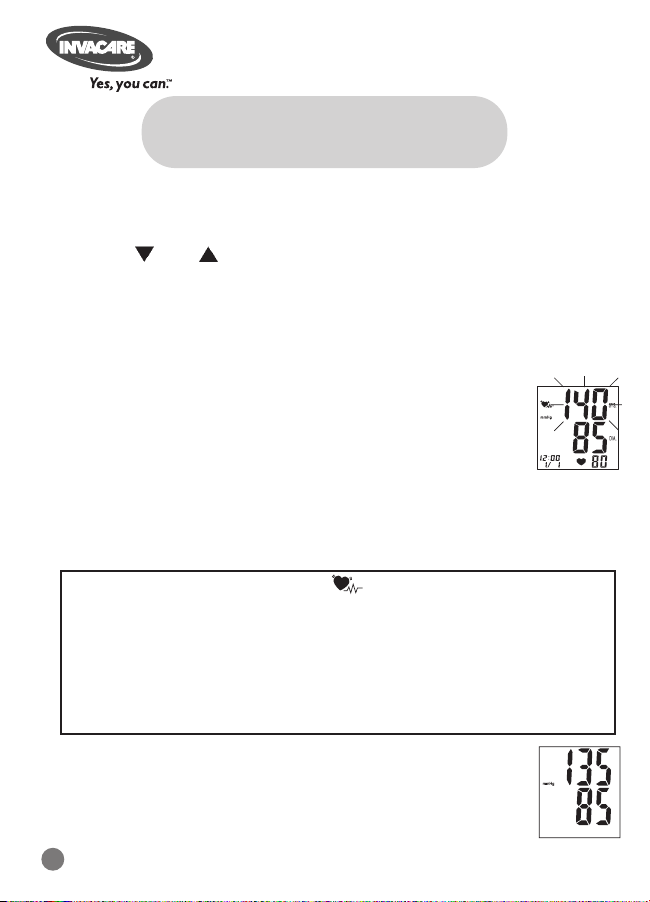
If the result of your Systolic or Diastolic rate of your reading result is greater than (not equal to) your set personalized level the DIGIT will flash. In addition the measurement that is out of range, either Systolic or Diastolic, will
flash. If both are out of range both will flash.
If the result of your Systolic or Diastolic rate of your reading result
is equal or less than your set personalized level a SMILING symbol
will show out and flash on screen.
•
Press and hold "Mode" button to check the pre-set personalized level.
•
To stop a reading in process, press the "START/STOP"
button.
•
The appearance of this symbol, , signifies that a certain pulse
irregularity was detected during the measurement. Talking, moving,
shaking or an irregular pulse during the measurement can result in
the appearance of this icon. Usually this is not a cause for concern,
however if the symbol appears often, we recommend you seek medical advice. The device does not replace a cardiac examination, but
serves to detect pulse irregularities at an early stage.
19
Storing, recalling, and erasing measurement data
Storing, recalling, and erasing
measurement data
•
Storing data
*After each measurement, the systolic and diastolic rates, pulse
rate and the time & date will be automatically stored. The memory holds data for the latest 40 measurements in each of 3 memory
zones. If more than 40 measurements are entered, the memory will
automatically clear out the oldest data.
Recalling data
*Press the " " or " " button to select the memory zone.
*Press the "MEMORY" button to get your stored memory data. If
there is no data in the memory nothing will appear.
*If there is data in the memory, the first reading will be
an average of the last three recorded set of measurements (systolic and diastolic pressure and pulse rate).
*Press the "MEMORY" button again and the latest
recorded set of measurements will appear along with
the recording time and date.
*Press the "
" button to read the next set of stored data. The data
displayed starts with the most recent reading and continues backwards to the oldest.
*If your memory readings are out of range of your preset personal
alert levels, they will flash as explained in Setting Date, Time and
Levels.
*No Irregular Heartbeat Detector Record will be stored in memory.
•

Storing, recalling, and erasing
measurement data
20
Storing, recalling, and erasing measurement data/3 Zones of 40 Memory
3 Zones of 40 Memory
When you take a measurement, the monitor automatically stores it in
memory space number one. As you continue to take measurements, the
monitor will push the previous measurement back one space. In other
words, the value in space one will always be the most recent blood pressure measurement taken.
Your monitor features a 3 party memory capability or 3 "zones" - each
zone stores 40 measurements each for a total capacity of 120 measurements. This feature is useful for a user to track their blood pressure
throughout the various periods of the day: morning, afternoon, and night.
Press the
" " button to toggle between memory zone No.1, 2, and 3.
Once you select a zone that you want to view the measurements in,
press the "
MEMORY" button once to view the most recent measure-
ment along with the time and date that it was taken. Press the "
MEM-
ORY
" button again in succession and you will see all of the measure-
ments registered to that zone. You can then press the
" " button to
switch to the next zone to view measurements. The monitor will automatically power off after about one minute of inactivity.
*When taking measurements, be sure and select the correct zone
number using the " " or " " button so that the measurement is registered to the appropriate zone.
Erasing data
*Press "MEMORY" into Memory mode.
*Press and hold on "MODE" button and then press "
" button, the
pre-set Personal Alert Level and all measurement data will be erased.
*To confirm the data has been erased, press the "MEMORY" button
and no data should appear.
•

21
Ordering a large cuff/Taking Care of Your Blood Pressure Monitor
Taking Care of Your
Blood Pressure Monitor
To insure a long life and accurate readings for your monitor, it
is important to treat it with care. Here are some basic tips to
follow:
*Keep the monitor out of direct sunlight, high humidity and
extreme temperature changes.
*Do not take the cuff or monitor apart. If repairs are needed
please see details in the warranty section.
*Do not drop the monitor.
*Keep the monitor free of dust and other materials. Avoid
getting any part of the monitor or cuff wet.
*To clean the monitor wipe it with a cloth slightly dampened
with water. We recommend cleaning your monitor about
once a month.
*Do not force the cuff to fold or bend, this may damage it on
the inside.
*Do not inflate the cuff if it is not wrapped around your wrist.
*DO NOT wrap the cuff around any body part other than your
wrist.
22
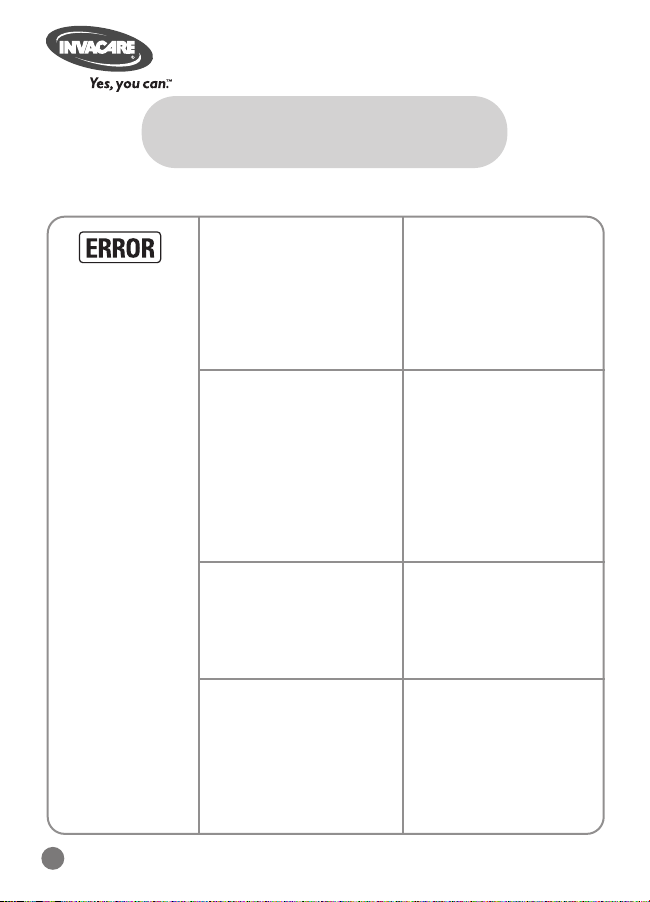
Troubleshooting
Error/Symbol What Does It Mean? How To Fix It
Troubleshooting
Monitor may have been
inflated without the cuff
around the wrist OR Cuff
may not be positioned
correctly on the wrist.
Read page 11 (Applying
the Cuff to Your Wrist).
Read pages 10
(Important Reminders).
Remember that it is
important not to move
and speak as it may
elevate measurements.
Make sure you are in a
quiet and comfortable
place when taking a
measurement.
Movement may have disturbed the cuff while
inflating and it is
attempting to re-inflate.
Check the cuff to make
sure it is positioned correctly.
You may have moved or
spoken during the measurement process.
You may have been
startled by a noise or
vibration while measuring.
23
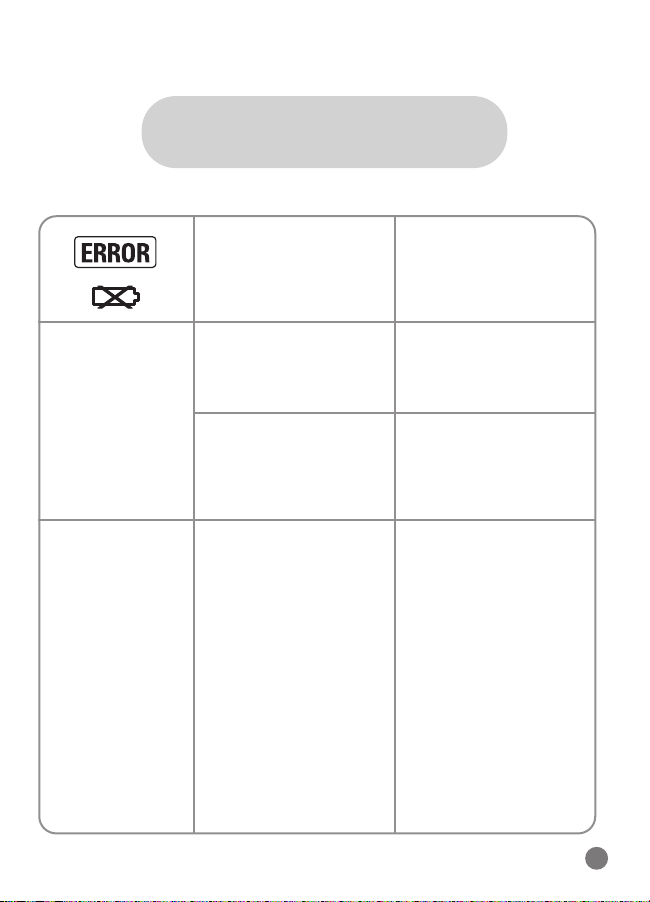
Troubleshooting
Troubleshooting
Error/Symbol What Does It Mean? How To Fix It
The batteries have run
down.
Replace with 2 new
AAA batteries. See
page 14 for instructions.
Unable to take a
measurement after
receiving an error
symbol.
Blood pressure
value seems too
high or too low
Cuff may not be
aligned correctly
Read page 11
(Applying the Cuff to
Your Wrist).
Read page 11
(Applying the Cuff to
Your Wrist).
Remove and reinsert
the batteries and then
proceed to take measurement again.
Circuitry locked.
The cuff may not be
positioned correctly.

24
Limited Lifetime Warranty
Limited Lifetime Warranty
This Blood Pressure Monitor is warranted to be free from defects in material and workmanship for the life of the original purchaser under normal
household use. In the event of a defect in materials or workmanship occurring during normal household use, manufacturer will, at its option, repair or
replace your monitor, including the cuff, with the same or comparable model
free of charge (except you must pay for shipping charges) for the lifetime of
the original owner
. This product is for home use only and is not intended for
commercial or clinical use. This warranty only extends to the original retail
purchaser. Purchase receipt or other proof of original purchase is required
before warranty performance.
This warranty extends solely to failures due to defects in materials or workmanship occurring during normal use. It does not cover normal wear of the
product. This warranty is void if: the product housing has been removed, if
the product's label, logo or serial number have been removed or if the product fails to function properly as a result of accident, misuse, abuse, neglect,
mishandling, misapplication, defective batteries, faulty installation, setup,
adjustments, improper maintenance, alteration, maladjustment of controls,
modification, power surges, commercial or clinical use of the product,
improper or incorrectly performed service, or acts beyond the manufacturer's or distributor's control.
The warranty and remedy provided herein are exclusive and in lieu of all
other express and implied warranties and unless stated herein, any statements or representations made by any other person or entity are void. NEITHER THE MANUFACTURER, DISTRIBUTOR, NOR THEIR AFFILIATES SHALL
BE LIABLE FOR ANY LOSS, INCONVENIENCE, INJURY, OR DAMAGE
INCLUDING DIRECT, SPECIAL, INCIDENTAL, OR CONSEQUENTIAL DAMAGES RESULTING FROM THE USE, IMPROPER USE, FAILURE TO HEED ANY
WARNING, DISCLAIMER OR INSTRUCTION OR INABILITY TO USE THIS
PRODUCT, WHETHER ARISING OUT OF ANY BREACH OF THIS WARRANTY OR ANY OTHER LEGAL THEORY. ALL EXPRESS AND IMPLIED WAR

25
Limited Lifetime Warranty
Limited Lifetime Warranty
RANTIES, INCLUDING THE WARRANTIES OF MERCHANTABILITY, ARE
LIMITED TO THE APPLICABLE WARRANTY PERIOD SET FORTH ABOVE.
Manufacturer and distributor assume no responsibility for injuries, damages
or penalties incurred or suffered resulting from the use of this product in an
improper manner or manner or location other than for that for which it is
intended, or from failure to heed any warning, disclaimer or instruction.
Some states do not allow the exclusion or limitation of incidental or consequential damages, or limitations on how long an implied warranty lasts, so
the above exclusions or limitations may not apply to you. This warranty
gives you specific legal rights and you may also have other rights which vary
from state to state.
Should your product prove defective during this warranty period, please
return the product in the original carton prepaid to:
SAI Customer Service
BP Monitors
105 Challenger Road, 6
th
Floor
Ridgefield Park, NJ 07660
Include $11.95 for return shipping & insurance within the continental U.S.
(CHECK OR MONEY ORDER ONLY PLEASE, NON-REFUNDABLE). If you are
not the original purchaser of the unit with proof of purchase, or if
your warranty period has expired, the price for repairing or replacing may vary. Sorry, we cannot deliver to P.O. Boxes or outside the U.S.
Please allow 6 ~ 8 weeks for delivery.
Include with your monitor a letter stating: your name, street address, daytime phone number, detailed description of the problem, a copy of your
dated cash register receipt or other proof of purchase.
This warranty applies only to products purchased in the U.S. For products
purchased in, but used outside, the U.S., this warranty covers only warranty services within the U.S. (and does not include shipping outside the U.S.).
 Loading...