

Invacare IRC400, CHECK O2 PLUS Installation And Operating Instructions Manual
INVACARE CHECK O2 PLUS HAND-HELD ANALYZER
ANALIZADOR DE OXIGENO PORTALBE INVACARE CHECK O
2
ANALYSEUR D' O2 PORTABLE INVACARE
Assembly, Installation and Operating Instructions - ENGLISH
Instrucciones de Ensamble, Instalación y Operación - DOMESTIC SPANISH
Instructions pour l'assemblage, l'installation et l'utilisation - FRENCH CANADIAN
USER: BEFORE USING THIS ANALYZER, READ THIS MANUAL AND SAVE FOR FUTURE
REFERENCE.
2
SAFETY SUMMARY
The following recommendations are made for
the safe and proper use of the Invacare Check
O2 Plus Hand-Held Analyzer:
CAUTION
“Caution: Federal law restricts this device to
sale by or on order of a physician, or any other
practitioner licensed by the law of the State
in which he practices to use or order the use
of this device.”
DO NOT expose any port of the analyzer to
any pressure greater than 20 PSI or damage
may result to internal components.
DO NOT use the analyzer on pure oxygen from
high pressure cylinders or liquid systems.
DO NOT use the Invacare Check O
2
Plus
Hand-Held Analyzer on any gas stream that
is humidified. Use of the analyzer with water
vapor can cause erroneous readings and internal damage.
INTENDED USE
NOTE: The Invacare Check O2 Plus Hand-Held Analyzer is designed and calibrated for use in measuring
unhumidified output gas of an oxygen concentrator ONLY.
NOTE: The analyzer is not for continuous monitoring
of patient gases.
NOTE: There are no user serviceable parts inside the
analyzer. Field calibration of the unit is not required.
NOTE: When using the analyzer after storage in either
extremely hot or cold conditions, allow the gas being
measured to flow through the analyzer for one (1) minute
to bring the internal sensor up to the gas stream temperature.
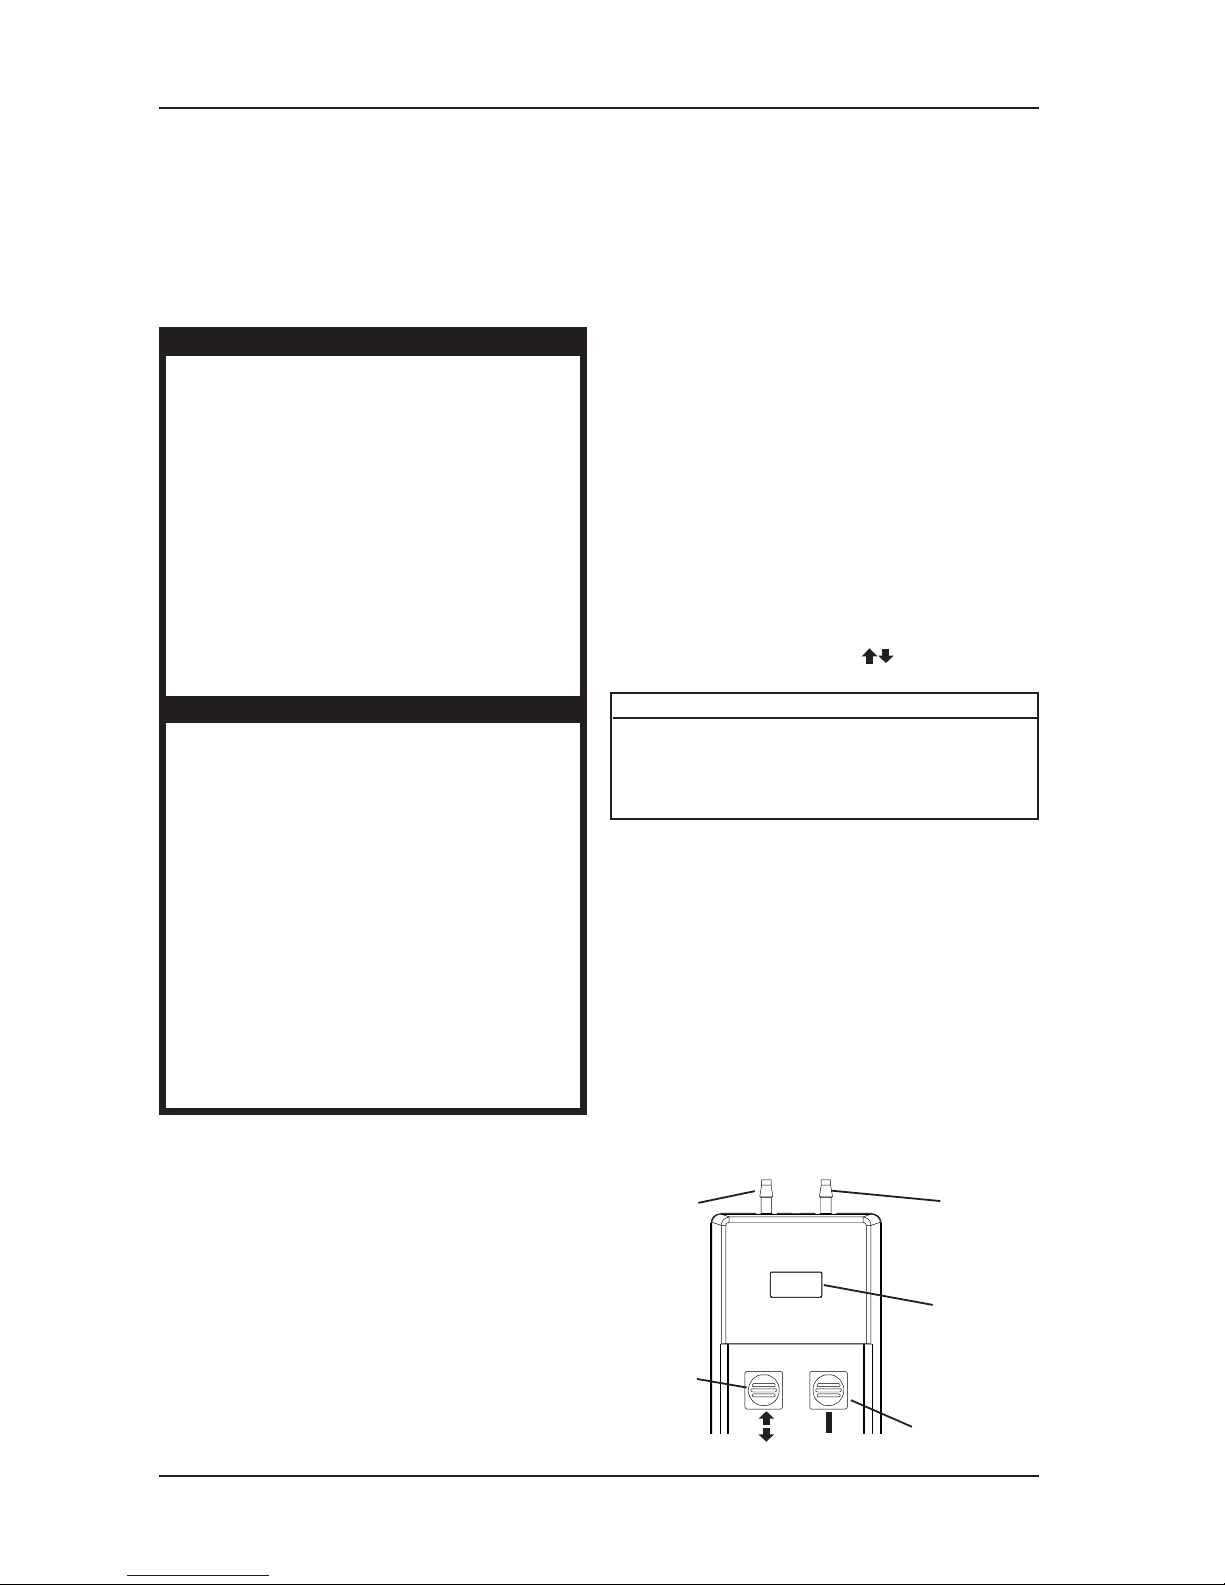
INSTRUCTIONS FOR USE (FIGURE 1)
`
1. Press the ON (
I
) button. The LCD display should
come on.
NOTE:The analyzer automatically shuts off after approximately two (2) minutes of operation. This helps save battery life.
2. The display will show “FLO” for approximately two (2)
seconds and then switch to readings in L/min.
3. If no reading is displayed or if display is erratic or frozen, refer to the troubleshooting section of this instruction sheet.
4. In order to measure oxygen concentration or
flow rate, connect the analyzer’s FLOW/CONCENTRATION inlet with a piece of ¼-inch (I.D.)
crushproof tubing to the outlet fitting of the gas
source to be measured.
5. In order to measure pressure, connect the analyzer’s
PRESSURE inlet with a piece of ¼-inch (I.D.)
crushproof tubing to the outlet fitting of the gas source
to be measured.
6. Pressing the FUNCTION ( ) button will toggle
the analyzer through its various detecting functions.
DISPLAY MEASURES VALUE
FLO Flow rate Liters per minute
O2 Oxygen concentration Percentage oxygen
PSI Pressure Pounds per square inch
HPA Pressure KiloPascals
WARNING
DO NOT install this equipment without first reading and understanding this instruction sheet. If
you are unable to understand these instructions,
contact a healthcare professional, dealer or
technical personnel if applicable before attempting to install this equipment - otherwise,
injury or damage may occur.
Oxygen rapidly accelerates combustion:
DO NOT smoke while using oxygen.
DO NOT use oxygen in the presence of flames,
sparks, or glowing objects.
Ensure that all items are properly and securely
installed.
NOTE: The Invacare Check O2 Plus Hand-Held Analyzer
can be used to measure the performance of an oxygen
concentrator from its outlet fitting, or any concentrator accessory such as the Invacare Remote Flowmeter or Pediatric Flowmeter. However, Invacare does NOT recommend using the Invacare Check O
2
Plus Hand-Held Analyzer to measure flow rates below 1 L/min. See product
specifications.
NOTE: The concentrator output gas, measured from the
concentrator outlet fitting or from a concentrator accessory
outlet fitting,must NOT contain humidified gas. Disconnect
any humidifier bottle before taking any readings to prevent
erroneous readings and damage to the internal flow sensor. Be sure to reconnect any required humidifier bottle
before returning any equipment to patient use.
Pressure
Inlet
Flow/
Concentration
Inlet
Function
Button
LCD
Display
NOTE: Check all parts for shipping damage. If damage is found, DO NOT use. Contact Carrier/Invacare
for further instructions.
On Button
FIGURE 1-INSTRUCTIONS FOR USE

3
PRODUCT SPECIFICATIONS
OPERATIONAL
Pressure:
Range: 0 to 10 PSIG 0 to 68.9 kPa
Resolution: 0.1 PSI 0.7 kPa
Accuracy:
+ 2% F.S. + 2% F.S.
Flow:
Range: 0 to 6.0 L/min.
Input: Unhumidified oxygen
concentrator output only
Resolution: 0.1 L/min.
Accuracy:
+ 5% F.S. (+ 0.3 L/min.)
Gas Stream
Temperature: +59 to +95°F / +15 to +35°C
Concentration:
Range: 73% to 96% O
2
Input: Unhumidified oxygen
concentrator output only
Resolution: 0.1 %
Accuracy: + 2%
Gas Stream
Temperature: +59 to +95°F / +15 to +35°C
Alarm: Low battery
Power On Time: 1 minute, 45 seconds +5 seconds
Display: LCD
Battery: Single NEDA/ANSI 1604A
alkaline 9 volt
Battery life: 400+ hours (13,700+ read
cycles) with alkaline battery
Warranty: 2 years
PHYSICAL: Weight: 10 oz. (295g)
Width: 3.3 in. (8.38 cm)
Length: 7.3 in. (18.54 cm)
Length Includung
Inlet Fittings: 7.9 in. (20.07 cm)
Thickness: 1.25 in. (3.18 cm)
ENVIRONMENTAL
Operating
Temperature
Range: +59 to +95°F / +15 to +35°C
Storage
Temperature
Range: -4 to +158°F / -20 to +70°C
Humidity range: 20 to 60% relative humidity
Altitude
(maximum): Up to 6000 ft. (1828 meters)
above sea level
CHANGING THE BATTERY
NOTE: The internal battery needs to be replaced whenever the BAt display is seen on the LCD.
1. Turn the analyzer over.
2. Remove the six (6) screws holding the case bottom to the top and take the bottom cover off.
3. Remove the discharged battery from the battery
clips and dispose of or recycle properly.
CAUTION
Observe proper polarity for battery installation.
4. Install a new 9 volt battery on the battery clips.
Make sure the battery snaps tightly on the clips.
NOTE: Use of a DURACELL® alkaline 9 volt battery
will provide for maximum life of the unit.
5. Turn the unit over and press the ON button. The
display should come on. If it does, replace the bottom cover and install the six cover screws.
6. If the unit does not come on, remove the battery,
check it in another device or on a battery tester
and reinstall it. Try turning the unit on again.
7. If the unit still fails to operate with a known good
battery, contact Invacare Technical Service for repair.
TROUBLESHOOTING
NOTE: There are no user serviceable parts inside the
analyzer.
1. If the unit fails to come on, replace the battery with
a known good battery.
2. If the unit fails to come on with known good battery, contact Invacare Technical Service for repair.
3. If the unit comes on but the FUNCTION button
does not select any functions, contact Invacare
Technical Service for repair.
4. If the display comes on but the readings are erratic or frozen, contact Invacare Technical Service
for repair.
5. If a segment of the display is missing or displayed
intermittently, contact Invacare Technical Service
for repair.
7. With "O2" readings, values below 70% will be
displayed as "LO".
8. When the battery is completely discharged, BAt
will flash once on the LCD and the analyzer will
turn itself off. Refer to section on changing the
battery in this Instruction sheet.

4
LIMITED WARRANTY
PLEASE NOTE: THE WARRANTY BELOW HAS BEEN DRAFTED TO COMPLY WITH FEDERAL LAW APPLICABLE TO PRODUCTS MANUFACTURED AFTER JULY 4, 1975.
This warranty is extended only to the original purchaser/user of our products.
This warranty gives you specific legal rights and you may also have other legal rights which vary
from state to state.
Invacare warrants its parts to be free from defects in materials and workmanship for a period of
two (2) years from date of purchase. If within such warranty period any such product shall be
proven to be defective, such product shall be repaired or replaced, at Invacare's option. This
warranty does not include any labor or shipping charges incurred in replacement part installation or repair of any such product. Invacare's sole obligation and your exclusive remedy under
this warranty shall be limited to such repair and/or replacement.
For warranty service, please contact your supplier or dealer.
DO NOT return products or parts directly to our factory without prior written consent. Any such
shipments will be refused.
LIMITATIONS AND EXCLUSIONS: THE FOREGOING WARRANTY SHALL NOT APPLY TO SERIAL NUMBERED PRODUCTS IF THE SERIAL NUMBER HAS BEEN REMOVED OR DEFACED, PRODUCTS SUBJECTED TO NEGLIGENCE, ACCIDENT, IMPROPER OPERATION, MAINTENANCE OR STORAGE, COMMERCIAL OR INSTITUTIONAL USE, PRODUCTS MODIFIED WITHOUT INVACARE CORPORATION'S
EXPRESS WRITTEN CONSENT (INCLUDING, BUT NOT LIMITED TO, MODIFICATION THROUGH THE
USE OF UNAUTHORIZED PARTS OR ATTACHMENTS) OR TO PRODUCTS DAMAGED BY REASON OF
REPAIRS MADE TO ANY COMPONENT WITHOUT THE SPECIFIC CONSENT OF INVACARE CORPORATION OR TO A PRODUCT DAMAGED BY CIRCUMSTANCES BEYOND INVACARE
CORPORATION'S CONTROL. SUCH EVALUATION WILL BE SOLELY DETERMINED BY INVACARE. THE
WARRANTY SHALL NOT APPLY TO PROBLEMS ARISING FROM NORMAL WEAR OR FAILURE TO
ADHERE TO THE FOLLOWING INSTRUCTIONS.
THE FOREGOING WARRANTY IS EXCLUSIVE AND IN LIEU OF ALL OTHER EXPRESS WARRANTIES.
IMPLIED WARRANTIES, IF ANY, INCLUDING THE IMPLIED WARRANTIES OF MERCHANTABILITY AND
FITNESS FOR A PARTICULAR PURPOSE, SHALL NOT EXTEND BEYOND THE DURATION OF THE EXPRESSED WARRANTY PROVIDED HEREIN AND THE REMEDY FOR VIOLATIONS OF ANY IMPLIED
WARRANTY SHALL BE LIMITED TO REPAIR OR REPLACEMENT OF THE DEFECTIVE PRODUCT PURSUANT TO THE TERMS CONTAINED HEREIN. INVACARE SHALL NOT BE LIABLE FOR ANY CONSEQUENTIAL OR INCIDENTAL DAMAGES WHATSOEVER.
THIS WARRANTY SHALL BE EXTENDED TO COMPLY WITH STATE/PROVINCIAL LAWS AND REQUIREMENTS.
 Loading...