

User: Before using the product, read this manual
and save for future reference.
Supplier:
This manual must be given to the end user.
For more information regarding
Invacare products, parts, and services,
please visit www.invacare.eu.com
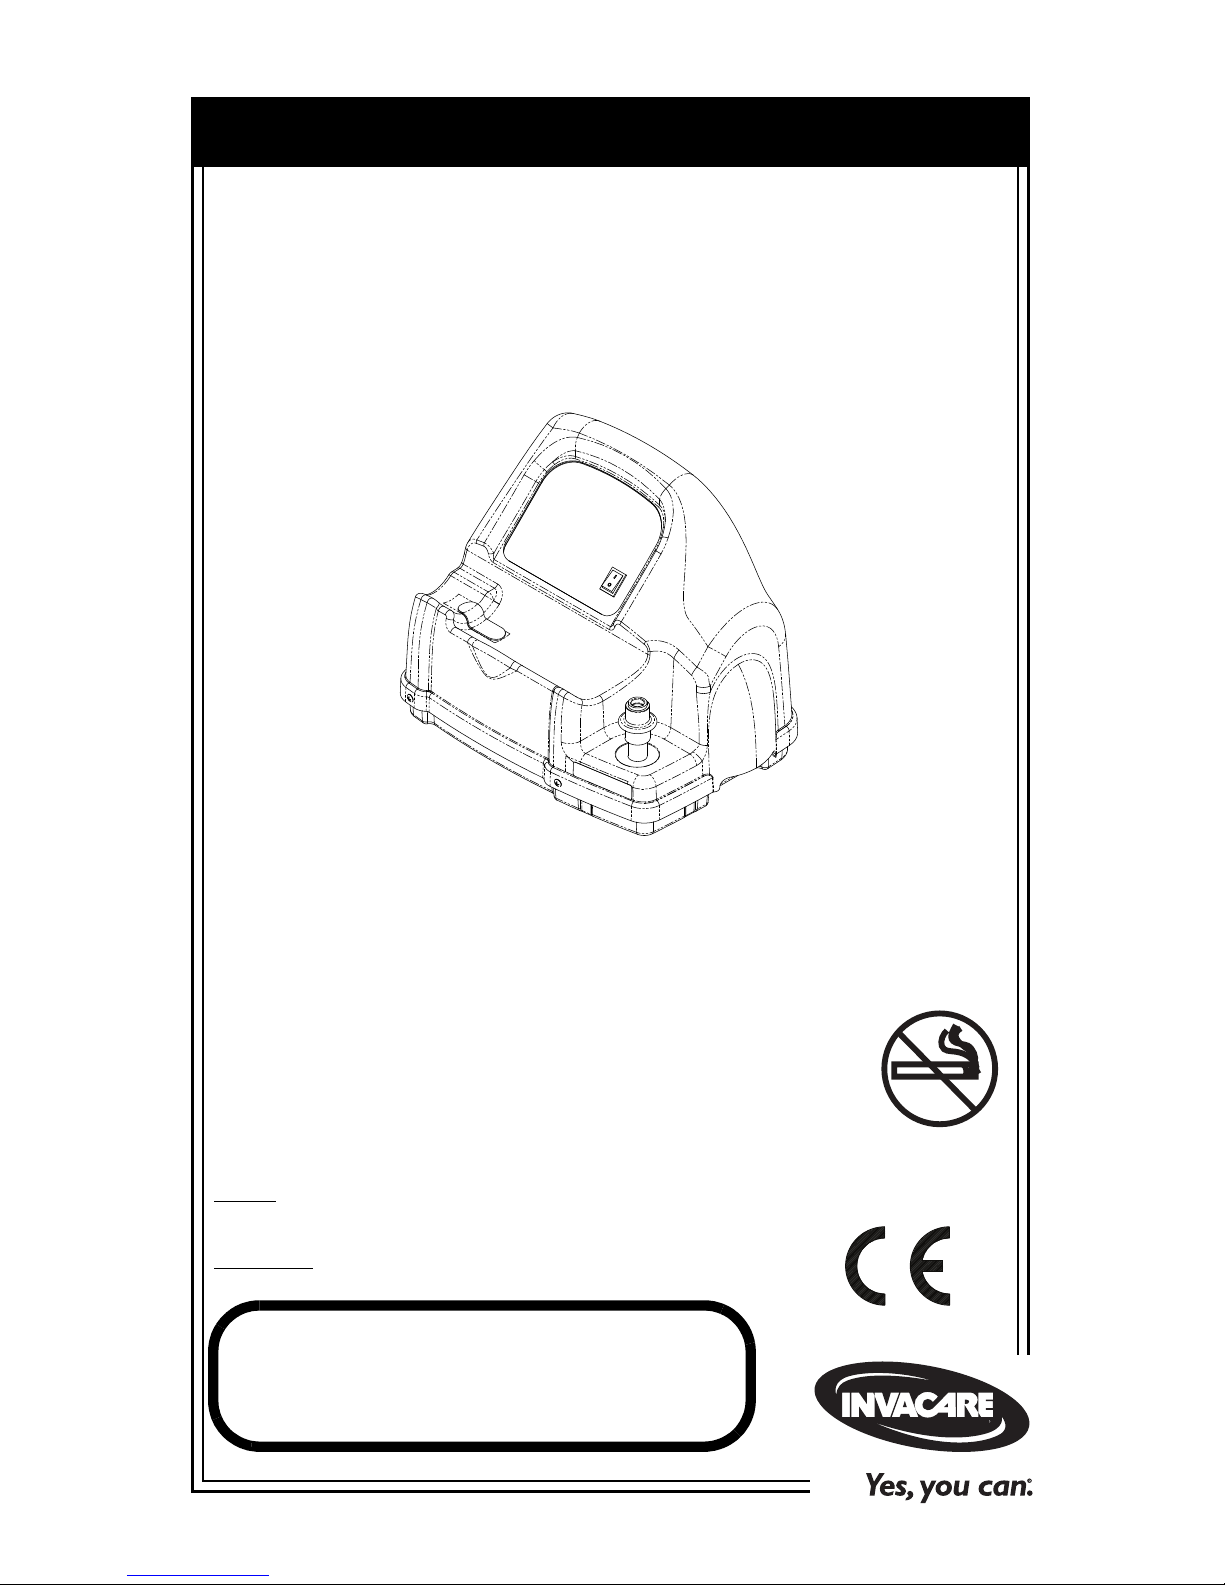
Operator Manual
HomeFill®II Compressor
Model IOH200AW
English UK. . . . . . . . . . . . . . 2
Dutch . . . . . . . . . . . . . . . . 39
French . . . . . . . . . . . . . . . . 77
Greek . . . . . . . . . . . . . . . 120
Italian. . . . . . . . . . . . . . . . 163
Portuguese . . . . . . . . . . . 206
Spanish . . . . . . . . . . . . . . 246
0434

WARNING
HomeFill®II Compressor 2 Part No 1145805
WARNING
DO NOT OPERATE THIS EQUIPMENT WITHOUT
FIRST READING AND UNDERSTANDING THIS
MANUAL. IF YOU ARE UNABLE TO
UNDERSTAND THE DANGERS, WARNINGS,
CAUTIONS, AND INSTRUCTIONS, CONTACT
INVACARE TECHNICAL SERVICES BEFORE
ATTEMPTING TO USE THIS EQUIPMENT OTHERWISE, SERIOUS INJURY OR PROPERTY
DAMAGE MAY RESULT.
DANGER
Users MUST NOT SMOKE while using this device. Do not
keep matches, lit cigarettes or other sources of ignition in
the same room as this product. Textiles and other
materials which would are not normally flammable are
easily ignited and burn with great intensity in oxygen
enriched air. Failure to observe this warning can result in
severe fire, property damage and cause physical injury or
DEATH.
NOTE: Updated versions of this manual are available at
www.invacare.com.

TABLE OF CONTENTS
Part No 1145805 3 HomeFill®II Compressor
SPECIAL NOTES ...............................................4
TYPICAL PRODUCT PARAMETERS ...................6
LABEL LOCATION ............................................8
DEALER INFORMATION ...................................9
HOMEFILL II INFORMATION ........................... 10
SECTION 1—GENERAL GUIDELINES ................ 11
SECTION 2—INITIAL SETUP ........................... 15
Initial Set Up of Compressor ........................................................15
SECTION 3—CHECKLIST AND CYLINDER
INSPECTION.................................................. 19
Compressor Operation Checklist ...............................................19
Cylinder Prefill Inspection ..............................................................19
SECTION 4—COMPRESSOR OPERATION.......... 22
Connecting/Disconnecting the Cylinder to/from the
Compressor ......................................................................................22
Turning the Compressor On ........................................................27
Setting the Flow Knob to the Prescribed Setting .....................28
Technical Description .....................................................................29
SECTION 5—INDICATOR LIGHTS.................... 31
SECTION 6—TROUBLESHOOTING/ CYLINDER FILL
TIMES ........................................................... 33
SECTION 7—MAINTENANCE.......................... 36
Cleaning the Compressor Filter ...................................................36
Cabinet ...............................................................................................37

HomeFill®II Compressor 4 Part No 1145805
SPECIAL NOTES
Check all parts for shipping damage. In the event of damage,
DO NOT use. Contact Invacare for further instruction.
Signal words are used throughout this manual and apply to
hazards or unsafe practices which could result in personal
injury or property damage. Refer to the following table for
definitions of the signal words.
ACCESSORIES
Many different types of humidifiers, oxygen tubing, cannulas
and masks can be used in conjunction with this device. You
should contact your local home care provider for advice on
which of these devices is most suitable for you. Your home
care provider can also provide advice on proper usage,
maintenance, and cleaning.
WARNING
Invacare products are specifically designed and
manufactured for use in conjunction with Invacare
accessories. Accessories designed by other manufacturers
have not been tested by Invacare and are not
recommended for use with Invacare products.
SIGNAL WORD MEANING
DANGER Danger indicates an imminently hazardous
situation which, if not avoided, will result in
death or serious injury.
WARNING Warning indicates a potentially hazardous
situation which, if not avoided, could result
in death or serious injury.
CAUTION Caution indicates a potentially hazardous
situation which, if not avoided, could result
in property damage.
Part No 1145805 5 HomeFill®II Compressor
RECYCLING INFORMATION
This product is supplied by an environmentally aware
manufacturer which adheres to the Waste Electrical and
Electronic Equipment (WEEE) Directive 2002/96/CE.
This product may contain substances that could be harmful to
the environment if disposed of in places (landfills) which are
not deemed appropriate by current legislation.
A 'crossed out wheelie bin' symbol has been placed on this
product to encourage you to recycle wherever possible.
Please be environmentally responsible and recycle this product
through your recycling facility at the end of it useful life.
HomeFill®II Compressor 6 Part No 1145805
TYPICAL PRODUCT
PARAMETERS
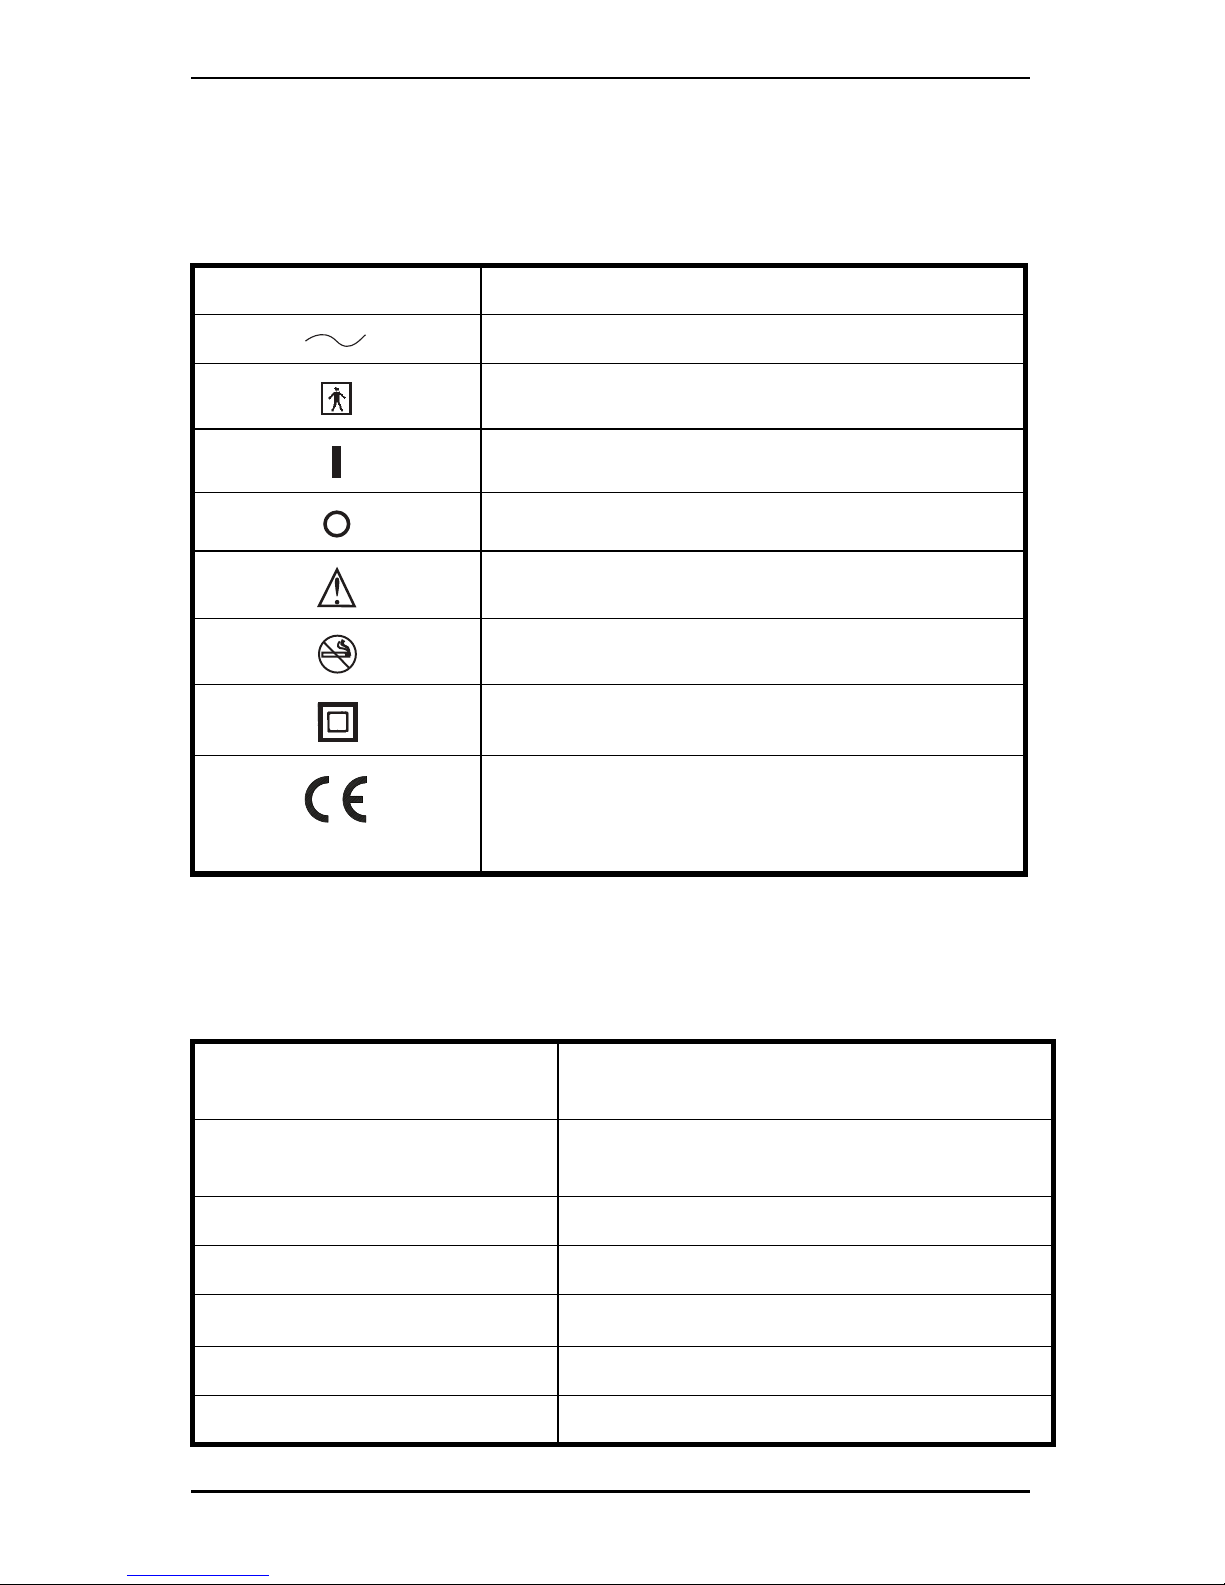
TYPICAL PRODUCT PARAMETERS
- COMPRESSOR
Regulatory Listing: EN/IEC 60601-1-2 EMC
Alternating Current
Type BF equipment
Unit running
Unit not running
Attention - Consider Accompanying Documents
DO NOT smoke
Class II, Double Insulation
This product complies with Directive 93/42/EEC
concerning medical devices.
The launch date of this product is stated in the CE
declaration of conformity.
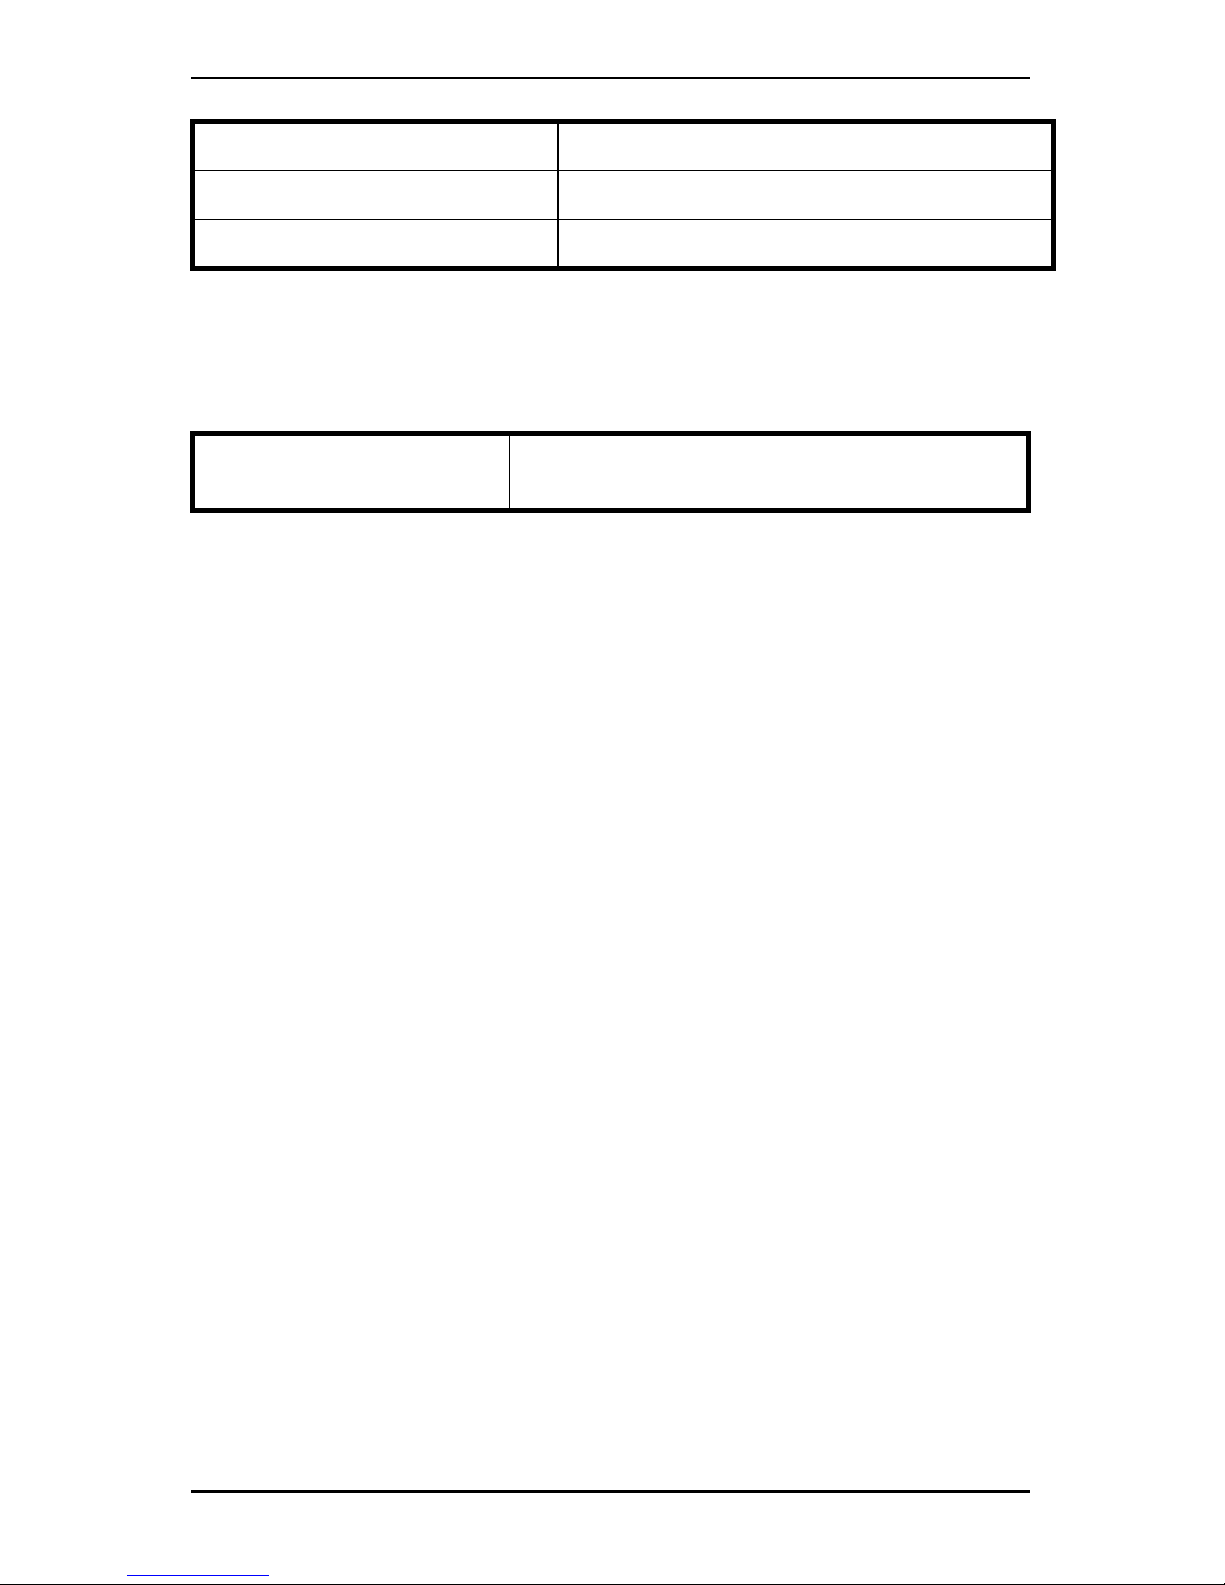
Operating temperature:
50 to 95° F (10 to 35° C) @ 20 to 60%
non-condensing humidity
Storage temperature:
-10 to 150° F (-23 to 65° C) @ 15 to 95%
humidity
Input Pressure Required:
14 - 21 PSI (96.5-144.7 kPa)
Input Flow Required:
2 L/min
Input O2% Required:
>90% O
2
Width:
20 ¼ inches (51.44 cm)
Height:
15 inches (38.1 cm)
Part No 1145805 7 HomeFill®II Compressor
CONSERVER/REGULATOR
SPECIFICATIONS
Depth:
16 inches (40.64 cm)
Weight:
33 lbs (14.97 kg)
Shipping Weight:
39 lbs (17.69 kg)
Oxygen Output
Settings 1 - 5 L/min pulse
2 L/min. continuous
HomeFill®II Compressor 8 Part No 1145805
LABEL LOCATION
DANGER - RISK OF ELECTRIC SHOCK
DO NOT remove cover. Refer servicing to qualified
service personnel.
DANGER- RISK OF FIRE
NO SMOKING - Keep ALL sources of ignition out
of the room in which this product is located and
away from areas where oxygen is being delivered.
Textiles, oil and other combustibles are easily
ignited and will burn with great intensity in oxygen
enriched air.
P/N 1145730 Rev A - 4/18/07
WARNING
Keep all connections free of oil and grease. See Owner’s
Manual before cleaning. NEVER oil or lubricate coupling.
Cylinders filled on this unit MUST be labeled “Contents
of this cylinder are the product of an oxygen
concentrator.”
Keep all connections free of oil and grease to avoid
violent ignition. See Owner’s Manual before cleaning.
This unit contains moving and high pressure
components. Manufacturer Service Only.
BEFORE COUPLING CYLINDER,
PUSH DOWN ON SLEEVE UNTIL
GREEN DOTS ARE VISIBLE.
Serial Number
Label Location
Specification
Label Location
P/N 1048080 Rev A -4/11/07

Part No 1145805 9 HomeFill®II Compressor
DEALER INFORMATION
NOTE: Invacare recommends leaving a full cylinder of oxygen with
the patient after setting up the HomeFill II compressor.
Before leaving a HomeFill II Compressor with a user, the
following checklist MUST be completed:
❑ Make sure the pressure test on cylinder has not expired.
❑ Instruct the user on the safe operation of the concentrator
and review all warnings.
❑ Instruct the user on the safe operation of the HomeFill II
compressor and review all warnings.
❑ Leave a full cylinder of oxygen with the user.
❑ Leave a copy of all warnings and filling instructions with
the user.

HomeFill®II Compressor 10 Part No 1145805
HOMEFILL II INFORMATION
HomeFill II is an accessory device to the oxygen concentrator,
which enables the patient to refill custom portable oxygen
cylinders for personal use.
NOTICE
The HomeFill II compressor is for use with specially
designed Invacare Platinum™5 and Platinum 9 HomeFill
II compatible oxygen concentrators.
The oxygen concentrator can be set to maximum flow
rate of when operating with HomeFill II compressor:
Platinum 5 - 2.5 L/min. or less
Platinum 9 - 5 L/min. or less
To determine if your oxygen concentrator is HomeFill II
compatible, examine the lower right corner of the rear of
the oxygen concentrator for an outlet fitting and refer to
the illustration below.
TOP VIEW
Concentrator
Power Cord
Outlet Fitting

Part No 1145805 11 HomeFill®II Compressor
SECTION 1—GENERAL GUIDELINES
WARNING
SECTION 1 - GENERAL GUIDELINES contains
important information for the safe operation and use of
this product. DO NOT use this product or any available
optional equipment without first reading and fully
understanding these instructions and any additional
instructional material such as Owner’s Manuals, Service
Manuals or Instruction Sheets supplied with this product
or optional equipment. If you are unable to understand
the Warnings, Cautions or Instructions, contact a health
care professional, dealer or technician before attempting
to use this equipment - otherwise, injury or damage may
occur.
In order to ensure the safe installation, assembly and
operation of the HomeFill II Compressor these instructions
MUST be followed.
“Caution: Statutory law can restrict this device to sale by or on
order of a doctor, or any other practitioner licensed by the law
of the governmental agency in which he/she practices to use
or order the use of this device.”
WARNING
This device is for the sole use of the oxygen patient. Cylinders
MUST ONLY be used by the oxygen patient and may not to be
distributed to any other individual for any purpose.
The maximum patient flow while filling the cylinders with
the IOH200AW is 2.5 L/min. for Platinum 5 and 5 L/min. for
Platinum 9.Patients with a higher prescribed flow should not
transfill while receiving supplemental oxygen treatment from
the Platinum Concentrator.

HomeFill®II Compressor 12 Part No 1145805
WARNING (CONTINUED)
NEVER block product air openings or place the product on a
soft surface, such as a bed or couch, where the air opening
may be blocked. Keep the openings free from lint, hair and the
like.
DO NOT use outdoors.
NEVER use near any type of flame or flammable/explosive
substance, vapour or atmosphere.
DO NOT disassemble. The unit is provided with double
insulation and has no serviceable parts. Should any service be
required, contact Invacare Technical Service.
If the compressor has a damaged cord or plug, if it is not
working properly, if it has been dropped or damaged, or
immersed in water, please call a qualified technician for
inspection and repair.
If any leakage of the oxygen cylinder is detected DO NOT
attempt to use the cylinder. Turn the flow selector knob on the
regulator to “Off”. If leakage persists, place the cylinder
outdoors and notify your Home Health Care Provider or
Service Representative of this condition.
DO NOT allow oil from your hands or other sources to come
into contact with the compressor coupling or bottle fittings. In
the presence of oxygen, these substances may become
flammable and may cause injury. Avoid touching the bottle
fitting whenever possible. Some examples of items to be
avoided are hand creams and lotions, cooking oils, suntan oils
or sunblocks and similar oil-based products. If you use these
types of products Invacare suggests you wash your hands
prior to using the HomeFill unit. Should the bottle fitting
come into contact with any such substance it should be wiped
with a damp cloth prior to being connected to the compressor.

Part No 1145805 13 HomeFill®II Compressor
WARNING (CONTINUED)
NEVER oil or lubricate the compressor coupler or bottle
fittings. NEVER use any penetrating oil or lubricant such as
WD-40 or 3 in One. If you experience connection difficulties,
please verify that the bottle fitting has been inserted straight
down into the compressor coupler. In the event of continued
difficulties, contact your supplier for assistance.
Keep the oxygen tubing, cord, and unit away from heated or
hot surfaces, including space heaters, blankets, cookers and
similar electrical appliances.
The HomeFill II is equipped with a high pressure relief valve
to ensure user safety. When activated, this safety feature will
emit an extremely loud noise. Should this noise occur, turn the
unit Off and contact your Home Health Care Provider or
Service Representative.
Before moving or repositioning either the compressor or
concentrator, ALWAYS push the power switch to the Off (O)
position and disconnect the AC power cords and the
interconnect hose between the compressor and concentrator.
Failure to follow this procedure may result in damage to the
unit or personal injury.
Children should ALWAYS be supervised around the
HomeFill II unit. When used with the HomeFill table or
similar elevated support surfaces, a child could knock over
the table or other surface thus causing the unit to fall. Failure
to observe this warning may result in personal injury or
product damage.
Handling
Use extreme care when handling and filling an oxygen
cylinder. Full oxygen cylinders are pressurised and can turn
into projectiles if dropped or mishandled.

HomeFill®II Compressor 14 Part No 1145805
WARNING (CONTINUED)
NEVER transport a compressor with a cylinder connected to
or stored on the compressor, otherwise injury or damage can
occur.
DO NOT store filled oxygen bottles near a furnace, hot water
tank, in the trunk of a car or in other areas of high
temperature. Storage in such areas may cause the bottle to
explode or can result in fire.

Part No 1145805 15 HomeFill®II Compressor
SECTION 2—INITIAL SETUP
NOTE: Suppliers Only - Refer to Dealer Information on page 9
prior to performing this procedure.
Initial Set Up of Compressor
Compressor Initial Setup Checklist
Before operating the HomeFill II Compressor for the first
time, complete the following checklist:
❑ Choose a location for the compressor.
❑ Transport the compressor to the desired location.
❑ Connect the power cord to the compressor.
❑ Connect the compressor to the concentrator.
Choosing a location
WARNING
NEVER use near any type of flame or flammable/explosive
substance, vapour or atmosphere.
Keep the oxygen tubing, cord, and unit away from heated
or hot surfaces, including space heaters, blankets, cookers
and similar electrical appliances.
The compressor should be at least three inches away from
walls, curtains or furniture to ensure sufficient air flow.
DO NOT use inside a cupboard.
The compressor should rest on a hard flat stable surface, such
as a table or the Ready Rack.
HomeFill®II Compressor 16 Part No 1145805
Compressor Transportation
NOTE: For this procedure, refer to FIGURE 2.1.
WARNING
NEVER transport a compressor with a cylinder connected
to or stored on the compressor as this may result in injury
or damage.
CAUTION
When transporting the compressor, take care no to bump
the compressor or the connectors into obstacles.
Otherwise, damage to the compressor may occur.
NOTE: For this procedure, refer to FIGURE 2.1.
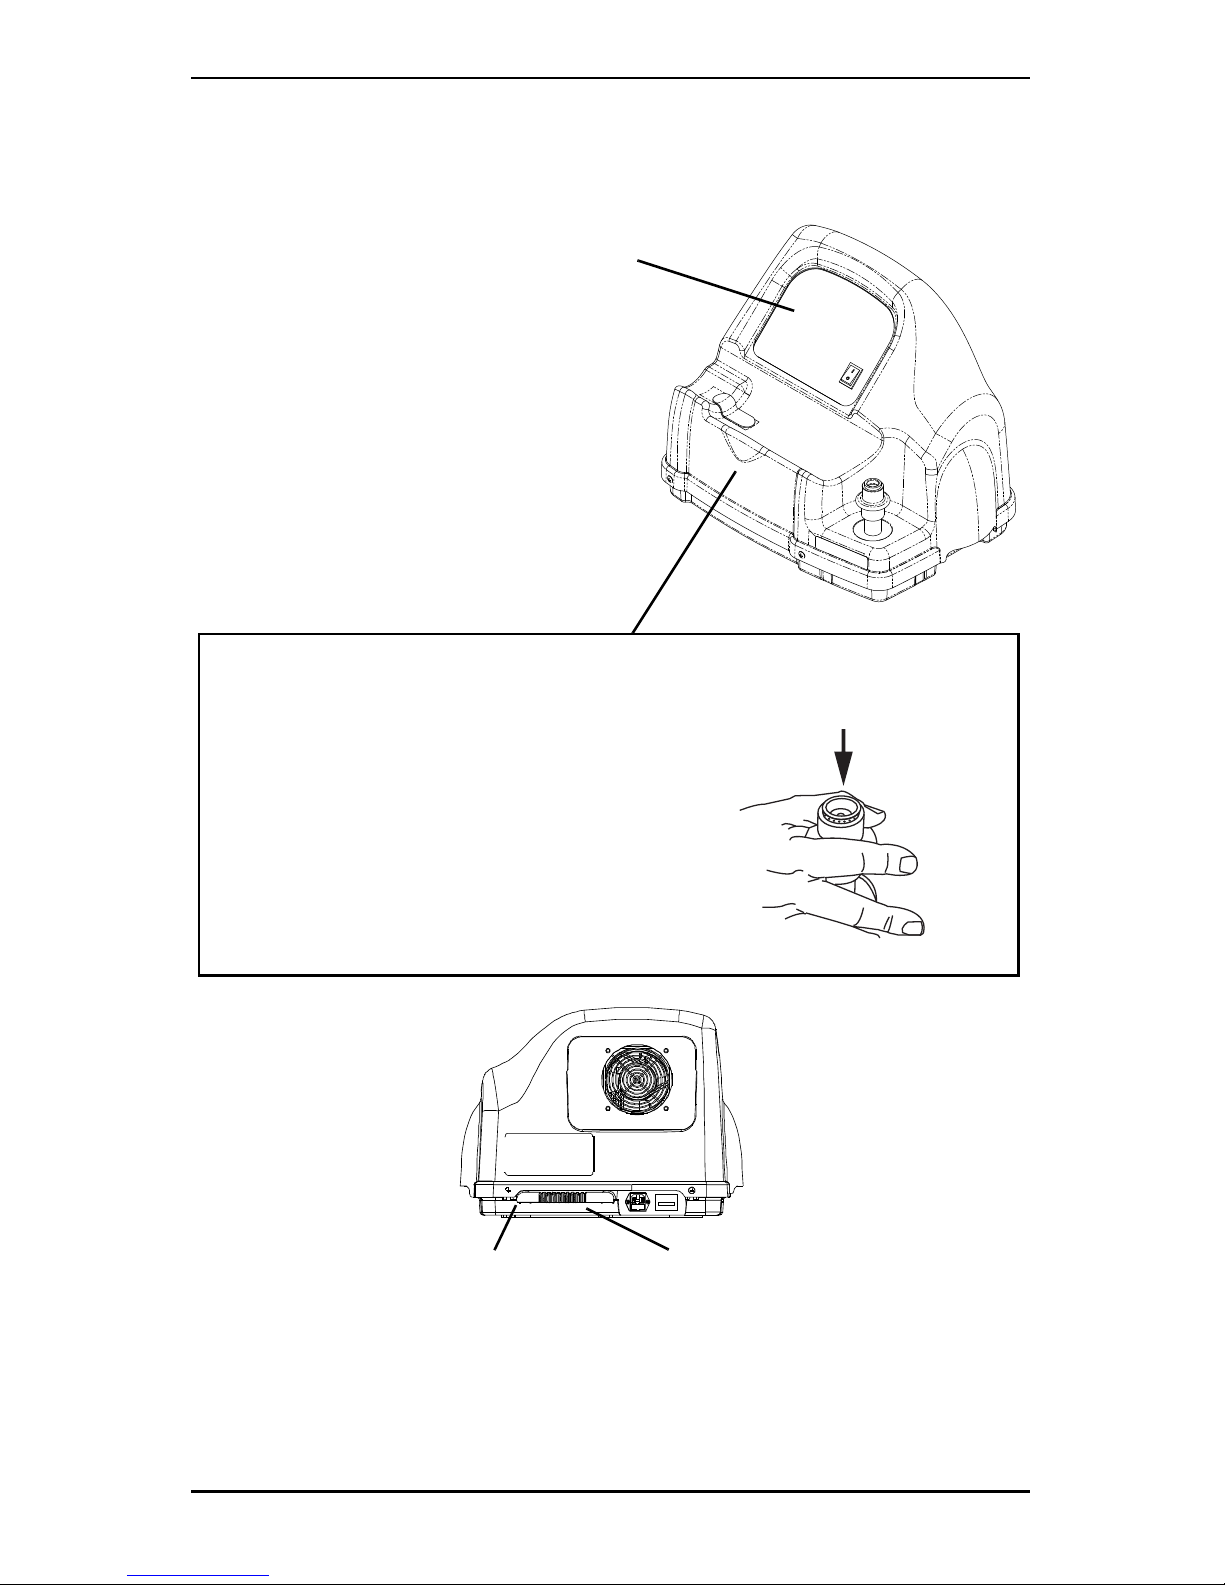
1. There are two
methods for the safe
transportation of the
compressor:
A. One hand - Hold the
hand grip at the
bottom rear of the
compressor.
B. Both hands - Hold the
hand grips on the
sides of compressor.
FIGURE 2.1 Compressor
Transportation
Installing the Power Cord
NOTE: For this procedure, refer to FIGURE 2.2 on page 17.
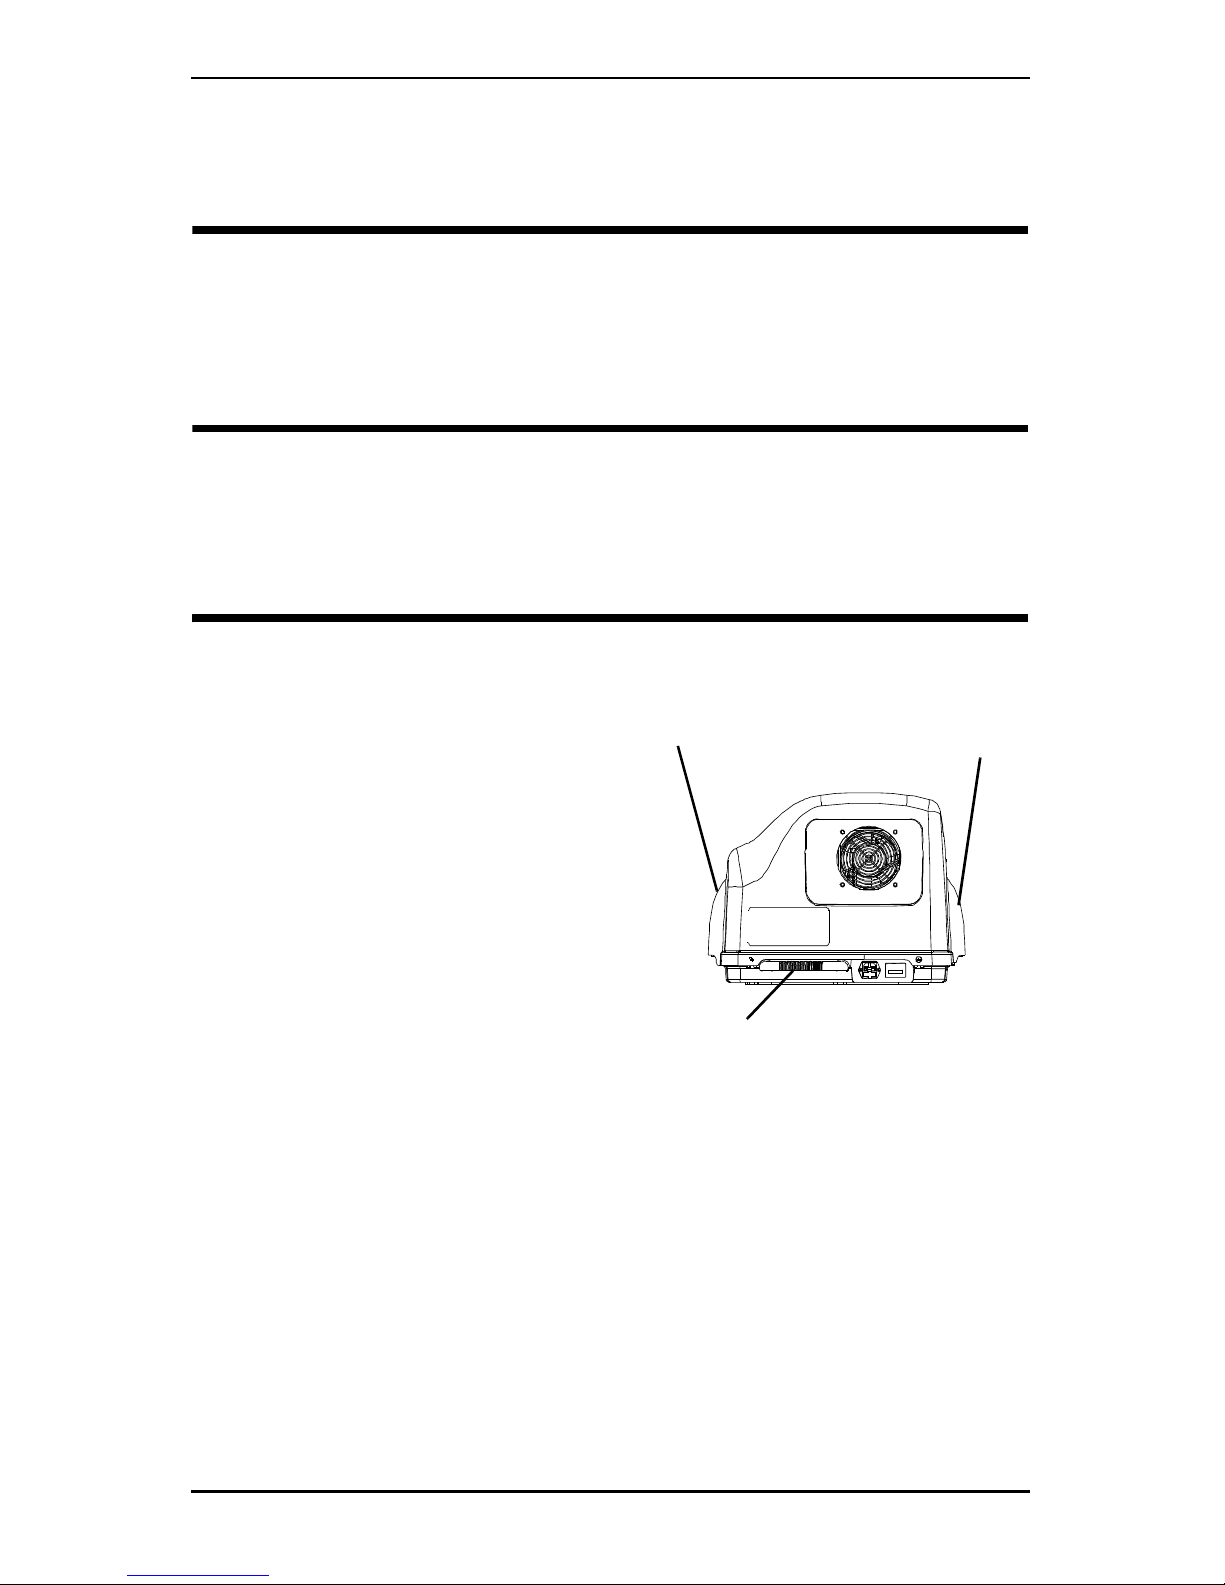
1. Ensure the compressor is on a hard flat stable surface, such
as a table or Ready Rack.
2. Make sure the power switch is in the Off (O) position.
3. Plug the power cord into the electric connector in the back
of the compressor.
Hand Grip
Hand Grip
Hand Grip
Part No 1145805 17 HomeFill®II Compressor
4. Plug the opposite end of the power cord into the wall
socket.
FIGURE 2.2 Installing the Power Cord
Connecting the Compressor to the Concentrator
NOTE: For this procedure, refer to FIGURE 2.3 on page 18.
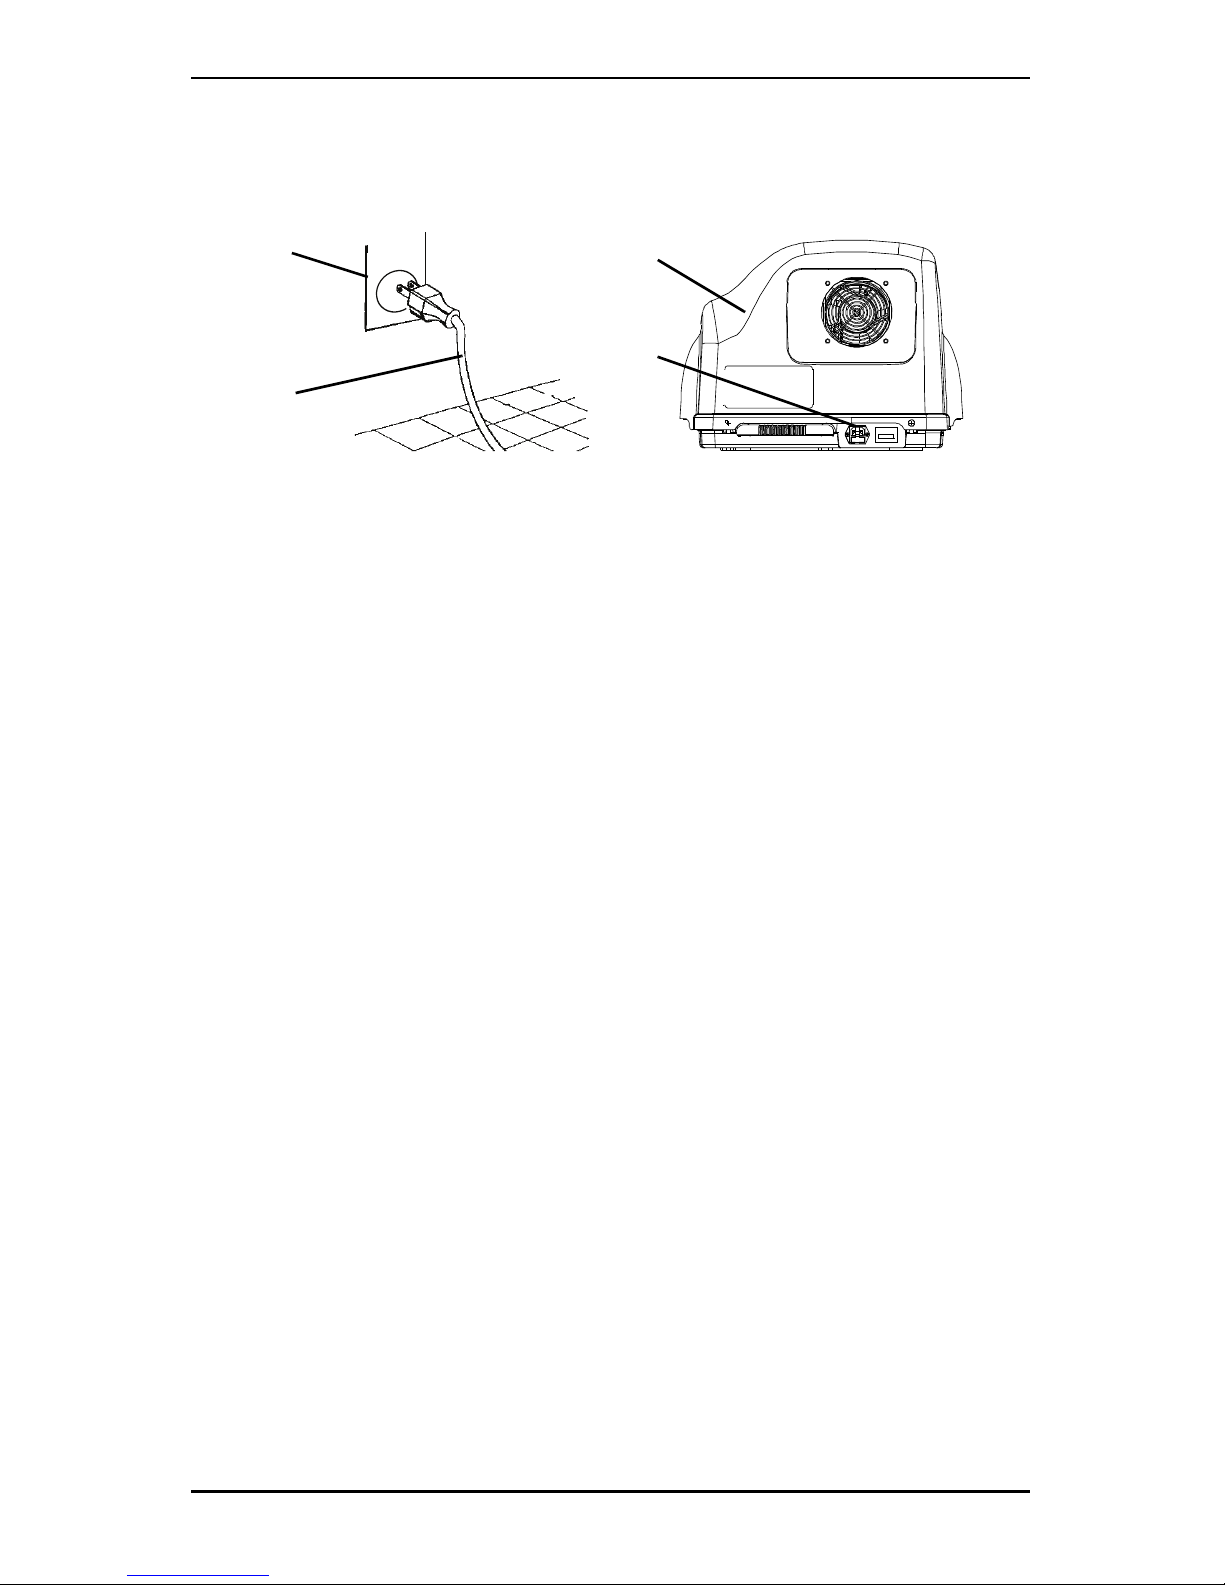
1. Insert one end of the interconnect hose into the outlet
fitting on the back of the concentrator (Detail “A”).
2. Insert the opposite end of the interconnect hose into the
inlet fitting on the side of the compressor (Detail “B”).
NOTE: The metal tabs on the concentrator outlet fitting and the
compressor inlet fitting will pop out with an audible “click” when
the end of the interconnect hose is properly installed (Detail “C”).
3. Loop any excess interconnect hose and secure to the back
of the concentrator with the fastening straps.
Wall
Socket
Power
Cord
Compressor
(REAR)
Electrical
Connection
HomeFill®II Compressor 18 Part No 1145805
FIGURE 2.3 Connecting the Compressor to the Concentrator
Insert End of
Interconnect Hose into
Inlet/Outlet Fitting
Inlet/Outlet Fitting
Metal
Tab
Interconnect
Hose
Compressor
Inlet Fitting
Power
Cord
Outlet Fitting
CONCENTRATOR
TOP VIEW
DETAIL “A”
DETAIL “C”
DETAIL “B”

Part No 1145805 19 HomeFill®II Compressor
SECTION 3—CHECKLIST AND
CYLINDER INSPECTION
Compressor Operation Checklist
Complete the following checklist each time the HomeFill II
Compressor is used to fill a cylinder:
❑ Ensure that the concentrator has been On for at least thirty
minutes. Refer to the concentrator Owner's Manual.
❑ Conduct the prefill inspection on the cylinder.
❑ Connect the cylinder to the compressor.
❑ Push the compressor power switch to the On ( ) position.
❑ Examine the indicator lights on the control panel.
❑ Disconnect and remove the full cylinder.
❑ Push the compressor power switch to the Off (O) position.
❑ Repeat this checklist when filling another cylinder.
Cylinder Prefill Inspection
WARNING
ONLY use cylinders that have the Invacare HomeFill II
connection and label.
All cylinders MUST be inspected before attempting to fill.
Otherwise, injury or damage may occur.
NOTE: For this procedure, refer to FIGURE 3.1 on page 20.
HomeFill®II Compressor 20 Part No 1145805
FIGURE 3.1 Cylinder Prefill Inspection

Part No 1145805 21 HomeFill®II Compressor
The Hydrostatic Testing Date
Aluminum cylinders MUST be tested every five years.
WARNING
DO NOT fill cylinders that have not been tested in the
past five years. Otherwise, serious personal injury may
result. For replacement contact your supplier.
External Examination
1. Examine the outside of the cylinder for the following
conditions, and replace the cylinder in the event of:
• Dents or surface damage
• Arc burns
• Oil or grease
• Any other signs of damage which may cause the
cylinder to be unacceptable or unsafe for use.
2. Inspect the cylinder for evidence of fire or thermal
damage. Such evidence includes charring or blistering of
the paint or other protective coating or heat sensitive
indicator. If fire or thermal damage is found, replace the
cylinder.
3. Inspect the cylinder/regulator assembly for the following,
and replace if found:
• Debris, oil or grease
• Noticeable signs of damage
• Signs of corrosion inside the valve
• Signs of excessive heat or fire damage

HomeFill®II Compressor 22 Part No 1145805
SECTION 4—COMPRESSOR
OPERATION
Connecting/Disconnecting the Cylinder
to/from the Compressor
Connecting the Cylinder to the Compressor
WARNING
NEVER use tools of any kind to connect/disconnect the
cylinder and the compressor. Otherwise, severe injury
and/or damage may occur.
DO NOT drop oxygen cylinders. Use both hands when
handling/transporting oxygen cylinders. Otherwise, injury
or damage may occur.
DO NOT use a liquid leak detector to test for leaks.
NOTE: For this procedure, refer to FIGURE 4.1 on page 23 and
FIGURE 4.2 on page 24.
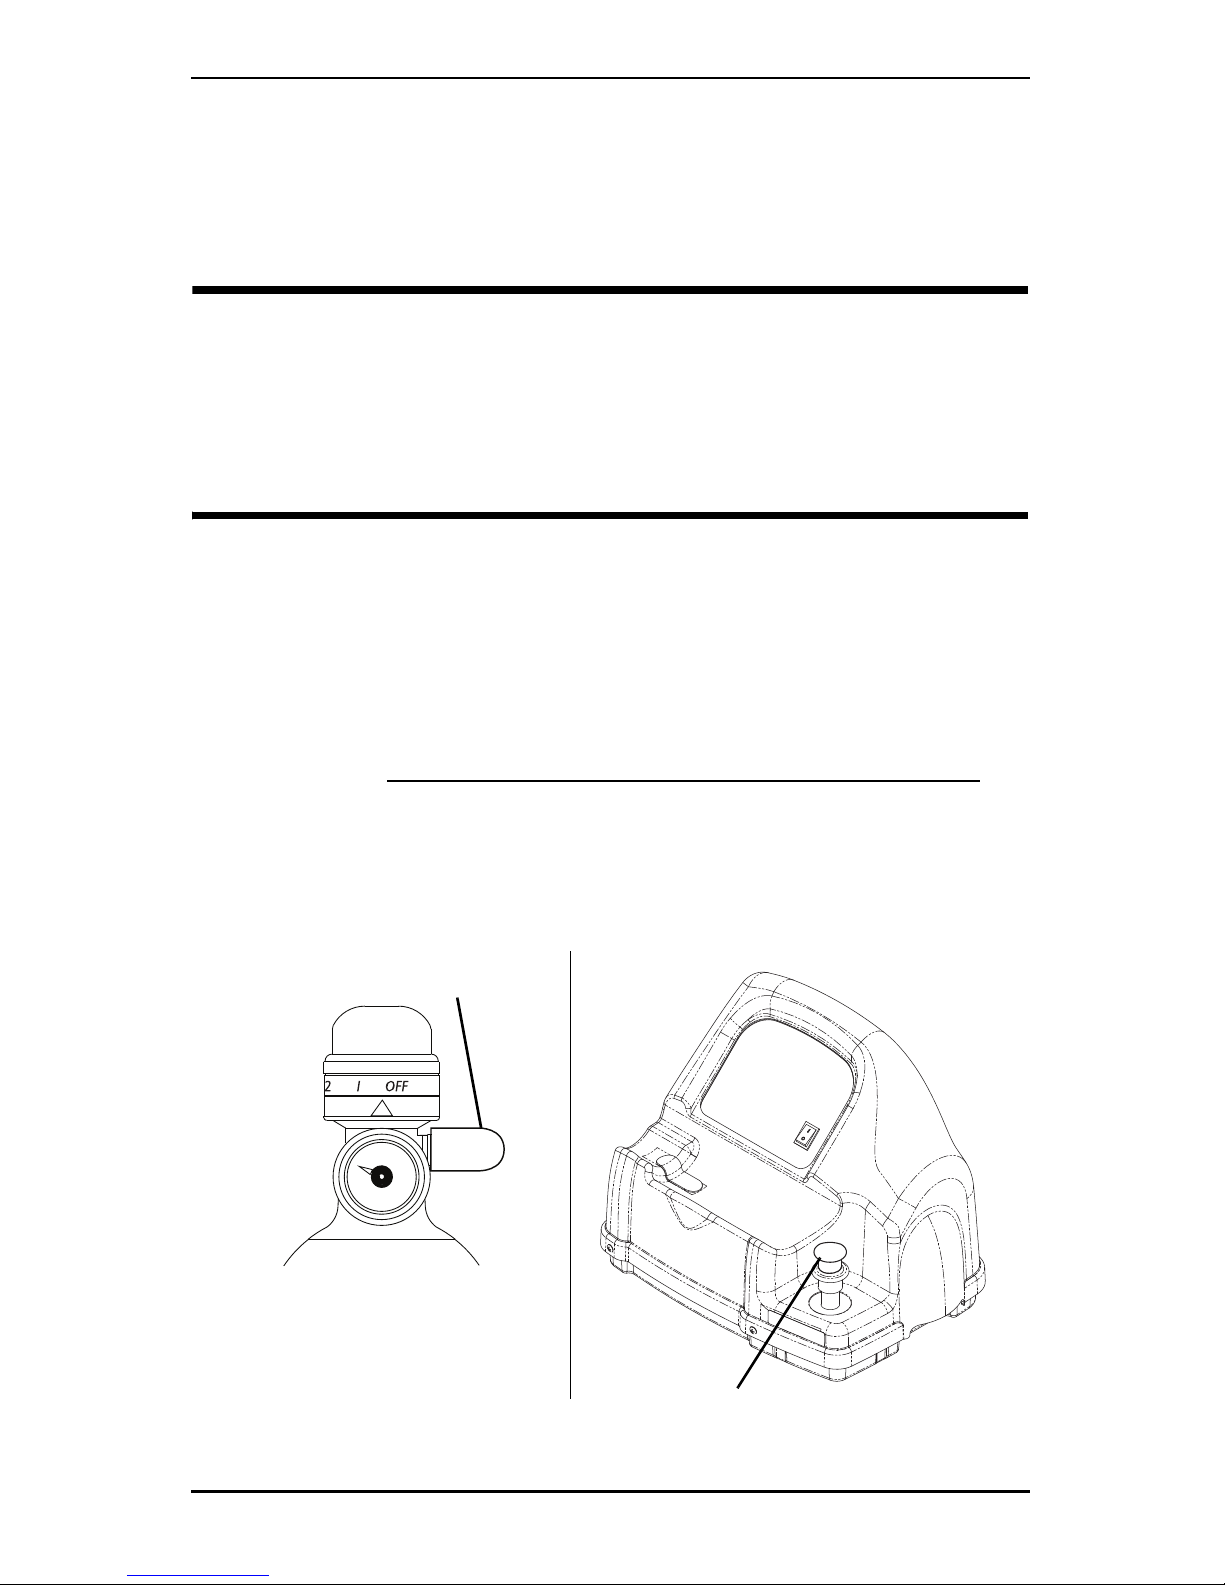
1. Examine the cylinder gauge. If the cylinder pressure is
less
than 1500 psig (10342 kPa), proceed to STEP 2 (FIGURE 4.2).
NOTE: If the cylinder pressure is greater than 1500 psig (10342
kPa), DO NOT attempt to top off this cylinder. It may not fill.
2. Set the regulator flow dial on the cylinder to Off (FIGURE
4.2).
3. Remove the cylinder and connector fillport covers.
CAUTION
DO NOT connect the outlet (cannula) connection to the
HomeFill II unit as this will result in the malfunction of the
conserving cylinder.
Part No 1145805 23 HomeFill®II Compressor
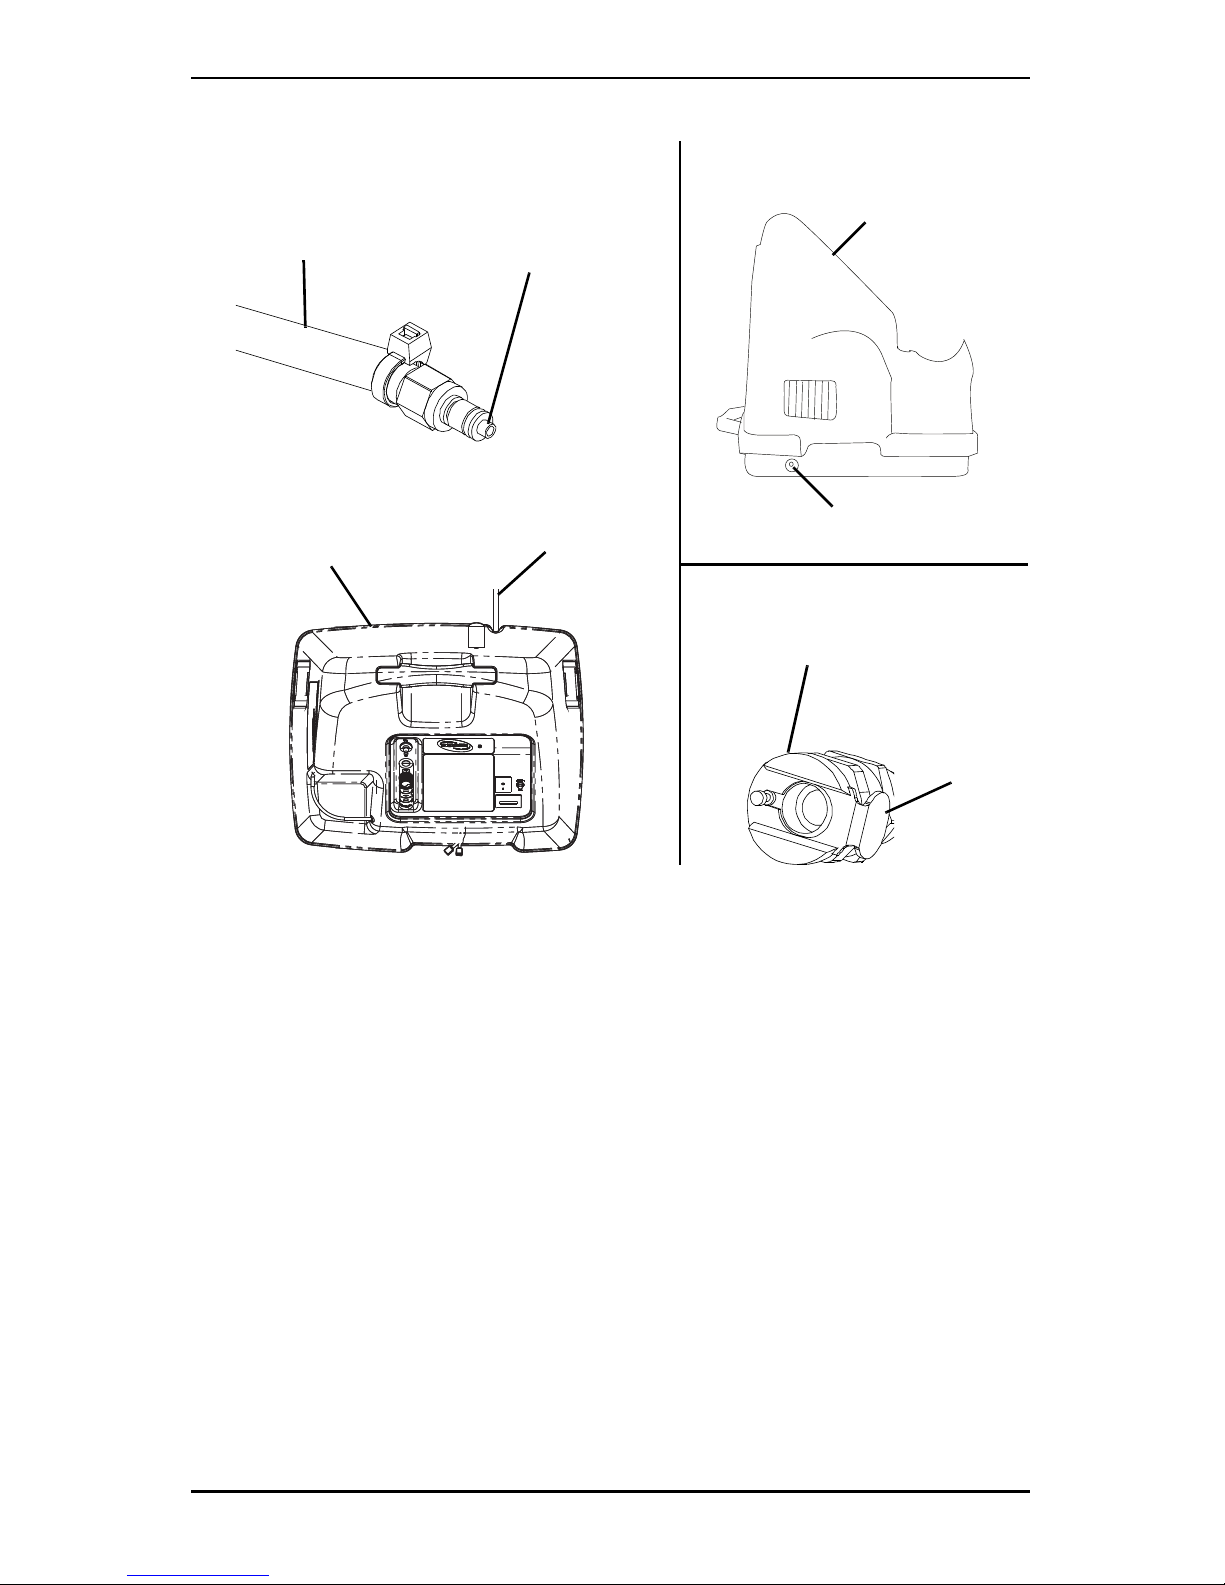
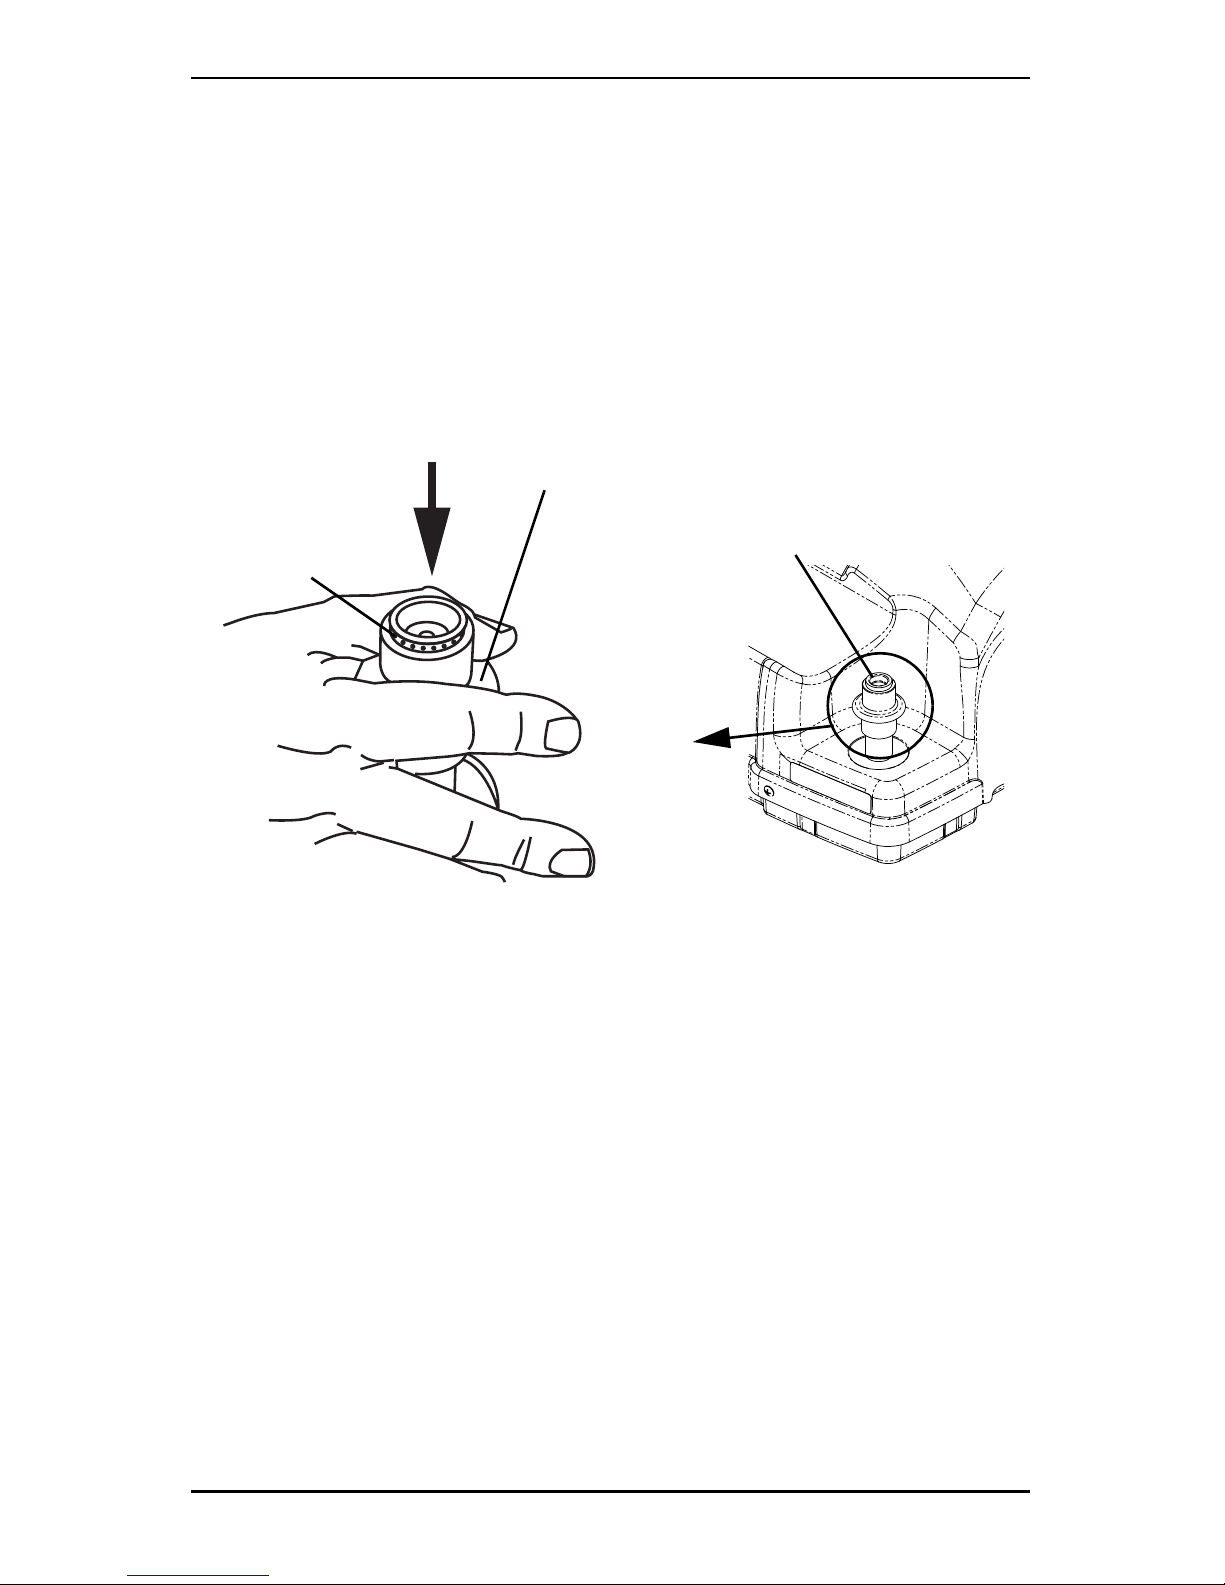
4. To reset the connector momentarily push DOWN on the
outer ring (sleeve) of the connector fillport until GREEN
dots are visible (FIGURE 4.1).
NOTE: If the outer ring (sleeve) is in the UP position
(GREEN dots not visible), the connector fillport will be
unable to accept the cylinder fillport. Pushing DOWN
momentarily will reset the connector fillport (GREEN
dots visible) to accept the cylinder fillport.
FIGURE 4.1 Resetting Connector Fillport
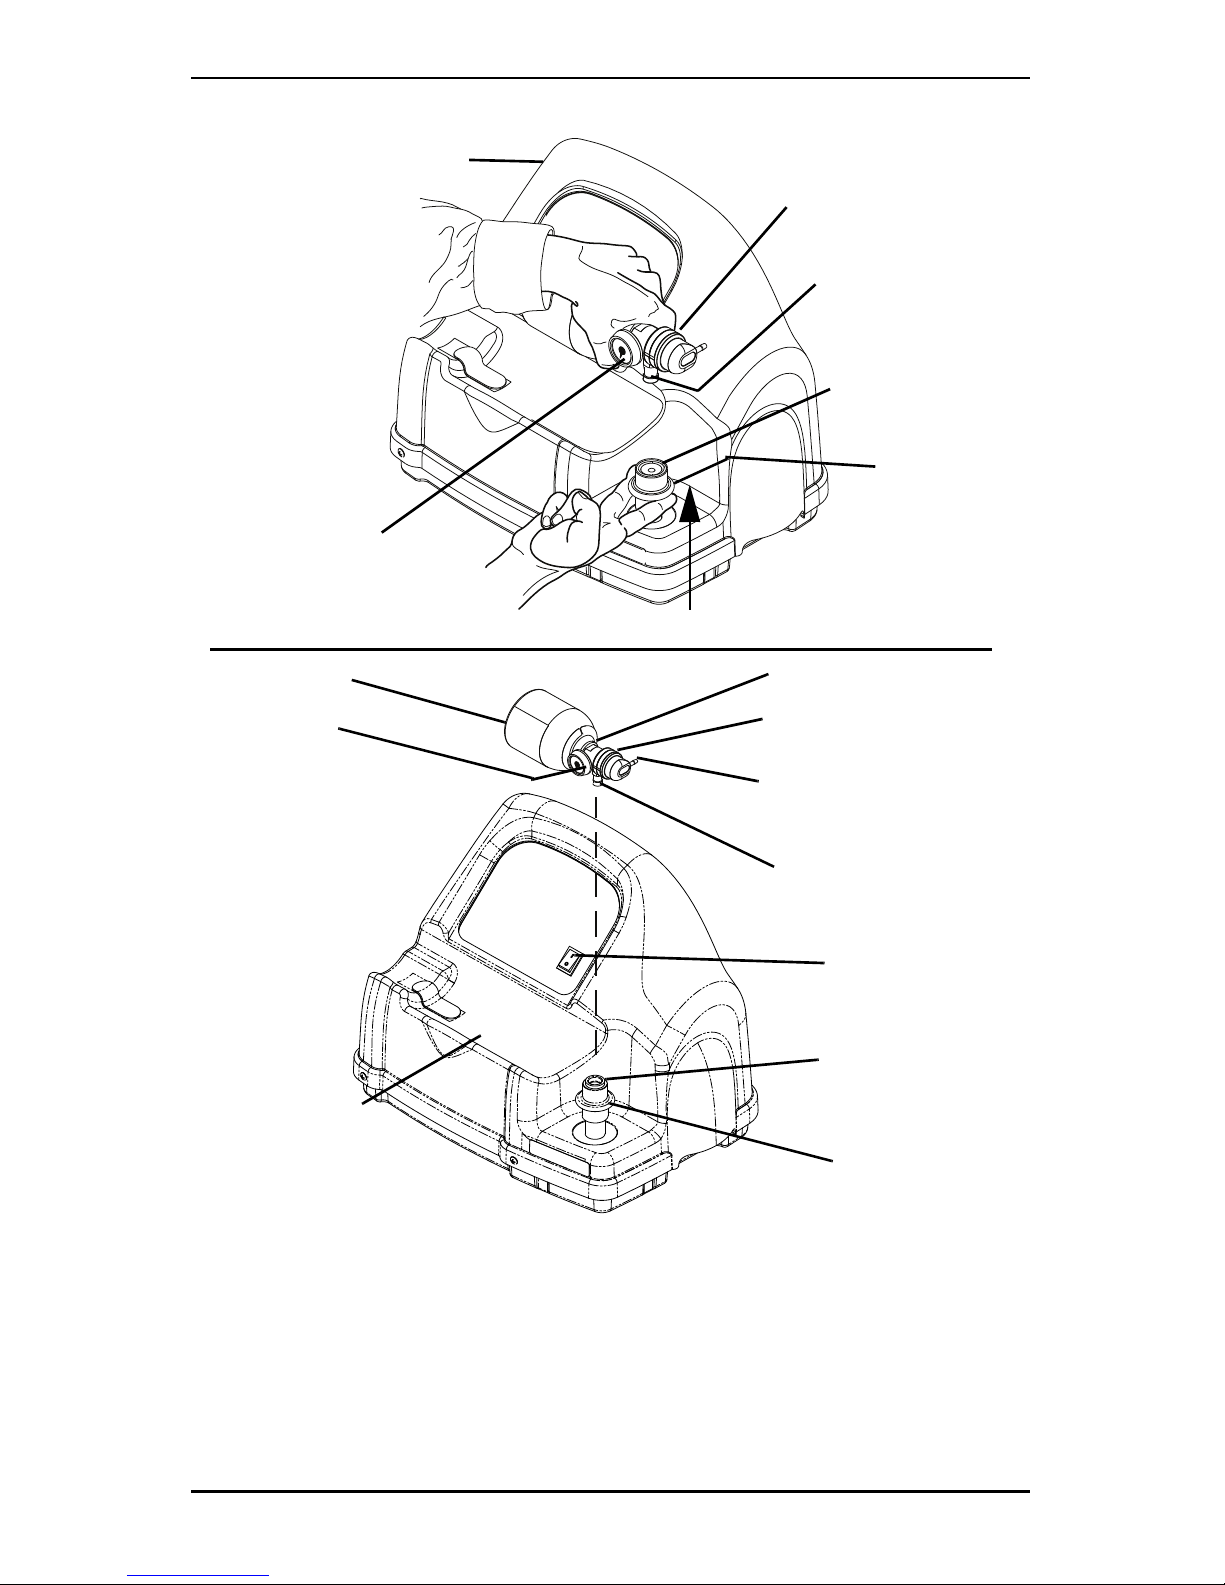
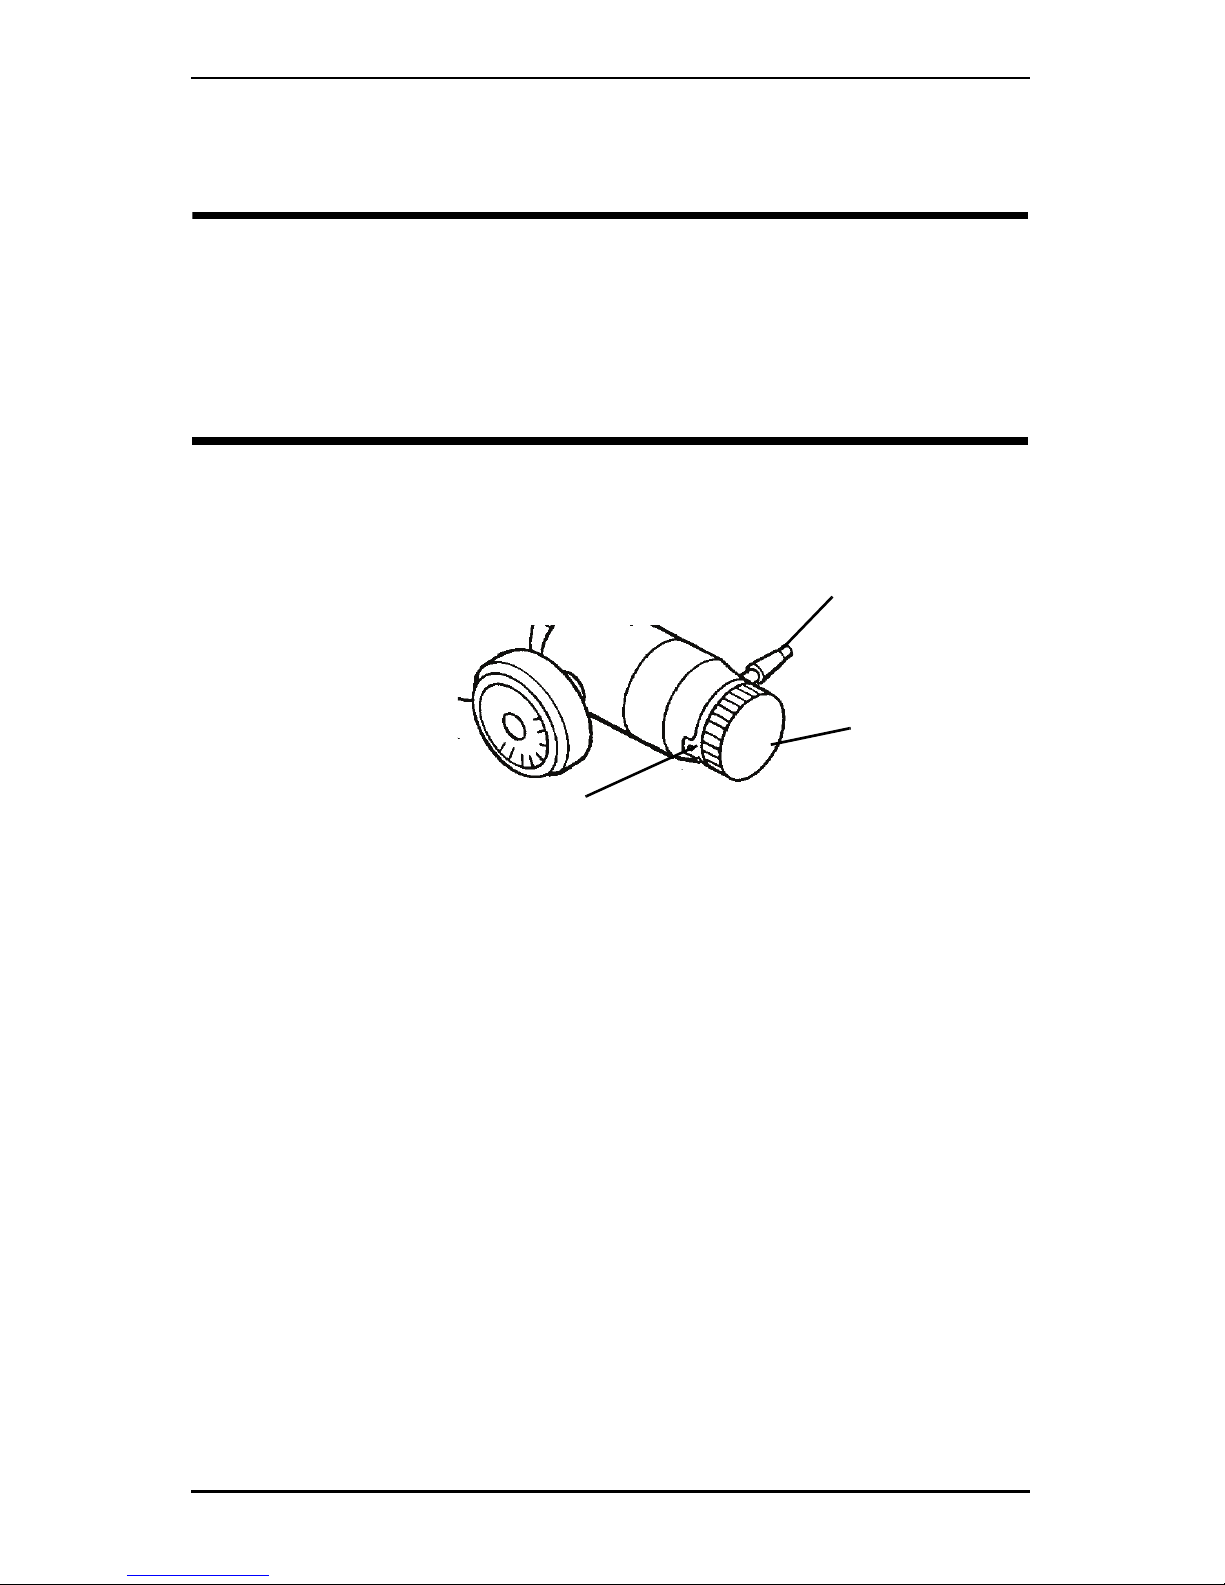
5. Grasp the cylinder/regulator assembly in the area behind
the cylinder gauge (FIGURE 4.2).
6. Position the cylinder in the compressor cradle (FIGURE
4.2).
7. Align the cylinder fillport with the connector fillport
(FIGURE 4.2).
8. Pull UP on the outer ring (sleeve) of the connector fillport
while pushing DOWN on the cylinder/regulator assembly
to couple the cylinder fillport into the connector fillport
(FIGURE 4.2).
NOTE: An audible “click” indicates that the cylinder is properly
connected.
Connector Fillport
Outer Ring (Sleeve)
PUSH
DOWN
GREEN Dots
BEFORE COUPLING
THE CYLINDER,
PUSH DOWN ON
THE SLEEVE UNTIL
THE GREEN
DOTS
ARE VISIBLE.
HomeFill®II Compressor 24 Part No 1145805
FIGURE 4.2 Connecting the Cylinder to the Compressor
Cylinder/Regulator
Assembly
Compressor
Cylinder
Gauge
Cylinder
Fillport
Connector
Fillport
PULL UP
Cylinder
Compressor
Cradle
Cylinder
Gauge
Regulator Flow Dial
Cylinder Fillport
Outer Ring
(Sleeve)
Connector
Fillport
NOTE: For
clarity, fillport
covers are not
shown.
Outlet (Cannula)
Connection
Power
Switch
Regulator
Outer Ring
(Sleeve)
Part No 1145805 25 HomeFill®II Compressor
Disconnecting the Cylinder from the Compressor
WARNING
NEVER use any type of tool to connect/disconnect the
cylinder and the compressor. Otherwise, severe injury
and/or damage may occur.
NOTE: For this procedure, refer to FIGURE 4.3 and FIGURE 4.4
on page 26.
1. Press the compressor power switch to the Off (O) position.
2. Grasp the cylinder/regulator assembly in the area behind
the cylinder gauge.
3. With the other hand, grasp the outer ring (sleeve) of the
connector fillport and push DOWN.
4. Lift up on the cylinder/regulator assembly to remove from
the connector fillport.
FIGURE 4.3 Disconnecting the Cylinder from the Compressor
Cylinder/Regulator
Assembly
Compressor
Cylinder
Gauge
Cylinder
Fillport
Connector
Fillport
Outer Ring
(Sleeve)
PUSH DOWN
HomeFill®II Compressor 26 Part No 1145805
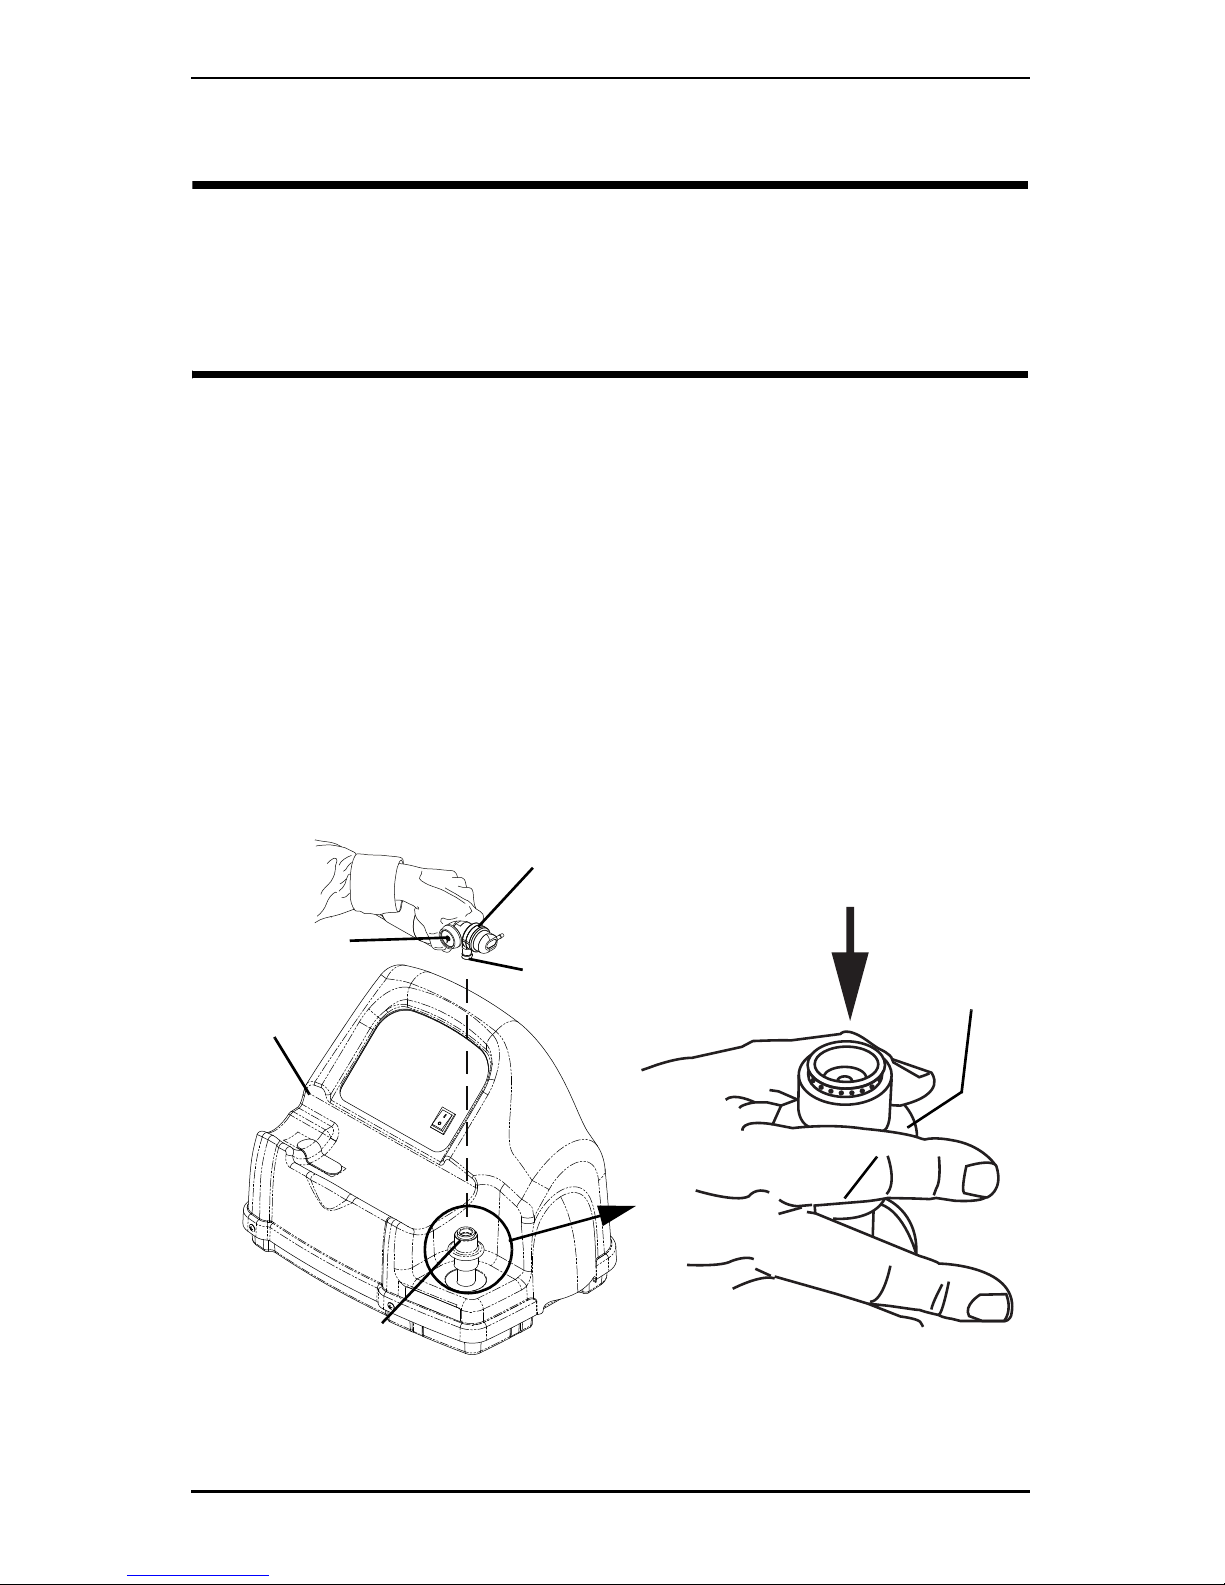
5. When the cylinder fillport is disconnected from the
connector fillport, release the outer ring (sleeve) of the
connector fillport and use both hands to remove the
cylinder from the compressor cradle.
WARNING
The fillport cover on the connector fillport and the
cylinder fillport MUST be replaced after filling and when
not in use. If either of the fillport covers are missing
contact your healthcare provider before using.
6. Place the fillport covers onto the connector fillport and
cylinder fillport.
7. Examine the cylinder gauge to ensure the cylinder is full
(needle pointing into GREEN area). If the cylinder is not
full, perform the following:
• Repeat Connecting the Cylinder to the Compressor on
page 22.
• If the cylinder is not full after a second attempt to fill it,
contact the provider.
FIGURE 4.4 Fillport Covers
Cylinder Fillport Cover
Connector Fillport Cover

Part No 1145805 27 HomeFill®II Compressor
Turning the Compressor On
NOTE: For this procedure, refer to FIGURE 4.5 on page 28.
1. Make sure the concentrator is On. Refer to the
concentrator Owner’s Manual.
CAUTION
The concentrator flow rate to the patient MUST be set at
a maximum of 2.5 L/min. or less for Platinum 5 models
and 5 L/min. for Platinum 9 models. Otherwise, the
oxygen level to the compressor will be of <90% and the
compressor will not fill the cylinder.
2. Set the concentrator flow rate to the patient to 2.5 L/min. or
less for Platinum 5 and 5 L/min. for Platinum 9 oxygen
concentrator. Refer to the concentrator Owner’s Manual.
3. Make sure the cylinder is connected to the compressor.
Refer to Connecting the Cylinder to the Compressor on
page 22.
4. Push the power switch on the control panel to the On ( )
position.
5. Examine the control panel. The following sequence of
events should occur:
A. 0-3 minutes - The O2 below normal (YELLOW) light
will light up while the compressor warms up.
B. After three minutes - The filling (GREEN) light will be
on while the cylinder is filling.
C. The full (GREEN) light will be on when the cylinder is
finished filling. Proceed to step 6.
NOTE: The O2 below normal (YELLOW) light may come on if the
oxygen level from the concentrator has not yet reached or drops
below 90%. The compressor will begin or resume filling when the

HomeFill®II Compressor 28 Part No 1145805
oxygen level reaches 90%. Refer to Troubleshooting/ Cylinder Fill
Times on page 33 if the light does not go Off within 10 minutes.
NOTE: Refer to Troubleshooting/ Cylinder Fill Times on page 33 if
the Attention (red) light and audible alarm are on.
6. Remove the full cylinder. Refer to Disconnecting the
Cylinder from the Compressor on page 25.
7. Push the power switch to the Off (O) position.
FIGURE 4.5 Turning the Compressor On
Setting the Flow Knob to the Prescribed
Setting
NOTE: For this procedure, refer to FIGURE 4.6.
1. Attach the nasal cannula to the outlet fitting of the
cylinder.
Attention (RED Light and
Audible Alarm)
O
2
Below Normal
(YELLOW Light)
Full (GREEN
Light)
Control Panel
Filling (GREEN
Light)
Power
Switch
I
O
Part No 1145805 29 HomeFill®II Compressor
2. Turn the flow knob to the L/min. setting prescribed by
your doctor or therapist.
WARNING
As changing the L/min. setting on the flow knob will affect
the dose of oxygen delivered, DO NOT readjust the
L/min. setting unless your doctor or therapist instructs
you to.
3. To turn the flow of oxygen Off, turn the flow knob
counter-clockwise to the Off position.
FIGURE 4.6 Setting the Flow Knob to the Prescribed Setting
Technical Description
The HomeFill II Oxygen System (IOH200AW) is an
electro-mechanical prescription system for home use. Its
intended function and use is to supply pressurized oxygen to
fill Invacare proprietary gas cylinders for ambulatory use
while the patient receives therapeutic oxygen from an
accessory oxygen concentrator. The IOH200AW gas system is
designed for use with an Invacare Platinum oxygen
concentrator with an integral HF2 accessory port that can
supply a gas concentration greater than 90% O2 around 2
L/min. while supplying a patient therapy flow rate up to 2.5
L/min. for Platinum 5 and 5 L/min. for Platinum 9.
Outlet Fitting
Flow Knob
Prescribed Setting

HomeFill®II Compressor 30 Part No 1145805
The HomeFill II Oxygen system consists of an IOH200AW gas
compressor, connection tubing, and the Invacare supplied
portable gas cylinders with the integral flow regulator and
interlocking fill fitting.
The IOH200AW compressor consists of a multistage
compressor, internal tank, control electronics with an integral
oxygen concentration sensor, interlocking fill fitting, inlet
fitting, and drive motor. Compressor operation is controlled
by the electronics assembly. The motor/compressor is allowed
to fill a cylinder only when the oxygen concentration of the
inlet gas stream is greater than 90%. The motor/compressor
fill operation is completed when the gas in a cylinder reaches
the maximum fill pressure of 2000 PSI (13786 kPa).
The IOH200AW compressor can fill cylinders for portable use
by ambulatory patients. Invacare supplied portable gas
cylinders have an interlocking fill fitting that matches only
with the Invacare IOH200AW compressor assembly. The gas
cylinder also contains an integral flow regulator with fixed,
selectable flow settings.

Part No 1145805 31 HomeFill®II Compressor
SECTION 5—INDICATOR LIGHTS
INDICATOR LIGHT
COLOUR
COMPRESSOR
STATUS
EFFECT
None Compressor is Off. O2 flowing to user if
concentrator is On.
O
2
Below Normal -
YELLOW
Compressor is On and
warming up (0-3
minutes after power is
On).
Cylinder filling not
started.
O
2
flowing to user if
concentrator is On.
O
2
from concentrator
is <90% (anytime after
three minute warmup).
Cylinder filling stops,
will restart when O
2
>90%.
O
2
flowing to user if
concentrator is On.
Filling - GREEN Compressor is On and
cylinder is filling. O
2
from concentrator is
>90% (any time after
three minute warmup).
Cylinder is filling
O
2
flowing to user if
concentrator is On.
Full - GREEN Compressor is On.
Cylinder has finished
filling (full) -remove
cylinder (FULL light is
On in >10 mins.)
or
Cylinder is not
attached properly check connection
(FULL light is On in
<10 mins.).
Cylinder filling stops
Cannot fill another
cylinder until
compressor is turned
Off and On again
O
2
flowing to user if
concentrator is On.

HomeFill®II Compressor 32 Part No 1145805
ATTENTION - RED
(Audible Alarm)
Compressor is On.
Cylinder NOT filling
Causes:
Full cylinder attached
when unit turned On replace with empty
cylinder
or
Internal failure contact supplier.
Compressor does not
start filling or stops
filling
Unit MUST be turned
Off and On before filling
can occur.
O
2
flowing to user if
concentrator is On.
INDICATOR LIGHT
COLOUR
COMPRESSOR
STATUS
EFFECT

Part No 1145805 33 HomeFill®II Compressor
SECTION 6—TROUBLESHOOTING/
CYLINDER FILL TIMES
TROUBLESHOOTING
PROBLEM SOLUTION
There are no indicator
lights on when
compressor is turned on.
1. Turn compressor Off (O).
2. Check that the power cord is correctly plugged
into compressor and wall socket.
3. Turn the compressor on ( ).
4. Clean air filters. Refer to Maintenance
on
page 36.
5. If performing STEPS 1-4 does not cause any
indicator lights to come on, contact your home
health care provider or Invacare for service.
RED light On 1.Check the cylinder gauge to see if it is full.
Cylinder full - Remove the cylinder and turn the
unit Off (O). Perform the Cylinder Prefill
Inspection on page 19 with a cylinder that is not
full.
Cylinder not full - Proceed to STEP 2.
2. Check that the cylinder is properly connected.
Turn the compressor Off (O). Remove the
cylinder and reinstall. Turn the compressor On
().
3. If the cylinder is not full and is properly
connected, the compressor may have an internal
failure.
Contact your home health care provider or
Invacare.
Compressor cycles On
and Off
or
O
2
Below Normal -
alternating (YELLOW)
and Filling (GREEN) lights
or
O
2
Below Normal
(YELLOW) light goes
On and Off
1. Check the concentrator liter flow setting is at
2.5 L/min. or less. Where necessary, adjust the
litre flow setting (refer to the concentrator
owner’s manual). Wait at least 20 minutes for the
GREEN light to appear. If it does not appear,
proceed to STEP 2.
2. The concentrator may need service. Contact
your home health care provider or Invacare.

HomeFill®II Compressor 34 Part No 1145805
O2 Below Normal
(YELLOW) light stays On.
1. Ensure the concentrator has warmed up for at
least 20 minutes. If 20 minutes have not passed,
turn the compressor Off (O) until the
concentrator warms up. If the YELLOW light
remains on proceed to STEP 2.
2. Inspect the connection between the
compressor and the concentrator for damage or
pinching. If damaged, replace. If pinched,
straighten tubing. Turn the compressor Off (O)
for at least 10 seconds.
Turn the compressor On ( ). If the YELLOW
light remains on after 10 minutes, proceed to
STEP 3.
3. The concentrator may need service. Contact
your home health care provider or Invacare.
Fill times exceed
maximum recommended
fill times or GREEN filling
light stays On.
1. Ensure the cylinder regulator is set to Off.
2. Check the recommended fill times shown in
Cylinder Fill Times
on page 35.
3. Check that the cylinder is properly connected.
Turn the compressor Off (O). Remove the
cylinder and reinstall. Turn the compressor ON
().
4. Check the compressor/concentrator line for
proper connection and/or damage (i.e. - leaks or
kinks).
5. Check the concentrator litre flow setting is at
three L/min. or less. Where necessary, adjust the
litre flow setting (refer to the concentrator
owner’s manual). If the GREEN filling light does
not go Off, the compressor and/or concentrator
may need service. Contact your home health care
provider or Invacare.
Excessive noise when
compressor is On.
1. Contact your home health care provider or
Invacare for service.
Hissing sound from
Regulator when flow
selector is Off.
1. Turn flow selector Off.
2. Should hissing sound continue, contact your
home health care provider or Invacare.
TROUBLESHOOTING
PROBLEM SOLUTION

Part No 1145805 35 HomeFill®II Compressor
NOTE: All filling times are approximate and may vary according to
environmental conditions.
*NOTE: Not for EU countries.
Regulator is On but O2 is
not being delivered.
1. Refill cylinder
2. Check that the cannula is straight and is not
pinched. If damaged, replace.
3. Contact your home health care provider or
Invacare for service.
CYLINDER FILL TIMES
Cylinder
Filling
Times
Concentrator Flow Rate to Patient:
(Platinum 5 up to 2.5 L/min. and
Platinum 9 up to 5 L/min.)
*HF2PC9 *HF2PCL4 *HF2PCL6 HF2PCE8
NORMAL 2 hr 20 min 60 min 1 hr 25 min 2 hr 5 min
MAXIMUM 2 hr 45 min 1 hr 20 min 1 hr 50 min N/A
TROUBLESHOOTING
PROBLEM SOLUTION

HomeFill®II Compressor 36 Part No 1145805
SECTION 7—MAINTENANCE
Cleaning the Compressor Filter
WARNING
Push the power switch to the Off (O) position and unplug
the compressor before cleaning.
DO NOT operate the compressor when the filter is not
installed.
CAUTION
DO NOT unplug by pulling the cord, as this could result in
damage.
NOTE: For this procedure, please refer to FIGURE 7.1.
NOTE: All compressors have one filter at the back of the cabinet.
NOTE: This procedures should be performed at least once a week.
1. Unplug the compressor. Hold the plug not the cord.
2. Remove the filter.
3. Clean the filter with a vacuum cleaner or wash in warm
soapy water and rinse thoroughly.
4. Dry the filter thoroughly before reinstallation.
FIGURE 7.1 Cleaning the Compressor Filter
Filter

Part No 1145805 37 HomeFill®II Compressor
Cabinet
WARNING
Push the power switch to the Off (O) position and unplug
the compressor before cleaning. To avoid electric shock,
DO NOT remove cabinet.
1. Clean the cabinet with a mild household cleaner and a
non-abrasive cloth or sponge.

CUSTOMER SERVICE AND WARRANTY INFORMATION
HomeFill®II Compressor 38 Part No 1145805
CUSTOMER SERVICE AND
WARRANTY INFORMATION
Terms and conditions of the warranty are part of the general terms and conditions
particular to the individual countries in which this product is sold.
Belgium & Luxemburg:
Invacare nv, Autobaan 22, B-8210 Loppem • Tel: (32) (0) 50 83 10 10 •
Fax: (32) (0) 50 83 10 11 • belgium@invacare.com • www.invacare.be
Danmark:
Invacare A/S, Sdr. Ringvej 37, DK-2605 Brøndby • Tel: (45) (0)36 90 00 00 •
Fax: (45) (0)36 90 00 01 • denmark@invacare.com • www.invacare.dk
Deutschland:
Invacare GmbH, Alemannenstraße 10, D-88316 Isny • Tel: (49) (0)75 62 7 00 0 •
Fax: (49) (0)75 62 7 00 66 • kontakt@invacare.com • www.invacare.de
European Distrbutor Organisation:
Invacare, Kleiststraße 49, D-32457 Porta Westfalica • Tel: (49) (0)57 31 754 540 •
Fax: (49) (0)57 31 754 541 • edo@invacare.com • www.invacare.eu.com
España:
Invacare SA, c/Areny s/n, Polígon Industrial de Celrà, E-17460 Celrà (Girona) •
Tel: (34) (0)972 49 32 00 • Fax: (34) (0)972 49 32 20 • contactsp@invacare.com •
www.invacare.es
France:
Invacare Poirier SAS, Route de St Roch, F-37230 Fondettes • Tel: (33) (0)2 47 62 64 66 •
Fax: (33) (0)2 47 42 12 24 • contactfr@invacare.com • www.invacare.fr
Ireland:
Invacare Ireland Ltd, Unit 5 Seatown Business Campus • Seatown Road, Swords, County
Dublin – Ireland • Tel: (353) 1 810 7084 • Fax: (353) 1 810 7085 • ireland@invacare.com •
www.invacare.ie
Italia:
Invacare Mecc San s.r.l., Via dei Pini 62, I-36016 Thiene (VI) • Tel: (39) 0445 38 00 59 •
Fax: (39) 0445 38 00 34 • italia@invacare.com • www.invacare.it
Nederland:
Invacare BV, Celsiusstraat 46, NL-6716 BZ Ede • Tel: (31) (0)318 695 757 •
Fax: (31) (0)318 695 758 • nederland@invacare.com • csede@invacare.com •
www.invacare.nl
Norge:
Invacare AS, Grensesvingen 9, Postboks 6230, Etterstad, N-0603 Oslo •
Tel: (47) (0)22 57 95 00 • Fax: (47) (0)22 57 95 01 • norway@invacare.com •
island@invacare.com • www.invacare.no
Österreich:
Invacare Austria GmbH, Herzog Odilostrasse 101, A-5310 Mondsee •
Tel: (43) 6232 5535 0 • Fax: (43) 6232 5535 4 • info@invacare-austria.com •
www.invacare.at
Sverige & Suomi:
Invacare AB, Fagerstagatan 9, S-163 91 Spånga • Tel: (46) (0)8 761 70 90 •
Fax: (46) (0)8 761 81 08 • sweden@invacare.com • finland@invacare.com •
www.invacare.se
Switzerland:
Invacare AG, • Benkenstrasse 260, CH-4108 Witterswil • Tel: (41) (0)61 487 70 80 •
Fax: (41) (0)61 487 70 81 • switzerland@invacare.com • www.invacare.ch
United Kingdom:
Invacare Limited, Pencoed Technology Park, Pencoed, Bridgend CF35 5HZ •
Tel: (44) (0) 1656 776222 • Fax: (44) (0) 1656 776220 • UK@invacare.com •
www.invacare.co.uk
Portugal:
Invacare Lda • Rua Estrada Velha, 949, P-4465-784 Leça do Balio •
Tel: (351) (0)225 1059 46/47 • Fax: (351) (0)225 1057 39 • portugal@invacare.com •
www.invacare.pt

Gebruiker: Lees deze handleiding vóór u het
product gebruikt en bewaar hem voor eventuele
raadplegingen in de toekomst.
Dealer:
Deze handleiding moet aan de eindgebruiker
worden verstrekt.
Voor meer informatie met betrekking
tot Invacare producten, onderdelen en
onderhoud, ga naar www.invacare.nl
Gebruikershandleiding
HomeFill® II Compressor
Model IOH200AW
0434

WAARSCHUWING
HomeFill® II Compressor 40 Part No 1145805
WAARSCHUWING
GEBRUIK DIT APPARAAT NIET ZONDER EERST
DEZE HANDLEIDING TE LEZEN EN TE
BEGRIJPEN. INDIEN U NIET IN STAAT BENT OM
DE GEVAREN, WAARSCHUWINGEN,
OPMERKINGEN EN INSTRUCTIES TE BEGRIJPEN,
NEEM DAN CONTACT OP MET DE TECHNISCHE
DIENST VAN INVACARE VÓÓR U EEN POGING
ONDERNEEMT OM DIT APPARAAT TE
GEBRUIKEN - ANDERS ZOU EEN ERNSTIG
LETSEL OF MATERIËLE SCHADE HET GEVOLG
KUNNEN ZIJN.
GEVAAR
Gebruikers mogen tijdens het gebruik van dit apparaat
NIET ROKEN. Houd alle lucifers, brandende sigaretten of
andere ontstekingsbronnen buiten de ruimte waar het
product zich bevindt. Textiel en andere materialen die
normaal gesproken niet branden, ontvlammen
gemakkelijk en branden met grote intensiteit in met
zuurstof verrijkte lucht. Het niet opvolgen van deze
waarschuwing kan ernstige branden en materiële
beschadiging veroorzaken en lichamelijk letsel of de
DOOD tot gevolg hebben.
OPMERKING: Bijgewerkte versies van deze handleiding zijn
beschikbaar op www.invacare.com

INHOUDSOPGAVE
Part No 1145805 41 HomeFill® II Compressor
SPECIALE OPMERKINGEN .............................. 42
TYPISCHE PRODUCTPARAMETERS ................. 44
LOCATIE VAN HET ETIKET ............................ 46
DEALER INFORMATIE .................................... 47
HOMEFILL II INFORMATIE .............................. 48
SECTIE 1—ALGEMENE RICHTLIJNEN ................... 49
SECTIE 2—BEGINOPSTELLING ............................. 53
Beginopstelling van de compressor...............................................53
SECTIE 3—CHECKLIST EN CILINDER INSPECTIE .. 57
Checklist compressorwerking........................................................57
Cilinderinspectie voorafgaand aan vullen.....................................57
SECTIE 4—WERKING VAN DE COMPRESSOR ....... 60
De cilinder aansluiten aan/loskoppelen van de compressor ...60
De compressor Aan zetten ............................................................65
Zet de regelknop op de voorgeschreven instelling...................67
Technische beschrijving ...................................................................68
SECTIE 5—INDICATORLAMPJES .......................... 69
SECTIE 6—PROBLEEMOPLOSSING/ VULTIJDEN VOOR
DE CILINDER ...................................................... 71
SECTIE 7—ONDERHOUD ..................................... 74
Reinigen van de compressorfilter..................................................74
Behuizing .............................................................................................75
KLANTENSERVICE- EN GARANTIE-INFORMATIE
76

SPECIALE OPMERKINGEN
HomeFill® II Compressor 42 Part No 1145805
SPECIALE OPMERKINGEN
Controleer alle onderdelen op beschadigingen als gevolg
van transport. In geval van beschadiging het apparaat
NIET
gebruiken. Neem contact op met Invacare voor
verdere instructies.
In deze handleiding worden signaalwoorden gebruikt die wijzen op
gevaren of onveilige gebruiken die kunnen resulteren in persoonlijk
letsel of materiële schade. Raadpleeg de volgende tabel voor definities
van de signaalwoorden.
ACCESSOIRES
U kunt dit apparaat gebruiken met vele verschillende typen
bevochtigers, zuurstofslangen, canules en maskers. U dient contact op
te nemen met uw plaatselijke thuiszorg voor aanbevelingen over welke
hulpmiddelen voor u het geschiktst zijn. Zij kunnen ook advies geven
over het juiste gebruik, onderhoud en reiniging.
WAARSCHUWING
Invacare-producten worden speciaal ontworpen en gemaakt voor
gebruik in combinatie met Invacare-accessoires. Accessoires die
zijn ontwor en door andere fabrikanten, zijn niet getest door
Invacare en worden niet aanbevolen voor gebruik met
Invacare-producten.
SIGNAALWOORD BETEKENIS
GEVAAR Gevaar geeft een op handen zijnde
gevaarlijke situatie aan die, als deze niet
wordt vermeden, de dood of ernstig letsel
tot gevolg heeft.
WAARSCHUWING Een waarschuwing geeft een mogelijk
gevaarlijke situatie aan die, als deze niet
wordt vermeden, de dood of ernstig letsel
tot gevolg kan hebben.
LET OP Let op geeft een mogelijk gevaarlijke
situatie aan die, als deze niet wordt
vermeden, materiële schade tot gevolg kan
hebben.

SPECIALE OPMERKINGEN
Part No 1145805 43 HomeFill® II Compressor
RECYCLINGINFORMATIE
Dit product wordt geleverd door een milieubewuste fabrikant
die zich houdt aan de richtlijn van de EU betreffende
afgedankte elektrische en elektronische apparatuur
(AEEA-richtlijn) 2002/96/CE.
Dit product kan stoffen bevatten die schadelijk zijn voor het
milieu als ze afgevoerd worden naar plaatsen (stortplaatsen)
die daar volgens de wet niet geschikt voor zijn.
Het symbool van de ʹ˜vuilnisbak op wieltjes met een kruis
erdoorʹ is op dit product geplaatst om u aan te moedigen
producten zo veel mogelijk te recyclen.
Wees milieubewust en recycle dit product aan het eind van de
levensduur via uw recyclingafdeling.

HomeFill® II Compressor 44 Part No 1145805
TYPISCHE
PRODUCTPARAMETERS
Naleving van
voorschriften:
EN/IEC 60601-1-2 EMC
Wisselstroom
Type BF-apparatuur
Apparaat ingeschakeld
Apparaat uitgeschakeld
Let op: raadpleeg bijgaande documentatie
NIET roken
Klasse II, dubbele isolatie
Dit product voldoet aan Richtlijn 93/42/EEG voor
medische hulpmiddelen.
De datum waarop dit product op de markt wordt
gebracht, staat vermeld in de EG-verklaring van
overeenstemming.

Part No 1145805 45 HomeFill® II Compressor
TYPISCHE PRODUCTPARAMETERS
- COMPRESSOR
CONSERVATOR/REGULATOR
SPECIFICATIES
Werktemperatuur:
50 tot 95° F (10 tot 35° C) @ 20 tot 60%
niet-condenserende vochtigheid
Opslagtemperatuur:
-10 tot 150° F (-23 tot 65° C) @ 15 tot 95%
vochtigheid
Vereiste invoerdruk:
14 - 21 PSI (96,5-144,7 kPa)
Vereist invoerdebiet:
2 l/min.
Vereist invoer O2%:
>90% O2
Breedte:
20 ¼ inch (51,44 cm)
Hoogte:
15 inch (38,1 cm)
Diepte:
16 inch (40,64 cm)
Gewicht:
33 pond (14,97 kg)
Vervoersgewicht:
39 pond (17,69 kg)
Zuurstofuitvoer
Instelling 1 - 5 l/min puls
2 l/min. continu

HomeFill® II Compressor 46 Part No 1145805
LOCATIE VAN HET ETIKET
............................................................................... P/N 1145745 Rev A - 4/11/07
WAARSCHUWING
Houd alle aansluitingen vrij van olie en vet. Raadpleeg vóór
het reinigen de gebruikershandleiding. De aansluiting
NOOIT oliën of smeren.
Cilinders die op deze eenheid zijn gevuld MOETEN voorzien
zijn van het etiket "De inhoud van deze cilinder is het
product van een zuurstofconcentrator".
Houd alle aansluitingen vrij van olie en vet om krachtige
ontsteking te vermijden. Raadpleeg vóór het reinigen de
gebruikershandleiding.
DE BEHUIZING VAN DE EENHEID NIET VERWIJDEREN
Deze eenheid bevat bewegende componenten en
componenten onder hoge druk. Alleen onderhoud en
reparaties door de fabrikant.
VÓÓR HET AANSLUITEN VAN
DE CILINDER DE HULS NAAR
BENEDEN DUWEN TOT DE
GROENE STIPPEN ZICHTBAAR
WORDEN.
Locatie van het
etiket met het
serienummer
Locatie van het
specificatie-etiket
P/N 1048092 Rev A - 4/11/07

Part No 1145805 47 HomeFill® II Compressor
DEALER INFORMATIE
OPMERKING: Invacare raadt aan om een volle zuurstofcilinder
achter te laten bij de patiënt na het opstellen van de HomeFill II
compressor.
Gelieve, alvorens een HomeFill II compressor bij een
gebruiker achter te laten, de volgende checklist NA te gaan:
❑ Controleer of de datum voor de druktest op de cilinder
niet verlopen is.
❑ Leer de gebruiker op een veilige manier om te gaan met de
concentrator en overloop alle waarschuwingen.
❑ Leer de gebruiker op een veilige manier om te gaan met de
HomeFill II compressor en overloop alle waarschuwingen.
❑ Laat een volle zuurstofcilinder achter bij de gebruiker.
❑ Laat een kopie van alle waarschuwingen en vulinstructies
achter bij de gebruiker.

HOMEFILL II INFORMATIE
HomeFill® II Compressor 48 Part No 1145805
HOMEFILL II INFORMATIE
HomeFill II is een apparaat dat een onderdeel vormt van
de zuurstofconcentrator die het voor de patiënt mogelijk
maakt zijn draagbare zuurstofcilinders voor persoonlijk
gebruik bij te vullen.
MEDEDELING
De HomeFill II compressor is bedoeld voor gebruik met
de speciaal ontworpen Invacare Platinum™5 en Platinum
9 HomeFill II compatibele zuurstofconcentrators.
De zuurstofconcentrator kan op het maximale debiet
worden ingesteld wanneer hij is aangesloten op de
HomeFill II compressor:
Platinum 5 - 2,5 l/min. of minder
Platinum 9 - 5 l/min. of minder
Controleer, om na te gaan of uw zuurstofconcentrator
compatibel is met de HomeFill II, of er een uitlaatfitting
aanwezig is in de hoek rechtsonder aan de achterzijde van
de zuurstofconcentrator. Zie de afbeelding hieronder.
BOVENAANZICHT
Concentrator
Netsnoer
Uitlaatfitting

SECTIE 1—ALGEMENE RICHTLIJNEN
Part No 1145805 49 HomeFill® II Compressor
SECTIE 1—ALGEMENE
RICHTLIJNEN
WAARSCHUWING
DEEL 1 - ALGEMENE RICHTLIJNEN bevat belangrijke
informatie voor het veilig bedienen en gebruiken van dit
product. Gebruik dit product of elk verkrijgbare
bijbehorende uitrusting NIET zonder eerst deze instructies
en elk bijkomend instructiemateriaal zoals
gebruikershandleidingen, service handleidingen of
instructiepagina's die met dit product of met de
bijbehorende uitrusting worden geleverd volledig door te
lezen en te begrijpen. Als u de waarschuwingen of instructies
niet begrijpt, moet u contact op nemen met een arts, dealer
of een technische medewerker vóór u deze apparatuur
probeert te gebruiken - anders kan letsel of schade optreden.
Om een veilige installatie, inrichting en werking van de
HomeFill II compressor te kunnen verzekeren, MOETEN deze
instructies worden opgevolgd.
"Opgelet: De wetgeving kan de verkoop van dit apparaat
beperken door of in opdracht van een arts, of elke andere
practicus die van overheidswege een goedkeuring heeft
gekregen in het district waar hij/zij het gebruik van dit apparaat
uitvoert of oplegt."
WAARSCHUWING
Het gebruik van dit apparaat is beperkt tot de patiënt die
zuurstof nodig heeft. Cilinders MOGEN UITSLUITEND
worden gebruikt door de patiënt die zuurstof nodig heeft, en
mogen niet aan een andere persoon worden gegeven, voor welk
doeleinde dan ook.

SECTIE 1—ALGEMENE RICHTLIJNEN
HomeFill® II Compressor 50 Part No 1145805
Het maximale debiet naar de patiënt tijdens het vullen van de
cilinders met de IOH200AW is 2,5 l/min. voor Platinum 5 en 5
l/min. voor Platinum 9. Patiënten met een hoger
voorgeschreven debiet mogen de cilinder niet vullen terwijl ze
een bijkomende zuurstofbehandeling toegediend krijgen van
de Platinum concentrator.
WAARSCHUWING (VERVOLG)
Blokkeer NOOIT de luchtopeningen van het product en plaats
het niet op een zachte ondergrond, zoals een bed of een bank,
waardoor de luchtopeningen geblokkeerd kunnen raken.
Houd de openingen vrij van stof, haar en dergelijke.
NIET buitenshuis gebruiken.
NOOIT in de omgeving van een vlam of brandbare/explosieve
stoffen, dampen of atmosfeer gebruiken.
NIET uit elkaar nemen. De eenheid is voorzien van een dubbele
isolatie en heeft geen onderdelen die moeten worden
onderhouden. Indien er toch onderhoud vereist is, kunt u
contact opnemen met de technische dienst van Invacare.
Indien de compressor een beschadigde kabel of stekker heeft,
niet naar behoren werkt, is gevallen, beschadigd of
ondergedompeld in water, dient u contact op te nemen
met een bevoegd technicus om de compressor na te kijken
en te herstellen.
Indien er een lek werd waargenomen in de zuurstofcilinder,
mag u de cilinder NIET gebruiken. Draai de regelknop
op de regulator naar de ʹUitʹ stand. Als de lekkage blijft
bestaan, plaats dan de cilinder in de buitenlucht en breng
uw zorgverlener of de vertegenwoordiger van deze toestand
op de hoogte.

SECTIE 1—ALGEMENE RICHTLIJNEN
Part No 1145805 51 HomeFill® II Compressor
Zorg ervoor dat er GEEN olie van uw handen of elke andere
bron in contact kan komen met de koppeling van de
compressor of met de fittings van de flessen. Deze substanties
kunnen ontvlambaar zijn in de aanwezigheid van zuurstof en
zodoende letsel veroorzaken. Vermijd indien mogelijk om de
fitting van de fles aan te raken. Voorbeelden van producten die
moeten worden vermeden zijn handcrèmes of lotions,
keukenoliën, zonneoliën of sunblocks en gelijkaardige
olieproducten. Als u deze soorten producten gebruikt, raadt
Invacare u aan vóór het gebruik van de HomeFill eenheid de
handen te wassen. Indien de fitting van de fles toch met een
dergelijke substantie in contact is gekomen, dient hij te worden
gereinigd met een vochtig doek alvorens de fles aan te
koppelen aan de compressor.
WAARSCHUWING (VERVOLG)
Het koppelstuk van de compressor of de fittingen van de flessen
NOOIT oliën of smeren. Gebruik NOOIT kruipolie of een
smeermiddel zoals WD-40 of 3-in-One. Indien er moeilijkheden
worden ervaren bij het aankoppelen van de fles, dient men na te
gaan of de fitting van de fles recht naar beneden wordt
ingebracht in het koppelstuk van de compressor. Indien deze
moeilijkheden zich blijven voordoen, dient u contact op te
nemen met uw leverancier.
Houd de slangen, het snoer en het apparaat uit de buurt van
verwarmde of hete oppervlakken, zoals kachels, dekens,
fornuizen en soortgelijke elektrische apparaten.
De HomeFill II is uitgerust met een veiligheidsklep voor hoge
druk om de veiligheid van de gebruiker te verzekeren. Na
activatie maakt deze veiligheidseigenschap een extreem luid
lawaai. Indien u dit geluid hoort dient u de eenheid Uit te zetten
en contact op te nemen met uw zorgverlener of
vertegenwoordiger.
Alvorens de compressor of de concentrator te bewegen of te
verplaatsen, steeds de Aan/uitschakelaar ALTIJD in de Uit (O)
stand zetten en de wisselstroomkabels en de verbindingsbuis
tussen de compressor en de concentrator ontkoppelen. Indien
dit wordt nagelaten kan dit leiden tot schade aan de eenheid of
tot persoonlijk letsel.

SECTIE 1—ALGEMENE RICHTLIJNEN
HomeFill® II Compressor 52 Part No 1145805
Kinderen moeten ALTIJD onder toezicht staan in de nabijheid
van het HomeFill II apparaat. Wanneer het apparaat wordt
gebruikt met de HomeFIll tafel of een gelijkaardig verhoogd
steunoppervlak, kan een kind een dergelijke tafel omverduwen
waardoor het apparaat kan vallen. Het niet in acht nemen van
deze waarschuwing kan leiden tot persoonlijk letsel of schade
aan het product.
Hantering
Ga extreem voorzichtig te werk bij het hanteren en vullen van
een zuurstofcilinder. Volle zuurstofcilinders staan onder druk en
kunnen een projectiel worden wanneer ze vallen of verkeerd
worden gehanteerd.
WAARSCHUWING (VERVOLG)
Vervoer NOOIT een compressor met een cilinder
aangekoppeld of waarbij de cilinder zich op de compressor
bevindt; dit zou kunnen leiden tot letsel of schade.
Bewaar NOOIT gevulde zuurstofflessen in de nabijheid van
een oven, warmwatertank, in de koffer van een wagen of
andere gebieden waar de temperatuur kan oplopen. Het
bewaren in dergelijke ruimtes kan leiden tot barsten van de
fles of tot brand.

SECTIE 2—BEGINOPSTELLING
Part No 1145805 53 HomeFill® II Compressor
SECTIE 2—BEGINOPSTELLING
OPMERKING: Alleen dealers - vóór het uitvoeren van deze
procedure zie Dealer informatie op pagina 47.
Beginopstelling van de compressor
Checklist beginopstelling compressor
Alvorens de HomeFill II compressor voor het eerst op te
starten, volg de volgende checklist:
❑ Kies een locatie voor de compressor.
❑ Breng de compressor naar de gewenste locatie.
❑ Verbind het netsnoer met de compressor.
❑ Verbind de compressor met de concentrator.
Het kiezen van een locatie
WAARSCHUWING
NOOIT in de omgeving van een vlam of
brandbare/explosieve stoffen, dampen of
atmosfeer gebruiken.
Houd de slangen, het snoer en het apparaat uit de buurt
van verwarmde of hete oppervlakken, zoals kachels,
dekens, fornuizen en soortgelijke elektrische apparaten.
De compressor moet minstens 8 cm van muren, gordijnen of
meubels worden geplaatst om voldoende luchtstroming
mogelijk te maken.
NIET gebruiken in een kast.
De compressor moet op een hard, vlak en stabiel oppervlak
staan, zoals een tafel of de Ready Rack.

SECTIE 2—BEGINOPSTELLING
HomeFill® II Compressor 54 Part No 1145805
Vervoeren van de compressor
OPMERKING: Raadpleeg voor deze procedure AFBEELDING 2.1.
WAARSCHUWING
Vervoer NOOIT een compressor met een cilinder
aangekoppeld of waarbij de cilinder zich op de compressor
bevindt; dit zou kunnen leiden tot letsel of schade.
LET OP
Let bij het vervoeren van de compressor op dat de
compressor of de connectoren niet tegen voorwerpen aan
slaan. Anders kan de compressor worden beschadigd.
OPMERKING: Raadpleeg voor deze procedure AFBEELDING 2.1.
1. Er zijn twee manieren om
de compressor veilig te
vervoeren:
A. Een hand - Neem de
handgreep vast
onderaan de
achterzijde van de
compressor.
B. Twee handen - Neem
de handgrepen vast
aan de zijkanten van de
compressor.
AFBEELDING 2.1 Vervoer
en van de compressor
Aansluiten van het netsnoer
OPMERKING: Raadpleeg voor deze procedure AFBEELDING 2.2
op pagina 55.
1. Controleer of de processor op een hard, vlak en stabiel
oppervlak staat, zoals een tafel of Ready Rack.
2. Controleer of de Aan/uitschakelaar op Uit (O) staat.
3. Stop het netsnoer in de elektrische connector aan de
achterzijde van de compressor.
Handgreep
Handgreep
Handgreep

SECTIE 2—BEGINOPSTELLING
Part No 1145805 55 HomeFill® II Compressor
4. Stop het andere uiteinde van het netsnoer in het stopcontact.
AFBEELDING 2.2 Aansluiten van het netsnoer
De compressor aansluiten op de concentrator
OPMERKING: Raadpleeg voor deze procedure AFBEELDING 2.3
op pagina 56.
1. Breng één uiteinde van de verbindingsslang in de
uitlaatfitting aan de achterzijde van de concentrator
(Detail "A").
2. Breng het andere uiteinde van de verbindingsslang in de
inlaatfitting aan de zijkant van de compressor (Detail "B").
OPMERKING: De metalen uitsteeksels op de uitlaatfitting van de
concentrator en de inlaatfitting van de compressor springen met een
hoorbare "klik" naar buiten wanneer het uiteinde van de
verbindingsslang correct wordt ingebracht (Detail "C").
3. Leg het teveel aan verbindingsslang in een lus en bevestig
deze aan de achterzijde van de concentrator met behulp van
de bevestigingsriemen.
Wand
topcontact
Stroom
Kabel
Compressor
(ACHTERKANT)
Elektrische
Verbinding

SECTIE 2—BEGINOPSTELLING
HomeFill® II Compressor 56 Part No 1145805
AFBEELDING 2.3 De compressor aansluiten op de
concentrator
Breng het uiteinde van
de verbindingsslang in de
inlaat/uitlaatfitting
Inlaat/uitlaatfitting
Verbinding
Slang
Compressor
Inlaatfitting
Stroom
Kabel
Uitlaatfitting
CONCENTRATOR
BOVENAANZICHT
DETAIL “A”
DETAIL “C”
DETAIL “B”
Metalen
uitsteeksel

SECTIE 3—CHECKLIST EN CILINDER INSPECTIE
Part No 1145805 57 HomeFill® II Compressor
SECTIE 3—CHECKLIST EN
CILINDER INSPECTIE
Checklist compressorwerking
Volg de volgende checklist telkens als de HomeFill II
compressor wordt gebruikt om een cilinder te vullen:
❑ Controleer of de concentrator gedurende ten minste dertig
minuten op Aan staat. Raadpleeg de
gebruikershandleiding van de concentrator.
❑ Voer het vullen de inspectie uitvoeren op de compressor.
❑ Koppel de cilinder aan de compressor.
❑ Zet de Aan/uitschakelaar van de compressor in de
Aan ( ) stand.
❑ Controleer de indicatorlampjes op het controlepaneel.
❑ Ontkoppel en verwijder de volle cilinder.
❑ Zet de Aan/uitschakelaar van de compressor in de
Uit (O) stand.
❑ Herhaal deze checklist indien er nog een cilinder moet
worden gevuld.
Cilinderinspectie voorafgaand aan vullen
WAARSCHUWING
Gebruik ALLEEN cilinders met het Invacare HomeFill II
verbindingsstuk en label.
Alle cilinders MOETEN vóór het vullen worden
geïnspecteerd. Anders kan letsel of schade optreden.
OPMERKING: Raadpleeg voor deze procedure AFBEELDING 3.1
op pagina 58.

SECTIE 3—CHECKLIST EN CILINDER INSPECTIE
HomeFill® II Compressor 58 Part No 1145805
AFBEELDING 3.1 Cilinderinspectie voorafgaand aan vullen

SECTIE 3—CHECKLIST EN CILINDER INSPECTIE
Part No 1145805 59 HomeFill® II Compressor
Datum voor de hydrostatische test
Aluminiumcilinders MOETEN elke vijf jaar worden getest.
WAARSCHUWING
GEEN cilinders vullen die de afgelopen vijf jaar niet zijn
getest. Er kan zwaar lichamelijk letsel optreden. Neem
contact op met uw dealer voor vervanging.
Extern onderzoek
1. Onderzoek de buitenkant van de cilinder op de volgende
condities en vervang de cilinder als deze voorkomen:
•Deuken
•Lasschade
• Olie of vet
• Alle andere vormen van beschadigingen waardoor
een cilinder onaanvaardbaar of onveilig wordt in
het gebruik.
2. Onderzoek de cilinder op tekenen van brand- of
thermische schade. Tekenen zijn onder andere
verbranding van of blaasvorming bij de verf of andere
beschermlagen of bij de hittegevoelige indicator.
Vervang de cilinder indien men brand- of thermische
schade ontdekt.
3. Controleer de cilinder/regelaar samenstelling op de
volgende punten, en vervang bij aanwezigheid van:
• Resten, olie of vet
• Waarneembare tekenen van schade
• Tekenen van corrosie in het ventiel
• Tekenen van schade door overmatige hitte of vuur

SECTIE 4—WERKING VAN DE COMPRESSOR
HomeFill® II Compressor 60 Part No 1145805
SECTIE 4—WERKING VAN DE
COMPRESSOR
De cilinder aansluiten aan/loskoppelen
van de compressor
De cilinder aansluiten aan de compressor
WAARSCHUWING
Gebruik NOOIT gereedschap om de cilinder aan te sluiten
aan/los te koppelen van de compressor. Anders kan zwaar
letsel en/of schade optreden.
De zuurstofcilinders NIET laten vallen. Gebruik twee handen
bij het hanteren/vervoeren van zuurstofcilinders. Anders kan
er letsel of schade optreden.
GEEN vloeistoflekdetector gebruiken om te testen op lekken.
OPMERKING: Raadpleeg voor deze procedure AFBEELDING 4.1 op
pagina 61 en AFBEELDING 4.2 op pagina 62.
1. Controleer de cilinderdrukmeter. (AFBEELDING 4.2) Indien
de cilinderdruk lager is dan 1500 psig (10342 kPa), ga verder
naar stap 2.
OPMERKING: Indien de cilinderdruk hoger is dan 1500 psig
(10342 kPa), de cilinder NIET loskoppelen. Dit is wellicht
niet mogelijk.
2. Stel de stroomregelaar op de cilinder op Uit.
(AFBEELDING 4.2)
3. Verwijder de cilinder en de bedekkingen van de
connectorvulpoort.
LET OP
Verbind de uitlaatkoppeling (canule) NIET met het
HomeFill II apparaat, anders werkt de zuurstofbesparende
cilinder niet juist.

SECTIE 4—WERKING VAN DE COMPRESSOR
Part No 1145805 61 HomeFill® II Compressor
4. Druk de buitenring (huls) van de connectorvulpoort kort
naar BENEDEN tot de GROENE stippen zichtbaar worden
om de connector te resetten (AFBEELDING 4.1).
OPMERKING: Als de buitenring (huls) naar BOVEN
staat (de GROENE stipjes zijn niet zichtbaar), kan de
connectorvulpoort niet aan de cilindervulpoort worden
gekoppeld. Kort INDRUKKEN zal de connectorvulpoort
resetten (GROENE stipjes zichtbaar) zodat deze aan de
cilindervulpoort kan worden gekoppeld.
AFBEELDING 4.1 De connectorvulpoort resetten
5. Pak de cilinder/regulator-inrichting vast achter de
cilinderdrukmeter (AFBEELDING 4.2).
6. Plaats de cilinder in het draagframe van de compressor
(AFBEELDING 4.2).
7. Plaats de cilindervulpoort op één lijn met de
connectorvulpoort (AFBEELDING 4.2).
8. Trek de buitenring (huls) van de connectorvulpoort
OMHOOG terwijl de cilinder/regulator inrichting naar
BENEDEN wordt gedrukt om de vulpoort van de cilinder te
koppelen aan de vulpoort van de connector
(AFBEELDING 4.2).
OPMERKING: Wanneer er een hoorbare 'klik' werd waargenomen
is de cilinder correct aangekoppeld.
Connectorvulpoort
Buitenring (huls)
INDRUKKEN
GROENE stipjes
DRUK, ALVORENS DE
CILINDER AAN TE
SLUITEN, DE HULS
NAAR BENEDEN
TOT DE
GROENE
STIPPEN
ZICHTBAAR
WORDEN.

SECTIE 4—WERKING VAN DE COMPRESSOR
HomeFill® II Compressor 62 Part No 1145805
AFBEELDING 4.2 De cilinder aansluiten aan de compressor
Cilinder/regulator-inrichting
Compressor
Cilinderdrukmeter
Cilindervulpoort
OMHOOG TREKKEN
Cilinder
Draagframe
van
Compressor
Cilinderdruk
Meter
Flowregelaar van
Regulator
Cilindervulpoort
Buitenring
(Sleeve)
Connectorvulpoort
OPMERKING:
De klepjes voor
de vulpoorten zijn
voor de
duidelijkheid
niet
afgebeeld.
Uitlaatkoppeling
(Canule)
Aan/uitschak
elaar
Regulator
Buitenring
(Huls)
Connector-
vulpoort

SECTIE 4—WERKING VAN DE COMPRESSOR
Part No 1145805 63 HomeFill® II Compressor
De cilinder loskoppelen van de compressor
WAARSCHUWING
Gebruik NOOIT gereedschap om de cilinder aan te
sluiten op/los te koppelen van de compressor. Anders kan
zwaar letsel en/of schade optreden.
OPMERKING: Raadpleeg voor deze procedure AFBEELDING 4.3
en AFBEELDING 4.4 op pagina 64.
1. Druk de Aan/uit-schakelaar op ʹUitʹ (O).
2. Pak de cilinder/regulator-inrichting vast achter
de cilinderdrukmeter.
3. Pak met de andere hand de buitenring (huls) van de
connectorvulpoort vast en druk deze naar BENEDEN.
4. Til de cilinder/regulator-inrichting op om deze van de
connectorvulpoort te verwijderen.
AFBEELDING 4.3 De cilinder loskoppelen van de compressor
Cilinder/regulator-inrichting
Compressor
Cilinder-
drukmeter
Cilindervulpoort
Connectorvulpoort
Buitenring
(Sleeve)
INDRUKKEN

SECTIE 4—WERKING VAN DE COMPRESSOR
HomeFill® II Compressor 64 Part No 1145805
5. Laat de buitenring (huls) van de connectorvulpoort los als de
cilindervulpoort is losgekoppeld van de connectorvulpoort
en gebruik twee handen om de cilinder uit het draagframe
van de compressor te verwijderen.
WAARSCHUWING
De vulpoortbedekking op de connectorvulpoort en de
cilindervulpoort MOET worden vervangen na het vullen en
wanneer de vulpoort niet wordt gebruikt. Indien een van de
vulpoortbedekkingen ontbreekt, neem dan vóór gebruik
contact op met uw zorgverlener.
6. Plaats de vulpoortbedekkingen op de connectorvulpoort
en cilindervulpoort.
7. Controleer de cilinderdrukmeter om na te gaan of de cilinder
vol is (naald wijst naar het GROENE gebied). Als de cilinder
niet vol is, voer dan de volgende stappen uit:
• Herhaal De cilinder aansluiten aan de compressor
op
pagina 60.
• Als de cilinder na een tweede poging nog steeds niet vol
is, neem dan contact op met uw leverancier.
AFBEELDING 4.4 Vulpoortbedekkingen
Cilindervulpoortbedekking
Connectorvulpoortbedekking

SECTIE 4—WERKING VAN DE COMPRESSOR
Part No 1145805 65 HomeFill® II Compressor
De compressor Aan zetten
OPMERKING: Raadpleeg voor deze procedure AFBEELDING 4.5
op pagina 66.
1. Controleer of de concentrator Aan staat. Raadpleeg de
gebruikershandleiding van de concentrator.
LET OP
De doorstroomsnelheid van de concentrator naar de patiënt
MOET worden ingesteld op maximum 2,5 l/min. of minder
voor Platinum 5 modellen en 5 l/min. voor Platinum 9
modellen. <Anders is het zuurstofgehalte naar de
compressor 90% en zal de compressor de cilinder niet vullen.
2. Stel de doorstroomsnelheid van de concentrator naar de
patiënt op 2,5 l/min. of minder voor de Platinum 5 en op 5
l/min. voor de Platinum 9 zuurstofconcentrator.
Raadpleeg de gebruikershandleiding van de concentrator.
3. Controleer of de cilinder is aangesloten aan de
compressor. Zie De cilinder aansluiten aan de compressor
op pagina 60.
4. Druk de Aan/uit-schakelaar op het controlepaneel in
de Aan ( ) stand.
5. Controleer het controlepaneel. De volgende opeenvolging
van voorvallen kan zich voordoen:
A. 0-3 minuten - Het O2 lager dan normaal (GEEL) lampje
brandt terwijl de compressor opwarmt.
B. Na drie minuten - Het vullen (GROEN) lampje brandt
terwijl de cilinder wordt gevuld.
C. Het vol (GROEN) lampje brandt wanneer de cilinder is
gevuld. Ga verder naar stap 6.
OPMERKING: Het O2 lager dan normaal (GEEL) lampje kan
beginnen branden als het zuurstofgehalte van de concentrator de
90% nog niet heeft bereikt of onder de 90% valt.

SECTIE 4—WERKING VAN DE COMPRESSOR
HomeFill® II Compressor 66 Part No 1145805
De compressor begint met of herneemt het vullen wanneer het
zuurstofgehalte 90% bereikt: Zie Probleemoplossing/ Vultijden voor
de cilinder op pagina 71 als het lampje niet op Uit staat binnen
de 10 minuten.
OPMERKING: Zie Probleemoplossing/ Vultijden voor de cilinder
op pagina 71als het Alarmlampje (rood) en hoorbaar alarm aan zijn.
6. Verwijder de volle cilinder. Zie De cilinder loskoppelen
van de compressor op pagina 63.
7. Druk de Aan/uitschakelaar naar de Uit (O) stand.
AFBEELDING 4.5 De compressor Aan zetten
Alarm (ROOD lampje en
hoorbaar alarm)
O
2
lager dan
normaal
(GEEL lampje)
Vol
(GROEN
lampje)
Controlepaneel
Vullen
(GROEN lampje)
Aan/uitscha
kelaar
I
O

SECTIE 4—WERKING VAN DE COMPRESSOR
Part No 1145805 67 HomeFill® II Compressor
Zet de regelknop op de voorgeschreven
instelling
OPMERKING: Raadpleeg voor deze procedure AFBEELDING 4.6.
1. Bevestig de neuscanule aan de uitlaatfitting van de
cilinder.
2. Draai de regelknop naar de l/min. instelling die werd
voorgeschreven door uw arts of therapeut.
WAARSCHUWING
Doordat het wijzigen van de l/min. instelling op de
regelknop de dosis toegediende zuurstof beïnvloedt, stel
de l/min. instelling NIET zelf bij tenzij dit werd
opgedragen door uw arts of therapeut.
3. Om de zuurstofstroom Uit te zetten, draai de regelknop
tegen de wijzers van de klok in naar de Uit-stand.
AFBEELDING 4.6 Zet de regelknop op de voorgeschreven
instelling
Uitlaatfitting
Regelknop
Voorgeschreven Instelling

SECTIE 4—WERKING VAN DE COMPRESSOR
HomeFill® II Compressor 68 Part No 1145805
Technische beschrijving
Het HomeFill II Zuurstofsysteem (IOH200AW) is een
elektromechanisch systeem dat verkrijgbaar is op voorschrift
voor thuisgebruik. De bedoelde functie en gebruik van het
systeem is zuurstof onder druk toe te leveren om gascilinders
van het merk Invacare te vullen voor ambulant gebruik terwijl
de patiënt therapeutisch zuurstof toegediend krijgt uit een
bijbehorende zuurstofconcentrator. Het IOH200AW
gassysteem is ontworpen voor gebruik met een Invacare
Platinum zuurstofconcentrator met een integrale HF2
toegangspoort die een gasconcentratie kan verschaffen die
groter is dan 90% O2 rond 2 l/min. terwijl aan de patiënt een
therapeutisch debiet wordt toegediend van max. 2,5 l/min.
voor Platinum 5 en 5 l/min. voor Platinum 9.
Het HomeFill II zuurstofsysteem bestaat uit een IOH200AW
gascompressor, verbindingsbuizen, en de door Invacare
geleverde draagbare gascilinders met de integrale
stroomregulator en een vergrendelende vulfitting.
De IOH200AW compressor bestaat uit een
meertrapscompressor, intern reservoir, controle-elektronica
met een integrale zuurstofconcentratiesensor,
vergrendelende vulfitting, inlaatfitting en aandrijfmotor. De
werking van de compressor wordt gecontroleerd door de
elektronica-inrichting. De motor/compressor kan een cilinder
alleen vullen als de zuurstofconcentratie van de
inlaatgasstroom groter is dan 90%. De motor/compressor
vuloperatie is voltooid wanneer het gas in een cilinder de
maximale vuldruk bereikt van 2000 PSI (13786 kPa).
De IOH200AW compressor kan draagbare cilinders vullen
voor ambulante patiënten. De draagbare gascilinders die
worden geleverd door Invacare hebben een vergrendelende
vulfitting die alleen past op de Invacare IOH200AW
compressor-inrichting. De gascilinder bevat ook een integrale
stroomregulator met vaste, selecteerbare stroominstellingen.

SECTIE 5—INDICATORLAMPJES
Part No 1145805 69 HomeFill® II Compressor
SECTIE 5—INDICATORLAMPJES
KLEUR
INDICATORLAMPJE
COMPRESSOR
STATUS
EFFECT
Geen Compressor is Uit. O2 stroomt naar
gebruiker als de
concentrator Aan is.
O
2
lager dan normaal -
GEEL
Compressor is Aan en
warmt op (0-3 minuten
nadat de
Aan/uitschakelaar op
Aan is gezet).
Vullen van de cilinder
niet gestart.
O
2
stroomt naar
gebruiker als de
concentrator Aan is.
O
2
van de
concentrator is <90%
(op ieder ogenblik na
de drie minuten
opwarmingstijd).
Vullen van de cilinder
stopt, herstart wanneer
O
2
l> 90%.
O
2
stroomt naar
gebruiker als de
concentrator Aan is.
Vullen - GROEN Compressor is Aan en
de cilinder wordt
gevuld. O
2
van de
concentrator is >90%
(op ieder ogenblik na
de drie minuten
opwarmingstijd).
Cilinder wordt gevuld
O
2
stroomt naar
gebruiker als de
concentrator Aan is.
Vol - GROEN Compressor is Aan.
Vullen van de cilinder
voltooid (vol) verwijder cilinder
(VOL lampje brandt
na >10 min.)
of
De cilinder is niet
correct bevestigd controleer de
aansluiting (VOL lampje
brandt na
<10 min.).
Vullen van de cilinder
stopt
Kan geen andere
cilinder vullen tot
de compressor Uit en
opnieuw Aan is gezet
O
2
stroomt naar
gebruiker als de
concentrator Aan is.

SECTIE 5—INDICATORLAMPJES
HomeFill® II Compressor 70 Part No 1145805
ALARM -ROOD
(Hoorbaar alarm)
Compressor is Aan.
Cilinder wordt NIET
gevuld Oorzaken:
Volle cilinder
aangesloten wanneer
het apparaat Aan staat
- vervangen door lege
cilinder
of
Intern defect neem contact op met
de verkoper.
De compressor begint
niet te vullen of stopt
met vullen
De eenheid MOET Uit
en opnieuw Aan
worden gezet voor er
kan worden gevuld.
O
2
stroomt naar
gebruiker als de
concentrator Aan is.
KLEUR
INDICATORLAMPJE
COMPRESSOR
STATUS
EFFECT

SECTIE 6—PROBLEEMOPLOSSING/ VULTIJDEN VOOR DE
Part No 1145805 71 HomeFill® II Compressor
SECTIE 6—PROBLEEMOPLOSSING/
VULTIJDEN VOOR DE CILINDER
PROBLEEMOPLOSSINGEN
PROBLEEM OPLOSSING
Er branden geen
indicatorlampjes
wanneer de compressor
wordt aangezet.
1. Zet de compressor Uit (O).
2. Controleer of het netsnoer goed is
aangebracht in de compressor en in het
stopcontact.
3. Zet de compressor Aan ( ).
4. Reinig de luchtfilters. Zie Onderhoud
op
pagina 74.
5. Indien na het uitvoeren van de
STAPPEN 1-4 de indicatorlampjes nog niet
branden, neem dan contact op met uw
leverancier of met Invacare voor onderhoud.
Het RODE lampje brandt 1. Controleer de cilindermeter om na te gaan of
de cilinder vol is. Cilinder vol - Verwijder de
cilinder en zet de eenheid Uit (O).
Cilinderinspectie voorafgaand aan vullen
op
pagina 57Voer de procedure uit met een cilinder
die niet vol is.
Cilinder niet vol - Ga verder naar STAP 2.
2. Controleer of de cilinder correct aangesloten
is. Zet de compressor Uit (O). Verwijder de
cilinder en sluit hem opnieuw aan. Zet de
compressor Aan ( ).
3. Als de cilinder niet vol en correct aangesloten
is, kan de compressor een intern defect hebben.
Neem contact op met uw leverancier of met
Invacare.
De compressor gaat
steeds Aan en Uit.
of O
2
lager dan normaal
(GEEL) en Vullen
(GROEN) lampje gaat
afwisselend aan en uit
of
O
2
lager dan normaal
(GEEL) gaat aan en uit
1. Controleer of het debiet van de concentrator
op 2,5 l/min. of minder is ingesteld. Stel indien
nodig het debiet bij (raadpleeg de
gebruikershandleiding van de concentrator).
Wacht minstens 20 minuten tot het GROENE
lampje brandt. Indien het groene lampje niet
brandt, ga verder naar STAP 2.
2. Het is mogelijk dat de concentrator een
onderhoudsbeurt nodig heeft; neem contact op
met uw zorgverlener of met Invacare.

SECTIE 6—PROBLEEMOPLOSSING/ VULTIJDEN VOOR DE
HomeFill® II Compressor 72 Part No 1145805
O2 lager dan normaal
(GEEL) lampje blijft
branden.
1. Ga na of de concentrator minsten 20 minuten
is opgewarmd. Indien de 20 minuten nog niet
voorbij zijn, zet dan de compressor Uit (O) tot de
concentrator is opgewarmd. Als het GELE lampje
blijft branden, ga verder naar STAP 2.
2. Controleer of de verbinding tussen de
compressor en de concentrator niet is
beschadigd of gekneld zit. Vervang de verbinding
bij beschadiging. Indien de verbinding gekneld zit,
trek de buis recht. Zet de compressor Uit (O)
gedurende minstens 10 seconden.
Zet de compressor Aan ( ). Als het GELE lampje
na 10 minuten blijft branden, ga verder naar STAP
3.
3. Het is mogelijk dat de concentrator een
onderhoudsbeurt nodig heeft; neem contact op
met uw zorgverlener of met Invacare.
De vultijd overschrijdt het
maximum van de
aanbevolen vultijden of
het GROEN vullampje
blijft branden.
1. Controleer of de cilinder regulator Uit staat.
2. Cilindervultijden
op pagina 73Controleer de
aanbevolen vultijden weergegeven in .
3. Controleer of de cilinder correct aangesloten
is. Zet de compressor Uit (O). Verwijder de
cilinder en sluit hem opnieuw aan. Zet de
compressor Aan
().
4. Controleer of de compressor/concentrator
verbinding correct aangesloten en/of beschadigd
is (d.w.z. - lekken of kronkels).
5. Controleer of de debietinstelling van de
concentrator op drie l/min. of minder staat. Stel
indien nodig het debiet bij (raadpleeg de
gebruikershandleiding van de concentrator).
Indien het GROENE vullampje niet stopt met
branden is het mogelijk dat de compressor en/of
concentrator een onderhoudsbeurt nodig
hebben. Neem contact op met uw zorgverlener
of met Invacare.
Zeer luid lawaai wanneer
de compressor Aan staat.
1. Neem contact op met uw zorgverlener of met
Invacare voor onderhoud.
Sissend geluid uit de
Regulator als de
debietselector Uit staat.
1. Zet de debietselector uit.
2. Als het sissende geluid niet stopt, neem dan
contact op met uw zorgverlener of met Invacare.
PROBLEEMOPLOSSINGEN
PROBLEEM OPLOSSING

SECTIE 6—PROBLEEMOPLOSSING/ VULTIJDEN VOOR DE
Part No 1145805 73 HomeFill® II Compressor
OPMERKING: Alle vultijden zijn bij benadering en kunnen
afhankelijk van de omstandigheden verschillen.
*OPMERKING: Niet in landen van de EU.
De regulator staat Aan
maar er wordt geen O2
geleverd.
1. Vul de cilinder opnieuw.
2. Controleer of de canule recht is en niet
gekneld zit. Vervang de verbinding bij
beschadiging.
3. Neem contact op met uw zorgverlener of met
Invacare voor onderhoud.
CILINDERVULTIJDEN
Cilindervul
tijden
Flowsnelheid van de concentrator
naar de patiënt:
(Platinum 5 tot 2,5 l/min.
en Platinum 9 tot 5 l/min.)
*HF2PC9 *HF2PCL4 *HF2PCL6 HF2PCE8
NORMAAL 2 uur 20 min 60 min 1 uur 25 min 2 uur 5 min
MAXIMAAL 2 uur 45 min 1 uur 20 min 1 uur 50 min N/A
PROBLEEMOPLOSSINGEN
PROBLEEM OPLOSSING

SECTIE 7—ONDERHOUD
HomeFill® II Compressor 74 Part No 1145805
SECTIE 7—ONDERHOUD
Reinigen van de compressorfilter
WAARSCHUWING
Zet vóór het reinigen de Aan/uitschakelaar in de
Uit (O) stand en trek de stekker van de compressor
uit het stopcontact.
Gebruik de compressor NIET zonder filter.
LET OP
De stekker NIET aan het snoer uit het stopcontact
trekken, anders kan de stekker worden beschadigd.
OPMERKING: Raadpleeg voor deze procedure AFBEELDING 7.1.
OPMERKING: Alle compressoren hebben één filter aan de
achterzijde van de behuizing.
OPMERKING: Voer deze procedure minstens eenmaal per week uit.
1. Trek de stekker van de compressor uit het stopcontact.
Neem de stekker vast en niet het snoer.
2. Verwijder de filter.
3. Reinig de filter met een stofzuiger of was de filter in een
warm sop en spoel grondig.
4. De filter grondig drogen alvorens opnieuw te installeren.
AFBEELDING 7.1 Reinigen van de compressorfilter
Filter

SECTIE 7—ONDERHOUD
Part No 1145805 75 HomeFill® II Compressor
Behuizing
WAARSCHUWING
Zet vóór het reinigen de Aan/uitschakelaar in de Uit (O)
stand en trek de stekker van de compressor uit het
stopcontact. Om elektrische schokken te voorkomen,
mag u de behuizing NIET verwijderen.
1. Reinig de behuizing met een mild huishoudelijk
reinigingsmiddel en een niet-schurende doek of spons.

KLANTENSERVICE- EN GARANTIE-INFORMATIE
HomeFill® II Compressor 76 Part No 1145805
KLANTENSERVICE- EN
GARANTIE-INFORMATIE
De garantievoorwaarden zijn onderdeel van de algemene voorwaarden van de
afzonderlijke landen waar dit product wordt verkocht.
Belgium & Luxemburg:
Invacare nv, Autobaan 22, B-8210 Loppem • Tel: (32) (0) 50 83 10 10 •
Fax: (32) (0) 50 83 10 11 • belgium@invacare.com • www.invacare.be
Danmark:
Invacare A/S, Sdr. Ringvej 37, DK-2605 Brøndby • Tel: (45) (0)36 90 00 00 •
Fax: (45) (0)36 90 00 01 • denmark@invacare.com • www.invacare.dk
Deutschland:
Invacare GmbH, Alemannenstraße 10, D-88316 Isny • Tel: (49) (0)75 62 7 00 0 •
Fax: (49) (0)75 62 7 00 66 • kontakt@invacare.com • www.invacare.de
European Distrbutor Organisation:
Invacare, Kleiststraße 49, D-32457 Porta Westfalica • Tel: (49) (0)57 31 754 540 •
Fax: (49) (0)57 31 754 541 • edo@invacare.com • www.invacare.eu.com
España:
Invacare SA, c/Areny s/n, Polígon Industrial de Celrà, E-17460 Celrà (Girona) •
Tel: (34) (0)972 49 32 00 • Fax: (34) (0)972 49 32 20 • contactsp@invacare.com •
www.invacare.es
France:
Invacare Poirier SAS, Route de St Roch, F-37230 Fondettes • Tel: (33) (0)2 47 62 64 66 •
Fax: (33) (0)2 47 42 12 24 • contactfr@invacare.com • www.invacare.fr
Ireland:
Invacare Ireland Ltd, Unit 5 Seatown Business Campus • Seatown Road, Swords, County
Dublin – Ireland • Tel: (353) 1 810 7084 • Fax: (353) 1 810 7085 • ireland@invacare.com •
www.invacare.ie
Italia:
Invacare Mecc San s.r.l., Via dei Pini 62, I-36016 Thiene (VI) • Tel: (39) 0445 38 00 59 •
Fax: (39) 0445 38 00 34 • italia@invacare.com • www.invacare.it
Nederland:
Invacare BV, Celsiusstraat 46, NL-6716 BZ Ede • Tel: (31) (0)318 695 757 •
Fax: (31) (0)318 695 758 • nederland@invacare.com • csede@invacare.com •
www.invacare.nl
Norge:
Invacare AS, Grensesvingen 9, Postboks 6230, Etterstad, N-0603 Oslo •
Tel: (47) (0)22 57 95 00 • Fax: (47) (0)22 57 95 01 • norway@invacare.com •
island@invacare.com • www.invacare.no
Österreich:
Invacare Austria GmbH, Herzog Odilostrasse 101, A-5310 Mondsee •
Tel: (43) 6232 5535 0 • Fax: (43) 6232 5535 4 • info@invacare-austria.com •
www.invacare.at
Sverige & Suomi:
Invacare AB, Fagerstagatan 9, S-163 91 Spånga • Tel: (46) (0)8 761 70 90 •
Fax: (46) (0)8 761 81 08 • sweden@invacare.com • finland@invacare.com •
www.invacare.se
Switzerland:
Invacare AG, • Benkenstrasse 260, CH-4108 Witterswil • Tel: (41) (0)61 487 70 80 •
Fax: (41) (0)61 487 70 81 • switzerland@invacare.com • www.invacare.ch
United Kingdom:
Invacare Limited, Pencoed Technology Park, Pencoed, Bridgend CF35 5HZ •
Tel: (44) (0) 1656 776222 • Fax: (44) (0) 1656 776220 • UK@invacare.com •
www.invacare.co.uk
Portugal:
Invacare Lda • Rua Estrada Velha, 949, P-4465-784 Leça do Balio •
Tel: (351) (0)225 1059 46/47 • Fax: (351) (0)225 1057 39 • portugal@invacare.com •
www.invacare.pt

Utilisateur : Lire ce manuel avant d'utiliser cet
appareil, et le conserver en cas de besoin.
Distributeur :
Ce manuel doit être remis à
l’utilisateur final.
Pour de plus amples informations sur
les produits Invacare, les pièces
détachées et le service client, veuillez
vous rendre sur www.invacare.fr
Manuel de l’opérateur
Compresseur HomeFill® II
Modèle IOH200AW
0434

MISE EN GARDE
Compresseur HomeFill® II 78 Part No 1145805
MISE EN GARDE
NE PAS UTILISER CET APPAREIL SANS AVOIR LU
ET COMPRIS CE MANUEL. SI VOUS N'ÊTES PAS
CAPABLE DE COMPRENDRE LES DANGERS, LES
MISES EN GARDE, LES AVERTISSEMENTS, ET LES
INSTRUCTIONS, CONTACTEZ LES SERVICES
TECHNIQUES INVACARE AVANT DE TENTER
D'UTILISER CET APPAREIL - SINON, DES
BLESSURES GRAVES OU DES DOMMAGES
MATÉRIELS PEUVENT SURVENIR.
DANGER
Les utilisateurs NE DOIVENT PAS FUMER lors de
l'utilisation cet appareil. Tenir les allumettes, cigarettes
allumées ou autres sources d’inflammation hors de la
pièce dans laquelle ce produit est installé. Les textiles et
autres matériaux qui ne brûleraient pas dans des
conditions normales s’enflamment facilement et brûlent
avec une grande intensité dans un endroit ou l'air est
enrichi en oxygène . Le non-respect de cette mise en
garde peut entraîner un incendie et des dégâts matériels
graves, ou provoquer des blessures corporelles voire la
MORT.
REMARQUE : Des mises à jour de ce manuel sont disponibles sur
www.invacare.com.

TABLE DES MATIÈRES
Part No 1145805 79 Compresseur HomeFill® II
REMARQUES SPÉCIALES ................................ 81
PARAMÈTRES TYPES
DU PRODUIT ................................................. 83
EMPLACEMENT DU LABEL ............................. 85
INFORMATIONS REVENDEUR ........................ 86
INFORMATIONS SUR LE
HOMEFILL II .................................................. 87
SECTION 1—PRÉSENTATION GLOBALE ........... 88
SECTION 2—PREMIÈRE MISE EN SERVICE ........ 92
Première mise en service du compresseur.................................92
SECTION 3—LISTE DES POINTS À VÉRIFIER ET
INSPECTION DE LA BOUTEILLE ...................... 96
Liste des points à vérifier sur le fonctionnement du
compresseur.......................................................................................96
Inspection du préremplissage de la bouteille..............................96
SECTION 4—FONCTIONNEMENT DU
COMPRESSEUR .............................................. 99
Branchement/débranchement de la bouteille du compresseur...
99
Mettre le compresseur en marche..............................................105
Réglage du bouton de débit sur le taux prescrit......................108
Description technique....................................................................109
SECTION 5—TÉMOINS LUMINEUX ................ 111
SECTION 6—DÉPANNAGE/PÉRIODES DE
REMPLISSAGE DE LA BOUTEILLE .................. 113
SECTION 7—ENTRETIEN .............................. 117
Nettoyage du Filtre du compresseur .........................................117
Capot supérieur...............................................................................118

Compresseur HomeFill® II 80 Part No 1145805
SERVICE APRÈS-VENTE ET INFORMATIONS DE
GARANTIE .................................................. 119

REMARQUES SPÉCIALES
Part No 1145805 81 Compresseur HomeFill® II
REMARQUES SPÉCIALES
Vérifier toutes les pièces contre les dommages dûs au
transport. En cas de dommage, NE PAS utiliser. Contacter
Invacare pour de plus amples informations.
Des mots-indicateurs sont utilisés dans ce manuel et
s’appliquent aux dangers ou pratiques dangereuses qui
pourraient entraîner des blessures ou des dégâts matériels. Se
reporter au tableau suivant pour les définitions des
mots-indicateurs.
ACCESSOIRES
Il y a une large gamme d'humidificateurs, de tubes à oxygène,
de canules et de masques pouvant être utilisés avec cet
appareil. Vous devriez contacter votre prestataire de soins à
domicile afin qu'il vous indique quels sont les dispositifs
adaptés à votre cas. Ils devraient également vous renseigner
concernant la méthode d'utilisation, la maintenance et le
nettoyage appropriés.
MOT-INDICATEUR SIGNIFICATION
DANGER Danger indique une situation dangereuse
imminente qui, si elle n'est pas écartée,
entrainera la mort ou des blessures graves.
MISE EN GARDE Warning (Mise en garde) indique une
situation potentiellement dangereuse qui, si
elle n'est pas écartée, peut entrainer la
mort ou des blessures graves.
ATTENTION Caution (attention) indique le risque d'une
situation potentiellement dangereuse qui, si
elle n'est pas écartée, peut entrainer des
dommages matériels.

REMARQUES SPÉCIALES
Compresseur HomeFill® II 82 Part No 1145805
MISE EN GARDE
Les produits Invacare sont spécialement conçus et
fabriqués pour être utilisés conjointement avec les
accessoires Invacare. Les accessoires conçus par d’autres
fabricants n’ont pas été testés par Invacare et leur
utilisation n’est pas recommandée avec les produits
Invacare.
INFORMATIONS DE RECYCLAGE
Ce produit a été livré par un fabricant soucieux de
l'environnement et conforme à la directive 2002/96/CE sur la
mise au rebut des équipements électroniques et électriques
WEEE.
Ce produit est susceptible de contenir des substances
potentiellement nocives pour l’environment s’il est mis au
rebut dans des endroits (décharges) non conformes à la
législation en vigueur.
Le symbole 'poubelle barrée' est apposé sur ce produit pour
vous encourager à le recycler dans les structures de collecte
appropriées.
Veuillez vous comporter de manière responsable vis-à-vis de
l'environnement et recycler ce produit arrivé en fin de vie par
le biais d'un centre de recyclage.

Part No 1145805 83 Compresseur HomeFill® II
PARAMÈTRES TYPES
DU PRODUIT
PARAMÈTRES TYPES DU PRODUIT
- COMPRESSEUR
Liste des
réglementations :
EN/IEC 60601-1-2 EMC
Courant alternatif
Équipement de Type BF
Appareil en marche
Appareil à l'arrêt
Attention - Consulter la documentation jointe
NE PAS fumer
Classe II, double isolation
Ce produit est conforme à la Directive 93/42/CEE sur les
dispositifs médicaux.
La date de lancement de ce produit est indiquée dans la
déclaration de conformité CE.
Température de
fonctionnement :
10 à 35°C (50 à 95° F) @ 20 à 60% sans
condensation d'humidité
Température de
stockage :
-23 à 65° (C-10 à 150° F) @ 15 à 95%
d'humidité
Pression d'entrée requise :
14 - 21 PSI (96.5-144.7 kPa)
Débit d'entrée requis :
2 L/min
% de O2 d'entrée requis :
>90% O
2
Largeur :
51,44 cm (20 ¼ inches)
Hauteur :
38,1 cm (15 inches)

Compresseur HomeFill® II 84 Part No 1145805
CONSERVATION/SPÉCIFICATIONS
DU DÉTENDEUR ET DE LA VALVE
À LA DEMANDE
Profondeur :
40,64 cm (16 inches)
Poids :
14,97 kg (33 lbs)
Poids d’expédition :
17,69 kg (39 lbs)
Sortie d'oxygène
Réglages de 1 - 5 L/impulsion min
2 L/min. en continu

Part No 1145805 85 Compresseur HomeFill® II
EMPLACEMENT DU LABEL
DANGER - RISQUE DE CHOC
ELECTRIQUE
NE PAS enlever le couvercle. Confier toute
réparation à un personnel qualifié pour les
réparations.
DANGER - RISQUE D'INCENDIE
NE PAS FUMER - Eloignez toute source d'ignition
hors de la pièce dans laquelle se trouve ce produit
et hors des zones de distribution d'oxygène. Les
textiles, l'huile et autres combustibles sont
facilement inflammables et brûlent avec grande
intensité dans une pièce où l'air est enrichi en
oxygène.
P/N 1145735 Rev A - 4/11/07
MISE EN GARDE
Veillez à ce qu'il n'y ait ni huile ni lubrifiant sur le
système de branchement. Voir le Manuel de l'Utilisateur
avant de procéder au nettoyage. NE JAMAIS huiler ou
lubrifier les branchements.
Les bouteilles remplies sur cet appareil DOIVENT
porter le label “Les produits contenus dans cette
bouteille sont le produit d'un concentrateur d'oxygène.”
Veillez à ce qu'il n'y ait ni huile ni graisse sur le système
de branchement pour éviter une inflammation violente.
Voir le Manuel de l'Utilisateur avant de procéder au
nettoyage.
NE PAS ENLEVER LE COUVERCLE DE L'APPAREIL
Cet appareil contient des composants mobiles et à haute
pression. Entretien par le fabricant uniquement.
AVANT DE BRANCHER LA
BOUTEILLE, POUSSEZ LE
MANCHON VERS LE BAS JUSQU'À
CE QU'APPARAISSENT DES
POINTS VERTS.
Emplacement du
Numéro de Série
Emplacement du
label des
spécifications
P/N 1048082 RévA - 04/11/07

Compresseur HomeFill® II 86 Part No 1145805
INFORMATIONS REVENDEUR
REMARQUE : Invacare recommande de laisser une bouteille
d'oxygène pleine au patient, après avoir installé le compresseur
Homefill II.
Avant de laisser un compresseur Homefill II avec un
utilisateur, les points suivants DOIVENT être vérifiés:
❑ Assurez vous que la date du test de pression sur la
bouteille n'a pas expiré.
❑ Instruisez l'utilisateur sur le fonctionnement du
concentrateur en toute sécurité et revoyez toutes les mises
en garde.
❑ Instruisez l'utilisateur sur le fonctionnement du
compresseur Homefill II en toute sécurité et revoyez
toutes les mises en garde.
❑ Laissez une bouteille d'oxygène pleine à l'utilisateur.
❑ Laissez une copie de toutes les mises en garde et des
instructions de remplissage avec l'utilisateur.

INFORMATIONS SUR LE HOMEFILL II
Part No 1145805 87 Compresseur HomeFill® II
INFORMATIONS SUR LE
HOMEFILL II
Le Homefill II est un dispositif accessoire du concentrateur
d'oxygène permettant au patient de re-remplir des bouteilles
d'oxygène portables à usage personnel.
AVIS
Le compresseur Homefill II est spécifiquement désigné
pour fonctionner avec les concentrateurs d'oxygène
compatibles Invacare Platinum™5 et Platinum 9.
Le concentrateur d'oxygène peut être réglé sur un taux
de débit maximum lorsqu'il fonctionne avec le
compresseur Homefill II :
Platinum 5 - 2.5 L/min. ou moins
Platinum 9 - 5 L/min. ou moins
Afin de déterminer si votre concentrateur d'oxygène est
compatible avec le Homefill II, regardez si une bouche de
remplissage se trouve sur le coin bas à droite à l'arrière du
concentrateur d'oxygène, en vous référant à l'illustration
ci-dessous.
VUE DE HAUT
Concentrateur
Cordon
d'alimentation
Bouche de
remplissage

SECTION 1—PRÉSENTATION GLOBALE
Compresseur HomeFill® II 88 Part No 1145805
SECTION 1—PRÉSENTATION
GLOBALE
MISE EN GARDE
La SECTION 1 – DIRECTIVES GÉNÉRALES contient des
informations importantes sur le fonctionnement et
l’utilisation correcte de ce produit. N'UTILISEZ PAS ce
produit ou tout autre produit optionnel sans avoir au
préalable lu et compris ces instructions et toutes
instructions complémentaires comme le manuel de
l'utilisateur, manuels d'entretien et feuilles d'instruction
fournies avec ce produit ou tout équipement optionnel. Si
l'utilisateur ne comprend pas les avertissements, mises en
garde ou instructions, il doit contacter un professionnel de
la santé, le distributeur ou le personnel technique avant
de tenter d'utiliser cet appareil pour éviter des blessures
ou des dégâts.
Ces instructions DOIVENT être suivies pour assurer
l'installation, l'assemblage et le fonctionnement du
compresseur Homefill II en toute sécurité.
“Attention : La loi statutaire peut limiter ce dispositif à la
vente par ou sur commande d'un médecin, ou n'importe quel
autre praticien autorisé par la loi de l'agence
gouvernementale à laquelle il/elle pratique pour employer ou
commander l'utilisation de ce dispositif.”
MISE EN GARDE
L’utilisation de cet appareil est limitée au patient recevant de
l’oxygène. Les bouteilles ne DOIVENT être utilisées QUE par
le patient recevant de l’oxygène et ne doivent pas être
distribuées à tout autre individu pour quelque raison que ce
soit.

SECTION 1—PRÉSENTATION GLOBALE
Part No 1145805 89 Compresseur HomeFill® II
MISE EN GARDE (SUITE)
Le taux de débit maximum du patient pendant le remplissage
des bouteilles avec le IOH200AW est de 2, 5 L/min. pour le
Platinum 5 et 5 L/min. pour le Platinum 9. Les patients ayant
une prescription pour un taux de débit plus important ne
devraient pas remplir les bouteilles alors qu'ils recoivent un
traitement supplémentaire du Concentrateur Platinum.
NE JAMAIS bloquer les ouvertures d’air de l’appareil ni le
placer sur une surface molle, un lit ou un canapé par exemple,
pour ne pas bloquer les sorties d’air. Éloigner les peluches,
cheveux et textures similaires des sorties d’air.
NE PAS utiliser à l'extérieur.
NE JAMAIS utiliser la bouteille à proximité de flammes ou de
substances, vapeurs ou atmosphère inflammables/explosives.
NE PAS démonter. L'appareil est fourni avec double isolation
et n'a pas de pièces réutilisables. Si un quelconque dépannage
est nécessaire, contactez le Service Technique Invacare.
Si le cordon d'alimentation ou la prise du compresseur sont
abîmés, s'il ne fonctionne pas correctement, s'il est tombé ou
endommagé, ou plongé dans l'eau, appelez un technicien
qualifié pour qu'il vérifie et répare l'appareil.
Si vous notez que la bouteille a une fuite d'oxygène, NE PAS
essayer d'utiliser cette bouteille. Tournez le sélecteur de débit
sur « Arrêt » (Off). Si la fuite persiste, mettez la bouteille
d'oxygène à l'extérieur et prévenez votre centre de santé ou
votre technicien de service de cet état de fait.

SECTION 1—PRÉSENTATION GLOBALE
Compresseur HomeFill® II 90 Part No 1145805
MISE EN GARDE (SUITE)
NE LAISSEZ PAS l'huile de vos mains ou autres substances
entrer en contact avec les parties de branchement du
compresseur ou les embouts de remplissage de la bouteille.
Ces substances peuvent s'enflammer en présence d'oxygène
et causer des blessures. Evitez autant que possible de toucher
aux embouts de la bouteille. Les produits à éviter sont par
exemple les crèmes ou lotions pour les mains; les huiles de
cuisine, les produits de bronzage et de protection solaire, ou
produits huileux similaires. Si vous utilisez ce type de
produit, Invacare vous suggère de vous laver les mains avant
d'utiliser l'appareil Homefill II. Si l'embout de la bouteille
entre en contact avec ce genre de substances, il doit être
préalablement nettoyé avec un chiffon doux humide avant
d'être connecté au compresseur.
Ne JAMAIS huiler ou lubrifier le coupleur ou les embouts de
branchement de la bouteille. Ne JAMAIS utiliser d'huile
pénétrante ou de lubrifiant tel que le WD-40 ou le 3 in One. Si
vous rencontrez des difficultés de connexion, vérifiez que
l'embout de la bouteille est insérée de façon droite dans le
coupleur du compresseur. Si vous continuez d'avoir des
difficultés, contactez votre fournisseur pour dépannage.
Ne pas placer les tubes à oxygène, le cordon de raccordement
ou l’appareil à proximité de surfaces chauffées ou chaudes
(poêle à gaz, couverture chauffante, cuisinière ou autre
appareil électrique similaire).
Le HomeFill II est équipé d'une soupape de sécurité haute
pression pour assurer la sécurité de l'utilisateur. Lorsqu'il est
activé, ce dispositif fera un bruit extrêmement fort. Si ce bruit
retentit, mettez l'appareil sur Arrêt/Off et contactez votre
centre de santé ou votre représentant.

SECTION 1—PRÉSENTATION GLOBALE
Part No 1145805 91 Compresseur HomeFill® II
MISE EN GARDE (SUITE)
Avant de déplacer ou de repositionner le compresseur ou le
concentrateur, poussez TOUJOURS le bouton de commande
sur Arrêt/Off (O), débranchez les cordons d'alimentation AC
et le tuyau d'interconnexion entre le compresseur et le
concentrateur. Ne pas respecter ces mises en garde peut
provoquer des dommages sur le produit et des blessures
physiques.
Les enfants doivent TOUJOURS être surveillés s'ils se
trouvent à proximité de l'appareil Homefill II. Lorsque le
Homefill II est utilisé sur une table ou un support, un enfant
pourrait tirer ou pousser une telle table et causer la chute de
l'appareil. Ne pas respecter ces mises en garde peut
provoquer des blessures physiques ou des dommages sur le
produit.
Manipulation
Faites extrêmement attention lorsque vous manipulez ou
remplissez une bouteille d'oxygène. Les bouteilles d'oxygène
pleines sont sous pression et peuvent se transformer en un
projectile si elles tombent ou si elles sont malmenées.
Ne transportez JAMAIS un compresseur avec une bouteillle
branchée ou posée sur le compresseur, sinon des blessures ou
des dommages peuvent survenir.
NE PAS entreposer de bouteilles d'oxygène pleines près d'une
fournaise, d'un réservoir d'eau chaude, dans le coffre d'une
voiture ou autre zone de haute température. Les entreposer
dans ce genre d'endroit peut provoquer une explosion ou un
incendie.

SECTION 2—PREMIÈRE MISE EN SERVICE
Compresseur HomeFill® II 92 Part No 1145805
SECTION 2—PREMIÈRE MISE EN
SERVICE
REMARQUE: Distributeurs uniquement - Se reporter
Informations revendeur à la page 86 avant de lancer cette procédure.
Première mise en service du compresseur
Liste des points à vérifier avant la mise en service
du compresseur
Avant de se servir du compresseur Homefill II pour la
première fois, procédez aux vérifications suivantes:
❑ Choisissez un emplacement pour le compresseur.
❑ Transportez le compresseur à l'endroit désiré.
❑ Branchez le cordon d'alimentation au compresseur.
❑ Branchez le compresseur au concentrateur
Choisir un emplacement
MISE EN GARDE
NE JAMAIS utiliser la bouteille à proximité de
flammes ou de substances, vapeurs ou atmosphère
inflammables/explosives.
Ne pas placer les tubes à oxygène, le cordon de
raccordement ou l’appareil à proximité de surfaces
chauffées ou chaudes (poêle à gaz, couverture chauffante,
cuisinière ou autre appareil électrique similaire).
Le compresseur doit être positionné à au moins 8 centimètres
des murs, rideaux ou meubles afin d'assurer une circulation
d'air suffisante.
NE PAS l'utiliser dans un cagibi.
Le compresseur doit être placé sur une surface dure plate et
stable, comme par exemple une table ou sur un chariot.

SECTION 2—PREMIÈRE MISE EN SERVICE
Part No 1145805 93 Compresseur HomeFill® II
Transporter le compresseur
REMARQUE: Pour cette procédure, se reporter à la FIGURE 2.1.
MISE EN GARDE
Ne JAMAIS transporter un compresseur avec une
bouteille branchée ou posée sur le compresseur, car des
blessures ou des dommages pourraient se produire.
ATTENTION
Lors du transport du compresseur, veillez à ne pas cogner
ni le compresseur ni les connecteurs contre un obstacle. Il
se pourrait sinon, que le compresseur soit abîmé.
REMARQUE: Pour cette procédure, se reporter à FIGURE 2.1
1. Il y a deux méthodes
pour transporter le
compresseur en toute
sécurité:
A. Une main - Saisissez
la poignée au bas de la
face arrière du
compresseur.
B. Deux mains -
Saisissez les poignées
sur les côtés du
compresseur.
FIGURE 2.1 Transporter le
compresseur
Installez le cordon d'alimentation
REMARQUE: Pour cette procédure, se reporter à FIGURE 2.2 à la
page 94.
1. Assurez-vous que le compresseur est placé sur une surface
dure plate et stable, comme par exemple une table ou sur
un chariot.
Poignée
Poignée
Poignée

SECTION 2—PREMIÈRE MISE EN SERVICE
Compresseur HomeFill® II 94 Part No 1145805
2. Assurez-vous que le bouton est sur la postion Off (Arrêt)
3. Branchez le cordon d'alimentation dans le connecteur
électrique à l'arrière du compresseur.
4. Branchez l'autre extrémité du cordon d'alimentation dans
la prise murale.
FIGURE 2.2 Installez le cordon d'alimentation
Connecter le compresseur au concentrateur
REMARQUE: Pour cette procédure, se reporter à FIGURE 2.3 à la
page 95.
1. Insérez une extrémité du tuyau d'interconnection dans la
prise de sortie à l'arrière du concentrateur (Détail "A").
2. Insérez l'autre extrémité du tuyau d'interconnection dans
la prise d'entrée sur le côté du compresseur (Détail "B").
REMARQUE: Les taquets métalliques sur la prise d'entrée et de
sortie du compresseur vont sortir en faisant un "click" audible
lorsque l'extrémité du tuyau d'interconnection sera installé
correctement (Détail "C").
3. Faites une boucle avec l'excédent du tuyau
d'interconnection et attachez le de façon sécurisée à
l'arrière du concentrateur à l'aide des sangles de fixation.
Prise
Murale
Câble
d'alimentation
Compresseur
(ARRIERE)
Prise
Electrique

SECTION 2—PREMIÈRE MISE EN SERVICE
Part No 1145805 95 Compresseur HomeFill® II
FIGURE 2.3 Connecter le compresseur au concentrateur
Insérez l'extrémité du
tuyau d'interconnection
dans la prise
d'entrée/sortie
Prise d'entrée/sortie
Taquet
métallique
Tuyau
d'interconnection
Compresseur
Prise d'entrée
Câble
d'alimentation
Prise de sortie
CONCENTRATEUR
VUE DE HAUT
DÉTAIL “A”
DÉTAIL “C”
DÉTAIL “B”

SECTION 3—LISTE DES POINTS À VÉRIFIER ET INSPECTION
Compresseur HomeFill® II 96 Part No 1145805
SECTION 3—LISTE DES POINTS À
VÉRIFIER ET INSPECTION DE LA
BOUTEILLE
Liste des points à vérifier sur le
fonctionnement du compresseur
Chaque fois que le Compresseur du Homefill II est utilisé pour
remplir une bouteille, procéder à la vérification suivante :
❑ S'assurer que le concentrateur était en marche pendant au
moins trente minutes. Se référer au Manuel Utilisateur du
concentrateur.
❑
Procéder à la vérification du préremplissage de la bouteille.
❑ Brancher la bouteille au compresseur.
❑ Mettre le bouton de mise en marche du compresseur sur la
position On ( ) (Marche).
❑ Vérifier les témoins lumineux sur le panneau de contrôle.
❑ Débrancher et enlever la bouteille pleine.
❑ Mettre le bouton de mise en marche du compresseur sur la
position Off (Arrêt)
❑ En cas de remplissage d'une autre bouteille, reprendre la
vérification de tous les points de cette liste.
Inspection du préremplissage de la
bouteille
MISE EN GARDE
Utiliser UNIQUEMENT les bouteilles munies du
branchement et du label Invacare Homefill II.
Toutes les bouteilles DOIVENT être inspectées avant de
tenter de les remplir. Sinon, des blessures ou des
dommages pourraient survenir.
REMARQUE : Pour cette procédure, se reporter à FIGURE 3.1 à la
page 97.

SECTION 3—LISTE DES POINTS À VÉRIFIER ET INSPECTION
Part No 1145805 97 Compresseur HomeFill® II
FIGURE 3.1 Inspection du préremplissage de la bouteille

SECTION 3—LISTE DES POINTS À VÉRIFIER ET INSPECTION
Compresseur HomeFill® II 98 Part No 1145805
La date de test hydrostatique
Les bouteilles en aluminium DOIVENT subir des tests de
ré-épreuve tous les cinq ans.
MISE EN GARDE
NE PAS remplir des bouteilles qui n'ont pas été testées au
cours des cinq dernières années. Sinon, des blessures
personnelles graves pourraient survenir. Contactez votre
revendeur pour son remplacement.
Examen externe
1. Examiner la surface externe de la bouteille pour vérifier les
points ci-dessous, et dans ce cas remplacer la bouteille :
• Entailles ou bosses
• Brûlures de l'arc
• Huile ou graisse
• Tout autre signe de dommage rendant la bouteille
inutilisable ou d'utilisation dangereuse.
2. Examiner la bouteille pour écarter tout signe évident de
dommage d'incendie ou de dommage thermique. Ces
traces incluent les traces de carbonisation ou de cloquage
de la peinture ou d’un autre revêtement protecteur, ou
toute autre indication pyrométrique. Remplacer la
bouteille si des traces de dommages thermiques ou causés
par le feu sont détectées.
3. Vérifier les points suivants de l'assemblage
bouteille/régulateur, et remplacer le cas échéant :
• Débris, huile ou graisse
• Traces visibles de dommages
• Traces de corrosion à l’intérieur de la soupape
• Signes de dommages dus à une chaleur excessive ou
un feu

SECTION 4—FONCTIONNEMENT DU COMPRESSEUR
Part No 1145805 99 Compresseur HomeFill® II
SECTION 4—FONCTIONNEMENT
DU COMPRESSEUR
Branchement/débranchement de la
bouteille du compresseur
Branchement de la bouteille au compresseur
MISE EN GARDE
NE JAMAIS utiliser d'outil de quelque sorte que ce soit
pour brancher/débrancher la bouteille et le compresseur.
Sinon, de graves blessures et/ou des dommages peuvent
survenir.
NE PAS faire tomber les bouteilles à oxygène. Utilisez
vos deux mains pour manipuler/transporter les bouteilles
d'oxygène. Sinon, des blessures ou des dommages
peuvent survenir.
NE PAS utiliser un détecteur de fuite liquide pour tester
les fuites.
REMARQUE : Pour cette procédure, se reporter FIGURE 4.2
à la page 102.
1. Examiner la jauge de la bouteille. Si la pression de la
bouteille est au dessous de 1500 psig (10342 kPa), passez à
L'ÉTAPE 2 (FIGURE 4.2).
REMARQUE : Si la pression de la bouteille est au dessus de
1500 psig (10342 kPa), NE PAS essayer de la remplir
complètement. Elle risque de ne pas se remplir.
2. Mettre le sélecteur de débit du régulateur sur Off (FIGURE
4.2).
3. Enlevez les bouchons de la bouteille et du connecteur
d'alimentation.

SECTION 4—FONCTIONNEMENT DU COMPRESSEUR
Compresseur HomeFill® II 100 Part No 1145805
ATTENTION
NE PAS relier le connecteur (canule) de sortie à l’appareil
HomeFill II ou la bouteille ne fonctionnera pas
normalement.
4. Poussez momentanément sur la BAGUE externe
(manchon) du connecteur d'alimentation jusqu'à ce que
des points VERTS appparaissent et que vous puissiez
remettre le connecteur (FIGURE 4.1).
REMARQUE : Si la bague externe (manchon) est en
position HAUTE (les points VERTS ne sont pas visibles),
le connecteur d'alimentation n’accueillera pas l’orifice
de remplissage de la bouteille. L’utilisateur doit enfoncer
momentanément la bague externe vers le BAS pour
rajuster l’orifice de remplissage du connecteur (points
VERTS visibles) afin d’accueillir l’orifice de remplissage
de la bouteille.
FIGURE 4.1 Rajustement de l’orifice de remplissage du
connecteur
5. Saisir l’ensemble bouteille/détendeur dans la zone située
derrière la jauge de la bouteille (FIGURE 4.2).
Orifice de remplissage
du connecteur
Bague externe (manchon)
ENFONCER
VERS LE BAS
Points VERTS
AVANT
D’ENCLENCHER LE
CYLINDRE, POUSSEZ. LA
BAGUE DU CONNECTEUR
VERS LE BAS
JUSQU’A CE QUE
DES POINTS
VERTS SOIENT
VISIBLES.
 Loading...