

Invacare ILIFTEE, ILIFTEM, I-Lift ILIFTHM, I-Lift ILIFTEM, I-Lift ILIFTEE User Manual
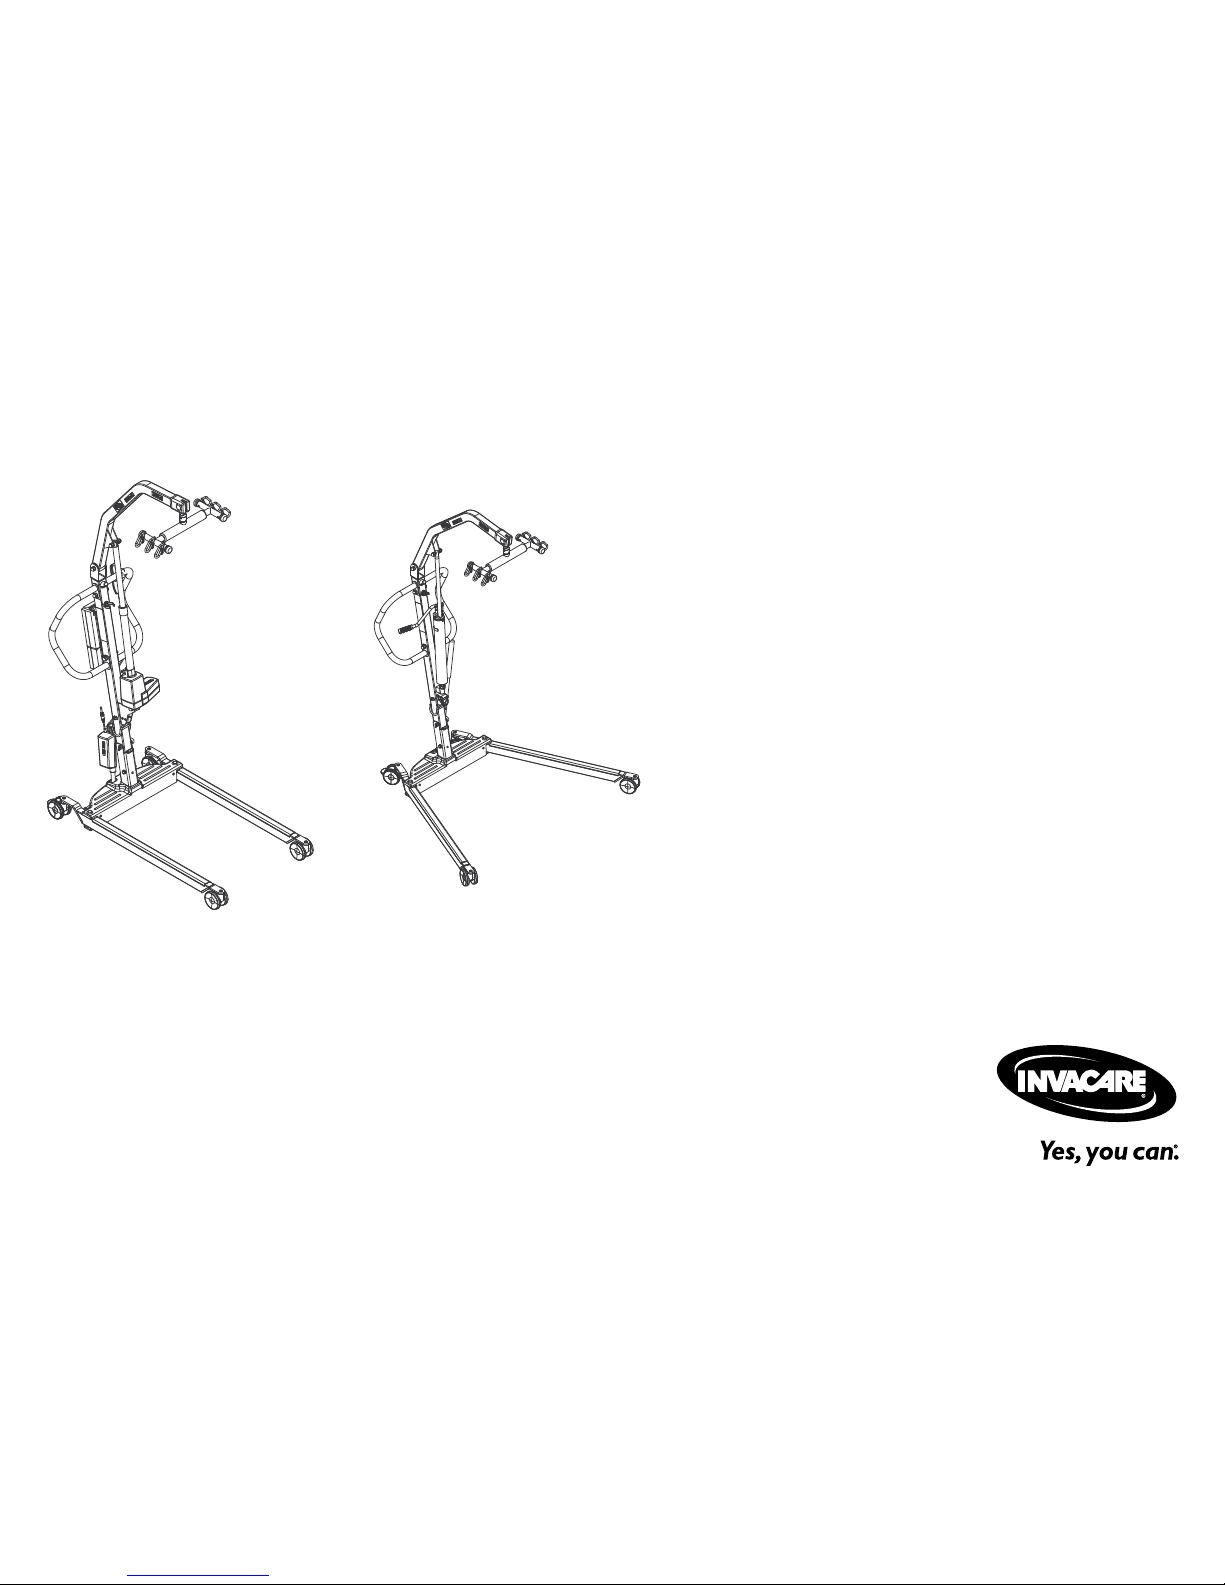
Invacare®I-Lift™
ILIFTHM,ILIFTEM,ILIFTEE
ENPortablePatientLift
UserManual...............................3
FCLève-personneportatif
Manuel d'utilisation........................55
ThismanualMUSTbegiventotheuseroftheproduct.
BEFOREusingthisproduct,readthismanualandsaveforfuturereference.

©2012InvacareCorporation.
Allrightsreserved.Republication,duplicationormodificationinwholeorinpartisprohibitedwithout
priorwrittenpermissionfromInvacare.Trademarksareidentifiedby™and®.Alltrademarksare
ownedbyorlicensedtoInvacareCorporationoritssubsidiariesunlessotherwisenoted.

Contents
ThismanualMUSTbegiventotheuseroftheproduct.
BEFOREusingthisproduct,readthismanualandsaveforfuture
reference.
1General......................................5
1.1Symbols..................................5
2Safety........................................6
2.1GeneralGuidelines..........................6
2.2OperatingInformation.......................6
General................................6
PinchPointsandPositioning.................7
ElectricalandGrounding....................7
Disposal................................8
2.3RadioFrequencyInterference..................8
2.4ProductLabeling...........................9
3TechnicalData................................10
3.1PatientLift................................10
3.2FullBodyandHeavyDutySlings................11
3.3DividedLegandToiletingSlings................12
3.4I-LiftScaleILS450...........................12
4Assembly.....................................13
4.1SafeAssembly.............................13
4.2AssemblingtheMasttotheBase................13
4.3AssemblingtheManual/HydraulicPumptothe
Boom...................................15
4.4AssemblingtheElectricActuatortotheBoom......16
4.5InstallingtheLegActuatortotheBase............17
4.6InstallingtheShifterHandle...................17
4.7CheckingtheServiceLight....................18
4.8ResettingtheServiceLight....................18
5Operation....................................19
5.1Introduction..............................19
5.2Closing/OpeningLegs........................19
Closing/OpeningManualLegs................19
Closing/OpeningElectricLegs................20
5.3Raising/LoweringtheLift.....................21
Raising/LoweringaManual/HydraulicLift........21
Raising/LoweringanElectricLift..............22
5.4ActivatingaMechanicalEmergencyRelease........22
PrimaryEmergencyRelease..................22
SecondaryEmergencyRelease................23
5.5PerforminganEmergencyStop.................23
5.6MountingtheBatteryCharger.................24
5.7ChargingtheBattery........................24
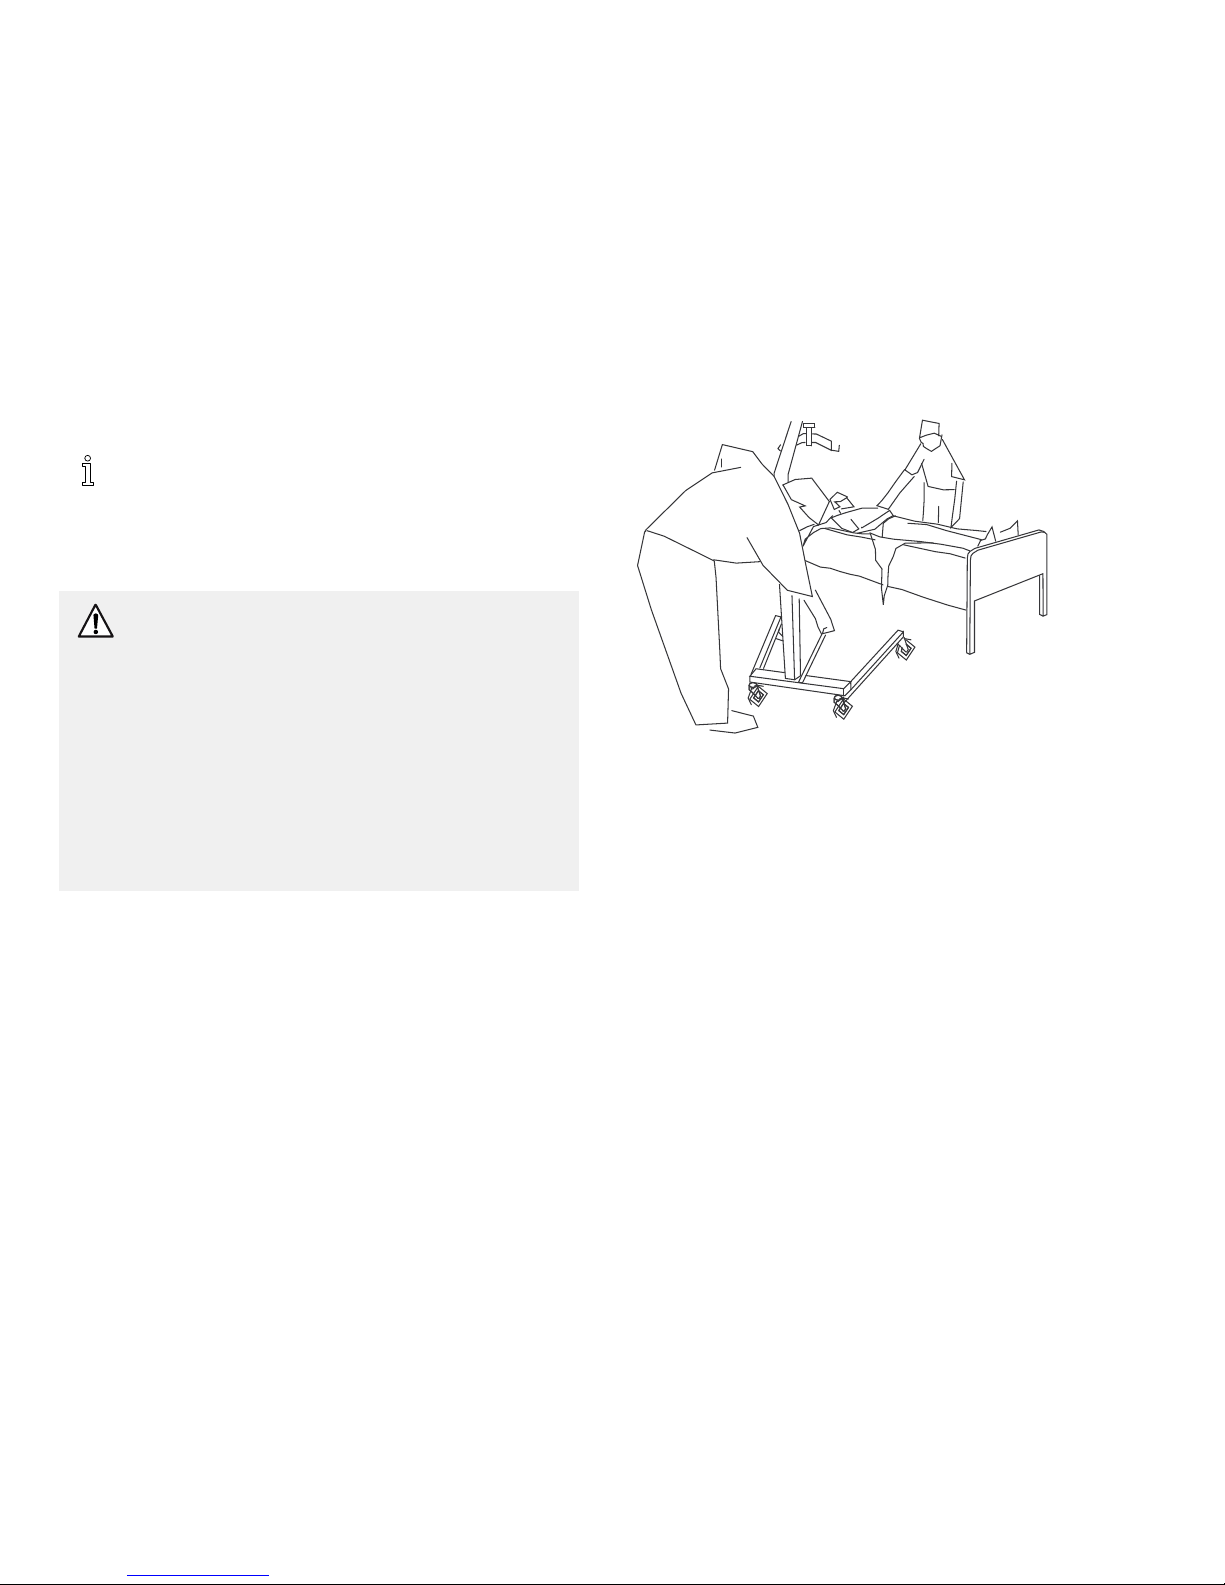
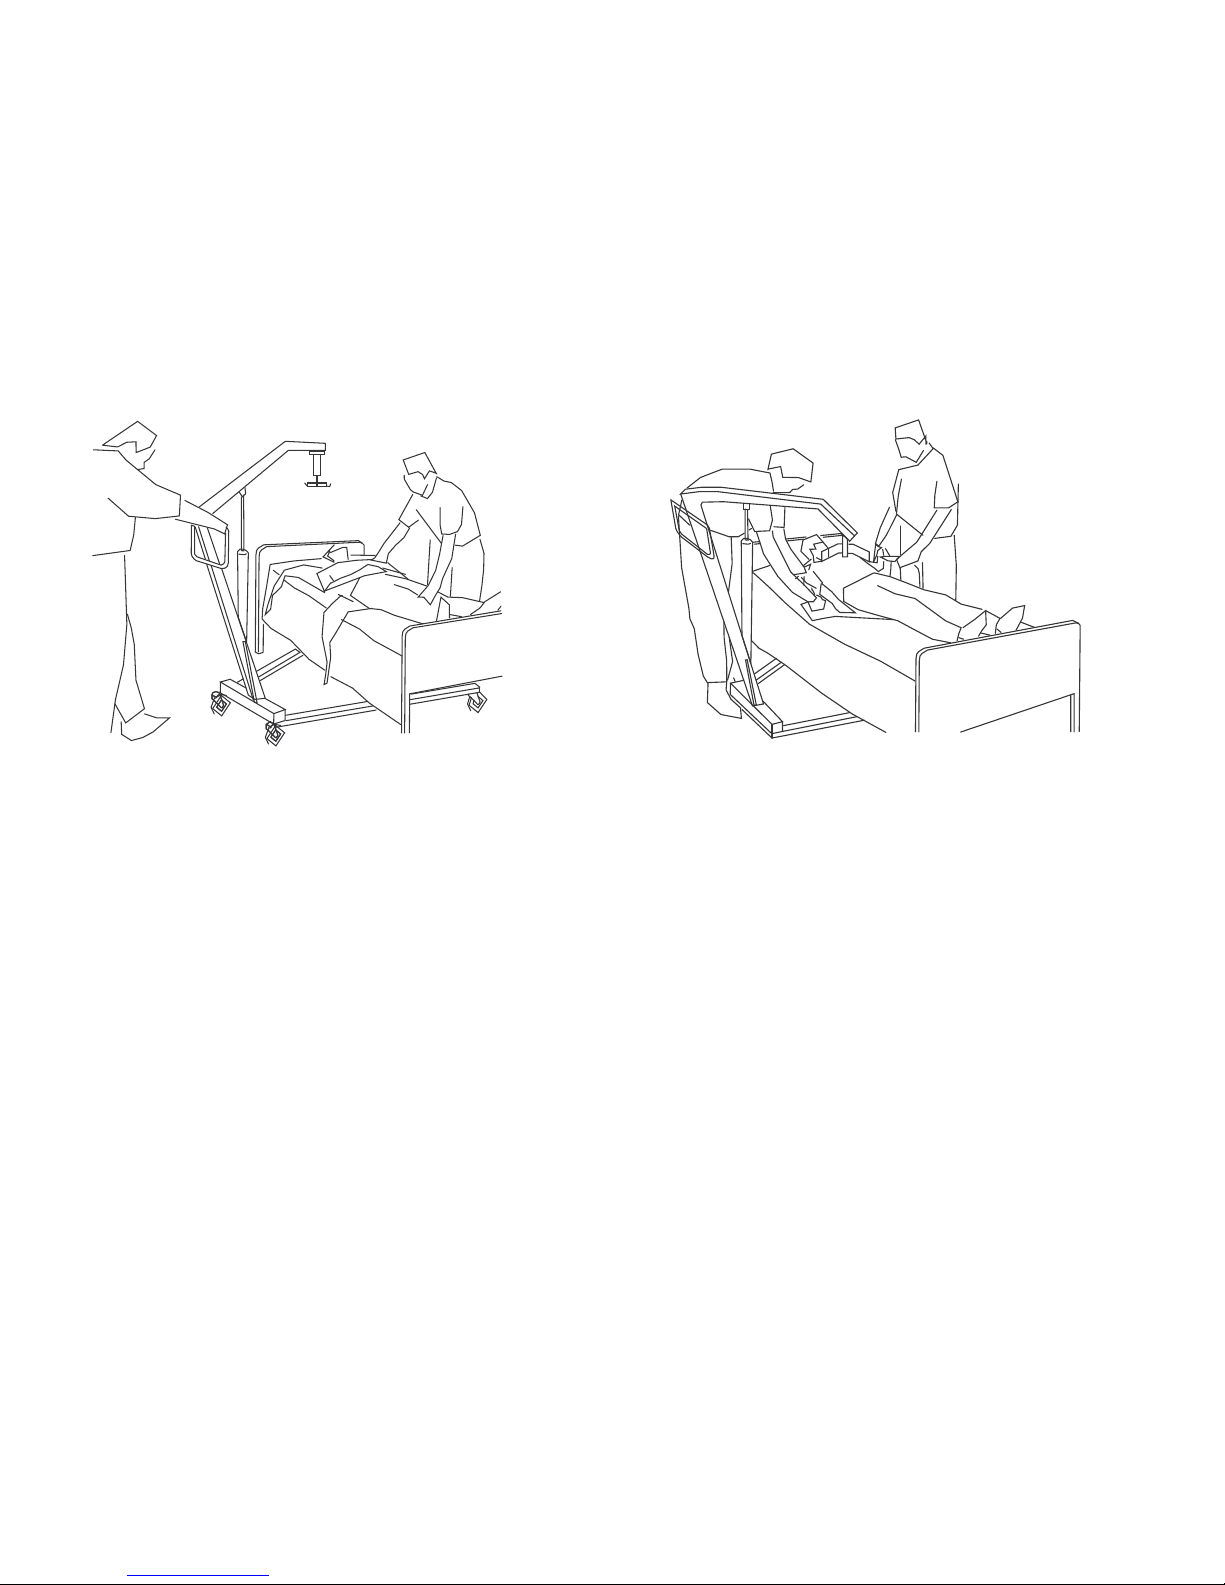
6LiftingthePatient..............................26
6.1SafeLifting................................26
6.2PreparingtoLift............................27
6.3AttachingtheSlingstotheLift.................29
6.4LiftingandTransferringthePatient..............31
FloorTransfer...........................32
CommodeTransferGuidelines...............33
BedTransfer............................33
WheelchairTransfer.......................34
7Troubleshooting...............................35
7.1TroubleshootingTable.......................35
8Maintenance..................................37
8.1SafeMaintenance...........................37
8.2MaintenanceSafetyInspectionChecklist..........37
8.3LubricatingtheLift..........................39
8.4DetectingWearandDamage..................39
8.5CleaningtheSlingandLift.....................39
8.6MaintainingtheManual/HydraulicPump...........39

8.7ReplacingaManual/HydraulicPump..............40
8.8AdjustingthePumpControlValve..............41
8.9ReplacingtheElectricActuator.................42
8.10ReplacingtheLegActuator....................43
8.11CheckingandTighteningMastPivotBolt..........44
8.12ReplacingtheSwivelBar......................44
8.13MaintainingtheBaseAdjustment................45
8.14ReplacingRearCasters.......................46
8.15ReplacingFrontCasters......................46
9Scale........................................47
9.1ScaleIntroduction..........................47
9.2RemovingtheSwivelBar.....................47
9.3InstallingtheScale..........................48
9.4OperatingtheScale.........................49
9.5WeighingthePatient........................50
9.6ReplacingtheBattery........................51
9.7CalibratingtheScale.........................51
9.8Troubleshooting...........................52
DisplayCodes...........................52
10Warranty.....................................53
10.1LimitedWarranty—NorthAmerica............53
11Survey.......................................54
11.1UsabilitySurvey............................54

General
1General
1.1Symbols
Signalwordsareusedinthismanualandapplytohazardsorunsafe
practiceswhichcouldresultinpersonalinjuryorpropertydamage.
Seetheinformationbelowfordefinitionsofthesignalwords.
WARNING!
–Warningindicatesapotentiallyhazardoussituation
which,ifnotavoided,couldresultindeathorserious
injury.
CAUTION!
–Cautionindicatesapotentiallyhazardoussituation
which,ifnotavoided,mayresultinpropertydamage
orminorinjuryorboth.
IMPORTANT
–Indicatesahazardoussituationthatcouldresultin
damagetopropertyifitisnotavoided.
Givesusefultips,recommendationsandinformationfor
efficient,trouble-freeuse.
Dateofmanufacture.
1171892-A5

I-Lift™
2Safety
2.1GeneralGuidelines
WARNING!
–DONOTusethisproductoranyavailableoptional
equipmentwithoutfirstcompletelyreadingand
understandingtheseinstructionsandanyadditional
instructionalmaterialsuchasowner’smanuals,service
manualsorinstructionsheetssuppliedwiththis
productoroptionalequipment.Ifyouareunableto
understandthewarnings,cautionsorinstructions,
contactahealthcareprofessional,dealerortechnical
personnelbeforeattemptingtousethisequipmentotherwise,injuryordamagemayoccur.
WARNING!
ACCESSORIESWARNING
–Invacareproductsarespecificallydesignedand
manufacturedforuseinconjunctionwithInvacare
accessories.Accessoriesdesignedbyother
manufacturershavenotbeentestedbyInvacareand
arenotrecommendedforusewithInvacareproducts.
NOTICE
–Theinformationcontainedinthisdocumentissubject
tochangewithoutnotice.
Checkallpartsforshippingdamagebeforeusing.Incaseofdamage,
DONOTusetheequipment.ContacttheDealerforfurther
instructions.
2.2OperatingInformation
Thissectionofthemanualcontainsgeneralsafetyinformation
aboutyourproduct.Forspecificsafetyinformation,refertothe
appropriatesectionofthemanualandprocedureswithinthatsection.
Forinstance,forsafetyinformationrelatedtoassemblingthelift,
referto4.1SafeAssembly,page13.
General
WARNING!
RiskofFalling
TheInvacarepatientliftisNOTatransportdevice.It
isintendedtotransferanindividualfromoneresting
surfacetoanother(suchasabedtoawheelchair).
DONOTattemptanytransferwithoutapprovalof
thepatient’sphysician,nurseormedicalassistant.
ThoroughlyreadtheinstructionsinthisOwner’sManual,
observeatrainedteamofexpertsperformthelifting
proceduresandthenperformtheentireliftprocedure
severaltimeswithpropersupervisionandacapable
individualactingasapatient.
Invacareslingsandpatientliftaccessoriesarespecifically
designedtobeusedinconjunctionwithInvacare
patientlifts.Slingsandaccessoriesdesignedbyother
manufacturersarenottobeutilizedasacomponentof
Invacare’spatientliftsystem.
–Usecommonsenseinalllifts.SpecialcareMUST
BEtakenwithpeoplewithdisabilitieswhocannot
cooperatewhilebeinglifted.
61171892-A
Safety
PinchPointsandPositioning
WARNING!
RiskofInjury
Pinchpointsarepresentinseverallocationsonthelift
andfingerscouldbepinched.
Thehangerbarcanmovesuddenlyandcauseinjury.
–ALWAYSkeephandsandfingersclearofmovingparts
toavoidinjury.
–Whenpositioninglift,beawareofthepositionofthe
hangerbarandthepatient.Injurycouldoccur.
ElectricalandGrounding
WARNING!
GROUNDINGINSTRUCTIONS
DONOT,underanycircumstances,cutorremove
theroundgroundingprongfromanyplugusedwith
orforInvacareproducts.Somedevicesareequipped
withthree-prong(grounding)plugsforprotection
againstpossibleshockhazards.Whereatwo-prong
wallreceptacleisencountered,itisthepersonal
responsibilityandobligationofthecustomertocontact
aqualifiedelectricianandhavethetwo-prongreceptacle
replacedwithaproperlygroundedthree-prongwall
receptacleinaccordancewiththeNationalElectrical
Code.Ifyoumustuseanextensioncord,useONLYa
three-wireextensioncordhavingthesameorhigher
electricalratingasthedevicebeingconnected.In
addition,InvacarehasplacedRED/ORANGEwarning
tagsonsomeequipment.DONOTremovethesetags.
–Carefullyreadbattery/batterychargerinformation
priortoinstalling,servicingoroperatingyourpatient
lift.
–Toreducetheriskofelectricshock,thisproducthas
apolarizedplug(onebladeiswiderthantheother).
Thisplugwillfitinapolarizedoutletonlyoneway.
Iftheplugdoesnotfitfullyintheoutlet,reverse
theplug.Ifitstilldoesnotfit,contactaqualified
electriciantoinstalltheproperoutlet.DONOT
changethepluginanyway.
1171892-A7
I-Lift™
Disposal
WARNING!
EnvironmentalHazard
Thisproducthasbeensuppliedfromanenvironmentally
awaremanufacturerthatcomplieswiththeWaste
ElectricalandElectronicEquipment(WEEE)Directive
2002/96/CE.
Devicecontainsleadacidbatteries.
Thisproductmaycontainsubstancesthatcouldbe
harmfultotheenvironmentifdisposedofinplaces
(landfills)thatarenotappropriateaccordingto
legislation.
–DONOTdisposeofbatteriesinnormalhousehold
waste.TheyMUSTbetakentoaproperdisposalsite.
Contactyourlocalwastemanagementcompanyfor
information.
–Pleasebeenvironmentallyresponsibleandrecyclethis
productthroughyourrecyclingfacilityatitsendoflife.
2.3RadioFrequencyInterference
WARNING!
–MostelectronicequipmentisinfluencedbyRadio
FrequencyInterference(RFI).CAUTIONshould
beexercisedwithregardtotheuseofportable
communicationequipmentintheareaaroundsuch
equipment.IfRFIcauseserraticbehavior,PUSHthe
RedPowerSwitchOFFIMMEDIATELY.DONOT
turnthePowerSwitchONwhiletransmissionisin
progress.
81171892-A
Safety
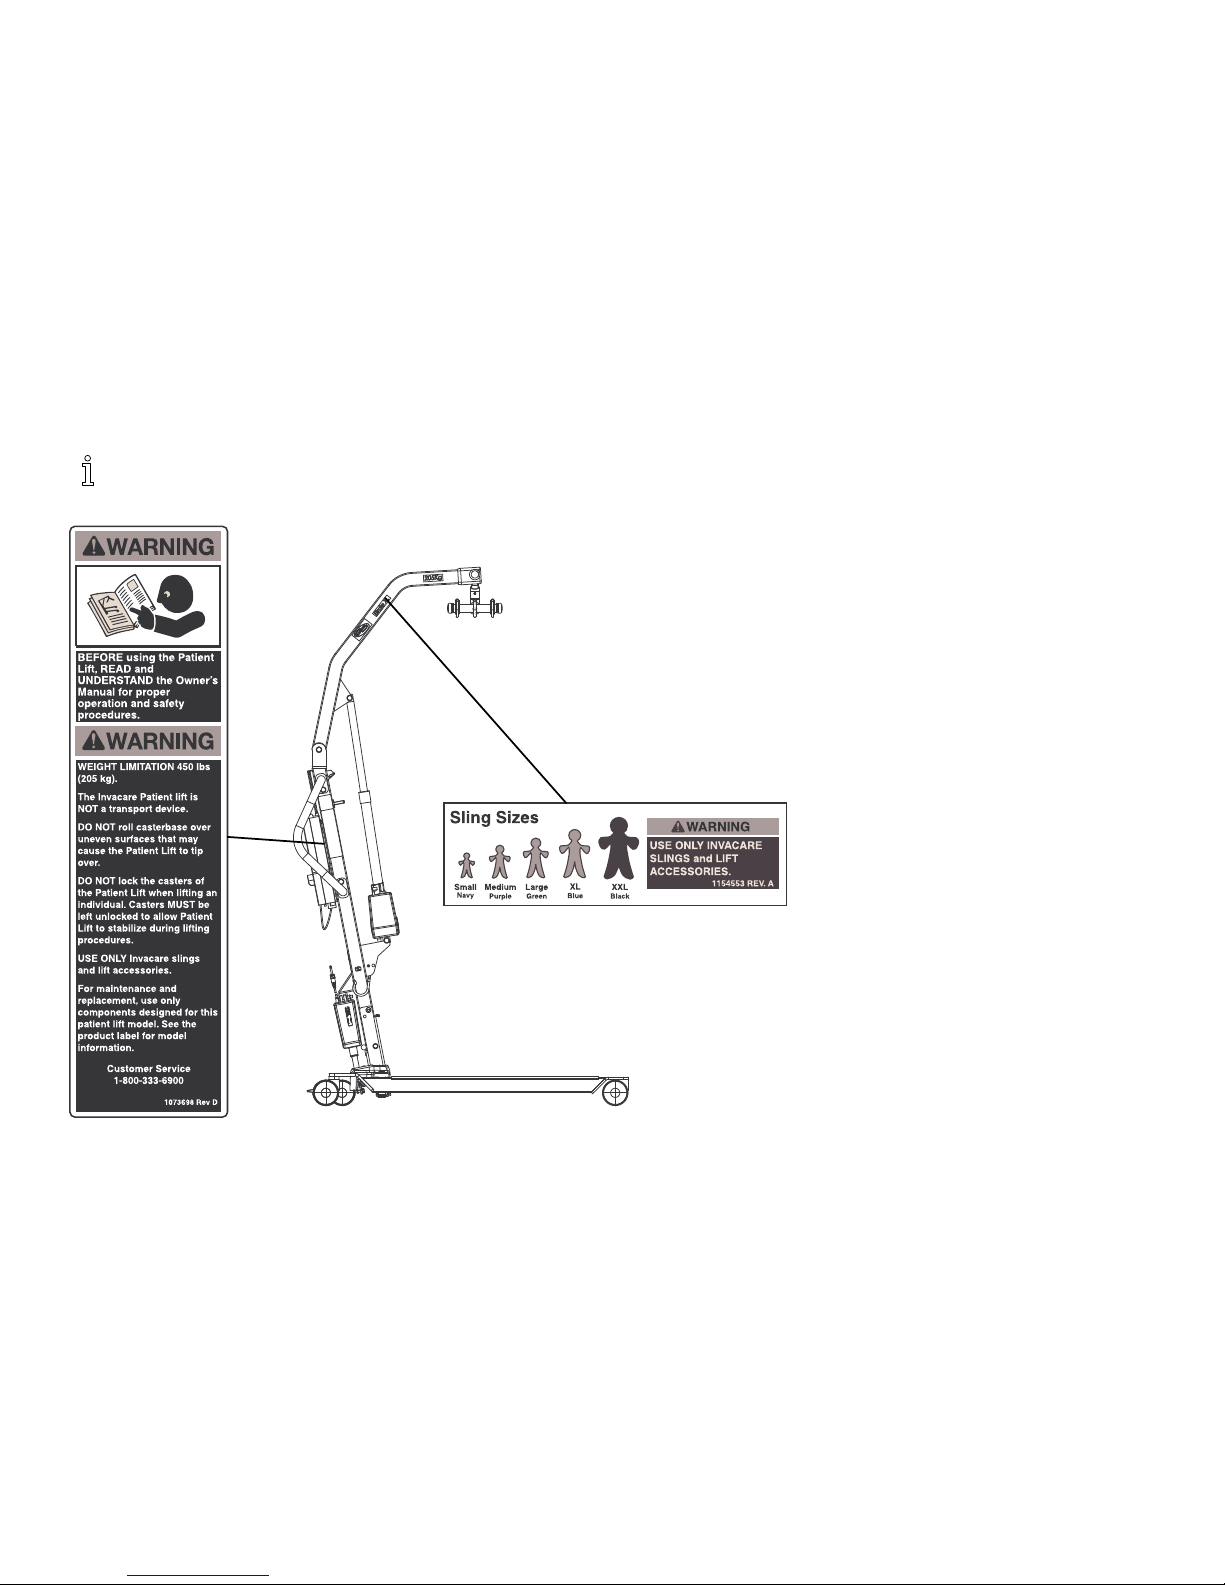
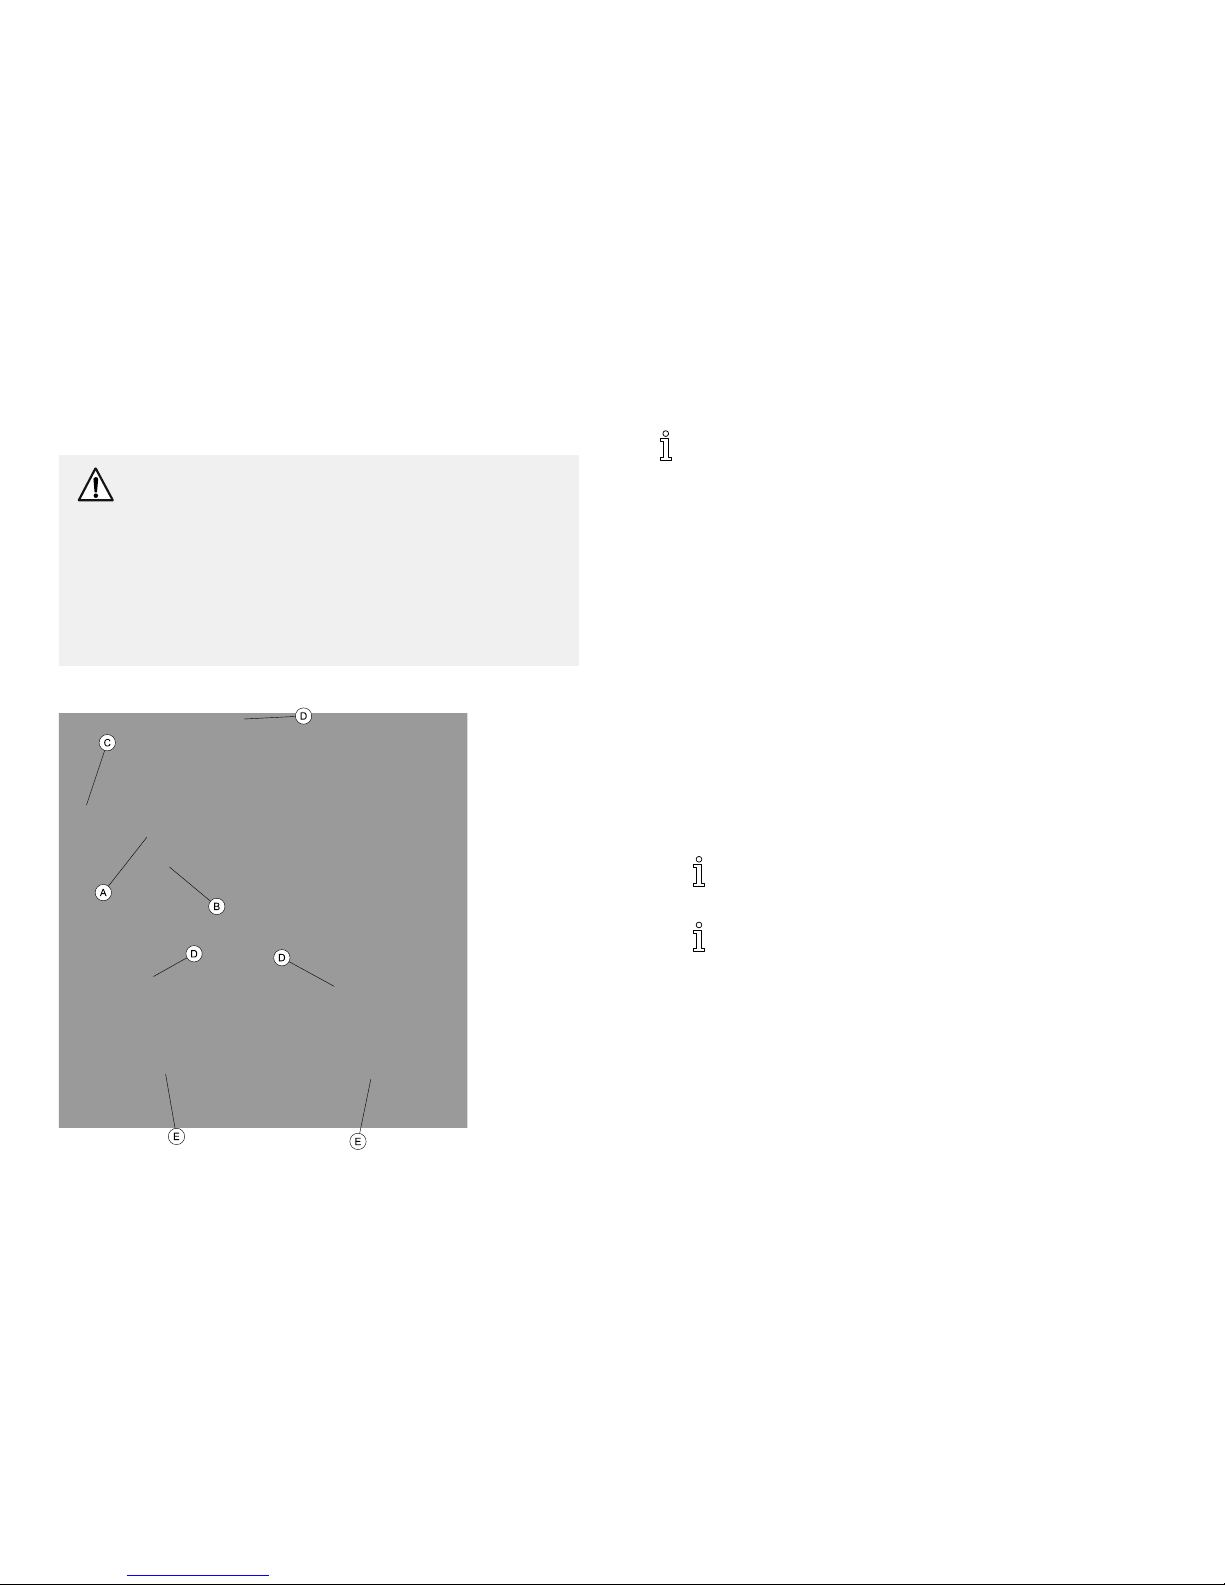
2.4ProductLabeling
Electricliftshown.Locationsarethesameonthehydraulic/manuallift.
1171892-A9

I-Lift™
3TechnicalData
3.1PatientLift
ILIFTHMILIFTEMILIFTEE
HeightatSlingHook-up-MAX.:
71.5in/1816mm76.1in/1933mm
HeightatSlingHook-up-MIN.:
22.8in/579mm22.2in/564mm
BaseWidthOPEN:47in/1196mm53.4in/1358mm
BaseWidthCLOSED:27.8in/705mm
BaseHeight(Clearance):
4.6in/117mm
BaseLength:
46.6in/1184mm
CasterSize:3.94in/100mm
SlingOptions:
3Styles3Styles1Style
TurningDiameter
57in/1450mm
57.6in/1464
MaxLiftingCapacity(WeightCapacity):
450lb/205kg
TotalWeight110lb/49.9kg117.5lb/53.3kg120lb/54.4kg
CyclesfromaFullCharge(Variesdepending
uponloadandstroke):
N/A
Approximately40cycles
Battery:
N/A
24VDC(Rechargeable)
ChargerInput:
N/A100-240VAC
ChargerOutput/ChargingTime:
N/A29.5VDCMax6hrs
Accessories:
DigitalScale
AudioLowBatteryAlarm:
N/A
Yes
MotorSafetyDevices:
N/A
Anti-Entrapment
WarrantyPump/Electronics:
1Year
WarrantyFrame3years
101171892-A

TechnicalData
3.2FullBodyandHeavyDutySlings
FullBody
FullBody
w/Commode
Heavy
Dutyw/o
Commode
Heavy
Dutyw/
Commode
R110
R112*
R111
R113*
R114R115R116R117*R140*R141*
Size:
MLXLMLXL
N/AN/A
Width:41.5
45.545.5
41.5
45.445.54545
Commode
Opening:
N/AN/AN/A889N/A
7
Length:
54.7
60.565.3
54.7
60.565.3
5555
Commode
Opening:
N/AN/AN/A111113N/A13
Back:
N/AN/AN/AN/AN/AN/AN/AN/A
WeightCapacity
(lbs):
450450450450450450600600
*Slingsmadeofameshmaterial.
Alldimensionsareininchesexceptwherenoted.
1171892-A
11

I-Lift™
3.3DividedLegandToiletingSlings
DividedLegToileting
R100PR100R101R102R121
Size:
PMLXLL
Width:3337.541
44.5
36
CommodeOpening:
N/AN/AN/AN/AN/A
Length:
59.862.867.872.337
CommodeOpening:
N/AN/AN/AN/AN/A
Back:
29.235.741.743.2N/A
WeightCapacity(lbs):
450450450450450
Alldimensionsareininchesexceptwherenoted.
3.4I-LiftScaleILS450
WeightRange:Upto600lbs.(272.7Kg)
Resolution:
+/-0.2lbs(.1Kg)
Display:
LiquidCrystalDigital
AutomaticPowerDown:Two(2)minutes
Size:5-3/4LX3-5/8WX4H
Weight:
.55lbs
Power:
Nine(9)VoltAlkalinebattery(included)
BatteryLife:Approximately1500readings
TemperatureRange:
50°To104°F(10°To40°C)
12
1171892-A

Assembly
4Assembly
4.1SafeAssembly
WARNING!
RiskofInjury
Improperassemblymaycauseinjuryordamage.
–UseonlyInvacarepartsintheassemblyofthispatient
lift.Thebaselegs,themast,boom,pumpassembly
andthehangerbararemanufacturedtospecifications
thatassurecorrectalignmentofallpartsforsafe
functionaloperation.
–DONOTovertightenthemountinghardware.This
willdamagethemountingbracket.
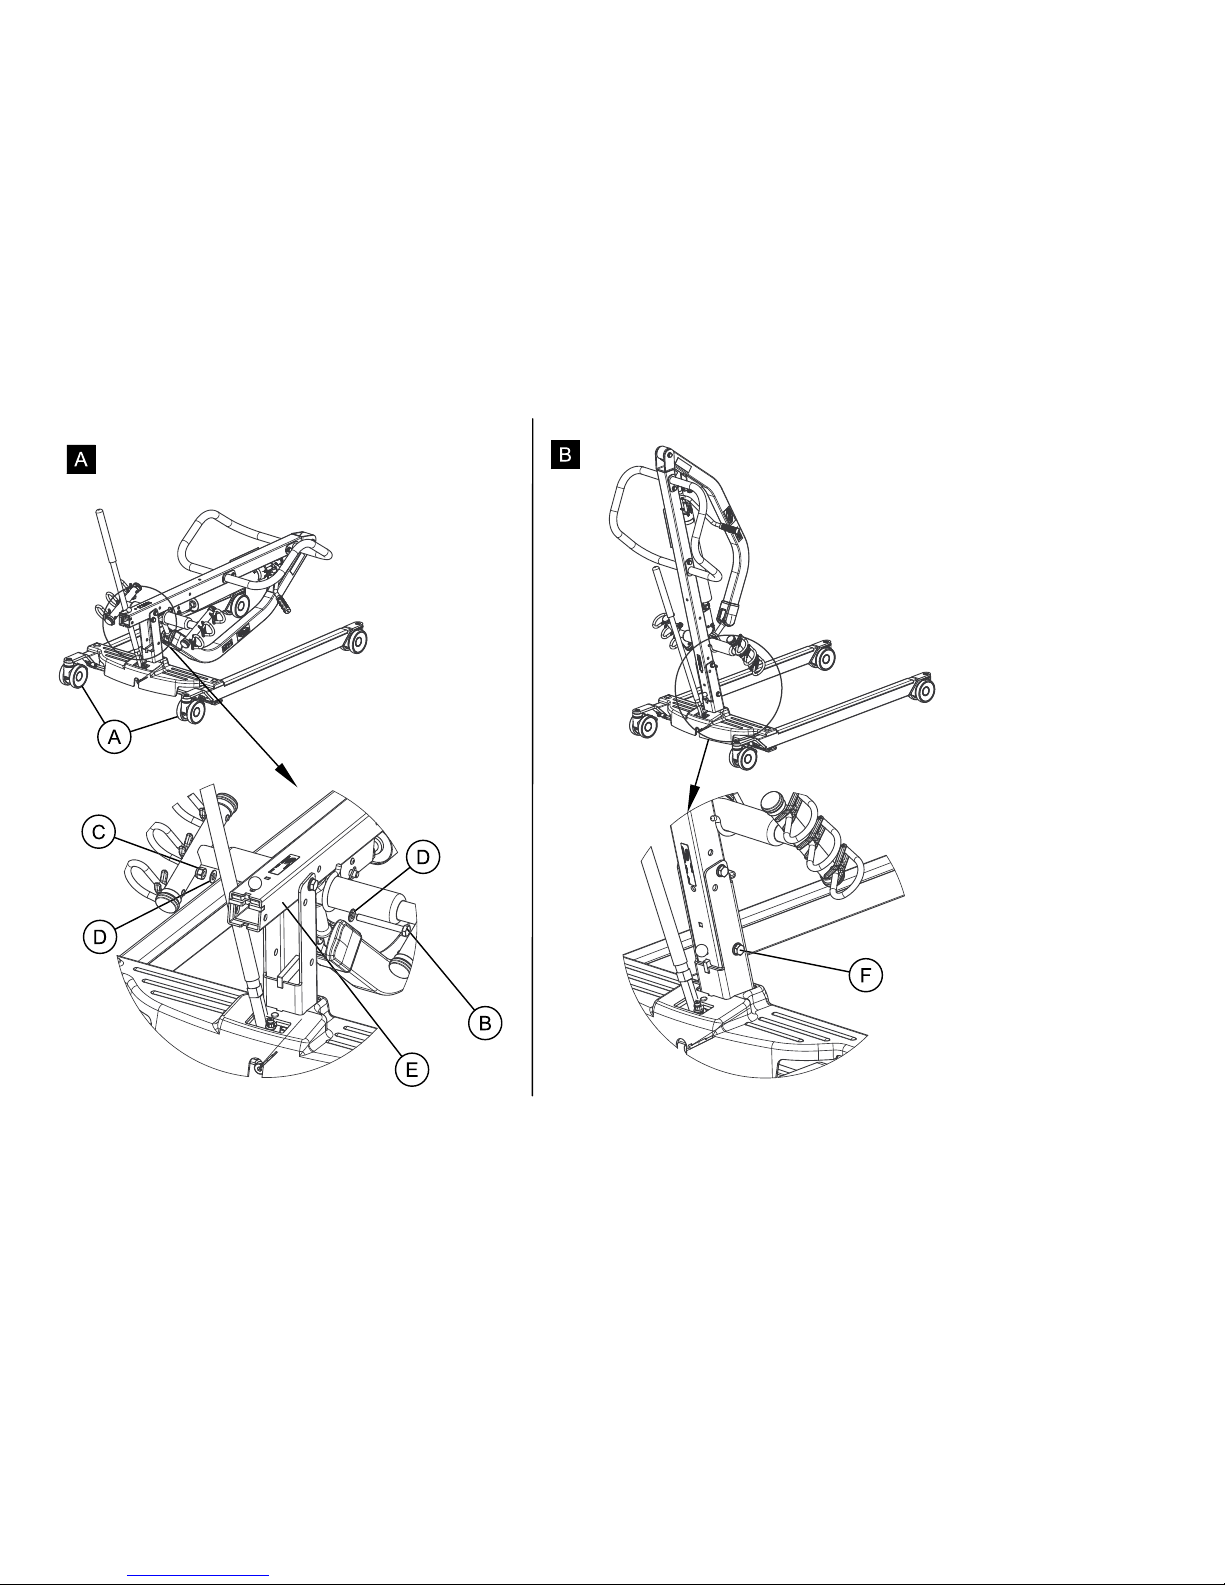
4.2AssemblingtheMasttotheBase
1.LockrearcastersA(DetailA).
2.RemovetheshoulderboltB,nutCandwashersD,fromthe
mastE.
3.Raisethemastassemblytoanuprightpositionuntilitlocksin
place(DetailB).
4.Installtheshoulderboltandwashers,throughthemastandthe
baseF.
5.Securewiththenut.
WARNING!
–Themastmaybefoldedforstorageortransporting.
Eachtimethemastisfolded,themastMUSTbe
properlysecuredtothebaseassembly.
1171892-A13
I-Lift™
14
1171892-A
Assembly
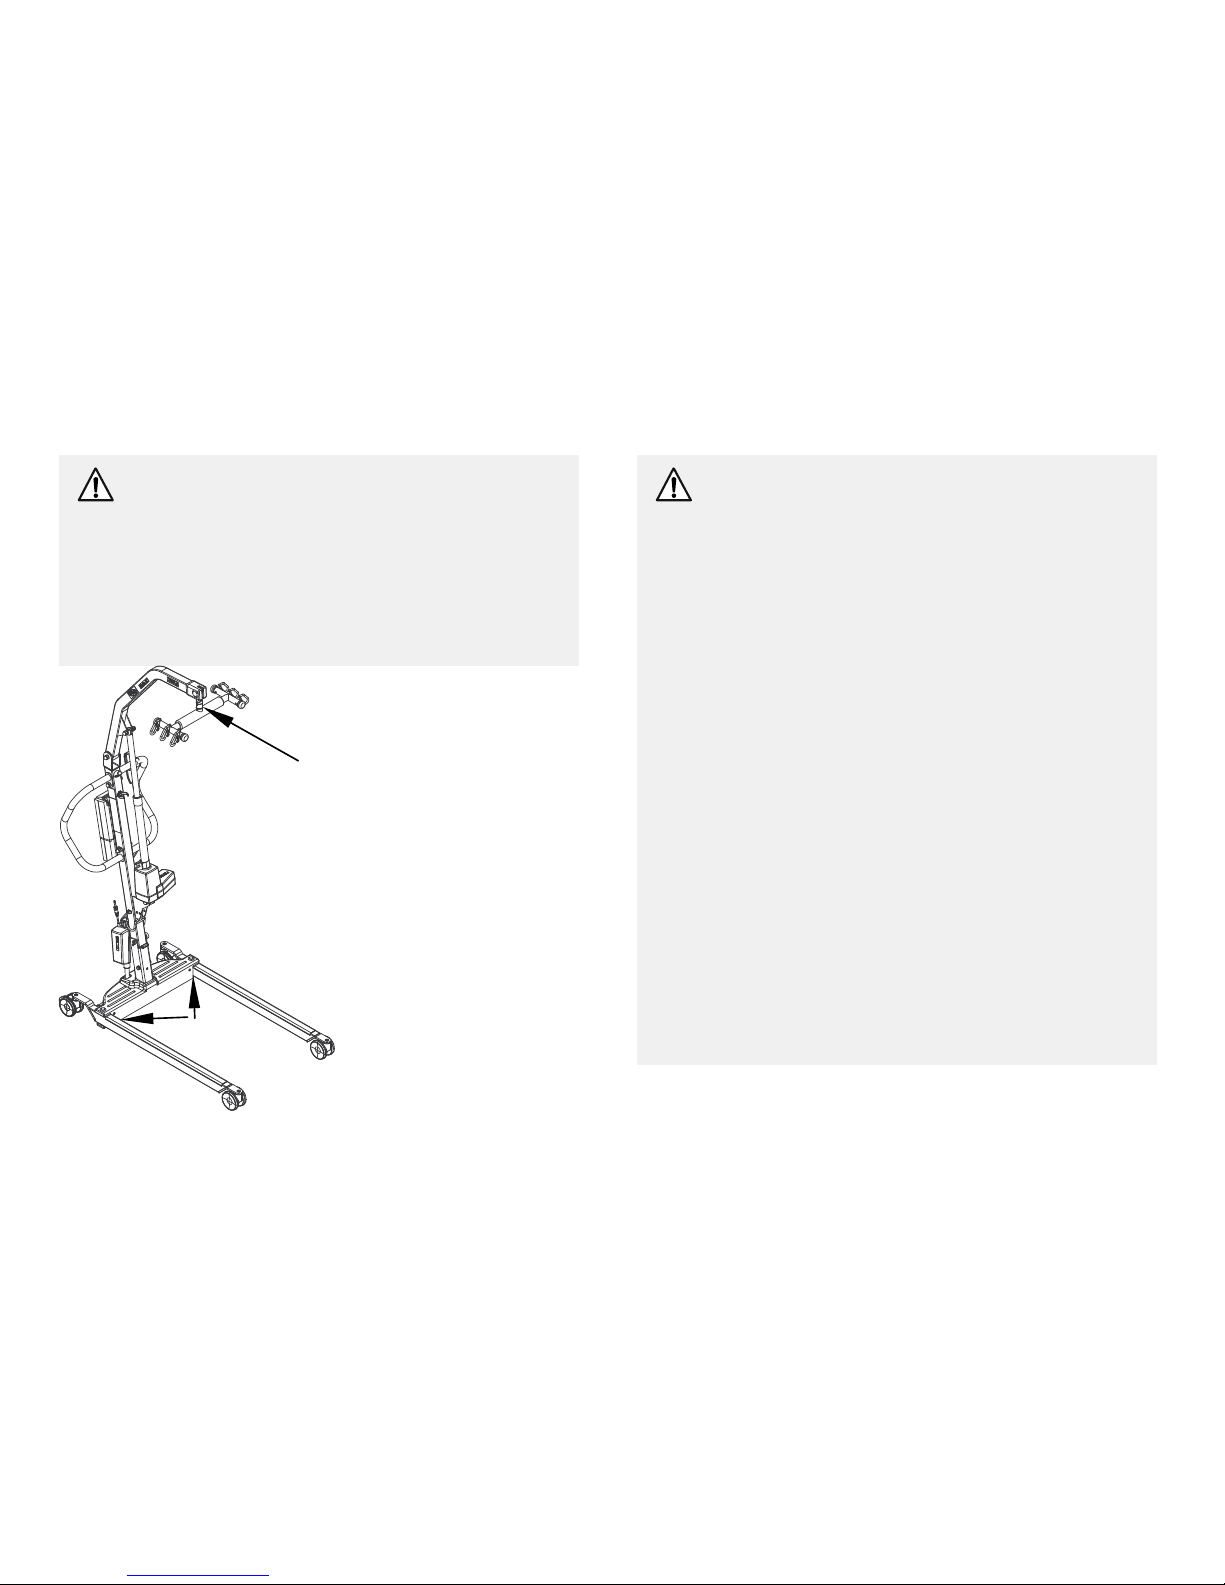
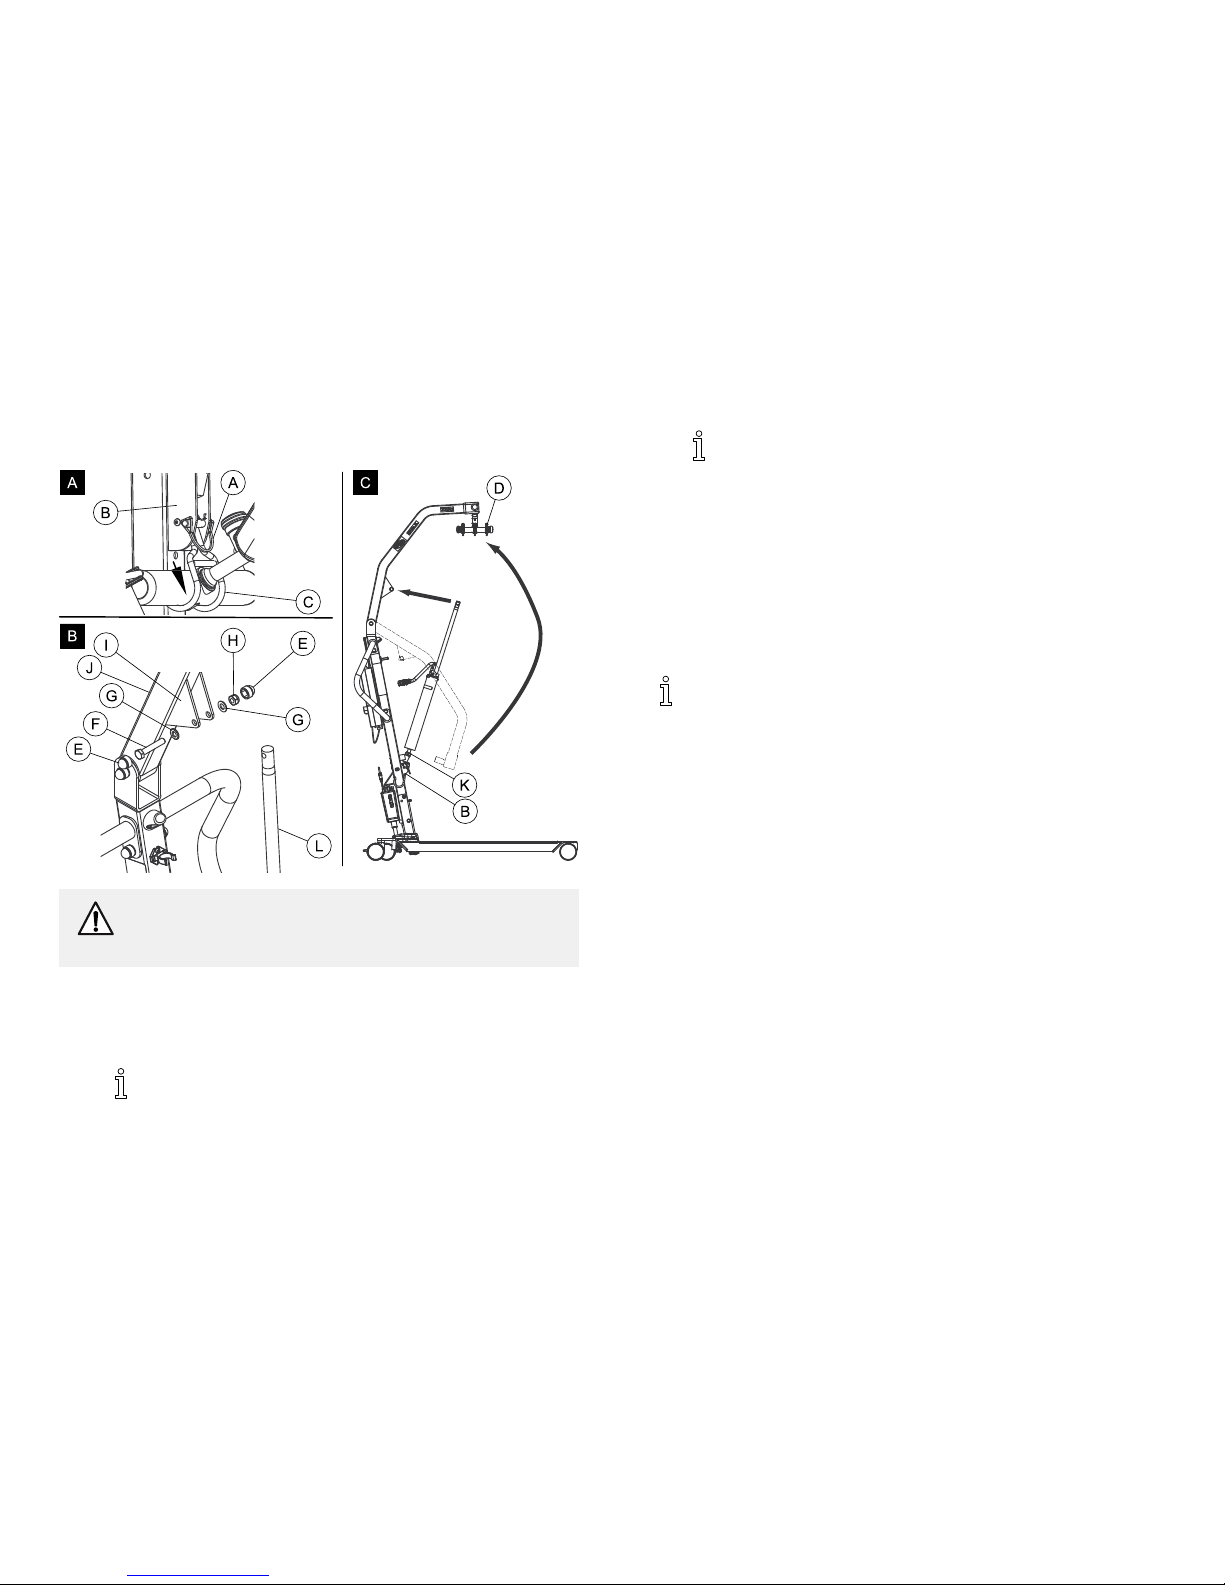
4.3AssemblingtheManual/HydraulicPumpto
theBoom
CAUTION!
–DONOTovertightenthemountinghardware.This
willdamagethemountingbracket.
1.RemovethequickreleasepinAfromthemastmountingbracket
B(DetailA).
2.LiftthehookCsecuringthehangerbarDtothemast.
ThehangerbarisnotshowninthehookinDetailA.
3.RemovethecapsE,boltF,washersGandnutHfromthe
mountingbracketIontheboomJ(DetailB).
ThebottomofthehydraulicpumpassemblyKwill
alreadybeassembledtothemastmountingbracket
(DetailC).
4.Lift-upontheboomandplaceitonyourleftshoulder.
5.Letthehydraulicpumprestontheright-sideofyourchestand
rotatetheshaftextensionLofthehydraulicpumpassembly
untilitlines-upwiththemountingbracketholesontheboom.
6.Aligntheholesofthemountingbracketwiththoseoftheshaft
extension
7.Installthebolt,washers,nutandcaps.
Besurethattheboltiscompletelythroughtheholesof
theboommountingbracketandthemanual/hydraulic
pumpassembly.Theboomassemblywillpivoteasilyifthe
mountinghardwareisalignedproperlywhentheboomis
securedtothemast.
1171892-A15

I-Lift™
4.4AssemblingtheElectricActuatortothe
Boom
CAUTION!
RiskofDamage
–DONOTovertightenthemountinghardware.This
willdamagethemountingbracket.
1.RemovethequickreleasepinAfromthemastmountingbracket
B(DetailA).
2.LiftthehookCsecuringthehangerbarDtothemast.
3.RemovethecapsE,boltF,washersG,bushingHandnutI
fromtheboommountingbracketJ(DetailB).
ThebottomoftheelectricactuatorassemblyKwill
alreadybeassembledtothemastmountingbracket
(DetailC).
4.Lift-upontheboomandplaceitonyourleftshoulder.
5.Lettheactuatorrestonyourright-sideofyourchestandrotate
theshaftextensionLoftheactuatorassemblyuntilitlines-up
withthemountingholesintheboomassembly.
6.Aligntheholesoftheboomassemblymountingbracketwith
thoseoftheactuator
Besurethattheboltiscompletelythroughtheholesof
theboommountingbracketandtheactuatorassembly.
Theboomassemblywillpivoteasilyifthemounting
hardwareisalignedproperlywhentheboomissecured
tothemast.
7.Installthebolt,washers,nut,bushingandcaps.
8.Plugintheelectricalconnectors(notshown)fromtheelectric
actuatortothebottomofthebatteryassembly.
9.Plugthependantcontrolintothebottomofthebatteryassembly
M.Besurethependantcontrolplugisfullyinserted.
161171892-A
Assembly
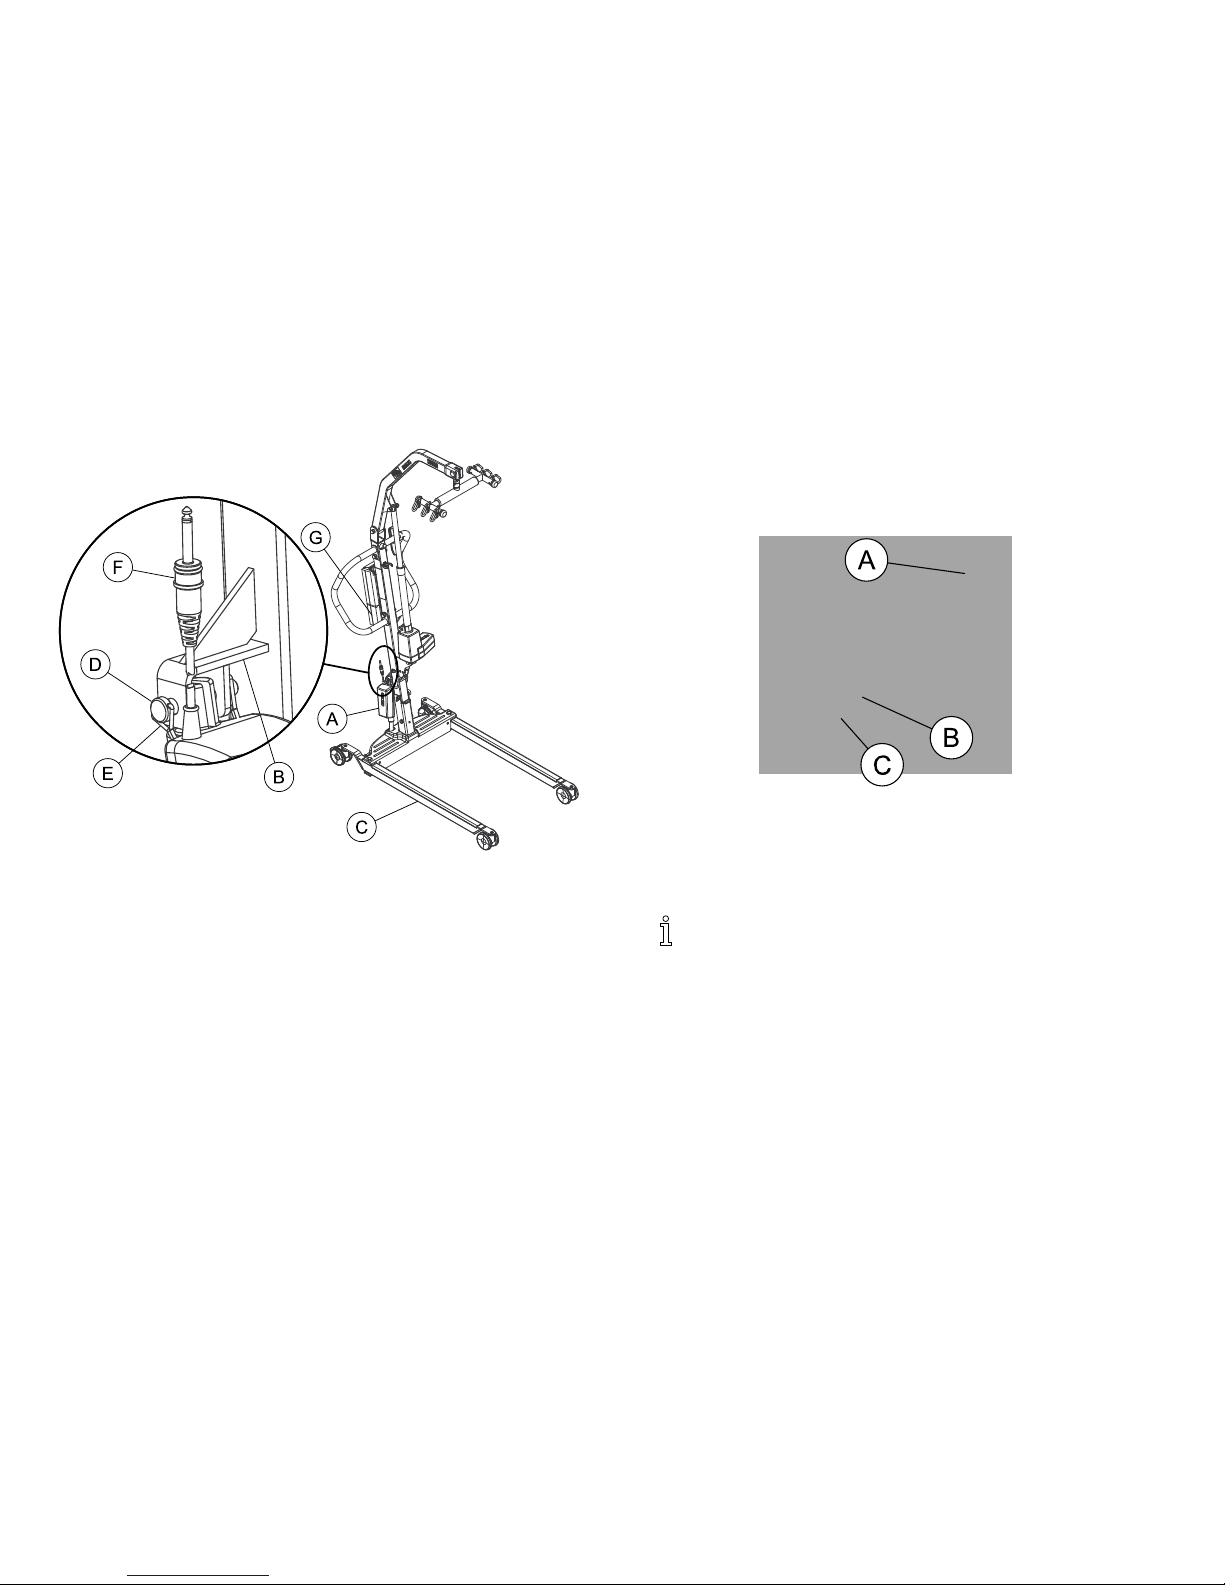
4.5InstallingtheLegActuatortotheBase
1.Performthefollowingtosecurethelegactuatortothemast
bracket:
a.PositionlegactuatorAintothemastbracketB.
b.MovethelegsCtoaligntheholesinthelegactuatorwith
theholesinthemastbracket.
c.InstallthepinDthroughtheholesofthelegactuatorand
mastbracketandsecurewithhitchpinsE.
2.ConnectthelegactuatorcableFtothebottomofthecontrol
boxG.
3.Ensuretheactuatorplugisfullypushedintothecontrolbox.
4.Checktheservicelight.Referto4.7CheckingtheServiceLight,
page18.
4.6InstallingtheShifterHandle
ThisprocedureappliestotheILIFTHMandILIFTEMonly.
1.RemovetheshifterhandleAfromthepackagingcarton.
2.Line-uptheshifterhandlethreadsBwiththreadedopeningC
inthebase.
3.Turntheshifterhandleclockwiseandsecurelytightenintothe
base.
1171892-A17
I-Lift™
4.7CheckingtheServiceLight
ThisprocedureappliestotheILIFTEEmodelsonly.
Eachtimetheliftisassembled,andbeforeusingthelift,the
servicelightshouldbechecked.
1.Assemblethelift.
2.ExaminethecontrolboxAtoseeiftheservicelightBisflashing.
3.Refertothetable.
ServiceLight
InitialAssembly
Reassembly
FlashingResettheservice
light.Referto
4.8Resettingthe
ServiceLight,page
18.
Theliftrequires
service.Contact
yourlocalInvacare
dealerforservice.
NotFlashing
Theliftisreadyforuse.
4.8ResettingtheServiceLight
Thisprocedureshouldonlybeperformedafterperforming
4.7CheckingtheServiceLight,page18.
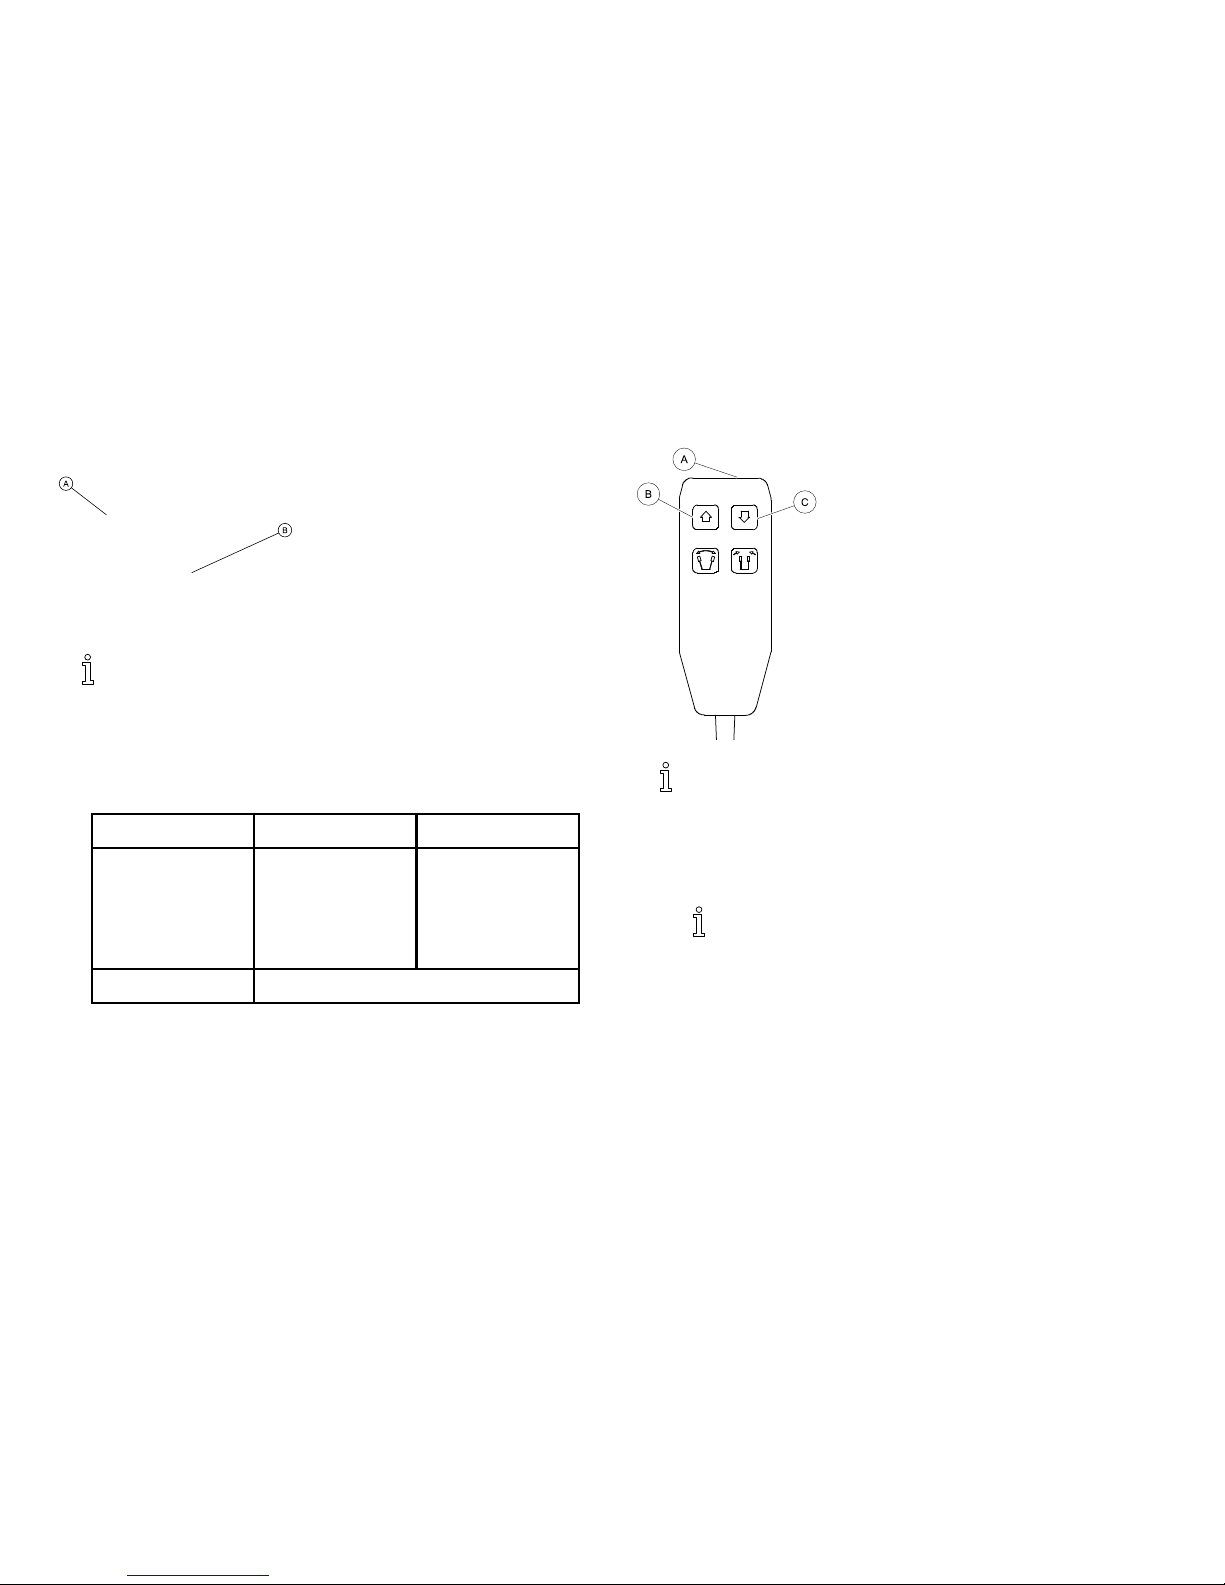
1.LocatethehandsetA.
2.PressandholdtheUPbuttonBandDOWNbuttonCatthe
sametimeforfiveseconds.
Youwillhearasoundwhentheservicelighthasbeen
reset.
181171892-A

Operation
5Operation
5.1Introduction
Theoperationofthepatientliftisaneasyandsafeprocedure.
Beforeusingtheliftwithapatient,refertothefollowing
proceduresforsafetyinformationandinstruction:
•2.2OperatingInformation,page6
•6.4LiftingandTransferringthePatient,page31
5.2Closing/OpeningLegs
WARNING!
RiskofInjury
Theliftcouldtipandendangerthepatientandassistants.
–Thelegsoftheliftmustbeinthemaximumopen
positionforoptimumstabilityandsafety.Ifitis
necessarytoclosethelegsofthelifttomaneuverthe
liftunderabed,closethelegsoftheliftonlyaslongas
ittakestopositiontheliftoverthepatientandliftthe
patientoffthesurfaceofthebed.Whenthelegsof
theliftarenolongerunderthebed,returnthelegsof
thelifttothemaximumopenposition.
–Theshifterhandlemustbelockedinplaceforoptimum
stabilityandsafety.
Closing/OpeningManualLegs
Theshifterhandleisusedtoopenorclosethelegsofthebasefor
stabilitywhenliftingapatient.
Refertothesafetyinformationin5.2Closing/OpeningLegs,
page19beforeperformingthisprocedure.
1.Standattherearofthepatientliftandgrasptheshifterhandle
withonehandandplacetheoppositehandonthesteering
handleofthemastforbalance.
TheshifterhandleMUSTlockintoitsmountingslottolock
thelegsinthefullclosedposition.
1171892-A19
I-Lift™
WARNING!
RiskofInjury
Theliftcouldtipandendangerthepatientandassistants.
–IftheshifterhandleisNOTpositionedcompletelyinto
itsmountingslot,DONOTusethepatientliftuntil
theshifterhandleisproperlyseatedandthelegsof
thepatientliftarelockedinplace.
2.Performoneofthefollowing:
a.ClosingtheLegsA—Pulltheshifterhandleawayfromthe
patientliftandthentoyourleftuntilitlocksinthenotchof
thebracket.
b.OpeningtheLegsB—Pulltheshifterhandleawayfrom
thepatientliftandthentoyourright.
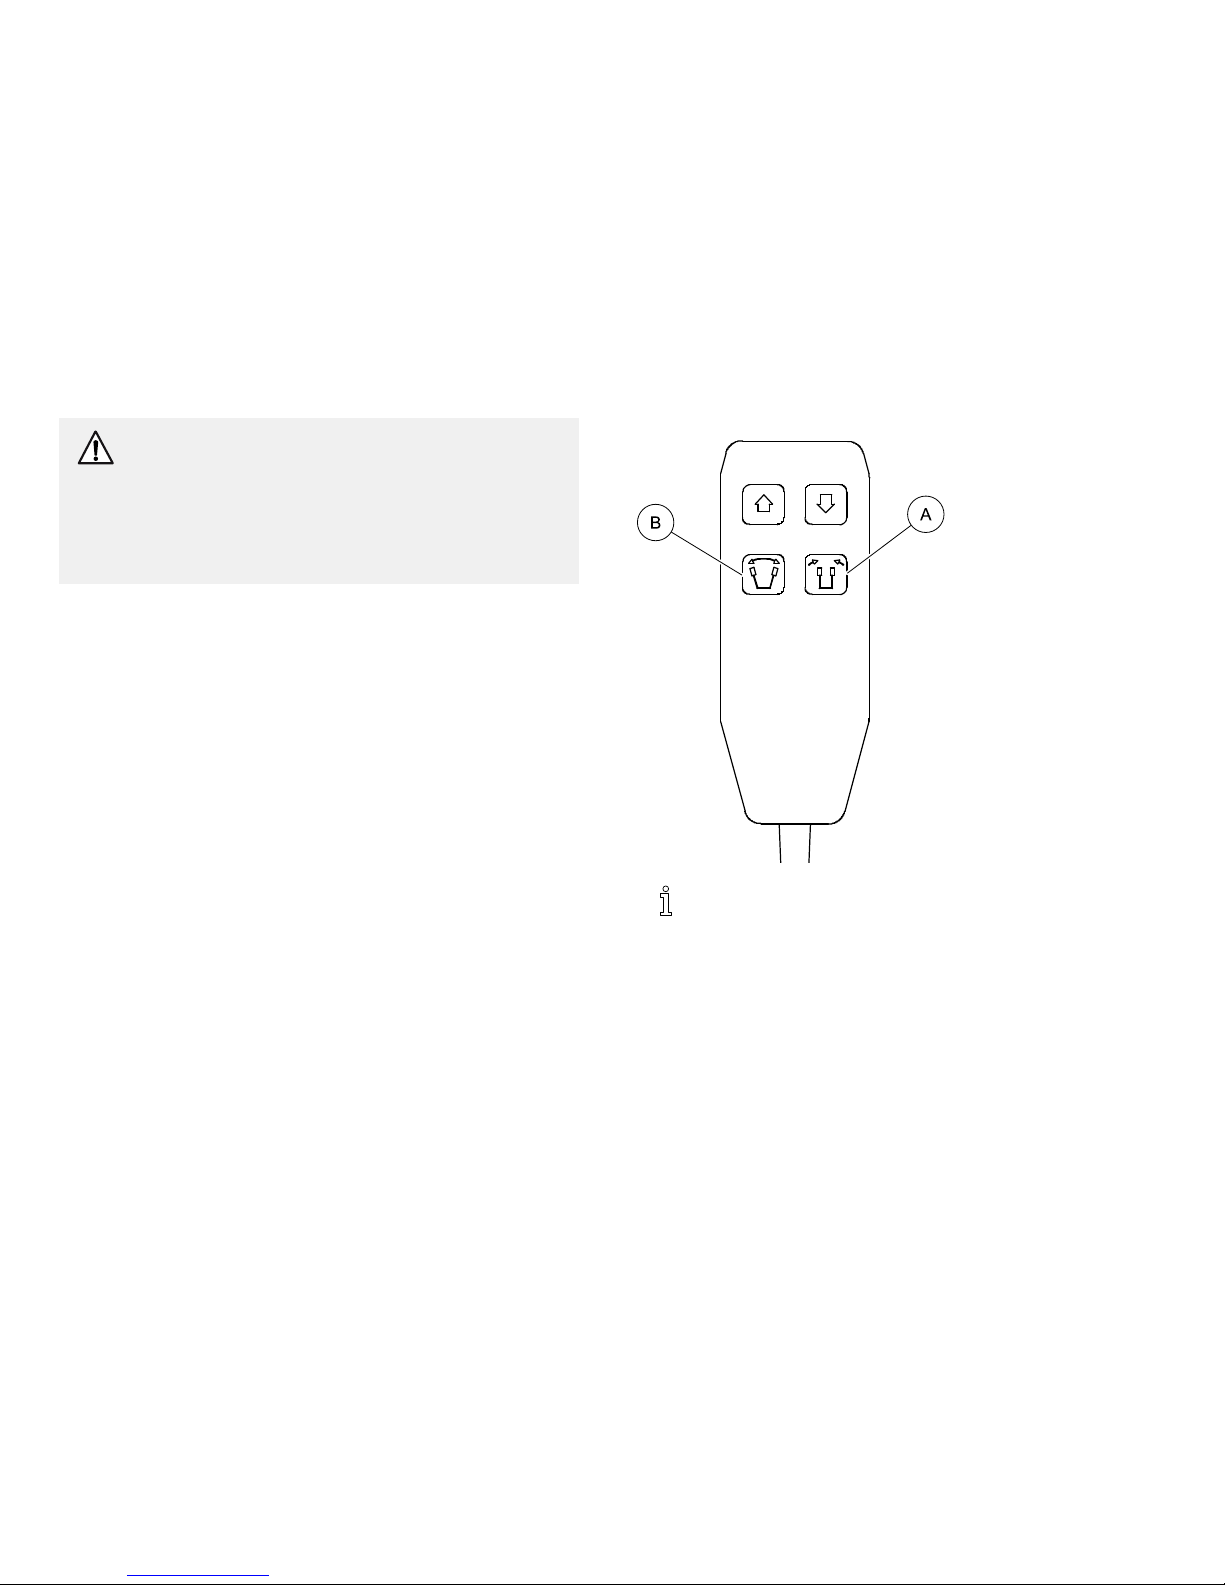
Closing/OpeningElectricLegs
Thependantisusedtoopenorclosethelegsofthebaseforstability
whenliftingapatient.
Refertothesafetyinformationin5.2Closing/OpeningLegs,
page19beforeperformingthisprocedure.
1.Toclosethelegs,pressthelegsclosedbuttonA.
2.Toopenthelegs,pressthelegsopenbuttonB.
201171892-A
Operation
5.3Raising/LoweringtheLift
WARNING!
RiskofInjury
Theliftcouldtipandendangerthepatientandassistants.
–Invacaredoesnotrecommendlockingoftherear
castersofthepatientliftwhenliftinganindividual.
–Invacaredoesrecommendthattherearcastersbeleft
unlockedduringliftingprocedurestoallowthepatient
lifttostabilizeitselfwhenthepatientisinitiallylifted
fromachair,bedoranystationaryobject.
Raising/LoweringaManual/HydraulicLift
Refertothesafetyinformationin5.3Raising/Loweringthe
Lift,page21beforeperformingthisprocedure.
Therearetwocontrolsonthepumpassembly:
•Thecontrolvalve
•Thepumphandle
1.Toraisethelift:
a.PositionthecontrolvalveintheclosedpositionA(towards
thepumphandleC).
b.MovethepumphandleupanddowntoelevatetheboomD
untilitlocksinthenotchofthebracket.
c.Ensuretheboomhaslockedinthenotchofthebracket.
2.Tolowerthelift:
a.GentlyopenBthecontrolvalve(awayfromthepump
handle).
b.IfthereisnopatientintheslingE,pulldownontheboom.
Therateofdescentoftheboomiscontrolledbythe
amountthatthecontrolvalveisopen.
Asafetygateispartofthehydraulicsystemthatcontrols
themaximumdescentoftheboomregardlessofhowfar
thecontrolvalveisopened.
1171892-A
21
I-Lift™
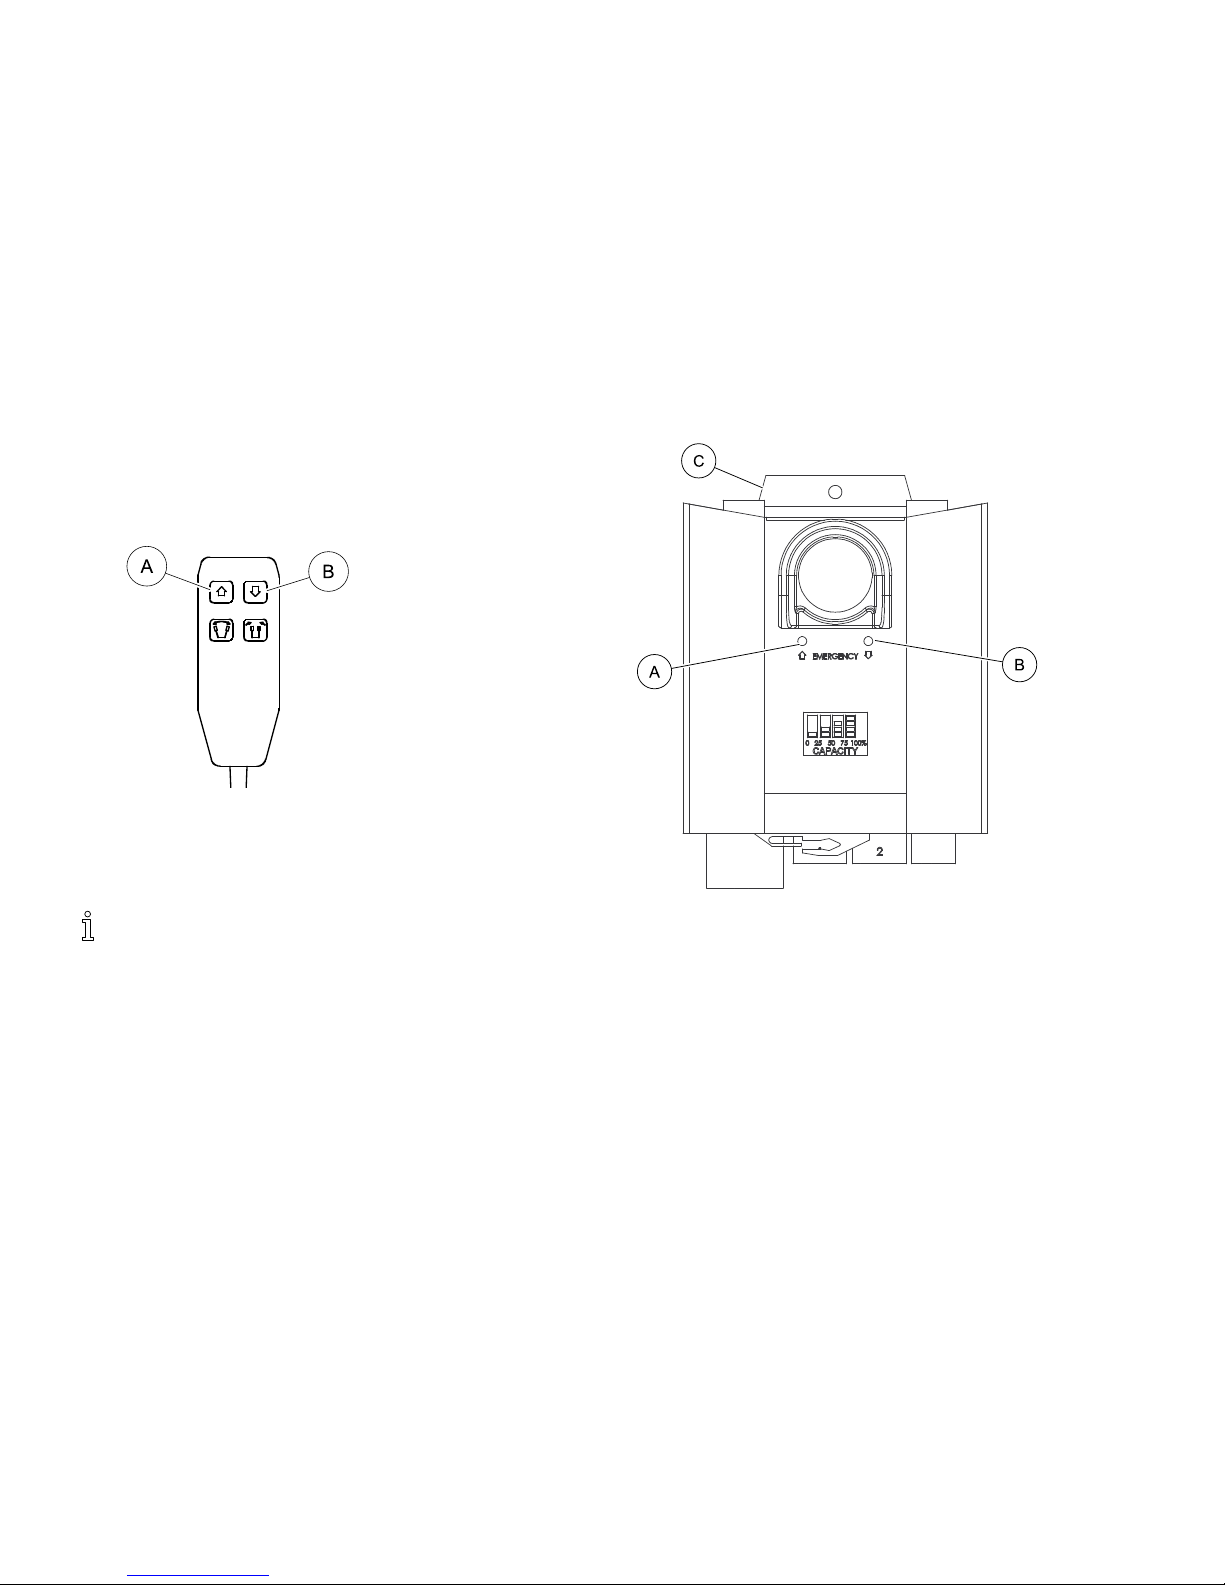
Raising/LoweringanElectricLift
Refertothesafetyinformationin5.3Raising/Loweringthe
Lift,page21beforeperformingthisprocedure.
1.Toraisethelift—PresstheUPAbuttontoraisetheboom
andthepatient.
2.Tolowerthelift—PresstheDOWNBbuttontolowerthe
boomandthepatient.
5.4ActivatingaMechanicalEmergencyRelease
Therearetwotypesofmechanicalemergencyrelease—primary
andsecondary.
PrimaryEmergencyRelease
1.InsertapenintotheholelabeledEmergencyUpAorEmergency
DownBonthecontrolboxC.
22
1171892-A

Operation
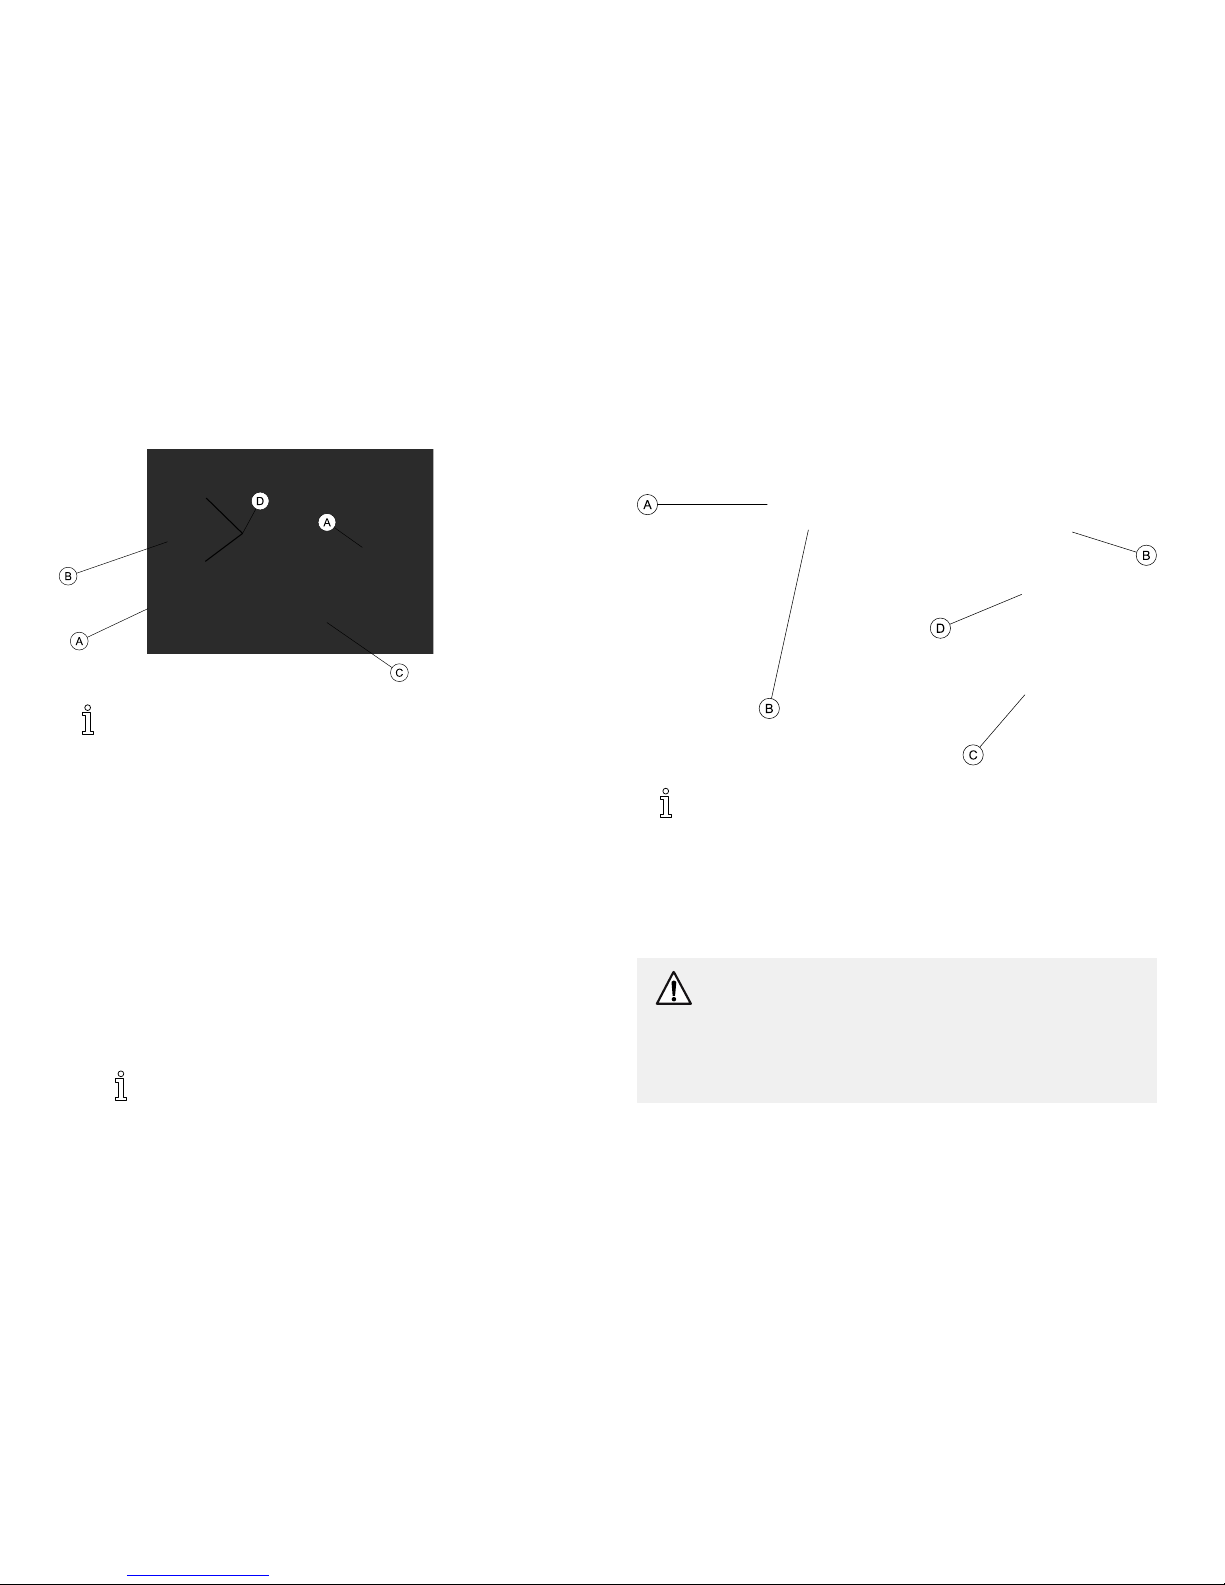
SecondaryEmergencyRelease
Itisrecommendedthattheprimaryemergencyreleasebe
used.Thesecondaryemergencyreleaseisonlyaback-upto
theprimaryemergencyrelease.
Incaseswheretheprimaryreleaseiseithernotfunctioningor
unreachable,asecondaryemergencyreleasemaybeused.
1.PullupontheEMERGENCYgripAandpushdownonthe
boomBatthesametime.
5.5PerforminganEmergencyStop
1.PresstheREDbuttonAonthecontrolboxBintostopthe
boomandpatientfromraisingorlowering.
2.Toreset,rotatetheemergencybuttonclockwise.
1171892-A23
I-Lift™
5.6MountingtheBatteryCharger
Refertoyourlocalregulationsconcerningpropermounting
procedures.
1.PlacethebatterychargerwithmountingbracketAonthewall
atthedesiredposition.
2.Withapencil,markthemiddleholeBposition.
3.Measuredown6½inchesfromthepencilmarkanddrillone
mountinghole.
4.InstallthebottommountingscrewCuntilthereisan
approximate1/8-inchgapbetweenthescrewheadandthewall.
5.Installthebatterychargerwithmountingbracketontothe
bottommountingscrew.
6.Drilltheremainingtwomountingholes.
7.InstallthetworemainingmountingscrewsDthroughthe
mountingbracketandintothewall.Tightensecurely.
8.Plugthebatterychargerintothewallelectricaloutlet.
ONLEDshouldilluminate.
5.7ChargingtheBattery
Invacarerecommendsthebatteryberechargeddailyto
prolongbatterylife.
Anaudiblealarmwillsound(hornwillbeep)whenbattery
islow.
1.LiftuponthehandleAonthebackofthebatteryB.
2.LiftthebatteryupandoutawayfromthecontrolboxC.
CAUTION!
Mountingthebatteryimproperlymaycauseinjuryor
damage.
–Makesurethereisanaudibleclickwhenmounting
batteryonthebatterychargertoconfirmproper
mounting.
3.PlacethebatteryonthebatterychargerDasshown.Makesure
thereisanaudibleclick.
24
1171892-A

Operation
ThechargeLEDwillilluminate.Whenchargingis
complete,chargeLEDwillstopilluminating.
Abatteryneedingtobefullyrechargedwilltake
approximatelyfourhours.
4.Liftuponthehandleonthebackofthebattery.
5.Liftthebatteryupandoutawayfromthebatterycharger.
CAUTION!
Mountingthebatteryimproperlymaycauseinjuryor
damage.
–Makesurethereisanaudibleclickwhenmounting
batteryonthecontrolboxtoconfirmproper
mounting.
6.Reinstallthebatteryontothecontrolboxasshown.Makesure
thereisanaudibleclick.
Thebatterymountstothecontrolboxandbatterycharger
asshown.
1171892-A25

I-Lift™
6LiftingthePatient
6.1SafeLifting
WARNING!
RiskofInjury
Theliftcouldtipandendangerthepatientandassistants.
–Refertothesafetyinformationandinstructionsin
thefollowingproceduresBEFOREperformingthis
procedure:
6.2PreparingtoLift,page27
6.3AttachingtheSlingstotheLift,page29
6.4LiftingandTransferringthePatient,page31
–AlthoughInvacarerecommendsthattwoassistantsbe
usedforallliftingpreparation,transferringfromand
transferringtoprocedures,ourequipmentwillpermit
properoperationbyoneassistant.Theuseofone
assistantisbasedontheevaluationofthehealthcare
professionalforeachindividualcase.
–DONOTexceedmaximumweightlimitationofthe
patientlift.TheweightlimitationfortheI-Liftis450
lbs(205kg).
–DONOTattemptanytransferwithoutapprovalof
thepatient’sphysician,nurseormedicalassistant.
ThoroughlyreadtheinstructionsinthisOwner’s
Manual,observeatrainedteamofexpertsperform
theliftingproceduresandthenperformtheentirelift
procedureseveraltimeswithpropersupervisionand
acapableindividualactingasapatient.
WARNING!
Riskofinjury
Theliftcouldtipandendangerthepatientandassistants.
–Duringtransfer,withpatientsuspendedinasling
attachedtothelift,DONOTrollcasterbaseover
unevensurfacesthatcouldcausethepatientliftto
tipover.
–Usesteeringhandleonthemastatalltimestopushor
pullthepatientlift.
–WheelchairwheellocksMUSTbeinalockedposition
beforeloweringthepatientintothewheelchairfor
transport.
–Beforetransferring,checkthatthewheelchairweight
capacitycanwithstandthepatient'sweight.
261171892-A
LiftingthePatient
6.2PreparingtoLift
RefertotheSafetysectioninthismanualandreviewthe
informationin6.1SafeLifting,page26beforeproceeding
furtherandobserveallwarningsindicated.
Beforepositioningthelegsofthepatientliftunderabed,
makesurethattheareaisclearofanyobstructions.
WARNING!
RiskofInjury
Theliftcouldtipandendangerthepatientandassistants.
–Thelegsoftheliftmustbeinthemaximumopen
positionforoptimumstabilityandsafety.Ifitis
necessarytoclosethelegsofthelifttomaneuverthe
liftunderabed,closethelegsoftheliftonlyaslongas
ittakestopositiontheliftoverthepatientandliftthe
patientoffthesurfaceofthebed.Whenthelegsof
theliftarenolongerunderthebed,returnthelegsof
thelifttothemaximumopenposition.
–Theshifterhandlemustbelockedinplaceforoptimum
stabilityandsafety.
1.Positionthepatientontothesling.Refertoyourslingowner’s
manual.
2.Unlocktherearcasters.
3.Openandlockthelegs.Referto5.2Closing/OpeningLegs,page
19.
1171892-A27
I-Lift™
4.Usethesteeringhandletopushthepatientliftintoposition.
5.Lowerthepatientliftforeasyattachmentofthesling.
6.Locktherearcasters.
7.Proceedto6.4LiftingandTransferringthePatient,page31.
281171892-A

LiftingthePatient
6.3AttachingtheSlingstotheLift
WARNING!
RiskofFalling
Improperlyinstalledslingsordamagedslingscancause
thepatienttofallorcauseinjurytoassistants.
–UseanInvacareapprovedslingthatisrecommended
bytheindividual’sdoctor,nurseormedicalassistant
forthecomfortandsafetyoftheindividualbeinglifted.
–Aftereachlaundering(inaccordancewithinstructions
onthesling),inspectsling(s)forwear,tears,andloose
stitching.
–Bleached,torn,cut,frayed,orbrokenslingsareunsafe
andcouldresultininjury.Discardimmediately.
–DONOTalterslings.
–Besuretochecktheslingattachmentseachtimethe
slingisremovedandreplaced,toensurethatitis
properlyattachedbeforethepatientisremovedfrom
astationaryobject(bed,chairorcommode).
WARNING!
–Ifthepatientisinawheelchair,securethewheellocks
inplacetopreventthechairfrommovingforwards
orbackwards.
–DONOTremovethestrapretainersfromthehanger
barhooks.Thestrapretainersmustbeclosedwhen
thestrapsareproperlyinstalledonthehooks.
–Whenconnectingslingsequippedwithcolorcoded
strapstothepatientlift,theshortestofthestraps
MUSTbeatthebackofpatientforsupport.Using
longsectionwillleavelittleornosupportforpatient's
back.Theloopsoftheslingarecolorcodedand
canbeusedtoplacepatientinvariouspositions.
Thecolorsmakeiteasytoconnectbothsidesofthe
slingequally.Makesurethatthereissufficienthead
supportwhenliftingapatient.
Theslingshavecolorcodedstrapstoassistwithproper
attachment.
1171892-A29

I-Lift™
1.PlacethestrapsAoftheslingBoverhooksCofthehanger
barD.
ThestrapretainerFcloseswhentheslingstrapis
properlyseatedonthehookG.
2.Matchthecorrespondingcolorsoneachsideoftheslingforan
evenliftofthepatient.
ModelNos.R110-R117FullBodySlingsandModel
Nos.R120-R122ToiletingSlingshavefourslingstraps
(twoperside—SeeDetailA).ModelNos.R100-R102
DividedLegSlingshavesixslingstraps(threeperside
—SeeDetailB).
InvacareLiftSwivelBarshavethreehookuppointsper
side.ThemiddlehookupEisONLYusedforslingsthat
havethreesetsofstrapsperside.
3.Usethelift.Referto6.4LiftingandTransferringthePatient,
page31.
301171892-A
 Loading...