

Invacare Excelerator XLT Pro, Excelerator XLT Jr, Excelerator XLT, Excelerator XLT Gold Owner's Operator And Maintenance Manual

Owner's Operator And Maintenance Manual
®
EXCELERATOR XLT SERIES
Excelerator XLT
Excelerator XLT Jr.
Excelerator XLT Pro
DEALER:
THIS MANUAL MUST BE GIVEN TO THE USER OF
THE HANDCYCLE.
REFER TO THE DEALER/TECHNICIAN INFORMATION ON PAGE 5 OF
THIS MANUAL.
USER:
BEFORE USING THIS HANDCYCLE, READ THIS MANUAL
AND SAVE FOR FUTURE REFERENCE.
Excelerator XLT Gold
Invacare products, parts, and services,
For more information regarding
please visit: www.invacare.co
m

WARNING
WARNING
WARNING
DO NOT OPERATE THIS EQUIPMENT
WITHOUT FIRST READING AND
UNDERSTANDING THIS MANUAL. IF YOU
ARE UNABLE TO UNDERSTAND THE
WARNINGS, CAUTIONS, AND
INSTRUCTIONS, CONTACT YOUR
INVACARE DEALER OR INVACARE
CUSTOMER SUPPORT AT (800) 532-8677
BEFORE ATTEMPTING TO USE THIS
EQUIPMENT - OTHERWISE INJURY OR
DAMAGE MAY RESULT.
THE INITIAL SET UP OF THIS WHEELCHAIR
MUST BE PERFORMED BY A QUALIFIED
TECHNICIAN.
Excelerator XLT Series 2 Part No. 1114850

TABLE OF CONTENTS
TABLE OF CONTENTS
PRODUCT REGISTRATION FORM ...................................................... 5
DEALER/TECHNICIAN INFORMATION .............................................. 7
SPECIAL NOTES................................................................................ 7
SPECIFICATIONS .............................................................................. 8
SECTION 1 - GENERAL GUIDELINES ................................................ 10
PROPER FIT ................................................................................................................................................. 10
OPERATING INFORMATION .............................................................................................................. 10
TIRE PRESSURE .......................................................................................................................................... 12
WEIGHT LIMITATION ............................................................................................................................ 12
SAFETY/HANDLING OF THE HANDCYCLE .................................................................................. 13
TRANSFERRING INTO/OUT OF THE HANDCYCLE................................................................... 14
SECTION 2 - SAFETY INSPECTION .................................................. 16
SAFETY INSPECTION CHECKLIST .....................................................................................................16
TROUBLESHOOTING ............................................................................................................................. 17
MAINTENANCE ........................................................................................................................................ 17
SECTION 3 - INITIAL SETUP ............................................................ 19
INITIAL SETUP ........................................................................................................................................... 19
SECTION 4 - OPERATION ............................................................... 21
RIDING THE HANDCYCLE .................................................................................................................. 21
SHIFTING GEARS ...................................................................................................................................... 22
BACKING-UP ............................................................................................................................................. 25
BRAKING ..................................................................................................................................................... 25
PARKING BRAKE ...................................................................................................................................... 26
STEERING/CORNERING ........................................................................................................................ 27
TABLE OF CONTENTS
SECTION 5 - RIDING POSITION ....................................................... 28
HAND CRANK HEIGHT ADJUSTMENT ........................................................................................... 28
FOOTREST AND LEG GUARD REPLACEMENT ............................................................................ 29
USING/REPLACING FOOTREST STRAP ........................................................................................... 30
FORE/AFT SEAT ADJUSTMENT ........................................................................................................... 32
BACK ANGLE ADJUSTMENT ............................................................................................................... 33
BACK HEIGHT ADJUSTMENT ............................................................................................................. 34
SECTION 6 - WHEELS ...................................................................... 35
INSTALLING/ADJUSTING THE REAR WHEEL AND QUICK-RELEASE AXLES ................... 35
INSTALLING THE REAR WHEELS WITH THREADED AXLES .................................................. 36
TIRE/TUBE REPLACEMENT AND TUNING/REPLACEMENT OF SPOKES............................. 36
TIRE PRESSURE .......................................................................................................................................... 36
DETERMINING/ADJUSTING TOE IN/TOE OUT............................................................................ 36
REPLACING CAMBER INSERTS ........................................................................................................... 37
Part No. 1114850 3 Excelerator XLT Series

SECTION 7 - SERVICE PROCEDURES ................................................ 38
FORK/CRANK ASSEMBLY REPLACEMENT...................................................................................... 38
ROAD CROWN COMPENSATOR REPLACEMENT/ADJUSTMENT ........................................ 41
SEVEN (7) SPEED SHIFTER CABLE INSTALLATION ..................................................................... 42
SEVEN (7) SPEED SHIFTER ADJUSTMENT/REPLACEMENT........................................................ 42
SEVEN (7) SPEED HUB CHAIN INSTALLATION/ADJUSTMENT .............................................. 43
TWENTY-FOUR (24) OR TWENTY-SEVEN (27) SPEED CASSETTE CHAIN
INSTALLATION/ADJUSTMENT ...................................................................................................... 45
PARKING BRAKE ADJUSTMENT/REPLACEMENT......................................................................... 47
SEAT UPHOLSTERY REPLACEMENT ................................................................................................. 48
BACK UPHOLSTERY REPLACEMENT................................................................................................ 49
SECTION 8 - OPTIONS .................................................................... 51
WATER BOTTLE INSTALLATION ...................................................................................................... 51
TOW BAR INSTALLATION AND USE .............................................................................................. 52
REAR SAFETY LIGHT ............................................................................................................................... 52
COMPUTER INSTALLATION ............................................................................................................... 53
SEAT POSITIONING STRAP INSTALLATION................................................................................. 53
HAND CRANK HANDLES .................................................................................................................... 54
GLOVES ........................................................................................................................................................ 54
SAFETY FLAG INSTALLATION ............................................................................................................ 55
SAFETY HELMET ....................................................................................................................................... 55
LATERAL SUPPORT ................................................................................................................................. 55
USING THE ALIGNMENT GAUGE ..................................................................................................... 56
MOUNTAIN DRIVE OPTION ............................................................................................................... 57
USING THE TRAVEL READY OPTION.............................................................................................. 58
ASSEMBLING/USING/ADJUSTING THE HANDCYCLE RACK .................................................. 61
LIMITED WARRANTY .................................................... BACK COVER
REGISTER YOUR PRODUCT!
The benefits of registering:
1. Safeguard your investment.
2. Ensure long term maintenance and servicing of your purchase.
3. Receive updates with product information, maintenance tips, and industry news.
4. Invacare can contact you or your provider, if servicing is needed on your product.
5. It will enable Invacare to improve product designs based on your input and needs.
Register ONLINE at www.invacare.com
- or -
Complete and mail the form on the next page
Any registration information you submit will be used by Invacare Corporation only, and
protected as required by applicable laws and regulations.
Excelerator XLT Series 4 Part No. 1114850

PRODUCT REGISTRATION FORM
Register ONLINE at www.invacare.com - or -
Complete and mail this form
Name _______________________________________________________________
Address _____________________________________________________________
City ___________________State/Province __________
Zip/Postal Code ________
Email ___________________________________ Phone No. _________________
Invacare Model No. ______________________ Serial No. __________________
Purchased From _________________________Date of Purchase: ___________
1. Method of purchase: (check all that apply)
❏ Medicare ❏ Insurance ❏ Medicaid ❏ Other __________________________
2. This product was purchased for use by: (check one)
❏ Self ❏ Parent ❏ Spouse ❏ Other
3. Product was purchased for use at:
❏ Home ❏ Facility ❏ Other
4. I purchased an Invacare product because:
Cut Along Line
❏ Price ❏ Features (list features) _________________________________________
5. Who referred you to Invacare products? (check all that apply)
❏ Doctor ❏ Therapist ❏ Friend ❏ Relative ❏ Other ___________________
❏ No referral ❏ Advertisement (circle one): TV, Radio, Magazine, Newspaper
6. What additional features, if any, would you like to see on this product?
7. Would you like information sent to you about Invacare products that may be available for a
__________________________________________________________________________
particular medical condition? ❏ Yes ❏ No
If yes, please list any condition(s) here and we will send you information by email and/or mail about
any available Invacare products that may help treat, care for or manage such condition(s):
__________________________________________________________________________
Fold
here
Fold
here
8. Would you like to receive updated information via email or regular mail about the Invacare
home medical products sold by Invacare's dealers? ❏ Yes ❏ No
9. What would you like to see on the Invacare website?
__________________________________________________________________________
10. Would you like to be part of future online surveys for Invacare products? ❏ Yes ❏ No
11. User's Year of birth: ______________________________________________________
If at any time you wish not to receive future mailings from us, please contact us at Invacare Corporation,
CRM Department, 39400 Taylor Parkway, Elyria, OH 44035, or fax to 877-619-7996 and we will remove
you from our mailing list.
To find more information about our products, visit www.invacare.com.
Fold
here
Fold
here
Cut Along Line
Invacare Product Registration Form
Please Seal with
Tape Before Mailing

SPECIAL NOTES
DEALER/TECHNICIAN INFORMATION
The term "qualified technician" in this manual refers to an Invacare qualified technician
or a Shimano® certified bicycle repair technician.
SPECIAL NOTES
WARNING/CAUTION notices as used in this manual apply to hazards or
unsafe practices which could result in personal injury or property damage.
NOTICE
THE INFORMATION CONTAINED IN THIS DOCUMENT IS SUBJECT
TO CHANGE WITHOUT NOTICE.
WARNING
HANDCYCLE USER
As a manufacturer of handcycles, Invacare endeavors to supply a
handcycle to meet many needs of the end user. However, final selection
of a handcycle to be used by an individual rests solely with the user and
his/her health care professional capable of making such a selection.
SPECIAL NOTES
HANDCYCLE TIE-DOWN RESTRAINTS AND SEAT POSITIONING
STRAPS
Invacare recommends that handcycle users NOT be transported in
vehicles of any kind while in a handcycle. As of this date, the Department
of Transportation has not approved any tie-down systems for
transportation of a user while in a handcycle, in a moving vehicle of any
type.
AS REGARDS RESTRAINTS - SEAT POSITIONING STRAPS - IT IS
THE OBLIGATION OF THE DME DEALER, THERAPISTS AND OTHER
HEALTH CARE PROFESSIONALS TO DETERMINE IF A SEATING
POSITIONING STRAP IS REQUIRED TO ENSURE THE SAFE
OPERATION OF THIS EQUIPMENT BY THE USER. SERIOUS INJURY
CAN OCCUR IN THE EVENT OF A FALL FROM A HANDCYCLE.
Part No. 1114850 7 Excelerator XLT Series

SPECIFICATIONS
TYPICAL PRODUCT PARAMETERS
Seat Width:
Seat Depth:
Seat-to-Floor
(approx.):
Back Style:
Back Height Fixed/
Adjustable Angle:
SPECIFICATIONS
Footrest:
Side - Wheel Clearance:
Rear Axle:
Rear Wheel Camber:
Wheels:
Brakes:
Handles:
Crankset:
Hub:
EXCELERATOR XLT
14 to 20-inches
15-inches
12, 13, or 14-inches
Adjustable Back Angle 90° - 110°
13-inches (Fixed)
20-inches (Narrow, Tall)
Adjustable Fore and Aft
2-inches - * 2½-inches
Quick-Release or Threaded
15° - Standard
26-inch Spoke High Performance
24-inch Cruiser or *Knobby
Internal reversing drum brakes and
parking brake
Ergonomic, Vertical foam covered or
Delrin®
Alloy Crankset
FRONT - Shimano Nexus® 7 Speed
Hub
REAR - Precision Black Anodized w/
½-inch Quick Release Stainless Axles
EXCELERATOR XLT JR
14-inches
15-inches
12, 13, or 14-inches
Adjustable Back Angle 90° - 110°
13-inches (Wide)
20-inches (Narrow, Tall)
Adjustable Fore and Aft
2-inches - 2½-inches
Quick-Release
15° - Standard
20-inch Cruiser
Internal reversing drum brakes and
parking brake
Ergonomic, Vertical foam covered or
Horizontal foam convered
Alloy Crankset
FRONT - Shimano Nexus 7 Speed
Hub
REAR - Precision Black Anodized w/
½-inch Quick Release Stainless Axles
Spokes:
Shift Levers:
Gears:
Seat Cushion:
Upholstery:
Weight:
Shipping Weight:
Weight Limitation:
Options:
14 Gauge Stainless
Shimano
7 Speed
Foam Insert - Optional
Nylon
35 pounds
65 pounds
250 pounds
Mirror, Backpack Hydration System,
Computer, Tow Bar, Horizontal
Handles, Safety Light, Helmet and Flag,
Custom Color, Seat Positioning Strap,
Quad Cuffs, Quad Gloves, Mountain
Drive, Bike Rack, Water Bottle and
Cage, Tripin Quad Handles, 24 Speed
External Gearing, Threaded Axles, Leg
Guard Attachments, Lateral Supports,
Alignment Gauge, Crutch Holder.
14 Gauge Stainless
Shimano
7 Speed
Foam Insert - Optional
Nylon
30-35 pounds
65 pounds
250 pounds
Cordless Computer, Helmet, Quad
Cuffs, Quad Gloves, Custom Color,
Seat Positioning Strap, Safety Flag,
Mirror, Safety Light, Water Bottle
and Cage, Leg Guard Attachment,
Crutch Holder, Bike Rack, Cushion,
Towbar for Wheelchair, Lateral
Supports, Backpack Hydration
System, Alignment Gauge, Mountain
Drive, Tripin Quad Handles.
* Knobby tires will reduce side wheel clearance to approximately 1-inch.
Excelerator XLT Series 8 Part No. 1114850

SPECIFICATIONS
TYPICAL PRODUCT PARAMETERS
Seat Width:
Seat Depth:
Seat-to-Floor
(approx.):
Back Style:
Back Height/
Adjustable Angle:
Footrest:
Side - Wheel Clearance:
Rear Axle:
Rear Wheel Camber:
Wheels:
Brakes:
Handles:
Crankset:
Hub:
Spokes:
Shift Levers:
Gears:
Seat Cushion:
Upholstery:
Weight:
Shipping Weight:
Weight Limitation:
Options:
EXCELERATOR XLT PRO
14 to 18-inches
15-inches
12, 13 and 14-inches
Adjustable Back Angle 90° - 110°
11-14-inches (Wide)
18½-inches (Narrow, Tall)
Adjustable Fore and Aft
2-inches - * 2½-inches
Quick-Release or Threaded
15° - Standard
26-inch Spoke High Performance
24-inch Cruiser or *Knobby
Dual Hand Caliper Brakes
Parking Brake (optional)
Ergonomic, Vertical, Adjustable
Width
XT Crankset
FRONT - Shimano 27 Speed External
Cassette XT/Ultegra®
REAR - Precision Black Anodized w/
½-inch Quick Release Stainless or
Threaded Axles
14 Gauge Stainless
Shimano - STI
27 Speed
Foam Insert - Optional
Nylon
30 pounds
65 pounds
250 pounds
Computer, Tow Bar, Safety Light, Helmet
and Flag, Custom Color, Bike Rack,
Water Bottle and Cage, Composite
Wheels, Leg Guard Attachment, Lateral
Supports, Welded Seat, Travel Option,
Parking Brake, Top End V Crankset,
Alingment Gauge, Backpack Hydration
System, Crutch Holder.
EXCELERATOR XLT
GOLD
14 to 18-inches
15-inches
10, 11 and 12-inches
Adjustable Back Angle 90° - 110°
12-inches (Wide)
18-inches (Narrow, Tall)
Adjustable Fore and Aft
2-inches - 2½-inches
Quick-Release or Threaded
15° - Standard
26-inch Spoke High Performance.
24-inch Cruiser or *Knobby
Dual Hand Caliper Brakes
Brake with locking lever mounted on
L pedal
Ergonomic, Vertical, Ovalized Aluminum
mounted on Top End S crankset
S Crankset
FRONT - Shimano 27 Speed External
Cassette XT/Ultegra®
REAR - Precision Black Anodized w/
½-inch Quick Release Stainless Axles
or Threaded Axles
14 Gauge Stainless
Shimano - STI
27 Speed
Foam Insert - Optional
Nylon-Adjustable Tension
30 pounds
65 pounds
250 pounds
Computer, Tow Bar, Safety Light,
Helmet and Flag, Custom Color,
Bike Rack, Water Bottle and Cage,
Leg Guard Attachment, Lateral
Supports, Welded Seat, Alignment
Gauge, Backpack Hydration System,
Composite Wheels, Crutch Holder.
SPECIFICATIONS
* Knobby tires will reduce side wheel clearance to approximately 1-inch.
Part No. 1114850 9 Excelerator XLT Series

SECTION 1
Section 1 - General Guidelines - includes the following:
Proper Fit
Operating Information
Tire Pressure
Weight Limitation
Safety/Handling of the Handcycle
Transferring Into/Out of the Handcycle
PROPER FIT
GENERAL GUIDELINES
The handcycle MUST be adjusted to fit the rider. For a proper fit:
The rider MUST be able to see over the hand crank.
The rider MUST have a slightly bent elbow when the hand pedals are
The rider MUST have a slight bend at the knee when feet are in the
GENERAL GUIDELINES
WARNING
toward the front of the handcycle (farthest from the rider's face).
footrests. Feet should be flat against footrest hoop.
XLT Series requires a 18' turning radius. If leg touches tire during turn
and user cannot sense this, a leg guard attachment is recommended.
The rider's knees MUST not obstruct hand crank operation.
Check the seat position, back angle, quick-release on threaded axles,
footrest fore/aft position, hand crank height for proper fit and smooth
operation of your handcycle.
OPERATING INFORMATION
WARNING
Wear your helmet at ALL times when riding the handcycle.
Before riding your handcycle, check your brakes. Be sure that the brakes
and all other features of your handcycle are operating properly.
ALWAYS keep fingers or hands AWAY from the chain while pedaling.
DO NOT let children play near the handcrank or the chain. Otherwise,
injury or damage may occur.
The user is responsible for normal upkeep and maintaining the handcycle
in proper operating condition.
The manufacturer is not responsible for failure, damage or injury caused
by improper operation or maintenance by the end-user.
To determine and establish your particular safety limits, practice
transferring activities in the presence of a qualified health care
professional BEFORE attempting active use of the handcycle.
Excelerator XLT Series 10 Part No. 1114850

GENERAL GUIDELINES
OPERATING INFORMATION (CONTINUED)
WARNING
SECTION 1
Before attempting to transfer IN or OUT of the handcycle, every precaution
should be taken to reduce the gap distance. Position the Excelerator on level
ground and as close as possible to the object you are transferring INTO or
OUT of.
The object you are transferring INTO or OUT of MUST also be secured
before attempting any transfer.
EXCELERATOR XLT, XLT JR., AND XLT GOLD MODELS ONLY - The
parking brake of the handcycle MUST be engaged before attempting any
transfer.
EXCELERATOR XLT PRO MODEL ONLY - This model may be ordered
with or without a parking brake. If ordered without a parking brake, the
handcycle must be positioned securely against a stable object before any
transfer is attempted. If ordered with the optional parking brake, the parking
brake MUST be engaged before attempting any transfer.
Care MUST BE taken when operating on roads, streets or highways.
Operation of the handcycle is subject to all traffic rules and regulations. (This
may include the use of a safety lights and reflectors for dusk/night riding.)
Give pedestrians the right of way.
GENERAL GUIDELINES
Slow down at all street intersections and observe to the left, to the right and
back to left again before proceeding.
Use proper hand signals when turning.
DO NOT attempt to move up or down an incline with an ice or oil film.
DO NOT attempt to ride over curbs or obstacles or speed bumps. Doing so
may cause your handcycle to "bottom out" and/or turn over and cause bodily
harm or damage to the handcycle.
DO NOT use parts, accessories, or adapters other than those authorized by
Invacare. Otherwise, the warranty is void.
DO NOT attempt to lift the handcycle by any removable (detachable) parts.
Lifting by means of any removable (detachable) parts of an handcycle may
result in injury to the user or damage to the handcycle.
DO NOT stand on the seat or frame of the handcycle.
If a seat positioning strap is deemed necessary by your health care
professional (doctor - therapist), ALWAYS wear a seat positioning strap.
Avoid all surface hazards.
DO NOT carry any riders.
DO NOT carry any items that may obstruct your view or prohibit you from
operating the handcycle properly.
DO NOT attempt to adjust or clean the internal gear hub with reversing
drum brake. This should only be performed by a bicycle professional.
Part No. 1114850 11 Excelerator XLT Series

SECTION 1
TIRE PRESSURE
DO NOT use your handcycle unless it has the proper tire pressure (p.s.i.).
DO NOT overinflate the tires. Failure to follow these suggestions may cause
the tire to explode and cause bodily harm.
DO NOT ride on a flat or underinflated tires. Riding on flat or underinflated
tires can cause injury, as well as, damage to the tire, tube and handcycle.
WEIGHT LIMITATION
The Invacare Excelerator XLT handcycles have a weight limitation of 250 lbs.
GENERAL GUIDELINES
GENERAL GUIDELINES
WARNING
WARNING
Excelerator XLT Series 12 Part No. 1114850

GENERAL GUIDELINES
SECTION 1
SAFETY/HANDLING OF THE HANDCYCLE
Safety and Handling of the handcycle requires the close attention of the user as well
as the assistant. This manual points out the most common procedures and techniques
involved in the safe operation and maintenance of the handcycle. It is important to
practice and master these safe techniques until you are comfortable in maneuvering the
handcycle.
Use this information only as a basic guide. The techniques that are discussed on the
following pages have been used successfully by many.
Individual users often develop skills to deal with daily living activities that may differ from
those described in this manual. Invacare recognizes and encourages each individual to
try what works best for him/her in overcoming obstacles that they may encounter.
Techniques in this manual are a starting point for the new handcycle user and assistant
with safety as the most important consideration for all.
STABILITY AND BALANCE
For stability and proper operation of your handcycle, you must at all times maintain
proper balance. Your handcycle should remain upright and stable during normal daily
activities when operated correctly.
GENERAL GUIDELINES
Invacare recommends using seat positioning straps for additional safety.
A NOTE TO HANDCYCLE ASSISTANTS
When learning assistance techniques for the handcycle, have an experienced assistant
help you before attempting it alone.
When you are assisting with a transfer to/from the handcycle, remember to use good
body mechanics. Keep your back straight and bend your knees whenever lifting or
positioning the handcycle for the end-user.
Also, be aware of detachable parts. These must NEVER be used for lifting supports or
to move the handcycle, as they may be inadvertently released, resulting in possible injury
to the user and/or assistant.
PERCENTAGE OF WEIGHT DISTRIBUTION
Transferring in and out of the handcycle will cause a change to the normal balance, the
center of gravity, and the weight distribution of the handcycle. To determine and
establish your particular safety limits, practice transferring activities in several
combinations in the presence of a qualified health care professional BEFORE attempting
a transfer alone.
Proper positioning is essential for your safety.
Part No. 1114850 13 Excelerator XLT Series

SECTION 1
TRANSFERRING INTO/OUT OF THE HANDCYCLE
(FIGURE 1)
Before attempting to transfer IN or OUT of the handcycle, every precaution
should be taken to reduce the gap distance. Position the XLT on level
ground and as close as possible to the object you are transferring INTO or
OUT of.
The object you are transferring INTO or OUT of MUST also be secured
before attempting any transfer.
EXCELERATOR XLT, XLT JR. AND XLT GOLD MODELS ONLY - The
parking brake of the handcycle MUST be engaged before attempting any
GENERAL GUIDELINES
transfer.
EXCELERATOR XLT PRO MODEL ONLY - This model may be ordered
with or without a parking brake. If ordered without a parking brake, the
handcycle must be positioned securely against a stable object before any
transfer is attempted. If ordered with the optional parking brake, the parking
brake MUST be engaged before attempting any transfer.
GENERAL GUIDELINES
WARNING
CAUTION
When transferring, position yourself as far back as possible in the seat.
This will prevent damage to the upholstery.
NOTE: This activity may be performed independently provided you have adequate mobility and
upper body strength.
1. Position the handcycle on level ground and as close as possible along side the object
to/from which you are transferring.
2. If possible, position the handcycle at a 45° angle to the object to/from which you are
transferring as shown in FIGURE 1.
3. If installed, apply the parking brake on the handcycle.
4. Position the hand crank handles a far forward as possible as shown in FIGURE 1.
This will create more room to transfer.
NOTE: If necessary, lift the front wheel off the ground and rotate the front tire.
5. Secure object that you are transferring into or out of. Apply wheel locks (if installed)
if the object is a wheelchair.
NOTE: During independent transfer, little or no seat platform will be beneath you. Although it may
be difficult to wedge the transfer board between the wheelchair seat and the handcycle seat, use
a transfer board if necessary.
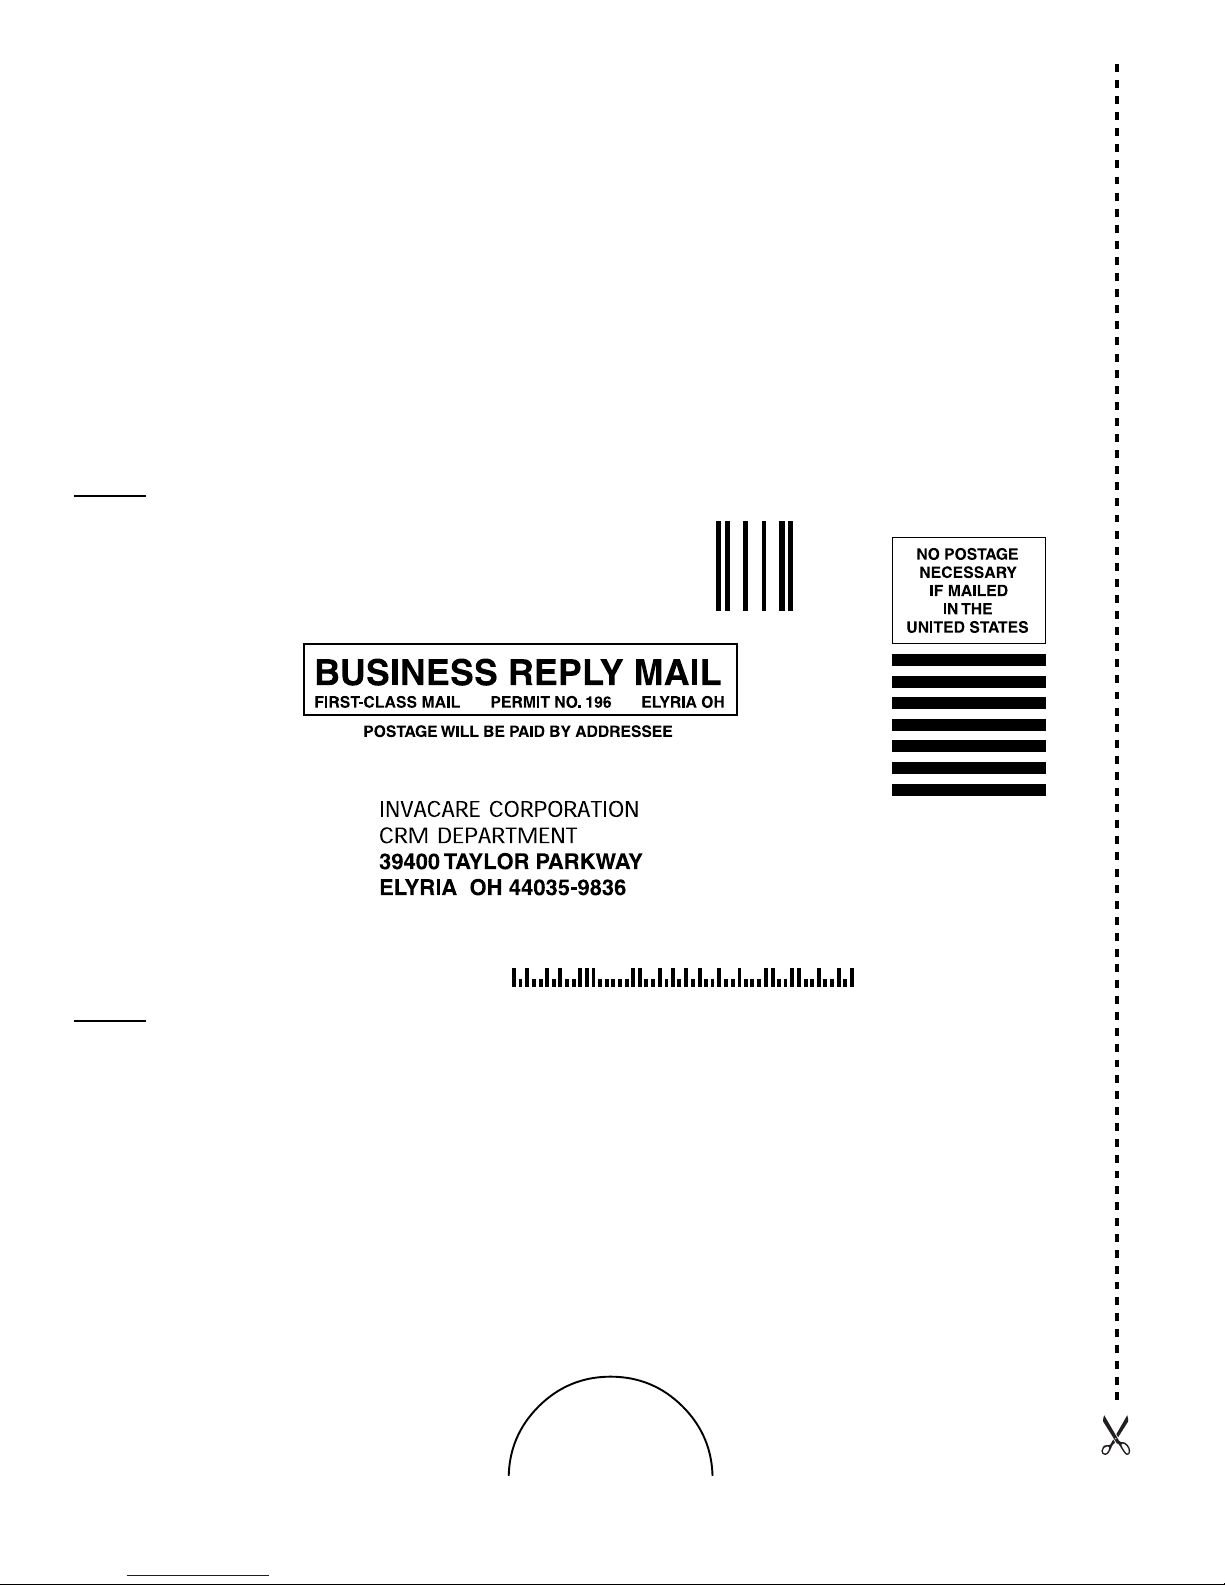
NOTE: Refer to STEPS A-F in FIGURE 1 for details regarding transfer to/from a wheelchair.
6. Shift body weight onto object while transferring.
7. Lift and place LEFT leg past front frame across seat and over center tube.
Excelerator XLT Series 14 Part No. 1114850
GENERAL GUIDELINES
SECTION 1
WARNING
If installed, parking brake
MUST be secured.
STEP F: Place both legs onto
handcycle footrests and secure
safety straps.
Hand Crank
(positioned toward the front
of the handcycle)
Footrest
Seat Frame
STEP E: Lift and shift weight
down into handcycle seat.
STEP A: Shift body weight to the edge of the
wheelchair upholstery closest to the handcycle.
HANDCYCLE
WARNING
Wheel locks MUST be
engaged if installed.
STEP B: Lift and
place LEFT leg past
front frame across
seat and over
center tube.
HEELCHAIR
W
GENERAL GUIDELINES
STEP D: Place
RIGHT hand on the
wheelchair frame.
STEP C: Place LEFT hand on the left
side of handcycle seat frame, NOT on
hand crank.
*NOTE: The steps in FIGURE 1 are specifically for transfer to/from a wheelchair and do not
correspond to the steps in the procedure on the previous page. Follow a similar procedure to
transfer to/from an object other than a wheelchair. Refer to the steps on the previous page for
more information.
NOTE: Excelerator shown for clarity.
FIGURE 1 - TRANSFERRING INTO/OUT OF A WHEELCHAIR*
Part No. 1114850 15 Excelerator XLT Series

SECTION 2
Section 2 - Safety Inspection - includes the following:
Safety Inspection Checklist Troubleshooting Maintenance
SAFETY INSPECTION CHECKLIST
NOTE: Every six (6) months, take your Excelerator XLT to a qualified technician for a thorough inspection and servicing.
Regular cleaning will reveal loose or worn parts and enhance the smooth operation of your Excelerator XLT. For safe
and proper operation, your Excelerator must be cared for just like any other vehicle. Routine maintenance will extend
the life and efficiency of your Excelerator XLT.
NOTE: Invacare recommends that the following adjustments be performed by a qualified technician. Initial adjustments
should be made to suit your personal body structure and preference. Thereafter follow these maintenance procedures.
ITEM INITIALLY WEEKLY MONTHLY PERIODICALLY
FRAME
Check for bent or broken frame. X X X
SAFETY INSPECTION
BRAKES
Parking Brake - Adjust brake shoes to front rim. Check
for worn or missing shoes. Check for wax or oil on rim. X X X
Cable anchor attached securely to brake arm. X X X
Internal Stopping Brakes - engages easily. X X X
UPHOLSTERY
Inspect for rips or sagging. X X
REAR WHEELS
Axle nut and wheel mounting nuts are secure. X X X
No excessive side movement or binding when
lifted and spun. X X X
CAUTION: As with any vehicle, the wheels and
tires should be checked periodically for cracks
and wear, and should be replaced if damaged.
SPOKES
Inspect for bent or broken spokes. X X
Check that all spokes are uniformly tight. X X
FRONT WHEEL/FORK
Keep axle nuts tight. Wheel should be centered in fork.
Keep wheel bearings adjusted and keep spokes tight
and wheel in proper alignment. X X X
Check rim and fork assembly for damage. X X X
CAUTION: As with any vehicle, the wheels and
tires should be checked periodically for cracks
and wear, and should be replaced if damaged.
TIRES
Inspect for flat spots, wear and proper inflation. X X X
CAUTION: As with any vehicle, the wheels and
tires should be checked periodically for cracks
and wear, and should be replaced if damaged.
CHAIN/CHAIN GUARD
Check for damage, rust, tension and stretch. Adjust if
necessary. Lubricate each link (3-in-1 oil® or a quality
bike lubricant). Check for damage or looseness. X X X
SHIFTER/BRAKE CABLES
Adjust according to shifter/brake manufacturer's
instructions (included with the handcycle). X X X
FRONT FORK
Keep tight and lubricate (All purpose grease). X X X
FOOTREST
Check that mounting hardware is tight and footrest secure. X X
Check footrest straps for wetness and/or damage. X X X
UPHOLSTERY
Clean upholstery with light detergent and water. X X
HAND GRIPS
Check periodically for looseness. If loose, replace. X
SAFETY INSPECTION
Excelerator XLT Series 16 Part No. 1114850

SAFETY INSPECTION
SECTION 2
TROUBLESHOOTING
SLUGGISH SQUEAKS LOOSENESS
VEERS VEERS TURN OR WHEEL AND IN
RIGHT LEFT PERFORMANCE FLUTTERS RATTLES EXCELERATOR SOLUTIONS
XX X X Check tires for correct
and equal pressure.
XXXXCheck for loose axle nuts.
XXCheck spokes and nipples.
XXXCheck chain for proper
tension and adjustment.
XXCheck that goose neck
fittings are secure.
MAINTENANCE
MAINTENANCE SAFETY PRECAUTIONS
WARNING
After ANY adjustments, repair or service and BEFORE use, make sure all
attaching hardware is tightened securely - otherwise injury or damage
may result.
CAUTION
DO NOT overtighten hardware attaching to the frame. This could cause
damage to the frame tubing.
SAFETY INSPECTION
SUGGESTED MAINTENANCE PROCEDURES
1. Before using your handcycle, make sure all nuts and bolts are tight. Check all parts
for damage or wear and replace. Check all parts for proper adjustment.
2. Check parking brake cable and shifter adjustment cables for proper adjustment and
operation. Refer to SECTION 7 of this manual.
3. If equipped, keep quick release axles free of dirt and lint to ensure positive locking
and proper operation. Refer to INSTALLING/ADJUSTING THE REAR WHEELS
AND QUICK-RELEASE AXLES in SECTION 6 of this manual.
WARNING
DO NOT use WD-40®, 3-in-1 oil®, or other penetrating lubricants on quickrelease axles. Otherwise, binding and/or damage to the wheelchair may occur.
4. Clean/oil quick-release axles once (1) a week with a Teflon® lubricant.
5. Keep optional quick release levers on axle tubes free of dirt and lint to ensure
positive locking and proper operation.
Part No. 1114850 17 Excelerator XLT Series

SECTION 2
DO NOT use the handcycle unless it has the proper tire pressure (p.s.i.).
DO NOT overinflate the tires. Failure to follow these suggestions may
cause the tire to explode and cause bodily harm.
4. Recommended tire pressure is listed on the side wall of the tire. If tire needs
replaced, see local bike shop.
As with any vehicle, the wheels and tires should be checked periodically
for cracks and wear, and should be replaced if damaged.
5. The wheels and tires should be checked periodically for cracks and wear, and should
be replaced if damaged.
SAFETY INSPECTION
6. Check chain for slack and readjust. Refer to SECTION 7 of this manual.
7. Regularly check for loose spokes in the front and rear wheels. If loose, have them
aligned at your local bike shop.
8. Check road crown compensator for proper operation. Refer to ROAD CROWN
COMPENSATOR REPLACEMENT/ADJUSTMENT in SECTION 7 of this manual.
SAFETY INSPECTION
WARNING
CAUTION
9. Check upholstery for sagging, rips or tears. Refer to BACK UPHOLSTERY
REPLACEMENT or SEAT UPHOLSTERY REPLACEMENT in SECTION 7 of this
manual.
10. Check alignment of front wheel. If it wobbles or takes too much effort to turn by
hand, have it aligned at your local bicycle shop.
Excelerator XLT Series 18 Part No. 1114850

INITIAL SETUP
Section 3 - Initial Setup - includes the following:
Initial Setup
SECTION 3
WARNING
After ANY adjustments, repair or service and BEFORE use, make sure all
attaching hardware is tightened securely - otherwise injury or damage
may result.
DO NOT operate the handcycle if the hand crank obstructs your view. If
the hand crank obstructs your view, adjust the hand crank height
BEFORE using the handcycle - otherwise injury or damage may occur.
INITIAL SETUP (FIGURE 1)
NOTE: Invacare recommends that the following procedures be performed by a qualified technician.
Tools required:
Adjustable Wrench (10-12-inches)
5, 8 and 32 mm Wrench
3/16-inch Allen Wrench
1/4-inch Allen Wrench
1/2-inch Box Wrench
1/2-inch Socket Wrench
Medium Flat Screwdriver
Medium Phillips Screwdriver
INITIAL SETUP
1. Install and adjust rear wheels (SECTION 6). Ensure quick-release axles or threaded
axles secure wheels to the handcycle.
2. Adjust footrest (SECTION 5) so that there is a slight bend in the knee.
3. Adjust hand crank assembly (SECTION 5) if unable to see over hand crank or if
knees obstruct hand crank rotation.
4. Adjust chain length (SECTION 7) if crank has been adjusted.
5. If installed, ensure parking brake (SECTION 7) functions properly. Check tension
and adjust parking brake cable (SECTION 7) if necessary.
6. Check brakes to make sure brakes work properly.
7. If back height is adjustable, adjust back height (SECTION 5).
8. Adjust seat position/upholstery (SECTIONS 5 and 7).
9. Check that all hardware is tight.
Part No. 1114850 19 Excelerator XLT Series
SECTION 3
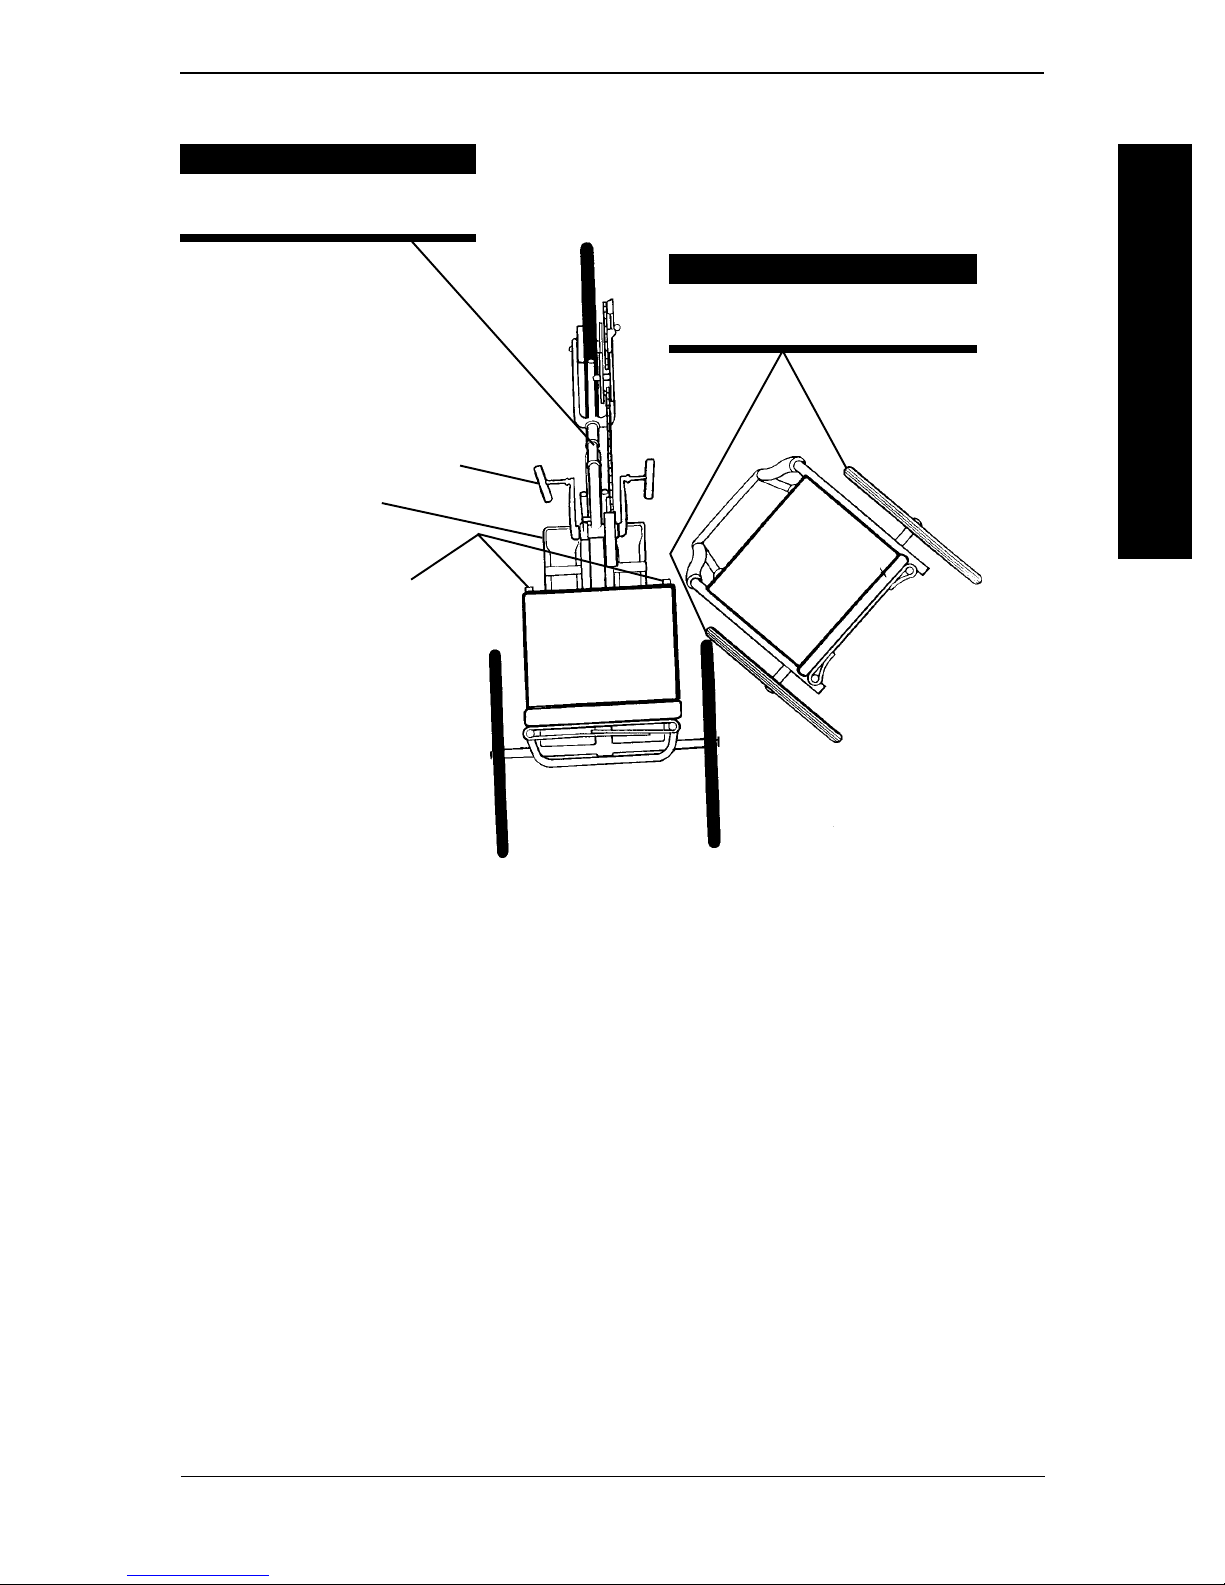
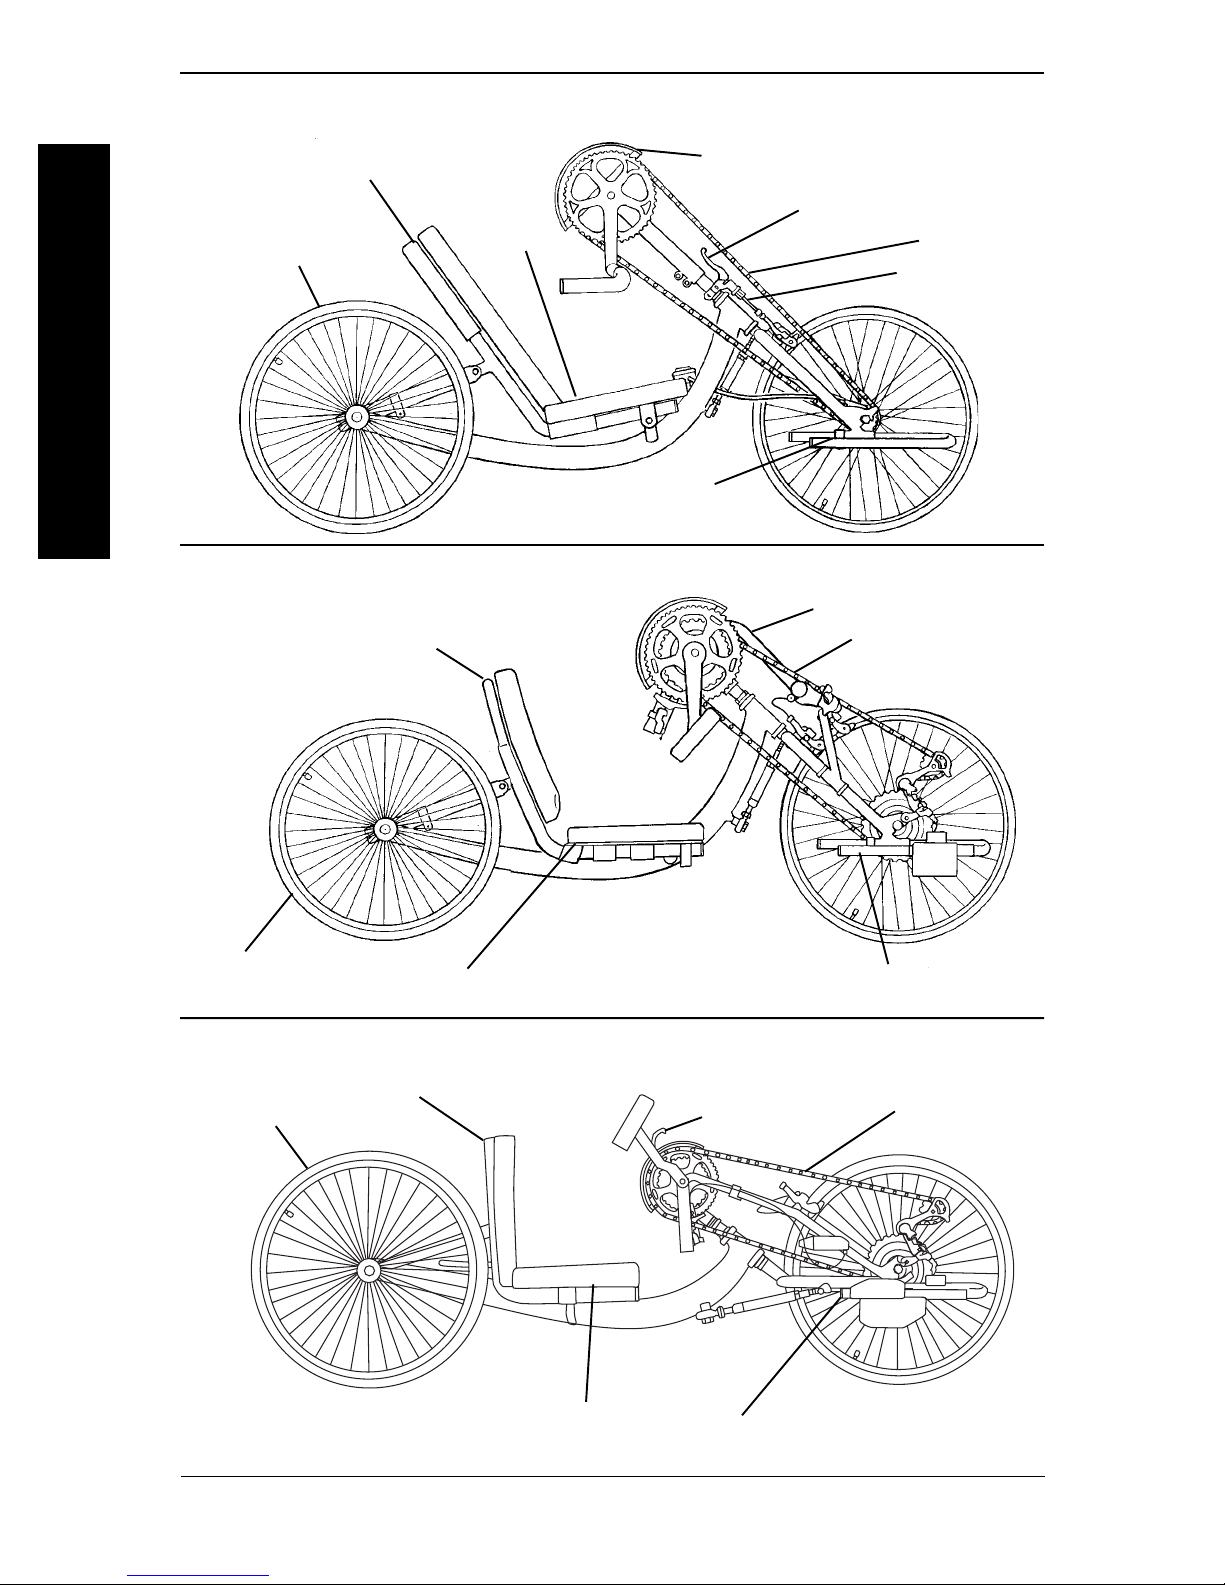
INITIAL SETUP
EXCELERATOR XLT/XLT JR.
INITIAL SETUP
Rear Wheel
Back
Back
Hand Crank Assembly
Seat
Footrest
EXCELERATOR XLT PRO
Parking Brake
Chain
Brake Cable
Brake Cable
Chain
Rear Wheel
Seat
Footrest
EXCELERATOR XLT GOLD
Rear Wheel
Back
Seat
Hand Brake
Footrest
Chain
FIGURE 1 - INITIAL SETUP
Excelerator XLT Series 20 Part No. 1114850
 Loading...