

Invacare Dress Toileting User Manual

Invacare®
User's Manual (GB)
Brugermanual (DK)
Bruksanvisning (SE)
Brukerveiledning (NO)
Bedienungsanleitung (DE)
Gebruiksaanwijzing (NL)
Manual d’utilisation (FR)
Manual del usuario (ES)
Manuale d’uso (IT)
Manual de Utilização (PT)
Dress Toileting
Dress Toileting
1. 2.
3.
4. 5. 6.

Quality Declaration
Congratulations with your new Invacare®sling from Invacare® EC-Høng A/S.
Your new sling is - marked in accordance with directive 93/42/EEC concerning medical
devices.
Invacare®slings are developed and constructed with consideration for the user and others
handling or assisting with lifting. Each sling type has been developed in accordance with the
European Standard EN 10535.
Invacare®slings have been supervised and quality controlled throughout the entire
production process, and the finished sling has been inspected by our finished goods control.
Please read the entire user’s manual before using the sling.
Invacare®EC-Høng A/S is certified according to ISO 9001 and ISO 13485.
For and on behalf of Invacare EC-Høng A/S
Brian Mundeling
R & D Manager

Invacare® Dress Toileting
USER´S MANUAL (GB) 2 - 3
BRUGERMANUAL (DK)
BRUKSANVISNING (SE)
BRUKERVEILEDNING (NO)
BEDIENUNGSANLEITUNG (DE)
GEBRUIKSAANWIJZING (NL) 12 - 13
MANUEL D’UTILISATION (FR)
MANUAL DEL USUARIO (ES)
4 - 5
6 - 7
8 - 9
10 - 11
14 - 15
16 - 17
MANUALE D’USO (IT)
MANUAL DE UTILIZAÇÃO (PT) 20 - 21
18 - 19

Dress Toileting
Thank you for purchasing an Invacare®sling.
The following user guide must be read and adhered to, or the warranty may be void.
Please check your sling on delivery – if the sling is not in perfect condition, please contact your
supplier.
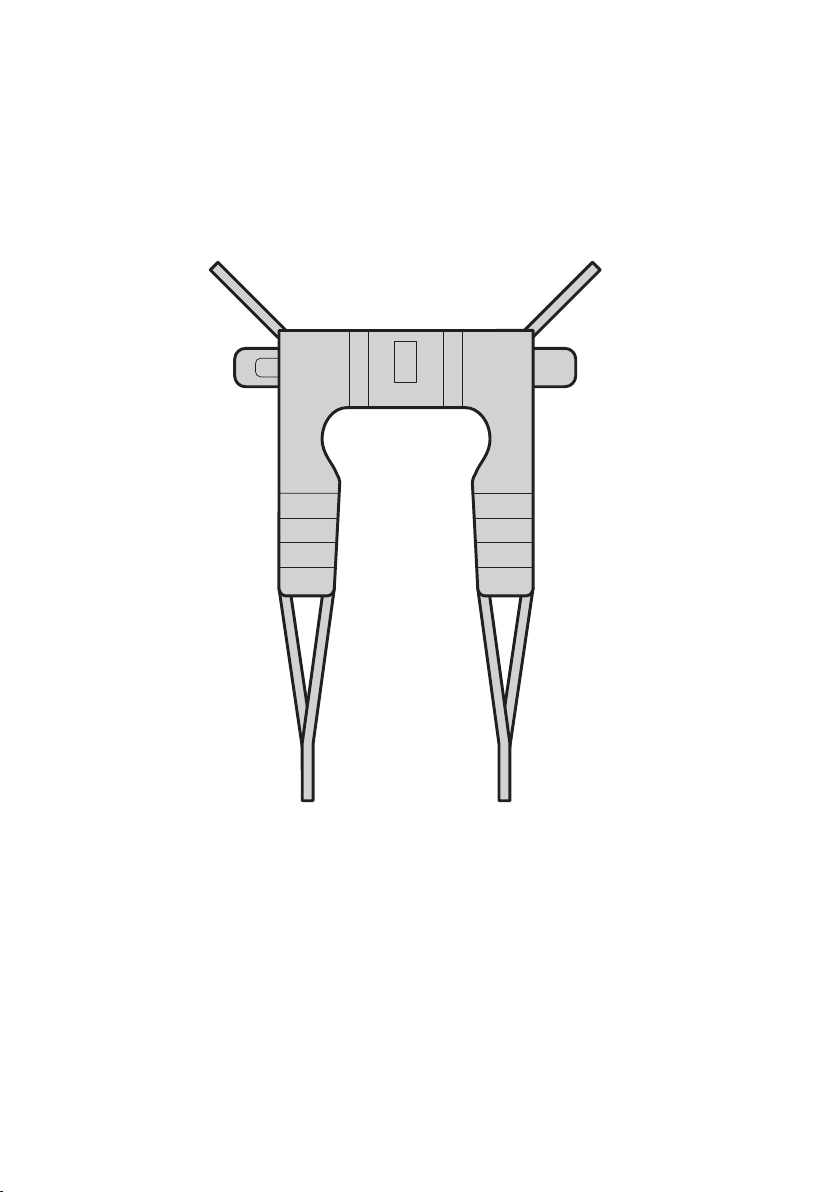
The Invacare®Toileting sling combines quick and easy application with maximum personal
access for dressing and hygiene. It is only suitable for clients with good head and trunk control;
however the sling can promote independence, as arms are free for function.
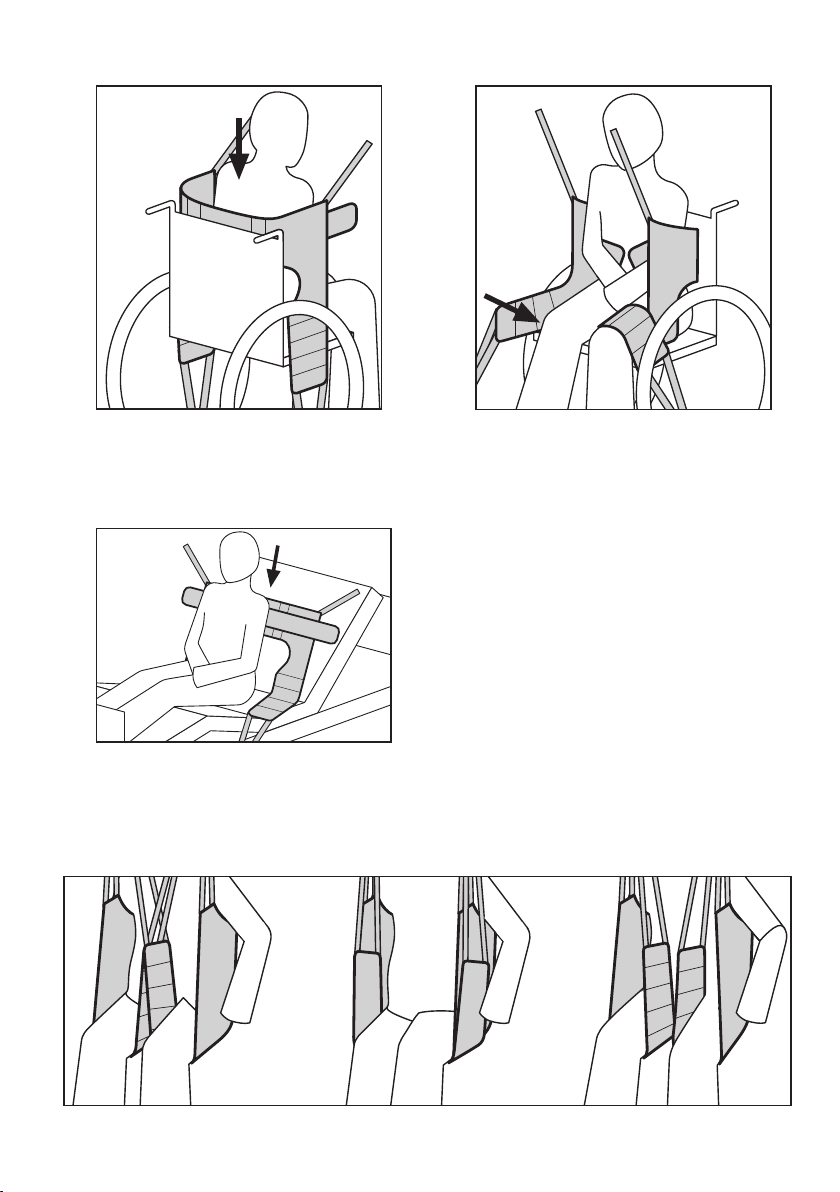
Sling application – Sitting in chair or wheelchair
Lean the client forward ensuring that he is well supported to reduce risk of falling and to
promote feelings of security.
Slide the sling down behind the back of the client in a central position with the aperture apex
aligned with the waist - the padded upper edge must be right under the arms.
Sit the client back against the sling. Picture 1.
The arms must be outside the sling.
Pass the leg support towards the front of the chair to each side of the thigh and under the
thigh. Picture 2.
Sling application – Sitting in a bed
Lean the client forward ensuring that they are well supported to reduce risk of falling and to
promote feelings of security.
Slide sling down behind the back of the client in a central position with the aperture apex
aligned with the base of the spine.
Sit the client back against the sling. Picture 3.
Application of the legs straps
Crossed legs straps:
For maximum security, cross the legs straps. This will reduce the risk of forward pitching and
also maintain a better alignment of the hips and lower limbs. Picture 4.
Looping the leg sections together:
If the client feels this is more comfortable pass each individual leg strap under both legs.
Ensure that the client is not prone to spasm and there has been a risk assessment completed
to address the possibility of forward pitching. Picture 5.
Uncrossed leg straps:
Apply each leg strap to each leg, but do not cross the straps before attaching to the spreader
bar or lifting strap. This can be recommended when the client has abdominal sensitivity or
requires intimate hygiene. Picture 6.
Note: It is crucial for the sitting position that the leg support is placed correctly.
Clients with reduced hip control must have the leg supports placed close to the groin.
2

Attach loops to the spreader bar or lifting strap
Attach the loops to the spreader bar or lifting straps. Attach the shoulder- and head loops
before the leg loops. The sling can be used at spreader bars with 2 or 4 attachment points.
Please note, that for security and comfort reasons, the size (width) of the spreader bar must
correspond with the size of the sling. Invacare recommend that a professional, prior to issuing
lifting equipment, always carry out a risk assessment. If you are in doubt about the use of
Invacare’s slings with other manufacturer’s equipment, contact Invacare®or you supplier for
advice.
The position of the client in the sling can be adjusted by using the different adjustment straps.
Shorter loops at the shoulders (the blue straps) and longer at the legs (grey) produces a more
vertical lift, which will assist with positioning into a chair or wheelchair. By lowering the loops
at the shoulders (grey loops) and/or shorten the loops at the legs (blue loops), a more reclined
position can be achieved, which is more suitable for a chair to bed transfer.
Use only CE marked spreader bars and hoists, preferably with a rated Safe Working
Load equal to or higher than that of the sling. If the SWL is lower than of the sling,
the SWL of the spreader bar or hoist is applicable.
Always check that all the straps are properly attached to the spreader bar or lifting
strap before attempting the lift.
Invacare®recommend that a risk assessment is always carried out by a professional
prior to issuing lifting equipment. Always choose the sling design and size according
to the clients weight, size and physical ability.
Slings should be checked regularly for wear and damage* – NEVER use a damaged
sling. (*In accordance with each country’s regulations).
If you are in any doubt, please do not attempt to use the sling and seek the advice
of a professional or your supplier.
Permissible max. load 200 kg.
Symbols: = 200 kg
Safe Working Load, consult the Users Manual, do not exceed 95°C washing temperature,
do not bleach, do not tumble dry, do not iron.
All Invacare®slings are guaranteed for one year.
3
Toiletsejl
Tak for du købte et Invacare® sejl.
Denne brugermanual skal læses og nøje overholdes, da garantien på produktet ellers vil
bortfalde. Sørg ligeledes for at tjekke sejlet ved modtagelse – hvis sejlet ikke lever op til dine
forventninger, kontakt Invacare® på tlf. 3690 0000.
Invacare® Toiletsejlet kombinerer hurtig og nem pålægning med maksimal anvendelse i
forbindelse med såvel påklædning som personlig hygiejne. Sejlet kan anvendes til brugere med
god hoved- og kropskontrol og giver brugeren en form for frihed, idet armene er fri af sejlet.
Pålægning af sejl – siddende stilling i stol eller kørestol
Læn brugeren fremad i stolen og sørg for god støtte, så brugeren ikke falder ud af stolen eller
føler sig usikker.
Placer sejlet midt mellem kørestolen og brugerens ryg med åbningens top langs brugerens talje
– den polstrede overdel skal placeres lige under armene.
Læn brugeren tilbage i stolen mod sejlet. Figur 1.
Armene skal være udenfor sejlet.
Træk sejlets benstøtter frem mod stolens forkant og ind under brugerens lår, samme
procedure følges i både højre og venstre side. Figur 2.
Pålægning af sejl – siddende i seng
Læn brugeren fremad og sørg for god støtte, så brugeren ikke falder tilbage eller føler sig
usikker.
Placer sejlet bag brugerens ryg med åbningens top langs brugerens rygsøjle.
Læn brugeren tilbage mod sejlet. Figur 3.
Pålægning af benstøtter
Krydsede benstøtter:
For størst mulig sikkerhed - kryds benstøtterne. Dette reducerer risikoen for at brugeren
tilter forover og giver samtidig en bedre positionering af hofter og ben. Figur 4.
Samlede benstøtter:
Hvis brugeren er amputeret eller føler løftet mere behageligt, kan benstøtterne placeres
sammen (stropperne lægges over hinanden). Sørg for at brugeren ikke er tilbøjelig til spasmer/
anfald og at der er lavet risikovurdering med henblik på forhindring af fremadglidning. Figur 5.
Delte benstøtter:
Benstøtterne kan uafhængig af hinanden monteres på liftens løftebøjle eller –stropper.
Dette anbefales, hvis brugeren har en speciel følsom underkrop eller i forbindelse med
personlig hygiejne. Figur 6.
Bemærk: Det er yderst vigtigt for siddepositionen at benstøtterne er placeret rigtigt.
Hos brugere med nedsat hoftefunktion, skal benstøtterne placeres tæt på lysken.
4
 Loading...