


 Loading...
CN51
Mobile Computer
For Windows Embedded Handheld 6.5
User Manual
Intermec Technologies Corporation
Worldwide Headquarters
6001 36th Ave.W.
Everett, WA 98203
U.S.A.
www.intermec.com
The information contained herein is provided solely for the purpose of allowing customers to operate and service Intermec-manufactured equipment and is not to be released, reproduced, or used for any other purpose without written permission of Intermec Technologies Corporation.
Information and specifications contained in this document are subject to change without prior notice and do not represent a commitment on the part of Intermec Technologies Corporation.
© 2013 by Intermec Technologies Corporation. All rights reserved.
The word Intermec, the Intermec logo, Norand, ArciTech, Beverage Routebook, CrossBar, dcBrowser, Duratherm, EasyADC, EasyCoder, EasySet, Fingerprint, i-gistics, INCA (under license), Intellitag, Intellitag Gen2, JANUS, LabelShop, MobileLAN, Picolink, Ready-to-Work, RoutePower, Sabre, ScanPlus, ShopScan, Smart Mobile Computing, SmartSystems, TE 2000, Trakker Antares, and Vista Powered are either trademarks or registered trademarks of Intermec Technologies Corporation.
There are U.S. and foreign patents as well as U.S. and foreign patents pending.
Wi-Fi is a registered certification mark of the Wi-Fi Alliance.
Microsoft, Windows, and the Windows logo are registered trademarks of Microsoft Corporation in the United States and/or other countries.
Bluetooth is a trademark of Bluetooth SIG, Inc., U.S.A.
This product includes software developed by the OpenSSL Project for use in the OpenSSL Toolkit (www.openssl.org).
This product includes cryptographic software written by Eric Young (EAY@cryptsoft.com).
This product uses Regex++, Index software during its operational phases. The owner of Regex++ has granted use of the software to anyone provided such use is accompanied by the following copyright and permission notice:
Regex++, Index. (Version 3.31, 16th Dec 2001) Copyright © 1998-2001 Dr John Maddock
Permission to use, copy, modify, distribute and sell this software and its documentation for any purpose is hereby granted without fee, provided that the above copyright notice appear in all copies and that both that copyright notice and this permission notice appear in supporting documentation. Dr John Maddock makes no representations about the suitability of this software for any purpose. It is provided “as is” without express or implied warranty.
ii |
CN51 Mobile Computer User Manual |
Contents
Contents
Before You Begin. . . . . . . . . . . . . . . . . . . . . . . . . . . . . . . . . . . . . . . . . . . . . . . . . . . . . . . . . . . . . . . . . ix Safety Information . . . . . . . . . . . . . . . . . . . . . . . . . . . . . . . . . . . . . . . . . . . . . . . . . . . . . . . ix Global Services and Support . . . . . . . . . . . . . . . . . . . . . . . . . . . . . . . . . . . . . . . . . . . . . . ix Warranty Information. . . . . . . . . . . . . . . . . . . . . . . . . . . . . . . . . . . . . . . . . . . . ix Web Support . . . . . . . . . . . . . . . . . . . . . . . . . . . . . . . . . . . . . . . . . . . . . . . . . . . . . x Send Feedback. . . . . . . . . . . . . . . . . . . . . . . . . . . . . . . . . . . . . . . . . . . . . . . . . . . . x Telephone Support . . . . . . . . . . . . . . . . . . . . . . . . . . . . . . . . . . . . . . . . . . . . . . . x
Who Should Read This Manual . . . . . . . . . . . . . . . . . . . . . . . . . . . . . . . . . . . . . . . . . . . . x Related Documents . . . . . . . . . . . . . . . . . . . . . . . . . . . . . . . . . . . . . . . . . . . . . . . . . . . . . . . x Patent Information . . . . . . . . . . . . . . . . . . . . . . . . . . . . . . . . . . . . . . . . . . . . . . . . . . . . . . xi
1 About the Computer Features . . . . . . . . . . . . . . . . . . . . . . . . . . . . . . 1
About the CN51 Mobile Computer . . . . . . . . . . . . . . . . . . . . . . . . . . . . . . . . . . . . . . . . . . . . . . . . . 2
About Language Provisioning . . . . . . . . . . . . . . . . . . . . . . . . . . . . . . . . . . . . . . . . . . . . . . . . . . . . . . 4
About the Battery . . . . . . . . . . . . . . . . . . . . . . . . . . . . . . . . . . . . . . . . . . . . . . . . . . . . . . . . . . . . . . . . . 4
Charge the Battery . . . . . . . . . . . . . . . . . . . . . . . . . . . . . . . . . . . . . . . . . . . . . . . . . . . . . . . . 4
Change the Battery. . . . . . . . . . . . . . . . . . . . . . . . . . . . . . . . . . . . . . . . . . . . . . . . . . . . . . . . 5
About Battery Status . . . . . . . . . . . . . . . . . . . . . . . . . . . . . . . . . . . . . . . . . . . . . . . . . . . . . . 6
About Battery Life and Conservation . . . . . . . . . . . . . . . . . . . . . . . . . . . . . . . . . . . . . . . 8
About the Status LEDs . . . . . . . . . . . . . . . . . . . . . . . . . . . . . . . . . . . . . . . . . . . . . . . . . . . . . . . . . . . . 9
About the Keypad . . . . . . . . . . . . . . . . . . . . . . . . . . . . . . . . . . . . . . . . . . . . . . . . . . . . . . . . . . . . . . . . 12 Configure the Keypad Backlight. . . . . . . . . . . . . . . . . . . . . . . . . . . . . . . . . . . . . . . . . . . 13 About the Color-Coded Keys . . . . . . . . . . . . . . . . . . . . . . . . . . . . . . . . . . . . . . . . . . . . . . 13 How to Capitalize Characters on the QWERTY Keypad . . . . . . . . . . . . . . . . . . . . . 14 How to Capitalize Characters on the Numeric Keypad . . . . . . . . . . . . . . . . . . . . . . 14 About the Power Button . . . . . . . . . . . . . . . . . . . . . . . . . . . . . . . . . . . . . . . . . . . . . . . . . . 15
About the Screen Backlight . . . . . . . . . . . . . . . . . . . . . . . . . . . . . . . . . . . . . . . . . . . . . . . . . . . . . . . 17
Configure the Screen Backlight Brightness . . . . . . . . . . . . . . . . . . . . . . . . . . . . . . . . . 17
About the Audio Features. . . . . . . . . . . . . . . . . . . . . . . . . . . . . . . . . . . . . . . . . . . . . . . . . . . . . . . . . 17
Adjust the Speaker Volume . . . . . . . . . . . . . . . . . . . . . . . . . . . . . . . . . . . . . . . . . . . . . . . 17
About the Imager . . . . . . . . . . . . . . . . . . . . . . . . . . . . . . . . . . . . . . . . . . . . . . . . . . . . . . . . . . . . . . . . 18
Read Bar Codes with the Imager. . . . . . . . . . . . . . . . . . . . . . . . . . . . . . . . . . . . . . . . . . . 18
Connect a Bluetooth Scanner . . . . . . . . . . . . . . . . . . . . . . . . . . . . . . . . . . . . . . . . . . . . . 20
CN51 Mobile Computer User Manual |
iii |
Contents
Insert a MicroSD Card . . . . . . . . . . . . . . . . . . . . . . . . . . . . . . . . . . . . . . . . . . . . . . . . . . . . . . . . . . . 21
How to Transfer Files. . . . . . . . . . . . . . . . . . . . . . . . . . . . . . . . . . . . . . . . . . . . . . . . . . . . . . . . . . . . . 23
Set Up the Computer as a Mass Storage Device . . . . . . . . . . . . . . . . . . . . . . . . . . . . . . . . . . . . . 23
CN51 Accessories . . . . . . . . . . . . . . . . . . . . . . . . . . . . . . . . . . . . . . . . . . . . . . . . . . . . . . . . . . . . . . . . 24
2 About the User Interface and Intermec Applications . . . . . . . . . . 27
About the User Interface. . . . . . . . . . . . . . . . . . . . . . . . . . . . . . . . . . . . . . . . . . . . . . . . . . . . . . . . . . 28
About the Home Screen . . . . . . . . . . . . . . . . . . . . . . . . . . . . . . . . . . . . . . . . . . . . . . . . . . 28
About Screen Gestures . . . . . . . . . . . . . . . . . . . . . . . . . . . . . . . . . . . . . . . . . . . . . . . . . . . 30
Title Bar Status Icons . . . . . . . . . . . . . . . . . . . . . . . . . . . . . . . . . . . . . . . . . . . . . . . . . . . .30
Configure the Screen Brightness . . . . . . . . . . . . . . . . . . . . . . . . . . . . . . . . . . . . . . . . . . 32
Calibrate the Screen . . . . . . . . . . . . . . . . . . . . . . . . . . . . . . . . . . . . . . . . . . . . . . . . . . . . . .32
About Intermec Applications . . . . . . . . . . . . . . . . . . . . . . . . . . . . . . . . . . . . . . . . . . . . . . . . . . . . . 32
Intermec Applications on the Computer . . . . . . . . . . . . . . . . . . . . . . . . . . . . . . . . . . . 32
Downloadable Intermec Applications for the Computer. . . . . . . . . . . . . . . . . . . . . 34
About Features Demo . . . . . . . . . . . . . . . . . . . . . . . . . . . . . . . . . . . . . . . . . . . . 34
About Intermec Browser. . . . . . . . . . . . . . . . . . . . . . . . . . . . . . . . . . . . . . . . . . 34
About Intermec HTML5 Browser. . . . . . . . . . . . . . . . . . . . . . . . . . . . . . . . . . 34
About Intermec Launcher . . . . . . . . . . . . . . . . . . . . . . . . . . . . . . . . . . . . . . . . 35
About Intermec Terminal Emulator . . . . . . . . . . . . . . . . . . . . . . . . . . . . . . . 35
About SmartSystems . . . . . . . . . . . . . . . . . . . . . . . . . . . . . . . . . . . . . . . . . . . . . 35
3 Use the Phone . . . . . . . . . . . . . . . . . . . . . . . . . . . . . . . . . . . . . . . . . . 37
About the Phone . . . . . . . . . . . . . . . . . . . . . . . . . . . . . . . . . . . . . . . . . . . . . . . . . . . . . . . . . . . . . . . . .38
Activate the UMTS Phone . . . . . . . . . . . . . . . . . . . . . . . . . . . . . . . . . . . . . . . . . . . . . . . . 38
About Worldwide UMTS . . . . . . . . . . . . . . . . . . . . . . . . . . . . . . . . . . . . . . . . . 42
Activate the CDMA Phone . . . . . . . . . . . . . . . . . . . . . . . . . . . . . . . . . . . . . . . . . . . . . . . . 42
Make a Phone Call . . . . . . . . . . . . . . . . . . . . . . . . . . . . . . . . . . . . . . . . . . . . . . . . . . . . . . . . . . . . . . . 43
Make an Emergency Phone Call . . . . . . . . . . . . . . . . . . . . . . . . . . . . . . . . . . . . . . . . . . . . . . . . . . . 43
Configure Phone Sounds . . . . . . . . . . . . . . . . . . . . . . . . . . . . . . . . . . . . . . . . . . . . . . . . . . . . . . . . . 44
How to Add and Switch Between Network Carriers . . . . . . . . . . . . . . . . . . . . . . . . . . . . . . . . . 45 Enable Automatic Configuration of Carrier Settings . . . . . . . . . . . . . . . . . . . . . . . . 45 Switch Carriers Using Intermec Settings . . . . . . . . . . . . . . . . . . . . . . . . . . . . . . . . . . . 45
iv |
CN51 Mobile Computer User Manual |
4 Use the Camera. . . . . . . . . . . . . . . . . . . . . . . . . . . . . . . . . . . . . . . . . 47
About the Color Camera. . . . . . . . . . . . . . . . . . . . . . . . . . . . . . . . . . . . . . . . . . . . . . . . . . . . . . . . . . 48
How to Take Pictures and Record Videos. . . . . . . . . . . . . . . . . . . . . . . . . . . . . . . . . . . . . . . . . . . 48 Take a Picture . . . . . . . . . . . . . . . . . . . . . . . . . . . . . . . . . . . . . . . . . . . . . . . . . . . . . . . . . . . 49 Record a Video. . . . . . . . . . . . . . . . . . . . . . . . . . . . . . . . . . . . . . . . . . . . . . . . . . . . . . . . . . . 49 Save Pictures and Videos to a microSD Card. . . . . . . . . . . . . . . . . . . . . . . . . . . . . . . . 50 Configure or Create Camera Scenes . . . . . . . . . . . . . . . . . . . . . . . . . . . . . . . . . . . . . . .50
Scene Settings . . . . . . . . . . . . . . . . . . . . . . . . . . . . . . . . . . . . . . . . . . . . . . . . . . . 50 Configure Camera Settings for Pictures and Videos . . . . . . . . . . . . . . . . . . . . . . . . . 53 Camera Settings for Pictures and Videos . . . . . . . . . . . . . . . . . . . . . . . . . . . 54
How To Read Bar Codes With the Camera. . . . . . . . . . . . . . . . . . . . . . . . . . . . . . . . . . . . . . . . . . 65 Enable or Disable Reading Bar Codes With the Camera . . . . . . . . . . . . . . . . . . . . . 65 Read Bar Codes With the Camera . . . . . . . . . . . . . . . . . . . . . . . . . . . . . . . . . . . . . . . . . 66 Camera Settings for Reading Bar Codes . . . . . . . . . . . . . . . . . . . . . . . . . . . . . . . . . . . . 66
How to Perform Document Capture with the Camera . . . . . . . . . . . . . . . . . . . . . . . . . . . . . . . 68 Enable or Disable Document Capture with the Camera . . . . . . . . . . . . . . . . . . . . . 69 Perform Document Capture with the Camera . . . . . . . . . . . . . . . . . . . . . . . . . . . . . . 69 Camera Settings for Document Imaging . . . . . . . . . . . . . . . . . . . . . . . . . . . . . . . . . . . 70
5 Use GPS . . . . . . . . . . . . . . . . . . . . . . . . . . . . . . . . . . . . . . . . . . . . . . . 73
About the Integrated GPS on Your Computer . . . . . . . . . . . . . . . . . . . . . . . . . . . . . . . . . . . . . . 74 Use the GPSID Installed on the Computer . . . . . . . . . . . . . . . . . . . . . . . . . . . . . . . . . 74 About the GPS Module Operating Modes . . . . . . . . . . . . . . . . . . . . . . . . . . . . . . . . . . 75 Improve GPS Performance on the Computer . . . . . . . . . . . . . . . . . . . . . . . . . . . . . . . 76
6 Configure the Computer . . . . . . . . . . . . . . . . . . . . . . . . . . . . . . . . . 77
How to Configure the Computer . . . . . . . . . . . . . . . . . . . . . . . . . . . . . . . . . . . . . . . . . . . . . . . . . . 78
About Intermec Settings on the Computer . . . . . . . . . . . . . . . . . . . . . . . . . . . . . . . . . . . . . . . . . 78 Start Intermec Settings . . . . . . . . . . . . . . . . . . . . . . . . . . . . . . . . . . . . . . . . . . . . . . . . . . . 78 About the Structure of Intermec Settings . . . . . . . . . . . . . . . . . . . . . . . . . . . . . . . . . . 79 How to Navigate in Intermec Settings. . . . . . . . . . . . . . . . . . . . . . . . . . . . . . . . . . . . . . 84 Enable Intermec Settings Password . . . . . . . . . . . . . . . . . . . . . . . . . . . . . . . . . . . . . . . .85 Restore Default Settings . . . . . . . . . . . . . . . . . . . . . . . . . . . . . . . . . . . . . . . . . . . . . . . . . . 85
Configure the Computer Remotely with SmartSystems . . . . . . . . . . . . . . . . . . . . . . . . . . . . . 86
CN51 Mobile Computer User Manual |
v |
About Network Communications . . . . . . . . . . . . . . . . . . . . . . . . . . . . . . . . . . . . . . . . . . . . . . . . . 86 Configure 802.11 Radio Communications . . . . . . . . . . . . . . . . . . . . . . . . . . . . . . . . . 86 About Bluetooth Communications . . . . . . . . . . . . . . . . . . . . . . . . . . . . . . . . . . . . . . . .87 Turn On the Bluetooth Radio. . . . . . . . . . . . . . . . . . . . . . . . . . . . . . . . . . . . . 88 Connect a Bluetooth Scanner . . . . . . . . . . . . . . . . . . . . . . . . . . . . . . . . . . . . . 89 Create a Configuration Bar Code with EasySet . . . . . . . . . . . . . . . . . . . . . 89 Connect to a Bluetooth Printer. . . . . . . . . . . . . . . . . . . . . . . . . . . . . . . . . . . . 90 Connect a Bluetooth Audio Device . . . . . . . . . . . . . . . . . . . . . . . . . . . . . . . . 92
About Serial and USB Communications . . . . . . . . . . . . . . . . . . . . . . . . . . . . . . . . . . . 93
About Wireless Security . . . . . . . . . . . . . . . . . . . . . . . . . . . . . . . . . . . . . . . . . . . . . . . . . . . . . . . . . . 93 Load a Certificate . . . . . . . . . . . . . . . . . . . . . . . . . . . . . . . . . . . . . . . . . . . . . . . . . . . . . . . . 94 How to Make Your Security Choice . . . . . . . . . . . . . . . . . . . . . . . . . . . . . . . . . . . . . . . .95 Select a Funk Security Profile . . . . . . . . . . . . . . . . . . . . . . . . . . . . . . . . . . . . . . . . . . . . . 95
Configure WPA or WPA2 Enterprise (802.1x) Security
with Funk Security . . . . . . . . . . . . . . . . . . . . . . . . . . . . . . . . . . . . . . . . . . . . 96 Configure WPA or WPA2 Personal (PSK) Security
with Funk Security . . . . . . . . . . . . . . . . . . . . . . . . . . . . . . . . . . . . . . . . . . . . 96 Configure 802.1x Security with Funk Security . . . . . . . . . . . . . . . . . . . . . . 97 Configure LEAP Security with Funk Security . . . . . . . . . . . . . . . . . . . . . . . 98 Configure Static WEP Security with Funk Security. . . . . . . . . . . . . . . . . . 98 Use Open (No Security) Associations with Funk Security . . . . . . . . . . . . 99
Select Microsoft as Your Security Choice . . . . . . . . . . . . . . . . . . . . . . . . . . . . . . . . . . . 99 Configure WPA or WPA2 Enterprise (802.1x) Security
with Microsoft Security . . . . . . . . . . . . . . . . . . . . . . . . . . . . . . . . . . . . . . .100 Configure WPA or WPA2 Personal (PSK) Security
with Microsoft Security . . . . . . . . . . . . . . . . . . . . . . . . . . . . . . . . . . . . . . .100 Configure 802.1x Security with Microsoft Security. . . . . . . . . . . . . . . . .101 Configure Static WEP Security with Microsoft Security . . . . . . . . . . . .102 Use Open (No Security) Associations with Microsoft Security. . . . . . .102
7 Manage the Computer . . . . . . . . . . . . . . . . . . . . . . . . . . . . . . . . . . 105
How to Manage the Computer in Your Network . . . . . . . . . . . . . . . . . . . . . . . . . . . . . . . . . . .106 How to Manage the Computer Using CloneNGo . . . . . . . . . . . . . . . . . . . . . . . . . .106 How to Manage the Computer Using SmartSystems . . . . . . . . . . . . . . . . . . . . . . .106
How to Develop and Install Applications. . . . . . . . . . . . . . . . . . . . . . . . . . . . . . . . . . . . . . . . . .107 How To Package Your Application. . . . . . . . . . . . . . . . . . . . . . . . . . . . . . . . . . . . . . . .107 Install Applications with SmartSystems. . . . . . . . . . . . . . . . . . . . . . . . . . . . . . . . . . .108 Install Applications with Microsoft Synchronization Software . . . . . . . . . . . . . .108 Install Applications with a microSD Card . . . . . . . . . . . . . . . . . . . . . . . . . . . . . . . . .109 How to Launch Applications Automatically . . . . . . . . . . . . . . . . . . . . . . . . . . . . . . .109
vi |
CN51 Mobile Computer User Manual |
How to Update the System Software . . . . . . . . . . . . . . . . . . . . . . . . . . . . . . . . . . . . . . . . . . . . . .109 Update the Computer with SmartSystems . . . . . . . . . . . . . . . . . . . . . . . . . . . . . . . .110 Update the Computer with a microSD Card . . . . . . . . . . . . . . . . . . . . . . . . . . . . . . .111
8 Troubleshoot and Maintain the Computer . . . . . . . . . . . . . . . . . .113
About the Intermec Dashboard . . . . . . . . . . . . . . . . . . . . . . . . . . . . . . . . . . . . . . . . . . . . . . . . . .114
About Troubleshooting the Computer . . . . . . . . . . . . . . . . . . . . . . . . . . . . . . . . . . . . . . . . . . . .115 Wi-Fi Connection Problems. . . . . . . . . . . . . . . . . . . . . . . . . . . . . . . . . . . . . . . . . . . . . .115 Check Wi-Fi Network Status . . . . . . . . . . . . . . . . . . . . . . . . . . . . . . . . . . . . . . . . . . . . .116 802.1x Security Problems . . . . . . . . . . . . . . . . . . . . . . . . . . . . . . . . . . . . . . . . . . . . . . . .117 Troubleshoot the Scanner with Scan Diagnostics . . . . . . . . . . . . . . . . . . . . . . . . . .119 Problems Reading Bar Codes. . . . . . . . . . . . . . . . . . . . . . . . . . . . . . . . . . . . . . . . . . . . .119 Problems Using the Computer . . . . . . . . . . . . . . . . . . . . . . . . . . . . . . . . . . . . . . . . . . .121
Call Product Support. . . . . . . . . . . . . . . . . . . . . . . . . . . . . . . . . . . . . . . . . . . . . . . . . . . . . . . . . . . .121
Locate Your Configuration Number . . . . . . . . . . . . . . . . . . . . . . . . . . . . . . . . . . . . . .122
Locate Your Operating System Version. . . . . . . . . . . . . . . . . . . . . . . . . . . . . . . . . . . .122
How to Restart the Computer . . . . . . . . . . . . . . . . . . . . . . . . . . . . . . . . . . . . . . . . . . . . . . . . . . . .123 Reboot the Computer . . . . . . . . . . . . . . . . . . . . . . . . . . . . . . . . . . . . . . . . . . . . . . . . . . .123 Cold Boot the Computer . . . . . . . . . . . . . . . . . . . . . . . . . . . . . . . . . . . . . . . . . . . . . . . .123 Clean Boot the Computer. . . . . . . . . . . . . . . . . . . . . . . . . . . . . . . . . . . . . . . . . . . . . . . .124
Clean the Computer. . . . . . . . . . . . . . . . . . . . . . . . . . . . . . . . . . . . . . . . . . . . . . . . . . . . . . . . . . . . .125
A Specifications . . . . . . . . . . . . . . . . . . . . . . . . . . . . . . . . . . . . . . . . 127
Physical and Environmental Specifications. . . . . . . . . . . . . . . . . . . . . . . . . . . . . . . . . . . . . . . .128
EA31 Extended Reading Range. . . . . . . . . . . . . . . . . . . . . . . . . . . . . . . . . . . . . . . . . . .130
EA31 Minimum Reading Distances. . . . . . . . . . . . . . . . . . . . . . . . . . . . . . . . . . . . . . .131
EA31 Typical Reading Distances . . . . . . . . . . . . . . . . . . . . . . . . . . . . . . . . . . . . . . . . .132
EA30 Extended Reading Range. . . . . . . . . . . . . . . . . . . . . . . . . . . . . . . . . . . . . . . . . . .134
EA30 Minimum Reading Distances. . . . . . . . . . . . . . . . . . . . . . . . . . . . . . . . . . . . . . .135
EA30 Typical Reading Distances . . . . . . . . . . . . . . . . . . . . . . . . . . . . . . . . . . . . . . . . .136
B Keypads and Keystrokes . . . . . . . . . . . . . . . . . . . . . . . . . . . . . . . .137
Standard Characters . . . . . . . . . . . . . . . . . . . . . . . . . . . . . . . . . . . . . . . . . . . . . . . . . . . . . . . . . . . .138
CN51 Keypads and Keystrokes . . . . . . . . . . . . . . . . . . . . . . . . . . . . . . . . . . . . . . . . . . .138
CN51 Mobile Computer User Manual |
vii |
viii |
CN51 Mobile Computer User Manual |

Before You Begin
Before You Begin
This section provides you with safety information, technical support information, and sources for additional product information.
Safety Information
Your safety is extremely important. Read and follow all warnings and cautions in this document before handling and operating Intermec equipment. You can be seriously injured, and equipment and data can be damaged if you do not follow the safety warnings and cautions.
This section explains how to identify and understand dangers, warnings, cautions, and notes that are in this document. You may also see icons that tell you when to follow ESD procedures and when to take special precautions for handling optical parts.
A caution alerts you to an operating procedure, practice, condition, or statement that must be strictly observed to prevent equipment damage or destruction, or corruption or loss of data.
Note: Notes either provide extra information about a topic or contain special instructions for handling a particular condition or set of circumstances.
Global Services and Support
Warranty Information
To understand the warranty for your Intermec product, visit the
Intermec web site at www.intermec.com and click Support >
Returns and Repairs > Warranty.
Disclaimer of warranties: The sample code included in this document is presented for reference only. The code does not necessarily represent complete, tested programs. The code is provided “as is with all faults.” All warranties are expressly disclaimed, including the implied warranties of merchantability and fitness for a particular purpose.
CN51 Mobile Computer User Manual |
ix |
Before You Begin
Web Support
Visit the Intermec web site at www.intermec.com to download our current manuals (in PDF).
Visit the Intermec technical knowledge base (Knowledge Central) at www.intermec.com and click Support > Knowledge Central to review technical information or to request technical support for your Intermec product.
Send Feedback
Your feedback is crucial to the continual improvement of our documentation. To provide feedback about this manual, please contact the Intermec Technical Communications department directly at TechnicalCommunications@intermec.com.
Telephone Support
In the U.S.A. and Canada, call 1-800-755-5505.
Outside the U.S.A. and Canada, contact your local Intermec representative. To search for your local representative, from the Intermec web site, click About Us > Contact Us.
Who Should Read This Manual
This user manual is for the person who is responsible for installing, configuring, and maintaining the CN51.
This document provides you with information about the features of the CN51, and how to install, configure, operate, maintain, and troubleshoot it.
Before you work with the CN51, you should be familiar with your network and general networking terms, such as IP address.
Related Documents
The Intermec web site at www.intermec.com contains our documents (as .pdf files) that you can download for free.
1 Visit the Intermec web site at www.intermec.com.
2 Click the Products tab.
x |
CN51 Mobile Computer User Manual |
Before You Begin
3Using the Products menu, navigate to your product page. For example, to find the CN51 computer product page, click
Computers > Handheld Computers > CN51.
4 Click the Manuals tab.
If your product does not have its own product page, click Support >
Manuals. Use the Product Category, the Product Family, and
Product menus to find your documentation.
Patent Information
There are U.S. and foreign patents pending.
CN51 Mobile Computer User Manual |
xi |
Before You Begin
xii |
CN51 Mobile Computer User Manual |

1
About the Computer Features
This chapter introduces the CN51 Mobile Computer with Windows® Embedded Handheld 6.5 operating system. Use this chapter to learn about basic computer features and functions, as well as the available accessories for it.
1
Chapter 1 — About the Computer Features
About the CN51 Mobile Computer
The Intermec CN51 Mobile Computer is the class-leading mid-range rugged mobile computer that empowers mobile workers with the resources to satisfy and delight customers efficiently today and earn new business tomorrow.
The CN51 is available with the following features:
•Windows Embedded Handheld 6.5 operating system
•1.5 GHz dual-core multi-engine processor with extended battery life
•1 GB DRAM, 16 GB Flash memory
•Large, outdoor-viewable WVGA display with full-size keypad
•Resistive touch panel display
•Bluetooth radio
•UMTS/HSPA+/CDMA or UMTS/HSPA+ WAN radio options; both options support voice and data
•IEEE 802.11a/b/g/n on computers without a cellular radio, IEEE 802.11b/g/n on computers with a cellular radio
•Customer-accessible microSD slot for removable memory cards (up to 32 GB)
•High-performance EA30 or EA31 area imager options, for reading bar codes and capturing signatures
•HTML5 support
•Integrated GPS receiver (with WAN radio option)
•Accelerometer that can automatically sense the angle of the computer and rotate the display between portrait and landscape
•5-megapixel color camera
2 |
CN51 Mobile Computer User Manual |

4DBO CVUUPO
/PUJGJDBUJPO -&%
1PXFS CVUUPO
CN51 Front View
#BUUFSZ SFMFBTF UBC
CN51 Back View
Chapter 1 — About the Computer Features
4QFBLFS 3FBEZ UP 8PSL -&% 


 (PPE SFBE -&%
7PMVNF CVUUPOT
#BUUFSZ TUBUVT -&%
.JDSPQIPOF
$BNFSB
*NBHFS
3FDPSE CVUUPO
4JEF TDBO
CVUUPO
CN51 Mobile Computer User Manual |
3 |

Chapter 1 — About the Computer Features
About Language Provisioning
You are prompted to select a language provision when the computer starts for the first time. It may take as little as three minutes to load your language. Once loaded, your selected language persists through all boot scenarios (warm, cold, or clean).
Make sure you select the correct language before you tap Provision. If you need to change the language provisioning, you must reinstall the operating system and restart the computer. When the computer restarts, select your new language.
About the Battery
The CN51 uses a Model 1015AB01 battery as its main power source. The battery has a 14.4 Watt hour capacity. Several factors determine the life of your battery, such as display brightness, display timeout, input devices, extreme temperatures, and your usage.
Fully charge the battery before you use the CN51. When you change the battery, the computer automatically goes into a power-off state and then cold boots.
Caution: The battery used in this device may present a fire or chemical burn hazard if it is mistreated. Do not disassemble it, heat it above 100 °C (212 °F) or incinerate it. Dispose of used batteries promptly. Keep away from children.
Contact your Intermec representative for replacement batteries.
Charge the Battery
Make sure you fully charge the battery (Model 1015AB01) before you use your CN51. You can charge the battery before or after you install it in the CN51. A fully discharged battery charges in approximately 6 hours.
•Insert the battery into a quad battery charger, a single dock, or a multidock, or attach external power to the CN51 with the battery installed.
The battery is fully charged when the battery status LED shows a steady green.
4 |
CN51 Mobile Computer User Manual |
Chapter 1 — About the Computer Features
Use these Intermec accessories to charge the CN51 batteries:
•Quad Battery Charger (Model AC21)
•Charge-Only Multidock (Model AD23)
•Ethernet Multidock (Model AD24)
•Single Dock (Model AD27)
•Vehicle Power Adapter (Model AE36)
•AC Power Adapter (Model AE37)
Change the Battery
When the battery in the CN51 has a low charge, replace it with a charged battery.
Note: When you remove a battery from the computer, Intermec recommends that you install a charged battery within one minute to maintain your network connections.
1 Save your files and close all open applications.
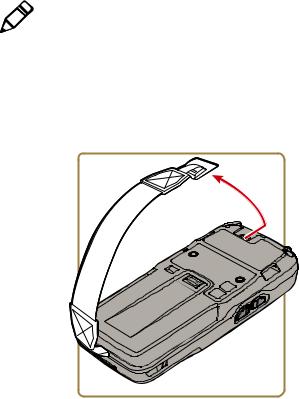
2 Press the Power button, and then select Hibernate from the menu.
3If necessary, disconnect the handstrap from the top of the computer.
CN51 Mobile Computer User Manual |
5 |
Chapter 1 — About the Computer Features
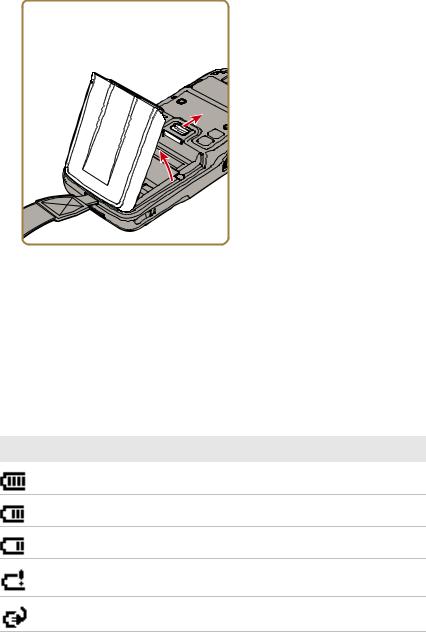
4Push forward on the battery release tab until the battery releases, and then lift the battery away from the computer.
5Insert the bottom of a fully charged battery into the CN51, and press down on the top until it clicks into place.
6 If necessary, reattach the handstrap.
About Battery Status
Use the battery icon on the Title bar to view the power status of the battery.
Battery Status Icons
Icon Status
Battery is fully charged.
Battery has medium charge.
Battery is low. You need to change the battery soon.
Battery is critically low. You need to change the battery now or place the computer in a charging dock immediately.
Battery is charging.
6 |
CN51 Mobile Computer User Manual |
Chapter 1 — About the Computer Features
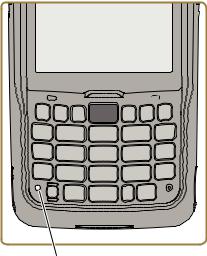
The Battery status LED below the computer screen indicates the charging status of the battery.
#BUUFSZ TUBUVT -&%
Battery LED States
LED State |
Description |
|
|
Steady green |
The computer is connected to a charger and the |
|
battery is more than 95% charged. |
|
|
Blinking green |
The computer is connected to a charger and the |
|
battery is between 60% and 95% charged. |
|
|
Steady red |
The computer is connected to a charger and the |
|
battery is less than 60% charged. |
|
|
Blinking red |
The battery is very low. The computer will soon go |
|
into Suspend mode. Charge or replace the battery. |
|
|
Amber |
There is a battery error. The battery is not charging |
|
because it is missing, faulty, or outside the allowable |
|
charging temperature range. If it is outside the |
|
charging temperature range, charging will resume |
|
when the battery temperature returns to the |
|
acceptable range of 0 °C to 45 °C (32 °F to 113 °F). |
|
|
Off |
No battery is installed. The CN51 does not turn on if |
|
no battery is installed. The battery is not critically low, |
|
and the CN51 is not connected to an external power |
|
source. |
|
|
CN51 Mobile Computer User Manual |
7 |
Chapter 1 — About the Computer Features
About Battery Life and Conservation
Batteries that are stored outside the computer for long periods of time slowly discharge. Intermec recommends storing the battery in a charger to maintain battery performance.
Battery Conservation Tips
When You Want to: |
Do this to Save Battery Power: |
|
|
Use the computer and the low |
• Connect the computer to an external |
battery status icon appears or the |
power source. |
battery light turns on. |
• Or, save your data, press the Power |
|
button, and select Hibernate. After |
|
the computer turns off, remove the |
|
battery and insert a fully charged |
|
battery. |
|
|
Stop using the computer for 5 |
Make sure that the low battery status icon |
minutes or longer. |
is not on the screen and the battery status |
|
LED is not on. Press the Power button |
|
and select Suspend to suspend the |
|
computer. |
|
If you have enabled the Sleep face down |
|
feature in Intermec Settings, the CN51 |
|
automatically suspends when you lay the |
|
computer face down. |
|
|
Store the computer for more than |
• If you are storing the computer for a |
a day. |
few days, like over the weekend, install |
|
a charged battery or connect the |
|
computer to a power source. |
|
• If you are storing the computer for |
|
longer, remove and charge the battery, |
|
and then store both the battery and |
|
computer in a cool location. Do not |
|
place the charged battery in the |
|
computer, which runs the battery |
|
down over time even when the |
|
computer is not in use. |
|
• If you store the battery for several |
|
months, recharge the battery to keep it |
|
at peak performance. |
|
|
Store the battery outside the |
Store the battery in a charger. |
computer. |
|
|
|
8 |
CN51 Mobile Computer User Manual |
Chapter 1 — About the Computer Features
About the Status LEDs
The status LEDs turn on, turn off, or blink to indicate a specific activity on your computer.


Status LED Locations
Main Status LED Descriptions
Callout |
LED |
Color |
Description |
|
|
|
|
1 |
Notification |
Orange |
Windows Mobile 6.5 notification. |
|
|
|
|
2 |
Good Read |
Green |
Good read of a bar code. |
|
|
|
|
|
|
Blinking |
Bad read of a bar code. |
|
|
red |
|
|
|
|
|
|
|
Blinking |
The data collection engine is |
|
|
green |
processing or starting up. |
|
|
|
|
CN51 Mobile Computer User Manual |
9 |
Chapter 1 — About the Computer Features
Main Status LED Descriptions (Continued)
Callout |
LED |
Color |
Description |
|
|
|
|
2 |
Intermec |
Blue |
If Intermec Terminal Emulator (ITE) |
|
Ready-to-Work |
|
is installed, the application is |
|
™ indicator |
|
running and is connected to the |
|
|
|
host. |
|
|
|
If you do not have ITE, you can |
|
|
|
configure the Ready-to-Work |
|
|
|
indicator to turn on or off to |
|
|
|
indicate a healthy state. |
|
|
|
|
|
|
Blinking |
ITE is running but not connected to |
|
|
blue |
the host. The computer is unhealthy. |
|
|
|
|
|
|
Off |
ITE is not installed or not running. |
|
|
|
The computer is healthy. |
|
|
|
|
3 |
Battery status |
Steady |
The computer is connected to a |
|
|
green |
charger and the battery is more than |
|
|
|
95% charged. |
|
|
|
|
|
|
Blinking |
The computer is connected to a |
|
|
green |
charger and the battery is between |
|
|
|
60% and 95% charged. |
|
|
|
|
|
|
Steady red The computer is connected to a |
|
|
|
|
charger and the battery is charging. |
|
|
|
|
|
|
Blinking |
The battery is very low, and the |
|
|
red |
computer will go into Suspend mode |
|
|
|
soon. Charge or replace the battery. |
|
|
|
|
|
|
Amber |
There is a battery error. The battery |
|
|
|
is not charging because it is missing, |
|
|
|
faulty, or outside the allowable |
|
|
|
charging temperature range. If it is |
|
|
|
outside the charging temperature |
|
|
|
range, charging will resume when |
|
|
|
the battery temperature returns to |
|
|
|
the acceptable range of 0 °C to 45 °C |
|
|
|
(32 °F to 113 °F). |
|
|
|
|
|
|
Off |
The computer is not on external |
|
|
|
power and the battery is operating |
|
|
|
normally. |
|
|
|
|
10 |
CN51 Mobile Computer User Manual |
Chapter 1 — About the Computer Features
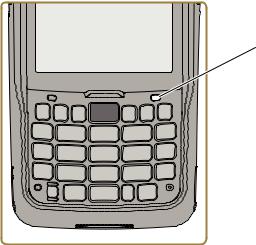
Location of Orange and Green Key LEDs
Orange and Green Key Status LEDs
Callout |
LED |
Color |
Description |
|
|
|
|
4 |
Orange/green key |
Orange or |
When the LED is orange, the |
|
status |
green |
Orange shift plane is enabled. |
|
|
|
You can type characters or |
|
|
|
access functions printed in |
|
|
|
orange on the keypad. |
|
|
|
When the LED is green, the |
|
|
|
Green shift plane is enabled. |
|
|
|
You can type characters or |
|
|
|
access functions printed in |
|
|
|
green on the keypad. |
|
|
|
|
CN51 Mobile Computer User Manual |
11 |
Chapter 1 — About the Computer Features
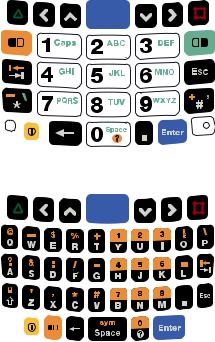
About the Keypad
The CN51 comes with either a numeric keypad or a QWERTY keypad:
•The numeric keypad is for applications that require mainly numeric data. This keypad also lets you enter special characters, including the alphabet, by pressing color-coded key sequences.
•The QWERTY keypad is designed for applications that require primarily alphabetic data. This keypad also lets you enter special characters by pressing color-coded key sequences.
CN51 Numeric Keypad
CN51 QWERTY Keypad
12 |
CN51 Mobile Computer User Manual |

Chapter 1 — About the Computer Features
Configure the Keypad Backlight
You can configure the keypad backlight to always turn on, always stay off, or turn on depending on the lighting level of your work environment.
1 Start Intermec Settings.
2 Tap Device Settings > Backlight > Keypad.
3Select the options you want for the keypad backlight:
•Select Always off to prevent the keypad backlight from turning on.
•Select Automatic to turn on the keypad backlight automatically based on the ambient light level.
•Select On With the Display to turn on the keypad backlight only when the display is on. When the CN51 suspends, the keypad backlight turns off to save power.
•Select Always on to turn the keypad backlight on all the time.
4 Tap OK.
About the Color-Coded Keys
Note: The CN51 with QWERTY keypad does not have a green key.
Use the orange  key and the green
  key to access additional characters, symbols, and functions printed on the keypad overlay. After you understand how to use the color-coded keys and key sequences, you can access all of the additional features printed on the keypad overlay.
The default setting for the Green/Orange keys is Press twice to lock. You can also set the keys to Press once to lock if you do not want the Green/Orange keys to lock after pressing them twice. The information in this section assumes that you are using the default setting for the Green/Orange keys lock options. To change the setting for the Green/Orange keys, go to Start > Settings > System > Intermec Settings > Device Settings > Keypad.
CN51 Mobile Computer User Manual |
13 |

Chapter 1 — About the Computer Features
How to Use the Color-Coded Keys
You Want To |
Press |
Example |
|
|
|
|
|
||
Use an orange |
(LED turns on), and then |
On the alphanumeric |
||
character or |
the key with the character or |
keypad, press |
, then |
|
function printed |
function printed above it |
press the M key to type |
||
above a key. |
(LED stays on). |
the number 9. |
|
|
|
|
|
||
Use a green |
(LED turns on), and then |
On the numeric keypad, |
||
character or |
the key with the character or |
press |
, then press 3 |
|
function printed |
function printed above it |
twice to type the letter |
||
above a key. |
(LED stays on). |
“e”. |
|
|
|
|
|
|
|
Unlock the green or |
or once. |
Press |
or |
once to |
orange key. |
|
unlock the key. The LED |
||
turns off.
How to Capitalize Characters on the QWERTY Keypad
If your CN51 has the QWERTY keypad, you can capitalize characters individually, or you can type all capital letters by enabling Caps Lock:
•To capitalize a single character, press the Shift key, and then the character.
•To enable Caps Lock, press  and then press the Shift key.
•When Caps Lock is enabled, press  and then press the Shift key to disable Caps Lock.
How to Capitalize Characters on the Numeric Keypad
If your CN51 has the numeric keypad, you can capitalize characters individually, or you can type all capital letters by enabling Caps Lock:
•To capitalize a single character, press the  key, and then the 1 key. Select the key with the letter you want to capitalize. Press 1 again to return to lowercase letters.
•To enable Caps Lock, press  and then press 1.
•To disable Caps Lock, press 1 again.
14 |
CN51 Mobile Computer User Manual |
Chapter 1 — About the Computer Features
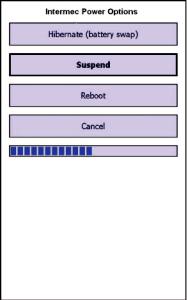
About the Power Button
When you press and release the Power button, the Intermec Power Options screen appears with a list of power options. If you do not select a power options setting, the currently selected action (the button outlined in bold) occurs after the timeout. Hibernate does not appear as an option if the computer is connected to external power.
Use the next table to understand the Intermec Power Options and what settings are available for your computer.
Intermec Power Options
Option |
Description |
|
|
Hibernate (battery swap) |
High power saving mode. The computer |
|
saves the current system state, registry, |
|
and file system and then powers off all |
|
radios and internal devices. You can wake |
|
the computer by pressing the Power |
|
button or connecting the computer to |
|
external power. |
|
|
CN51 Mobile Computer User Manual |
15 |
Chapter 1 — About the Computer Features
Intermec Power Options (Continued)
Option |
Description |
|
|
Suspend |
Medium power saving mode. When on |
|
battery power, Suspend mode saves the |
|
current system state and then turns off |
|
most radios and internal devices. The |
|
WWAN radio remains in a lower power |
|
state and can still receive calls. When the |
|
computer is connected to external power, |
|
Suspend mode turns off the screen but |
|
leaves all radios on. You can wake the |
|
computer by pressing the Power button, |
|
pulling the scanner trigger, or scheduling |
|
an event such as an alarm. If the |
|
computer is on battery power during |
|
Suspend mode, you can also wake the |
|
computer by connecting it to external |
|
power. |
|
|
Reboot |
The computer does not save the current |
|
system state, but the registry and file |
|
systems are saved. The computer shuts |
|
down all running processes and restarts. |
|
|
Cancel |
Cancels the Intermec Power Options |
|
menu. |
|
|
Screen Off |
Lowest power saving mode. The screen |
|
turns off, but the radios and internal |
|
devices stay on. Tap the screen to turn it |
|
back on. |
|
|
Shutdown |
Very high power saving mode. The |
|
computer turns off everything. You must |
|
press Power or apply external power to |
|
restart the computer. |
|
|
If you are using WPA or 802.1x security, the computer may need to reauthenticate before it resumes your application. The Real Time Clock (RTC) will persist through all of the power options as long as it receives power from the Real Time Clock battery.
The Intermec Power Options screen is customizable. You can use Intermec Settings to determine which options are available to end users, the timeout until the default choice is selected, the default action if no option is selected, or to disable the Power Options Screen.
16 |
CN51 Mobile Computer User Manual |
Chapter 1 — About the Computer Features
About the Screen Backlight
The display has an ambient light sensor that automatically adjusts the backlight intensity to conserve power and ensure the display is readable. You can set the backlight intensity levels as needed for your environment.
Configure the Screen Backlight Brightness
Use Intermec Settings to configure the brightness of the screen backlight.
1 Tap Start > Settings > System > Intermec Settings.
2 Tap Device Settings > Backlight > Display.
3 Select a brightness level. The default value is +1.
4 Tap OK and exit Intermec Settings.
About the Audio Features
Your mobile computer has a speaker, a microphone, and several software tools for configuring the volume of sounds.
Adjust the Speaker Volume
The computer volume includes sounds you hear when you tap the screen or scan bar codes with a scanner.
1 Tap the Title bar at the top of the screen.
2 Tap the Volume icon  .
.
3Use your stylus to adjust the volume slider, or use the side volume buttons to change the volume setting.
4 Tap OK.
CN51 Mobile Computer User Manual |
17 |
Chapter 1 — About the Computer Features
About the Imager
The computer has an EA30 or EA31 area imager that can read 1D and 2D bar code symbologies, composite symbologies, and postal codes. You can also use the imager to take pictures as if it were a camera.
You can also use Bluetooth communications to connect the computer to cordless scanners, such as the SF51 and SR61.
Read Bar Codes with the Imager
All of the imagers support omni-directional scanning and include an aiming beam to help you correctly frame bar codes.
Before you start reading bar codes, use Intermec Settings to:
•enable only the bar code symbologies that you need.
•choose the predefined imager mode that best suits your environment.
Predefined Mode |
For Scanning |
|
|
1D |
Only 1D labels. |
|
|
1D and 2D Standard |
(Default) All types of bar code labels. |
|
|
1D and 2D Bright Environment |
In high ambient light, such as outdoors |
|
in sunshine. |
|
|
1D and 2D Reflective Surface |
Glossy Labels. |
|
|
18 |
CN51 Mobile Computer User Manual |
Loading...